The Beta Account Center is temporarily unavailable
×
We are experiencing intermittent network issues affecting Everlasting and Excelsior


oedipus_tex
-
Posts
2652 -
Joined
-
Last visited
-
Days Won
4
Content Type
Profiles
Forums
Events
Store
Articles
Patch Notes
Everything posted by oedipus_tex
-
 I tried a revised version of Elec/Psi rerolled with the APP pool as /Soul. I also refocused some of the attacks on some extra procs to boost kill times a bit more. It went faster. The drop in safety was also notable. This time, I didn't eat any inspirations unless they were absolutely needed (which they were, a few times,a s noted below). At one point I dropped in on a group and realized only after the fact that the AoE hold wasn't on my bar. 😮 I did live through it, but you can see in real time what my thought process when in that moment when I went hunting thru the menus for it lol. I also realized after the fact that the build was just shy of permadom. Domination dropped towards the end, I tried to power thru as best I could. Still that final battle versus Trapdoor was a complete mezz. I got mezzed by the pack by the door, someone didn't die, but did have to eat a few inspirations to come back. This build has Gremlins, for the bonuses mainly. They survived for a while, which is what tells me conditions in this mission are nothing like most difficult content. Gremlins in a typical radio mission won't last past the first x8+4 spawn. Depending on where you stop or start the timer and what you consider complete, I'd say this was around a 9:00 to 9:30 run. Keeping in mind once again that the player behind this has never gotten a medal on the ski chalet slopes.
-
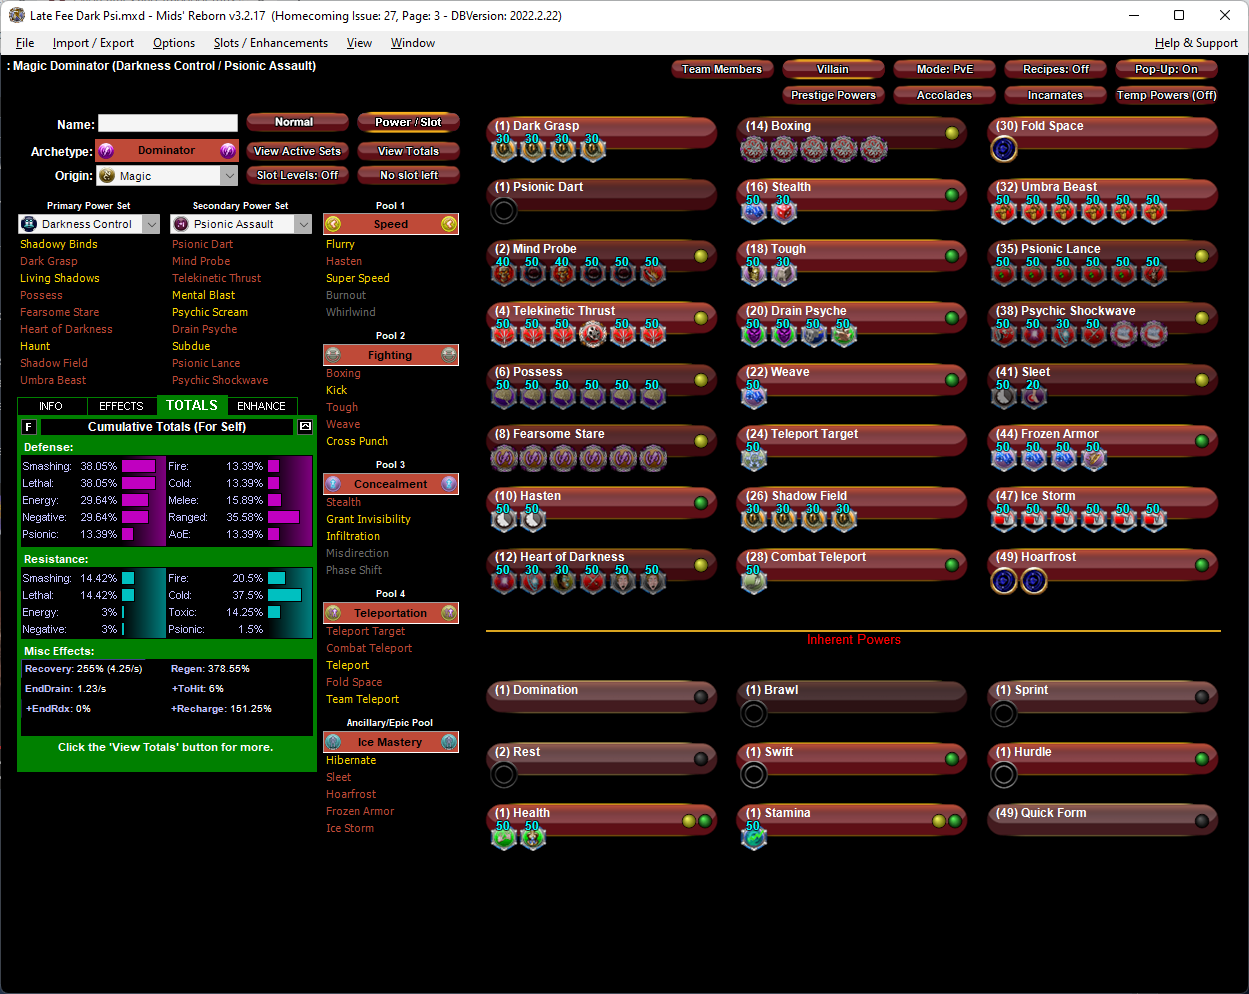
So I tried Darl/Psi/Ice. It came in around 9:30 depending on where you start and stop the clock. I didn't double back to make sure every single thing died so I may have left behind too many enemies to make it a suitable run. I'm positive a person better equipped with a "speed run" mentality could get through this faster. I ended up using inspirations. It felt too unnatural not to. I realize armored characters often don't use them in their testing. But armored characters come from a different world entirely, where they don't have to play moment by moment and honestly could probably still finish the mission after pouring a pitcher of water on the keyboard. I think this run really shows off some of the big challenges Dominators face in the "real" game. Mobs just don't tend to stand around waiting to get hit by a big mezz. One real issue here is that a more logical thing to do would be to aggro enemies at the tops of tunnels and then leap down rather than fight and then leap, but the nature of controls works in reverse of that. Interestingly, due to the nature of this mission, the Elec/Psi felt much safer than the Dark/Psi. Partly that was because that build is more familiar to me, but also because of Electric's drains and sleep patches adding some security. Dark/Psi killed the packs a lot faster though, in part due to being able to use Sleet (since there's no Sleep to worry about interrupting) and more proccing on the attacks. I know from experience that's just the nature of this mission though. Real life encounters aren't built the way this is, and hugging up close to a bunch of IDF is likely to get a robot dropped on your head. I had the Dom ATO slotted in Fearsome Stare here like it is on my other Dark builds but with this being a Drain Psyche build the proc may be going wasted there. The build could use some overall tuning to balance its cone/pbaoe approach. I actually died twice trying this too. This is a video of the third run. The second death was mostly just latency. But the overall pressure is definitely harsher with Dark/Psi. This was the build used:
-
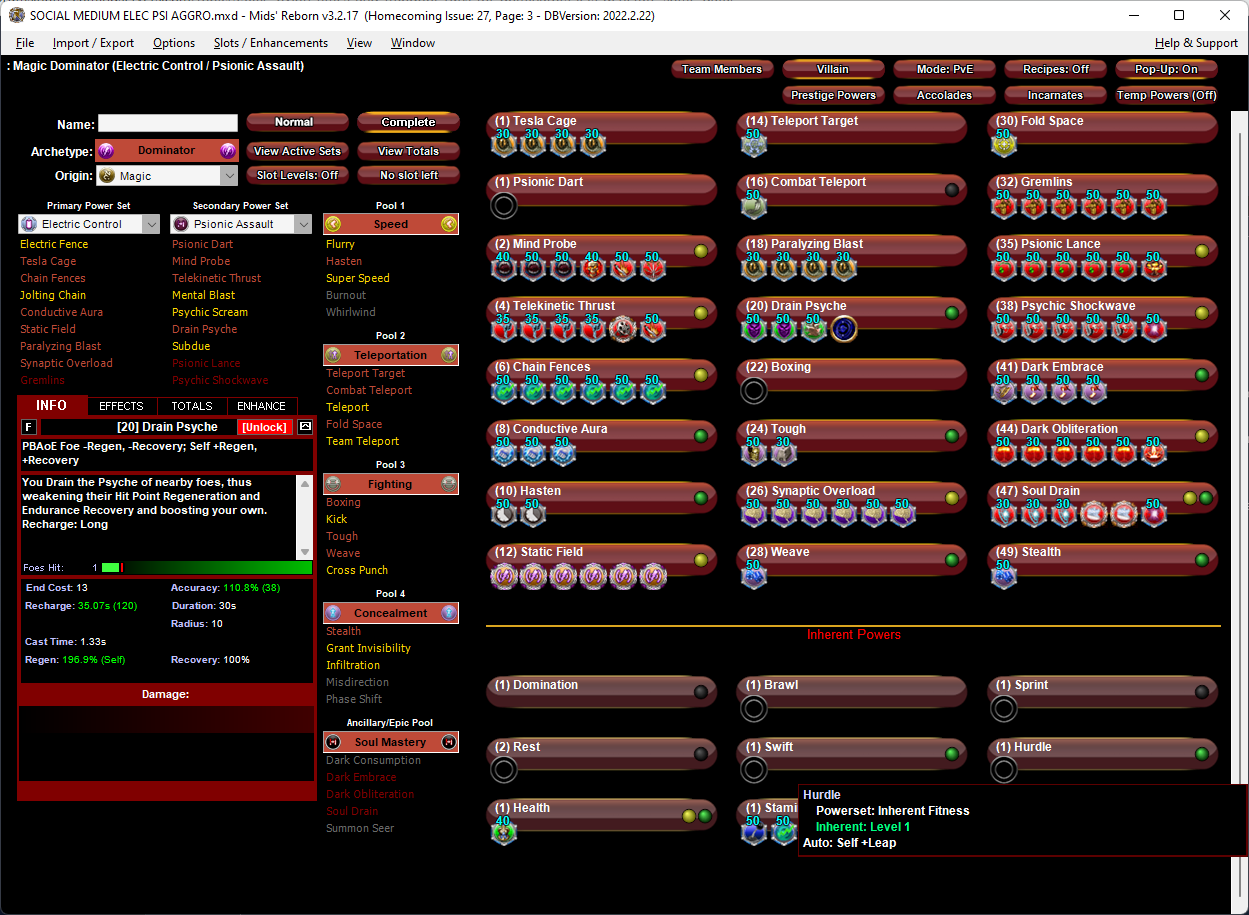
I ran Trapdoor on my Elec/Psi/Psi main and came up with a completion time over 11 minutes, almost 12 minutes depending on how you measure it. Video here for any who want to see specifics: Mind you, this is a build intentionally built to be able to tank through difficult-ish spawns without taking melee or ranged damage, hence relatively high stats to both but not optimized for procs. Psi Assault is known to be a lowish damage set, so the numbers aren't that surprising to me. Speed running is particularly not a feature of this particular combo. I have no real alpha breaker other than the Sleep patch. Dropping in on enemies from above with SF running means bracing for an immediate counter attack. However, if even some Blasters seem to be running and surviving this mission it should theoretically be okay. I wasn't sure if the intention was to use iPowers and inspirations or not. I completely forgot about that limitation at the start and used a bunch, then later on remembered and stopped, so it;s not a fair assessment. I'm not sure how much the inspirations really helped or hurt though, until the final battle... Realizing I was waaaaaay behind the clock, for the last battle I did something that makes no sense for a solo Electric Dominator and rushes the Elite Boss, pulling the mob behind me. Nothing about the tactic made sense except in the context of timers, though perhaps it simulates better what happens in team play. Anyway, with no controls on him, Defenses ebbed and a pack of enemies chasing me, Trapdoor opened fired and *damn near* killed me, even with the Defenses I still had. At that point I had to eat two greens or I was out. I was able to get the fight under control without too much trouble. You can see how long it takes to burn the elite boss down rotating Psi Assault's three best Single Target Attacks. His endurance is drained, and he is held, so few chances of him breaking free and hurting me, but definiitely not good conditions for speed running something. I don't have a Mid's build that's a perfect match to the live build, but it should be fairly close to this: This Villain build was built using Mids Reborn 3.2.17 https://github.com/LoadedCamel/MidsReborn Click this DataLink to open the build! Level 50 Magic Dominator Primary Power Set: Electric Control Secondary Power Set: Psionic Assault Power Pool: Speed Power Pool: Teleportation Power Pool: Fighting Power Pool: Concealment Ancillary Pool: Psionic Mastery Villain Profile: Level 1: Tesla Cage -- BslGaz-Acc/Hold(A), BslGaz-Acc/Rchg(17), BslGaz-Rchg/Hold(25), BslGaz-EndRdx/Rchg/Hold(31) Level 1: Psionic Dart -- SprWntBit-Rchg/SlowProc(A), SprWntBit-Dmg/EndRdx/Acc/Rchg(43), SprWntBit-Acc/Dmg(45), SprWntBit-Dmg/Rchg(46), SprWntBit-Acc/Dmg/EndRdx(46) Level 2: Mind Probe -- SprBlsCol-Rchg/HoldProc(A), SprBlsCol-Dmg/EndRdx/Acc/Rchg(3), SprBlsCol-Acc/Dmg/Rchg(5), SprBlsCol-Acc/Dmg/EndRdx(5), SprBlsCol-Dmg/EndRdx(7), Hct-Dam%(43) Level 4: Telekinetic Thrust -- KntCmb-Acc/Dmg(A), KntCmb-Dmg/EndRdx(13), KntCmb-Dmg/Rchg(15), KntCmb-Dmg/EndRdx/Rchg(15), OvrFrc-Dam/KB(17), GldStr-%Dam(43) Level 6: Chain Fences -- PwrTrns-+Heal(A), PwrTrns-Dam/Acc/Rech/End(7), PwrTrns-EndMod(9), PwrTrns-Dam/Rech(9), PwrTrns-Dam/EndMod(11), PwrTrns-Dam/Acc/End(13) Level 8: Conductive Aura -- SynSck-EndMod(A), SynSck-Dam/Rech/Acc(34), SynSck-EndMod/+RunSpeed(34) Level 10: Hasten -- RechRdx-I(A), RechRdx-I(11) Level 12: Static Field -- SprAscoft-Rchg/+Dmg%(A), SprAscoft-Acc/Conf/Hold/Immob/Sleep/Stun/Fear/EndRdx/Rchg(31), SprAscoft-Acc/Conf/Hold/Immob/Sleep/Stun/Fear(33), SprAscoft-Conf/Hold/Immob/Sleep/Stun/Fear/Rchg(33), SprAscoft-EndRdx/Rchg(33), SprAscoft-Acc/Conf/Hold/Immob/Sleep/Stun/Fear/EndRdx(34) Level 14: Teleport Target -- WntGif-ResSlow(A) Level 16: Combat Teleport -- BlsoftheZ-ResKB(A) Level 18: Paralyzing Blast -- BslGaz-Rchg/Hold(A), BslGaz-Acc/Hold(19), BslGaz-Acc/Rchg(19), BslGaz-EndRdx/Rchg/Hold(21) Level 20: Drain Psyche -- Empty(A), Empty(21), Empty(23), Empty(23) Level 22: Boxing -- KntCmb-Acc/Dmg(A), KntCmb-Dmg/EndRdx(37), KntCmb-Dmg/Rchg(40), KntCmb-Dmg/EndRdx/Rchg(42) Level 24: Tough -- StdPrt-ResDam/Def+(A), GldArm-3defTpProc(25) Level 26: Synaptic Overload -- CrcPrs-Conf%(A), CrcPrs-Conf/EndRdx(27), CrcPrs-Conf(27), CrcPrs-Conf/Rchg(29), CrcPrs-Acc/Conf/Rchg(29), CrcPrs-Acc/Rchg(31) Level 28: Weave -- LucoftheG-Def/Rchg+(A), LucoftheG-Def(46) Level 30: Fold Space -- Acc-I(A) Level 32: Stealth -- LucoftheG-Def/Rchg+(A) Level 35: Psionic Lance -- StnoftheM-Dam%(A), StnoftheM-Dmg/EndRdx/Rchg(36), StnoftheM-Dmg/ActRdx/Rchg(36), StnoftheM-Acc/ActRdx/Rng(36), StnoftheM-Dmg/EndRdx(37), Apc-Dam%(37) Level 38: Psychic Shockwave -- Obl-%Dam(A), Obl-Acc/Dmg/EndRdx/Rchg(39), Obl-Dmg(39), Obl-Acc/Rchg(39), Obl-Dmg/Rchg(40), Obl-Acc/Dmg/Rchg(40) Level 41: Link Minds -- LucoftheG-Def/Rchg+(A), LucoftheG-Def/Rchg(42), LucoftheG-Def/EndRdx/Rchg(42) Level 44: Psionic Tornado -- PstBls-Dam%(A), PstBls-Acc/Dmg/EndRdx(45), PstBls-Acc/Dmg(45), PstBls-Dmg/EndRdx(48), PstBls-Dmg/Rchg(48), Bmbdmt-+FireDmg(48) Level 47: Indomitable Will -- LucoftheG-Def/Rchg+(A) Level 49: Mind Over Body -- UnbGrd-Max HP%(A), UnbGrd-ResDam/EndRdx/Rchg(50), UnbGrd-ResDam(50), UnbGrd-ResDam/EndRdx(50) Level 1: Domination Level 1: Brawl -- Empty(A) Level 1: Sprint -- Empty(A) Level 2: Rest -- Empty(A) Level 1: Swift -- Empty(A) Level 1: Hurdle -- Empty(A) Level 1: Health -- Mrc-Rcvry+(A) Level 1: Stamina -- PrfShf-End%(A), PwrTrns-+Heal(3) Level 49: Quick Form ------------ | Copy & Paste this data into Mids Reborn : Hero Designer to view the build | |-------------------------------------------------------------------| |MxDz;1408;664;1328;HEX;| |78DA6593594F135114C7EF74A6D69696B694BD4069A50B142BF809342C894B93223| |EAA75ACA54E523BA4331AF9186EF12BA8D12735E2F61D5C505F7CF1D5044159C4B8| |D4D3F99F0B182699F9CDFDCFD9EE3977F2D726FD7373D34784129CA8EA96559C342| |F1B35DD36EBEEBC5E314AAAA0CB437762FB4371C2ACD975B39A9BAA964B76DD2849| |21BE6372D4B2F42B553B57B00CB34616BC16BE82498EB3F3E5F2C536E7F574B95A9| |E37EBB66E9361C091A68DCA25DBA855C2CEEA58EDAA6119178CAA612FC4A6E68DD2| |76CCBC6ED9E5FA022AAE34D376539D83747F0F09793554B1E412A25F13A1F760F70| |770E023E851778C35F15013625C13230FC0D1BBE0C17BCCFBE07E72521438B995DB| |105DB740ED26F306B8EF3A07CDBA1C7AC95995CE6AA1D95C4DF867C0D653CC5930F| |4598573065CA3BDB9A5B37B93336C7059ABCC6FA06F0DF4AF831BE4EC616797E70B| |C4F83273054CD0B8BDDC10C59B1588C4DCA4082DFCD1DDF20A350DBC04071799CF9| |8CFC1F80B30499103EC2C025188291283520C7E428B7E509AB09C609827D6C6936C| |E349B6F304FD142842F3708C230DBA44BBF3ECDCF554284D878CD8C14D1FE2A6A7B| |9E9C3DC74958CBBB84F4A57F3AD79700EA3E02DAAAD47B6A04747C1BDE79967C0BE| |B3CC73E04011D4287254468E76283855EDA0DA4989642BFA7BD1F10079C4D843C4D| |8A3954A49C853905882E58177CCB7CC37E0D06BE6386A089273526E2029780C0D7C| |4CFD62FE06D37F987FC1048D25238F5086CB190E3323608A8CB232437611E9479F3| |21F81871E339F305D6E944DCE39B9E11C671822718C4575EC276A1EDF62AE333740| |9AE0F62FDDE8DBB568AEE92C9CDC2B15341C2047521C69D927A426ADBEEE9556FE9| |38ED35B5A13ABBB4445DC41E75CFCB39E18A1ADC8EAFE0157AEEF46| |-------------------------------------------------------------------| I mentioned in the Elec/Psi thread that I've been working on a more damage-leaning build for my Elec/Psi better suited for situations where the extra Defense is less needed and more procs can be slipped in. If I can get that build set up I'll try a run for comparison.
-
Thanks for sharing this. 🙂 I think Plant has a special advantage in this style of run, because its Confuse power contributes to kill time. Whether this translates to real world dominance over Fire Control I'm not sure, but it definitely helps it in speed runs. It also helps that in this very specific mission the goal is a straight line, so Carrion Creepers can keep up. Plant can lose significant damage on tangled maps and actually can get itself in trouble in the few pieces of content where scout-sassination is the ideal tactic. I'll try this on a few characters later. Speed running stuff is not really my style so I am not sure I'm the best person to try it, but I can give it my best shot.
-
Optimizing Electric/Psi for all-out damage
oedipus_tex replied to Onlyasandwich's topic in Dominator
No, I have no problem Fold Spacing them. If bosses are +4 to you they won't get teleported, but everything else should be. I can look into the mission later to see if the mobs somehow inheritted teleport protection along the ride. I dont even know what powers they might have that even provide TP protection. 🙂- 23 replies
-
- 1
-

-
- electric control
- psi assault
- (and 1 more)
-
Trick Arrow can function with minimal slotting, although passing up that sweet proc damage on Ice Arrow and Acid Arrow pains me. Still, it can be done: Flash Arrow, Glue Arrow, and Disruption Arrow are all autohit -Damage in PG Arrow is also autohit The debuffs in Oil Slick Arrow are autohit (not the damage from lit slicks though) Most of these powers don't have demanding Recharges and are reasonably perma out of the box. It's hard to pick a second set with these requirements. If I was for some reason really committed to this I'd probably pick something with good damage numbers out of the gate, like Ice or Fire Blast.
-
I mothballed a Dark/Martial too and suspected this, but didn't know it was that dire. How confident are you that these are consistent results? I always thought Envenomed Blades worked similar to incarnate powers that add proc damage.
-
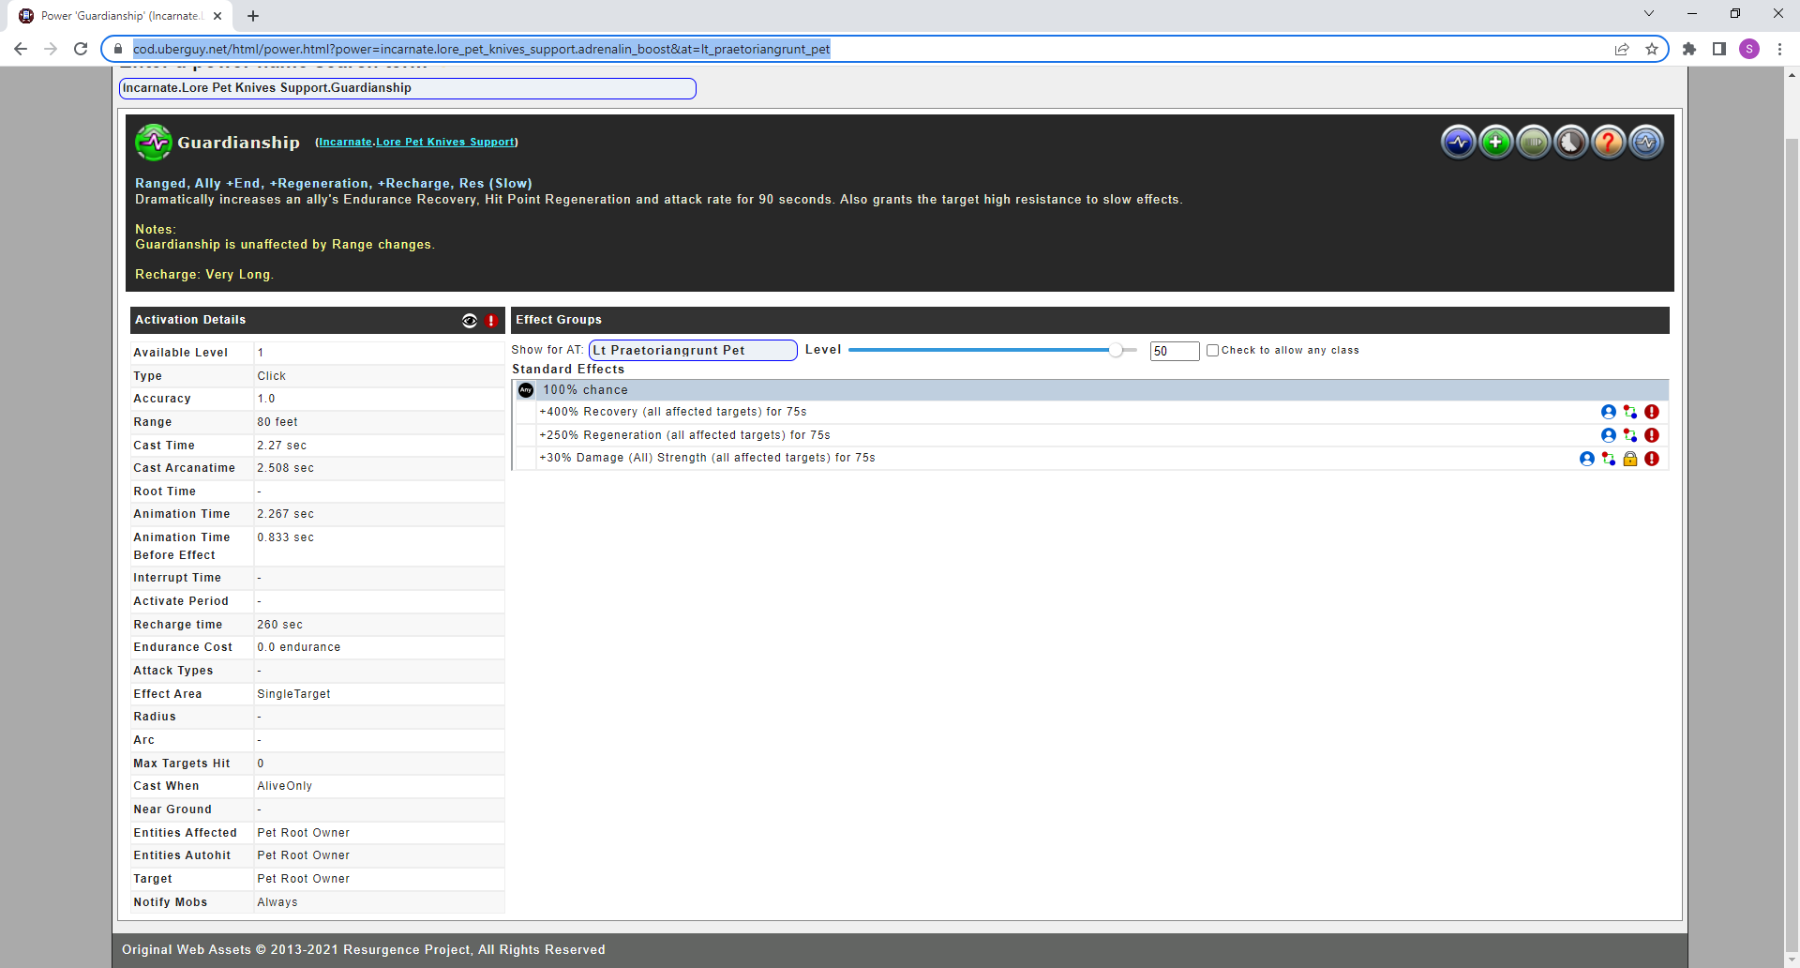
I think this is the CoD entry for that power. https://cod.uberguy.net/html/power.html?power=incarnate.lore_pet_knives_support.adrenalin_boost&at=lt_praetoriangrunt_pet If this is the same power, it's click with a Recharge of 260 and the effects last 75s. It can only be cast on the pet's owner.
-
Uun is correct. Poison Gas Arrow is a very strange power. The -Damage component only applies to the initial cast, and is autohit. The Sleep portion pulses every 2.5 seconds and rolls Accuracy. Personally I just throw a Chance for Self Heal in PGA and ignore the Sleep entirely.
-
@Carnifax did an examination of procs in Jolting Chain recently and came up with results he posted in this thread: The end result was that procs do fire in chains, but not with the frequency you'd expect from a single target power. I'm not sure about Trick Shot.
-
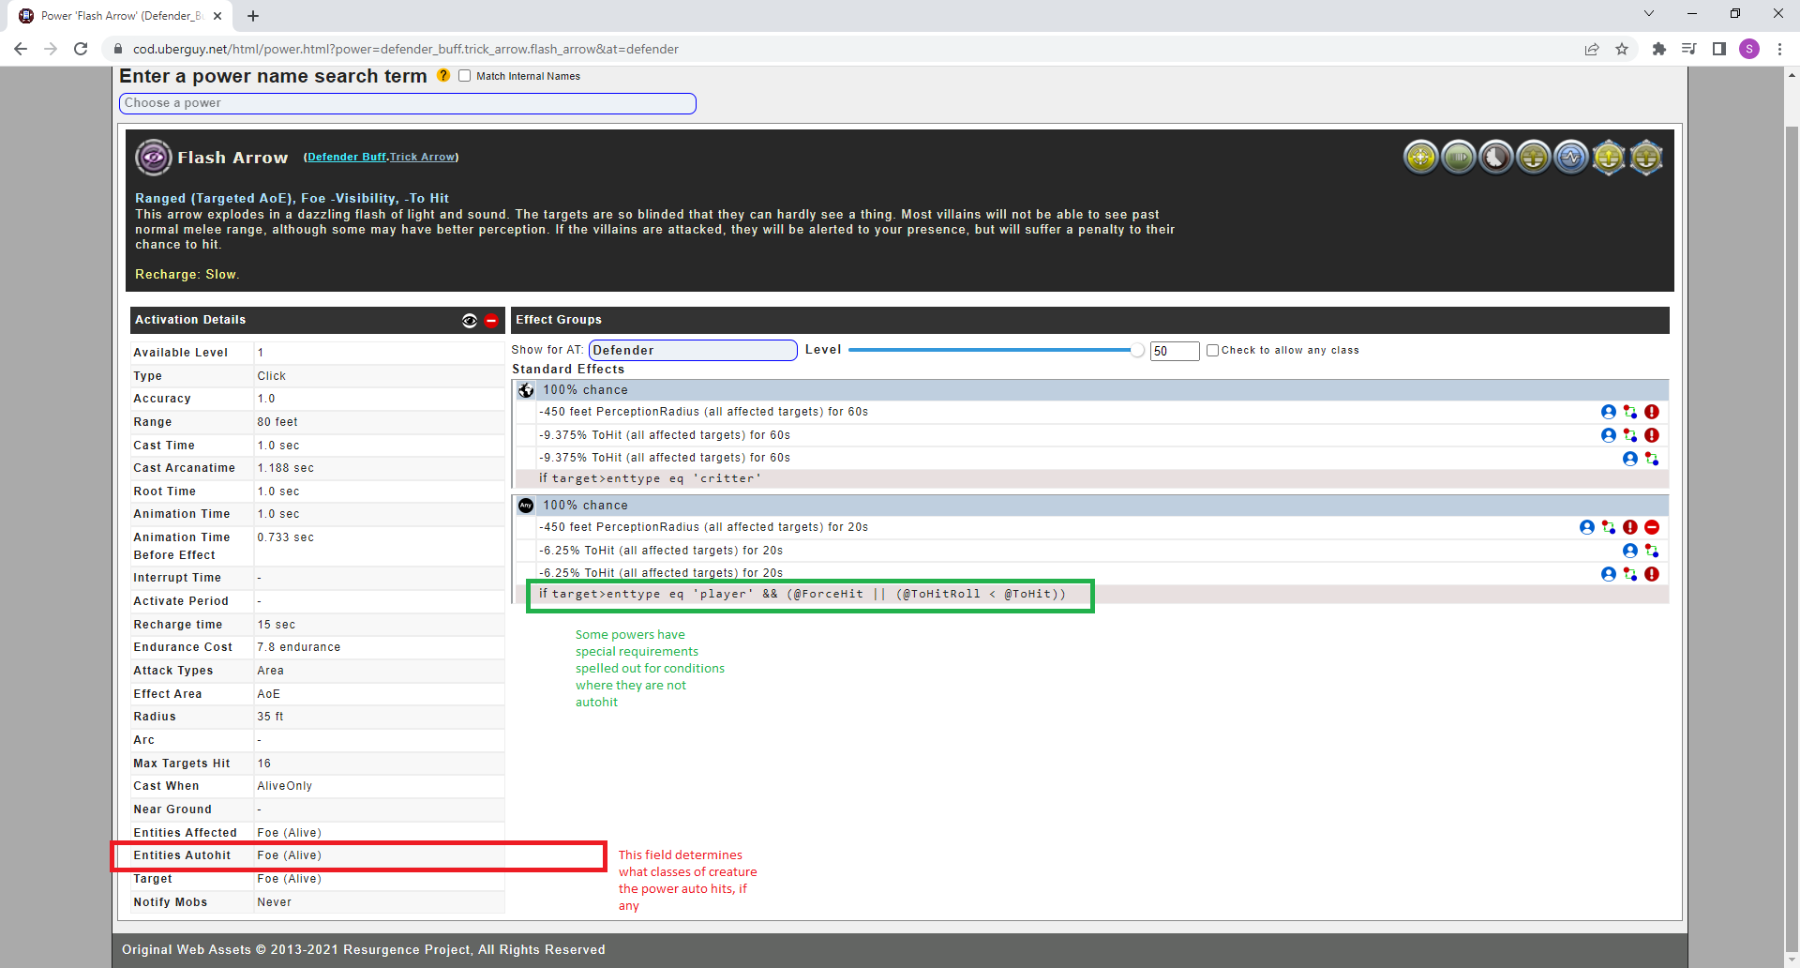
I'm not sure if it applies to every single power, but in general partial autohit powers are arranged like this on City of Data: Flash Arrow is a specific example of a case where the check happens if target is a player. There are some other powers that check for other things. E.g. Hot Feet's slow effect is autohit, but the damage component rolls Accuracy.
-
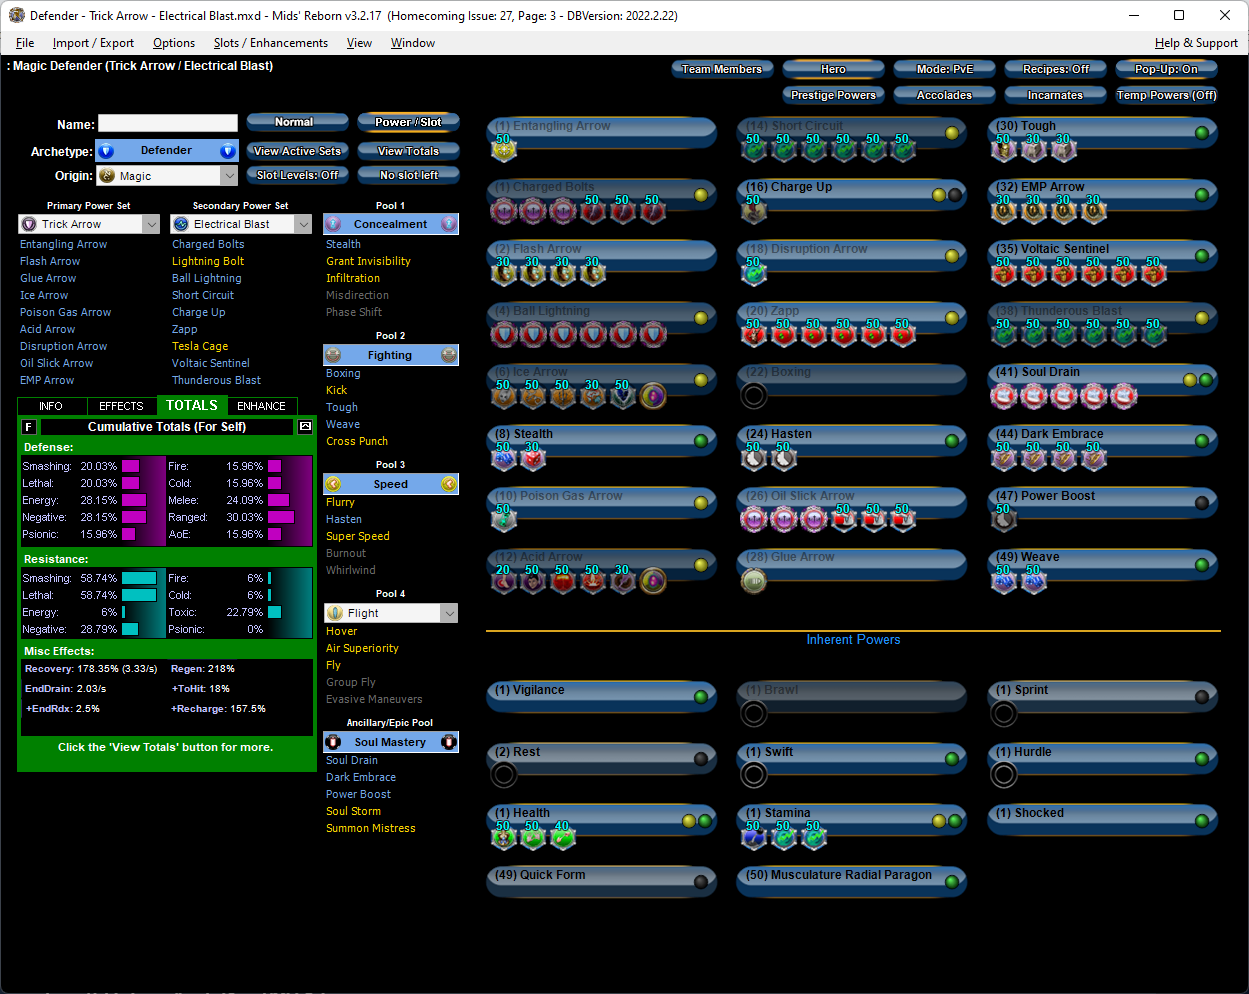
For comparison, this is the build I made for my Defender that went the Power Boost route. Full disclosure, other than running around on the test server with it for a few minutes, I didn't get close to finishing the in-game version. I did hit 50 on the un-IOed build and demolished the Honoree in the incarnate mission though, so that may indicate something. Despite what I said about not liking Voltaic Sentinel much, I did take it, mainly because it takes a pet IO set that provides combination Ranged Defense and Recharge. This build is possibly underprocced for damage. It does have an unusually high amount of self heal though. There's a heal proc in Ball Lightning, Short Circuit, Thunderous Blast, Poison Gas, and Disruption Arrow, and the +Absorb proc in Charged Bolts. I skipped Tesla Cage, which may be a mistake. However in actual gameplay I didn't find the power that great. It has an interesting AoE mechanic but I could never get behind how it actually functions. This Hero build was built using Mids Reborn 3.2.17 https://github.com/LoadedCamel/MidsReborn Click this DataLink to open the build! Level 50 Magic Defender Primary Power Set: Trick Arrow Secondary Power Set: Electrical Blast Power Pool: Concealment Power Pool: Fighting Power Pool: Speed Ancillary Pool: Soul Mastery Hero Profile: Level 1: Entangling Arrow -- Acc-I(A) Level 1: Charged Bolts -- SprVglAss-Dmg/EndRdx/Rchg(A), SprVglAss-Rchg/+Absorb(3), SprVglAss-Dmg/Rchg(3), Thn-Acc/Dmg(5), Thn-Dmg/EndRdx(5), Thn-Acc/Dmg/Rchg(7) Level 2: Flash Arrow -- CldSns-ToHitDeb(A), CldSns-Acc/ToHitDeb(11), CldSns-ToHitDeb/EndRdx/Rchg(13), CldSns-Acc/EndRdx/Rchg(13) Level 4: Ball Lightning -- SprDfnBst-Rchg/Heal%(A), SprDfnBst-Acc/Dmg/EndRdx/Rchg(15), SprDfnBst-Acc/Dmg(15), SprDfnBst-Dmg/Rchg(17), SprDfnBst-Dmg/EndRdx/Rchg(17), SprDfnBst-Acc/Dmg/EndRdx(19) Level 6: Ice Arrow -- GhsWdwEmb-Dam%(A), UnbCns-Dam%(19), GldNet-Dam%(21), NrnSht-Dam%(21), IceMisTrmt-+ColdDmg(23), HO:Endo(23) Level 8: Stealth -- LucoftheG-Def/Rchg+(A), Ksm-ToHit+(25) Level 10: Poison Gas Arrow -- CaloftheS-Heal%(A) Level 12: Acid Arrow -- AchHee-ResDeb%(A), TchofLadG-%Dam(25), PstBls-Dam%(27), Bmbdmt-+FireDmg(27), ShlBrk-%Dam(29), HO:Lyso(29) Level 14: Short Circuit -- PwrTrns-+Heal(A), PwrTrns-Dam/Acc/Rech/End(31), PwrTrns-EndMod(31), PwrTrns-Dam/Rech(31), PwrTrns-Dam/EndMod(33), PwrTrns-Dam/Acc/End(33) Level 16: Charge Up -- GssSynFr--Build%(A) Level 18: Disruption Arrow -- PwrTrns-+Heal(A) Level 20: Zapp -- GldJvl-Dam%(A), StnoftheM-Dmg/EndRdx(33), StnoftheM-Acc/ActRdx/Rng(34), StnoftheM-Dmg/ActRdx/Rchg(34), StnoftheM-Dmg/EndRdx/Rchg(34), StnoftheM-Dam%(36) Level 22: Boxing -- Empty(A) Level 24: Hasten -- RechRdx-I(A), RechRdx-I(36) Level 26: Oil Slick Arrow -- SprVglAss-Acc/Dmg(A), SprVglAss-Acc/Dmg/EndRdx/Rchg(36), SprVglAss-Acc/Dmg/EndRdx(37), Artl-Acc/Dam/Rech(37), Artl-Dam/Rech(37), Artl-End/Rech/Rng(39) Level 28: Glue Arrow -- Range(A) Level 30: Tough -- GldArm-3defTpProc(A), StdPrt-ResDam/Def+(39), StdPrt-ResKB(39) Level 32: EMP Arrow -- BslGaz-Acc/Hold(A), BslGaz-Acc/Rchg(40), BslGaz-Rchg/Hold(40), BslGaz-EndRdx/Rchg/Hold(40) Level 35: Voltaic Sentinel -- ExpRnf-+Res(Pets)(A), ExpRnf-EndRdx/Dmg/Rchg(42), ExpRnf-Acc/Rchg(42), ExpRnf-Acc/Dmg(42), ExpRnf-Dmg/EndRdx(50), ExpRnf-Acc/Dmg/Rchg(50) Level 38: Thunderous Blast -- PwrTrns-+Heal(A), PwrTrns-Dam/Acc/Rech/End(43), PwrTrns-EndMod(43), PwrTrns-Dam/Rech(43), PwrTrns-Dam/EndMod(45), PwrTrns-Dam/Acc/End(45) Level 41: Soul Drain -- SprAvl-Rchg/KDProc(A), SprAvl-Acc/Dmg/EndRdx/Rchg(45), SprAvl-Acc/Dmg/Rchg(46), SprAvl-Acc/Dmg/EndRdx(46), SprAvl-Dmg/EndRdx(46) Level 44: Dark Embrace -- UnbGrd-Max HP%(A), UnbGrd-ResDam(48), UnbGrd-ResDam/EndRdx(48), UnbGrd-ResDam/EndRdx/Rchg(48) Level 47: Power Boost -- RechRdx-I(A) Level 49: Weave -- LucoftheG-Def/Rchg+(A), LucoftheG-Def(50) Level 1: Vigilance Level 1: Brawl -- Empty(A) Level 1: Sprint -- Empty(A) Level 2: Rest -- Empty(A) Level 1: Swift -- Empty(A) Level 1: Hurdle -- Empty(A) Level 1: Health -- Pnc-Heal/+End(A), NmnCnv-Regen/Rcvry+(7), Mrc-Rcvry+(9) Level 1: Stamina -- PrfShf-End%(A), PwrTrns-+Heal(9), PwrTrns-EndMod(11) Level 1: Shocked Level 49: Quick Form Level 50: Musculature Radial Paragon ------------ | Copy & Paste this data into Mids Reborn : Hero Designer to view the build | |-------------------------------------------------------------------| |MxDz;1418;708;1416;HEX;| |78DA65944B4F535110C7CF7DB5A52F405E7D804081822D568A8FC49DF24A506A881| |8B74D6D6FEB8DD7965C8AC0D7F0859A80B87461540475EBD285092AEA0790E84A01| |01A30B53A767E608869B945FCE9C9933FFF39F7B494C0FB8B3D9A1534CF2F69BA98| |989E4809ED5F319DDD212A99C9166E5C70E3FBF8827FB26B3D9D805CB485F499EB6| |ACC254CBBF9DF3A97C4ECFC4064D3D5D84FD9499EC83238BAC7AB4503063C3F96BC| |68471C9308DE28C8747868CDCE5A291CF39F96A6C5CD7332EDC30CB3BC1C171231D| |EB2F58D6E478B16025C70A9366320107EAD68C0F2485E0775D863F125759622C008| |8ABEC91CCC453D258AFCA83F271621CA9CE61B23A8FB42D206F40B144272AD26758| |35A9CCB986747F217E453E0628A293F242E127789F13179155CF884BC803CBC85B5| |0AC8962EDAA849BC33267ED2026D5A624DEA9DEABF175FD0948871B786028769229| |D9EBB0D8F787F1E4DB70468570A5E2356ECE42D025DAB95EC1AA062ADE60BBC04BB| |C7D40C6368D36859FD478B2DC4E614F20CD238A3D3FD1C2833BC40DE226B2658BB8| |8D7C0AC59554CC2A1F62C73B806AA1B19A4E5C2CABA2A056D38D16B4ACA0B6D6B7C| |477C4F7C8B655A40496D489367525785808420DC2A58628E513EF4233BF68E6EF41| |056DC790ED47893634A45D43861DC89B501C14F28355E89202ED9A282837F5A2FC7| |0034E30EC43DE83CA66F18235AFE28BD4F981F891F809B90408098DA16DB4EED016| |719DB8818C6F127F2097011D62681D6471848616A1A1456868DD34B46E1ADA14A8E| |F92F8B75552BB1ED0E602F2F07DE23C710E390D455171B7E86F34E0C8367187F80B| |B9E6662C262C8CD15054B0B0474CAC87DEEB782DF29CBAFBB5971AD5DDAFBCBC867| |18FEC0F8DAAA20242120F7D73EEFD9FC143DFF787D6F78464D68A926D175188E30C| |B053651BFF25CDA2ED0E72DA490EFBA23C29C3559F8DC0FD484F69A40612C47DFE0| |27898E5A7| |-------------------------------------------------------------------|
-
Ambushes will usually take the elevators, but others will usually not. I'm unclear on whether an ambush will take the elevators after they've already encountered a player, though. Plant Control's Spirit Tree will take the elevators, if the owner does.
-
Optimizing Electric/Psi for all-out damage
oedipus_tex replied to Onlyasandwich's topic in Dominator
Yeah it's unfortunate. I wish the role of pets in general was better defined. The issue with them is scalability, since you can't really IO them. They work okay against small packs of enemies, but really fall apart at tougher difficulties. You can kinda see a related issue in the video I posted above. If you notice the incredibly awkward opener I used in the portion at around 0:30 but didn't pay a heavy price for it, and compare it to my death at 18:30, you can see that what carried me through that opener was Barrier Destiny, or more accurately, soft capped Defenses. At the time of my death, Defense has fallen to around 28 and 29. That little bit of difference resulted in being nearly instantly knocked face to the floor. That really reinforces for me two things: There's a huge difference between survivability when soft capped versus not Pets that don't have a lot of native defense or resists are toast at x8+4 Of course there are other ways to stay capped e.g. clever use of Purples. That death was really my fault for not doing better management. It did surprise me at first though because the change wasn't gradual, it was near instant death.- 23 replies
-
- 1
-

-
- electric control
- psi assault
- (and 1 more)
-
Optimizing Electric/Psi for all-out damage
oedipus_tex replied to Onlyasandwich's topic in Dominator
Unfortunately it only gets worse as you go up in difficulty. They last like 20 seconds in hard content. There are just too many good powers out there to justify them IMO. They're slightly better on a Controller, since you might have a chance of keeping them alive and are more pressed for damage.- 23 replies
-
- 1
-
-
- electric control
- psi assault
- (and 1 more)
-
I have one of these, but on a Defender. I went the Power Boost route in order to magnify the -ToHit in Flash Arrow and the endurance crash from the nuke. It's good. There's a lot of synergy. Not going to be one of my mains I don't think. But an interesting combo. In the overall I didn't find the new endurance drain mechanic as effective as Electric Control, although maybe it's not supposed to be. It's good and sometimes enemies go flat on endurance. It's sorta hard to keep them that way though. The extra damage from the Shocked effect is helpful in this regard to making the mechanic feel better. However I have to be honest and admit I dislike the new Voltaic Sentinel. It's a toggle. If you get mezzed, it drops. It's annoying. I wasn't a big fan of the older version either, but at least it was on a steady schedule. Now it drops in the main times I might need something blasting to rescue me. Some players seem to like it though, so maybe it's a "me" thing.
-
Either of these is going to be great. Thermal helps more with downing AVs so if that's on the agenda I'd lean that way. Electric's drains work well when other team members also have Electric powers, so if someone else has an end crashing ability it might be an option.
-
The lvl 41 Clockwork King AV challenge for Controllers
oedipus_tex replied to LynxNordique's topic in Controller
Unfortunately Arctic Air won't confuse an AV or even a Boss on its own. The ticks are set to Replace rather than Stack, so two ticks in a row just continue the confuse duration rather than add to Magnitude. It can stack with some external sources though, like the Coercive Persuasion Chance for Contagious Confusion proc. That proc used to be amazing in AA on live, it took a huge hit when procs were changed though due to how procs are now calculated in AoEs. -
This is hot. Thanks for sharing the commands. I've long been too lazy to look them up. I agree Combat Teleport on Dark Control is a huge help. I mainly just /macro TLPT powexeclocation target "combat teleport" to teleport right to the feet of whoever I have selected. Can be a big help if OP decides to go with the Earth APP, since you can TP right to a bosses feet and hold them instantly.
-
Special note on Fearsome Stare: there are multiple ways to slot this power, and none of them are wrong. It's an interesting power because how you slot it can radically change how it works. If you put a damage proc in it, it will proc frequently but no longer be "safe" to cast from range. Enemies fear'ed by the power still strike back. For this reason, on Dominators I don't proc damage in it. On a Controller it's a different story because you may feel safer, given you have a whole buff/debuff set to work with, and easy access to heals. Just be aware when you start fighting end game enemies, the hail of return fire you get from opening with this power can be a lot to deal with. If you put -ToHit in it (highly recommended) it's more of a ToHit debuff. This is how I usually slot it on Controllers. More of a Dominator thing, the power is an excellent place to put that class's +global Damage ATO. This is very play style dependent because sometimes there are better spots for the proc. (When the proc fires it does not allow an enemy counter strike). One proc I've never played with is Unspeakable Terror: Chance to Disorient. I imagine proccing it and being able to position yourself with Heart of Darkness fast enough is difficult to pull off. OTOH, Heart of Darkness absolutely stacks with the Earth APP's Fissure. Although the chance to Stun is only 50% it's still pretty effective, especially if you're willing to hurl the occasional Howling Twilight offensively.
-
IMO the key to soloing with a Controller is understanding two major things, 1) Containment and 2) damage procs. Containment is the easier of the two IMO. It's a straightforward doubling of (enhanced) damage. If your power says it hits for 50 after enhancements, it now hits for 50 +50 = 100. Containment damage benefits from +global damage like from Fulcrum Shift. You mentioned Gravity Dominators. What may surprise you is that with Containment, Gravity's Propel and Lift actually do more damage on a Controller than on a Dominator. That's because although the Controller Ranged Modifier is 0.55 compared to a Dominator's 0.95, x2 0.55 = 1.10. Controllers with Containment have better mods than Defender (0.65), Corruptor (0.75), and are actually pretty close to Blasters (1.125). The catch of course is Controllers generally don't have access to T2 or T3 blasts, nor do they get Aim or Build Up, or nukes. So although they can put out some pretty fierce damage mods in theory, the challenge is the actual powers aren't all that suited to receive it, with a few exceptions: Hot Feet Lift Propel Spectral Wounds Fireball, etc in the APPs Note: "true" pets like your dark doggie and the Dark Servant do not benefit from Containment. Some pseudo pets do and other do not. Additional sidenote, you get free Containment damage when attacking an iTrial raid boss even if they are not immobilized, held, slept, or stunned. To get containment versus an AV I believe you do need to immobilize or sleep them (it's been a very long time since I really paid attention tbh). ------------------------------------------------------------------------------------------ Procs are a more complex topic because they vary so widely, as do the ways to apply them. For starters though, there are some powers that benefit greatly from procs: Single target holds, especially in fast casting powers like Mind and Fire (Dark's is not particularly fast casting but still worth proccing). Some of these can get wild DPAs in the 400s if they land while -resist debuffs are applied The Stone APPs Seismic Smash Powers in the secondary like Ice Arrow, Acid Arrow, and Poison Trap Powers that apply multiple attrib types that can be procced, like Heart of Darkness Plant's Carrion Creepers As a reminder, proc damage doesn't help Containment. Proc damage is boosted by -Resist, like from Tar Pit, though. This can make calculating your actual damage difficult on Controllers. To see what you're doing in Mids, turn off procs to see the potential number that is multiplied by Containment. Turn them back on and do some subtraction to see where damage is added back.
-
You are just under what you need for consistent permadom. BTW you shouldn't three-slot Hasten. Two slots will do it. You can enhance the enhancements to get a bit more kick to them.
-
What are your tips for managing a large character roster?
oedipus_tex replied to oedipus_tex's topic in General Discussion
I am the worst about hoarding rewards. I don't think I've ever converted one type of merit to another. Usually I just use merits to buy enhancement converters to sell on the market because it is quick and easy to understand. 🙂 Come to think of it I have never spent a Vanguard merit. Not even sure what they actually buy. -
What are your tips for managing a large character roster?
oedipus_tex replied to oedipus_tex's topic in General Discussion
Any advice on consolidating merits? I actually never realized you could mail them. 😮 I have probably over 20,000 merits scattered across all those alts. I may be overestimating. But possibly not. I could take turns rolling through all of them and grabbing the merits. Do most folks store their merits on a single main? Being able to email them is a game changer. I guess I never thought to try. I have emailed Empyrean merits, so it probably should have been obvious. -
Vampire movies, powers, themes, and my Nicolas Cage resentment...
oedipus_tex replied to Snarky's topic in General Discussion
There's the Demitri from Darkstalkers route. I'm not sure what CoX archetype he would be, but he does seem more CoX-y than a lot of traditional vampires. Stalker or Scrapper with Fireball maybe?