oedipus_tex
-
Posts
2652 -
Joined
-
Last visited
-
Days Won
4
Content Type
Profiles
Forums
Events
Store
Articles
Patch Notes
Everything posted by oedipus_tex
-
Just commenting on this several years later. 🙂 While the basic tenets of this guide still hold, one thing I'd modify for a lot of builds is the single target hold. Rather than slot it with Basilisk's, I think in a lot of cases its better to proc the hold out for damage. Several of them can do considerable damage slotted that way, especially Mind and Fire. A few of them fall into weird ground where that's less effective... Plant and Electric for example. I do happen to think permadom is more important than procs in most cases, so if you have to slot the Hold with Basilisk's it won't hurt you. As the build moves to the higher end though I'd consider looking into how much damage you pick up with procs. Doms are often starved for strong ranged attacks, the Holds can fill that gap nicely.
-

Your Opinion on Sets and ATs that Over or Underperform
oedipus_tex replied to TheZag's topic in General Discussion
RE: Energy Blast, I have three thoughts. One, waiting til level 35 for Explosive Blast on Defenders is torture. Most sets get their AoE around level 20. Two, its a shame knock chance doesn't scale with archetype modifiers, so that Defenders got a version of this set that felt extra Defender-y. The knock chances are identical to a Blaster, so the only value you get playing it on a Defender is the occasional very mild ability to overcome an enemy's knock protection. I can't think of a situation where I've seen that actually come into play. Three, Nova feels like it should do more damage than a typical nuke. The fact that it doesn't and the knock is considered an "extra" is strange to me. I consider the knock a hassle to deal with, you're either slotting it for kb to kd or else dealing with scatter. I feel like this particular nuke should be doing incomparable damage as an incentive for dealing with it. -
Your Opinion on Sets and ATs that Over or Underperform
oedipus_tex replied to TheZag's topic in General Discussion
Underperformers I'd like to see made more interesting (not necessarily stronger): Archery on Defenders (used to be okay because crashless nuke. now not so much) Assault Rifle Dominator Martial Assault, Electric Assault, Thorny Assault (may be fine damage wise, but have zero utility powers. other than particle effects can you really tell these apart?) Ice, Mind, and Electric Control on Dom and Controller Gravity Control on Dominators For some reason, any buff/debuff set with a single target anti-mezz: Pain, Empathy, Sonic Resonance, and Poison. Only Thermal escapes the single target anti-mezz curse Force Field. For a set that supposedly uses knock extensively, why is it so bad at it? A Blaster with Bonfire has better knock potential than the entire set. -
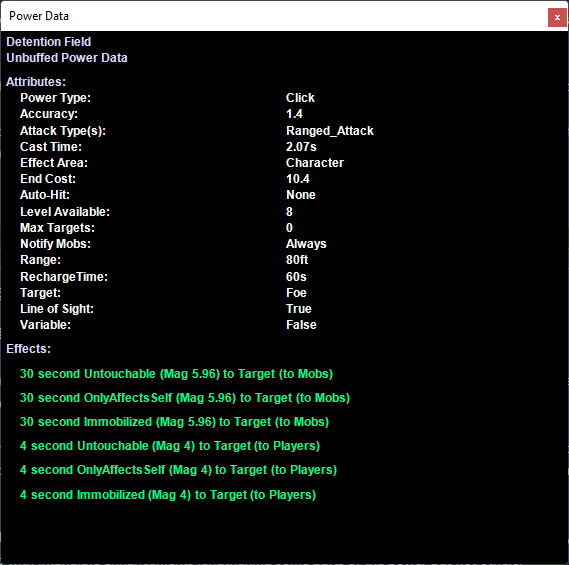
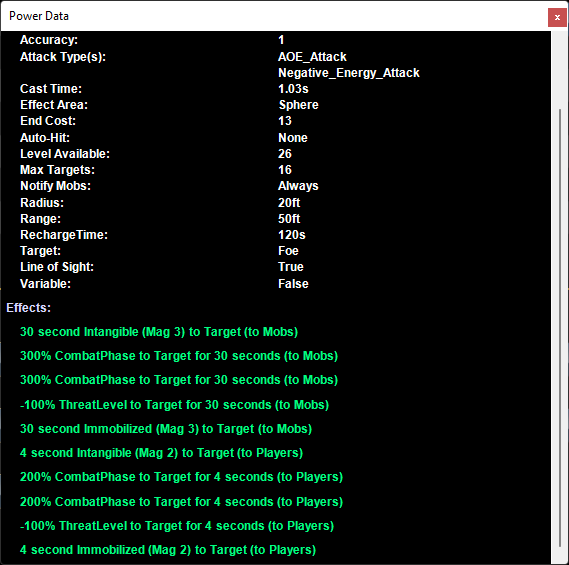
Personal Force Field is an interesting power. It sets you to Only Affect Self, but doesn't actually make you Intangible. It actually works very similarly to the power Rest. You can't attack, but enemies can attack you. PFF happens to include very high Defense and Resist buffs, but enemies can still hit you through it. Something kinda interesting about PFF by the way is that if you happen to get hit with a -Resist power and go into PFF and it pushes your Resists to 100% or higher, you ignore those resist debuffs entirely. That's true of any situation where you hit 100% Resist, just especially likely to happen with PFF since it provides around +40% Resist on a Defender, so just PFF + Tough + APP armor is likely to trigger that for Slash and Lethal resist. Probably not a situation people encounter too often, but interesting anyway. I used to think this power was not very good at end game since on most archetypes that get their resist cuts off at 75%, but it turns out resistance to resistable resistance debuffs has no cut off. The Force Field power Detention Field applies the Untouchable, Only Effect Self, and Immobilized effects. Untouchable and OnlyEffectSelf are technically mezzes, so Mag 5.96 will IIRC mezz a normal Boss but not an Elite Boss. Dark Miasma has a power that is superficially similar, but it uses the actual Intangible effect, Mag 3. FYI Black Hole is one of the most universally hated and skipped powers in the game. Gravity's Dimension Shift used to be a clone of this power but was updated in a revamp of Gravity Control late in the live game's history. I still wouldn't describe Dimension Shift as great, but at least it is better than Black Hole. Come to think of it I can't even think of the last time I saw someone cast Black Hole, which is probably a good thing. If ever there was a power built to annoy and frustrate team mates, this is the one.

-
If this was a buffet, what build should everyone try?
oedipus_tex replied to oedipus_tex's topic in General Discussion
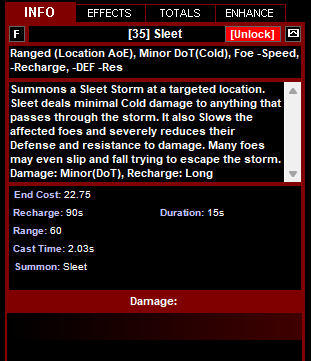
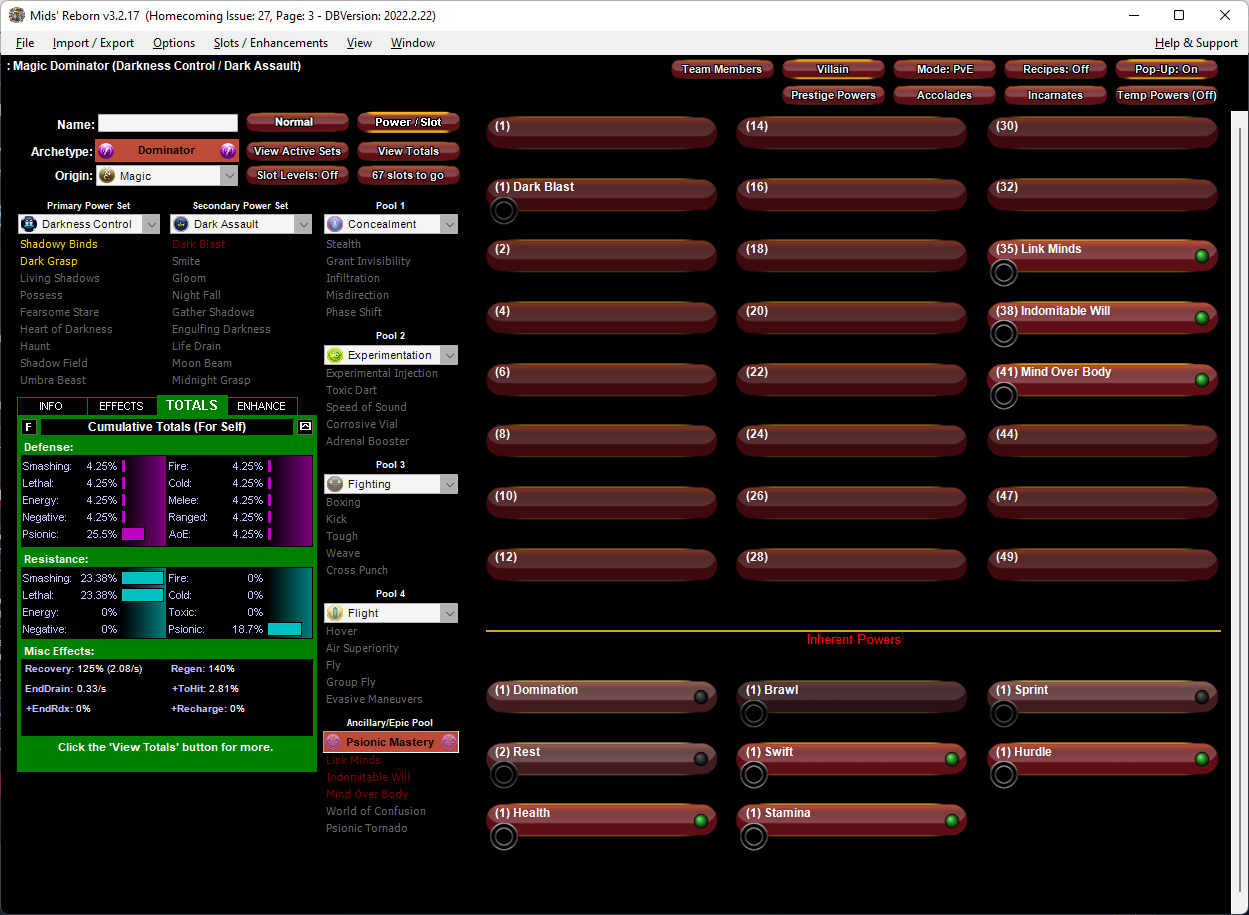
For those of you looking into Dominators for the first time, a while back I' wrote a guide on how to do a "trust fund build" that gets you to permadom levels relatively painlessly. It will show you some of the quickest and most popular paths to getting your Dom up and running. I do think it's a class that needs IO work before it really becomes manageable. So, what makes this class so strange is lot of its potential comes from the epics. Dominators have two extremely good epic APP choices that lead you down either the path of debuffer or extra-sturdy abomination if played right. They're worth knowing about if you've never played the class, because in a lot of ways they define what the class is actually capable of, and that isn't very apparent if you've only dabbled or played at lower levels. First, from their Ice APP, the (honestly overpowered, perhaps justified for saving the class from obscurity) Sleet. It's not quite as strong as the "real" version Cold Domination gets; 90 recharge instead of 60, and the rain lasts 15 seconds versuses the real version which lasts 30. But, the debuff lasts 30 seconds after the rain departs. So, this power can very reasonably get down to a 30 second recharge and end up double stacking on difficult enemies. At that point you're actually beating out a lot of Defender and Controller builds who either can't stack the debuff at all (e.g. Sonic Resonance, Radiation) or can't reasonably get the recharge low enough (Thermal, Time). (What's kinda interesting here is a lot of folks roll Defenders, Controller and Corruptors for their debuffs, particularly -Regen and -Resist. A .../Psi/Ice Dominator packs -30% to -60% Resist and -500% Regen, as good or better than many of those toons. You likely won't have the Def/Corruptors ranged attack power, but you'll pick up control abilities instead. It's just a surprising option open to a class not normally associated with those abilities). The second APP of note is the Psi APP. It's mainly notable for a trifecta of powers that individually aren't that amazing but in combination are pretty sensational: So, Dominators are not a class known for having any Defense whatsoever. But their Psi APP provides an enhanceable baseline of 4.25% defense to all, 25.5% defense to Psi(!!) and still provides a Resist armor with baseline 23% resist to smash/lethal and 18.7% to Psi. You pay for this by losing out on the debuff of Sleet and a good aoe blast (Psinado is cool looking but not particularly strong). But it's worth knowing about, because Dominators are unexpectedly capable of soft capping. This is particularly true of /Psi Assault Dominators, because having their healing and recovery already covered, they can dip into Destiny Barrier for the +5% always-up defense and conceivably toe into a capped to multiple vectors build, as can be seen here:
-
Me continuing to ramble on this necro'ed post... 🙂 One of the better improvements HC made to the Assault sets is making most of the PBAoE attacks have a 15ft radius. On live these were a crapshoot of unnormalized values, often with pathetic radiuses around 8 to 10 feet. The increase to 15ft radius gave most Dominators an actual reliable AoE attack, and that is pretty huge. So thank you to the HC team for that change, it does do a lot for the class. Dominators are still stuck with a lot of (to me) unwieldly cones. I wasn't there when this class was being storyboarded by the live team, but I almost feel like Dominators were given these cone powers in order to prove a point that cones could be made useful. I think the idea was like, well, this new Dominator class can lock down enemies, so it's well positioned to use that style of power. Except, Dominators are often point blank damage dealers and some of the sets also rely on AoE auras that require specific positioning. Even without an actual damage increase, an increase in the radius and length of Dominator cone attacks would make me a lot more willing to tolerate playing some of the Assault sets. I don't feel like there's enough reward at the moment for bothering to position and then wait through the long animation times. It just doesn't "feel" good.
-
Electric Control is great fun, but also I think an example of the design overtaking the project, if that makes sense. In Electric Control's case, there was a strong desire to make the "contagious jump" concept work, and I'm not certain the set came out better for it. Synaptic Overload doesn't Dominate on its chain jumps, for example. There's no balance reason for that that I'm aware of, it's just that it summons pseudo pets, and they were never made to Dominate. Dark Control's Shadow Field is a pseudo pet that does Dominate, so its not that there is a rule against pseudo-pets Dominating. I just think when the set was released there was so much going on with Going Rogue that it was a detail that was missed. I wouldn't be against Jolting Chain having a much stronger -Endurance component either. It currently doesn't drain endurance on anyone but the first enemy hit. I have no idea why, because including end drain in the pets isn't an extra level of difficulty. The power's description doesn't indicate that the drain only happens on the first target, it's just one of those things you have to figure out.
-
The Assault sets on live were a randomized assortment of attacks that had no pattern or reason behind their animation times. Because of this, on live, many of the melee attacks were barely worth taking, and Dominators were a low damage ranged class. Homecoming improved the attack values on a lot of the attacks, making them a lot better. I like that HC did this. I'm still not quite sure they went far enough with the secondary effects of the Assault sets. The melee attacks in particular, despite now having more rational damage values. are still mostly copies of Scrapper and Tanker punches and kicks with similar secondary effects. That's fine on an armored character, but on a completely unarmored class leaves a bit to be desired IMO. The Assault sets that stand out tend to be the ones with a strong exotic abilities that set them apart: Psi, because of its heal and recovery, Fire because of its strong ranged attacks and blue bar rescue, Dark because a combo of Power Boost and a self heal. The sets that fall directly in line with the standard design pattern IMO struggle on two levels, first with strength, and second with setting themselves off differently enough to be worth a playthrough. To me, it's not just that Electric Assault (for example) is a low performer, it's that there's nothing going on with the set that's interesting or different enough to make me want to roll it after I've rolled so many toons who are already so similar. The closest thing I can compare Assault sets to are the Blaster Manipulation sets. Those sets I do feel are pretty wildly different from each other and encourage a lot more playthroughs. I'd like to see minor adjustments to the blander Assault sets not necessarily to make them "stronger," just a bit "weirder" or more different from each other. The Manipulation sets are really successful in this regard, IMO and offer a template for the kinds of fun things that could be added. The Control sets haven't had a balance pass in many many years. The last one I recall was around Issue 4 or 5 when ED was introduced and the recharge on aoe holds increased to 240 seconds. Some modernization of them would be welcome. In particular, some of the single target holds and immobilizes could be sped up, and the order of power unlocks adjusted.
-
I'm going to admit that even after all these years I'm not sure. Several of the attribs in Group Invisibility have "cancel event" flags for Attacked, HitByFoe, and MissionObjectClick. I'm not sure if these cancel the effect permanently or just for the duration of the flag. This bears testing.
-
For a long, long time I've stuck to mostly Dominators and Controllers, with the occasional Defender thrown in. Lately I've been forcing myself to try other archetypes outside of my comfort zone. It's really interesting to me what you tend to take for granted (for example, I am used to the assumption that locking into enemies into position is a given). From this I have two questions: What are the builds you've played that were so unusual you think other people should try them for an eye opening experience? What are the archetypes/sets you've just never gotten around to trying, but someone might be able to persuade you. I currently don't have any VEAT or HEAT characters. They've just never interested me, I guess because they feel so pre-set to me. I'm open to being wrong about them of course. I also don't have a single Scrapper character over level 30. I have one Stalker (Ice/Rad Armor). He's excellent, but I've never explored beyond that. As for builds I think everyone should play at least once: Some variety of Ice Control. Not because it's good, IMO it's pretty mediocre. But Arctic Air is such an unusual, bizarre power that requires such a unique approach to game play I think everyone should play it once. A Storm Summoner. It's so different from what any other MMO offers, and IMO tests a lot of assumptions about what "good" normally means. The new Trick Arrow. I can't say how much I love the redesign of this set and how uniquely it plays. An Electric Control character. Again not because it is great. Because it is so goddam strange. It can be pretty effective, maybe a solid A or B tier. But learning to play it involves adjusting to so many variables and paying attention to enemy blue bars. I can't think of a similar build offered by other MMOs. What are your recommendations and requests?
-
Sleet is frankly an overpowered APP power, but that's okay because its existence elevates Dominators out of probable obscurity. A /Psi Dominator with Sleet and Drain Psyche is packing around -30% to -60% resist debuff and -500% Regen. That's actually rather good. A high Defender or Corruptor will often have somewhat better -Resist, but you're still landing close to what an average-ish Buff/Debuff set brings. The real downside of Dominators in general and /Psi specifically IMO is the point blank, blapper style damage. That's fine in "normal" content where you can get in close. Completely falls apart against archvillains and iTrial bosses, in most cases. I still enjoy Dominators, but iTrial masters most are not. It's still a fun way to play debuffer though if you want to go all in like that.
-
Sorry for replying to myself here. 🙂 I just did some more thinking about this build, and realized that with Seismic Force and the Guassian's proc in play, I'm actually exceeding the damage cap for Defenders: So the big question here for me becomes "How often am I really hitting that cap?" and "How often am I maximizing interaction between Seismic Force/Guassian's and blast powers?" I think the answer here is it's time to build this on a Corruptor instead, since they have a higher damage cap, and Scourge won't count against the cap. But I'm willing to hear opinions to the contrary.
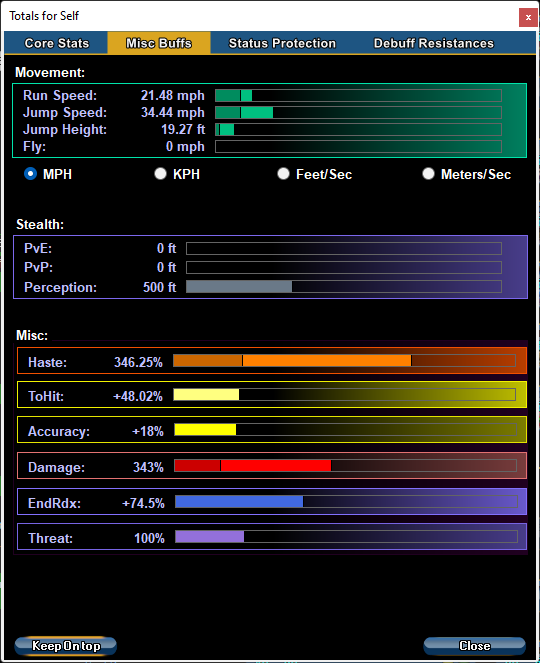
-
Hey all you cool cats and kittens, mind sanity checking this Nature/Seismic/Soul build? I've never played Seismic so I am not sure which powers are worth it. On paper it looks like a decently proccable set with a ranged nuke that should potentially combo well with Nature's +ToHit bonus in its T9 in order to enable some serious proc potential. The theoretical version pasted here should be able to keep a pretty strong self Damage buff going, depending on how many enemies I can lure into Soul Drain range. I am not sure if the 343% number below includes damage from the +30% Defender global or not; I assume it does not. The normal question of "Should this actually be a Corruptor?" applies. Corruptors have a higher damage cap, and although I didn't actually hit the Damage cap for Defenders here, there might be some way I'm not levering all the tools available to me yet. BIG QUESTION: Which alpha slot? Normally I'd just go with Musculature. But we're hitting pretty good damage numbers already. Should I triple down on that for even more damage? Or is there a case for a different Alpha slot? My assumption is this is taking Clarion Destiny to avoid Spore Cloud/Entangling Aura detoggles. This Hero build was built using Mids Reborn 3.2.17 https://github.com/LoadedCamel/MidsReborn Click this DataLink to open the build! Level 50 Magic Defender Primary Power Set: Nature Affinity Secondary Power Set: Seismic Blast Power Pool: Speed Power Pool: Fighting Power Pool: Leaping Ancillary Pool: Dark Mastery Hero Profile: Level 1: Regrowth -- NmnCnv-Regen/Rcvry+(A), NmnCnv-Heal(11), NmnCnv-Heal/EndRdx(11), NmnCnv-EndRdx/Rchg(13), NmnCnv-Heal/Rchg(15), NmnCnv-Heal/EndRdx/Rchg(17) Level 1: Encase -- SprVglAss-Acc/Dmg(A), SprVglAss-Dmg/Rchg(3), SprVglAss-Acc/Dmg/EndRdx/Rchg(3) Level 2: Wild Growth -- TtnCtn-ResDam/Rchg(A), TtnCtn-ResDam(9) Level 4: Rock Shards -- SprVglAss-Dmg/EndRdx/Rchg(A), SprVglAss-Acc/Dmg/EndRdx(5), SprVglAss-Rchg/+Absorb(5), PstBls-Dmg/EndRdx(7), PstBls-Acc/Dmg(7), PstBls-Dam%(9) Level 6: Spore Cloud -- DarWtcDsp-ToHitDeb(A), DarWtcDsp-ToHitdeb/Rchg/EndRdx(17), DarWtcDsp-ToHitDeb/Rchg(19), DarWtcDsp-ToHitDeb/EndRdx(19) Level 8: Corrosive Enzymes -- Acc-I(A) Level 10: Entomb -- Apc-Dam%(A), Apc-Dmg/EndRdx(34), Apc-Dmg(37), ShlBrk-%Dam(40), TchofLadG-%Dam(42), GldJvl-Dam%(42) Level 12: Wild Bastion -- DS:DSyncHealRech(A), DS:DSyncHealRech(13) Level 14: Hasten -- RechRdx-I(A), RechRdx-I(15) Level 16: Seismic Force -- GssSynFr--Build%(A), GssSynFr--ToHit/EndRdx(45), GssSynFr--ToHit(45), GssSynFr--Rchg/EndRdx(46), GssSynFr--ToHit/Rchg/EndRdx(46), GssSynFr--ToHit/Rchg(46) Level 18: Boxing -- Empty(A) Level 20: Upthrust -- AchHee-ResDeb%(A), TchofLadG-%Dam(21), ShlBrk-%Dam(21), ExpStr-Dam%(23), PstBls-Dam%(25), FrcFdb-Rechg%(25) Level 22: Tough -- StdPrt-ResDam/Def+(A), GldArm-3defTpProc(23), StdPrt-ResKB(43) Level 24: Weave -- LucoftheG-Def/Rchg+(A), LucoftheG-Def(50) Level 26: Entangling Aura -- BslGaz-Acc/Hold(A), BslGaz-Acc/Rchg(27), BslGaz-Rchg/Hold(27), BslGaz-EndRdx/Rchg/Hold(29) Level 28: Tombstone -- StnoftheM-Dam%(A), StnoftheM-Dmg/EndRdx/Rchg(29), StnoftheM-Dmg/ActRdx/Rchg(31), StnoftheM-Acc/ActRdx/Rng(31), StnoftheM-Dmg/EndRdx(31), GldJvl-Dam%(34) Level 30: Combat Jumping -- LucoftheG-Def/Rchg+(A) Level 32: Overgrowth -- AdjTrg-Rchg(A), AdjTrg-ToHit/EndRdx(33), AdjTrg-EndRdx/Rchg(33), AdjTrg-ToHit/EndRdx/Rchg(33), AdjTrg-ToHit/Rchg(34) Level 35: Stalagmite -- SprDfnBst-Rchg/Heal%(A), SprDfnBst-Acc/Dmg/EndRdx/Rchg(36), SprDfnBst-Acc/Dmg(36), SprDfnBst-Dmg/Rchg(36), SprDfnBst-Dmg/EndRdx/Rchg(37), SprDfnBst-Acc/Dmg/EndRdx(37) Level 38: Meteor -- PstBls-Dam%(A), PstBls-Acc/Dmg/EndRdx(39), PstBls-Dmg/Rng(39), PstBls-Dmg/Rchg(39), PstBls-Dmg/EndRdx(40), OvrFrc-Dam/KB(40) Level 41: Oppressive Gloom -- Acc-I(A) Level 44: Dark Embrace -- UnbGrd-Max HP%(A), HO:Ribo(45) Level 47: Soul Drain -- Erd-%Dam(A), Erd-Acc/Rchg(48), Erd-Dmg/Rchg(48), Obl-%Dam(48), Obl-Acc/Rchg(50), Obl-Dmg/Rchg(50) Level 49: Soul Transfer -- RechRdx-I(A) Level 1: Brawl -- Empty(A) Level 1: Sprint -- Empty(A) Level 1: Vigilance Level 2: Rest -- Empty(A) Level 1: Swift -- Empty(A) Level 1: Health -- Mrc-Rcvry+(A), Pnc-Heal/+End(43) Level 1: Hurdle -- Empty(A) Level 1: Stamina -- PrfShf-End%(A), PwrTrns-+Heal(42), PrfShf-EndMod(43) Level 1: Seismic Shockwaves Level 49: Quick Form ------------ | Copy & Paste this data into Mids Reborn : Hero Designer to view the build | |-------------------------------------------------------------------| |MxDz;1393;680;1360;HEX;| |78DA65944B4F135114C7EF74A6544A0B560A9447C5F2B0D0D6DAA26E8D22B2504A1| |0D46DD394993A110B694B62574613BF801B97BE15B7F28C3B3F80894079F88E5B8D| |E8CAC444534FE77F6E8A61D2E9EF9E73CFEB9E7BEF24AE0FB90C63F89450EACF4CA| |5F2F9E4906EE8D9493D674FA432665A541E07BD7EA94F0ECE1A4674345598CDE9C9| |D3866166CD42B13A3B9ECA66F4C9E8846EE6AF99E9E420C52C08E7D8F4F45474624| |6D727DDD670D8CC5C2998D9CCFF92CB9246F4D40C099EB333663A3A94CA5D4D2628| |869E2BFAA88C00BD6BDDF4A7589595EDE2328DE29A705E625E005DE360FD04B8FF2| |2B815AA3ADB444CB394B638F338B84E1914365294303CF745C177144195E9D50178| |68C79827C09A854ACF88F302CE2B608922DBD959B52FD950DB0A786099F9125C256| |3071B0B471B22BCA7F4B582D3D7C6611988813D113058A35AE9FB5F43EE8FA81637| |29629D5C585DD82E84A60A17B38BF6D92D27DD61A4AB677EA0B40D326DC373848DC| |C311F83479E319F329F800A45F6B0B3F094E9111F295EA3EC62E32BB26BD48497CB| |F572F9CD45E87DDC3DDF6DC82AC56B929BD8D4A2C078006B0CF9206B64D42297D3D| |284CD8B7BC16D6A44ABDC87D692CDF268DB606E821D5BE027AAB55DD6DA5E422D1D| |EBE0C135E62AF30D18E0963753197EB9897E2EE32DA5EF64A5D6F908AB3EF490F98| |0799F37F71EF899CAE8925BD0B58CF0DD4BCC17CC79B06781B9086E9073AF5C432F| |F7F3F0327389B9080617985FE07C83D027D7D0C707F12629C3B2BFE1DFB08C9C14D| |659BA4522DD17A7952EBA833E1EFDCAFCC614708AFFC102E37FC139B71031992EC6| |07B04313F229D3AF728646F6AA46B5EAF52E8F69724CF38A35FFDD599D67971FBB5| |48A3847A3201DA2004ADBD96BFFD3B9FB0B72972FD82FDCFBD01DC8DBBB3E33E5F3| |24C4B88EF23FFAD2DB0B| |-------------------------------------------------------------------|
-
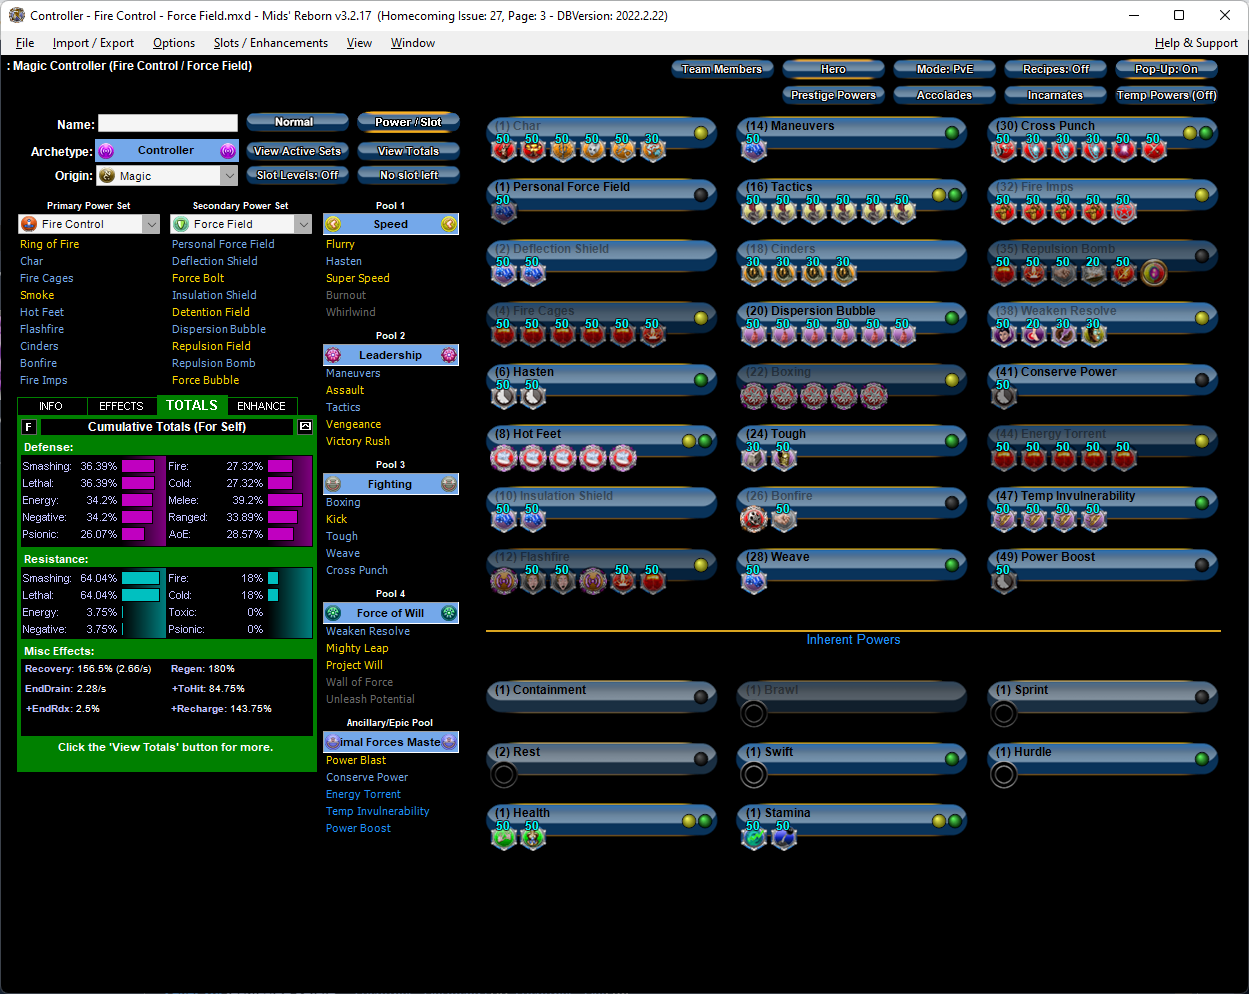
So I am realizing in retrospect that you asked for a Fire/Force Field Defender and not Controller. Apologies. 🙂 Many of the same basic principles still apply. I'll have to revisit later with Defender-specific suggestions.
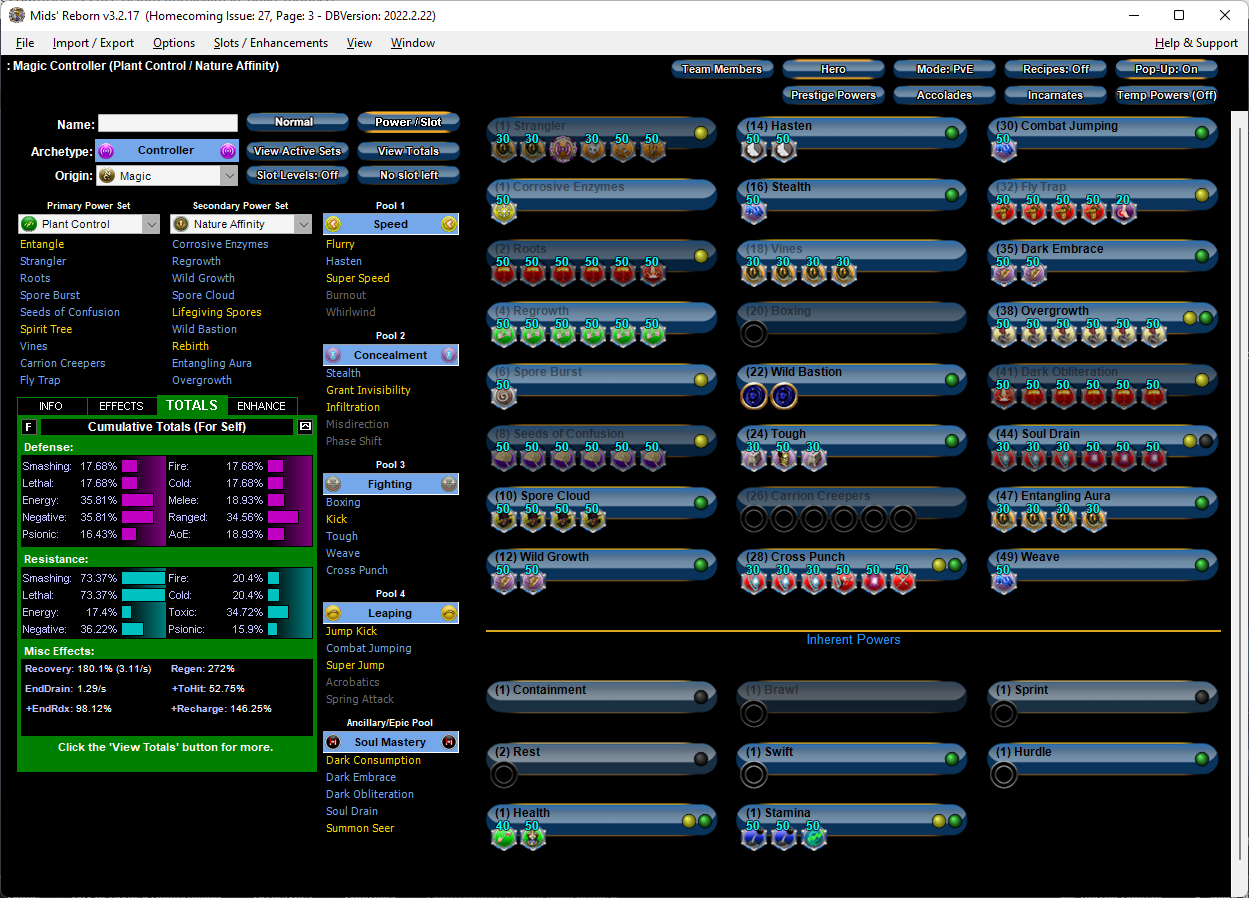
-
Here's a possible take on this combo. I'll admit that despite playing Nature to 50 once or twice, I don't have great builds pre-made for it, so I am fiddling a little bit in the dark here. Nature's big power is a combination of three things: endurance discount, global damage, and +ToHit. It's not possible to perma this power, but you can get reasonably close. I was able to get it down to around a 20 second gap, which I think is pretty reasonable. Anyway, that combination of things leads me to believe a proc build is in order. I also think this is a good opportunity to go with the Soul APP for Soul Drain, which can be used to push the +Damage advantage even further. It's sadly not possible to perma this, but you can get about 44% up time from it. If these numbers are accurate, when you are able to combine Soul Drain with saturated targets and Overgrowth, you're at 338% Damage bonus, which is Kinetics levels of damage buff. This isn't sustainable, but not a bad place to be about half the time. The trick will be getting enough enemies into Soul Drain's radius, which isn't always easy. Seeds of Confusion can help with that though if you hold off on Immobilizing until mobs can gather. I took Cross Punch to try to push the damage advantage a bit, and since we're assuming we'll be up close for Soul Drain. I could have procced out Seeds of Confusion for more damage, but I think the +5 Ranged Defense and +10 Recharge (especially) are more valuable. Recharge is the name of the game here, with all of Nature's powers being hungry for it. I didn't slot Carrion Creepers because there is optimal slotting listed somewhere on this forum and I can't remember precisely what it is. 🙂 But you should slot it that way. This Hero build was built using Mids Reborn 3.2.17 https://github.com/LoadedCamel/MidsReborn Click this DataLink to open the build! Level 50 Magic Controller Primary Power Set: Plant Control Secondary Power Set: Nature Affinity Power Pool: Speed Power Pool: Concealment Power Pool: Fighting Power Pool: Leaping Ancillary Pool: Soul Mastery Hero Profile: Level 1: Strangler -- BslGaz-Acc/Hold(A), BslGaz-Rchg/Hold(3), SprWiloft-Rchg/Dmg%(3), GhsWdwEmb-Dam%(5), UnbCns-Dam%(5), GldNet-Dam%(7) Level 1: Corrosive Enzymes -- Acc-I(A) Level 2: Roots -- PstBls-Dam%(A), PstBls-Acc/Dmg/EndRdx(11), PstBls-Dmg/Rchg(11), PstBls-Dmg/EndRdx(13), PstBls-Acc/Dmg(13), Bmbdmt-+FireDmg(15) Level 4: Regrowth -- NmnCnv-Regen/Rcvry+(A), NmnCnv-Heal(15), NmnCnv-Heal/EndRdx(17), NmnCnv-EndRdx/Rchg(17), NmnCnv-Heal/Rchg(19), NmnCnv-Heal/EndRdx/Rchg(19) Level 6: Spore Burst -- FrtHyp-Plct%(A) Level 8: Seeds of Confusion -- CrcPrs-Conf%(A), CrcPrs-Conf(21), CrcPrs-Conf/EndRdx(21), CrcPrs-Acc/Rchg(23), CrcPrs-Acc/Conf/Rchg(23), CrcPrs-Conf/Rchg(25) Level 10: Spore Cloud -- DarWtcDsp-ToHitDeb(A), DarWtcDsp-ToHitDeb/EndRdx(25), DarWtcDsp-ToHitdeb/Rchg/EndRdx(27), DarWtcDsp-ToHitDeb/Rchg(27) Level 12: Wild Growth -- UnbGrd-ResDam(A), UnbGrd-ResDam/EndRdx(29) Level 14: Hasten -- RechRdx-I(A), RechRdx-I(29) Level 16: Stealth -- LucoftheG-Def/Rchg+(A) Level 18: Vines -- BslGaz-Acc/Hold(A), BslGaz-Acc/Rchg(31), BslGaz-Rchg/Hold(31), BslGaz-EndRdx/Rchg/Hold(31) Level 20: Boxing -- Empty(A) Level 22: Wild Bastion -- DS:DSyncHealRech(A), DS:DSyncHealRech(33) Level 24: Tough -- StdPrt-ResDam/Def+(A), GldArm-3defTpProc(33), StdPrt-ResKB(50) Level 26: Carrion Creepers -- Empty(A), Empty(33), Empty(34), Empty(34), Empty(34), Empty(36) Level 28: Cross Punch -- Erd-%Dam(A), Erd-Dmg/Rchg(36), Erd-Acc/Dmg/Rchg(36), Arm-Dam%(37), Obl-%Dam(37), ScrDrv-Dam%(37) Level 30: Combat Jumping -- LucoftheG-Def/Rchg+(A) Level 32: Fly Trap -- ExpRnf-EndRdx/Dmg/Rchg(A), ExpRnf-Acc/Dmg(39), ExpRnf-Dmg/EndRdx(39), ExpRnf-Acc/Dmg/Rchg(39), AchHee-ResDeb%(40) Level 35: Dark Embrace -- UnbGrd-Max HP%(A), UnbGrd-ResDam(40) Level 38: Overgrowth -- GssSynFr--Build%(A), GssSynFr--ToHit/EndRdx(40), GssSynFr--Rchg/EndRdx(42), GssSynFr--ToHit/Rchg/EndRdx(42), GssSynFr--ToHit/Rchg(42), GssSynFr--ToHit(43) Level 41: Dark Obliteration -- Bmbdmt-+FireDmg(A), PstBls-Dam%(43), PstBls-Acc/Dmg/EndRdx(43), PstBls-Dmg/Rchg(45), PstBls-Dmg/EndRdx(45), PstBls-Acc/Dmg(45) Level 44: Soul Drain -- Erd-%Dam(A), Erd-Acc/Rchg(46), Erd-Dmg/Rchg(46), Obl-%Dam(46), Obl-Acc/Rchg(48), Obl-Acc/Dmg/Rchg(48) Level 47: Entangling Aura -- BslGaz-Acc/Hold(A), BslGaz-Acc/Rchg(48), BslGaz-Rchg/Hold(50), BslGaz-EndRdx/Rchg/Hold(50) Level 49: Weave -- LucoftheG-Def/Rchg+(A) Level 1: Brawl -- Empty(A) Level 1: Containment Level 1: Sprint -- Empty(A) Level 2: Rest -- Empty(A) Level 1: Swift -- Empty(A) Level 1: Health -- Mrc-Rcvry+(A), Pnc-Heal/+End(7) Level 1: Hurdle -- Empty(A) Level 1: Stamina -- PrfShf-End%(A), PrfShf-EndMod(9), PwrTrns-+Heal(9) ------------ | Copy & Paste this data into Mids Reborn : Hero Designer to view the build | |-------------------------------------------------------------------| |MxDz;1381;679;1358;HEX;| |78DA65945B4F135110C767BB5B91D20A15A1405B28A5152C50A8EF262A9704434D1| |5F5C54B5D715B3759BAA45D8CC4AFE083FAE217F01ADF046CF5453146BF8097AF60| |BC205E1313639D9E999336E9A6BBBF3D33E7CC99F39FD9A6AF4C7B73B9D983A0744| |C597AA9949DB20B4ED1B62CA3E84EEB7973116A570BDE91BA474E4A662CBDE0C8D1| |40C384C32BB95CF2A8EEAC148DECA15CCE2C98CE2A783236AE5958368C8B7EF13A5| |7B86C96CC0BA6855E9FB0CC9AF94B8E59C87BC568DED09771109C59361793D3F692| |59D01DBB985DB057AC6C5A2F394671B5A79619DE8F149057D50D6F5C00610D5CEF9| |80F55809406DA9222C6DA9C4B8C77CC90FDD9102EA30055803E10C63545DA30A252| |21A3A7CCDC207AD7996BC45D2EB7E0738CA87244B77A4A21E74962C731E671E2EE0| |5E609E23AC22DD3719FA65C37142A8388D8A29371CF19E679627796798ED87396F8| |02D369E5886AEB63763E25F6559865E2264E6EE3C94ADB4F9228F48B18C51C7CD2E| |91BA55387983E74B6CBC4DBBBE83465845FEEEDE7CAF4BF657285FADF13158CD0C9| |A784CE2A5EF012D3E9923B768DA2BE9A0A11A68AF303EC74050254DEC87ECA35D54| |3E30AA2574AD72B8246C473B0E939249ED7E2004159BDE016A536F489F999183B40| |72C580768B5D2511BA31A5B01421CC223C410CB0511BF8412BF76E33BF31BF13873| |7919D1A5CC7C05179F2E81FDA66980BF21A6589CB1CE30F78E57DE2BE7BCCBBCC3B| |C4C46DE20D8C31221519E19E4D708F27B8C7C7B8C7C7B8C7C7B8C73F7801B0E01EB| |17894D519FFC86495C6599589BFB4E3C43FE22B4C3B29BB21C9DD30C1DD90E26E48| |71376828E5A4947292A50C69F52F1D7FB57A851B4CD5F9667F46AB7FCAA008D3174| |FE3272F4C5F1B4C0A1CC1B761FC8B18A4736C35CFDF6E30B9E0169D6FE74DE66F4D| |B036B3FA1F3580F995| |-------------------------------------------------------------------|
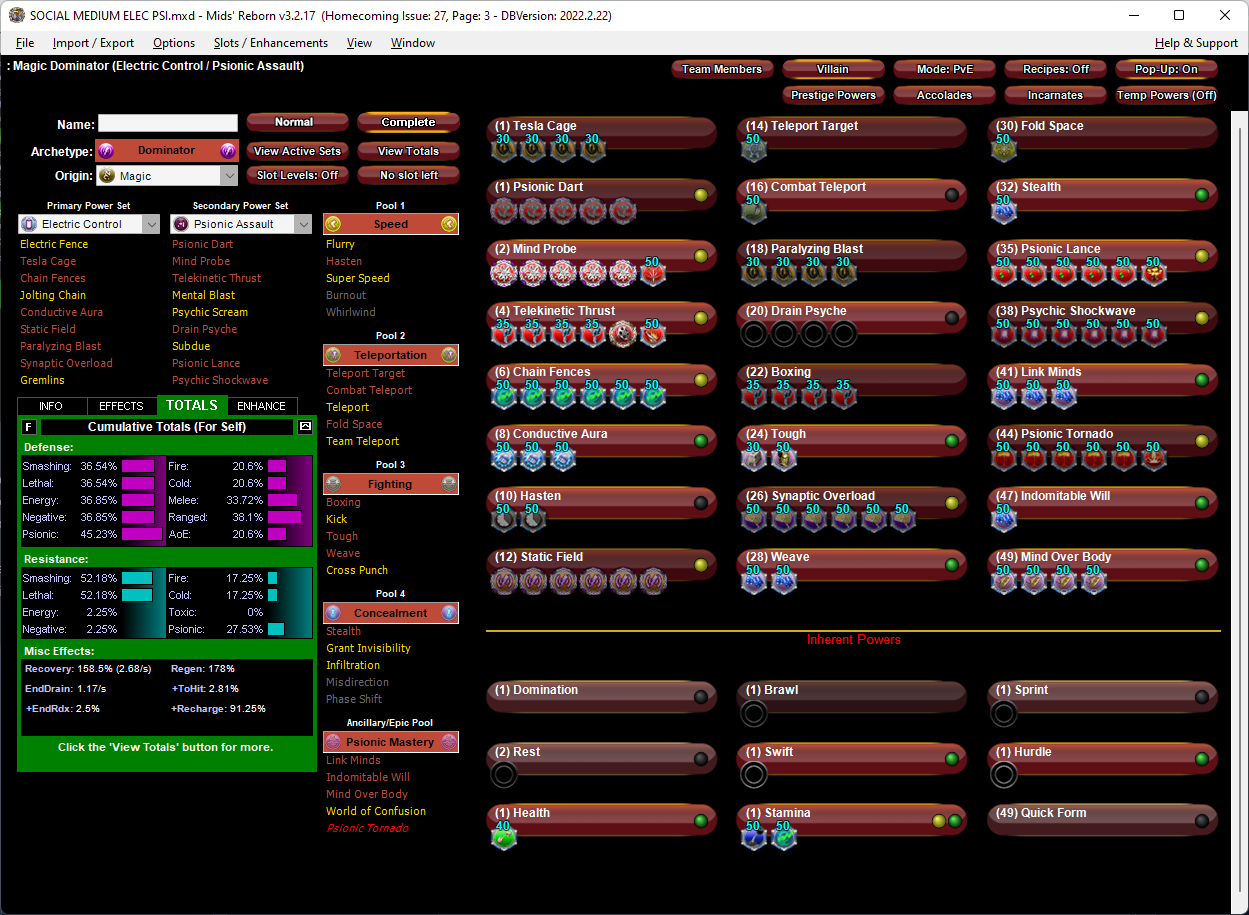
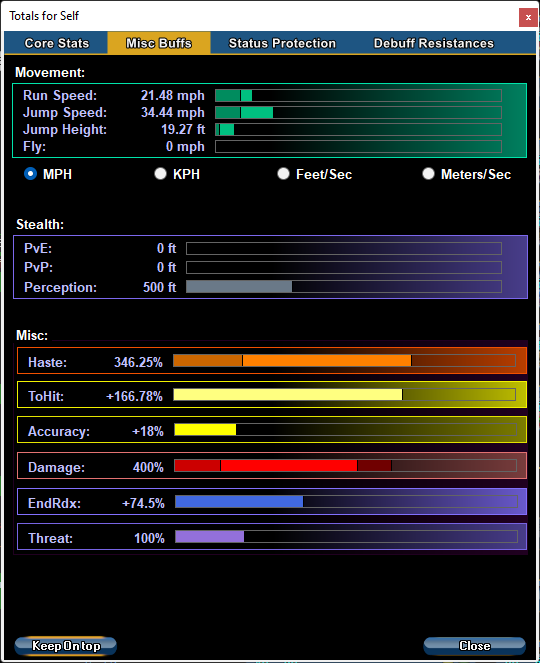
-
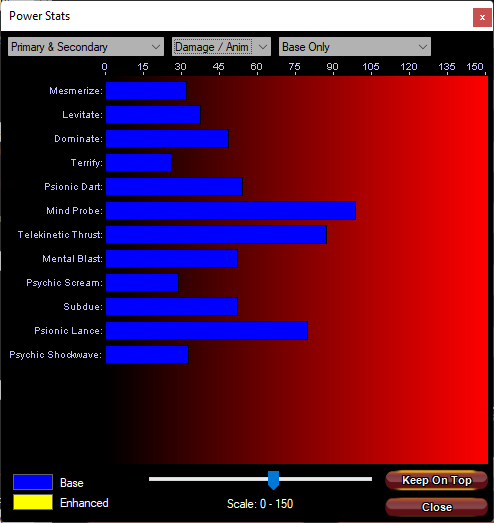
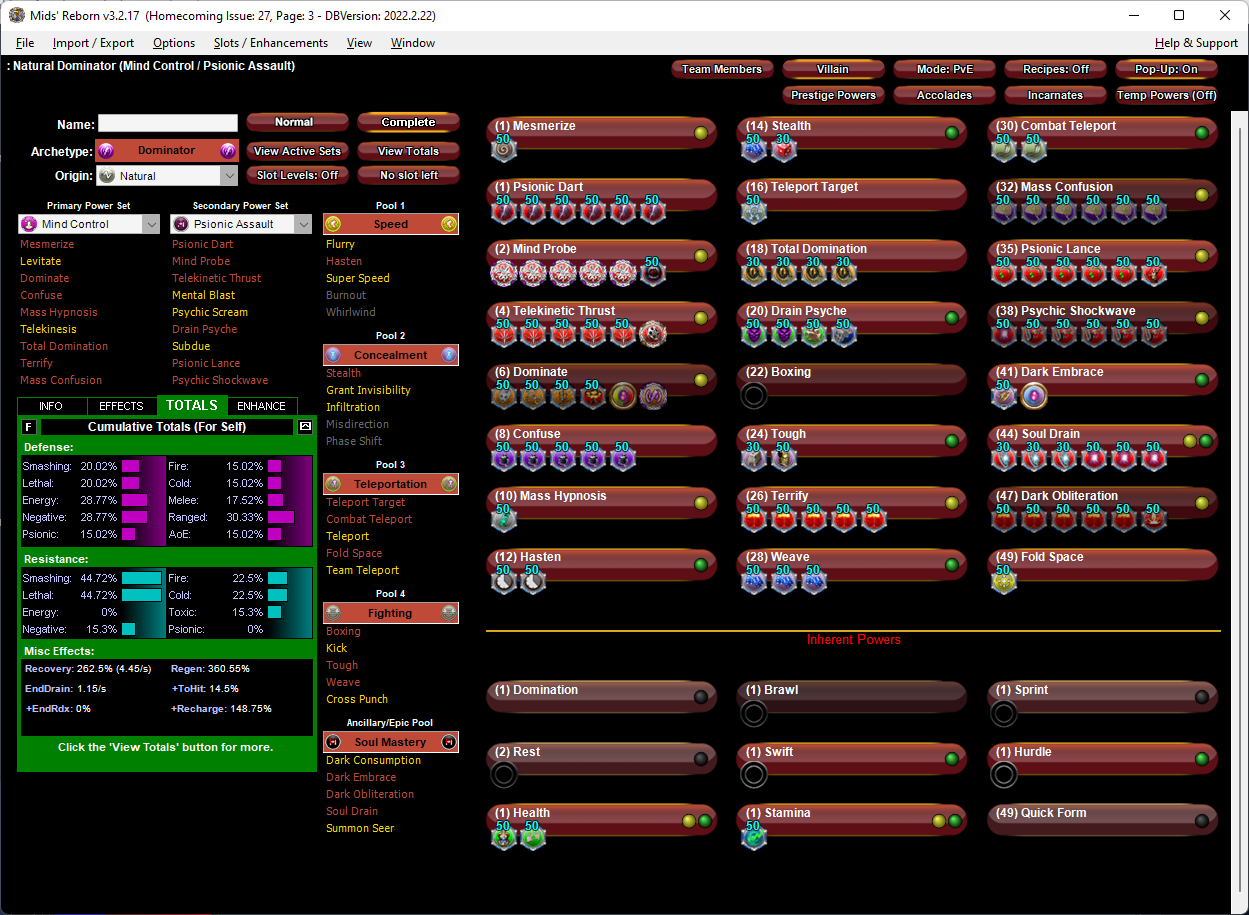
One of the first things I like to do with any new pairing is pull up the Damage/Anim screen in Mids to have a look at the baseline DPAs we're dealing with. In the case of Mind/Psi we have this: I then like to think through the proccability of each power and whether that changes the rankings. In this case we have these options: Dominate is both our highest DPA ST Mind Control power AND is highly proccable. This is a must take and must proc for me. Mind Probe is our highest DPA single target attack, followed by TK Thrust. Mind Probe is no more proccable than any other ST melee attack; TK Thrust takes an extra KB damage proc. However, the KB in it probably needs mitigation with KB to KD, losing us a slot, so they break about even, with Mind Probe a bit ahead. Snipes are always must-take powers on Dominators. Psionic Dart, Mental Blast, and Subdue all have nearly the same DPA (exactly the same for Mental Blast and Subdue, actually). But, we are forced to take Psionic Dart. Given that, Psi Dart is the clear winner and the others mostly ignorable unless you need the Immobilize in Subdue. Note Subdue can also be used as a delivery mechanism for the Dominator ATO proc. Psy Shockwave and Psychic Scream are both thoroughly average AoE powers. Pick the one that works for you. Sadly despite having enhanceable Stun, Psy Shockwave doesn't take the Dominator ATO proc... which I think is an oversight/bug, since other similar Dom powers do take that proc. This is the power where I would otherwise put that proc. You're forced to pick between Mesmerize and Levitate, and that's a shame, because neither is very good on a Dominator. If Mind Control worked like other sets, you'd take tke the ST hold. We can't do that with Mind, so we're basically losing a power slot that might otherwise go to a better power. Given the forced option, I'd personally take Mesmerize, since despite its lower DPA at least that will instantly sleep an AV in Domination mode. Note the updated version of Mesmerize is autohit, so you don't need to expend slots on it to get the instant sleep AV effect. Just cast it, it will always hit. To do damage with it you do need Accuracy, though. As for the remainder of the powers: Drain Psyche is the keystone of the build. The build will rely on this for its healing and recovery. This will involve approaching close range on enemies. Mass Confusion is the only absolute must-take. It has frustrating long recharge, but not taking it isn't really an option. Terrify is probably required as well. Terrify is an "okay" power. It's a 40 sec recharge Fear cone with 2 second animation time that deals a base 50 damage. It's helpful to compare that that to the typical Dominator AoE Immobilize Mind doesn't get: 8 second recharge, 1.17 to 1.67 second animation time (varies by set), 15 base damage. So, Terrify has pretty good DPA (base 50 for 2 sec anim) but not great DPS. Also note that one of Mind's chief rival sets, Plant Control, deals 31.7 damage with 1.67 animation time, every 8 seconds. No one is sure if this is intentional or a bug. but that's double what any other AoE immobilize does, and actually as good as a lot of 'real' Defender AoE blasts. E.g. Defender Explosive Arrow is base 32 damage, 16 recharge. Anyway, Terrify is a cone, and Drain Psyche is a PBAoE, so its up to you how to resolve that conflict. I think some players have had success using Combat Teleport with macros. That would also clear you to pick up Fold Space if you wanted to go that route. If you're going to solo a lot, its how I'd roll it. Mass Hypnosis is now autohit. It's an easy place to put a chance for a +15% heal proc. Open every fight with this if you're starting out with less than full HP. Enemies won't notice and you get a free 15% HP back. RE: Drain Psyche strategies and Mind Control in general. Teleport doesn't wake enemies up. Given this, and the fact that Drain Psyche benefits so much from clumped enemies, I'd consider a Fold Space strategy. If you team a lot, this will be a lot less effective and I'd recommend going a more traditional Defense route. You'll have to decide which APP powers to take. Personally, I think if you're taking Fold Space and Drain Psyche anyway, the right choice is the Soul APP for Soul Drain. But there are also good arguments for Psi (more defense) and Ice (excellent -Resist in Sleet and more HP in Hoarfrost). Basic proposed build below. I wish it had a bit more Defense, but it's not terrible, Move slots around as you think is appropriate. This Villain build was built using Mids Reborn 3.2.17 https://github.com/LoadedCamel/MidsReborn Click this DataLink to open the build! Level 50 Natural Dominator Primary Power Set: Mind Control Secondary Power Set: Psionic Assault Power Pool: Speed Power Pool: Concealment Power Pool: Teleportation Power Pool: Fighting Ancillary Pool: Soul Mastery Villain Profile: Level 1: Mesmerize -- FrtHyp-Plct%(A) Level 1: Psionic Dart -- Thn-Acc/Dmg(A), Thn-Dmg/Rchg(3), Thn-Acc/Dmg/EndRdx(3), Thn-Dmg/EndRdx/Rchg(5), Thn-Dmg/EndRdx(7), Thn-Acc/Dmg/Rchg(7) Level 2: Mind Probe -- SprBlsCol-Rchg/HoldProc(A), SprBlsCol-Dmg/EndRdx/Acc/Rchg(9), SprBlsCol-Acc/Dmg/Rchg(9), SprBlsCol-Acc/Dmg/EndRdx(11), SprBlsCol-Dmg/EndRdx(11), Mk'Bit-Dam%(13) Level 4: Telekinetic Thrust -- Hct-Dam%(A), Hct-Dmg/EndRdx(13), Hct-Acc/Rchg(15), Hct-Acc/Dmg/Rchg(15), Hct-Dmg/Rchg(17), OvrFrc-Dam/KB(17) Level 6: Dominate -- GhsWdwEmb-Dam%(A), UnbCns-Dam%(19), GldNet-Dam%(19), Apc-Dam%(21), HO:Nucle(21), SprAscoft-Rchg/+Dmg%(23) Level 8: Confuse -- MlsIll-Acc/Conf/Rchg(A), MlsIll-Conf/Rng(23), MlsIll-Acc/EndRdx(25), MlsIll-EndRdx/Conf(25), MlsIll-Acc/Rchg(27) Level 10: Mass Hypnosis -- CaloftheS-Heal%(A) Level 12: Hasten -- RechRdx-I(A), RechRdx-I(27) Level 14: Stealth -- LucoftheG-Def/Rchg+(A), Ksm-ToHit+(29) Level 16: Teleport Target -- WntGif-ResSlow(A) Level 18: Total Domination -- BslGaz-Acc/Hold(A), BslGaz-Rchg/Hold(29), BslGaz-EndRdx/Rchg/Hold(31), BslGaz-Acc/Rchg(31) Level 20: Drain Psyche -- TchoftheN-Heal/HP/Regen/Rchg(A), TchoftheN-Acc/Heal(31), DctWnd-Heal/Rchg(33), EffAdp-Acc/Rchg(33) Level 22: Boxing -- Empty(A) Level 24: Tough -- StdPrt-ResDam/Def+(A), GldArm-3defTpProc(33) Level 26: Terrify -- PstBls-Dam%(A), PstBls-Acc/Dmg/EndRdx(34), PstBls-Dmg/Rng(34), PstBls-Dmg/Rchg(34), PstBls-Dmg/EndRdx(36) Level 28: Weave -- LucoftheG-Def/Rchg+(A), LucoftheG-Def(46), LucoftheG-Def/EndRdx(50) Level 30: Combat Teleport -- BlsoftheZ-ResKB(A), BlsoftheZ-Travel/EndRdx(43) Level 32: Mass Confusion -- CrcPrs-Conf%(A), CrcPrs-Conf/EndRdx(36), CrcPrs-Conf(36), CrcPrs-Conf/Rchg(37), CrcPrs-Acc/Conf/Rchg(37), CrcPrs-Acc/Rchg(37) Level 35: Psionic Lance -- StnoftheM-Dam%(A), StnoftheM-Dmg/EndRdx/Rchg(39), StnoftheM-Dmg/ActRdx/Rchg(39), StnoftheM-Acc/Dmg(39), StnoftheM-Dmg/EndRdx(40), GldJvl-Dam%(40) Level 38: Psychic Shockwave -- Obl-%Dam(A), Arm-Dam%(40), Arm-Dmg/EndRdx(42), Arm-Acc/Rchg(42), Arm-Acc/Dmg/Rchg(42), Arm-Dmg/Rchg(43) Level 41: Dark Embrace -- UnbGrd-Max HP%(A), HO:Ribo(43) Level 44: Soul Drain -- Erd-%Dam(A), Erd-Acc/Rchg(45), Erd-Dmg/Rchg(45), Obl-%Dam(45), Obl-Acc/Rchg(46), Obl-Acc/Dmg/Rchg(46) Level 47: Dark Obliteration -- PstBls-Dam%(A), PstBls-Acc/Dmg/EndRdx(48), PstBls-Dmg/EndRdx(48), PstBls-Dmg/Rchg(48), PstBls-Acc/Dmg(50), Bmbdmt-+FireDmg(50) Level 49: Fold Space -- Acc-I(A) Level 1: Brawl -- Empty(A) Level 1: Domination Level 1: Sprint -- Empty(A) Level 2: Rest -- Empty(A) Level 1: Swift -- Empty(A) Level 1: Health -- Pnc-Heal/+End(A), NmnCnv-Regen/Rcvry+(5) Level 1: Hurdle -- Empty(A) Level 1: Stamina -- PwrTrns-+Heal(A) Level 49: Quick Form ------------ | Copy & Paste this data into Mids Reborn : Hero Designer to view the build | |-------------------------------------------------------------------| |MxDz;1408;683;1366;HEX;| |78DA65945B4F134114C767BB5B2BD05A282DB77229456E2D14EA9B0A0AE19210AD6| |982F1C54B5DA1E0C6A54BBA8B914FA17879F4FA15BCBEF8017CD228EA83BEF86634| |A2F14262A2D6D3FD9F911A26D9FC76FE73FE3367E64C267361D2BFB0303D2694E08| |4A9DB766ED25A320ABA63157D477467A5A89BAAA0E6A3AFFDDF506EC22A3845CB4C| |658CC2BCEC746E0D8FDBB6BE623AA9AC6D5805634EF64575D622D3EC723E3F5FE7F| |ECE14CE1BB671C6300D6735E42A47F3667ED92A3ABA43D6802B4D1B8B671DA3B018| |9D5A36E6525BABCC5A2B662EA3DB4EBEB8DA44F9C5E81B2D67AB94331625218E7B8| |4486BC257217AC575E18A9E9BCCDBA07607DC7183790BDC4966459A956B1AC4ABCC| |2B60F565E61AE83F077315995569569348C79F0077F533FBC0DA5EE63BD5E541825| |7B0D9BBA4B862680641A1290485D3E88747284C5345C363E863041FAFACF936616E| |F801367D677E035BBE82E364AA92A757F504629C6A5FC3A25293C4C65A98011A0CC| |8C140048ED6DFD46DD344370D06E574C128129B20D4B1A8D6AD7BDCC8D65760FB6B| |E64BD04FC1F58A5BBB925A1FC60CED113096C172B18B380285968BF0798948899A5| |0496A94E93596FF68D2D81EF82709CDF2889A1F61439D0F990F98F7C1AE7B7C4D68| |C6289B3C51DEF060184CD7823D14D426976D7B8BF4126FC072E13A64593B74885DA| |79927C0DD2799A79839BE2B648ECB0B155F474E3D2F98CF994FC1DE67CC016C3848| |E8962B770B88BDA398B97F84B99FB98FD3DE0B5EA2F03EB9A7BE9F30270EE0D6BDF| |70B919469253750BC810FCC8F4C5E71F017661CFC03AE919C9269A5B80E435C8721| |3EF721AE43FA2ED3E375A93608312CEFD8700B065B35211BBD02EE4D885748A5C3D| |BC7B39A7C2248525CE95375E55BE24A9F2B244574623FDA31547D637BFC97FFA44D| |3C0E871294B24CE52FF492D95B| |-------------------------------------------------------------------|
-
Thanks for sharing your build. I have a couple of minor comments I hope are helpful. 🙂 Overall I recognize this is a proc build. Good job on most of it. This build is close, but isn't quite a perma-dom build on its own. You can use base buffs to get reach perma-dom levels, or potentially close the gap with Ageless Destiny. Just making sure you're aware. It can still work with this Recharge as long you're aware going in, as long as that's part of the plan. I wouldn't bother proccing Distortion Field. For all those procs, you've landed at about 49 Damage. Where if you just 5 slotted Positron's Blast and included the proc you'd get 50 damage, with better recharge, lower endurance cost, accuracy, and pick up a global Recharge bonus I'd recommend taking Lift over Crush. You don't have to so that of course. But Lift is 100% chance to knock up, casts very fast (1 second), and has better DPA than Crush. If you're trying to get purple set bonuses for Recharge, 5 slotted Apocalypse works well here. If you are doing it for the Recharge bonus, it is probably better to put purples in Soul Drain instead of purpling out Dimension Shift, since DS doesn't get any benefits at all from slotting, other than Range, End Redux, and Recharge.
-
It may not be what you're asking for, but you're at least partly describing an Illusion Controller. Pick any that have strong debuffs. Cold, Dark, Time, Thermal, Trick Arrow, etc depending on the flavor of the supplemental abilities you want. Build for Recharge and whatever level of personal Defense you're comfortable with. Go on to easily solo Task Forces because you get to ignore 90% of the nastiness enemies throw at you. Stack single target Confusion discreetly and don't even deal with Elite Boss aggro at all. Tanking groups of enemies can be somewhat trickier, but is still doable. This isn't a "leap into the fray" and survive build, of course. Although depending on which secondary you picked it's not necessarily even bad at that.
-
Here is a potential procc'ed out take on the combo. I aimed to make this as damage friendly as possible without skimping too badly on the ally shields or other effects. Endurance slotting in Stamina/Health is a bit underslotted, so this would be relying on Destiny Ageless. You could decide to move slots out of procs over to those spots if you wanted to take a different route, like Rebirth for the healing. Power Boost is a given for any of my Force Field builds. While you don't have to do it, IMO double-strength shields are making the most of Force Field's otherwise mediocre abilities. I took Weaken Resolve to help cover for Force Field's lack of resistance debuff. Due to the nature of the -Resist proc not stacking from multiple teammates, on teams it won't be super critical. If you solo, though, this power should be giving a reliable -27% Resist debuff plus the damage effects listed, which should help a lot against hard targets, since -Resist multiplies proc and pet damage. RE: Force Bubble, Repulsion Field and Force Bolt, this may be sacrilege to some Force Field players, but these powers don't even pass the "would I take this if it was an APP power?" test for me. Some of these powers are APP powers and people don't take them. I personally think Repulsion Field is the best of the lot, and Force Bubble is kinda fun. But this a power gaming buiild, and none of these three surpass what you can grab from pool powers in my opinion. RE: Smoke, this is normally not a very good power. But Power Boosted Smoke is actually a pretty decent source of -ToHit, and you could sneak that into the build if you wanted. Note I didn't bother to completely cap to any vector. You could, if you wanted to, by moving some slots around. My take on it is that 1) you're way overcapped for the 15 seconds after Power Boost, 2) you're capped any time you eat a Purple, 3) you're probably capped if there's any teammate nearby running a defense toggle or using a -ToHit power. This Hero build was built using Mids Reborn 3.2.17 https://github.com/LoadedCamel/MidsReborn Click this DataLink to open the build! Level 50 Magic Controller Primary Power Set: Fire Control Secondary Power Set: Force Field Power Pool: Speed Power Pool: Leadership Power Pool: Fighting Power Pool: Force of Will Ancillary Pool: Primal Forces Mastery Hero Profile: Level 1: Char -- GldJvl-Dam%(A), Apc-Dam%(3), GldNet-Dam%(3), GhsWdwEmb-Dam%(5), UnbCns-Dam%(5), NrnSht-Dam%(7) Level 1: Personal Force Field -- LucoftheG-Def/Rchg+(A) Level 2: Deflection Shield -- LucoftheG-Def/Rchg+(A), LucoftheG-Def(7) Level 4: Fire Cages -- PstBls-Dam%(A), PstBls-Acc/Dmg/EndRdx(9), PstBls-Dmg/Rchg(9), PstBls-Dmg/EndRdx(11), PstBls-Acc/Dmg(11), Bmbdmt-+FireDmg(13) Level 6: Hasten -- RechRdx-I(A), RechRdx-I(13) Level 8: Hot Feet -- SprAvl-Rchg/KDProc(A), SprAvl-Acc/Dmg/EndRdx/Rchg(15), SprAvl-Acc/Dmg/Rchg(15), SprAvl-Acc/Dmg/EndRdx(17), SprAvl-Dmg/EndRdx(17) Level 10: Insulation Shield -- LucoftheG-Def/Rchg+(A), LucoftheG-Def(19) Level 12: Flashfire -- SprWiloft-Conf/Hold/Immob/Sleep/Stun/Fear/Rchg(A), AbsAmz-Acc/Stun/Rchg(19), AbsAmz-Stun(21), SprWiloft-Rchg/Dmg%(21), Bmbdmt-+FireDmg(23), PstBls-Dam%(23) Level 14: Maneuvers -- LucoftheG-Def/Rchg+(A) Level 16: Tactics -- GssSynFr--Build%(A), GssSynFr--ToHit/EndRdx(42), GssSynFr--Rchg/EndRdx(43), GssSynFr--ToHit/Rchg/EndRdx(43), GssSynFr--ToHit/Rchg(43), GssSynFr--ToHit(46) Level 18: Cinders -- BslGaz-Acc/Hold(A), BslGaz-Acc/Rchg(25), BslGaz-Rchg/Hold(27), BslGaz-EndRdx/Rchg/Hold(27) Level 20: Dispersion Bubble -- RedFrt-EndRdx(A), RedFrt-Def(29), RedFrt-Def/EndRdx(29), RedFrt-Def/Rchg(40), RedFrt-EndRdx/Rchg(40), RedFrt-Def/EndRdx/Rchg(42) Level 22: Boxing -- SprBlsCol-Rchg/HoldProc(A), SprBlsCol-Dmg/EndRdx/Acc/Rchg(31), SprBlsCol-Acc/Dmg/Rchg(50), SprBlsCol-Acc/Dmg/EndRdx(50), SprBlsCol-Dmg/EndRdx(50) Level 24: Tough -- StdPrt-ResDam/Def+(A), GldArm-3defTpProc(31) Level 26: Bonfire -- OvrFrc-Dam/KB(A), FrcFdb-Rechg%(31) Level 28: Weave -- LucoftheG-Def/Rchg+(A) Level 30: Cross Punch -- Arm-Dam%(A), Erd-%Dam(33), Erd-Dmg(33), Erd-Dmg/Rchg(33), Obl-%Dam(34), ScrDrv-Dam%(34) Level 32: Fire Imps -- ExpRnf-Acc/Dmg(A), ExpRnf-Dmg/EndRdx(34), ExpRnf-Acc/Dmg/Rchg(36), ExpRnf-EndRdx/Dmg/Rchg(36), SlbAll-Build%(36) Level 35: Repulsion Bomb -- PstBls-Dam%(A), Bmbdmt-+FireDmg(37), FrcFdb-Rechg%(37), ExpStr-Dam%(37), Ann-ResDeb%(39), HO:Nucle(39) Level 38: Weaken Resolve -- TchofLadG-%Dam(A), AchHee-ResDeb%(39), ShlBrk-%Dam(40), CldSns-%Dam(42) Level 41: Conserve Power -- RechRdx-I(A) Level 44: Energy Torrent -- PstBls-Dam%(A), PstBls-Acc/Dmg/EndRdx(45), PstBls-Dmg/Rng(45), PstBls-Dmg/Rchg(45), PstBls-Acc/Dmg(46) Level 47: Temp Invulnerability -- UnbGrd-Max HP%(A), UnbGrd-ResDam/EndRdx/Rchg(48), UnbGrd-ResDam(48), UnbGrd-ResDam/EndRdx(48) Level 49: Power Boost -- RechRdx-I(A) Level 1: Brawl -- Empty(A) Level 1: Containment Level 1: Sprint -- Empty(A) Level 2: Rest -- Empty(A) Level 1: Swift -- Empty(A) Level 1: Health -- NmnCnv-Regen/Rcvry+(A), Pnc-Heal/+End(25) Level 1: Hurdle -- Empty(A) Level 1: Stamina -- PwrTrns-+Heal(A), PrfShf-End%(46) ------------ | Copy & Paste this data into Mids Reborn : Hero Designer to view the build | |-------------------------------------------------------------------| |MxDz;1388;672;1344;HEX;| |78DA6594494C135118C7DF7466A89496420B94B5D04AA1B5B48267884BA589A6242| |4267A6C9A32854906DA4C6B22F18C71E1E2164F6E898AC6A3EBD5BB7872397B5263| |44C4257AAA1FF3FF9E609864FAEBB77FEF7BEFCDD4A9C3DE52297B40282D19AB50A| |DE633E5859A5DB62CC3D6A70AB366516C3E6E7AFBB72CD2299D356D430A3DDBEC87| |4E964AE96CD92E1AF9AC695833C2335D26F76315C398F13B7F734661C6B0AB7366C| |5E7C8597376AE662ECC062039A1E552FE846959DD9315B3989EB6CDF98295772CD5| |FC54A15A33ECC5CECDBEE85D52E847715AADEB624415624C13AE31173809599B57C| |023D0371448EED3C438029D6021DAE134415038A3A2B0B2A10D3C43503942579F0B| |47B9EB19F309E879CC7C047A5DBAC3280D539799F5241B9967C9E066A3E6BEAD39C| |AE65BCC9B60CB0DE675703F0534CA8C8DDC6B807B3D476892BD36AD6014811C46D0| |7694F910FA0EEEB183D7D44ABDFA38B3F071E62029FD72D8FE07C890B80FEE5961D| |E63DE055377C0F314D8CAC16AEB6B97B3039D6FC0EEB7CC77E041720CCA4A413FCA| |F736333DE07013D30B267CA0426DB6F3C2B5F6AB1855F80A3876997989791154292| |82447190AE18084F7613A1748ECC2A1A82B5DEFA10C2F61611A45F6C851F5F0A896| |6394402EA06F029E036B58DDC027E66730229031721AC35FA6C07E7916FAD7111CF| |906EEDE607E6766C00C05447115EA7A94B77190B775907B1D5C24063531F4011587| |C6C94F5345352E444C6E4E6C15CE432FE03CDCA03A6D263EA2DD9724C6E5B589F3F| |9DDF00A9194434F72F911BE19234F997C43527C335629535A964DFF414F7B7F337F| |307F82AF08A3B2EC2897EDD5B65FE13A3D9B1DFE53D5733BEDD39AFC62904A71545| |F3C5B5F11F6FABA4DA588E3D8D5CE085A59DBE9BFFE9FFF2F1CAAD4354CF22FE9F6| |D2D2| |-------------------------------------------------------------------|
-
Thanks for the feedback all. Before anyone commented, I played for several hours as a Brute. Hit Level 30, took another look at the combo, decided I'd prefer it as Tanker. I've created a Tanker instance of the toon and switched over. This character is surprisingly enjoyable to play at low levels so I didn't fret too much about having to start over. An early damage aura really helps with low level soloing. FWIW I didn't find the Brute version having any trouble getting Fury. It's possible I don't know enough about how Fury works, but the bar was more or less instantly full in any combat engagement. On the second play through I see that I much prefer the unlock order of powers on Tankers to Brutes. Tankers get Oppressive Gloom at 26, versus 35 on a Brute. The Tanker does have to wait til 38 for Seismic Smash, but I'd rather have early AoE attack/stun powers (20, 26, and 28 on the Tanker versus the Brute's 8, 32, and 35). I haven't yet gotten to where I can combo Fault and Oppressive Gloom, which are the real showstopper of the combo IMO. Pretty excited about it though, because Fault by itself is pretty good mitigation. Having a Mag 4 hold on top of that is comfortable Dominator territory for me, albiet in a much more survivable package than I am used to.
-
I'm rerolling one of toons yet again and think I'd like to try Stone Melee mixed with Dark Armor. I like Dark Armor because I am mainly a Dominator player, and the stun in it is fun (probably skipping the Fear aura though). I'm leaning toward Brute at the moment but could be persuaded.
-
What are the benefits and drawbacks of Energy Melee and Electric Armor paired together for each of the melee ATs? I'm initially leaning Tanker, but could be talked out of that if there's a significant reason to roll it differently.
-
Never done one of those farms, but they seem like the province of Water Blasters. I can see Water/Tactical Arrow doing well at something like that.
-
Spiritual Alpha and the oddness of CoH to hit buffs question
oedipus_tex replied to Snarky's topic in General Discussion
Oh for sure there are cases where it can work out. Spiritual Core add 45% Recharge to every single power, 30% of which ignores enhancement diversification. That could result in unlocking an attack chain for some builds that otherwise wouldn't work out, and for those cases, all the blessings. The damage alphas are so hard to pass up just because Damage is the one stat we normally want every power into the Reds on. Being able to go 30% or 22% above that, and have it apply to every attack, is really hard to pass up. There are occasions though where there's a house of cards moment that unlocks with an alternative slot. -
Spiritual Alpha and the oddness of CoH to hit buffs question
oedipus_tex replied to Snarky's topic in General Discussion
Spiritual Alpha is in probably most cases one of the worst Alpha power selections. It's the mermaid Alpha slot luring the unwary sailor in a size DD bra made of useful seeming numbers that just want to drown you. I'm not going to say there's no build that exists that can't make use of it, but, probably 90% of the time, staying away is what you should do. The reason actually isn't ToHit. But we'll get to that. Alpha slots are just enhancements that happen to operate on your whole build. Imagine slotting a ToHit enhancement. What does that do? It enhances enhanceable +ToHit (if the power has it). Slot a Hami O that has ToHit enhance in a power that lacks +ToHit? Oh well, wasted. So it was with the Alpha slot. But that's not the reason Spiritual is such a sour power. Like I mentioned, Alpha slots are just enhancements that happen to affect more than one power. What happens when you put Recharge in a power? Proc rates decrease. Same thing happens with Spiritual. On top of that, Alpha slots partially break through the enhancement diversifcation system, which leads to my final statement: I'm not going to say that it's always true, but probably 95% of the time, not taking an Alpha slot with a Damage enhancement is a mistake. Not talking to you right now, Kinetics. Everyone else. Damage. Damage damage damage Alpha slot. You can take one of the ones that happens to give Damage and other stuff like end mod or +/- ToHit or Hold duration. But anything else outside of a very very specialized situation should be taking a Damage alpha slot. And especially not Spiritual.