oedipus_tex
-
Posts
2652 -
Joined
-
Last visited
-
Days Won
4
Content Type
Profiles
Forums
Events
Store
Articles
Patch Notes
Everything posted by oedipus_tex
-

Question on Perma-hasten, PermaDom, and the details
oedipus_tex replied to TK3477's topic in Dominator
For "comfortable" perma Domination you want around +90% Global recharge from set bonuses. Dominators are, frustratingly, one of the only (maybe THE only?) AT that doesn't get +Recharge in its secondaries. Other ATs can usually hit better global recharge than Dominators, the AT that needs it most. That said there are some tried and true strategies. Here's a real basic formula: Starting out: Defense powers. Every one of them should be slotted with Luck of the Gambler + Recharge. 5 of these are worth +32.25% Recharge. Price: About 6 million inf each. Note actually finding and taking 5 defense powers in a Dom build can be hard. Standard picks are: APP armor, Combat Jumping, Maneuvers, Weave, Vengeance. APP armor can be Ice, Psi, or Mace. Psi offers two places for LoTG and still provides a resist armor, so for a cheap, just starting out perma-dom I recommend it most. Hold powers. You have at least 2 of these. 4 slot Basilisk's Gaze for +7.5% recharge each. Price: About 3 million per piece. AoE powers. 5 slot Positron's Blast for +6.25% Recharge. Price: 2 million per piece. Snipe powers. 5 slot Sting of the Manticore for +7.5% recharge. Pets: 4 slot Expedient Reinforcement for +6.25% recharge. Price: 2 million inf per piece Assuming 5 defense powers, 2 hold powers, and 2 AoEs, a snipe, and a pet, this will bring you to about +73% recharge, You're need an additional +20 to get to the edge of permadom, and about +25-30% to get pretty comfortable. Where you find that depends on what set you're playing: Electric Control or Assault: 6 slot Power Transfer provides +7.5% recharge. This can go in any power that does endurance drain, ideally in one that also does damage. Price: 1 mil Dark Control: Cloud Senses (usually in Fearsome Stare but can go in any -ToHit power) is worth 6.25% recharge. Price: million ish per piece Dark Control also has two pets, so you can slot Exp Reinforcement twice Fire or Earth Control: Put a chance for +100% Recharge in Bonfire and Earthquake. You can't do this with Ice's ice slick, annoyingly. PBAoE attacks: Obliteration is relatively inexpensive and worth +5% recharge at 6 slots Note that Destiny Ageless adds global Recharge and does help you achieve perma Dom. Getting max performance: Confuse powers. Nearly always should be 5 or 6 slotted with Coercive Persuasion purple set. Confuse control sets have an easier time reaching perma dom comboed into Range defense capped because of this set. Price: 20 mil inf Dominator ATO. Adds +10 recharge. Price: 20 mil inf per piece. Ideally goes in a power you use a lot so you can take advantage of the +damage proc. Hold purple set. I rarely use this, but it is worth +10 recharge at purple prices, 20 mil per piece. Ranged AoE Attack: Whatever it is. 5 slot Ragnarok. (Doms almost never 6 slot purples, that's for armor characters trying to fill an armor hole). Price: 25 million per piece. This replaces your Posi's Blast slotting. This is usually the last thing I pay for because it only really gives you about +3 more recharge, since this is so similar to Positron's Blast. Tip on purples. Yes they are expensive. During normal play they will sometimes drop, If you get a crap purple, build it anyway, and use conversion on it. It costs one converter to flip a purple to another random purple. This makes obtaining the useful sets like Armageddon, Ragnarok, etc much more doable. Unfortunately for ATOs you're just stuck paying millions. -
I think the various "mode" powers need a look to be honest. The issue is that Dominators have two possible places they can use for damage. There's the primary of some Control sets (Gravity, Mind) and the Assault set itself. Gravity for example is a straight up blast set with a few controls. It loses big paired with Energy or Fire Assault because those mechanics don't actually benefit the blasts it has. In fact, I'm critical of Gravity Control because the powers mesh so poorly with the secondary. Are Propel andL ift meant to replace blasts in the secondary? Gravity's special attack mechanic that rewards the player with extra damage feels like it needs an update on Dominators so that any Assault power, not just Propel and Lift, benefits.
-
What's the Best Gravity Dominator Build You Can Put Together?
oedipus_tex replied to oedipus_tex's topic in Dominator
I believe you can also use Recall Friend on pets and position Singularity that way. -
Thanks Infinitum. The Tanker was an experiment to see how my Elec/Psi Dominator would perform as a Tanker. Elec/Psi Tanker has a lot of conceptual overlap with Elec/Psi Dom. The Elec/Psi Dom is a very good sapper, especially when I run him as Elec/Psi/Mu (right now he's swapped to Ele/Psi/Primal for the better damage). I was disappointed in the Tanker as a sapper, but he does still run content well. The best Sapper-with-armor build I've found is Elec/Elec/Elec or Elec/Energy/Elec Sentinel. With that build I can crash enemy endurance very reliably. But, no Confuse power. 😞 I guess overall this points to game balance being on point. None of the three combos is especially better than the others, all have their merits.
-
-Recharge in general is just nasty nasty nasty, especially on a Dominator. Arctic Air would be the most brutal power in the game, except the enemy version of it is nerfed. They can't run it continually, it's up for like 20 seconds and down for a while. If they could keep it running all the time this would be the worst power to possibly encounter. It does not roll ToHit. The Slow always hits, and the Confusion is the rare example of a mezz that is a pure luck roll, 30% per tick. The other main example of this is Choking Cloud., but that's a Hold which more teams are likely to have mezz protection to ward off. Cold Domination and Time Manipulation are two sets that really have no business appearing on enemies in the AE. Outside of some specialized builds, they simply wreck players. The proliferation of Slow Run Speed powers in general can be overcome with Teleport powers, which are much more useful in AE content than the general game.
-
Well, I discovered something disappointing. Mids reports Electric Fences to have -16% Endurance. In game, the actual number is much lower, only 5%, which is not enough to meaningfully make this into a sapper. Power Sink is still good, but mainly as an endurance restoration tool. Can a drain-tank work for Tankers without pairing Elec Armor with Elec Melee? I was hopeful the Mu app would cover it, but it doesn't seem to in practice. Also, I was quite surprised that Electric Fences on Tankers stops knockdown. The version on Electric Controllers does not do this. I also thought it would, at a minimum, have been converted the way Earth, Fire, Ice, and Plant Control all have been from totally stopping knock to converting kb to kd. Was it missed during that update?
-
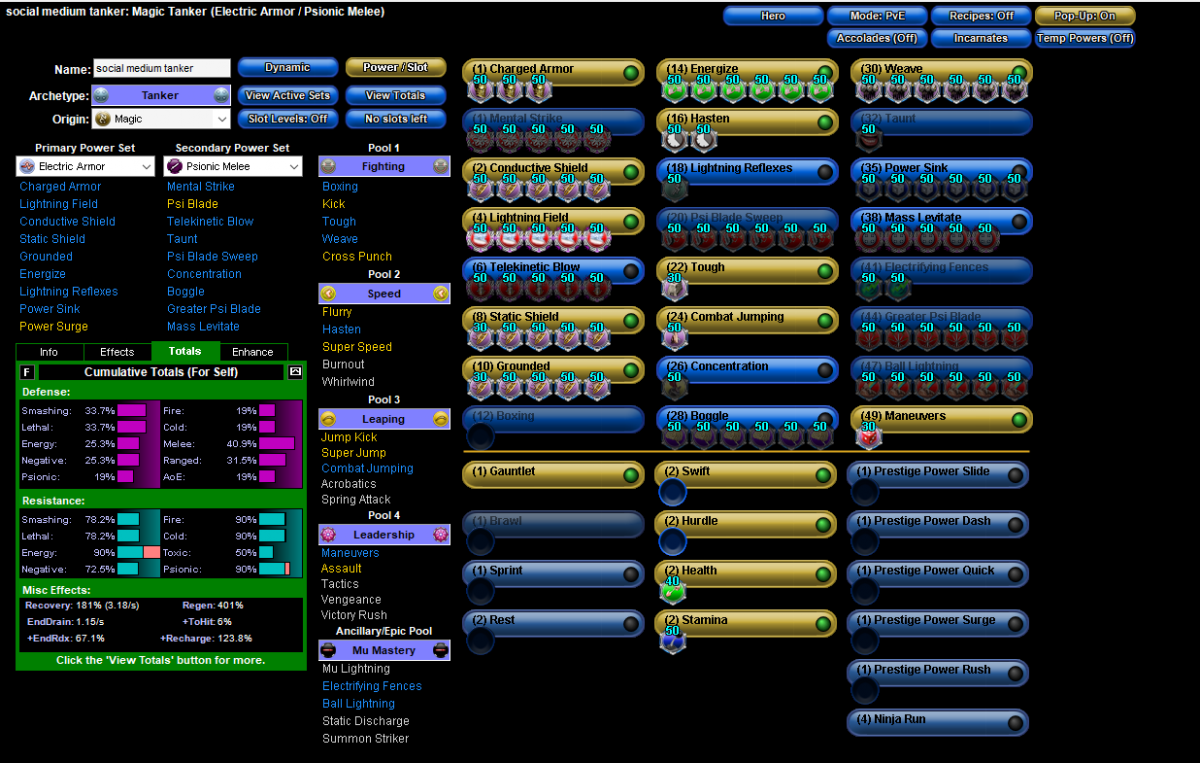
I've decided recently to re-concept my Elec/Psi Dominator as an Elec/Psi Tanker. The hope is to build a sap-Tanker with some control-ish capabilities with Boggle. I'm familiar with slotting for Dominators but not for Tankers. Can you take a look at the build below and give pointers? Current incarnate plans are Musculature for Damage + End Mod, and Destiny Barrier. I couldn't cap all Defense due to not having any base in Electric to work from, but hopefully ~40% melee and 31.5 Ranged is a decent enough base. The proc in Mass Levitate adds some additional Resist (I assume, never used it) that should bring S/L up to 85%, which hopefully works with the residual 5% in Destiny Barrier to keep me capped at 90% resist to S/L/F/C/En/Psi. Neg still has a hole and I patched Toxic as much as I could, but that's a big hole to try to patch. Thanks! Hero Plan by Mids' Reborn : Hero Designer 2.6.1.25 https://github.com/Crytilis/mids-reborn-hero-designer Click this DataLink to open the build! social medium tanker: Level 50 Magic Tanker Primary Power Set: Electric Armor Secondary Power Set: Psionic Melee Power Pool: Fighting Power Pool: Speed Power Pool: Leaping Power Pool: Leadership Ancillary Pool: Mu Mastery Hero Profile: Level 1: Charged Armor -- GldArm-3defTpProc(A), GldArm-ResDam(3), GldArm-End/Res(3) Level 1: Mental Strike -- SprBlsCol-Rchg/HoldProc(A), SprBlsCol-Dmg/EndRdx/Acc/Rchg(5), SprBlsCol-Acc/Dmg/Rchg(5), SprBlsCol-Acc/Dmg/EndRdx(7), SprBlsCol-Acc/Dmg(7) Level 2: Conductive Shield -- UnbGrd-Max HP%(A), UnbGrd-ResDam/EndRdx/Rchg(9), UnbGrd-ResDam(9), UnbGrd-ResDam/EndRdx(11), UnbGrd-Rchg/ResDam(11) Level 4: Lightning Field -- SprAvl-Acc/Dmg(A), SprAvl-Dmg/EndRdx(13), SprAvl-Acc/Dmg/EndRdx(13), SprAvl-Acc/Dmg/Rchg(15), SprAvl-Acc/Dmg/EndRdx/Rchg(15) Level 6: Telekinetic Blow -- SprGntFis-Dmg/EndRdx/Rchg(A), SprGntFis-Dmg/Rchg(17), SprGntFis-Acc/Dmg/EndRdx/Rchg(17), SprGntFis-Rchg/+Absorb(19), SprGntFis-Acc/Dmg/Rchg(19) Level 8: Static Shield -- UnbGrd-ResDam/EndRdx/Rchg(A), UnbGrd-Rchg/ResDam(21), UnbGrd-ResDam(21), UnbGrd-ResDam/EndRdx(23), UnbGrd-EndRdx/Rchg(23) Level 10: Grounded -- UnbGrd-ResDam/EndRdx/Rchg(A), UnbGrd-ResDam(25), UnbGrd-ResDam/EndRdx(25), UnbGrd-EndRdx/Rchg(27), UnbGrd-Rchg/ResDam(27) Level 12: Boxing -- Empty(A) Level 14: Energize -- NmnCnv-Heal(A), NmnCnv-Heal/Rchg(29), NmnCnv-Heal/EndRdx/Rchg(29), NmnCnv-EndRdx/Rchg(31), NmnCnv-Heal/EndRdx(31), NmnCnv-Regen/Rcvry+(31) Level 16: Hasten -- RechRdx-I(A), RechRdx-I(33) Level 18: Lightning Reflexes -- Run-I(A) Level 20: Psi Blade Sweep -- Arm-Dmg(A), Arm-Dmg/Rchg(33), Arm-Acc/Dmg/Rchg(33), Arm-Acc/Rchg(34), Arm-Dmg/EndRdx(34), Arm-Dam%(34) Level 22: Tough -- StdPrt-ResDam/Def+(A) Level 24: Combat Jumping -- Rct-ResDam%(A) Level 26: Concentration -- GssSynFr--Build%(A) Level 28: Boggle -- CrcPrs-Conf(A), CrcPrs-Conf/Rchg(36), CrcPrs-Acc/Conf/Rchg(36), CrcPrs-Acc/Rchg(36), CrcPrs-Conf/EndRdx(37), CrcPrs-Conf%(37) Level 30: Weave -- ShlWal-ResDam/Re TP(A), ShlWal-Def/EndRdx/Rchg(37), ShlWal-EndRdx/Rchg(39), ShlWal-Def/Rchg(39), ShlWal-Def(39), ShlWal-Def/EndRdx(40) Level 32: Taunt -- PrfZng-Dam%(A) Level 35: Power Sink -- PreOptmz-EndMod/Rech(A), PreOptmz-Acc/Rech(40), PreOptmz-EndMod/Acc/End(40), PreOptmz-EndMod/Acc/Rech(42), PreOptmz-EndMod/End(45), PreOptmz-EndMod/End/Rech(50) Level 38: Mass Levitate -- SprMghoft-Acc/Dmg(A), SprMghoft-Dmg/Rchg(42), SprMghoft-Acc/Dmg/Rchg(42), SprMghoft-Dmg/EndRdx/Rchg(43), SprMghoft-Rchg/Res%(43) Level 41: Electrifying Fences -- PwrTrns-Dam/EndMod(A), PwrTrns-Dam/Acc/End(43) Level 44: Greater Psi Blade -- Hct-Dmg(A), Hct-Dmg/Rchg(45), Hct-Acc/Dmg/Rchg(45), Hct-Acc/Rchg(46), Hct-Dmg/EndRdx(46), Hct-Dam%(46) Level 47: Ball Lightning -- Rgn-Dmg(A), Rgn-Dmg/Rchg(48), Rgn-Acc/Dmg/Rchg(48), Rgn-Acc/Rchg(48), Rgn-Dmg/EndRdx(50), Rgn-Knock%(50) Level 49: Maneuvers -- Ksm-ToHit+(A) Level 1: Brawl -- Empty(A) Level 1: Gauntlet Level 1: Prestige Power Dash -- Empty(A) Level 1: Prestige Power Slide -- Empty(A) Level 1: Prestige Power Quick -- Empty(A) Level 1: Prestige Power Rush -- Empty(A) Level 1: Prestige Power Surge -- Empty(A) Level 1: Sprint -- Empty(A) Level 2: Rest -- Empty(A) Level 4: Ninja Run Level 2: Swift -- Empty(A) Level 2: Health -- Mrc-Rcvry+(A) Level 2: Hurdle -- Empty(A) Level 2: Stamina -- PrfShf-End%(A) Level 50: Musculature Radial Paragon ------------ ------------ Set Bonus Totals: 10.5% DamageBuff(Smashing) 10.5% DamageBuff(Lethal) 10.5% DamageBuff(Fire) 10.5% DamageBuff(Cold) 10.5% DamageBuff(Energy) 10.5% DamageBuff(Negative) 10.5% DamageBuff(Toxic) 10.5% DamageBuff(Psionic) 27.88% Defense(Melee) 20.69% Defense(Smashing) 20.69% Defense(Lethal) 6% Defense(Fire) 6% Defense(Cold) 12.25% Defense(Energy) 12.25% Defense(Negative) 6% Defense(Psionic) 18.5% Defense(Ranged) 6% Defense(AoE) 5.4% Max End 7.5% Enhancement(Max EnduranceDiscount) 4% Enhancement(Confused) 53.75% Enhancement(RechargeTime) 45% Enhancement(Accuracy) 6% Enhancement(Heal) 302.2 HP (16.13%) HitPoints Knockback (Mag -3) Knockup (Mag -3) MezResist(Confused) 155% MezResist(Held) 155% MezResist(Immobilized) 155% MezResist(Sleep) 155% MezResist(Stunned) 155% MezResist(Terrorized) 155% MezResist(Teleport) 100% (20% chance) 22.5% (0.38 End/sec) Recovery 44% (3.44 HP/sec) Regeneration 30% ResEffect(SpeedFlying) 30% ResEffect(RechargeTime) 30% ResEffect(SpeedRunning) 11.75% Resistance(Smashing) 11.75% Resistance(Lethal) 38% Resistance(Fire) 38% Resistance(Cold) 25.25% Resistance(Energy) 25.25% Resistance(Negative) 50% Resistance(Toxic) 50% Resistance(Psionic) | Copy & Paste this data into Mids' Reborn : Hero Designer to view the build | |-------------------------------------------------------------------| |MxDz;1475;689;1378;HEX;| |78DA6594D94F135114C6EFD0A9D8522C48D9A92002DDA050C05D635416459AA0A04| |F6A99942B4C2C6D3353127DF4C1EDCDB8C417B7575FFC2B707F77897F834B02CAEE| |783AE79390CCA4EDAFF39D73BE73E6DE99495E1BF0BD1ABE714C28BE9319CD34531| |35AF6AA34DC496D5A4F0B3A02662EAD6B99965939A5CFCDB614EC702905829C991A| |905764D694F1C18C4C170C3D9D3A6ECCE68C0644933223657CCCD473590AD967A27| |C2C97CBC487F4E999829E9DF6DA67E37929A77CF6DF51A9E549F7FF3F99928639A3| |E7AB07F37A3A7EC2982BC854722E95D4CC8234AED7D12421FACEFBE947290E6C958| |85E9710095594748309E652BBC061A9E2916A6BEA43F00173DB7DF01EF30DF92AEC| |AB2A2BECB37D195C647A7F834BCCD754E3428DEB09FBF89E82CF983B9E832F982B3| |49B1BB3B96FB3567113BCC3DC7917BCC57C4B7D4AD1A7B43853501501CC10C06C35| |98ADE60FF31DD57850E3414D1D72EB90DB80DC067829B4DD653C9B28B3E810EFC9A| |59C5DDCE5E7153BAB691C9C60EE3A079E052F305BC9CDCFB58A3F266CAD05FC40BE| |95E854D9C5DA1AAD4C156BEEAA03259C7F103CC4DC7D183C021E65BAA85735F712D| |5B58A7DB535A4D542AB5DE02B5CA71EF5E85BFF926B37486B44DFC68BACEDB9045E| |0653CCB6495063AAD42388F5099EE11E6DA7991DA7C0617084191A62AE52DF66CCD| |26CB2DF475A9756FBF6B6DCAD2BBCFBA1257095195963762E3313EB4C8BFCDA7167| |B57FE21E91CFE01766F42BF88D394908738D125E609FE822F32F99C5B02EB10E9EA| |F330486995D11300AC6981AF9C6511BEF65ADBB0FEC07F73213FBC0FDCC4A5AD31E| |EC5BCF86B0F7B249DD7CA2E953BC3323EAE67BC08A3AA23D0E25E150FA1C4ABF431| |97528632ADA92A2D88AA782DE02AC58DFBD9B6F11447F6E5546E84F48153F1C59BF| |B62A8F791D8A016B949E88042EF31F059805A0| |-------------------------------------------------------------------|

-
What's the Best Gravity Dominator Build You Can Put Together?
oedipus_tex replied to oedipus_tex's topic in Dominator
The main enemy group to watch out for is Arachnos. On my Elec/Psi perma dom I can run Council or Circle of Thorns radio missions at x8+4. But not Arachnos. I can go until Domination drops due to -Recharge. Even token amounts of -Recharge will do it. -
What's the Best Gravity Dominator Build You Can Put Together?
oedipus_tex replied to oedipus_tex's topic in Dominator
If Domination is dropping it could be because you got hit with -Recharge. Most Psi and Ice power have it, and even a little bit of it can cause Domination to drop. -
Gotcha. Yeah, Power Sink. That's a power worth its weight in gold. Power Sink is autohit. In normal content that's pretty useful, but in the AE when you're about to get beat down, it's a lifesaver. Get surrounded by Hurricanes (an AE designer favorite), Power Sink and pray it detoggles them. By the way I should talk about Hurricane. Hurricane is the devil. Hurricane is not just a -ToHit debuff, it's a -Range debuff. OMG. The first time I got mobbed by 'caners and kept clicking and nothing happened I was confused. It wasn't til I thought about what that power does that it occurred to me how dangerous it is when enemies use it.
-
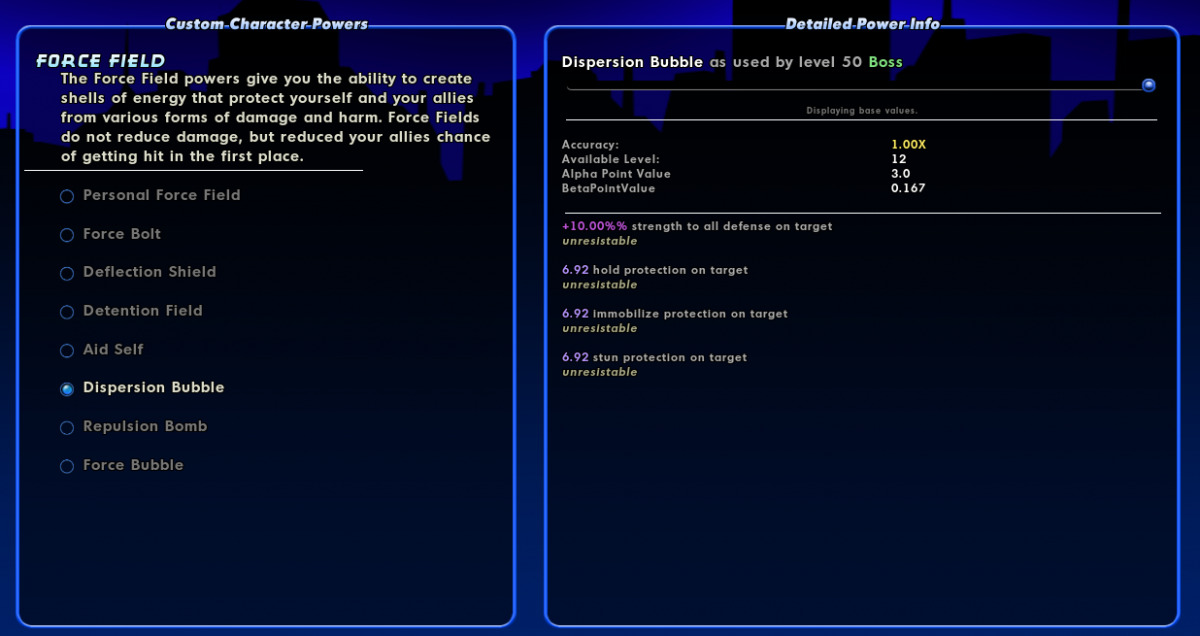
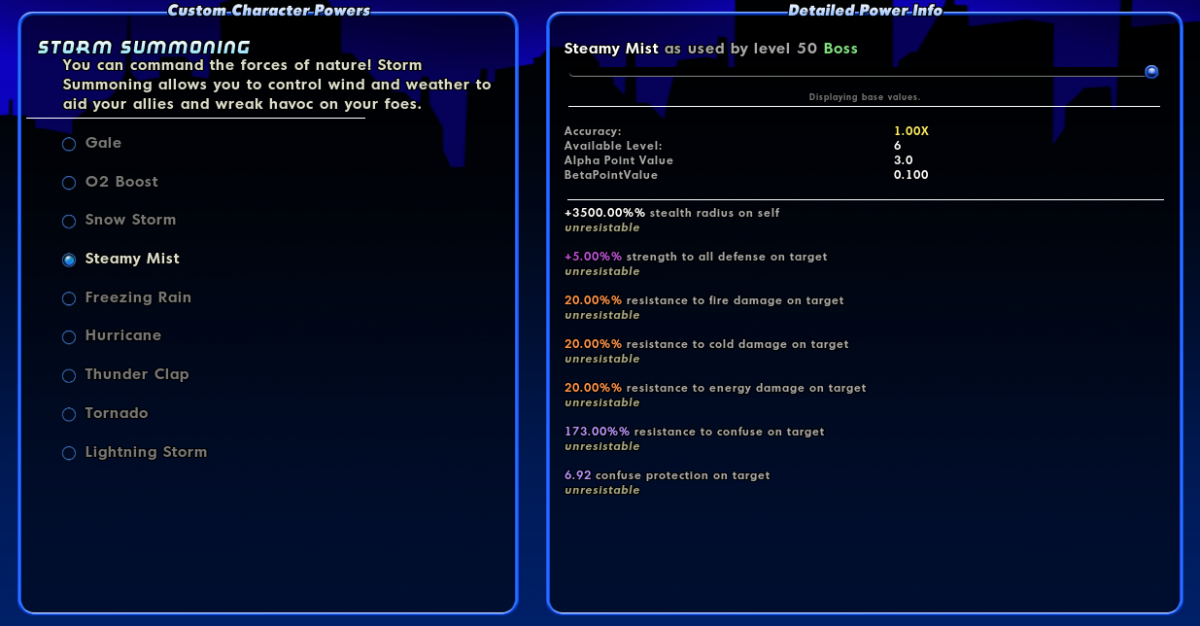
Taking a look at conferrable status protection next. Here is Empathy's Clear Mind. It follows the same scaling as mezz protection provided by an armor, for 1 min 30 seconds. It also protects against mezz types most armors do not: So of course the question is "How reliably does critter AI uses Clear Mind?" The answer to which is "It depends." For sure, when given Clear Mind, some enemies will pre-stack it on their allies. They'll go one by one and cast it on each ally, creating a whole group that is super protected. However, enemies don't always seem to be "awake" to do this. They for sure do it if they are guarding a captive, and maybe for some other objectives. I am not sure that standard enemies standing on a map do it unless they are part of a custom spawn. In my experience, enemies that are part of an ambush or who are actively engaged in fighting do not cast it reliably. They are too interested in bashing your face in. They seem to cast it if they have nothing else available. If you Confuse an enemy with Clear Mind it has a modest chance to cast it on you. Compared to Clear Mind, here's how other anti mezzes compare: Poison (Antidote): Does not cover Confuse or Terrorize. Also provides some resistance to slow/recharge debuffs. Thermal (Thaw): Identical to Clear Mind, but provides a massive Run Speed and Recharge resistance buff (80%). I actually never realized this power was this good. Pain (Enforced Morale): Identical to Clear Mind with some tweaks to resistances/bonuses Sonic Resonance (Clarity): For some reason doesn't exist, so Sonic Resonance only gets mezz protection from its big bubble For the AoE mezz protections, both big bubble powers (Force Field, Sonic Res) confer status as such: Traps is not available in the AE. One more worth a look: Steamy Mists (Storm). It has Confusion protection. In fact, when you see Steamy Mists in the AE, you should probably go "Oh, I bet they gave the enemy that power to give the group its with Confusion protection. The similar-ish powers Arctic Fog and Shadow Fall do not confer Mezz protection. Not sure if this is an oversight or not. On players, Shadow Fall confers Terrorize protection, the AE version does not seem to do this.
-
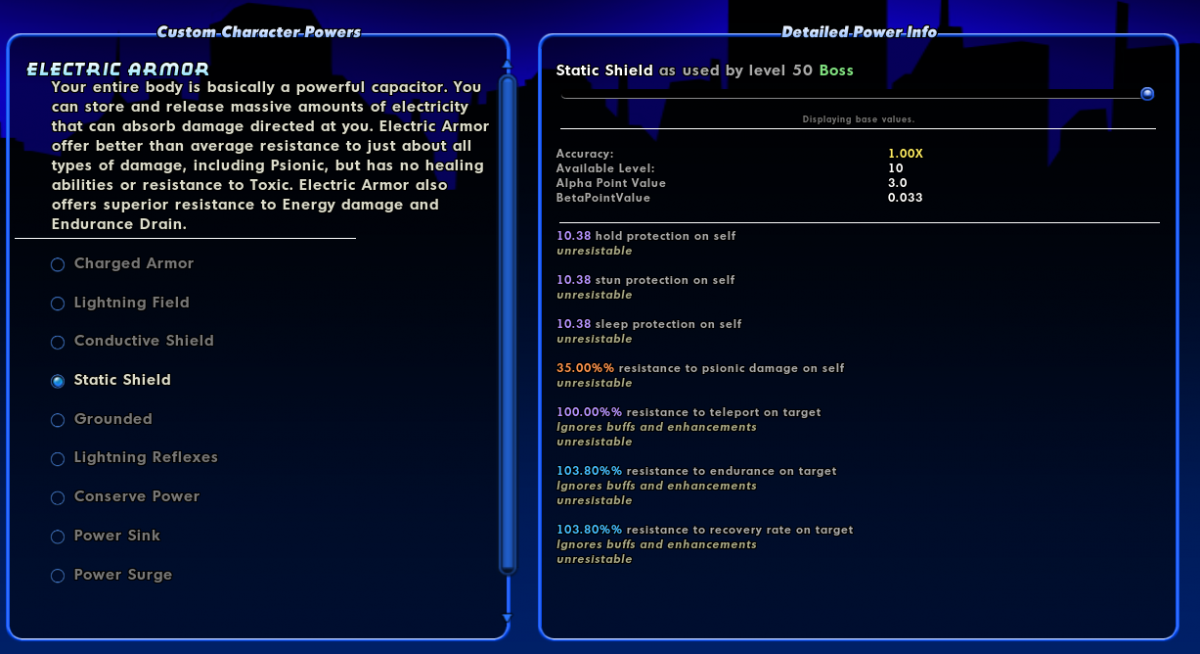
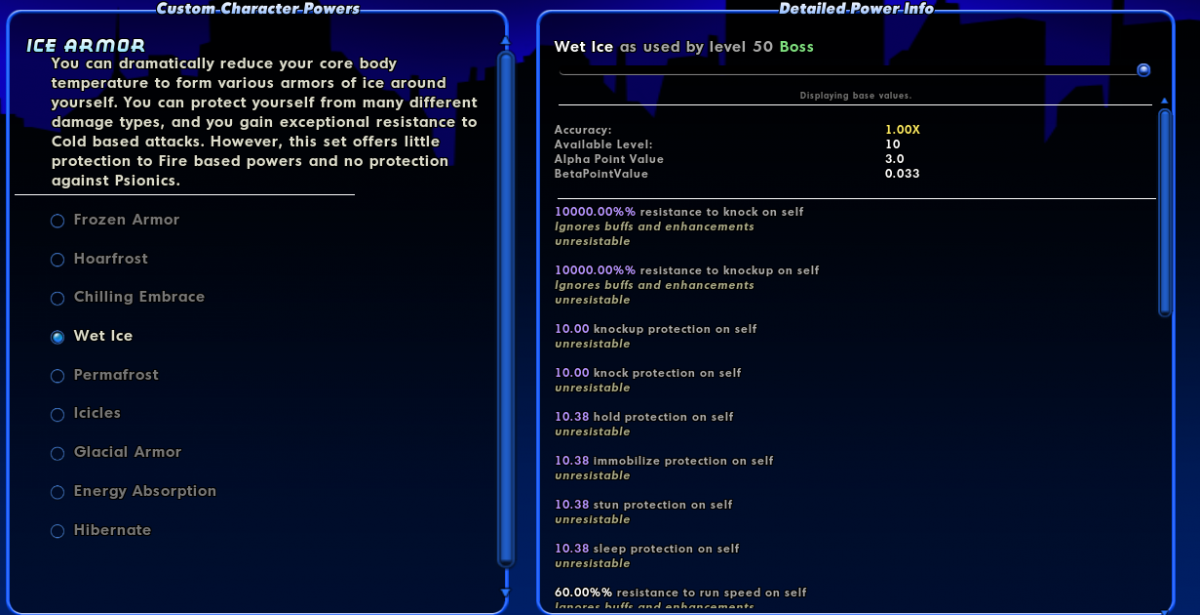
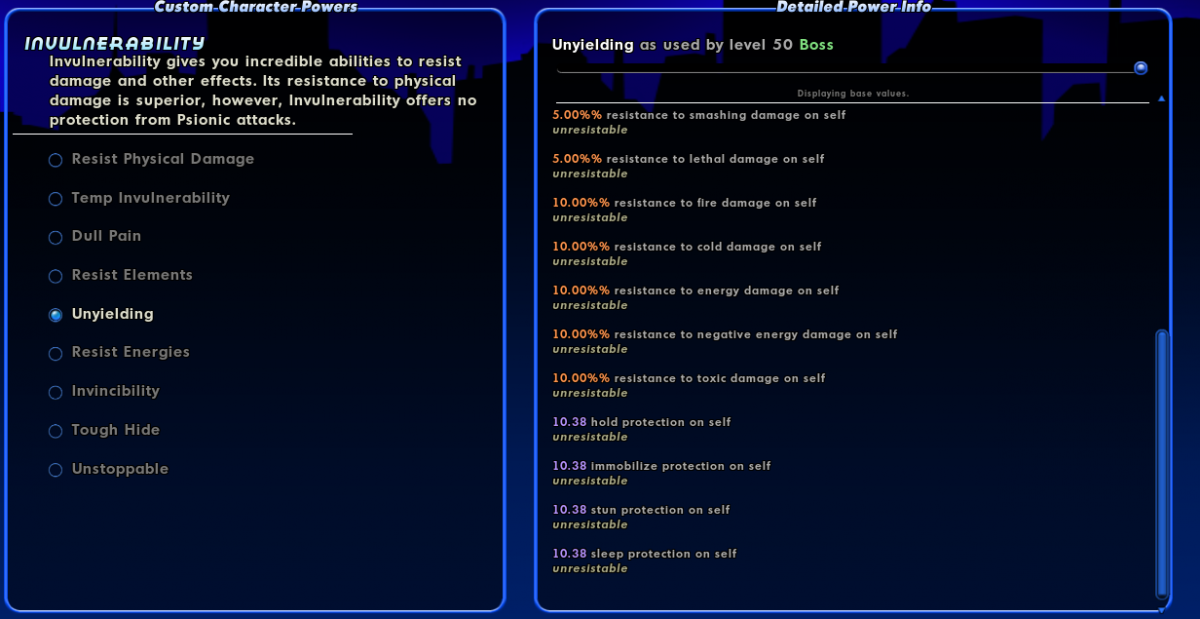
RE: Sleet, one reason I tend to skip Ice is that although Sleet is great, the only AoE blast in //Ice is Ice Storm. It does good damage, but interrupts Sleep. I'm also a little confused about how it interacts with Fear. On Electric Control specifically, what I want is a one-shot knockdown power where hopefully the enemy is hit by the Sleep effect again before they stand up, putting them in lockout mode. Sleep and Fear aren't usually great mezzes, but AE content is different from the canon game. AE designers seem to love Force Field, Traps, and Sonic Resonance bubbles. As for actual armored enemies, I hadn't until recently poked through them to see what I was up against. Here's the anti-mezz powers in 5 random armor sets in the AE. Things worth noting: For bosses and lieutenants, Mezz protection on enemies scales with their level, starting at around 3.5 at level 1 and ending at 10.38 at level 50 (I assume higher than that at 54?). So, to "beat" a mezz most boss enemies are armored against, you need to hit Mag 11. A perma-Dominator can do this with two casts of a mezz, generally. Oops nope, protection in armor stacks with protection from rank. So, a Boss has Mag 4 + 10.38 = 14.38 protection, which you can (generally) overcome with 3 stacks in Dom mode (6+6+6 = 18). Your best chance of doing this is probably a single target Hold, but Mind Control could use Dominate > Telekinesis > Dominate or throw Total Domination in there. Hold procs can help you out here. UPDATE: Minion armor mezz protections are somewhat lower, scaling up to around 7.8 Most armor sets lack Confusion and Fear protection. I'm going to go a separate post on these two mezzes and what AE designers have to do to give these protections to their custom designs. Dark Armor: Just really hope you don't run into Dark Armor. It is one of the new sets with protection to Fear, and note its anti mezz power provides +50% Resistance versus Psi. Note, Dark Armor is one of the few armors with no knock protection, the other obvious one being Fire. There aren't really many ways for designers to confer knock protection unless the critter has it in its armor set. The only powerset I know of that provides -Knock as a buff you can cast on others is Kinetics (Increase Density). Electric Affinity can also do it, but isn't present in the AE. Note: Has an unusual form of knock/immobilize protection in the Grounded power that works only if the enemy is touching the ground.
-
Interesting discussion. Frosticus I'd like to hear why you like the Mu app. I was using that for a while on Elec/Psi and recently gravitated to Elec/Psi/Primal, altho Mu had a lot going for it, Mainly, Power Sink which on an Electric build is outrageously good at flooring Elite Boss endurance. I happen to think the Primal APP is extremely underrated. It has two AoE blasts to pick from, Energy Torrent and Explosive Blast Energy Torrent is the same old Energy Torrent. Fast cast time (1.07 seconds) only really held back by its target cap, 10 versus 16. I actually normally don't pick this, choosing Explosive Blast instead, but it's interesting that it's here. Now here's what's weird. Explosive Blast. It recharges in 16 seconds, which is twice as fast as the other Domintor AoE blasts. But it costs 28(!) endurance. That's unmanageable for most builds unless... Unless you have Conserve Power, which,... bing!... this APP has! It has Energy Transfer. 266 damage with a 2.6 second cast time. It also damages the caster. Which is annoying, except there are two Assault sets that can heal it right back, Psi and Dark. Conserve Power never gets enough attention in my opinion. I think that's because it's effect is subtle. In actual play on a high recharge build it's a very good endurance management tool.
-
Interesting and very different build. Thanks for sharing, Poison isn't a powerset that gets a lot of discussion. Does the PBAoE aura combo well with Seeds? I tend to dislike cone/PBAoE combos but I suppose Seeds lasts long enough that you don't need to reapply it too much. Still, Poison... That lack of a self heal or any defense/resist/something on top of the harsh endurance cost always puts me off. I recently tried Gravity/Poison and it wasn't bad, just not what I'm used to from a "support" set. I assume this build has to run Clarion for mezz protection to prevent the aura from detoggling, which means Rebirth, Barrier, and Ageless are off the table. BTW I'm not sure I can get behind skipping Weaken and Envenom. They are both just so juicy when dealing with AVs and Elite Bosses. It's definitely an original build though. If a player is going to skip those and proc out other powers IMO you would do better just to play Storm. Then you'd get a some defense/resist, and be able to stay at range for dropping Freezing Rains, with damage coming from Lighting Storm/Tornado. I've been pushing the developers to consider making Poison's heal a ground targetable splash so the user can cast it on themselves. That change would raise Poison in my estimation.
-
I'm wondering if someone can contrast Elec/Elec/Elec with Elec/Energy Aura/Elec. I have one of the latter at 40, he's incredibly survivable. But as I'm looking to IOs and powers like Unleash Potential to combo with, the benefits of a Resist armor are tempting. Any thoughts on the differences?
-
That was a typo. I meant to type -Fly. And you are correct, which is why Hover and Fly are much harder to use. Most custom AE enemies who are patterned after Controllers will have the immobilize, because, unless their other set is a Blast/Melee set, they have to take them in order for the mob to be worth 100% XP value. This is actually a balance issue I wrestle with when making Control type characters. They can pull flyers from the air with ease. I assume by this you mean that some of these powers do not Dominate, which is true for some of them. However there isn't an Electric or Mind Controller other than /Storm that can come anywhere in the ballpark of the damage potential of an Electric\ or Mind\ Dominator. I wouldn't even consider an Electric or Mind Controller for this kind of content other than as a pure support character.
-
I actually have a 9 year old video of how Heat Loss used to work. This is back from when I used to run a Mind/Cold Controller. With a 1 billion influence (in those days dollars, the market was much pricier) I was able to solo at... x8+0 without bosses! And I was so proud of myself. 🙂 Heat Loss is used at around the 12 second mark. You'll see my blue bar spike when it goes off. I believe this video pre-dates incarnates by a few months to a year. You can see the toggles I'm running--very rare on a Controller at the time. You may also notice I would also leave Super Speed on at all times. Such is the benefit of a bottomless endurance power. I mained Mind/Cold for a while back then because I am a masochist. If any developers want to talk to me about how Mind should be fixed, watch the part in the video where I use a Power Boost + Total Domination combo to get Containment. Heat Loss, tho, was great then and is still very good now.
-
Back before inherent Fitness pool, Cold Domination was considered one of the best Buff/Debuff sets because with enough Recharge you could perma Heat Loss and have endless endurance. Since back then there was also no incarnate system and fewer Recovery procs, Heat Loss was a ticket to amazing builds that could skip Leap/Health/Stamina and replace them with the Fighting pool. All those builds you see now with Tough and Weave? Outside of Fire farmers and, later, Cold Domination builds they were much rarer back in the day because few Controllers could both spare the power picks and have enough endurance to run armor toggles. Things have shifted a lot since back then. It's still a great power, just not "OMGWTAmazing" like it was. Mainly the way it contributes now is it lets you skip slotting Stamina and Health. You can also pick a Alpha and Destiny a bit more freely (I'd pick Destiny Clarion for a lot of builds, for example.) From a pure technical standpoint, I believe the power is most similar to Fulcrum Shift. It summons a pseudo-pet for each enemy hit. These pseudo pets provide the endurance and recovery boost to any teammate in the range. The enemies also get a -Resistance debuff (that stacks with Sleet) and a HUGE -Recharge debuff (-240%). Note the cap on -Recharge is -75%, even against a +4 enemy your debuff is still at around 115%, way over the cap. The extra debuff helps you overcome Resistance. But, sadly, you can't perma it. I can't remember how long it lasts, the numbers 15 or 20 seconds sound familiar tho.
-
I recently started joining "challenge teams" for AE runs. These are mission arcs specifically designed to challenge a team of incarnates. It's helped revive my interest in the game. What's cool is how the nature of the AE can radically alter the meta of the game. The value of certain powers becomes evident when the dynamic shifts. The Dominator class in particular, which I consider "so-so"in normal content, is a vital team member on AE challenge missions due to being the only class that can mostly-reliably shut down all-boss spawns, which are rare in normal content but frequent in the AE. Here are a few things I've noticed: Suprisingly good powers: Static Field. This is the Electric Control Sleep patch. In normal content it's pretty good. In the AE, as long as your teammates understand how it works, it's really becomes a breakout power. Many powersets with mezz protection have either a Sleep, Fear, or Confusion hole. Sleep specifically is a hole that many Archvillains are subject to. Figuring out where to place your Static Fields (plural--you can and should drop them whenever the power recharges) is a strategy question. A favorite trick I find myself using is running around a wall and dropping the patch right inside the door to fend off ambushes. Static Field recharges very quickly, and can be placed around corners. The only real downside is how it conflicts with DoTs. Mesmerize. This is the Mind Control power that doesn't get much notice in normal content. It's a Mag 4 Sleep, Mag 8 for perma-Dominators. Mildly useful in normal content, incredibly useful when AVs and Elite Bosses can appear in wild ambushes Telekinesis. Yes, this infamous not great power, for one reason: it's autohit. No amount of spammed Hurricanes or Fearsome Stares can make it miss. Knock Patches. Don't roll ToHit, so are useful for reasons above, for enemies subject to Knock. Confusion powers in general. In normal content, you rarely encounter NPC Masterminds, pet owners, or Storm Summoners. In the AE they turn up a lot more frequently. Not only do these powers turn the pets on their masters, they last longer than other controls and generally won't draw aggro. -ToHit and Endurance Drain. It's hard to build a custom enemy that resists both these categories of debuff. You do tend to find enemies who ignore mezz, much less likely are enemies who resist endurance drain. However, Electric Control probably should still try to play somewhat ranged, so the strategy that emerges is Electric Fences slotted for endurance drain. Snipes. Killer minions are rare in normal content but show up with some frequency in the AE. Being able to discreetly peck them off becomes a huge asset. Difficulties: Death happens a lot more frequently in the AE. This can lead to a perma Dom being stuck in a cycle of unable to maintain Domination mode. Dying is a really hard penalty for Dominators relative to other sets. Melee and PBAOE Dominators struggle. It's just too hazardous to go toe to toe with enemies tuned to kill Brutes and Tanks. My Elec/Psi Dom, normally a PBAoE character, spends a lot of fights ducking behind corners. Hover and Fly become difficult to use or useless due to so many AE enemies with some form of Fly. Any else got observations or builds to share? I've decided my next character will be built specifically for for the AE. Looking not just at Dominators, but all classes. Sentinels, surprisngly, look to have a ton of promise for AE missions to a combo of armor and ranged attacks.
-
You didn't list them, but for /Storm I usually prefer the Psi or Primal APPs. Psi provides Indomitable Will, which with enough recharge confers perma mezz protection and capped Psi defense. Psi Tornado has lower DPA than Fireball but has a higher target cap than cone powers (16 vs 10), 50% chance for knockup excellent range (100ft) and another place to put a Chance for 100% Recharge proc. Psi also gives you a Resistance armor while still providing a Defense slot for Luck of the Gambler, worth +7.5% global recharge. Primal provides Conserve Power, a game changer on high recharge builds. Tho it can't be made truly perma, it still provides good uptime. On a Endurance hungry set like Storm it makes a big difference in sustainability. Primal also provides Power Boost, which is less useful for Plant/Storm than some other builds, but never useless. In general I favor the S/L Resistance armor sets over the S/L Defense armor sets. I find that capped S/L Defense on a low HP character like a Controller doesn't convey as much survivability as a mix of Defense with some Resistance.
-
E/D provides Resistance to Slash and Energy damage. Not bad but there are more important things to be worried about, usually. I'd slot it as a mule. Gladiator Armor +3% or Steadfast Protection +3%.
-
I think the easiest time you will have as a first time Dominator is Plant/Fire. It's a very straightforward combo that won't require you to understand the combat mechanics in detail. Just Seeds > Blast > replace Carrion Creepers when you need to. It's also probably one of the highest damage Dominators you can build.
-
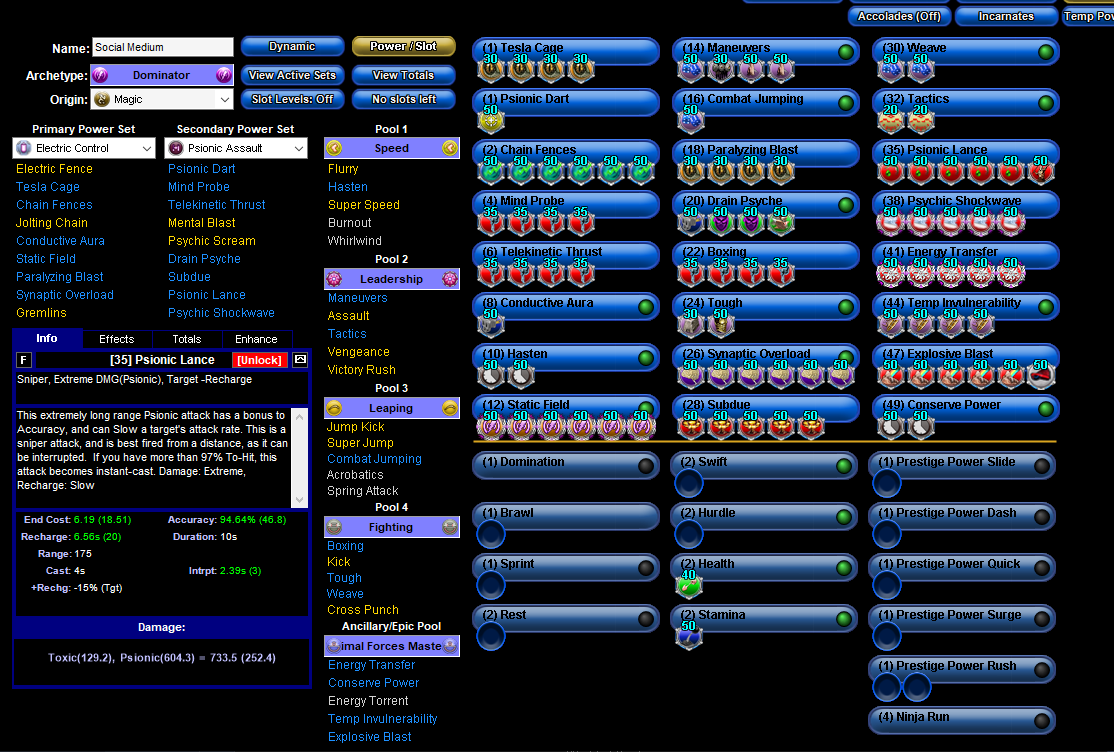
This is my most recently updated Elec/Psi/Primal build. You wouldn't want to duplicate this with an Elec/Elec because the Primal pool only really works well if you have a self heal (drain psyche) to offset the self damage. A more defensive version of this would be Elec/Psi/Psi. A more sapper version of it, which I used to roll with, would be Elec/Psi/Mu. All have their strengths. In the end I went with this for the better damage, since Psi APP doesnt offer much. Hero Plan by Mids' Reborn : Hero Designer 2.6.1.25 https://github.com/Crytilis/mids-reborn-hero-designer Click this DataLink to open the build! Social Medium: Level 50 Magic Dominator Primary Power Set: Electric Control Secondary Power Set: Psionic Assault Power Pool: Speed Power Pool: Leadership Power Pool: Leaping Power Pool: Fighting Ancillary Pool: Primal Forces Mastery Hero Profile: Level 1: Tesla Cage -- BslGaz-Acc/Hold(A), BslGaz-Acc/Rchg(3), BslGaz-Rchg/Hold(3), BslGaz-EndRdx/Rchg/Hold(5) Level 1: Psionic Dart -- Acc-I(A) Level 2: Chain Fences -- PwrTrns-+Heal(A), PwrTrns-Dam/Acc/Rech/End(7), PwrTrns-Dam/Acc/End(7), PwrTrns-Dam/EndMod(9), PwrTrns-Dam/Rech(9), PwrTrns-EndMod(11) Level 4: Mind Probe -- KntCmb-Acc/Dmg(A), KntCmb-Dmg/EndRdx(11), KntCmb-Dmg/Rchg(13), KntCmb-Dmg/EndRdx/Rchg(13) Level 6: Telekinetic Thrust -- KntCmb-Acc/Dmg(A), KntCmb-Dmg/EndRdx(15), KntCmb-Dmg/Rchg(15), KntCmb-Dmg/EndRdx/Rchg(17) Level 8: Conductive Aura -- EffAdp-EndMod/Acc(A) Level 10: Hasten -- RechRdx-I(A), RechRdx-I(17) Level 12: Static Field -- SprAscoft-Acc/Conf/Hold/Immob/Sleep/Stun/Fear(A), SprAscoft-Acc/Conf/Hold/Immob/Sleep/Stun/Fear/EndRdx/Rchg(19), SprAscoft-Rchg/+Dmg%(19), SprAscoft-EndRdx/Rchg(21), SprAscoft-Conf/Hold/Immob/Sleep/Stun/Fear/Rchg(21), SprAscoft-Acc/Conf/Hold/Immob/Sleep/Stun/Fear/EndRdx(23) Level 14: Maneuvers -- LucoftheG-Def/Rchg+(A), ShlWal-ResDam/Re TP(23), Rct-ResDam%(37), Rct-Def(46) Level 16: Combat Jumping -- LucoftheG-Def/Rchg+(A) Level 18: Paralyzing Blast -- BslGaz-Acc/Hold(A), BslGaz-Acc/Rchg(25), BslGaz-Rchg/Hold(25), BslGaz-Acc/EndRdx/Rchg/Hold(27) Level 20: Drain Psyche -- EffAdp-Acc/Rchg(A), TchoftheN-Heal/HP/Regen/Rchg(27), TchoftheN-Acc/Heal(29), DctWnd-Heal/Rchg(29) Level 22: Boxing -- KntCmb-Acc/Dmg(A), KntCmb-Dmg/EndRdx(31), KntCmb-Dmg/Rchg(31), KntCmb-Dmg/EndRdx/Rchg(31) Level 24: Tough -- StdPrt-ResDam/Def+(A), GldArm-3defTpProc(33) Level 26: Synaptic Overload -- CrcPrs-Conf(A), CrcPrs-Conf/Rchg(33), CrcPrs-Acc/Conf/Rchg(33), CrcPrs-Acc/Rchg(34), CrcPrs-Conf/EndRdx(34), CrcPrs-Conf%(34) Level 28: Subdue -- Apc-Dam%(A), Apc-Dmg/EndRdx(36), Apc-Acc/Rchg(36), Apc-Acc/Dmg/Rchg(36), Apc-Dmg/Rchg(37) Level 30: Weave -- LucoftheG-Def/Rchg+(A), LucoftheG-Def(39) Level 32: Tactics -- RctRtc-ToHit(A), RctRtc-Pcptn(37) Level 35: Psionic Lance -- StnoftheM-Dam%(A), StnoftheM-Dmg/EndRdx/Rchg(39), StnoftheM-Acc/Dmg(39), StnoftheM-Dmg/EndRdx(40), StnoftheM-Dmg/ActRdx/Rchg(40), GldJvl-Dam%(40) Level 38: Psychic Shockwave -- SprAvl-Rchg/KDProc(A), SprAvl-Acc/Dmg/EndRdx/Rchg(42), SprAvl-Acc/Dmg/Rchg(42), SprAvl-Acc/Dmg/EndRdx(42), SprAvl-Dmg/EndRdx(43) Level 41: Energy Transfer -- SprBlsCol-Acc/Dmg(A), SprBlsCol-Rchg/HoldProc(43), SprBlsCol-Dmg/EndRdx/Acc/Rchg(43), SprBlsCol-Dmg/EndRdx(45), SprBlsCol-Acc/Dmg/EndRdx(45) Level 44: Temp Invulnerability -- UnbGrd-ResDam(A), UnbGrd-Max HP%(45), UnbGrd-ResDam/EndRdx(46), UnbGrd-Rchg/ResDam(46) Level 47: Explosive Blast -- Rgn-Dmg/EndRdx(A), Rgn-Dmg(48), Rgn-Dmg/Rchg(48), Rgn-Acc/Dmg/Rchg(48), Rgn-Acc/Rchg(50), SuddAcc--KB/+KD(50) Level 49: Conserve Power -- RechRdx-I(A), RechRdx-I(50) Level 1: Brawl -- Empty(A) Level 1: Domination Level 1: Prestige Power Dash -- Empty(A) Level 1: Prestige Power Slide -- Empty(A) Level 1: Prestige Power Quick -- Empty(A) Level 1: Prestige Power Rush -- Empty(A), Empty(5) Level 1: Prestige Power Surge -- Empty(A) Level 1: Sprint -- Empty(A) Level 2: Rest -- Empty(A) Level 4: Ninja Run Level 2: Swift -- Empty(A) Level 2: Health -- Mrc-Rcvry+(A) Level 2: Hurdle -- Empty(A) Level 2: Stamina -- PrfShf-End%(A) Level 1: Quick Form Level 50: Musculature Radial Paragon ------------ ------------ Set Bonus Totals: 15% DamageBuff(Smashing) 15% DamageBuff(Lethal) 15% DamageBuff(Fire) 15% DamageBuff(Cold) 15% DamageBuff(Energy) 15% DamageBuff(Negative) 15% DamageBuff(Toxic) 15% DamageBuff(Psionic) 28.19% Defense(Smashing) 28.19% Defense(Lethal) 6% Defense(Fire) 6% Defense(Cold) 17.25% Defense(Energy) 17.25% Defense(Negative) 6% Defense(Psionic) 23.19% Defense(Melee) 21% Defense(Ranged) 6% Defense(AoE) 1.35% Max End 2.5% Enhancement(Max EnduranceDiscount) 4% Enhancement(Stunned) 4% Enhancement(Held) 4.4% Enhancement(Terrorized) 8% Enhancement(Sleep) 8% Enhancement(Immobilized) 92.5% Enhancement(RechargeTime) 8% Enhancement(Confused) 39% Enhancement(Accuracy) 190.8 HP (18.76%) HitPoints MezResist(Confused) 43.75% MezResist(Held) 43.75% MezResist(Immobilized) 43.75% MezResist(Sleep) 43.75% MezResist(Stunned) 43.75% MezResist(Terrorized) 43.75% MezResist(Teleport) 100% (20% chance) 20% PerceptionRadius 20% (0.33 End/sec) Recovery 44% (1.86 HP/sec) Regeneration 30% ResEffect(SpeedFlying) 30% ResEffect(RechargeTime) 30% ResEffect(SpeedRunning) 9.5% Resistance(Smashing) 30.5% Resistance(Fire) 30.5% Resistance(Cold) 10.25% Resistance(Energy) 10.25% Resistance(Negative) 8% Resistance(Toxic) 8% Resistance(Psionic) 9.5% Resistance(Lethal) | Copy & Paste this data into Mids' Reborn : Hero Designer to view the build | |-------------------------------------------------------------------| |MxDz;1505;696;1392;HEX;| |78DA6594596F125114C7EF7406292D1490625728205D2C94425B7D35A68B898504E| |DAB8A133A6927A10C99A1893EFA09AC46E383A9CB17F0D9F53368B42EEF3E5BAB74| |D1273C9DF32F903009FCE69EF33FCB3D736772B717DC2F2FDFBD2824EF7C49B5ACC| |282B1A197D5AA613A72EA9A5E147479568CA2AE9622396D55DFDC709225D65015E6| |8D72D5344AA9C59256AC9A7AF1C4106D4A2E5996BA59AAA6F2966E944981B5E8CA1| |B14B852D1B455AF7D9BD5D455CDB4D6F58AFB645DD1CB6B1E7BB1A4AFAD5769155F| |ACE8C554DED437D45261C9308B9A55C8A9565533EF349BEFA726C7E9F7C72770D56| |5B1D3214448111D5FC0AF4CE51BD32937B4420C12328AA851BCC4368774A8D8B653| |07E03EB3B306FE6676ED614DF964D496F3C75323DF55A6FB1AB8C27491D001AD03D| |A1E687BA0F5417B403D39A54EBB4FE756875D2B464FC565375A975C09EEDD071E92| |BE9B7D8EEE57B26D3BFD0E7CCFEC7D03BE669E79CBF4535E0FC7CA9EA0C4BE65D99| |E57BCC69AA95DC490D6CB5AE185F6886AFBB12F3FE6DF8FF9F763FE83DF996E4A13| |90BA6C6DE01EEF6BB097730F07C11CE795A856107983985718F30A635E61CC4B266| |D1F66D3777C43B522339CEF2FF53780D90C5CE79A911BE04D66B400DE0255A68752| |0C710FCA50866D67D3E0349862C6A7980AF512422F21CC68AC971920DF087C234F4| |81FA0B86D660FD58AE11CC676F8B98E7D063F30C73F829FC024EFD14B18459FA32F| |F86C9E7B0E3E039F3227B799217A68138899D882EF11F89099BC0F3E6046282681B| |392D8E7DAC97F382307E011334ADA14F693BAC0B3999E0167C13966E63CF883EB84| |29368D39A571C633E0B0D2F20ED7E93A3E002796FA649B37DD66C9B459669B16892| |D8AFD3FD7A6CCB659F24AE3FB2124DBE2F235BE0AF59F74D825A9D5FBABD572856E| |C615B1DBA6DA6BB53CE6E92C4F36F7990D9089FDF5FF4E06FFBF| |-------------------------------------------------------------------|
-
So, everyone has their own style. The original build lacks Arctic Air, which is hard for me to get behind. If you're willing to pivot to Ice/Ice/Psi, the build below would provide perma dom and the following armors: Villain Plan by Mids' Reborn : Hero Designer 2.6.1.25 https://github.com/Crytilis/mids-reborn-hero-designer Click this DataLink to open the build! Level 50 Magic Dominator Primary Power Set: Ice Control Secondary Power Set: Icy Assault Power Pool: Flight Power Pool: Leadership Power Pool: Fighting Power Pool: Speed Ancillary Pool: Psionic Mastery Villain Profile: Level 1: Block of Ice -- BslGaz-Acc/Hold(A), BslGaz-Acc/Rchg(3), BslGaz-Rchg/Hold(3), BslGaz-Acc/EndRdx/Rchg/Hold(5) Level 1: Ice Bolt -- Empty(A) Level 2: Ice Sword -- SprBlsCol-Acc/Dmg(A), SprBlsCol-Dmg/EndRdx(5), SprBlsCol-Acc/Dmg/EndRdx(7), SprBlsCol-Acc/Dmg/Rchg(7), SprBlsCol-Dmg/EndRdx/Acc/Rchg(9), SprBlsCol-Rchg/HoldProc(9) Level 4: Frostbite -- SprAscoft-Acc/Conf/Hold/Immob/Sleep/Stun/Fear(A), SprAscoft-Rchg/+Dmg%(13), SprAscoft-Conf/Hold/Immob/Sleep/Stun/Fear/Rchg(15), SprAscoft-EndRdx/Rchg(15), SprAscoft-Acc/Conf/Hold/Immob/Sleep/Stun/Fear/EndRdx(17), SprAscoft-Acc/Conf/Hold/Immob/Sleep/Stun/Fear/EndRdx/Rchg(17) Level 6: Arctic Air -- CrcPrs-Conf(A), CrcPrs-Conf/Rchg(19), CrcPrs-Acc/Conf/Rchg(19), CrcPrs-Acc/Rchg(21), CrcPrs-Conf/EndRdx(21), CrcPrs-Conf%(23) Level 8: Hover -- LucoftheG-Def/Rchg+(A) Level 10: Ice Blast -- Thn-Acc/Dmg(A), Thn-Dmg/EndRdx(23), Thn-Dmg/Rchg(25), Thn-Acc/Dmg/Rchg(25), Thn-Acc/Dmg/EndRdx(27), Thn-Dmg/EndRdx/Rchg(50) Level 12: Ice Slick -- RechRdx-I(A) Level 14: Maneuvers -- LucoftheG-Def/Rchg+(A), LucoftheG-Def(27) Level 16: Boxing -- KntCmb-Acc/Dmg(A), KntCmb-Dmg/EndRdx(29), KntCmb-Dmg/Rchg(29), KntCmb-Dmg/EndRdx/Rchg(31) Level 18: Tough -- GldArm-3defTpProc(A), StdPrt-ResDam/Def+(31) Level 20: Power Up -- RechRdx-I(A) Level 22: Flurry -- KntCmb-Acc/Dmg(A), KntCmb-Dmg/EndRdx(31), KntCmb-Dmg/Rchg(33), KntCmb-Dmg/EndRdx/Rchg(33) Level 24: Weave -- LucoftheG-Def/Rchg+(A), LucoftheG-Def(33), LucoftheG-Def/EndRdx(34) Level 26: Glacier -- SprEnt-Acc/Hold(A), SprEnt-Hold/Rchg(34), SprEnt-End/Rchg(34), SprEnt-Acc/Hold/End(36), SprEnt-Acc/Hold/End/Rchg(36), SprEnt-Rchg/AbsorbProc(36) Level 28: Chilling Embrace -- SprAvl-Acc/Dmg(A), SprAvl-Dmg/EndRdx(37), SprAvl-Acc/Dmg/EndRdx(37), SprAvl-Acc/Dmg/Rchg(37), SprAvl-Acc/Dmg/EndRdx/Rchg(39), SprAvl-Rchg/KDProc(39) Level 30: Hasten -- RechRdx-I(A), RechRdx-I(39) Level 32: Jack Frost -- ExpRnf-Acc/Rchg(A), ExpRnf-Acc/Dmg(40), ExpRnf-Dmg/EndRdx(40), ExpRnf-Acc/Dmg/Rchg(40), ExpRnf-EndRdx/Dmg/Rchg(42), ExpRnf-+Res(Pets)(42) Level 35: Ice Slash -- KntCmb-Acc/Dmg(A), KntCmb-Dmg/EndRdx(42), KntCmb-Dmg/Rchg(43), KntCmb-Dmg/EndRdx/Rchg(43) Level 38: Bitter Ice Blast -- Apc-Dam%(A), Apc-Dmg/EndRdx(43), Apc-Acc/Rchg(45), Apc-Acc/Dmg/Rchg(45), Apc-Dmg/Rchg(45) Level 41: Indomitable Will -- LucoftheG-Def/Rchg+(A) Level 44: Mind Over Body -- UnbGrd-Max HP%(A), UnbGrd-ResDam(46), UnbGrd-ResDam/EndRdx(46), UnbGrd-ResDam/EndRdx/Rchg(46) Level 47: Psionic Tornado -- Rgn-Dmg/EndRdx(A), Rgn-Acc/Rchg(48), Rgn-Acc/Dmg/Rchg(48), Rgn-Dmg/Rchg(48), Rgn-Dmg(50) Level 49: Link Minds -- LucoftheG-Def/Rchg+(A), LucoftheG-Def/Rchg(50) Level 1: Brawl -- Empty(A) Level 1: Domination Level 1: Quick Form Level 1: Prestige Power Dash -- Empty(A) Level 1: Prestige Power Slide -- Empty(A) Level 1: Prestige Power Quick -- Empty(A) Level 1: Prestige Power Rush -- Empty(A) Level 1: Prestige Power Surge -- Empty(A) Level 1: Sprint -- Empty(A) Level 2: Rest -- Empty(A) Level 4: Ninja Run Level 2: Swift -- Run-I(A) Level 2: Health -- Mrc-Rcvry+(A), Pnc-Heal/+End(11) Level 2: Hurdle -- Jump-I(A) Level 2: Stamina -- PrfShf-End%(A), PrfShf-EndMod(11), EndMod-I(13) Level 50: Musculature Core Paragon ------------ ------------ Set Bonus Totals: 15% DamageBuff(Smashing) 15% DamageBuff(Lethal) 15% DamageBuff(Fire) 15% DamageBuff(Cold) 15% DamageBuff(Energy) 15% DamageBuff(Negative) 15% DamageBuff(Toxic) 15% DamageBuff(Psionic) 26.31% Defense(Smashing) 26.31% Defense(Lethal) 21% Defense(Fire) 21% Defense(Cold) 23.81% Defense(Energy) 23.81% Defense(Negative) 6% Defense(Psionic) 22.25% Defense(Melee) 26.63% Defense(Ranged) 13.5% Defense(AoE) 2.5% Enhancement(Max EnduranceDiscount) 37% Enhancement(Accuracy) 4% Enhancement(Stunned) 4% Enhancement(Held) 91.25% Enhancement(RechargeTime) 4.4% Enhancement(Terrorized) 8% Enhancement(Immobilized) 8% Enhancement(Sleep) 8% Enhancement(Confused) 13.5% SpeedFlying 164 HP (16.13%) HitPoints 13.5% JumpHeight 13.5% SpeedJumping MezResist(Confused) 53.75% MezResist(Held) 53.75% MezResist(Immobilized) 53.75% MezResist(Sleep) 53.75% MezResist(Stunned) 53.75% MezResist(Terrorized) 53.75% MezResist(Teleport) 100% (20% chance) 24% (0.4 End/sec) Recovery 56% (2.37 HP/sec) Regeneration 45% ResEffect(SpeedFlying) 45% ResEffect(RechargeTime) 45% ResEffect(SpeedRunning) 10% Resistance(Smashing) 10% Resistance(Lethal) 38.5% Resistance(Fire) 38.5% Resistance(Cold) 13.75% Resistance(Energy) 13.75% Resistance(Negative) 10% Resistance(Toxic) 10% Resistance(Psionic) 13.5% SpeedRunning | Copy & Paste this data into Mids' Reborn : Hero Designer to view the build | |-------------------------------------------------------------------| |MxDz;1481;665;1330;HEX;| |78DA6594DB4E13511486F774A6600B582A20677AE05CA4743819A38931A04681A4C| |AAD5A27A52993D496B435914BDF4051E38D9C7C00AF3D261EDF408D2FA1A062A237| |D6C5FC3F94D8499B6FCFBFFFBDD69AB5DA99BB355DFBE4FCEDD34AF34D65AC42213| |19DBB6167AD622EEF9EB3D27652577255CBB7737F233195CB16F3B94CF44232B5B7| |3EB07BA650B06E668AB2BBBCB75635F19CF8CF65ECF462D1E7AC6753D6422A5F58B| |497EAB0B7BB6567D35EE76E7E29955A089C5DB293D178C1CE65ED6462CE2A1453F9| |65D497DECDD42255F5CB77C2A971F72AE9EAA34B4A3594EB13F91934BE807F5DFB5| |EF9C8A54AA26850DCDA1D432953DC77C1AA15F21E78E83EF9009C94CCBA86B3FA53| |DDD16A5F81879F91CFC1FA17E44BF0B8C0CDBCEE2B2E473B7295BC063626C8EBE05| |10BF4C840AA91575537698EA6493C0FE3795615FC6B60CB3AB901B66D82E663F084| |9CAD61576A86A0F925471D726875CCD1D6C85CB2E763C77D7141D8501D97C8CB60D| |73CA88BD7CF38FE513C7B57B386E9C86D03F336306F48FC4D8CDDC4D85D8C1D64EC| |20631BE26D466C57336B0CB2C6503D785272B47246ADAF31B7D01BF22DD8FD8E7C4| |F7EE0EF40CEB6F36CFB23683DABE41AB90EF66D909B60586AEBE47377F2D9FAC853| |1237C05905B630D3FE6DF23BF9031CFC49EE806E391B667FC2ECCF20FB13617F22E| |C4F95787BE1357A4D9C8FC4C0632364941C06BBFD4A0DF0B735C09EF68836044D1F| |FA83190EEF90BFC8DF609F78A3CC199D44CC9109729C1C03CD51302C6762EC558C3| |94D3FD861FCFF8F0D9795D24CA4BC8E543863158A59A18C5528E315CA6C851237F6| |DF1A4A73144FBDBC0B58C957AFECB287DA3066BE55D634EDA22CFA0DE50DA167DF0| |EFA07E0DF2E6B2EED21FAE45D016B83F0CCC89FC784A7F40F0C4BE82A| |-------------------------------------------------------------------|
-
What's the Best Gravity Dominator Build You Can Put Together?
oedipus_tex replied to oedipus_tex's topic in Dominator
I wonder if it would balance Gravity Control on Dominators better if Propel did AoE damage. Dominators have tons of single target but AoE damage is limited. The power already does AoE knockdown. For sure though, the Impact mechanic should apply to Assault attacks. Or else be changed to make better sense on this archetype.