The Beta Account Center is temporarily unavailable
×
We are experiencing intermittent network issues affecting Everlasting and Excelsior


oedipus_tex
-
Posts
2652 -
Joined
-
Last visited
-
Days Won
4
Content Type
Profiles
Forums
Events
Store
Articles
Patch Notes
Everything posted by oedipus_tex
-
My problem with Hurricane was always that the main times you might want to use it, running in with Hurricane gets you mezzed and it detoggles. It would be a quasi-useful power on an archetype like Sentinels or in a Storm Armor set. I do build late game /Storm to have mezz protection but by that point I find the usefulness of the power has past.
-
Just as an FYI, if you decide to team, it's considered polite to avoid creating havoc with your knockback powers. Solo, it's do whatever you want. The power Gale in particular is tempting to click a lot because of its fast recharge, but most teams will get frustrated with you Galing stuff around. Supposedly, there are people good enough to use this power strategically. I have played Storm to 50 4 times and have never been able to use it; it literally gets removed from my hotbar. I highly recommend purchasing Knockback to Knockdown IOs as soon as possible for Lighting Storm and Tornado. They usually run about 2.5 million influence each. The first 40 levels are very different from the final 10 with this set. It's worth it to continue, the final 2 powers are brutal.
-
I think the best synergy for Electric Control is Psi Assault. My "main" is an Elec/Psi. It's good. Sturdy. Can farm decently, not as fast as Plant, but because Jolting Chain probably better than most other secondaries other than maybe Fire. I can roll through radio missions at x8+4 against some enemies, as long as they don't have -Recharge powers. I was having issues with single target damage so I dropped the Mu pool for Primal. Energy Transfer combos well with Drain Psyche and mitigates the self damage that power does. Personally I have a low opinion of Electric Assault as a set. The best combo for it actually probably actually is Electric Control, so if you're determined to play Electric Assault, Electric Control would be my pick. But, there are stronger secondaries for Electric Control. If you do decide to pick a secondary with a Power Boost effect, the best pairing is probably Dark Assault. The Power Boost-like power there boosts the -ToHit and self heal in that set on top of your endurance drain, so you get a 3-in-1 package. However unlike Psi it features a bunch of DoT powers that interrupt the sleep patch power. FWIW I find the Electric Gremlin pets worthless on a Dom late game build. They are ok-ish prior to IOs but don't keep up. I had them in my build forever but finally dropped them. I found they didn't contribute enough damage for how much heat they brought down on my head at x8+4 solo.
-
Ice Control used to be my favorite Dominator set. This was back when the Contagious Confusion proc had a decent chance of firing in Arctic Air. It's taken an unfortunate nerf since then. It's still fun, but I'm hoping the set gets some attention at some point. Overall this is a great build. Questions/things to think about below. I'd not bother with World of Confusion. Take Indom Will instead for the huge Psi Defense bonus and ability to slot a Luck of the Gambler. You could probably safely drop one of the two AoEs. For me it's Psychic Scream that usually gets cut. I don't recommend skipping the AoE immobilize. You can replace Psychic Scream with it. As a Psi Dom you might struggle with single target damage, so if you decide to plug it. consider the Primal APP for Total Focus-normally not a great power, but Drain Psyche makes the health drain disappear almost instantly, so its free, huge damage. The Psi APP is good tho if you want to get LoTG but still have a resistance shield.
-
If on the fence I would roll Storm. It's my belief every City of Heroes player owes themselves to play Storm at least once, because it's an iconic set. Dark is a good set, but for whatever reason I just don'tfeel about it that way. If you don't roll Dark/Storm it should be because you plan to roll Storm with something else. Note if you want to avoid Fade entirely, you can roll Dark Miasma on a Defender, Corruptor or Mastermind. They don't get that power.
-
For Destiny I like to follow the leads of farming builds and stick to Ageless. Ageless allows you to hit massive Recharge numbers without disrupting proc chances, leading to a damage increase. I don't find Rebirth that useful to be honest, due to the recharge not making it an every fight patch up ability. There is a downside to Aid Self of course, losing out on a 4th power pool. That's why it will always likely come down to personal choice.
-
Sorry, by Sleet I meant Freezing Rain. They are nearly the same power, I get the names mixed up.
-
I always skip 02 Burst on Storm builds because I take Aid Other + Aid Self, which is somewhat redundant. O2 Burst is a weak heal with a minor mezz protection effect. IMO it's an outdated power, designed for when battles flowed differently. Combat hasn't favored this sort of power since around 2005 or so, if it ever did. I've found that no matter how much control or debuff I bring, hits break through. The point of Aid Self is less to sit there healing in the middle of battle (tho on fast moving teams I do that too), and more to top back off after each fight so time isn't lost. Note that the T3 Healing power Field Medic adds Recovery to Aid Self, which can be useful on an endurance heavy Storm build.
-
Hi all, I've refactored my Grav/Storm build to take advantage of some of the newer sets. Mind taking a look and see if anything stands out I overlooked? Endurance consumption is beastly with this build, so the plan is for Cardiac and the Destiny that provides End restoration. I'm aware World of Confusion is not a great power, so it's being used as a mule for the +10 recharge +5 ranged defense. Assuming I got nothing wrong, this build offers: Soft capped Ranged defense Soft capped Psi defense Near soft capped Energy/Negative defense Capped S/L Resist Self heal (aid self) Mezz protection (perma when Recharge from Destiny is factored in) 32%-40% Resist to most exotic damage types Ability to stun bosses with Wormhole + Thunderclap -- with sad limitation that bosses more than +3 aren't teleported 😞 Wormhole on 26s recharge before Destiny is taken into account Tornado, Lit Storm, Wormhole and Singularity all do knockdown instead of knockback, allowing tight packing mobs The only power I'm semi worried about is Crushing Field. It's not very accurate at base. Here I'm using it as little more than a way to set Containment. I'm hoping the -Defense in Freezing Rain covers the gap. If I had more slots, this is the power I'd revise. Hero Plan by Mids' Reborn : Hero Designer 2.6.1.25 https://github.com/Crytilis/mids-reborn-hero-designer Click this DataLink to open the build! Pinball Blizzard: Level 50 Magic Controller Primary Power Set: Gravity Control Secondary Power Set: Storm Summoning Power Pool: Speed Power Pool: Leaping Power Pool: Medicine Power Pool: Fighting Ancillary Pool: Psionic Mastery Hero Profile: Level 1: Lift -- Thn-Acc/Dmg(A), Thn-Dmg/EndRdx(3), Thn-Dmg/Rchg(3), Thn-Acc/Dmg/Rchg(5), Thn-Acc/Dmg/EndRdx(5), Thn-Dmg/EndRdx/Rchg(7) Level 1: Gale -- Acc-I(A) Level 2: Gravity Distortion -- BslGaz-Acc/Hold(A), BslGaz-Rchg/Hold(9), BslGaz-Acc/Rchg(9), BslGaz-Acc/EndRdx/Rchg/Hold(11) Level 4: Hasten -- RechRdx-I(A), RechRdx-I(13) Level 6: Propel -- Thn-Acc/Dmg(A), Thn-Acc/Dmg/EndRdx(15), Thn-Dmg/EndRdx/Rchg(15), Thn-Dmg/EndRdx(17), Thn-Dmg/Rchg(17), Thn-Acc/Dmg/Rchg(19) Level 8: Crushing Field -- Acc-I(A) Level 10: Steamy Mist -- LucoftheG-Def/Rchg+(A), Rct-ResDam%(21) Level 12: Combat Jumping -- LucoftheG-Def/Rchg+(A), BlsoftheZ-ResKB(21), ShlWal-ResDam/Re TP(23) Level 14: Aid Other -- Heal-I(A) Level 16: Freezing Rain -- RechRdx-I(A) Level 18: Gravity Distortion Field -- SprWiloft-Acc/Conf/Hold/Immob/Sleep/Stun/Fear(A), SprWiloft-Conf/Hold/Immob/Sleep/Stun/Fear/Rchg(23), SprWiloft-EndRdx/Rchg(25), SprWiloft-Acc/Conf/Hold/Immob/Sleep/Stun/Fear/EndRdx(25), SprWiloft-Acc/Conf/Hold/Immob/Sleep/Stun/Fear/EndRdx/Rchg(27), SprWiloft-Rchg/Dmg%(27) Level 20: Aid Self -- Heal-I(A) Level 22: Boxing -- Empty(A) Level 24: Tough -- StdPrt-ResDam/Def+(A), GldArm-3defTpProc(29) Level 26: Wormhole -- AbsAmz-Stun/Rchg(A), AbsAmz-Acc/Stun/Rchg(29), AbsAmz-Acc/Rchg(31), AbsAmz-EndRdx/Stun(31), AbsAmz-ToHitDeb%(31), SuddAcc--KB/+KD(33) Level 28: Weave -- LucoftheG-Def/Rchg+(A), LucoftheG-Def(33) Level 30: Thunder Clap -- SprOvrPrs-Rchg/Energy Font(A), SprOvrPrs-Acc/Conf/Hold/Immob/Sleep/Stun/Fear/EndRdx/Rchg(33), SprOvrPrs-Acc/Conf/Hold/Immob/Sleep/Stun/Fear/EndRdx(34), SprOvrPrs-EndRdx/Rchg(34), SprOvrPrs-Conf/Hold/Immob/Sleep/Stun/Fear/Rchg(34), SprOvrPrs-Acc/Conf/Hold/Immob/Sleep/Stun/Fear(36) Level 32: Singularity -- ExpRnf-Acc/Rchg(A), ExpRnf-Acc/Dmg(36), ExpRnf-Dmg/EndRdx(36), ExpRnf-+Res(Pets)(37), ExpRnf-EndRdx/Dmg/Rchg(37), SuddAcc--KB/+KD(37) Level 35: Tornado -- FrcFdb-Rechg%(A), ExpRnf-Acc/Rchg(39), ExpRnf-Acc/Dmg(39), ExpRnf-Acc/Dmg/Rchg(39), ExpRnf-EndRdx/Dmg/Rchg(40), OvrFrc-Dam/KB(40) Level 38: Lightning Storm -- Apc-Acc/Rchg(A), Apc-Dam%(40), Apc-Dmg/EndRdx(42), Apc-Dmg/Rchg(42), Apc-Acc/Dmg/Rchg(42), SuddAcc--KB/+KD(43) Level 41: Indomitable Will -- LucoftheG-Def/Rchg+(A), RechRdx-I(43), RechRdx-I(43) Level 44: Mind Over Body -- UnbGrd-Max HP%(A), UnbGrd-ResDam/EndRdx(45), UnbGrd-ResDam(45) Level 47: Psionic Tornado -- Artl-Acc/Dam(A), Artl-Dam/End(48), Artl-Dam/Rech(48), Artl-Acc/Dam/Rech(48), Artl-Acc/Rech/Rng(50), Artl-End/Rech/Rng(50) Level 49: World of Confusion -- CrcPrs-Conf/EndRdx(A), CrcPrs-Conf%(50), CrcPrs-Conf(51), CrcPrs-Conf/Rchg(51), CrcPrs-Acc/Conf/Rchg(51), CrcPrs-Acc/Rchg(51) Level 1: Brawl -- Empty(A) Level 1: Containment Level 1: Prestige Power Dash -- Empty(A), Empty(7) Level 1: Prestige Power Slide -- Empty(A) Level 1: Prestige Power Quick -- Empty(A) Level 1: Prestige Power Rush -- Empty(A) Level 1: Prestige Power Surge -- Empty(A) Level 1: Sprint -- Empty(A) Level 2: Rest -- Empty(A) Level 4: Ninja Run Level 2: Swift -- Empty(A) Level 2: Health -- Mrc-Rcvry+(A), NmnCnv-Regen/Rcvry+(19) Level 2: Hurdle -- Empty(A) Level 2: Stamina -- EndMod-I(A), EndMod-I(11), PrfShf-End%(13) Level 50: Cardiac Core Paragon ------------ | Copy & Paste this data into Mids' Reborn : Hero Designer to view the build | |-------------------------------------------------------------------| |MxDz;1475;665;1330;HEX;| |78DA6594CB6F125114C6EFC00085424B2D589E82B4850A4AA1BA6FD2AA4D2C28098| |92B958E30D0497805A8B1DDB970EB236A5CF95CF84CF45F51A3C6851BE35A5B6D5D| |B8C2D3391F42C224F0BBF73BCFB98FC95E3D697FB3726D5148CEE5AAD26E17961BF| |54EAB51ADAA2D5356A96845418F33A7D52F2BD56A78A9AA6D6D29AD9285C448DFB3| |17945C692957B4CE666F1E1A7059DA289793F94EA3552BE4376AB5465DAB57842DD| |7A0A87C53554B767D98519526191CFA24AB96B4A2565779765AABAC77C8E63AD5D4| |8AC95C5BA314C542566977D4D6A6871A8AD2EF8624F0744DE201212D0BC343F0115| |37E0C3E619A9F32D7FAB142F858BB491ACB5DA3F4D120445016239FC14F4CDB1766| |8456C5A83B77256382E3EDE02DD24DE8CB84BEC6507F0CF59DE8D3893E0FA0CFDB1| |46B415F16F45524CD8A5A56B7A46BAE5DA3CE83E43CCA36C368CFF6D5C0B655F609| |928F03391D339CB344AEE3D0C6D1F71DD226D0F7C433E47FCEF4BC005F327DAFC0D| |7CC10D59844BE49D4904873437377E9114652A6F02653FB035AC9C00267B84B532F| |AA7B57F90D0219E6A12C78163CC70C7F97797729AF1F79FD5885B08B59DE2F83BCC| |120FB8703CCC37ED0077A99D31EE63D8A0D2136B4CD35A777C05FCC993D7017444F| |158A8D2036729D6D51E4882247F4373386D8D8375E8B758A9D45ECEC3C6C69E6911| |4780C4C32E3A8FB8E52CCE144CC612DE2D8E11EDF934F023E89BF5CF3E81F708FF9| |8190440F49A349D7E665D0049A99690B38C27C4BC72D85D8D41AF79756980B17C08| |BE025B0803D97076EA67E6A827DA51BEF8F25B69AF5FFD450547A48393EA49C1852| |32434A4EFEFF551092AE589D74F7D1CF0F1B59A541EB765F91A4333488D1ED3ECFF| |BF073C87BA7AF18A430EF8E0DB4DFE71559A48B95669FEE3F971FF8D8| |-------------------------------------------------------------------|
-
On /Storm I usually skip O2 Burst and take Aid Other and then Aid Self. On a Controller, the set usually mitigates enough damage that you can use Aid Self without too much issue. I'd encourage a Hover build with some Ranged defense. Storm leans very heavily on three powers: Sleet, Lighting Storm and Tornado. Steamy Mist, it's stealth aura, is nearly identical to the aura Dark and Cold get, and provides a little bit of Defense along with some exotic Resistance that is otherwise hard to get on a squishy character. Other than those 4 powers you could probably skip everything else and be okay. The upshot of Storm is that you're really waiting until level 35 to start feeling how the set will play out, and only really feeling its strength at around level 40, when Lighting Storm and Tornado are slotted up. Dark Affinity in comparison is a more consistent ride.
-

What's the Best Gravity Dominator Build You Can Put Together?
oedipus_tex replied to oedipus_tex's topic in Dominator
Below is the best I've been able to come up with so far. Grav/Psi/Fire, skipping nearly everything in Psi. Basically using it only for Drain Psyche and Psychic Shockwave. Not sure how I feel about this to be honest. On the one hand, it's very survivable. On the other, I can't help but compare it to a Controller, who would do a bit less raw damage, but actually be able to use its support set. Drain Psyche does make a build very survivable though and debuffs AVs so maybe this works? One thing that stands out immediately though is that on Dominators, the Impact mechanic pushes you to rely on Gravity Control for damage as opposed to your Assault set. I can make Psi work because Drain Psyche is a good power. Much less sure about other Assault sets. Hero Plan by Mids' Reborn : Hero Designer 2.6.1.25 https://github.com/Crytilis/mids-reborn-hero-designer Click this DataLink to open the build! Social Medium: Level 50 Magic Dominator Primary Power Set: Gravity Control Secondary Power Set: Psionic Assault Power Pool: Speed Power Pool: Fighting Power Pool: Leadership Power Pool: Leaping Ancillary Pool: Fire Mastery Hero Profile: Level 1: Lift -- Thn-Acc/Dmg(A), Thn-Dmg/EndRdx(3), Thn-Dmg/Rchg(3), Thn-Acc/Dmg/Rchg(5), Thn-Acc/Dmg/EndRdx(5), Thn-Dmg/EndRdx/Rchg(7) Level 1: Psionic Dart -- Acc-I(A) Level 2: Gravity Distortion -- BslGaz-Acc/EndRdx/Rchg/Hold(A), BslGaz-EndRdx/Rchg/Hold(9), BslGaz-Rchg/Hold(9), BslGaz-Acc/Rchg(11), HO:Perox(11), Dmg-I(13) Level 4: Mind Probe -- Hct-Dmg/EndRdx(A), Hct-Dam%(13), Hct-Acc/Rchg(15), Hct-Acc/Dmg/Rchg(15), Hct-Dmg/Rchg(17) Level 6: Propel -- Apc-Dam%(A), SuddAcc--KB/+KD(17), Apc-Dmg/EndRdx(19), Apc-Acc/Dmg/Rchg(19), Apc-Acc/Rchg(21), Apc-Dmg/Rchg(21) Level 8: Crushing Field -- SprAscoft-Acc/Conf/Hold/Immob/Sleep/Stun/Fear(A), SprAscoft-Conf/Hold/Immob/Sleep/Stun/Fear/Rchg(23), SprAscoft-EndRdx/Rchg(33), SprAscoft-Acc/Conf/Hold/Immob/Sleep/Stun/Fear/EndRdx(33), SprAscoft-Acc/Conf/Hold/Immob/Sleep/Stun/Fear/EndRdx/Rchg(33), SprAscoft-Rchg/+Dmg%(34) Level 10: Hasten -- RechRdx-I(A), RechRdx-I(23) Level 12: Boxing -- Empty(A) Level 14: Maneuvers -- LucoftheG-Def/Rchg+(A), Ksm-ToHit+(25), ShlWal-ResDam/Re TP(25), Rct-ResDam%(27) Level 16: Dimension Shift -- RechRdx-I(A) Level 18: Gravity Distortion Field -- BslGaz-Acc/Hold(A), BslGaz-Acc/Rchg(27), BslGaz-Rchg/Hold(29), BslGaz-Acc/EndRdx/Rchg/Hold(29) Level 20: Drain Psyche -- EffAdp-Acc/Rchg(A), TchoftheN-Heal/HP/Regen/Rchg(31), TchoftheN-Acc/Heal(31), DctWnd-Heal/Rchg(31) Level 22: Super Speed -- BlsoftheZ-ResKB(A) Level 24: Combat Jumping -- LucoftheG-Def/Rchg+(A) Level 26: Wormhole -- SuddAcc--KB/+KD(A), SprDmnGrs-Rchg/Fiery Orb(34), SprDmnGrs-Acc/Conf/Hold/Immob/Sleep/Stun/Fear/EndRdx/Rchg(34), SprDmnGrs-Acc/Conf/Hold/Immob/Sleep/Stun/Fear/EndRdx(36), SprDmnGrs-Conf/Hold/Immob/Sleep/Stun/Fear/Rchg(36), FrcFdb-Rechg%(36) Level 28: Tough -- StdPrt-ResDam/Def+(A), GldArm-3defTpProc(37) Level 30: Weave -- LucoftheG-Def/Rchg+(A), LucoftheG-Def(37), LucoftheG-Def/EndRdx(42), LucoftheG-EndRdx/Rchg(50) Level 32: Singularity -- ExpRnf-+Res(Pets)(A), ExpRnf-EndRdx/Dmg/Rchg(37), ExpRnf-Acc/Rchg(39), ExpRnf-Acc/Dmg/Rchg(39), ExpRnf-Acc/Dmg(39), ExpRnf-Dmg/EndRdx(40) Level 35: Rain of Fire -- PstBls-Dam%(A), PstBls-Acc/Dmg/EndRdx(40), PstBls-Dmg/Rchg(40), PstBls-Dmg/EndRdx(42), PstBls-Acc/Dmg(42) Level 38: Psychic Shockwave -- Arm-Dam%(A), Arm-Dmg/EndRdx(43), Arm-Acc/Rchg(43), Arm-Acc/Dmg/Rchg(43), Arm-Dmg/Rchg(45) Level 41: Fire Ball -- PstBls-Dam%(A), PstBls-Acc/Dmg/EndRdx(45), PstBls-Acc/Dmg(45), PstBls-Dmg/Rchg(46), PstBls-Dmg/EndRdx(46), Bmbdmt-+FireDmg(50) Level 44: Fire Shield -- UnbGrd-Max HP%(A), UnbGrd-ResDam(46), UnbGrd-ResDam/EndRdx(50) Level 47: Melt Armor -- AchHee-ResDeb%(A), TchofLadG-%Dam(48), ShlBrk-%Dam(48), RechRdx-I(48) Level 49: Rise of the Phoenix -- RechRdx-I(A) Level 1: Brawl -- Empty(A) Level 1: Domination Level 1: Prestige Power Dash -- Empty(A) Level 1: Prestige Power Slide -- Empty(A) Level 1: Prestige Power Quick -- Empty(A) Level 1: Prestige Power Rush -- Empty(A), Empty(7) Level 1: Prestige Power Surge -- Empty(A) Level 1: Sprint -- Empty(A) Level 2: Rest -- Empty(A) Level 4: Ninja Run Level 2: Swift -- Empty(A) Level 2: Health -- Mrc-Rcvry+(A) Level 2: Hurdle -- Empty(A) Level 2: Stamina -- PrfShf-End%(A) Level 1: Quick Form Level 50: Musculature Radial Paragon ------------ ------------ Set Bonus Totals: 11% DamageBuff(Smashing) 11% DamageBuff(Lethal) 11% DamageBuff(Fire) 11% DamageBuff(Cold) 11% DamageBuff(Energy) 11% DamageBuff(Negative) 11% DamageBuff(Toxic) 11% DamageBuff(Psionic) 6% Defense(Melee) 6% Defense(Smashing) 6% Defense(Lethal) 6% Defense(Fire) 6% Defense(Cold) 18.81% Defense(Energy) 18.81% Defense(Negative) 6% Defense(Psionic) 20.38% Defense(Ranged) 6% Defense(AoE) 8% Enhancement(Stunned) 8% Enhancement(Confused) 8% Enhancement(Held) 8.8% Enhancement(Terrorized) 16% Enhancement(Sleep) 16% Enhancement(Immobilized) 2.5% Enhancement(Max EnduranceDiscount) 79% Enhancement(Accuracy) 96.25% Enhancement(RechargeTime) 6% SpeedFlying 167.9 HP (16.51%) HitPoints 6% JumpHeight 6% SpeedJumping Knockback (Mag -4) Knockup (Mag -4) MezResist(Confused) 43.75% MezResist(Held) 43.75% MezResist(Immobilized) 43.75% MezResist(Sleep) 43.75% MezResist(Stunned) 43.75% MezResist(Terrorized) 43.75% MezResist(Teleport) 100% (20% chance) 19% (0.32 End/sec) Recovery 36% (1.53 HP/sec) Regeneration 24% Resistance(Smashing) 34.5% Resistance(Fire) 34.5% Resistance(Cold) 21.75% Resistance(Energy) 21.75% Resistance(Negative) 18% Resistance(Toxic) 18% Resistance(Psionic) 24% Resistance(Lethal) 6% SpeedRunning | Copy & Paste this data into Mids' Reborn : Hero Designer to view the build | |-------------------------------------------------------------------| |MxDz;1493;695;1390;HEX;| |78DA6594494F136118C7DFE94C5B96D6EE2C85B214B0D08D0E787169900092489B9| |0F001C8A44C6092D2693AC5C8D183678F9E5C3F801735E276F00378733B78F3ACA0| |E0C183A98FF37FA04D6612F8F5FDBFCFD67F9FB67C73D9F764F5D68290024B55CDB| |23697CD5DA3A635CD86BBAC6D1B15418F7FC3AC185A75ACAC6F197BBB5E52C6CFA2| |3697CC5AB36156F3AB0DED86D1DC3F3D77442C5A96B6576DE6D72DC3AC1995D3B3E| |85937296FA3AEEB5B7EFBE535637BA769D4B603F6A9A46B5B7AC3DA31EABED3739D| |2E8756EA4685421BFA6659B39A7A63BF3DF2008D96A2BFAC2CF869B9C53D82AA08D| |77DE6035079C87C047A1E83DE76AE10716839D224AE277D7109915044D767E627B0| |E723B348618A2C7C09E476512E4AB61439EDB2355F063C37C39C068329304F096EE| |EE756F9EE9B62335CC0399C07A3B3CC1C384BB95E09B9DE03D9D6FA5E8263AF98AF| |996FC0F1B760923EDB6EE44ADD19CCDFC794E8AE977DE96DD12342A4F8112DFB639| |21D35F057D82E0CACA162FC182C10029C1DE08A2A69216872E803DC8BB38BC3ECEA| |30BBEDA3D888D463C746EEE09D8E44517B24C62C6386099A2BC6BD625F11DB475A3| |F6615FD3CEB1CA50DB2CB83ECEEF822F32A38B1C02C326FA39E4CF586D8A9A1FF85| |69C6C939CCA1D05D827D4970AFC928381304D530384F29A33CC3E8096A4F1E83E70| |F99BF984760EA276F0D9997E4CD4A1EC0D3D40BE67370E619F32918A07E539C3355| |449DF415E665E625307B110C509F699E719AFB64B94F96EBE6B85F8EFBA92E37B69| |67233F0C295F9037F7227A0FA1B0C534C9EF720FF8E7A46688BDFF3367B64DBDB59| |DE9910C516F8B32DB036AC747C63EDCD4CB69556DA715B7028AA43996F2B12148FF| |DFF8223B2E450D695B35F0B21D94A77F0EC37A0F59D9658923A6F0F3B95EBF422A5| |881F8EA8A34EE52EDC594BB7DF67294212EE5BFF00F28FF980| |-------------------------------------------------------------------| -
Hi all, Just wondering what the best Gravity Dominator build you can assemble would look like. I admit I'm partly asking because I don't consider this set very good on Dominators. But if you had to build a Gravity Dom, what sets would you use? I'm tempted to go with some kind of Gravity/Psi Dominator for Drain Psyche, but when I try to build it I find myself skipping all but 3 powers in the Assault set. Just curious whether it is possible to make this set work in a way that I haven't thought of.
-
Maybe, but you can't Wormhole a pack on top of the dark pet IOed with kb to kd and watch them bounce helplessly. 😄 I like both pets. The Gravity one though is incredible in the context of its powerset.
-
In the secondary I would skip Rending Furry and Vicious Slash. Blood Craze is potentially (and unfortunately) skippable as well, altho I don't personally skip it. Just wish it recharged a bit faster. If you have to skip something in the primary I'd make it Haunt, but only if you mainly team. Haunt provides okay, not great, damage and control. But it also provides access to pet IO slotting, which can do a lot for you.
-
The main thing to know about Dark Control is that it is somewhat heavy on cones. The second thing worth knowing is that it was the final Control set added to the game, and by the time they got to it they had a handle on what made a power good. So, every power is good. Only the T1 immobilize is easily skippable. Dropping anything from a Dark build is always a very hard choice. The T9 pet is easily among the best, beaten only by Gravity's Singularity. The pet is a wolf looking thing, not quite meshing with some "dark" concepts, so plan for that if concept is important. Either Dark Affinity or Storm will work well as a secondary. Storm is actually one of the oldest sets and Dark Affinity one of the newest. Storm is a precursor to a Dominator archetype and plays similarly in some ways, focusing on damage and some control type abilities at the expense of buffs. FYI Storm is murder on your blue bar until high levels. If you choose it, slot heavily for endurance reduction. Also plan on some kb to kd converters for Lighting Storm and Tornado. Pre warning about Dark Affinity, it's graphically heavy. Your character will spend a lot of time semi transparent with glowing eyes. That's my main reason for rarely playing the set.
-
I got one to the mid 30s and abandoned when I realized he was going to be perma hidden/invisible with no way to disable it like you can with Dark Armor.
-
A slightly dirty technique for a mid-cost Controller farm build is to go with the Psi APP. It comes with Indomitable Will, which adds a huge Psionic Defense boost, while still providing a resistance shield. Since this power also provides mezz protection, you can then create farms that are Psi based and be capped without having to refactor the rest of your build. You'll want to use Psi powersets that don't debuff Recharge. Illusion Control works especially well, because Spectral Wounds heals some of the damage back on its own. The other power have to be handpicked from Psi Blast or Mind Control. Powers that cause Sleep are useful because if you do somehow manage to get mezzed you recover after 1 hit. The nice thing about this build is it works in PVE or farm contexts. In farms you're capped to Psi damage. In PVE you're mezz protected and haven't sacrificed anything major. The only real downside is Psi Blast and Psionic Tornado (while fun) are a lot slower to cast than Fire Blast or Fireball.
-
I recently retooled my Elec/Psi Dom and have some success farming with him as well. I've forgone Fire Farms for custom made Energy based farms, which are far from perfect. I was originally specced as Elec/Psi/Mu, but I found single target damage in that setup extremely lacking, and bosses took far too long to bring down. So I swapped to Elec/Psi/Primal. This added Total Focus, which is a power I dont normally like, but with the heal in Drain Psyche its pretty dreamy. The build is a cross-up farmer/PVE content build which is how it landed as an Energy farmer. Energy Defense happens to overlap with Ranged Defense, which is more accessible to Dominators than most other Defense types, and more practical in "everyday" content. It isn't quite capped to either. I haven't decided if it's worth the investment when a single purple carries me over the top. I suspect Plant Control is strictly better at dishing damage. I'm not sure about the safety part. I have a Plant/Kinetics character and the comparison is hard to make. One thing I did figure out about Electric Control that had never dawned on me before is that Static Field should be slotted with the Dominator +Damage proc. I used to just single slot Static Field with 1 Accuracy, now it gets the full Dom ATO set. The Damage proc has a very high chance to fire in this power and it can stack. I now have Static Field on a macro to place under current target and I cast every time it is up. It turns out the Sleep effect stacks. This solves a common survivability problem on farms where enemies rushing toward you are uncontrolled--with Electric they hit the sleep patch and pass out. Even work on bosses. Hero Plan by Mids' Reborn : Hero Designer 2.6.1.25 https://github.com/Crytilis/mids-reborn-hero-designer Click this DataLink to open the build! Social Medium: Level 50 Magic Dominator Primary Power Set: Electric Control Secondary Power Set: Psionic Assault Power Pool: Speed Power Pool: Leadership Power Pool: Leaping Power Pool: Fighting Ancillary Pool: Primal Forces Mastery Hero Profile: Level 1: Tesla Cage -- SprDmnGrs-Rchg/Fiery Orb(A), SprDmnGrs-Acc/Conf/Hold/Immob/Sleep/Stun/Fear/EndRdx/Rchg(3), SprDmnGrs-Acc/Conf/Hold/Immob/Sleep/Stun/Fear/EndRdx(3), SprDmnGrs-EndRdx/Rchg(5), SprDmnGrs-Conf/Hold/Immob/Sleep/Stun/Fear/Rchg(5), SprDmnGrs-Acc/Conf/Hold/Immob/Sleep/Stun/Fear(7) Level 1: Psionic Dart -- Acc-I(A) Level 2: Chain Fences -- PwrTrns-+Heal(A), PwrTrns-Dam/Acc/Rech/End(9), PwrTrns-Dam/Acc/End(9), PwrTrns-Dam/EndMod(11), PwrTrns-Dam/Rech(11), PwrTrns-EndMod(43) Level 4: Mind Probe -- Mk'Bit-Dam%(A), Mk'Bit-Acc/Dmg/EndRdx/Rchg(13), Mk'Bit-Acc/EndRdx/Rchg(13), Mk'Bit-Dmg/Rchg(15), Mk'Bit-Dmg/EndRdx(15), Mk'Bit-Acc/Dmg(42) Level 6: Jolting Chain -- Apc-Dam%(A), ExpStr-Dam%(17), Dcm-Build%(17), FrcFdb-Rechg%(19), GldJvl-Dam%(19), Acc-I(39) Level 8: Conductive Aura -- EffAdp-EndMod/Acc(A) Level 10: Hasten -- RechRdx-I(A), RechRdx-I(21) Level 12: Static Field -- SprAscoft-Acc/Conf/Hold/Immob/Sleep/Stun/Fear(A), SprAscoft-Acc/Conf/Hold/Immob/Sleep/Stun/Fear/EndRdx/Rchg(23), SprAscoft-Rchg/+Dmg%(23), SprAscoft-EndRdx/Rchg(25), SprAscoft-Conf/Hold/Immob/Sleep/Stun/Fear/Rchg(25), SprAscoft-Acc/Conf/Hold/Immob/Sleep/Stun/Fear/EndRdx(27) Level 14: Maneuvers -- LucoftheG-Def/Rchg+(A), Ksm-ToHit+(21), ShlWal-ResDam/Re TP(27), Rct-ResDam%(29) Level 16: Combat Jumping -- LucoftheG-Def/Rchg+(A) Level 18: Paralyzing Blast -- BslGaz-Acc/Hold(A), BslGaz-Acc/Rchg(29), BslGaz-Rchg/Hold(31), BslGaz-Acc/EndRdx/Rchg/Hold(31) Level 20: Drain Psyche -- EffAdp-Acc/Rchg(A), TchoftheN-Heal/HP/Regen/Rchg(31), TchoftheN-Acc/Heal(33), DctWnd-Heal/Rchg(33) Level 22: Super Speed -- BlsoftheZ-ResKB(A) Level 24: Boxing -- Empty(A) Level 26: Synaptic Overload -- CrcPrs-Conf(A), CrcPrs-Conf/Rchg(33), CrcPrs-Acc/Conf/Rchg(34), CrcPrs-Acc/Rchg(34), CrcPrs-Conf/EndRdx(34), CrcPrs-Conf%(36) Level 28: Subdue -- SprWntBit-Acc/Dmg(A), SprWntBit-Dmg/Rchg(36), SprWntBit-Acc/Dmg/EndRdx(36), SprWntBit-Acc/Dmg/Rchg(37), SprWntBit-Dmg/EndRdx/Acc/Rchg(37) Level 30: Tough -- StdPrt-ResDam/Def+(A), GldArm-3defTpProc(37) Level 32: Weave -- LucoftheG-Def/Rchg+(A), LucoftheG-Def(39) Level 35: Psionic Lance -- StnoftheM-Dam%(A), StnoftheM-Dmg/EndRdx/Rchg(39), StnoftheM-Acc/Dmg(40), StnoftheM-Dmg/EndRdx(40), StnoftheM-Dmg/ActRdx/Rchg(40), GldJvl-Dam%(46) Level 38: Psychic Shockwave -- Arm-Dam%(A), Arm-Dmg/EndRdx(42), Arm-Acc/Rchg(42), Arm-Acc/Dmg/Rchg(43), Arm-Dmg/Rchg(43) Level 41: Energy Transfer -- Hct-Dam%(A), Hct-Dmg/EndRdx(45), Hct-Acc/Rchg(45), Hct-Acc/Dmg/Rchg(46), Hct-Dmg/Rchg(46) Level 44: Conserve Power -- RechRdx-I(A), RechRdx-I(45) Level 47: Explosive Blast -- Rgn-Dmg/EndRdx(A), Rgn-Dmg(48), Rgn-Dmg/Rchg(48), Rgn-Acc/Dmg/Rchg(48), Rgn-Acc/Rchg(50), SuddAcc--KB/+KD(50) Level 49: Temp Invulnerability -- UnbGrd-ResDam(A), UnbGrd-Max HP%(50) Level 1: Brawl -- Empty(A) Level 1: Domination Level 1: Prestige Power Dash -- Empty(A) Level 1: Prestige Power Slide -- Empty(A) Level 1: Prestige Power Quick -- Empty(A) Level 1: Prestige Power Rush -- Empty(A), Empty(7) Level 1: Prestige Power Surge -- Empty(A) Level 1: Sprint -- Empty(A) Level 2: Rest -- Empty(A) Level 4: Ninja Run Level 2: Swift -- Empty(A) Level 2: Health -- Mrc-Rcvry+(A) Level 2: Hurdle -- Empty(A) Level 2: Stamina -- PrfShf-End%(A) Level 1: Quick Form Level 50: Musculature Radial Paragon ------------ | Copy & Paste this data into Mids' Reborn : Hero Designer to view the build | |-------------------------------------------------------------------| |MxDz;1503;705;1410;HEX;| |78DA6594CB4F135114C6EFED4C298F96164AE55928E5DD42A580262A88848789D0A| |4095BB54ECA58464BA7E99444962E5CEBCE8D7F80AFB8F6F93768148D0B77AE5594| |87BA30F530DF8136E924EDAFF7BBDF39F79C7BEF34716BC1FDECE2ED5921BDF359C| |DB2520BE68691D38A66C199D032465AD0E35935D386960D25F4356373C3454AF8D8| |959A3773C582998D2D66F574B160A48F84DEB265CEB2B4CD6C3196B40C33470E1E8| |BFAA44981AB795D5FF3DA3F57746D4D2F58EB46DE7D34CE1BB98CC71E2C1999F522| |8DFA17F3463A962C181B5A36B56416D2BA954A6856512F6C958B6FA32287E8F3CB4| |75FF2B0899253CCA942C455E1B8C09C05D5F3CC19B0661A7429829F92101DC2D676| |7D9C8EF2C903F86AF7997B60FD2EF32718D9E179CAA770AC7213F9DC379806D8B8C| |ECC8023D7C13D5AD7C9B1CEB8C3D67C5B443FF1C161B3AA68BE03BD7954B139C835| |EF53AC4BD6DA7DB8EEC113A653ACC3BEC8BA287C2DCC03F237F09E353C47AE13AF9| |96FC0B697CC1760C72BB089F27A10AB78021279FFD130489E6578BA76391779BDF0| |0A2F7B7FD3DA4DE85369DA76D8715D1FC1EE4FCCCFA09BD2F865BDEDF5DF455FDD2| |DC81D0A3013C8DB476B05F82C035FE095A4B5B2D65AA247FCA1D5DBB9F3F6CB7085| |AE80BD579929E635B04F033DB46027B2A99D0F71E27D8F988FC1FE27CCA7A042150| |4F91482ADD2EEAA7F0295AB34D7C3733DBC3B832D602359C27C1BC2DB38B5C10FE0| |D05BE63BE67B708C6F859730C0750ECCA0F69169E63930729679060CD2910C73CC7| |014DA688439028E0D3387F8242826CAF547F9668D327B692EC6F5C74EC37F728239| |C99C02E3A7985FB167218A1DE7BCE37BE829FE976F965AF1C6DA271A2E2BA548D5E| |C789512AF5226CB8A8452637F4F553957AA94A47AFC6F21A4ADD4F98EFF034ADFE8| |EA4A5939FBA352B924EDB7FA7B956BA752B98FDD598E94FB5CF19384F9D27F9ED10| |0B7| |-------------------------------------------------------------------|
-
Yes it was you. 🙂 You carried my Plant/Kin who has been sitting at level 47 for 6 months to 50, so thanks for that.:)
-
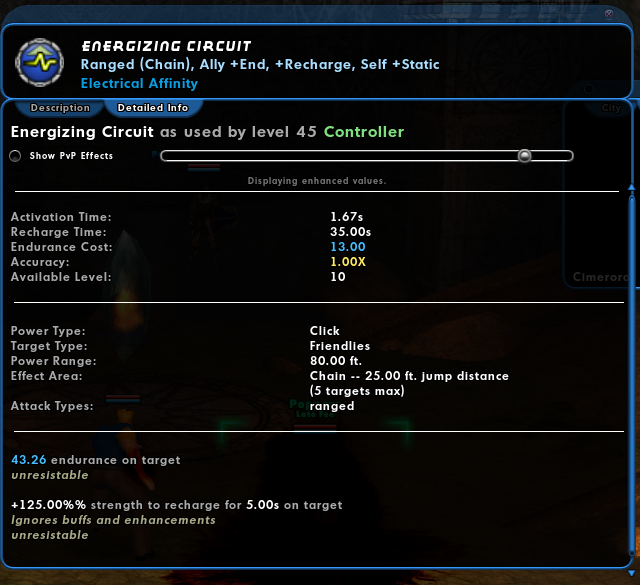
The Electric Affinity power Energizing Circuit has a peculiar attribute some people might initially overlook. In addition to being an endurance recovery power, it also provides a huge but very brief burst of +Recharge. Here are the stats for a Controller: So, the thing is, this power degrades in strength with each leap, starting at 125 for the first target and degrading for each target hit. If you happen to be precisely the second target hit, you get a 93.2% Recharge bonus. Needless to say, that's huge. The power has a base Recharge of 35 seconds, so the fastest possible Recharge for it is about 8 seconds. It animates in 1.67 seconds, neither particularly fast nor slow. I have a build right now that, prior to adding in the +93% Recharge, has this power recharging in 10 seconds. With the Recharge buff, that would bring the power down to about 8 seconds to recharge (the cap). The buff lasts 5 seconds, so I can have near perpetual uptime. However, I'll be animation locked. However to the however, since this power happens to feed endurance back to me, I actually gain more endurance than I lost by casting it. Now before anyone gets too excited about the possibility of perma Phantom Army, there's a catch: each entity hit by the chain degrades its strength. So to make sure you get a big bonus, you want to not have more than 1 pet. (I dont know if this power chains to Phantom Army or not). So the question is: what to make of all this? Just a curiosity? Or is there some hidden scary capped Recharge potential here for a monster build?

-
Right after I posted this I got invited to a fire farm, and to my surprise, the farmer was a Dominator. Plant/Fire/Fire to be exact. She was pretty good too. I don't know how the timing worked compared to a Brute, but I didn't feel like clear speed was slow.
-
I have done it with my Elec/Psi/Elec Dominator, but it isn't the fastest way to farm. Just different. To pull it off, I special built a set of Energy based NPCs. Energy Blast and Beam Rifle, mainly. Then built for Ranged/Energy Defense. Confuse each pack with Synaptic Overload, then drop a Sleep patch, then super speed in and hit Power Sink, which eliminates any potential melee attacks and refills the blue bar. Drain Psyche then provides a source of regen to keep from dying. There are probably more efficient ways to do it. This Dominator was built for PVE and could probably be made more efficient.
-
Dominators are an interesting archetype that (to me) has been slightly left behind by newer game mechanics. Dominators had a period toward the end of the original game when they were top notch, prior to Blasters having sustain powers and all ranged characters having crashless nukes. Since then though, Dominators are far down the damage scale where it counts, and the class is built around the risky proposal that control powers are strong enough for a player to survive at close range without armor. The proposition works in certain easy content, but falls apart as difficulty level is raised. The content designed to challenge top tier Scrappers and Brutes annihilates an archetype that only gets S/L armors out of its epics. Even Controllers, Defenders, and Corruptors have an easier time surviving at close range. Dominators used to have the advantage of being the only squishy archetype that could bring any build to have mezz protection. but Destiny Clarion is now provided that to all squishies, even Blasters, and generally with less work than having to come up with a +90% global Recharge build. That isn't to say Dominators aren't still fun. It's just that, to me at least, other than a handful a builds, mainly involving the /Psi APP, the archetype doesn't hold it together in difficulty play the way other achetypes do. And while I undertand why Blasters got sustain powers, because they were truly an underperforming archetype, it's a shame most Dominator secondaries don't provide armor/regen/what have you to reward close up play. Instead most truly difficult content, versus Victorias, etc, is a game of keep away using singlee target blasts and subpar cones, with the aoes only coming from the epics.
-
I think from reading above you are playing an Illusion/Empath. I don't have a build for that, but I did find a partial Ill/Nature build I must have built a while ago in response to a comment. Its still got 3 slots to go and could use some tightening up but may provide an idea. Keep in mind, an Ill/Emp is not a farming build. It's mainly a combo tank-healer utility character. It will do well on teams but can probably survive very difficult encounters, but kill speed when solo is an likely an issue. Hero Plan by Mids' Reborn : Hero Designer 2.6.1.25 https://github.com/Crytilis/mids-reborn-hero-designer Click this DataLink to open the build! ill nature: Level 50 Natural Controller Primary Power Set: Illusion Control Secondary Power Set: Nature Affinity Power Pool: Speed Power Pool: Leaping Power Pool: Flight Power Pool: Leadership Ancillary Pool: Mace Mastery Hero Profile: Level 1: Blind -- BslGaz-Acc/EndRdx/Rchg/Hold(A), BslGaz-Acc/Rchg(3), BslGaz-Acc/Hold(3), BslGaz-Rchg/Hold(5) Level 1: Corrosive Enzymes -- Acc-I(A) Level 2: Regrowth -- Heal-I(A) Level 4: Spectral Wounds -- Thn-Acc/Dmg(A), Thn-Dmg/EndRdx(5), Thn-Dmg/Rchg(7), Thn-Acc/Dmg/Rchg(7), Thn-Acc/Dmg/EndRdx(9), Thn-Dmg/EndRdx/Rchg(9) Level 6: Deceive -- CrcPrs-Conf/EndRdx(A), CrcPrs-Conf%(11), CrcPrs-Conf(11), CrcPrs-Conf/Rchg(13), CrcPrs-Acc/Conf/Rchg(13), CrcPrs-Acc/Rchg(15) Level 8: Wild Growth -- StdPrt-ResDam/Def+(A), GldArm-3defTpProc(39), UnbGrd-Max HP%(39), StdPrt-ResKB(40), StdPrt-ResDam/EndRdx(40) Level 10: Spore Cloud -- DarWtcDsp-ToHitDeb/EndRdx(A), DmpSpr-ToHitDeb/EndRdx(17), DarWtcDsp-ToHitDeb(17) Level 12: Group Invisibility -- LucoftheG-Def/Rchg+(A) Level 14: Hasten -- RechRdx-I(A), RechRdx-I(15) Level 16: Lifegiving Spores -- Heal-I(A) Level 18: Phantom Army -- ExpRnf-Acc/Rchg(A), ExpRnf-Acc/Dmg/Rchg(19), ExpRnf-EndRdx/Dmg/Rchg(19), ExpRnf-Acc/Dmg(21), RechRdx-I(21), SlbAll-Build%(23) Level 20: Wild Bastion -- NmnCnv-Heal/Rchg(A), DctWnd-Heal/Rchg(23), Pnc-Heal/Rchg(25) Level 22: Flash -- SprWiloft-Acc/Conf/Hold/Immob/Sleep/Stun/Fear(A), SprWiloft-Conf/Hold/Immob/Sleep/Stun/Fear/Rchg(25), SprWiloft-EndRdx/Rchg(27), SprWiloft-Acc/Conf/Hold/Immob/Sleep/Stun/Fear/EndRdx(27), SprWiloft-Acc/Conf/Hold/Immob/Sleep/Stun/Fear/EndRdx/Rchg(29), SprWiloft-Rchg/Dmg%(29) Level 24: Combat Jumping -- LucoftheG-Def/Rchg+(A) Level 26: Spectral Terror -- SprOvrPrs-Acc/Conf/Hold/Immob/Sleep/Stun/Fear(A), SprOvrPrs-Conf/Hold/Immob/Sleep/Stun/Fear/Rchg(31), SprOvrPrs-EndRdx/Rchg(31), SprOvrPrs-Acc/Conf/Hold/Immob/Sleep/Stun/Fear/EndRdx(31), SprOvrPrs-Acc/Conf/Hold/Immob/Sleep/Stun/Fear/EndRdx/Rchg(33), SprOvrPrs-Rchg/Energy Font(33) Level 28: Rebirth -- RechRdx-I(A) Level 30: Hover -- LucoftheG-Def/Rchg+(A) Level 32: Phantasm -- ExpRnf-Acc/Rchg(A), ExpRnf-Acc/Dmg(33), ExpRnf-Acc/Dmg/Rchg(34), ExpRnf-Dmg/EndRdx(34), OvrFrc-Dam/KB(34) Level 35: Poisonous Ray -- Thn-Acc/Dmg(A), Thn-Acc/Dmg/EndRdx(36), Thn-Dmg/EndRdx/Rchg(36), Thn-Dmg/EndRdx(37), Thn-Dmg/Rchg(37), Thn-Acc/Dmg/Rchg(37) Level 38: Overgrowth -- RechRdx-I(A), RechRdx-I(39) Level 41: Maneuvers -- LucoftheG-Def/Rchg+(A), RedFrt-Def(42), RedFrt-EndRdx(42), RedFrt-Def/EndRdx(42), RedFrt-EndRdx/Rchg(43), RedFrt-Def/EndRdx/Rchg(43) Level 44: Disruptor Blast -- FrcFdb-Rechg%(A), Empty(45), PstBls-Dam%(45), ExpStr-Dam%(45), PstBls-Acc/Dmg(46), Rgn-Dmg(46) Level 47: Summon Tarantula -- AchHee-ResDeb%(A), ExpRnf-Acc/Rchg(48), ExpRnf-Acc/Dmg/Rchg(48), ExpRnf-Acc/Dmg(48), ExpRnf-EndRdx/Dmg/Rchg(50), RechRdx-I(50) Level 49: Scorpion Shield -- LucoftheG-Def/Rchg+(A), LucoftheG-Def(50), LucoftheG-Def/EndRdx(51) Level 1: Brawl -- Empty(A) Level 1: Containment Level 1: Prestige Power Dash -- Empty(A) Level 1: Prestige Power Slide -- Empty(A) Level 1: Prestige Power Quick -- Empty(A) Level 1: Prestige Power Rush -- Empty(A) Level 1: Prestige Power Surge -- Empty(A) Level 1: Sprint -- Empty(A) Level 2: Rest -- Empty(A) Level 4: Ninja Run Level 2: Swift -- Empty(A) Level 2: Health -- Mrc-Rcvry+(A) Level 2: Hurdle -- Empty(A) Level 2: Stamina -- EndMod-I(A), EndMod-I(43) ------------ | Copy & Paste this data into Mids' Reborn : Hero Designer to view the build | |-------------------------------------------------------------------| |MxDz;1471;682;1364;HEX;| |78DA65944B4F135114C7EFB4536BDFADD0078FD2D227522814DD1BC547306048D8A| |AB581299D64326DFA4864E9C26FA0C68DF288828FC48DC618378A8FF805D4B0F503| |28A82B57F574CEBFD06426697F73FFF7DC73FFF7CC9959B879DEFDE2D2AD3342F2C| |F6AA546A3385BD59BF5AAA62975FB9552B3552F69822EA7AA6971BD3356EC344C1E| |457517E4E734ADD550AB7A5788F5C49C6B95CB79239D523C5B2EABBADA5C0BCCE91| |5A5AEE8CD7CF7C6B958A53C4B354559711BB7F34AA9A6EAAB2E63705153572B4D5F| |776245A9372A6A6DF8424D5DCEF76CB5505A56E8AFD154EA6B11B29AA6DF862470B| |5AD62CF22445416966FE057A6FC9DF92E79182BC420A1208BF7A449D0A4146BEB24| |5859B3591FB0263F641E5B073798C737C12DE626ADB561ADED86C5D09C25F02AD37| |D0DBCCEF41699BBE4C56E9869CBF6B06478CECC588DB9CC3F6636C27A36C4FC406B| |1CBC9FC5F196F3F85F81AF998F28D4C579852B28195A829EB58735C99363EF5EF02| |3E5F4A126BE4E4DB2B2784CB1019C2BB0CF794FFC01FF32FB0F40E409CDF2F813E5| |EBE3BD2C7D4BBC7F68811919E1736DD13088FCC16DD6223BCCC127E053E6F033F03| |933446709E37C619C6F9B30807C0311D9D04606C0417088191F06A3CCCFE47708E7| |1FC2591CB447147B44B1C70E21C671720C3589A306A3A8CDE86FF0077BBD43454CC| |05702BD95440F25D14329F45A0ABD9642AF7D215F693CB3347C65C000F91BE339DB| |18FC9DF4823ED0C91C77831EE63DF29483A7DC6DF63BD1A64B4CBCE1EC136BA4F6C| |962F2258F276738EA3EADCC63657E9763A650892954600A1529A04B0A707C97D64E| |A32BA6E1B8D0CF9CF1333B0FE6F08D351C458F94F6B86976DAA4144CCA299372DAA| |4CC9B9445B9E73B61280EFFE157A2FDD349B352EFEC7EAF725932DEA15FA6A88323| |4592E25C9771F03F73B7FEA6| |-------------------------------------------------------------------|
-
Assuming you want to spend a lot of influence on your build, there are 3 magic number benchmarks to consider: 32.5% 40% 45% The "true" soft cap is 45%. For a Controller with no base Defense, as with /Empathy, probably the only position you will be able to cap to is Ranged Defense. 32.5% is the amount of Defense you need to hit the soft cap with one purple inspiration. This is a fine number that will radically improve your survivability without breaking your budget. 40% is the amount of Defense you need if you use Barrier as your Destiny power and take it all the way to tier 4. (I wouldn't as an Empath. Instead I would skip Empathy's anti mezz power and take Clarion Destiny as the Destiny choice). This is a good number to hit for farmers though, because farms don't feature enemies with mezz. 45% is the true soft cap. In the old days, players would work tirelessly to hit this number. With the change to damage procs making them more viable, it's faded somewhat in importance. You'll have to decide between going for S/L defense or ranged defense. In general I feel like Ranged defense is the better bargain for Controllers, because you can cap it and still get S/L resistance for dealing with hits that break through. For Ranged defense, there are a few slotting options that are close to imperative because of the cost/benefit: If you have a Confusion power, x6 slot Coerceive Persuasion for +10 Recharge and +5 Ranged Def Slot an AoE control with x6 Will of the Controller for an additional +10 Recharge +5 Ranged Def Slot the 2 +3% globals Do those steps above and you're already at +16 defense. The rest comes down to careful power choices. Hover, Combat Jumping, and Manuevers can greatly assist you. In general, favor enhancement sets that can provide both Defense and Recharge: Luck of the Gambler (goes in any defense power, this is broken powerful and provides +7.5% global recharge, this is the secret ingredient that makes many builds work) Cloud Senses (-ToHit powers, mainly for Dark Control or Illusion Control) Expedient Reinforcement (pets, can only be slotted x1 per build) Basilisk's Gaze (Hold powers)