oedipus_tex
-
Posts
2652 -
Joined
-
Last visited
-
Days Won
4
Content Type
Profiles
Forums
Events
Store
Articles
Patch Notes
Everything posted by oedipus_tex
-
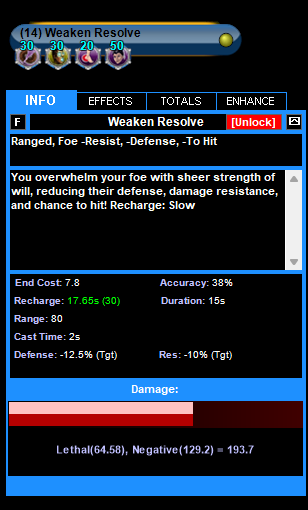
Weaken Resolve is an interesting power, because on its own its values aren't that impressive. Look at the Defender version, we've got: The power can be procc'ed out somewhat nicely. The resulting attack isn't amazing, given Weaken Resolves animation time of 2 seconds. Still, it's not terrible given the -10% Resist (Defender numbers) and chance to proc an additional -20% Resist proc. Opinions?

-
I just finished playing on these to 50. I didn't fully IO the build, not sure if I'm that dedicated to it. If you're used to playing a set that has a quick heal, this will take some adjustment in thinking prior to having the assets to tank through anything. My currently level 50, partially incarnated Shield/Energy can go through about x8+1 Fire Farms with bosses turned off. That's still pretty good IMO, much better than most characters. Also, far from unkillable. The last ITF I did with this character I had most of the unique procs slotted, but no real set bonuses. I found I could tank through most stuff other than the grouped up Elite Bosses. Pretty good performance I think. Part of the reason for my slowness to invest is armor powers in particular tend to be expensive to slot with sets. There are some players who are gifted at the market or farming in ways I am not and seem able to slot any toon they roll. I have over 193 toons, with two I'd consider to have "complete" builds. I do happen to have a Dark Armor and Reflexes Tanker to compare the Shield to. I find the Shield is about as survivable as the SR. The Dark Tank on the other hand, similarly disinvested, drops like a rock and depends a lot on that set's rezz to avoid embaressing himself with wipe outs. I've seen the hints of how the set will perform with further investment, and given the inclination I may continue the build out. I'm not as hardcore as some other players about this though. My Tank is likely to always be "pretty good."
-

Changes to -RES (Resistance Debuffs)
oedipus_tex replied to kingsmidgens's topic in General Discussion
Reminds me of the time I was modding Terraria to add some CoX-like features and wanted to add a "Rain of Arrows" type power, got this instead: -
Changes to -RES (Resistance Debuffs)
oedipus_tex replied to kingsmidgens's topic in General Discussion
Hah! Somehow I missed this bit of City of Heroes history. Singularity had Dimension Shift at one point? Wow, Gravity Control really was the most cursed set from the beginning wasn't it? -
This reminds me of a laugh to be found in the game's power files. The Dominator class is more than once misspelled "Domingator." Possibly we could get a Cowruptor class?
-
Total Noob question : how does one do damage as a Controller ?
oedipus_tex replied to ZEdglord's topic in Controller
Keep in mind you get 5 procs from the Pay to Win vendor at level 1. You should slot them more or less the same way you should "real" procs in later powers. Char with four freebie damage procs recharges fast and is actually good. Ditto with Roots. Those procs expire at level 20 but make a lot of difference prior to that. -
Fire/Nature is definitely strong synergy. A lot of people don't realize it, because it happens late in the build, but Nature is actually the second best set for AoE +Damage buffs. It can't hit Kinetics levels, but +66% Damage for the whole team is never going to be bad, especially in a set already as capable as Nature. Nature lacks a substantial -Regen power (it can do -150%) but does have single target -Resist in the T1.
-
Correct. Getting that fixed has long been on my list of Control set requests.
-
Bouncing off this comment: making this proc more equitable is at the top of my wishlist for Dominators. I think if it could be slotted into any attack and not require that attack contain a control attribmod that a lot of balance issues would resolve. Right now, the best places to slot it are unevenly distributed. Needless to say, slotting the full set and still benefitting from the proc is difficult.
-
Overall build looks pretty solid. Nice job. You've got a lot of Recharge and some pretty good Defenses going. I have nothing but nitpicks to add. IMO Scorpion Shield is a lot better on Archetypes other than Dominators. Most people believe the premiere Defense armor on Dominators is in the Ice APP, because of the combo of armor + Sleet (resist debuff) + heal (Hoarfrost/Hibernate). If you can justify it thematically, it would probably be a pure upgrade to switch to Ice in this case. If you do stick with Scorpion, Poison Ray is a good power to pick up. Note, Spore Burst is now autohit. It's a good one slot wonder for putting a 15% self heal proc you can toss out every 15 seconds or so. I like to use it as an opener when my health is below full. Spirit Tree, if you take it at all, probably could use a Health IO instead of a Recharge. Vines probably needs at least 4 slots to be effective. I like to put Basilisk's Gaze here. Roots is a high damage attack in its own right. Fiery Orb is fine here and was recently noted to do decent damage. The Dominating Grasp set is considered low rated by many players. I wouldn't bother slotting the whole set. I'd probably do x5 Positron's Blast x1 Fiery Orb proc. That way you get an extra damage proc, decent damage, and +6.25% recharge. A lot of people put a -Resist IO in Fly Trap. I usually see x4 Expedient Reinforcement or Call to Arms x1 Achille's Heel -Resist proc. Or else x6 Expedient Reinforcement to pick up the Ranged defense there. Thorntrops, I've never tried the Chance to Knock special IO. Curious how it performs in this power. The slotting you have on Strangler is technically fine, just make sure to toss a Hold out periodically to keep proccing your +Damage global proc. You'll lose some Damage if you're trying to solo an AV or something. In average fights you're probably throwing the Hold out periodically anyway. Note that Thorntrops, if you take it, actually does significant damage over long fights. It's possible to get this power to around 300 damage, and with a 1.63 anim time that means it's actually a decent blast power. The Recharge on it is pretty reasonable, easily allowing you to have two or three stacks going in a mob. The trops do take a while to do their work--45 seconds, longer than some fights. So this is an "up to you" decision.
-
For better or worse, when I've had friends try the game and they are not experienced video game players, I've usually pushed them toward first trying a Dark Miasma Defender or Corruptor. My reasoning is: Blast powers are relatively straight forward. Most people quickly understand what a Fireball or Flare is. I have them choose which ever blast set they want, so they feel like they've picked something appealing to them. Although some Blast sets are obviously stronger than others, they'll all more or less function as expected. Dark Miasma specifically offers powers that showcase the variety that exists in this game: the "bounce heal", the tar patch, the toggle, the fear cone, and so on. So you're introducing some of the game's core concepts with training wheels on. Those basic instructions have tended to keep my friend's interests. I had one who quit because her laptop couldn't handle it, but a few others have stayed around for a while.
-
This is a very well put together build. You've done a very good job covering defenses and resistance. This character is durable, has strong sources of damage. Overall, excellent. The best part is that it can get even better from here. I'll echo what Carnifax said about Bonfire. I'd reduce this to just a chance for 100% recharge proc and a KB to KD IO. I'd move these slots to Stamina so you're not wheezing for endurance as much. Hot Feet usually works best with a x5 set. You can go with Armageddon, Ice Mistral's Torment, or Superior Avalanche, depending on what works for you. Procs here tend not to do much, so I hunt for bonuses, and make sure to cover Accuracy, Damage, and End Redux. FYI I tend not to go with Obliteration because it has low End Redux; the other three are more reasonable. In Dark Embrace, be sure to take the +7.5% Max HP global. Fire Cages I would slot with a damage set like Positron's Blast. Remember, procs don't benefit from Containment. So, even if a power seems like it does a little more damage procc'ed out, it actually may not when you consider what double the damage would be. You can keep a proc of your choice in the sixth slot (Posi's itself comes with a damage proc, so you'll have two). Twilight Grasp probably needs more Accuracy. The set you have slotted is a Heal set that doesn't include any. Unfortunately the Accuracy+Heal sets have mediocre bonuses. You do get an extra damage proc out of Nictus though. Keep in mind, with this power probably all you really need is Accuracy, the Heal portion is less important to enhance. It's completely acceptable to lose some set bonuses here in order to move slots elsewhere in the build, and just put Acc/Heal Hami Os or frankenslots.
-
I can't speak to Thorny's damage potential, only its utility, which I think is a ripe area for some improvement. It's such a cool looking set. On live, it had Aim instead of Build Up, and the switch over on HC has helped it. But overall it's a surprisingly vanilla set. I wish there was something to really set it apart. As for the numbers, all I can say is it feels slow. The redraw certainly doesn't help it. I could forgive low numbers if it had some interesting abilities. The current implementation has Thorntrops, which doesn't stand out to me, but is an opportunity for the developers to introduce something fun and unusual.
-
What Can Be Done to Recruit Players?
oedipus_tex replied to Apparition's topic in General Discussion
I understand the difficult position the HC team is in. Curating content is difficult. In a number of posts the HC team has outlined the challenges of nativizing code. I don't think it's the case that they aren't open to it. It's just that powersets and other systems are made of many interlocking sub-parts. It might not seem like a poorly coded power could crash the game or corrupt the database, but it unfortunately is. I do think we'll see some collabs one day. -
What Can Be Done to Recruit Players?
oedipus_tex replied to Apparition's topic in General Discussion
The version of Wind Control that exists in the live code consists of power definitions but not particles. In my experience, power definitions require the least amount of development time. The particles are where the time crunch is. The team could reuse particles from other sets and possibly get an okay-ish looking set. It's not the case that's there's an entirely complete Wind Control set in the base files that's ready to roll, though. -
How much damage does envenomed blades add to attacks?
oedipus_tex replied to EnjoyTheJourney's topic in Dominator
It's not a lot of damage to be sure. Should be noted that this power also adds +12% ToHit for 40 seconds, which on its own is pretty powerful for helping boost you toward a proc build. So even if the +damage isn't a ton, it's not a total wash. Martial in theory combos well with a set like Fire, with the +ToHit helping to proc out Char. +ToHit will also generally help Controls land. If Dominators weren't so dependent on set bonuses for Recharge and Defense it would probably carry further. Still wish it delivered a bit more direct damage, though. -
How much damage does envenomed blades add to attacks?
oedipus_tex replied to EnjoyTheJourney's topic in Dominator
Okay, I missed something else about this power. It seems to include a second damage proc, which I missed before. This proc I think applies to damage auras. If I'm reading the notation on that right, it's saying "Apply this when the activate period is not zero." I.e. toggle or auto powers with a pulse rate. Not going to try to validate how much extra damage it's adding. But it seems I was wrong about the power not adding damage to toggles. It just seems to do with a second, separate proc.
-
How much damage does envenomed blades add to attacks?
oedipus_tex replied to EnjoyTheJourney's topic in Dominator
There was a player who did an analysis of Envenomed Blades. I think it may have been @Carnifax. I believe he had some field data on this power and concluded it doesn't add very much damage at all. I can parse out certain things from the code. The Requires field for example is written in reverse Polish notation: if !target.isFriend? && power.base>activateperiod == 0 && target>enttype eq 'critter' && Ne(power.base>CategoryName, 'Judgement') It means: If the target is not a Friend (i.e. is an enemy)... ... And if the power has an Activate Period of zero (i.e. is a power that doesn't "pulse," like most toggles or auto powers do) ... ... And if the target is a critter ... ... And if the power is not in the Judgment powerset. The actual damage portion is a bit harder to parse: [EDIT: As noted below, this is the PVP formula, not the PVE formula. For discussion of the PVE formula, scroll down.] Magnitude Expression: 8.759*(0.7*power.base>activatetime + 0.04*minmax(power.base>rechargetime, 0, 20) + 0.4) Basically, the amount of damage is based on a modified combo of Activation Time plus Recharge Time plus an offset of 0.4, times a multiplier of 8.759. The first mod factors: ANIM: The longer the activation time of the power, also the more damage, You get 0.7 mod factor for each second of animation. A 2 second animation = +1.4 mod factor. RECHARGE: You get +0.04 modified Recharge Time per point of base Recharge between 0 and 20. So a power with 20 recharge = 0.8. Recharge is clamped to a range of 0 to 20. So a power with greater than 20 recharge gets the max value of 0.8. OFFSET: Add 0.4 to the above two factors. Multiply all of that by 8.759. Keep in mind that decimals that are less than 1.0 reduce rather than increase a value during multiplication. So, in order to get at least the ~8.7 base value of damage, you need for the modified Anim and modified Recharge result plus 0.4 to be greater than zero. Hopefully I won't fall on my face by trying to math out of some of the implications: Animation time is more important than Recharge to the formula.** You get 0.7 points for each second of animation time, but only 0.04 for each extra second of Recharge. However, and this is speaking as a non mathematician, over the long haul faster animating powers still do more actual DPA. That's because the multiplier 0.7, less than zero. So for each second of animation time you only get 70% of the value of the time you are spending. Math people feel free to correct me if this is a horrendous misread. Unlike a real proc, at least radius of the power doesn't count against you. Per previous section, it unfortunately won't apply to toggle powers like Hot Feet.* No idea if it applies to pseudo pets. *Notation in next post. This proc won't apply to toggles, but there's a secocnd proc in the power that will. ** EDIT: Clarifying myself here. What I forgot to make note of is that although Anim time has more impact in the literal sense, in the real world Recharge has a much wider range of values than anim does. Anim ranges typically runs from 1.1 to 3.0. Recharge typically ranges from 4 to 20 (the clamp). So assuming I'm not misreading the formula, the final ranges of these values would be: ANIM: 0.7 to 2.1. RECHARGE: 0.16 to 0.8 A power at the extreme end with an anim of 3 seconds and a recharge of 20 would get around 8.759 * (2.1 + 0.8 + 0.4) = ~28 extra damage. To use a real power from in game, Fireball has an anim of 1 second, recharge 32 (clamped at 20), so 8.759 * (0.7 + 0.8 +0.4) = 16 extra damage. -
A shoehorn, the kind with teeth. Mind Control/Savage Assault
oedipus_tex replied to Errant Interests's topic in Dominator
I personally really enjoy Savage Assault. It's a fun, weird set. The worst thing I can think to say about it is it heavily features birds, which can sometimes be hard to justify aesthetically in a build. Savage on the whole though has some serious strengths. It has a built in self heal, which isn't incredible, but most Doms get none at all. It also has a place to put Gaussian's chance for Build Up, which means we can hit respectable damage numbers. Here's a fairly vanilla, safe build that will ease you into the character. This isn't built for the highest possible damage. Instead it's built to give you significant breathing room to learn to play your new Dominator safely. While I personally think Sleet and a few other APP powers are technically more powerful, I still recommend starting out with the Psi pool so you can feel how Dominators play when they are well protected. You can then peel layers away from that to add more damage. This build puts the Dominator ATO proc in Dominate. Dominate is hybrid slotted as a proc cannon and normal-slot out. It could potentially do more damage as a pure proc, but, you'd have to make other changes to the build to make up for lost Accuracy. Note, making this build work will probably require external Endurance. I recommend Destiny Ageless. That means when exemping you won't have that extra support, but IMO that's easily solved by just not running all your toggles when exemp'ed. This Villain build was built using Mids Reborn 3.2.17 https://github.com/LoadedCamel/MidsReborn Click this DataLink to open the build! Level 50 Magic Dominator Primary Power Set: Mind Control Secondary Power Set: Savage Assault Power Pool: Speed Power Pool: Concealment Power Pool: Fighting Power Pool: Leaping Ancillary Pool: Psionic Mastery Villain Profile: Level 1: Mesmerize -- Thn-Acc/Dmg(A), Thn-Dmg/EndRdx(36), Thn-Dmg/Rchg(50) Level 1: Call Swarm -- HO:Nucle(A) Level 2: Dominate -- UnbCns-Dam%(A), SprAscoft-Rchg/+Dmg%(7), Thn-Acc/Dmg(7), Thn-Dmg/EndRdx(9), Thn-Dmg/Rchg(9), GhsWdwEmb-Dam%(11) Level 4: Maiming Slash -- Mk'Bit-Dam%(A), Mk'Bit-Acc/Dmg/EndRdx/Rchg(11), Mk'Bit-Acc/Dmg(13), Mk'Bit-Dmg/EndRdx(13), Mk'Bit-Dmg/Rchg(15), Mk'Bit-Acc/EndRdx/Rchg(15) Level 6: Confuse -- SprAscoft-Acc/Conf/Hold/Immob/Sleep/Stun/Fear/EndRdx/Rchg(A), SprAscoft-Acc/Conf/Hold/Immob/Sleep/Stun/Fear(17), SprAscoft-Conf/Hold/Immob/Sleep/Stun/Fear/Rchg(17), SprAscoft-EndRdx/Rchg(19), SprAscoft-Acc/Conf/Hold/Immob/Sleep/Stun/Fear/EndRdx(19) Level 8: Mass Hypnosis -- CaloftheS-Heal%(A) Level 10: Unkindness -- AchHee-ResDeb%(A), PstBls-Dam%(21), PstBls-Acc/Dmg/EndRdx(21), PstBls-Acc/Dmg(23), PstBls-Dmg/EndRdx(23), PstBls-Dmg/Rng(25) Level 12: Hasten -- RechRdx-I(A), RechRdx-I(25) Level 14: Stealth -- LucoftheG-Def/Rchg+(A) Level 16: Spot Prey -- GssSynFr--Build%(A), GssSynFr--ToHit/EndRdx(27), GssSynFr--ToHit(27), GssSynFr--ToHit/Rchg(29), GssSynFr--ToHit/Rchg/EndRdx(29), GssSynFr--Rchg/EndRdx(31) Level 18: Total Domination -- BslGaz-Acc/Rchg(A), BslGaz-Rchg/Hold(31), BslGaz-EndRdx/Rchg/Hold(31), BslGaz-Acc/EndRdx/Rchg/Hold(33) Level 20: Boxing -- Empty(A) Level 22: Tough -- StdPrt-ResDam/Def+(A), GldArm-3defTpProc(33) Level 24: Weave -- LucoftheG-Def/Rchg+(A) Level 26: Terrify -- Artl-End/Rech/Rng(A), Artl-Acc/Dam/Rech(33), Artl-Acc/Rech/Rng(34), Artl-Acc/Dam(34), Artl-Dam/End(34), Artl-Dam/Rech(36) Level 28: Blood Craze -- DS:DSyncHealRech(A) Level 30: Combat Jumping -- LucoftheG-Def/Rchg+(A), ShlWal-ResDam/Re TP(46), Rct-ResDam%(46) Level 32: Mass Confusion -- CrcPrs-Conf%(A), CrcPrs-Conf/EndRdx(36), CrcPrs-Conf(37), CrcPrs-Conf/Rchg(37), CrcPrs-Acc/Conf/Rchg(37), CrcPrs-Acc/Rchg(39) Level 35: Call Hawk -- Apc-Dam%(A), Apc-Dmg/EndRdx(39), Apc-Acc/Dmg/Rchg(39), Apc-Acc/Rchg(40), Apc-Dmg/Rchg(40), ExpStr-Dam%(40) Level 38: Feral Charge -- Mk'Bit-Acc/EndRdx/Rchg(A), Mk'Bit-Dam%(42), Mk'Bit-Acc/Dmg(42), Mk'Bit-Dmg/EndRdx(42), Mk'Bit-Dmg/Rchg(43), Mk'Bit-Acc/Dmg/EndRdx/Rchg(43) Level 41: Link Minds -- LucoftheG-Def/Rchg+(A), LucoftheG-Def/Rchg(43), LucoftheG-Def(45) Level 44: Mind Over Body -- UnbGrd-Max HP%(A), UnbGrd-ResDam(45), UnbGrd-ResDam/EndRdx(45), UnbGrd-Rchg/ResDam(46) Level 47: Psionic Tornado -- PstBls-Dam%(A), PstBls-Acc/Dmg/EndRdx(48), PstBls-Dmg/Rchg(48), PstBls-Dmg/EndRdx(48), PstBls-Acc/Dmg(50), Bmbdmt-+FireDmg(50) Level 49: Indomitable Will -- LucoftheG-Def/Rchg+(A) Level 1: Brawl -- Empty(A) Level 1: Domination Level 1: Sprint -- Empty(A) Level 2: Rest -- Empty(A) Level 1: Swift -- Empty(A) Level 1: Health -- Pnc-Heal/+End(A), Mrc-Rcvry+(3), NmnCnv-Regen/Rcvry+(3) Level 1: Hurdle -- Empty(A) Level 1: Stamina -- PrfShf-End%(A), PwrTrns-+Heal(5), PwrTrns-EndMod(5) Level 1: Blood Frenzy ------------ | Copy & Paste this data into Mids Reborn : Hero Designer to view the build | |-------------------------------------------------------------------| |MxDz;1403;674;1348;HEX;| |78DA65945B4F134114C767BBB3144A2BD6969B505ACAB52D5DA8CF1A215C1294264| |D487C52EB0ACB325ABA0D5B89FD243E092F5E9FBDE1EDC1473F80972FA192881A13| |753D9D7346306CD2FC3AE7CC997399FF6EF1E65C786D6D619A691DB315CBF3CA73E| |E86A85A7577D3285A8E58D1193C41F80DFC739467DD6A7DD3AD9845515D558BD481| |7BC6F3AC1B95BAB96C6D598EAD962C54722166B966DBAB51F977B1BA253C7155544| |4BD11919605E1ACD745D509CBD5926DD560919CAF8915B3E409B72A56CA45CBABDB| |9B0D2CD369E6EB81E252F03BD32C556B96CBFC00BB0D287036B48D2CEC207F650E3| |631761AC07576162235321ADA6240EE6C79AD239B2725386BDD26EE20431B9AE41F| |38510EA919AC5FC734A16BC8F01AD1411E5B270AE434441A94991BAF30E3F15DE27| |3E48917C497C8194050F5107CAB49A39665AC4D95D1F6067A887116DFC534F167C8| |AE47C4C7C89EA7C8345C703B9DA8B5E7C8498C8033A2D2453A319D0EE93A54BA8E8| |738B2930F887790FD7789F79003F791B3D040944ED4A3EF02728E03EF891F90A98F| |480DD2C728138BF9F0301D4C9DAADCCE6EBC87D4299C0E0767B72AB79BCA9D035FA| |FBAE1DE56431A532DC8C120512772E49081E4D06B9F3AB12F6748CD74419A84525B| |82D2E4CF630DF9AFC87940524D296961F7435790C3178997889791A365E46F10565| |A9362F58D74819C534413393649CC131B78F33E048FA0D07D6384D4962175664895| |19526596549925D5A6A38C8DABDEC6A9B76C143911470EC3A69CBAC4DC4F6C78629| |FF88D06F103390A9B4D350893543949AA9C7C4224551648A58500DD03044FA9F94F| |5139FD9CA9075E64298BF42193BF74D45FE2EAD50793264D9F42873F07D2F42574F| |8333288F507CE81650C7801B37F3E1AB7F75FDC2DBC0EFE9D23F790F6D8C126FF2F| |A117D5D4| |-------------------------------------------------------------------|
-
Total Noob question : how does one do damage as a Controller ?
oedipus_tex replied to ZEdglord's topic in Controller
TA is a very strong secondary, especially on Trollers. Partly because it has good debuffs and abilities overall. But partly because of how effective it is when procc'ed out, especially on a normally low damage AT like Controller.
-
Total Noob question : how does one do damage as a Controller ?
oedipus_tex replied to ZEdglord's topic in Controller
If you're going to solo with this class, in most cases I think the solution is to fight as many enemies as a time as you think you can handle, at a low difficult setting, probably with bosses turned off. -1 x3 is probably a reasonable setting for a semi-built Troller to handle, but it depends on the sets. A few of them are kind of apoplectic too. For example, Electric Control has excellent solo control of average sized groups, but low damage. So Electric on its own is a slow soloist, but e.g. Electric/Trick Arrow makes up for some of it. Controllers (and Dominators) are meant to handle big groups of enemies at a time. Their Controls are only up every 90-120 seconds prior to Recharge enhancements. That drives a strategy built around taking on lots of stuff. Specifically, what you're looking for is the ability to make inspirations rain down on the character. You want fast inspiration churn so you can chug down reds, purples, and blues to keep yourself pressing forward. Bosses provide good XP but also slow down your inspiration rate. Once you've found a setting with good inspiration rain, you can try increasing the number of enemies. I'd increase up to x8 before I'd increase the level. Having more enemies you can mow down quickly will give you a lot more inspirations than adding +difficulty will. -
I've done the same in the past. IMO if going the Sorcery path, it's often worth it to skip Propel for Arcane Bolt. Arcane Bolt is a pretty decent attack for any non-Grav Controller to pick up too. Not a huge heavy hitter, but not bad, and it opens up the Sorcery pool.
-
Total Noob question : how does one do damage as a Controller ?
oedipus_tex replied to ZEdglord's topic in Controller
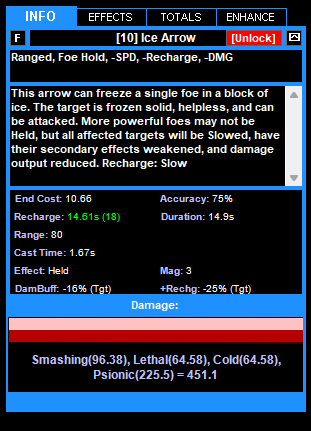
Here's an example of procs in a power: Holds like Char that have a fast animation speed are ideal for damage procs, because the fast cast speed means a high DPA. In this case, average damage is about 317 per cast. With the anim time of 1.07 seconds, that's a DPA of 296. That's high for an 8 second recharge power. Keep in mind, damage from procs are averages. Each proc has a chance to fire. On average, the damage will work out to an additional +317. But, sometimes it could be as high as +534, or as low as +0. That's the nature of chance.
-
Total Noob question : how does one do damage as a Controller ?
oedipus_tex replied to ZEdglord's topic in Controller
It's going to depend a lot on the sets involved. Gravity is probably the smoothest ride. Lift does extremely good damage for a Controller. Propel does decent, not outstanding, damage. I think level 2 Gravity Controllers may have the highest single target DPA of any character in that level range just because of how hard Lift hits with Containment. Fire and Mind Controllers both have very fast casting single target holds that can be procced out for good damage in the ~250 DPA range. Plant Control's Roots power does double the damage of the other AoE immobilizes. It's actually as good as a Defender's Explosive Blast, but with double the area of effect and half the recharge. Carrion Creepers is a proc monster that delivers substantial damage. Fire Control's Hot Feet does about the same damage of a free Fireball cast every 10 seconds. Dark Control takes -ToHit sets, which makes all of the powers very procc'able. On the secondary side, a few sets stand out for Damage. Kinetics, of course. Also Trick Arrow and Storm. More subtly, Nature provides a big +Damage boost. Cold Domination can proc out Infrigidate. One trap to avoid: You probably want to skip the Controller single target blast available in most APPs. They are mostly not very good. If you need an additional single target blast, you're often better off taking the T1 immobilize power, which typically recharge in 4 seconds, and are available from level 1. -
I think Blasters and Dominators are tied for most buttons on the hot bar. Both are very click-dependent classes, for different reasons. IMO Dominator beats Blaster for the number of buttons you have to click.