

Chelsea Rorec
-
Posts
306 -
Joined
-
Last visited
Content Type
Profiles
Forums
Events
Store
Articles
Patch Notes
Posts posted by Chelsea Rorec
-
-
4 hours ago, Calamity Cain said:
Ah, that clarifies it, thanks! So I punched up my own version of this, changing a few of the powers (incidentally I like that you added Medicine, since the character has some medical training). I get nervous with such low resist, but I suppose the idea is that with such high damage and high defense, most things will be dead before they can land a hit right?
Speaking of damage, I compared your offered build and my own, particularly the damage output on Assassin's Blow, and I can't for the life of me understand why the two are different. Your build shows 1182.4 Damage on Assassin's Blow, while mine shows 788.4 Damage. Meanwhile, both of our Eagle's Claw have matching damage outputs of 688.3 Damage. What am I missing? How is your example squeezing almost 300 more damage out of Assassin's Blow? Here's my take on your build:
Villain Plan by Mids' Reborn : Hero Designer 2.6.1.25
https://github.com/Crytilis/mids-reborn-hero-designerClick this DataLink to open the build!
Doc Indigo 2: Level 50 Technology Stalker
Primary Power Set: Martial Arts
Secondary Power Set: Ninjitsu
Power Pool: Leaping
Power Pool: Medicine
Ancillary Pool: Weapon MasteryVillain Profile:
Level 1: Storm Kick -- TchofDth-Acc/Dmg(A), TchofDth-Dmg/EndRdx(3), TchofDth-Dmg/Rchg(3), TchofDth-Acc/Dmg/EndRdx(5), TchofDth-Dmg/EndRdx/Rchg(5), TchofDth-Dam%(7)
Level 1: Hide -- LucoftheG-Def/Rchg+(A)
Level 2: Crippling Axe Kick -- TchofDth-Acc/Dmg(A), TchofDth-Dmg/EndRdx(7), TchofDth-Dmg/Rchg(9), TchofDth-Acc/Dmg/EndRdx(9), TchofDth-Dmg/EndRdx/Rchg(11), TchofDth-Dam%(11)
Level 4: Danger Sense -- RedFrt-Def/EndRdx(A), RedFrt-Def/Rchg(13), RedFrt-EndRdx/Rchg(13), RedFrt-Def/EndRdx/Rchg(15), RedFrt-Def(15), RedFrt-EndRdx(17)
Level 6: Assassin's Blow -- SprStlGl-Acc/Dmg(A), SprStlGl-Dmg/Rchg(17), SprStlGl-Acc/Dmg/Rchg(19), SprStlGl-Dmg/EndRdx/Rchg(19), SprStlGl-Acc/Dmg/EndRdx/Rchg(21), SprStlGl-Rchg/Hide%(21)
Level 8: Combat Jumping -- LucoftheG-Def/Rchg+(A)
Level 10: Ninja Reflexes -- RedFrt-Def/EndRdx(A), RedFrt-Def/Rchg(23), RedFrt-EndRdx/Rchg(23), RedFrt-Def/EndRdx/Rchg(25), RedFrt-Def(25), RedFrt-EndRdx(27)
Level 12: Focus Chi -- GssSynFr--ToHit(A), GssSynFr--ToHit/Rchg(39), GssSynFr--ToHit/Rchg/EndRdx(40), GssSynFr--Rchg/EndRdx(40), GssSynFr--ToHit/EndRdx(40), GssSynFr--Build%(42)
Level 14: Caltrops -- PstBls-Dam%(A)
Level 16: Kuji-In Rin -- RechRdx-I(A)
Level 18: Cobra Strike -- CrsImp-Acc/Dmg(A), CrsImp-Dmg/EndRdx(34), CrsImp-Dmg/Rchg(34), CrsImp-Acc/Dmg/Rchg(36), CrsImp-Acc/Dmg/EndRdx(36), CrsImp-Dmg/EndRdx/Rchg(36)
Level 20: Kuji-In Sha -- StdPrt-ResDam/Def+(A), GldArm-3defTpProc(48), Prv-Heal/Rchg(48), Prv-Heal/Rchg/EndRdx(50), Prv-Absorb%(50)
Level 22: Thunder Kick -- TchofDth-Acc/Dmg(A), TchofDth-Dmg/EndRdx(31), TchofDth-Dmg/Rchg(33), TchofDth-Acc/Dmg/EndRdx(33), TchofDth-Dmg/EndRdx/Rchg(33), TchofDth-Dam%(34)
Level 24: Aid Other -- Mrc-Rcvry+(A)
Level 26: Crane Kick -- CrsImp-Acc/Dmg(A), CrsImp-Dmg/EndRdx(27), CrsImp-Dmg/Rchg(29), CrsImp-Acc/Dmg/Rchg(29), CrsImp-Acc/Dmg/EndRdx(31), CrsImp-Dmg/EndRdx/Rchg(31)
Level 28: Aid Self -- Prv-Heal/Rchg(A), Prv-Heal/Rchg/EndRdx(50)
Level 30: Field Medic -- RechRdx-I(A)
Level 32: Eagles Claw -- SprAssMar-Acc/Dmg(A), SprAssMar-Dmg/Rchg(37), SprAssMar-Acc/Dmg/Rchg(37), SprAssMar-Dmg/EndRdx/Rchg(37), SprAssMar-Acc/Dmg/EndRdx/Rchg(39), SprAssMar-Rchg/Rchg Build Up(39)
Level 35: Physical Perfection -- PrfShf-End%(A)
Level 38: Web Grenade -- TraoftheH-Dam%(A)
Level 41: Shuriken -- Thn-Acc/Dmg(A), Thn-Dmg/EndRdx(42), Thn-Dmg/Rchg(42), Thn-Acc/Dmg/Rchg(43), Thn-Acc/Dmg/EndRdx(43), Thn-Dmg/EndRdx/Rchg(43)
Level 44: Exploding Shuriken -- Artl-Acc/Dam(A), Artl-Dam/End(45), Artl-Dam/Rech(45), Artl-Acc/Dam/Rech(45), Artl-Acc/Rech/Rng(46), Artl-End/Rech/Rng(46)
Level 47: Resuscitate -- Pnc-Heal/+End(A)
Level 49: Blinding Powder -- CrcPrs-Conf%(A)
Level 1: Assassination
Level 1: Brawl -- Empty(A)
Level 1: Quick Form
Level 1: Prestige Power Dash -- Empty(A)
Level 1: Prestige Power Slide -- Empty(A)
Level 1: Prestige Power Quick -- Empty(A)
Level 1: Prestige Power Rush -- Empty(A)
Level 1: Prestige Power Surge -- Empty(A)
Level 1: Sprint -- Clr-Stlth(A)
Level 2: Rest -- IntRdx-I(A)
Level 4: Ninja Run
Level 2: Swift -- Run-I(A)
Level 2: Health -- NmnCnv-Regen/Rcvry+(A)
Level 2: Hurdle -- Jump-I(A)
Level 2: Stamina -- PrfShf-End%(A), PwrTrns-EndMod(46), PwrTrns-+Heal(48)
------------Looks ok
Altho you do want that Pancea in health not in Resuscitate.
Always take cobra strike.
It is more damage that most of your attacks and is great for a fast strike after AS.
Web grenade NEEDS an ACC enhancer.
Not sure on the dmg difference between builds.
-
15 hours ago, Calamity Cain said:
- Any pointers on where to put the slots instead and what sets to pursue?
- What do you mean "Kuji-in Rin is a clicky and dosn't play nice with hasten"? I know they're both clickies, but you can have more than one. I can auto Hasten and use Kuji-in Rin situationally, since its resists are pretty situational in the first place.
- I did notice the end draw as I was leveling today, but then I wasn't fully slotted. Mids says my recovery with this build would still be solid, with 1.9/s Net Endurance Gain with everything turned on. I'm all for using less endurance, but again I'm not sure where to start if I'm outright removing Fighting toggles and Maneuvers. Just turning those off on this build shows about a 10% drop in all Defenses and about 15% drop in Smashing/Lethal Resistance.
Again, I'm new at this, but that's what it looks like to me. I appreciate the feedback, but if you can be more specific?
Ok on the first point fully slot your defensive toggles and use a Red fortune set as that gives +Dmg +rech and +ranged defence so you are looking at an extra 5% ranged def just from slotting reflexes and danger sense and an extra 10% Rech and 4% dmg.
Mmm smexy.
Kujin-Rin is your anti Hold power and should always be on Auto because any -Rech will slow it down and the overlap without hasten will be short.
So if you have stacked -Rech and Holds on you when Rin ends you end up getting held.
So having Rin on Auto means you can't have hasten on Auto and it becomes a clickfest.
Obviously any +Rech is good to your build but Hasten is not required and Rin only needs 1 +Rech enhancer and any bit of extra +Rech from sets is a bonus.
I personally don't like being held so it is definitely not Situational 🙂
Mids dosn't tell you how much end your attack powers will be using as well as the toggles alltogether.
So that 1.9/s Gain won't last with MA's power speed.
I had the same issue with my Kat/Nin and that is not as fast as MA is.
Here is a sample build to give you an idea what you can do.
48% melee def 47% Ranged def with no fighting or leadership pool. 55% Extra Rech means it dosn't need hasten.
SpoilerThis Villain build was built using Mids Reborn 3.0.2.19
https://github.com/Reborn-Team/MidsRebornClick this DataLink to open the build!
Level 50 Natural Stalker
Primary Power Set: Martial Arts
Secondary Power Set: Ninjitsu
Power Pool: Leaping
Power Pool: Medicine
Ancillary Pool: Weapon MasteryVillain Profile:
Level 1: Storm Kick -- TchofDth-Dam%(A), TchofDth-Acc/Dmg(3), TchofDth-Dmg/EndRdx(3), TchofDth-Dmg/Rchg(5), TchofDth-Acc/Dmg/EndRdx(5), TchofDth-Dmg/EndRdx/Rchg(7)
Level 1: Hide -- LucoftheG-Def/Rchg+(A)
Level 2: Crippling Axe Kick -- TchofDth-Dmg/EndRdx/Rchg(A), TchofDth-Acc/Dmg(7), TchofDth-Dmg/EndRdx(9), TchofDth-Dmg/Rchg(9), TchofDth-Acc/Dmg/EndRdx(11), TchofDth-Dam%(11)
Level 4: Danger Sense -- RedFrt-EndRdx(A), RedFrt-Def/EndRdx(13), RedFrt-Def/Rchg(13), RedFrt-EndRdx/Rchg(15), RedFrt-Def/EndRdx/Rchg(15), RedFrt-Def(17)
Level 6: Assassin's Blow -- SprStlGl-Acc/Dmg(A), SprStlGl-Dmg/Rchg(17), SprStlGl-Acc/Dmg/Rchg(19), SprStlGl-Dmg/EndRdx/Rchg(19), SprStlGl-Acc/Dmg/EndRdx/Rchg(21), SprStlGl-Rchg/Hide%(21)
Level 8: Super Jump -- Jump-I(A)
Level 10: Ninja Reflexes -- RedFrt-Def/EndRdx(A), RedFrt-Def/Rchg(23), RedFrt-EndRdx/Rchg(23), RedFrt-Def/EndRdx/Rchg(25), RedFrt-Def(25), RedFrt-EndRdx(27)
Level 12: Focus Chi -- GssSynFr--ToHit(A), GssSynFr--ToHit/Rchg(40), GssSynFr--ToHit/Rchg/EndRdx(40), GssSynFr--Rchg/EndRdx(43), GssSynFr--ToHit/EndRdx(46), GssSynFr--Build%(48)
Level 14: Caltrops -- ImpSwf-Dam%(A)
Level 16: Kuji-In Rin -- RechRdx-I(A)
Level 18: Cobra Strike -- CrsImp-Acc/Dmg(A), CrsImp-Dmg/EndRdx(34), CrsImp-Dmg/Rchg(34), CrsImp-Acc/Dmg/Rchg(36), CrsImp-Acc/Dmg/EndRdx(36), CrsImp-Dmg/EndRdx/Rchg(36)
Level 20: Kuji-In Sha -- StdPrt-ResDam/Def+(A), GldArm-3defTpProc(48), Prv-Heal/Rchg(48), Prv-Heal/Rchg/EndRdx(50), Prv-Absorb%(50)
Level 22: Combat Jumping -- LucoftheG-Def/Rchg+(A)
Level 24: Thunder Kick -- TchofDth-Acc/Dmg(A), TchofDth-Dmg/EndRdx(31), TchofDth-Dmg/Rchg(33), TchofDth-Acc/Dmg/EndRdx(33), TchofDth-Dmg/EndRdx/Rchg(33), TchofDth-Dam%(34)
Level 26: Crane Kick -- CrsImp-Dmg/EndRdx/Rchg(A), CrsImp-Acc/Dmg(27), CrsImp-Dmg/EndRdx(29), CrsImp-Dmg/Rchg(29), CrsImp-Acc/Dmg/Rchg(31), CrsImp-Acc/Dmg/EndRdx(31)
Level 28: Smoke Flash -- Acc-I(A)
Level 30: Injection -- Acc-I(A)
Level 32: Eagles Claw -- SprAssMar-Acc/Dmg(A), SprAssMar-Dmg/Rchg(37), SprAssMar-Acc/Dmg/Rchg(37), SprAssMar-Dmg/EndRdx/Rchg(37), SprAssMar-Acc/Dmg/EndRdx/Rchg(39), SprAssMar-Rchg/Rchg Build Up(39)
Level 35: Aid Self -- Prv-Heal/Rchg(A), Prv-Heal/Rchg/EndRdx(50)
Level 38: Physical Perfection -- PwrTrns-+Heal(A)
Level 41: Shuriken -- Thn-Acc/Dmg(A), Thn-Dmg/EndRdx(42), Thn-Dmg/Rchg(42), Thn-Acc/Dmg/Rchg(42), Thn-Acc/Dmg/EndRdx(43), Thn-Dmg/EndRdx/Rchg(43)
Level 44: Exploding Shuriken -- Artl-Acc/Dam(A), Artl-Dam/End(45), Artl-Dam/Rech(45), Artl-Acc/Dam/Rech(45), Artl-Acc/Rech/Rng(46), Artl-End/Rech/Rng(46)
Level 47: Web Grenade -- Acc-I(A)
Level 49: Blinding Powder -- Acc-I(A)
Level 1: Assassination
Level 1: Brawl -- Empty(A)
Level 1: Sprint -- Empty(A)
Level 2: Rest -- Empty(A)
Level 2: Swift -- Empty(A)
Level 2: Health -- Pnc-Heal/+End(A)
Level 2: Hurdle -- Empty(A)
Level 2: Stamina -- EndMod-I(A), PwrTrns-EndMod(39), PwrTrns-+Heal(40)
------------ -
You don't have to take tough/weave to cap /nin you can do it with sets.
Kuji-in sha can take +3 def resist enhancers
Kuji-in Rin is a clicky and dosn't play nice with hasten
/nin is quite end heavy and with the speed of MA probably more so. Tough/weave/Maneuvers would make it a nightmare.
-
You are preaching to the choir here.
Elec/elec on excelsior at lvl 40 atm
Got one on Torchbearer at 50
Love it.
-
 1
1
-
-
16 hours ago, Mack008 said:
+1 for DP/Dev.
Recently hit the mid-30s and discovered how well a few things dovetail.
-- Smoke Grenade + Cloaking Device allows you to walk in the middle of a group without aggro'ing them.
-- Plant a Trip Mine (or Time Bomb) at their feet, then trigger Hail of Bullets to go off at the same time.
And as a bonus, planting a Trip Mine (or Time Bomb) grants a hefty damage bonus which Hail of Bullets can take advantage of, on top of what Targeting Drone gives for your first attack.
This is a great tactic for solo work.
You can also put a Celerity +Stealth in sprint for the same effect.
-
1
-
-
+1 for DP/Dev
Field Operative allows you to hover tank with fly because of the +end meaning you have a free power pick for something else because you don't have to take hover.
And you can pile all your def into ranged def.
DP/MC is also is also good.
-
On 1/20/2021 at 11:32 AM, Elia87 said:
No haste Chelsea?
Level 18
QuoteAlso not taking cutting beam it really does suck ass.
It's one of the only AOE's you get.
Works great with LRM or Overcharge.
With Overcharge,LRM and trip mine you get 3 big AOE's for clearing big mobs adding cutting beam makes sense as beam rifle dosn't really do well against big mobs.
This isn't a whipped up build, this is one of my 50's so i know it works and works well.
-
1
-
-
This Hero build was built using Mids Reborn 3.0.2.19
https://github.com/Reborn-Team/MidsRebornClick this DataLink to open the build!
Level 50 Natural Blaster
Primary Power Set: Beam Rifle
Secondary Power Set: Devices
Power Pool: Flight
Power Pool: Speed
Power Pool: Leadership
Ancillary Pool: Munitions MasteryHero Profile:
Level 1: Charged Shot -- SprDfnBrr-Acc/Dmg(A), SprDfnBrr-Dmg/Rchg(3), SprDfnBrr-Acc/Dmg/Rchg(5), SprDfnBrr-Acc/Dmg/EndRdx(17), SprDfnBrr-Acc/Dmg/EndRdx/Rchg(19), SprDfnBrr-Rchg/+Status Protect(34)
Level 1: Toxic Web Grenade -- Acc-I(A)
Level 2: Cutting Beam -- Artl-Acc/Dam(A), Artl-Dam/End(3), Artl-Dam/Rech(5), Artl-Acc/Dam/Rech(11), Artl-Acc/Rech/Rng(17), Artl-End/Rech/Rng(46)
Level 4: Caltrops -- ImpSwf-Dam%(A)
Level 6: Disintegrate -- Thn-Acc/Dmg(A), Thn-Dmg/EndRdx(7), Thn-Dmg/Rchg(7), Thn-Acc/Dmg/Rchg(9), Thn-Acc/Dmg/EndRdx(9), Thn-Dmg/EndRdx/Rchg(46)
Level 8: Fly -- EndRdx-I(A)
Level 10: Targeting Drone -- AdjTrg-ToHit/EndRdx(A), AdjTrg-ToHit/EndRdx/Rchg(11)
Level 12: Lancer Shot -- Thn-Acc/Dmg(A), Thn-Dmg/EndRdx(13), Thn-Dmg/Rchg(13), Thn-Acc/Dmg/Rchg(15), Thn-Acc/Dmg/EndRdx(15), Thn-Dmg/EndRdx/Rchg(46)
Level 14: Aim -- GssSynFr--ToHit/Rchg(A)
Level 16: Smoke Grenade -- Acc-I(A)
Level 18: Hasten -- RechRdx-I(A), RechRdx-I(19)
Level 20: Field Operative -- PwrTrns-+Heal(A), Prv-Absorb%(21), LucoftheG-Def(21), LucoftheG-Def/Rchg+(45), PwrTrns-EndMod(45), NmnCnv-Regen/Rcvry+(45)
Level 22: Penetrating Ray -- ExcCnt-Acc/Dmg(A), ExcCnt-Dmg/EndRdx(23), ExcCnt-Dmg/ActRdx(23), ExcCnt-Dmg/Rng(25), ExcCnt-Dmg/Rchg(25), ExcCnt-Stun%(50)
Level 24: Taser -- Thn-Acc/Dmg(A), Thn-Dmg/EndRdx(31), Thn-Dmg/Rchg(42), Thn-Acc/Dmg/Rchg(43), Thn-Acc/Dmg/EndRdx(43), Thn-Dmg/EndRdx/Rchg(43)
Level 26: Piercing Beam -- Artl-Acc/Dam(A), Artl-Dam/End(27), Artl-Dam/Rech(27), Artl-Acc/Dam/Rech(29), Artl-Acc/Rech/Rng(29), Artl-End/Rech/Rng(36)
Level 28: Trip Mine -- SprBlsWrt-Acc/Dmg(A), SprBlsWrt-Dmg/Rchg(37), SprBlsWrt-Acc/Dmg/Rchg(37), SprBlsWrt-Acc/Dmg/EndRdx(37), SprBlsWrt-Acc/Dmg/EndRdx/Rchg(40), SprBlsWrt-Rchg/Dmg%(42)
Level 30: Assault -- EndRdx-I(A)
Level 32: Overcharge -- Artl-Acc/Dam(A), Artl-Dam/End(33), Artl-Dam/Rech(33), Artl-Acc/Dam/Rech(33), Artl-Acc/Rech/Rng(34), Artl-End/Rech/Rng(34)
Level 35: Tactics -- AdjTrg-ToHit/EndRdx(A), AdjTrg-ToHit/EndRdx/Rchg(36), GssSynFr--Build%(36)
Level 38: Gun Drone -- ExpRnf-Acc/Rchg(A), ExpRnf-Acc/Dmg(39), ExpRnf-Dmg/EndRdx(39), ExpRnf-Acc/Dmg/Rchg(39), ExpRnf-EndRdx/Dmg/Rchg(40), ExpRnf-+Res(Pets)(40)
Level 41: Body Armor -- StdPrt-ResDam/Def+(A), GldArm-3defTpProc(42)
Level 44: Sleep Grenade -- Acc-I(A)
Level 47: LRM Rocket -- Artl-Acc/Dam(A), Artl-Dam/End(48), Artl-Dam/Rech(48), Artl-Acc/Dam/Rech(48), Artl-Acc/Rech/Rng(50), Artl-End/Rech/Rng(50)
Level 49: Surveillance -- Acc-I(A)
Level 1: Brawl -- Empty(A)
Level 1: Defiance
Level 1: Quick Form
Level 1: Prestige Power Dash -- Empty(A)
Level 1: Prestige Power Slide -- Empty(A)
Level 1: Prestige Power Quick -- Empty(A)
Level 1: Prestige Power Rush -- Empty(A)
Level 1: Prestige Power Surge -- Empty(A)
Level 1: Sprint -- Clr-Stlth(A)
Level 2: Rest -- Empty(A)
Level 4: Ninja Run
Level 2: Swift -- Run-I(A)
Level 2: Health -- Pnc-Heal/+End(A)
Level 2: Hurdle -- Jump-I(A)
Level 2: Stamina -- EndMod-I(A), PwrTrns-EndMod(31), PwrTrns-+Heal(31)
Level 50: Musculature Radial Paragon
Level 50: Assault Radial Embodiment
Level 50: Ion Core Final Judgement
Level 50: Degenerative Core Flawless Interface
Level 50: Barrier Core Epiphany
Level 1: Disintegrating
-------------
1
-
 1
1
-
-
Thank you for telling everyone that AR is terrible.
Keep it up.
I have a terrible time clearing mobs with Full auto,LRM and trip mine and i definitely do not have those recharged for everymob.
Snipe rifle is NOT worth the animation time and DOES NOT one shot most mobs.
Flamethrower and Burn DOES NOT kill AV's and EB's with ease.
I DO NOT recommend AR/DEV and you SHOULD NOT play those sets!.
AR really needs a buff Dev's 😉
-
Musculature Radial
And if you don't take interface Preemptive you'll make baby jesus cry.
-
 1
1
-
-
I ran the hcinstall.exe and it did it's thing and saw a previous version of Tequila and did the copy thing but now when i click the desktop short cut i get the agreement and Accept/reject buttons but on clicking Accept it does nothing.
Nothing starts up.
Installed in a new location as per the instructions.
Tried a different different location and nothing.
agreement window..accept..nothing.
on win 10 x64
-
My pet list goes.
1: Animated Stone - tanky
2: Singularity - holdy
3: Jack Frost - frosty
4: Fire Imps - burny
5: Gremlins - sparky
6: Umbral Beast - noisey
7: Fly Trap - flimsy
-
17 hours ago, Doomguide2005 said:
True, Power Sink, along with Dark Consumption and several other powers can return large amounts of endurance to the user. They are specifically designed to do so. The original question was specifically directed however, at Electrical Blasts chance to return some of its -endurance as a +endurance to the blasts user. And that is what I was directing my response towards when I said the conventional wisdom was "no" and not to rely on that +end to help in any notable way.
As an aside I had a Mids build back on Live where my Elec blasts (Emp/Elec) were each 6 slotted with the last slot being a Tempest chance for end drain proc (the other 5 being either Decimation or Positron). The build never got realized before Sunset but let us just say extreme recharge plus PBU had Short Circuit recharging in about 7 seconds with about -200% recovery and 70 end drain each usage ... not much had any end to use or recover in short order.
Yes Electrical Blast chance for returning end is not worth slotting and any return must be none existent or so small i've never noticed.
But like i mentioned there are alternatives if you need endurance.
-
I thought i had made some sturdy blasters untill i made a elec/elec with 75% S/L resist and capped ranged def and was stunned.
I'll just leave this here.
SpoilerHero Plan by Mids' Reborn : Hero Designer 2.6.0.7
https://github.com/ImaginaryDevelopment/imaginary-hero-designerClick this DataLink to open the build!
elec elec blaster: Level 50 Magic Blaster
Primary Power Set: Electrical Blast
Secondary Power Set: Electricity Manipulation
Power Pool: Flight
Power Pool: Leaping
Power Pool: Fighting
Power Pool: Speed
Ancillary Pool: Mu MasteryHero Profile:
Level 1: Lightning Bolt -- SprDfnBrr-Acc/Dmg(A), SprDfnBrr-Dmg/Rchg(3), SprDfnBrr-Acc/Dmg/Rchg(9), SprDfnBrr-Acc/Dmg/EndRdx(36), SprDfnBrr-Acc/Dmg/EndRdx/Rchg(48), SprDfnBrr-Rchg/+Status Protect(48)
Level 1: Electric Fence -- Acc-I(A)
Level 2: Charged Brawl -- Mk'Bit-Acc/Dmg(A), Mk'Bit-Dmg/EndRdx(3), Mk'Bit-Dmg/Rchg(5), Mk'Bit-Acc/EndRdx/Rchg(5), Mk'Bit-Dam%(19), Mk'Bit-Acc/Dmg/EndRdx/Rchg(37)
Level 4: Ball Lightning -- Artl-Acc/Dam(A), Artl-Dam/End(7), Artl-Dam/Rech(7), Artl-Acc/Dam/Rech(9), Artl-End/Rech/Rng(19), Artl-Acc/Rech/Rng(46)
Level 6: Lightning Field -- PreOptmz-EndMod/Acc/End(A), PwrTrns-Dam/Acc/End(42), PwrTrns-+Heal(42), Arm-Dam%(50)
Level 8: Fly -- HO:Micro(A)
Level 10: Havoc Punch -- Mk'Bit-Acc/Dmg(A), Mk'Bit-Dmg/EndRdx(11), Mk'Bit-Dmg/Rchg(11), Mk'Bit-Acc/EndRdx/Rchg(15), Mk'Bit-Acc/Dmg/EndRdx/Rchg(15), Mk'Bit-Dam%(37)
Level 12: Short Circuit -- PreOptmz-Acc/Rech(A), PreOptmz-EndMod/End(13), PreOptmz-EndMod/Rech(13), PreOptmz-EndMod/Acc/End(17), PreOptmz-EndMod/Acc/Rech(17), PreOptmz-EndMod/End/Rech(50)
Level 14: Aim -- GssSynFr--ToHit/Rchg(A)
Level 16: Build Up -- GssSynFr--Build%(A)
Level 18: Combat Jumping -- Krm-ResKB(A)
Level 20: Force of Thunder -- TchoftheN-Acc/EndRdx/Heal/HP/Regen(A), FrcFdb-Rechg%(21), SuddAcc--KB/+KD(21), ThfofEss-Acc/EndRdx/Heal(27), PreOptmz-EndMod/Acc/Rech(40)
Level 22: Zapp -- ExcCnt-Acc/Dmg(A), ExcCnt-Dmg/EndRdx(23), ExcCnt-Dmg/ActRdx(23), ExcCnt-Dmg/Rng(25), ExcCnt-Dmg/Rchg(25), ExcCnt-Stun%(34)
Level 24: Boxing -- Acc-I(A)
Level 26: Tough -- StdPrt-ResDam/Def+(A), GldArm-3defTpProc(27), Ags-ResDam/EndRdx(43), Ags-ResDam/Rchg(46), Ags-ResDam/EndRdx/Rchg(46), Ags-ResDam(50)
Level 28: Thunder Strike -- SprBlsWrt-Acc/Dmg(A), SprBlsWrt-Dmg/Rchg(29), SprBlsWrt-Acc/Dmg/Rchg(29), SprBlsWrt-Acc/Dmg/EndRdx(36), SprBlsWrt-Acc/Dmg/EndRdx/Rchg(36), SprBlsWrt-Rchg/Dmg%(37)
Level 30: Weave -- Rct-Def(A), Rct-Def/EndRdx(31), Rct-Def/Rchg(31), Rct-Def/EndRdx/Rchg(31), ShlWal-ResDam/Re TP(48)
Level 32: Thunderous Blast -- Artl-Acc/Dam(A), Artl-Dam/End(33), Artl-Dam/Rech(33), Artl-Acc/Dam/Rech(33), Artl-Acc/Rech/Rng(34), Artl-End/Rech/Rng(34)
Level 35: Power Sink -- RechRdx-I(A)
Level 38: Shocking Grasp -- Mk'Bit-Acc/Dmg(A), Mk'Bit-Dmg/EndRdx(39), Mk'Bit-Dmg/Rchg(39), Mk'Bit-Acc/EndRdx/Rchg(39), Mk'Bit-Acc/Dmg/EndRdx/Rchg(40), Mk'Bit-Dam%(40)
Level 41: Hasten -- RechRdx-I(A), RechRdx-I(42)
Level 44: Charged Armor -- Ags-ResDam(A), Ags-ResDam/EndRdx(45), Ags-ResDam/Rchg(45), Ags-ResDam/EndRdx/Rchg(45)
Level 47: Hover -- LucoftheG-Def/Rchg+(A)
Level 49: Afterburner -- LucoftheG-Def/Rchg+(A)
Level 1: Brawl -- Empty(A)
Level 1: Defiance
Level 1: Quick Form
Level 1: Prestige Power Dash -- Empty(A)
Level 1: Prestige Power Slide -- Empty(A)
Level 1: Prestige Power Quick -- Empty(A)
Level 1: Prestige Power Rush -- Empty(A)
Level 1: Prestige Power Surge -- Empty(A)
Level 1: Sprint -- Empty(A)
Level 2: Rest -- Empty(A)
Level 4: Ninja Run
Level 2: Swift -- Run-I(A)
Level 2: Health -- Pnc-Heal/+End(A)
Level 2: Hurdle -- Jump-I(A)
Level 2: Stamina -- EndMod-I(A), EndMod-I(43), PwrTrns-+Heal(43)
Level 50: Musculature Total Core Revamp
Level 50: Preemptive Total Core Conversion
Level 50: Assault Total Core Graft
Level 50: Barrier Total Core Invocation
------------ -
On 10/11/2020 at 1:56 AM, Doomguide2005 said:
Fairly certain the conventional wisdom is no. Certainly not as it stands currently and as the sole reason to try it. I never noted it on my Elec/Fire on Live (he used blue skittles by the bucket load) and the new sustain in the secondary has so far rendered it moot here on HC.
Power Sink.
Yes it does return endurance but having an end stable build is easy so power sink will mostly be used for end draining the mobs with short circuit.
-
On my elec/elec i took lighting field but only used 3 slots for end mods/end redux and a chance for self heal and it basicly used to keep the npc's end down.
Also i maxed the ranged def to 51% and maxed the S/L resists to 75% with 50% energy resists with tough/weave and charged armour.
But that's my elec/elec blapper build.
-
1
-
-
I went this way with my beam/dev
SpoilerHero Plan by Mids' Reborn : Hero Designer 2.6.0.7
https://github.com/ImaginaryDevelopment/imaginary-hero-designerClick this DataLink to open the build!
Level 50 Natural Blaster
Primary Power Set: Beam Rifle
Secondary Power Set: Devices
Power Pool: Flight
Power Pool: Speed
Power Pool: Leadership
Ancillary Pool: Munitions MasteryHero Profile:
Level 1: Charged Shot -- SprDfnBrr-Acc/Dmg(A), SprDfnBrr-Dmg/Rchg(3), SprDfnBrr-Acc/Dmg/Rchg(5), SprDfnBrr-Acc/Dmg/EndRdx(17), SprDfnBrr-Acc/Dmg/EndRdx/Rchg(19), SprDfnBrr-Rchg/+Status Protect(34)
Level 1: Toxic Web Grenade -- Acc-I(A)
Level 2: Cutting Beam -- Artl-Acc/Dam(A), Artl-Dam/End(3), Artl-Dam/Rech(5), Artl-Acc/Dam/Rech(11), Artl-Acc/Rech/Rng(17), Artl-End/Rech/Rng(46)
Level 4: Caltrops -- ImpSwf-Dam%(A)
Level 6: Disintegrate -- Thn-Acc/Dmg(A), Thn-Dmg/EndRdx(7), Thn-Dmg/Rchg(7), Thn-Acc/Dmg/Rchg(9), Thn-Acc/Dmg/EndRdx(9), Thn-Dmg/EndRdx/Rchg(46)
Level 8: Fly -- EndRdx-I(A)
Level 10: Targeting Drone -- AdjTrg-ToHit/EndRdx(A), AdjTrg-ToHit/EndRdx/Rchg(11)
Level 12: Lancer Shot -- Thn-Acc/Dmg(A), Thn-Dmg/EndRdx(13), Thn-Dmg/Rchg(13), Thn-Acc/Dmg/Rchg(15), Thn-Acc/Dmg/EndRdx(15), Thn-Dmg/EndRdx/Rchg(46)
Level 14: Aim -- GssSynFr--ToHit/Rchg(A)
Level 16: Smoke Grenade -- Acc-I(A)
Level 18: Hasten -- RechRdx-I(A), RechRdx-I(19)
Level 20: Field Operative -- PwrTrns-+Heal(A), Prv-Absorb%(21), Pnc-Heal/+End(21), LucoftheG-Def/Rchg+(45), PwrTrns-EndMod(45), NmnCnv-Regen/Rcvry+(45)
Level 22: Penetrating Ray -- StnoftheM-Acc/Dmg(A), StnoftheM-Dmg/EndRdx(23), StnoftheM-Acc/ActRdx/Rng(23), StnoftheM-Dmg/ActRdx/Rchg(25), StnoftheM-Dmg/EndRdx/Rchg(25), StnoftheM-Dam%(50)
Level 24: Maneuvers -- RedFrt-Def/EndRdx(A), RedFrt-Def/Rchg(31), RedFrt-EndRdx/Rchg(42), RedFrt-Def/EndRdx/Rchg(43), RedFrt-Def(43), RedFrt-EndRdx(43)
Level 26: Piercing Beam -- Artl-Acc/Dam(A), Artl-Dam/End(27), Artl-Dam/Rech(27), Artl-Acc/Dam/Rech(29), Artl-Acc/Rech/Rng(29), Artl-End/Rech/Rng(36)
Level 28: Trip Mine -- SprBlsWrt-Acc/Dmg(A), SprBlsWrt-Dmg/Rchg(37), SprBlsWrt-Acc/Dmg/Rchg(37), SprBlsWrt-Acc/Dmg/EndRdx(37), SprBlsWrt-Acc/Dmg/EndRdx/Rchg(40), SprBlsWrt-Rchg/Dmg%(42)
Level 30: Assault -- EndRdx-I(A)
Level 32: Overcharge -- Artl-Acc/Dam(A), Artl-Dam/End(33), Artl-Dam/Rech(33), Artl-Acc/Dam/Rech(33), Artl-Acc/Rech/Rng(34), Artl-End/Rech/Rng(34)
Level 35: Tactics -- AdjTrg-ToHit/EndRdx(A), AdjTrg-ToHit/EndRdx/Rchg(36), GssSynFr--Build%(36)
Level 38: Gun Drone -- ExpRnf-Acc/Rchg(A), ExpRnf-Acc/Dmg(39), ExpRnf-Dmg/EndRdx(39), ExpRnf-Acc/Dmg/Rchg(39), ExpRnf-EndRdx/Dmg/Rchg(40), ExpRnf-+Res(Pets)(40)
Level 41: Body Armor -- StdPrt-ResDam/Def+(A), GldArm-3defTpProc(42)
Level 44: Sleep Grenade -- Acc-I(A)
Level 47: LRM Rocket -- Artl-Acc/Dam(A), Artl-Dam/End(48), Artl-Dam/Rech(48), Artl-Acc/Dam/Rech(48), Artl-Acc/Rech/Rng(50), Artl-End/Rech/Rng(50)
Level 49: Surveillance -- Acc-I(A)
Level 1: Brawl -- Empty(A)
Level 1: Defiance
Level 1: Quick Form
Level 1: Prestige Power Dash -- Empty(A)
Level 1: Prestige Power Slide -- Empty(A)
Level 1: Prestige Power Quick -- Empty(A)
Level 1: Prestige Power Rush -- Empty(A)
Level 1: Prestige Power Surge -- Empty(A)
Level 1: Sprint -- Clr-Stlth(A)
Level 2: Rest -- Empty(A)
Level 4: Ninja Run
Level 2: Swift -- Empty(A)
Level 2: Health -- Mrc-Rcvry+(A)
Level 2: Hurdle -- Empty(A)
Level 2: Stamina -- EndMod-I(A), PrfShf-EndMod(31), PrfShf-End%(31)
Level 50: Musculature Total Radial Revamp
Level 50: Assault Core Embodiment
Level 50: Diamagnetic Total Core Conversion
------------One thing you do need to do is slot Defiant barrage into a power you can use when held like charged shot as it helps massivily when held.
All blasters get a couple of powers they can used when mezzed.
Also i didn't take agility but took musculature and assault so with the 38.5% extra damage from sets i stacked it's a huge damage buff.
And anyone who says "don't take trip mine" has no idea. It is an amazing AOE for big mobs and Toe Bombing is a thing.
I have 3 large AOE's in LRM,Trip mine and overcharge.
And gun drone lasts a good while and i can often have 2 at the same time.
Also makes a great bullet sponge.
One thing i am thinking about is trading maneuvers for Taser as taser is great damage and a thunderstrike set will mean the def dosn't drop that much and it will mean less end useage.
-
1
-
-
47% ranged def 40% Nrg/neg Nrg 75% S/L resists 42% energy resist and perma dom.
One of my favourite toons.
Villain Plan by Mids' Reborn : Hero Designer 2.6.0.7
https://github.com/ImaginaryDevelopment/imaginary-hero-designerClick this DataLink to open the build!
Milly Amp 2: Level 50 Mutation Dominator
Primary Power Set: Electric Control
Secondary Power Set: Electricity Assault
Power Pool: Flight
Power Pool: Speed
Power Pool: Leaping
Power Pool: Fighting
Ancillary Pool: Mu MasteryVillain Profile:
Level 1: Tesla Cage -- BslGaz-Acc/Hold(A), BslGaz-Acc/EndRdx/Rchg/Hold(3), BslGaz-Acc/Rchg(7), BslGaz-EndRdx/Rchg/Hold(7)
Level 1: Charged Bolts -- Dcm-Acc/Dmg(A), Dcm-Dmg/EndRdx(15), Dcm-Dmg/Rchg(25), Dcm-Acc/EndRdx/Rchg(40), Dcm-Acc/Dmg/Rchg(42), EntChs-Heal%(42)
Level 2: Charged Brawl -- Mk'Bit-Acc/Dmg(A), Mk'Bit-Dmg/EndRdx(3), Mk'Bit-Dmg/Rchg(5), Mk'Bit-Acc/EndRdx/Rchg(5), Mk'Bit-Acc/Dmg/EndRdx/Rchg(9), Mk'Bit-Dam%(23)
Level 4: Chain Fences -- SprDmnGrs-Acc/Conf/Hold/Immob/Sleep/Stun/Fear(A), SprDmnGrs-Rchg/Fiery Orb(9), SprDmnGrs-Acc/Conf/Hold/Immob/Sleep/Stun/Fear/EndRdx/Rchg(15), SprDmnGrs-Acc/Conf/Hold/Immob/Sleep/Stun/Fear/EndRdx(23), SprDmnGrs-Conf/Hold/Immob/Sleep/Stun/Fear/Rchg(31), SprDmnGrs-EndRdx/Rchg(43)
Level 6: Fly -- Flight-I(A)
Level 8: Conductive Aura -- NmnCnv-Regen/Rcvry+(A), PrfShf-EndMod/Acc(42)
Level 10: Havoc Punch -- Mk'Bit-Acc/Dmg(A), Mk'Bit-Dmg/EndRdx(11), Mk'Bit-Dmg/Rchg(11), Mk'Bit-Dam%(13), Mk'Bit-Acc/EndRdx/Rchg(46), Mk'Bit-Acc/Dmg/EndRdx/Rchg(48)
Level 12: Hasten -- RechRdx-I(A), RechRdx-I(13)
Level 14: Hover -- LucoftheG-Def/Rchg+(A)
Level 16: Static Field -- SprAscoft-Acc/Conf/Hold/Immob/Sleep/Stun/Fear(A), SprAscoft-Conf/Hold/Immob/Sleep/Stun/Fear/Rchg(17), SprAscoft-EndRdx/Rchg(17), SprAscoft-Acc/Conf/Hold/Immob/Sleep/Stun/Fear/EndRdx(19), SprAscoft-Acc/Conf/Hold/Immob/Sleep/Stun/Fear/EndRdx/Rchg(19), SprAscoft-Rchg/+Dmg%(25)
Level 18: Build Up -- GssSynFr--Build%(A)
Level 20: Paralyzing Blast -- BslGaz-Acc/Hold(A), BslGaz-Acc/Rchg(21), BslGaz-EndRdx/Rchg/Hold(21), BslGaz-Acc/EndRdx/Rchg/Hold(34)
Level 22: Combat Jumping -- LucoftheG-Def/Rchg+(A)
Level 24: Boxing -- Acc-I(A)
Level 26: Synaptic Overload -- CrcPrs-Conf(A), CrcPrs-Conf/Rchg(27), CrcPrs-Acc/Conf/Rchg(27), CrcPrs-Acc/Rchg(29), CrcPrs-Conf/EndRdx(29), CrcPrs-Conf%(43)
Level 28: Tough -- StdPrt-ResDam/Def+(A), GldArm-3defTpProc(40), Ags-ResDam/EndRdx(43), Ags-ResDam/Rchg(46), Ags-ResDam/EndRdx/Rchg(48), Ags-ResDam(50)
Level 30: Weave -- Rct-Def(A), Rct-Def/EndRdx(31), LucoftheG-Def/Rchg+(31), LucoftheG-Def/EndRdx(37)
Level 32: Gremlins -- ExpRnf-Acc/Rchg(A), ExpRnf-Acc/Dmg(33), ExpRnf-Acc/Dmg/Rchg(33), ExpRnf-EndRdx/Dmg/Rchg(33), ExpRnf-+Res(Pets)(34), ExpRnf-Dmg/EndRdx(34)
Level 35: Thunder Strike -- Obl-Dmg(A), Obl-Acc/Rchg(36), Obl-Dmg/Rchg(36), Obl-Acc/Dmg/Rchg(36), Obl-Acc/Dmg/EndRdx/Rchg(37), Obl-%Dam(37)
Level 38: Zapp -- StnoftheM-Acc/Dmg(A), StnoftheM-Dmg/EndRdx(39), StnoftheM-Acc/ActRdx/Rng(39), StnoftheM-Dmg/ActRdx/Rchg(39), StnoftheM-Dmg/EndRdx/Rchg(40), EntChs-Heal%(50)
Level 41: Power Sink -- RechRdx-I(A), EndMod-I(50)
Level 44: Charged Armor -- UnbGrd-ResDam(A), UnbGrd-ResDam/EndRdx(45), UnbGrd-ResDam/EndRdx/Rchg(45), UnbGrd-Rchg/ResDam(45)
Level 47: Afterburner -- LucoftheG-Def/Rchg+(A)
Level 49: Surge of Power -- UnbGrd-Max HP%(A)
Level 1: Brawl -- Empty(A)
Level 1: Domination
Level 1: Prestige Power Dash -- Empty(A)
Level 1: Prestige Power Slide -- Empty(A)
Level 1: Prestige Power Quick -- Empty(A)
Level 1: Prestige Power Rush -- Empty(A)
Level 1: Prestige Power Surge -- Empty(A)
Level 1: Sprint -- Empty(A)
Level 2: Rest -- Empty(A)
Level 4: Ninja Run
Level 2: Swift -- Run-I(A)
Level 2: Health -- Pnc-Heal/+End(A)
Level 2: Hurdle -- Jump-I(A)
Level 2: Stamina -- EndMod-I(A), EndMod-I(46), PwrTrns-+Heal(48)
Level 50: Barrier Partial Core Invocation
Level 50: Agility Partial Core Revamp
Level 1: Quick Form
Level 50: Assault Partial Core Graft
Level 50: Preemptive Total Core Conversion
------------ -
I will say it is really easy to cap ranged def and cap smashing and lethal resists on a elec/elec/mu and that is with only tough/weave and charged armour.
Mine has 49% ranged def and 75%S/L resists.
And it's cheap as chips.
No purples.
-
+1 for AR/Dev
The thing i like is if you take munitions mastery and LRM you have 3 large mass mob destroyers in Full Auto,LRM and trip mine if you slot it.
Not many other blasters have 3 large AOE's like that and are up as often.
(/me waits for the post about how such and such blaster can do that).
Also +1 for Taser
It does more damage than buckshot and M30 which i never took.
I always felt AR/Dev needed some form of melee like the rifle stock bash you see on Longbow and Taser sorta fills that.
-
My blaster has 50% ranged def but malaise seems to completely ignore it and hits me everytime.
I could put that down to "hey it's Psi and ranged def dosn't cover Psi" but i thought it covered everything.
Mother mayhem is the same.
I have swollowed 4 purples insp for 90% def and he still hits every single time.
Secondly everytime i get held i can't use a break free even when only held.
I mean it says on it you can use it when held.
I was slept and held and it would not work.
Anyone else having a problem with not being able to use a break free when held ?
-
His burst 61.24dps
My Burst 77.32dps
His flamethrower 26.23 dps
My Flamethrower 34.28 dps
his snipe 89.88dps
My snipe 87.76dps
his ignite 55.86dps
My ignite 66.4 dps
his full auto 18.7dps
My full auto 18.94dps
His trip mine 17.97dps
my trip mine 45.17 dps
His def 47%
My def 49%
My recharge 111%
his recharge 68%
My dmg 41%
his dmg 24%
My Gun drone 2.55 dps
His Gun drone 1.84dps
Those numbers don't lie.
-
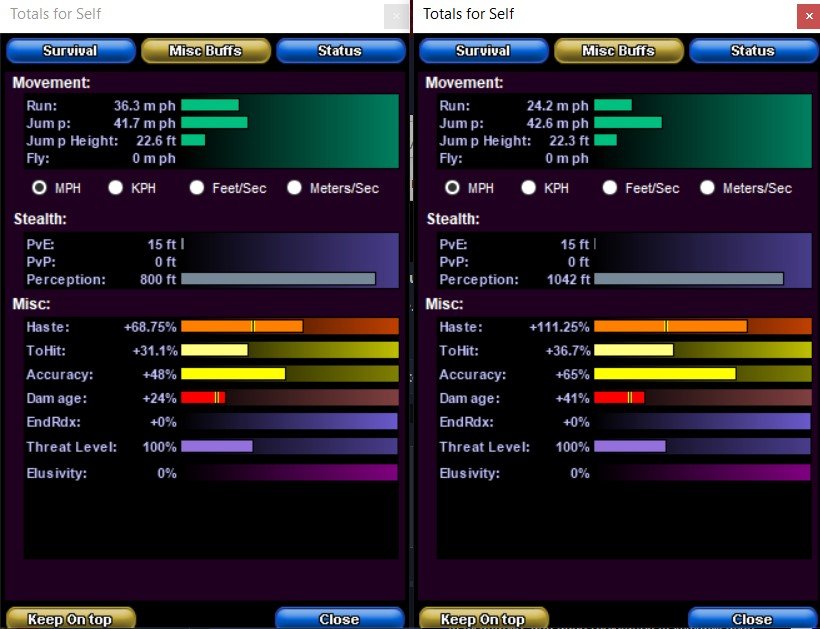
Quote
On paper, yes, Chelsea's build technically is capable of delivering more DPS... or is it? There's this thing that I call Animation Saturation. It's when you have a reliable attack chain that lets you cycle between powers as they recharge.

Yours on the left mine on the right.
It's plain to see more recharge,Acc,To hit and damage
My attack chain is burst,slug,snipe,flamethrower,ignite on AV/EB.s
They die.
It also has more capacity to remove mobs with LRM and full auto recharge faster and a fully slotted trip mine for toe bombing.
And you can pass on ignite all you want but it is the AV/EB killer that you need.
And both mine are up faster.
Buckshot and M30 are just meh
Taser does more damage than both of those.
What did i pass on ?
Nothing really. It has more defence,recharge,dmg,to hit,acc,endurance and has Health injection with the HP procs.
I have a nice travel power which yours lacks and isn't choking the endurance with tough/weave for LESS def than my build.
I mean tough/weave and scorpian shield don't even mesh well as you are stacking ranged def and scorpian shield is S/L def.
And only 34% S/L at that.
Seriously the def numbers are all over the place.
This toon i have made on 2 servers and both are 50 and i love it.
It erases mobs with LRM/Full auto and trip mine if needed.
AV/EB's die in ignite/flamethrower.
In my opinion it's just a better all round build.
And cheaper.
1 quick side note i can stay out of melee range with fly on and the endurance is sustainable.
-
😲
I'll just leave this here.
Hero Plan by Mids' Reborn : Hero Designer 2.6.0.7
https://github.com/ImaginaryDevelopment/imaginary-hero-designerClick this DataLink to open the build!
Level 50 Mutation Blaster
Primary Power Set: Assault Rifle
Secondary Power Set: Devices
Power Pool: Flight
Power Pool: Leaping
Power Pool: Leadership
Power Pool: Speed
Ancillary Pool: Munitions MasteryHero Profile:
Level 1: Burst -- SprDfnBrr-Acc/Dmg(A), SprDfnBrr-Dmg/Rchg(3), SprDfnBrr-Acc/Dmg/Rchg(5), SprDfnBrr-Acc/Dmg/EndRdx(7), SprDfnBrr-Acc/Dmg/EndRdx/Rchg(9), SprDfnBrr-Rchg/+Status Protect(46)
Level 1: Toxic Web Grenade -- HO:Endo(A)
Level 2: Slug -- Thn-Acc/Dmg(A), Thn-Dmg/EndRdx(3), Thn-Dmg/Rchg(5), Thn-Acc/Dmg/Rchg(7), Thn-Acc/Dmg/EndRdx(9), Thn-Dmg/EndRdx/Rchg(17)
Level 4: Caltrops -- ImpSwf-Dam%(A)
Level 6: Taser -- Thn-Acc/Dmg(A), Thn-Dmg/EndRdx/Rchg(23), Thn-Acc/Dmg/EndRdx(25), Thn-Dmg/EndRdx(37), Thn-Dmg/Rchg(40), Thn-Acc/Dmg/Rchg(42)
Level 8: Fly -- HO:Micro(A)
Level 10: Targeting Drone -- AdjTrg-ToHit/EndRdx/Rchg(A), AdjTrg-ToHit/EndRdx(46)
Level 12: Sniper Rifle -- ExcCnt-Acc/Dmg(A), ExcCnt-Dmg/EndRdx(13), ExcCnt-Dmg/ActRdx(13), ExcCnt-Dmg/Rng(15), ExcCnt-Dmg/Rchg(15), ExcCnt-Stun%(17)
Level 14: Beanbag -- Stp-Acc/Stun/Rchg(A), Stp-Acc/EndRdx(25), Stp-Acc/Rchg(50)
Level 16: Smoke Grenade -- HO:Lyso(A)
Level 18: Flamethrower -- Artl-Acc/Dam(A), Artl-Dam/End(19), Artl-Dam/Rech(19), Artl-Acc/Dam/Rech(21), Artl-Acc/Rech/Rng(21), Artl-End/Rech/Rng(23)
Level 20: Field Operative -- LucoftheG-Def/Rchg+(A), NmnCnv-Regen/Rcvry+(42), PwrTrns-EndMod(43), PwrTrns-+Heal(43), Pnc-Heal/+End(43), Prv-Absorb%(46)
Level 22: Combat Jumping -- Krm-ResKB(A)
Level 24: Assault -- EndRdx-I(A)
Level 26: Ignite -- Artl-Acc/Dam(A), Artl-Dam/End(27), Artl-Dam/Rech(27), Artl-Acc/Dam/Rech(36), Artl-Acc/Rech/Rng(36), Artl-End/Rech/Rng(36)
Level 28: Trip Mine -- SprBlsWrt-Acc/Dmg(A), SprBlsWrt-Dmg/Rchg(29), SprBlsWrt-Acc/Dmg/Rchg(29), SprBlsWrt-Acc/Dmg/EndRdx(31), SprBlsWrt-Acc/Dmg/EndRdx/Rchg(31), SprBlsWrt-Rchg/Dmg%(34)
Level 30: Hasten -- RechRdx-I(A), RechRdx-I(31)
Level 32: Full Auto -- Artl-Acc/Dam(A), Artl-Dam/End(33), Artl-Dam/Rech(33), Artl-Acc/Dam/Rech(33), Artl-Acc/Rech/Rng(34), Artl-End/Rech/Rng(34)
Level 35: Tactics -- AdjTrg-ToHit/EndRdx(A), AdjTrg-ToHit/EndRdx/Rchg(37), GssSynFr--Build%(37)
Level 38: Gun Drone -- ExpRnf-Acc/Rchg(A), ExpRnf-Acc/Dmg(39), ExpRnf-Dmg/EndRdx(39), ExpRnf-Acc/Dmg/Rchg(39), ExpRnf-EndRdx/Dmg/Rchg(40), ExpRnf-+Res(Pets)(40)
Level 41: Body Armor -- StdPrt-ResDam/Def+(A), GldArm-3defTpProc(42)
Level 44: Cryo Freeze Ray -- BslGaz-Acc/Hold(A), BslGaz-Acc/Rchg(45), BslGaz-Acc/EndRdx/Rchg/Hold(45), BslGaz-EndRdx/Rchg/Hold(45)
Level 47: LRM Rocket -- Artl-Acc/Dam(A), Artl-Dam/End(48), Artl-Dam/Rech(48), Artl-Acc/Dam/Rech(48), Artl-Acc/Rech/Rng(50), Artl-End/Rech/Rng(50)
Level 49: Surveillance -- Acc-I(A)
Level 1: Brawl -- Empty(A)
Level 1: Defiance
Level 1: Quick Form
Level 1: Prestige Power Dash -- Empty(A)
Level 1: Prestige Power Slide -- Empty(A)
Level 1: Prestige Power Quick -- Empty(A)
Level 1: Prestige Power Rush -- Empty(A)
Level 1: Prestige Power Surge -- Empty(A)
Level 1: Sprint -- Empty(A)
Level 2: Rest -- Empty(A)
Level 4: Ninja Run
Level 2: Swift -- Run-I(A)
Level 2: Health -- Mrc-Rcvry+(A)
Level 2: Hurdle -- Jump-I(A)
Level 2: Stamina -- EndMod-I(A), PrfShf-EndMod(11), PrfShf-End%(11)
Level 50: Musculature Partial Radial Revamp
Level 50: Assault Partial Core Graft
Level 50: Ion Partial Radial Judgement
Level 50: Diamagnetic Partial Core Conversion
Level 50: Longbow Partial Core Improved Ally
Level 50: Barrier Core Epiphany
------------I can tell at a glance i'm doing way more damage than you.
-
1
-
Is Assault Rifles weak on Blasters?
in Blaster
Posted
Yes it's Weak! *ahem*
Dev's it's needs a buff *cough*