

Chelsea Rorec
-
Posts
306 -
Joined
-
Last visited
Content Type
Profiles
Forums
Events
Store
Articles
Patch Notes
Posts posted by Chelsea Rorec
-
-
I'm in the other camp.
Bitter Freeze ray has great range and can 1 shot an NPC, it is the sniper power of ice blast (not offically).
I wanted 2 holds in my ice/ice and i went for BFR and Freezing Touch and i slotted both for damage.
-
 1
1
-
 1
1
-
-
I would say yes.

But i wouldn't rely on it or base a build on it as a lot of NPC's will just run up to you and slap your face.
It's like -Recharge. sure it's there and some times it does help a small amount but would you risk your life on it ?
I wouldn't 🙂
-
14 hours ago, Elia87 said:
Very interesting build! No idea at all what you did but seems interesting! Ice seems very strange to build..
It is a tough one.
Basicly i managed to capped ranged def (46%) with 40% Energy/neg def and 35% S/L.
I would of liked more S/L resists (34%) but absorb from frigid protection seems to be doing the job and i did want cold mastery as my epic.
It works and i can't argue with that 🙂
-
1
-
 1
1
-
-
i went toe to toe with marauder yesterday with this.
TLDR he hits like a girl.
This Hero build was built using Mids Reborn 3.0.4.7
https://github.com/Reborn-Team/MidsRebornClick this DataLink to open the build!
Level 50 Magic Blaster
Primary Power Set: Ice Blast
Secondary Power Set: Ice Manipulation
Power Pool: Flight
Power Pool: Leaping
Power Pool: Speed
Power Pool: Fighting
Ancillary Pool: Cold MasteryHero Profile:
Level 1: Ice Blast -- SprDfnBrr-Acc/Dmg(A), SprDfnBrr-Dmg/Rchg(3), SprDfnBrr-Acc/Dmg/Rchg(5), SprDfnBrr-Acc/Dmg/EndRdx(5), SprDfnBrr-Acc/Dmg/EndRdx/Rchg(7), SprDfnBrr-Rchg/+Status Protect(7)
Level 1: Chilblain -- Acc-I(A)
Level 2: Frozen Fists -- KntCmb-Acc/Dmg(A), KntCmb-Dmg/EndRdx(3), KntCmb-Dmg/Rchg(9), KntCmb-Dmg/EndRdx/Rchg(9), CrsImp-Acc/Dmg(11), CrsImp-Acc/Dmg/Rchg(45)
Level 4: Ice Sword -- Mk'Bit-Dam%(A), Mk'Bit-Acc/Dmg(13), Mk'Bit-Dmg/EndRdx(13), Mk'Bit-Dmg/Rchg(15), Mk'Bit-Acc/EndRdx/Rchg(15), Mk'Bit-Acc/Dmg/EndRdx/Rchg(17)
Level 6: Fly -- EndRdx-I(A)
Level 8: Aim -- RechRdx-I(A)
Level 10: Frigid Protection -- PwrTrns-+Heal(A), NmnCnv-Regen/Rcvry+(11), PwrTrns-EndMod(23), Prv-Absorb%(23), Prv-Heal(50)
Level 12: Frost Breath -- Artl-Acc/Dam(A), Artl-Dam/End(17), Artl-Dam/Rech(19), Artl-Acc/Dam/Rech(19), Artl-Acc/Rech/Rng(25), Artl-End/Rech/Rng(48)
Level 14: Ice Storm -- Artl-Acc/Dam(A), Artl-Dam/End(25), Artl-Dam/Rech(27), Artl-Acc/Dam/Rech(27), Artl-Acc/Rech/Rng(29), Artl-End/Rech/Rng(29)
Level 16: Build Up -- RechRdx-I(A)
Level 18: Bitter Ice Blast -- Thn-Acc/Dmg(A), Thn-Dmg/EndRdx(31), Thn-Dmg/Rchg(33), Thn-Acc/Dmg/Rchg(33), Thn-Acc/Dmg/EndRdx(33), Thn-Dmg/EndRdx/Rchg(34)
Level 20: Ice Patch -- RechRdx-I(A)
Level 22: Combat Jumping -- Krm-ResKB(A)
Level 24: Hasten -- RechRdx-I(A), RechRdx-I(37)
Level 26: Bitter Freeze Ray -- Thn-Acc/Dmg(A), Thn-Dmg/EndRdx(34), Thn-Dmg/Rchg(34), Thn-Acc/Dmg/Rchg(36), Thn-Acc/Dmg/EndRdx(36), Thn-Dmg/EndRdx/Rchg(36)
Level 28: Boxing -- Acc-I(A)
Level 30: Tough -- StdPrt-ResDam/Def+(A), UnbGrd-ResDam(31), UnbGrd-ResDam/EndRdx(31), GldArm-3defTpProc(37), UnbGrd-Rchg/ResDam(50), UnbGrd-ResDam/EndRdx/Rchg(50)
Level 32: Blizzard -- SprBlsWrt-Acc/Dmg(A), SprBlsWrt-Dmg/Rchg(37), SprBlsWrt-Acc/Dmg/Rchg(39), SprBlsWrt-Acc/Dmg/EndRdx(39), SprBlsWrt-Acc/Dmg/EndRdx/Rchg(39), SprBlsWrt-Rchg/Dmg%(40)
Level 35: Freezing Touch -- Mk'Bit-Acc/Dmg(A), Mk'Bit-Dmg/EndRdx(40), Mk'Bit-Dmg/Rchg(40), Mk'Bit-Acc/EndRdx/Rchg(42), Mk'Bit-Acc/Dmg/EndRdx/Rchg(46), Mk'Bit-Dam%(46)
Level 38: Weave -- RedFrt-Def/EndRdx(A), RedFrt-Def/Rchg(42), RedFrt-EndRdx/Rchg(42), RedFrt-Def/EndRdx/Rchg(43), RedFrt-Def(43), RedFrt-EndRdx(43)
Level 41: Snow Storm -- EndRdx-I(A)
Level 44: Frozen Armor -- Rct-Def(A), Rct-Def/EndRdx(45), Rct-EndRdx/Rchg(45), Rct-Def/Rchg(46), Rct-Def/EndRdx/Rchg(48), Rct-ResDam%(48)
Level 47: Hoarfrost -- Prv-Heal/Rchg(A)
Level 49: Hibernate -- RechRdx-I(A)
Level 1: Defiance
Level 1: Brawl -- Empty(A)
Level 1: Sprint -- Empty(A)
Level 2: Rest -- Empty(A)
Level 2: Swift -- Empty(A)
Level 2: Hurdle -- Empty(A)
Level 2: Health -- Pnc-Heal/+End(A)
Level 2: Stamina -- EndMod-I(A), PwrTrns-EndMod(21), PwrTrns-+Heal(21)
Level 50: Musculature Core Paragon
Level 50: Degenerative Core Flawless Interface
Level 50: Assault Core Embodiment
-------------
1
-
-
On 6/26/2021 at 2:31 PM, SuperPlyx said:
Surely Revy would be Dual Pistols 😁
You sir get a Cookie.
-
 1
1
-
-
On 6/26/2021 at 3:49 AM, Greenmantle said:
This is an awesome build. I checked around before I made my decisions with this and I made a few minor changes, but this build is great! Thank you for your help!
I remade my Earth/Storm on Excelsior and made a few changes.
It is up to 26 procs.
This Hero build was built using Mids Reborn 3.0.4.7
https://github.com/Reborn-Team/MidsRebornClick this DataLink to open the build!
Level 50 Natural Controller
Primary Power Set: Earth Control
Secondary Power Set: Storm Summoning
Power Pool: Flight
Power Pool: Leaping
Power Pool: Speed
Ancillary Pool: Stone MasteryHero Profile:
Level 1: Fossilize -- SprWiloft-Acc/Conf/Hold/Immob/Sleep/Stun/Fear(A), SprWiloft-Conf/Hold/Immob/Sleep/Stun/Fear/Rchg(3), SprWiloft-EndRdx/Rchg(5), SprWiloft-Acc/Conf/Hold/Immob/Sleep/Stun/Fear/EndRdx(5), SprWiloft-Acc/Conf/Hold/Immob/Sleep/Stun/Fear/EndRdx/Rchg(7), SprWiloft-Rchg/Dmg%(46)
Level 1: Gale -- Acc-I(A)
Level 2: Stone Cages -- JvlVll-Acc/End/Rech(A), PstBls-Acc/Dmg/EndRdx(3), JvlVll-Dam%(7), TraoftheH-Dam%(9), PstBls-Dam%(9), Bmbdmt-+FireDmg(25)
Level 4: Snow Storm -- EndRdx-I(A)
Level 6: Quicksand -- ImpSwf-Dam%(A)
Level 8: Fly -- HO:Micro(A)
Level 10: Steamy Mist -- StdPrt-ResDam/Def+(A), GldArm-3defTpProc(11), LucoftheG-Def/EndRdx(11), LucoftheG-Def/Rchg+(25)
Level 12: Stalagmites -- Stp-Acc/Rchg(A), Stp-EndRdx/Stun(13), Stp-Acc/EndRdx(13), Stp-Stun/Rng(15), Stp-Acc/Stun/Rchg(15)
Level 14: Combat Jumping -- LucoftheG-Def/Rchg+(A)
Level 16: Freezing Rain -- Ann-ResDeb%(A), Bmbdmt-+FireDmg(17), JvlVll-Dam%(17), ImpSwf-Dam%(21), TchofLadG-%Dam(21), ShlBrk-%Dam(31)
Level 18: Earthquake -- AchHee-ResDeb%(A), TchofLadG-%Dam(19), ExpStr-Dam%(19)
Level 20: Hurricane -- HO:Enzym(A)
Level 22: Hasten -- RechRdx-I(A), RechRdx-I(23)
Level 24: Super Speed -- EndRdx-I(A)
Level 26: Volcanic Gasses -- Ann-ResDeb%(A), JvlVll-Dam%(27), Bmbdmt-+FireDmg(27), NrnSht-Dam%(29), GhsWdwEmb-Acc/Hold/Rchg(29), GhsWdwEmb-Dam%(31)
Level 28: O2 Boost -- DctWnd-Heal/Rchg(A)
Level 30: Air Superiority -- KntCmb-Acc/Dmg(A), KntCmb-Dmg/EndRdx(31), GldStr-Acc/Dmg(34), KntCmb-Dmg/Rchg(40), KntCmb-Dmg/EndRdx/Rchg(43), GldStr-%Dam(50)
Level 32: Animate Stone -- SvrRgh-Acc/Dmg(A), SvrRgh-Dmg/EndRdx(33), SvrRgh-Acc/EndRdx(33), SvrRgh-Acc/Dmg/EndRdx(33), SvrRgh-Acc(34), SvrRgh-PetResDam(34)
Level 35: Tornado -- ExpRnf-Acc/Rchg(A), ExpRnf-Acc/Dmg(36), ExpRnf-Dmg/EndRdx(36), ExpRnf-Acc/Dmg/Rchg(36), ExpRnf-EndRdx/Dmg/Rchg(37)
Level 38: Lightning Storm -- Dcm-Acc/Dmg(A), Dcm-Dmg/EndRdx(39), Dcm-Dmg/Rchg(39), Dcm-Acc/EndRdx/Rchg(39), Dcm-Acc/Dmg/Rchg(40), FrcFdb-Rechg%(40)
Level 41: Fissure -- JvlVll-Acc/End/Rech(A), PstBls-Acc/Dmg(42), JvlVll-Dam%(42), ExpStr-Dam%(42), Bmbdmt-+FireDmg(43), PstBls-Dam%(50)
Level 44: Seismic Smash -- KntCmb-Acc/Dmg(A), KntCmb-Dmg/EndRdx(45), KntCmb-Dmg/Rchg(45), KntCmb-Dmg/EndRdx/Rchg(45), Hct-Acc/Dmg/Rchg(46), Hct-Dam%(46)
Level 47: Rock Armor -- LucoftheG-Def/EndRdx(A), LucoftheG-Def(48), LucoftheG-Def/EndRdx/Rchg(48), LucoftheG-Def/Rchg+(48)
Level 49: Earth's Embrace -- Pnc-Heal/Rchg(A), Pnc-Heal/EndRedux/Rchg(50)
Level 1: Containment
Level 1: Brawl -- Empty(A)
Level 1: Sprint -- Empty(A)
Level 2: Rest -- Empty(A)
Level 2: Swift -- Run-I(A)
Level 2: Hurdle -- Jump-I(A)
Level 2: Health -- Mrc-Rcvry+(A), NmnCnv-Regen/Rcvry+(23), Pnc-Heal/+End(43)
Level 2: Stamina -- PrfShf-End%(A), PrfShf-EndMod(37), EndMod-I(37)
Level 1: Prestige Power Dash -- Empty(A)
Level 1: Prestige Power Slide -- Empty(A)
Level 1: Prestige Power Quick -- Empty(A)
Level 1: Prestige Power Rush -- Empty(A)
Level 1: Prestige Power Surge -- Empty(A)
Level 4: Ninja Run
Level 50: Diamagnetic Interface
Level 50: Agility Core Paragon
Level 50: Portal Jockey
Level 50: The Atlas Medallion
Level 50: Task Force Commander
------------ -
AR/Dev
Yep i'm weird 😛
-
Here is my Fire/Fire/Fire
Capped ranged def and almost capped S/L resists.
Lots of fun 🙂
This Hero build was built using Mids Reborn 3.0.4.7
https://github.com/Reborn-Team/MidsRebornClick this DataLink to open the build!
Level 50 Natural Blaster
Primary Power Set: Fire Blast
Secondary Power Set: Fire Manipulation
Power Pool: Flight
Power Pool: Leaping
Power Pool: Speed
Power Pool: Fighting
Ancillary Pool: Flame MasteryHero Profile:
Level 1: Fire Blast -- Thn-Acc/Dmg(A), Thn-Dmg/EndRdx(5), Thn-Dmg/Rchg(5), Thn-Acc/Dmg/Rchg(7), Thn-Acc/Dmg/EndRdx(7), Thn-Dmg/EndRdx/Rchg(9)
Level 1: Ring of Fire -- Acc-I(A)
Level 2: Fire Ball -- Artl-Acc/Dam(A), Artl-Dam/End(9), Artl-Dam/Rech(11), Artl-Acc/Dam/Rech(11), Artl-Acc/Rech/Rng(13), Artl-End/Rech/Rng(13)
Level 4: Fire Sword -- Mk'Bit-Acc/Dmg(A), Mk'Bit-Dmg/EndRdx(15), Mk'Bit-Dmg/Rchg(15), Mk'Bit-Acc/EndRdx/Rchg(17), Mk'Bit-Acc/Dmg/EndRdx/Rchg(17), Mk'Bit-Dam%(19)
Level 6: Rain of Fire -- Artl-Acc/Dam(A), Artl-Dam/End(19), Artl-Dam/Rech(21), Artl-Acc/Dam/Rech(21), Artl-Acc/Rech/Rng(23), Artl-End/Rech/Rng(23)
Level 8: Fly -- EndRdx-I(A)
Level 10: Fire Sword Circle -- SprDfnBrr-Acc/Dmg(A), SprDfnBrr-Dmg/Rchg(25), SprDfnBrr-Acc/Dmg/Rchg(25), SprDfnBrr-Acc/Dmg/EndRdx(27), SprDfnBrr-Acc/Dmg/EndRdx/Rchg(27), SprDfnBrr-Rchg/+Status Protect(29)
Level 12: Aim -- GssSynFr--ToHit/Rchg(A)
Level 14: Combat Jumping -- ShlWal-ResDam/Re TP(A)
Level 16: Build Up -- GssSynFr--ToHit/Rchg(A)
Level 18: Blaze -- Thn-Acc/Dmg(A), Thn-Dmg/EndRdx(29), Thn-Dmg/Rchg(31), Thn-Acc/Dmg/Rchg(31), Thn-Acc/Dmg/EndRdx(31), Thn-Dmg/EndRdx/Rchg(33)
Level 20: Cauterizing Aura -- NmnCnv-Regen/Rcvry+(A), NmnCnv-Heal(50)
Level 22: Hasten -- RechRdx-I(A), RechRdx-I(33)
Level 24: Boxing -- Acc-I(A)
Level 26: Blazing Bolt -- ExcCnt-Acc/Dmg(A), ExcCnt-Dmg/EndRdx(33), ExcCnt-Dmg/ActRdx(34), ExcCnt-Dmg/Rng(34), ExcCnt-Dmg/Rchg(34), ExcCnt-Stun%(36)
Level 28: Consume -- Acc-I(A)
Level 30: Tough -- StdPrt-ResDam/Def+(A), GldArm-3defTpProc(39), Ags-ResDam/EndRdx(39), Ags-ResDam/Rchg(39), Ags-ResDam/EndRdx/Rchg(40), Ags-ResDam(40)
Level 32: Inferno -- SprBlsWrt-Acc/Dmg(A), SprBlsWrt-Dmg/Rchg(36), SprBlsWrt-Acc/Dmg/Rchg(36), SprBlsWrt-Acc/Dmg/EndRdx(37), SprBlsWrt-Acc/Dmg/EndRdx/Rchg(37), SprBlsWrt-Rchg/Dmg%(37)
Level 35: Burn -- Obl-Dmg(A), Obl-Acc/Rchg(40), Obl-Dmg/Rchg(42), Obl-Acc/Dmg/Rchg(42), Obl-Acc/Dmg/EndRdx/Rchg(42), Obl-%Dam(43)
Level 38: Hot Feet -- Obl-Dmg(A), Obl-Acc/Rchg(43), Obl-Dmg/Rchg(43), Obl-Acc/Dmg/Rchg(45), Obl-Acc/Dmg/EndRdx/Rchg(45), Obl-%Dam(45)
Level 41: Weave -- RedFrt-Def/EndRdx(A), RedFrt-Def/Rchg(46), RedFrt-EndRdx/Rchg(46), RedFrt-Def/EndRdx/Rchg(46), RedFrt-Def(48), RedFrt-EndRdx(48)
Level 44: Bonfire -- SuddAcc--KB/+KD(A)
Level 47: Fire Shield -- Ags-ResDam/EndRdx(A), Ags-ResDam/Rchg(48), Ags-ResDam/EndRdx/Rchg(50), Ags-ResDam(50)
Level 49: Melt Armor -- Acc-I(A)
Level 1: Defiance
Level 1: Brawl -- Empty(A)
Level 1: Sprint -- Empty(A)
Level 2: Rest -- Empty(A)
Level 2: Swift -- Empty(A)
Level 2: Hurdle -- Empty(A)
Level 2: Health -- Pnc-Heal/+End(A)
Level 2: Stamina -- EndMod-I(A), PwrTrns-EndMod(3), PwrTrns-+Heal(3)
Level 49: Quick Form
Level 50: Musculature Radial Paragon
------------ -
I had fun with this build.
Might take a little bit of inf.
This Hero build was built using Mids Reborn 3.0.2.19
https://github.com/Reborn-Team/MidsRebornClick this DataLink to open the build!
Level 50 Mutation Blaster
Primary Power Set: Electrical Blast
Secondary Power Set: Electricity Manipulation
Power Pool: Flight
Power Pool: Leaping
Power Pool: Speed
Power Pool: Fighting
Ancillary Pool: Mu MasteryHero Profile:
Level 1: Lightning Bolt -- SprDfnBrr-Acc/Dmg(A), SprDfnBrr-Dmg/Rchg(5), SprDfnBrr-Acc/Dmg/Rchg(5), SprDfnBrr-Acc/Dmg/EndRdx(7), SprDfnBrr-Acc/Dmg/EndRdx/Rchg(7), SprDfnBrr-Rchg/+Status Protect(9)
Level 1: Electric Fence -- Acc-I(A)
Level 2: Ball Lightning -- Artl-Acc/Dam(A), Artl-Dam/End(9), Artl-Dam/Rech(11), Artl-Acc/Dam/Rech(11), Artl-Acc/Rech/Rng(13), Artl-End/Rech/Rng(13)
Level 4: Charged Brawl -- Mk'Bit-Acc/Dmg(A), Mk'Bit-Dmg/EndRdx(15), Mk'Bit-Dmg/Rchg(15), Mk'Bit-Acc/EndRdx/Rchg(17), Mk'Bit-Acc/Dmg/EndRdx/Rchg(17), Mk'Bit-Dam%(19)
Level 6: Short Circuit -- PreOptmz-Acc/Rech(A), PreOptmz-EndMod/End(19), PreOptmz-EndMod/End/Rech(21), PreOptmz-EndMod/Rech(21), PreOptmz-EndMod/Acc/End(23), PreOptmz-EndMod/Acc/Rech(23)
Level 8: Fly -- HO:Micro(A)
Level 10: Havoc Punch -- Mk'Bit-Dam%(A), Mk'Bit-Acc/Dmg(25), Mk'Bit-Dmg/EndRdx(25), Mk'Bit-Dmg/Rchg(27), Mk'Bit-Acc/EndRdx/Rchg(27), Mk'Bit-Acc/Dmg/EndRdx/Rchg(29)
Level 12: Zapp -- ExcCnt-Acc/Dmg(A), ExcCnt-Dmg/EndRdx(29), ExcCnt-Dmg/ActRdx(31), ExcCnt-Dmg/Rng(31), ExcCnt-Dmg/Rchg(31), ExcCnt-Stun%(33)
Level 14: Aim -- GssSynFr--ToHit/Rchg(A)
Level 16: Thunder Strike -- SprBlsWrt-Acc/Dmg(A), SprBlsWrt-Dmg/Rchg(33), SprBlsWrt-Acc/Dmg/Rchg(33), SprBlsWrt-Acc/Dmg/EndRdx(34), SprBlsWrt-Acc/Dmg/EndRdx/Rchg(34), SprBlsWrt-Rchg/Dmg%(34)
Level 18: Build Up -- GssSynFr--ToHit/Rchg(A)
Level 20: Dynamo -- PwrTrns-Dam/Acc/Rech/End(A), PwrTrns-Dam/Acc/End(36), PwrTrns-+Heal(36), NmnCnv-Regen/Rcvry+(36), Prv-Absorb%(50)
Level 22: Combat Jumping -- Krm-ResKB(A)
Level 24: Hasten -- RechRdx-I(A), RechRdx-I(37)
Level 26: Boxing -- Acc-I(A)
Level 28: Power Sink -- RechRdx-I(A)
Level 30: Tough -- StdPrt-ResDam/Def+(A), GldArm-3defTpProc(37), Ags-ResDam/EndRdx(37), Ags-ResDam/Rchg(39), Ags-ResDam/EndRdx/Rchg(39), Ags-ResDam(39)
Level 32: Thunderous Blast -- Artl-End/Rech/Rng(A), Artl-Acc/Dam(40), Artl-Dam/End(40), Artl-Dam/Rech(40), Artl-Acc/Dam/Rech(42), Artl-Acc/Rech/Rng(42)
Level 35: Force of Thunder -- AbsAmz-Acc/Stun/Rchg(A), AbsAmz-Acc/Rchg(42), SuddAcc--KB/+KD(43), FrcFdb-Rechg%(43)
Level 38: Shocking Grasp -- Mk'Bit-Acc/Dmg/EndRdx/Rchg(A), Mk'Bit-Acc/Dmg(43), Mk'Bit-Dmg/EndRdx(45), Mk'Bit-Dmg/Rchg(45), Mk'Bit-Acc/EndRdx/Rchg(45), Mk'Bit-Dam%(46)
Level 41: Weave -- RedFrt-Def/EndRdx(A), RedFrt-Def/Rchg(46), RedFrt-Def/EndRdx/Rchg(46), RedFrt-Def(48), ShlWal-ResDam/Re TP(48)
Level 44: Charged Armor -- Ags-ResDam/EndRdx(A), Ags-ResDam/Rchg(48), Ags-ResDam/EndRdx/Rchg(50), Ags-ResDam(50)
Level 47: Hover -- LucoftheG-Def/Rchg+(A)
Level 49: Afterburner -- LucoftheG-Def/Rchg+(A)
Level 1: Brawl -- Empty(A)
Level 1: Defiance
Level 1: Sprint -- Empty(A)
Level 2: Rest -- Empty(A)
Level 2: Swift -- Empty(A)
Level 2: Health -- Pnc-Heal/+End(A)
Level 2: Hurdle -- Empty(A)
Level 2: Stamina -- EndMod-I(A), PwrTrns-EndMod(3), PwrTrns-+Heal(3)
Level 1: Quick Form
Level 50: Preemptive Core Flawless Interface
Level 50: Assault Radial Embodiment
Level 50: Barrier Core Epiphany
Level 50: Musculature Radial Paragon
------------ -
I think that question is subjective.
I've had fun with AR/Dev,Elec/elec,Arch/Ninja,Fire/Fire
So i think the question should be what is fun for you 🙂
-
 1
1
-
-
This is my Elec/Elec Blapper with only tough/weave and epic shield.
All that def is from sets (Weave/combat jumping also) and the resists are from tough and the epic shield charged armour.
It is an easy thing to do as the sets with range mostly have S/L resists also.
Mako's bite and Executioner's contract for example.
So no incarnate powers are used and this def/res is all the time and you don't nerf your build trying to chase it and you don't have any down time.
She tanks better than some tanks 😛
-
I have +stealth in sprint and Field Operative so 65ft stealth.
But smoke grenade is fantastic for getting barrels in Posi 2 and the -To Hit is always a bonus but i mostly use it for the -Perception when i'm grabbing glowies.
-
A lot of sets have ranged def and S/L resists.
But none have S/L Def and S/L resists.
So on a lot of my builds i focus on ranged def with a resist epic and tough/weave and stack the set bonuses for ranged def and S/L resist.
-
On my Elec/Elec blaster i maxed range def and S/L/Nrg resist.
Then i had a Panacea in Health.
A power Transfer %heal in Stamina and Dynamo
And a chance for heal in Lightning bolt and Zapp.
Wit the Def and Resist it was more than enough to keep me alive.
-
1
-
1
-
-
On 3/10/2021 at 5:14 PM, dragonhawk777 said:
For this toon I would say the decision factor came down to that Bonfire beats Sleep Grenade by a mile in the cc department, and a self rez seemed a bit more useful than dealing with the animation swap from going to and from Archery and LRM.
Yeah i don't rate Sleep Grenade much and have never taken it.
Cyro freeze ray is good tho and is good for keeping an npc in Ignite.
-
18 hours ago, dragonhawk777 said:
I hadn't thought of putting a stealth IO in Sprint, it's an interesting idea. That would allow me to drop as and get either Assault for a bit more damage or Teleport for team utility. I wish they would just make Hasten an inherited power like the fitness pool was. It's pretty much a mandatory ability for any toon, and that would free up a power pool. Particularly since they are adding and tweaking different pools.
I have AR/Dev and Archery/Dev and i've always taken Fly,combat jumping,Hasten,assault,tactics and munitions mastery.
FO supports all those and CJ is +def and immob resist and adds better control to fly and you get the immob res when on the ground. Plus you don't get the weird Fly sliding with CJ.
Dev needs Hasten.
Assault/Tactics is good for the extra +To hit/+dmg but also is a mule for +Dmg bonuses from sets.
Munitions masters is a good set. Body Armour means you don't have to take tough for the +Def IO's so saves you a power slot.
Cryo freeze ray great hold.
LRM some people don't like it but when you fire that first then your primary main blaster AoE stuff dies.
Surveillance is a debuff.
SpoilerThis Hero build was built using Mids Reborn 3.0.2.19
https://github.com/Reborn-Team/MidsRebornClick this DataLink to open the build!
Level 50 Magic Blaster
Primary Power Set: Archery
Secondary Power Set: Devices
Power Pool: Flight
Power Pool: Speed
Power Pool: Leaping
Power Pool: Leadership
Ancillary Pool: Munitions MasteryHero Profile:
Level 1: Aimed Shot -- SprDfnBrr-Acc/Dmg(A), SprDfnBrr-Dmg/Rchg(3), SprDfnBrr-Acc/Dmg/Rchg(3), SprDfnBrr-Acc/Dmg/EndRdx(5), SprDfnBrr-Acc/Dmg/EndRdx/Rchg(5), SprDfnBrr-Rchg/+Status Protect(7)
Level 1: Toxic Web Grenade -- Acc-I(A)
Level 2: Fistful of Arrows -- Artl-Acc/Dam(A), Artl-Dam/End(7), Artl-Dam/Rech(9), Artl-Acc/Dam/Rech(9), Artl-Acc/Rech/Rng(11), Artl-End/Rech/Rng(11)
Level 4: Taser -- Thn-Acc/Dmg(A), Thn-Dmg/EndRdx(13), Thn-Dmg/Rchg(13), Thn-Acc/Dmg/Rchg(15), Thn-Acc/Dmg/EndRdx(15), Thn-Dmg/EndRdx/Rchg(17)
Level 6: Blazing Arrow -- Thn-Acc/Dmg(A), Thn-Dmg/EndRdx(17), Thn-Dmg/Rchg(19), Thn-Acc/Dmg/Rchg(19), Thn-Acc/Dmg/EndRdx(21), Thn-Dmg/EndRdx/Rchg(21)
Level 8: Fly -- EndRdx-I(A)
Level 10: Targeting Drone -- AdjTrg-ToHit/EndRdx/Rchg(A), AdjTrg-ToHit/EndRdx(23), GssSynFr--Build%(23)
Level 12: Explosive Arrow -- Artl-Acc/Dam(A), Artl-Dam/End(25), Artl-Dam/Rech(25), Artl-Acc/Dam/Rech(27), Artl-Acc/Rech/Rng(27), Artl-End/Rech/Rng(29)
Level 14: Aim -- AdjTrg-ToHit/Rchg(A)
Level 16: Hasten -- RechRdx-I(A), RechRdx-I(31)
Level 18: Ranged Shot -- ExcCnt-Acc/Dmg(A), ExcCnt-Dmg/EndRdx(31), ExcCnt-Dmg/ActRdx(33), ExcCnt-Dmg/Rng(33), ExcCnt-Dmg/Rchg(33), ExcCnt-Stun%(34)
Level 20: Field Operative -- LucoftheG-Def/Rchg+(A), PwrTrns-EndMod(34), PwrTrns-+Heal(34), Pnc-Heal/+End(36), NmnCnv-Regen/Rcvry+(36), NmnCnv-Heal(36)
Level 22: Combat Jumping -- Krm-ResKB(A)
Level 24: Caltrops -- TmpRdn-Dmg/Slow(A)
Level 26: Smoke Grenade -- DarWtcDsp-ToHitDeb/Rchg(A)
Level 28: Trip Mine -- SprBlsWrt-Acc/Dmg(A), SprBlsWrt-Dmg/Rchg(37), SprBlsWrt-Acc/Dmg/Rchg(37), SprBlsWrt-Acc/Dmg/EndRdx(37), SprBlsWrt-Acc/Dmg/EndRdx/Rchg(39), SprBlsWrt-Rchg/Dmg%(39)
Level 30: Assault -- EndRdx-I(A)
Level 32: Rain of Arrows -- Artl-Acc/Dam(A), Artl-Dam/End(39), Artl-Dam/Rech(40), Artl-Acc/Dam/Rech(40), Artl-Acc/Rech/Rng(40), Artl-End/Rech/Rng(42)
Level 35: Tactics -- AdjTrg-ToHit/EndRdx/Rchg(A), AdjTrg-ToHit/EndRdx(42)
Level 38: Gun Drone -- ExpRnf-Acc/Rchg(A), ExpRnf-Acc/Dmg(42), ExpRnf-Dmg/EndRdx(43), ExpRnf-Acc/Dmg/Rchg(43), ExpRnf-EndRdx/Dmg/Rchg(43), ExpRnf-+Res(Pets)(45)
Level 41: Body Armor -- StdPrt-ResDam/Def+(A), GldArm-3defTpProc(45), Ags-Psi/Status(46), ImpSki-Status(50)
Level 44: Cryo Freeze Ray -- BslGaz-Acc/Hold(A), BslGaz-Acc/Rchg(45), BslGaz-EndRdx/Rchg/Hold(46), BslGaz-Acc/EndRdx/Rchg/Hold(46)
Level 47: LRM Rocket -- Artl-Acc/Dam(A), Artl-Dam/End(48), Artl-Dam/Rech(48), Artl-Acc/Dam/Rech(48), Artl-Acc/Rech/Rng(50), Artl-End/Rech/Rng(50)
Level 49: Surveillance -- Acc-I(A)
Level 1: Brawl -- Empty(A)
Level 1: Defiance
Level 1: Sprint -- Clr-Stlth(A)
Level 2: Rest -- Empty(A)
Level 2: Swift -- Empty(A)
Level 2: Health -- Mrc-Rcvry+(A)
Level 2: Hurdle -- Empty(A)
Level 2: Stamina -- EndMod-I(A), PwrTrns-EndMod(29), PwrTrns-+Heal(31)
Level 18: Quick Form
------------ -
Here are the things you need to know.
Gun drone with Expedient Reinforcement set improves the gun drone resistances and helps with ranged def if you are stacking that.
Field Operative will support Fly (with an end IO) Assault (1 end IO) and Tactics (Adjusted targeting To hit/End, To hit/end/rech) Targeting drone (same Enhancers as Tactics) and still allow you to go mental with the attacks.
Field Operative and a Stealth IO in Sprint gives you 65feet of stealth. You don't need to take super speed. This makes you invis to "Most" mobs. Obviously not KoA or anyone with good +per.
Taser. Fantastic short range damage and quick firing. Also Energy damage. More damage than most prinary skills.
Trip mine Great AoE take it and go toe bombing.
Time bomb..garbage.
-
My Elec/Elec Blapper.
This Hero build was built using Mids Reborn 3.0.2.19
https://github.com/Reborn-Team/MidsRebornClick this DataLink to open the build!
Level 50 Magic Blaster
Primary Power Set: Electrical Blast
Secondary Power Set: Electricity Manipulation
Power Pool: Flight
Power Pool: Leaping
Power Pool: Speed
Power Pool: Fighting
Ancillary Pool: Mu MasteryHero Profile:
Level 1: Lightning Bolt -- SprDfnBrr-Acc/Dmg(A), SprDfnBrr-Dmg/Rchg(5), SprDfnBrr-Acc/Dmg/Rchg(5), SprDfnBrr-Acc/Dmg/EndRdx(7), SprDfnBrr-Acc/Dmg/EndRdx/Rchg(7), SprDfnBrr-Rchg/+Status Protect(9)
Level 1: Electric Fence -- Acc-I(A)
Level 2: Ball Lightning -- Artl-Acc/Dam(A), Artl-Dam/End(9), Artl-Dam/Rech(11), Artl-Acc/Dam/Rech(11), Artl-Acc/Rech/Rng(13), Artl-End/Rech/Rng(13)
Level 4: Charged Brawl -- Mk'Bit-Acc/Dmg(A), Mk'Bit-Dmg/EndRdx(15), Mk'Bit-Dmg/Rchg(15), Mk'Bit-Acc/EndRdx/Rchg(17), Mk'Bit-Acc/Dmg/EndRdx/Rchg(17), Mk'Bit-Dam%(19)
Level 6: Short Circuit -- PreOptmz-Acc/Rech(A), PreOptmz-EndMod/End(19), PreOptmz-EndMod/End/Rech(21), PreOptmz-EndMod/Rech(21), PreOptmz-EndMod/Acc/End(23), PreOptmz-EndMod/Acc/Rech(23)
Level 8: Fly -- HO:Micro(A)
Level 10: Havoc Punch -- Mk'Bit-Dam%(A), Mk'Bit-Acc/Dmg(25), Mk'Bit-Dmg/EndRdx(25), Mk'Bit-Dmg/Rchg(27), Mk'Bit-Acc/EndRdx/Rchg(27), Mk'Bit-Acc/Dmg/EndRdx/Rchg(29)
Level 12: Zapp -- ExcCnt-Acc/Dmg(A), ExcCnt-Dmg/EndRdx(29), ExcCnt-Dmg/ActRdx(31), ExcCnt-Dmg/Rng(31), ExcCnt-Dmg/Rchg(31), ExcCnt-Stun%(33)
Level 14: Aim -- GssSynFr--ToHit/Rchg(A)
Level 16: Thunder Strike -- SprBlsWrt-Acc/Dmg(A), SprBlsWrt-Dmg/Rchg(33), SprBlsWrt-Acc/Dmg/Rchg(33), SprBlsWrt-Acc/Dmg/EndRdx(34), SprBlsWrt-Acc/Dmg/EndRdx/Rchg(34), SprBlsWrt-Rchg/Dmg%(34)
Level 18: Build Up -- GssSynFr--ToHit/Rchg(A)
Level 20: Dynamo -- PreOptmz-EndMod/Acc/End(A), PwrTrns-Dam/Acc/End(36), PwrTrns-+Heal(36), Arm-Dam%(36), FuroftheG-ResDeb%(50)
Level 22: Combat Jumping -- Krm-ResKB(A)
Level 24: Hasten -- RechRdx-I(A), RechRdx-I(37)
Level 26: Boxing -- Acc-I(A)
Level 28: Power Sink -- RechRdx-I(A)
Level 30: Tough -- StdPrt-ResDam/Def+(A), GldArm-3defTpProc(37), Ags-ResDam/EndRdx(37), Ags-ResDam/Rchg(39), Ags-ResDam/EndRdx/Rchg(39), Ags-ResDam(39)
Level 32: Thunderous Blast -- Artl-End/Rech/Rng(A), Artl-Acc/Dam(40), Artl-Dam/End(40), Artl-Dam/Rech(40), Artl-Acc/Dam/Rech(42), Artl-Acc/Rech/Rng(42)
Level 35: Force of Thunder -- Stp-Acc/Stun/Rchg(A), Stp-Acc/Rchg(42), SuddAcc--KB/+KD(43), FrcFdb-Rechg%(43)
Level 38: Shocking Grasp -- Mk'Bit-Acc/Dmg/EndRdx/Rchg(A), Mk'Bit-Acc/Dmg(43), Mk'Bit-Dmg/EndRdx(45), Mk'Bit-Dmg/Rchg(45), Mk'Bit-Acc/EndRdx/Rchg(45), Mk'Bit-Dam%(46)
Level 41: Weave -- Rct-Def(A), Rct-Def/EndRdx(46), Rct-Def/Rchg(46), Rct-Def/EndRdx/Rchg(48), ShlWal-ResDam/Re TP(48)
Level 44: Charged Armor -- Ags-ResDam/EndRdx(A), Ags-ResDam/Rchg(48), Ags-ResDam/EndRdx/Rchg(50), Ags-ResDam(50)
Level 47: Hover -- LucoftheG-Def/Rchg+(A)
Level 49: Afterburner -- LucoftheG-Def/Rchg+(A)
Level 1: Brawl -- Empty(A)
Level 1: Defiance
Level 1: Sprint -- Empty(A)
Level 2: Rest -- Empty(A)
Level 2: Swift -- Empty(A)
Level 2: Health -- Pnc-Heal/+End(A)
Level 2: Hurdle -- Empty(A)
Level 2: Stamina -- EndMod-I(A), PwrTrns-EndMod(3), PwrTrns-+Heal(3)
Level 1: Quick Form
Level 50: Musculature Core Paragon
Level 50: Preemptive Core Flawless Interface
Level 50: Assault Radial Embodiment
Level 50: Barrier Core Epiphany
------------ -
In my Elec/Elec i also have it in Static field.
So for me in general it is what ever power i am six slotting.
Generally i don't 6 slot the single target hold so it often goes in another power.
More often that not it goes in a 6 slot power that has not got a set that gives +def.
-
On 2/6/2021 at 5:40 AM, DougGraves said:
Electric puts them to sleep with static field. I want to then pick them off one by one. What are the good secondaries for single target damage?
Electrical Assault hands down as it will assist with -end and when you get Preemptive it just gets even better.
-
My Elec/Elec has 75% S/L 50%NRG resists and 48% ranged def.
Coupled with the -endurance and -End and i tank better than most tanks 😛
No Rune of Power just Tough and Weave so it's all the time.
-
On 11/18/2020 at 12:04 AM, Hopestar said:
Assault Rifle is weak on every AT, the numbers are small, it's highly resisted damage typing, and its mostly cones that can't hit a whole group. There's other reasons, but I can't think of them for the moment.
Lots of numbers fly, but they're small.
Also see the testing Galaxy Brain was so gracious to spend time making:I love it when people say this stuff.
It's not like AR has, i dunno, fire aswell as lethal.
And cones are just that..cones. Have you considered like standing further back to catch the mob in the cone.
Cones will seem narrow if you are face to face with a mob

Flamethrower and Full Auto are quite a wide cone when used properly.
With any luck all the AR bashing will get it buffed then my overpowered AR/Dev will be horrificaly overpowered. 🙂
Carry on.
-
1
-
1
-
-
34 minutes ago, Calamity Cain said:
With Sprint + Athletic Run and the LRT Accolade, I don't really invest in travel powers anymore, unless it suits the concept, so I'm fine leaving Super Jump out.
Anyway, thanks for the help, it's given me a lot to chew on.It is a nice sentiment but when you have to travel the length of IP with no travel power you will get bored of it very quickly 🙂
-
16 minutes ago, Calamity Cain said:
The damage difference is driving me nuts. haha I tweaked my build a bit, and it actually gets 1 or 2 extra points of damage on all other attacks, but somehow your build's Assassin's Blow is dominating mine. I've made sure all relevant slotting is the same, all options match, etc. But no matter what, your build gets 300 or so more damage on Assassin's Blow.
I'd think it was a glitch but I recreated your build from scratch and it still shows a 300 damage difference. 😖How odd.
The short and the curly of it is it will still perform the same regardless of what mids says.
It is possible that it's factoring in Gaussians chance for BU ? Is focus chi turned on ?
A thing to note is any enhancer that gives +Recovery or regen like miracle,numina's etc if you put them in powers that you target someone else with it will apply to that person and not yourself.
All in All i'd still go with the chance for heal enhancers in health,stamina,physical perfection because the end useage is below 1 so the panacea,stamina "should" be able to handle it.
I see an end useage of 0.38/s s and that very low so go with the above for a bit more survivability.
And i just noticed you have no super jump or any travel power so you will have to drop Resuscitate for super jump.
Think of yourself before you think of others 🙂
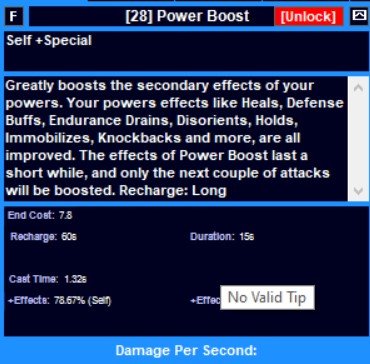
Freeze Ray or Bitter freeze ray?
in Blaster
Posted
Procs in freezing rain have a chance to fire when the rain is cast and then 10 seconds after.
Seen it on my storm controller but as she's not got many damaging powers it is like a mini nuke.
You won't need it on a blaster tho.