Nemu
-
Posts
1424 -
Joined
-
Last visited
-
Days Won
3
Content Type
Profiles
Forums
Events
Store
Articles
Patch Notes
Everything posted by Nemu
-
If all you do is ITF with that build then all the toxic/psi resist bonuses are irrelevant. You can also break up the superior gauntleted fist set in KO blow into 2 sets of 3 for more energy/neg E resist. There's also not a lot of fire/cold damage on that TF so the F/C defense bonuses can be shaved off too. With those shaved slots you can look to bump up your eng/NE def/resists, recharge, recovery, and if you value it, slow resist. If you want to fit handclap in, drop assault. Assault is pretty low return on investment. I came up with this - focusing on more E/N def and resists. You don't need tough to hit S/L resist cap and two less toggles means better end consumption. Energy torrent replaces laser beam eyes as another source of KD and mitigation that you can use when rage crashes and you need to buy some time. AoE>single target against stuff that can cause defense cascade failure - wipe out the fodder fast and you reduce the amount of debuffs that will land on you. This Hero build was built using Mids Reborn 3.2.17 https://github.com/LoadedCamel/MidsReborn Click this DataLink to open the build! Level 50 Magic Tanker Primary Power Set: Invulnerability Secondary Power Set: Super Strength Power Pool: Leaping Power Pool: Speed Power Pool: Fighting Power Pool: Leadership Ancillary Pool: Energy Mastery Hero Profile: Level 1: Resist Physical Damage -- StdPrt-ResDam/Def+(A) Level 1: Jab -- SprGntFis-Dmg/Rchg(A), SprGntFis-Acc/Dmg/Rchg(5), SprGntFis-Dmg/EndRdx/Rchg(7) Level 2: Temp Invulnerability -- UnbGrd-ResDam(A), UnbGrd-ResDam/EndRdx(3), UnbGrd-Rchg/ResDam(3), UnbGrd-ResDam/EndRdx/Rchg(5) Level 4: Haymaker -- SprMghoft-Acc/Dmg(A), SprMghoft-Dmg/Rchg(7), SprMghoft-Acc/Dmg/Rchg(9), SprMghoft-Dmg/EndRdx/Rchg(9), SprMghoft-Acc/Dmg/EndRdx/Rchg(11), SprMghoft-Rchg/Res%(11) Level 6: Combat Jumping -- LucoftheG-Def/Rchg+(A), WntGif-ResSlow(33), Rct-Def(42), Rct-ResDam%(42) Level 8: Unyielding -- UnbGrd-ResDam(A), UnbGrd-ResDam/EndRdx(17), UnbGrd-ResDam/EndRdx/Rchg(17), UnbGrd-Max HP%(19) Level 10: Resist Elements -- UnbGrd-ResDam(A), UnbGrd-ResDam/EndRdx(19), UnbGrd-ResDam/EndRdx/Rchg(25), UnbGrd-Rchg/ResDam(33) Level 12: Resist Energies -- UnbGrd-ResDam(A), UnbGrd-ResDam/EndRdx(13), UnbGrd-Rchg/ResDam(13), UnbGrd-ResDam/EndRdx/Rchg(15) Level 14: Hasten -- RechRdx-I(A), RechRdx-I(15) Level 16: Hand Clap -- FrcFdb-Rechg%(A), SuddAcc--KB/+KD(36), AbsAmz-Acc/Stun/Rchg(36), AbsAmz-Acc/Rchg(37) Level 18: Invincibility -- LucoftheG-Def/Rchg+(A), ShlWal-Def/EndRdx(34), ShlWal-Def/EndRdx/Rchg(34), ShlWal-Def(34), ShlWal-ResDam/Re TP(36) Level 20: Knockout Blow -- SprGntFis-Acc/Dmg(A), SprGntFis-Acc/Dmg/EndRdx/Rchg(21), SprGntFis-Rchg/+Absorb(21), SprBlsCol-Acc/Dmg/EndRdx(23), SprBlsCol-Dmg/EndRdx(23), FrcFdb-Rechg%(25) Level 22: Kick -- Empty(A) Level 24: Tough -- GldArm-3defTpProc(A) Level 26: Tough Hide -- LucoftheG-Def/Rchg+(A), ShlWal-Def/EndRdx(27), ShlWal-Def(27), ShlWal-Def/Rchg(29), ShlWal-Def/EndRdx/Rchg(29) Level 28: Rage -- HO:Membr(A), HO:Membr(43) Level 30: Weave -- LucoftheG-Def/Rchg+(A), ShlWal-Def/EndRdx(31), ShlWal-Def/EndRdx/Rchg(31), ShlWal-Def(31), ShlWal-EndRdx/Rchg(33) Level 32: Taunt -- MckBrt-Taunt/Rchg/Rng(A) Level 35: Conserve Power -- RechRdx-I(A) Level 38: Foot Stomp -- Erd-Dmg(A), Erd-Acc/Dmg/EndRdx/Rchg(39), Erd-%Dam(39), SprAvl-Acc/Dmg/EndRdx(39), SprAvl-Dmg/EndRdx(40), FrcFdb-Rechg%(40) Level 41: Physical Perfection -- PrfShf-End%(A) Level 44: Energy Torrent -- SprFrzBls-Acc/Dmg(A), SprFrzBls-Dmg/EndRdx(45), Artl-Acc/Dam(45), Artl-Acc/Rech/Rng(45), Artl-End/Rech/Rng(46), FrcFdb-Rechg%(46) Level 47: Dull Pain -- Prv-Heal(A), Prv-Heal/EndRdx(47), Prv-EndRdx/Rchg(47), Prv-Heal/Rchg(48), Prv-Heal/Rchg/EndRdx(48), Prv-Absorb%(48) Level 49: Maneuvers -- LucoftheG-Def/Rchg+(A), ShlWal-Def/EndRdx(49), ShlWal-EndRdx/Rchg(49), ShlWal-Def/EndRdx/Rchg(50), ShlWal-Def(50) Level 1: Brawl -- Empty(A) Level 1: Gauntlet Level 1: Sprint -- Empty(A) Level 2: Rest -- Empty(A) Level 1: Swift -- Run-I(A) Level 1: Health -- Pnc-Heal/+End(A), Mrc-Rcvry+(37), NmnCnv-Regen/Rcvry+(37) Level 1: Hurdle -- Jump-I(A) Level 1: Stamina -- PrfShf-End%(A), PwrTrns-EndMod(40), PwrTrns-+Heal(42) Level 50: Musculature Radial Paragon Level 50: Freedom Phalanx Reserve Level 50: Portal Jockey Level 50: Task Force Commander Level 50: The Atlas Medallion ------------ | Copy & Paste this data into Mids Reborn : Hero Designer to view the build | |-------------------------------------------------------------------| |MxDz;1457;685;1370;HEX;| |78DA6D94CB4F135114C6EF74EEF028AD3C2ACF4A81024205C696B8726522A0609B3| |4C1B83364804B3BDA94A62D46F6E263A91B576AE2D2B5AEFC2F7C01BA74232A8FC4| |F7AA1EE67C37B4D149DADFDC73BF7BCEB9DFCC9DD4CDA9C0CACACC396104CEE79C5| |269E1B293BFAE8A56CAC9B84BE2F0AAA75F84A30B536A45E54BCA9ECDDF58CBE555| |D15974736E793D8CE994CA2965CFAF15E87EBE5C54F94C392B02E9D5D59C9D544EC| |1CD67FCDE60BEA0D472D0BB9D7133D9324D346BD5B22A96B26E21345D7097EC69AA| |91595F4839A5B22AAE775127A3F47BD5487F86D75C45884EBAEB9562DC7F14F4890| |D2944420A799B597787F99A561A1099C677D30BFA7E80BF98F237D3A68C26C496F9| |8E83759BCC862D709BE97F0F7E6076906D96AE64B51B5EB03FCC93B13DF01BF3658| |C6CD6E27AB4D582B65AD04EDB1FE65BDA43A3163742DC067117C4FDD8CB26899BB4| |B809E200C401888E6151947A0E426C04C7044F827172A3990DAE98CD1B3E2F38F89| |17D1D4CF27828C5DCA2B2AD86908762D98ADD0FCC70998159708E39788999A00A21| |54B042B738F3F1BBE03D66C703F03EB30B9DF8A8F7768177A2BD42973029D4A9439| |D935C649B3AEBC61E65373AEB41673DE8E8C405109D4E52676143F83C63C26709D2| |14A74049657A75C65E648C2063041922C8DC7F91799A32F6E957B8EF1AEFE109CD4| |575C351F87E8694C3085AC33B3EEF653FB90BEE818FD98D9147205C7916A413A3CB| |8C3EE4E0532A3366C0E7B1E7BC62FC05685ACC7AE64403888C6FC83F5B1F0AFB134| |ECA0EF819BBFB027E057799AD64555C5B1587557158158735095896D00F430A7DD1| |69F79E6C4C1E9DF54AF2DFF9B4D4D31432BCD0AEBFFA9B31C1DEEED77C3306B8DED| |01C45468857B8BFBD9A95A3BCF2A066258C1D39600F633F99C91041B7F9BF2BEDAF| |125CAD1E38D583C5EAC15F1E96EFFE| |-------------------------------------------------------------------|
-
The stalker chance to build up proc is a global proc that has a chance to proc off any stalker attack and it will recharge build up instantly when it procs. That can lead to big bursts as well. It's much more consistent than using burnout every 5 minutes. Put a gaussian's chance for build up proc in build up for even bigger +dam buff in a limited window. If you toss the stalker chance to hide proc in Assassin's strike or other powers with a decently long recharge you can set up crits on demand as well for big bursts of damage. The stalker ATOs are game changers. Take advantage of those before you experiment with placate shenanigans, those ATOs take far less power pick investments and offer way more return on investment. Modern day stalkers play very much like scrappers, they don't wait to become hidden anymore because the chance to hide proc will do that constantly for them while they are attacking.
-
Welcome to the game! If you are organically collecting inf just by running content then yes. They are more expensive than what you are able to earn as you are leveling. A good tactic for newer players is to run some story arcs/task forces/get explore accolades in lowbie zones for the merit reward. Turn those merits into enhancement converters at the merit reward vendor and sell those converters for around 70,000 inf per converter in the auction house (type /ah in chat to bring up the auction house). You don't need to sell all of them, but you can sell enough to outfit yourself. Those converters can be used to make even more money by using them to convert your crafted yellow/orange recipes and selling those crafted IO in the auction house. If you have questions about builds and stuff feel free to post those in the respective AT forums.
-
This is what I do Ukase: Chain petcomall attack to a power, like a MM personal attack Chain petcomall follow defensive to a travel power You don't need binds for each tier of pets, that bind guide is overly complex and hardly practical for 99% of play situations, although it is a fantastic showcase of CoH's bind capabilities. In today's meta, you either tell all your pets to focus fire on a target or you are telling them to go into BG mode and follow you. Occasionally you need to tell them to goto spot X. That's about it. It's easy today to build for survival so that you can just tank the alpha for the henchmen. You'll lose some T1 and occasionally T2s from time to time but it's easy enough to re-summon them. If you are binding tray locations rather than specific powers and you want to 1 click summon your henchmen, you can create macros for each tier to powexelocation_self the henchmen and put those macros in the tray positions that you've bound keys to. If you want to get really fancy and do both upgrades for your henchmen with one key you can create rotating bind files to do so. Also, you can bind shift+those keys as well to give yourself some more bind keys. If you are using WASD as movement keys, consider moving those to ERTF, that setup opens up some real-estate and gives your pinky some purpose other than hitting shift or tab.
-
Very good start, you can substitute a full set of makos for a full set of touch of death to hit softcap to both S/L and Ranged defense. But the defenses are solid the way they are currently. Reaction time provides a bigger recovery boost than stamina, you can move a slot out of stamina and put it into reaction time. You'd want some KB protection early on, a blessing of Zephyr kb prot in super jump will cover that hole nicely. You can also shave some slots from various defense powers that offer low yield like combat jumping and shuffle those elsewhere for some more cheap set bonuses but overall solid budget build, it'll only get better with more investment. The other blaster ATO set is a good place to start if you want to invest more.
-
Pro-tip Decimation - chance for build up goes very well in seeker drones and it will proc almost every activation. Great on defenders/corruptors For those 2 ATs I slot seeker 3 piece whatever ATO set that gives the 10% recharge bonus and the decimation proc.
-
Hello Capella, I looked at the builds posted. Agreed with the previous comments about end consumption. Also, turn the yellow dot on kick off, it skews your recharge. I would not slot kick with anything, the FF feedback proc won't proc often and it a waste of 2mil inf in that slot. S/L and energy damage are pretty common endgame so I looked at shoring those defenses up. Even though fire/cold defense is easy to get via winter IO sets, they are not as common and you'll be ok not having high defense against those types for the majority of content. Builds also tend to suffer offensively when you build very defensively. Damage isn't really the issue here, it's accuracy against higher cons. You can simulate your to-hit against +4s by going to options -> configuration -> Exemping & Base Values and setting the base to hit to 39. Then look at the accuracy field for your bread and butter powers to see if it's 95% or higher, as 95% represents your maximum chance to hit a +4 mob. For this reason every one of my builds tend to slot a kismet +acc and a lot take tactics if they are not using a lot of purple sets. There are other alternatives as well, LOTG gives a good 9% ACC bonus at 4 slots and I've often resorted to that on my defense armor builds that lean heavily into procs. Typical invul builds shoot for some sort of softcap with 1 foe in invincibility and that's usually good enough. Of all the attacks from energy melee, Energy transfer is the best candidate to proc because it doesn't cost end, that gives you a little more kick into an otherwise very defensive build. This is my draft of the build. Softcap to S/L/E/N with 1 foe in invinciblity, enough acc to hit +4s for most ST powers. The AoEs aren't going to be spammed against one target, but with 3-4+ foes in invincibility they will also have 95%+ chance to hit. This Villain build was built using Mids Reborn 3.2.17 https://github.com/LoadedCamel/MidsReborn Click this DataLink to open the build! Level 49 Magic Brute Primary Power Set: Energy Melee Secondary Power Set: Invulnerability Power Pool: Leaping Power Pool: Speed Power Pool: Fighting Power Pool: Leadership Ancillary Pool: Mu Mastery Villain Profile: Level 1: Energy Punch -- SprBrtFur-Acc/Dmg/Rchg(A), SprBrtFur-Acc/Dmg/EndRdx/Rchg(3), SprBrtFur-Rech/Fury%(3) Level 1: Resist Physical Damage -- RctArm-ResDam/EndRdx(A), RctArm-ResDam/Rchg(5), RctArm-ResDam(5) Level 2: Bone Smasher -- SprUnrFur-Acc/Dmg(A), SprUnrFur-Dmg/Rchg(11), SprUnrFur-Acc/Dmg/Rchg(11), SprUnrFur-Dmg/EndRdx/Rchg(13), SprUnrFur-Acc/Dmg/EndRdx/Rchg(13), SprUnrFur-Rchg/+Regen/+End(15) Level 4: Combat Jumping -- LucoftheG-Def/Rchg+(A), Ksm-ToHit+(15), Rct-ResDam%(17) Level 6: Build Up -- GssSynFr--Build%(A) Level 8: Whirling Hands -- Arm-Dmg(A), Arm-Acc/Dmg/Rchg(17), Arm-Acc/Rchg(19), Arm-Dmg/EndRdx(19), Arm-Dam%(21), FuroftheG-ResDeb%(21) Level 10: Resist Elements -- RctArm-ResDam/EndRdx(A), RctArm-ResDam/Rchg(23), RctArm-ResDam(23) Level 12: Hasten -- RechRdx-I(A), RechRdx-I(25) Level 14: Super Speed -- WntGif-ResSlow(A) Level 16: Unyielding -- GldArm-3defTpProc(A), RctArm-ResDam/EndRdx(25), RctArm-ResDam(27), RctArm-ResDam/EndRdx/Rchg(27) Level 18: Total Focus -- SprBlsCol-Acc/Dmg(A), SprBlsCol-Dmg/EndRdx(29), SprBlsCol-Acc/Dmg/EndRdx(29), SprBlsCol-Dmg/EndRdx/Acc/Rchg(31), SprBlsCol-Rchg/HoldProc(31) Level 20: Resist Energies -- RctArm-ResDam/EndRdx(A), RctArm-ResDam/Rchg(31), RctArm-ResDam(33) Level 22: Kick -- Empty(A) Level 24: Tough -- RctArm-ResDam/EndRdx/Rchg(A), RctArm-ResDam/EndRdx(33), RctArm-ResDam(33) Level 26: Weave -- LucoftheG-Def/Rchg+(A), LucoftheG-Def/EndRdx(34), LucoftheG-Def/EndRdx/Rchg(34), LucoftheG-Def(34) Level 28: Invincibility -- LucoftheG-Def/Rchg+(A), RctRtc-Pcptn(36), LucoftheG-Def/EndRdx(36) Level 30: Maneuvers -- LucoftheG-Def/Rchg+(A), LucoftheG-Def/EndRdx(36), LucoftheG-Def(37), LucoftheG-Def/EndRdx/Rchg(48) Level 32: Energy Transfer -- SprBrtFur-Acc/Dmg(A), SprBrtFur-Dmg/Rchg(37), SprBrtFur-Dmg/EndRdx/Rchg(37), HO:Nucle(39), Hct-Dam%(39), PrfZng-Dam%(39) Level 35: Tough Hide -- LucoftheG-Def/Rchg+(A), ShlWal-Def/EndRdx(40), ShlWal-Def(40), ShlWal-ResDam/Re TP(40) Level 38: Temp Invulnerability -- StdPrt-ResDam/Def+(A), UnbGrd-ResDam/EndRdx(42), UnbGrd-Max HP%(42), UnbGrd-ResDam(42) Level 41: Dull Pain -- Prv-Heal(A), Prv-Heal/EndRdx(43), Prv-EndRdx/Rchg(43), Prv-Heal/Rchg(43), Prv-Heal/Rchg/EndRdx(45), Prv-Absorb%(45) Level 44: Mu Lightning -- SprWntBit-Acc/Dmg(A), SprWntBit-Acc/Dmg/EndRdx(45), SprWntBit-Acc/Dmg/Rchg(46), SprWntBit-Dmg/EndRdx/Acc/Rchg(46), SprWntBit-Rchg/SlowProc(46) Level 47: Ball Lightning -- Artl-Acc/Dam(A), Artl-Dam/End(47), Artl-Acc/Dam/Rech(47), Ann-ResDeb%(47) Level 49: Electrifying Fences -- Artl-Acc/Dam(A), Artl-Dam/End(49), Artl-Acc/Dam/Rech(49) Level 1: Brawl -- Empty(A) Level 1: Fury Level 1: Sprint -- UnbLea-Stlth(A) Level 2: Rest -- Empty(A) Level 1: Swift -- Run-I(A) Level 1: Health -- Pnc-Heal/+End(A), Mrc-Rcvry+(7), NmnCnv-Regen/Rcvry+(7) Level 1: Hurdle -- Jump-I(A) Level 1: Stamina -- PrfShf-End%(A), PwrTrns-EndMod(9), PwrTrns-+Heal(9) Level 1: Energy Focus Level 14: Speed Phase Level 50: Born In Battle Level 50: High Pain Threshold Level 50: Invader Level 50: Marshal Level 50: Cardiac Core Paragon ------------ | Copy & Paste this data into Mids Reborn : Hero Designer to view the build | |-------------------------------------------------------------------| |MxDz;1472;691;1382;HEX;| |78DA5594596F125114C7EF300305CA2A85D252A0D01628B423F864B4A6465B126B4| |96A4CD4F882D85EE82484121623DF428DC62713B726AE5FC1ADFA595CAB4D5C121F| |CC7866CEB9016E80DFDC73FE67B9CB50BABEE2AA568B2799347ABA5E69B7CBA75AD| |D0EB7962A356D53663046E01B368DE512AF73AEAE3678ABD6C349141D2BBCCA1B6D| |AE9E695CEBD6C15DB9AAD5B54E8FB9367676EAEA3AAF34B546CD694ECE3739DF729| |B8F45ADB6DD018757A8B678ABBDAD3583AB4D6D53A592DD72A9D2EEF0562F0C7D64| |8C7E24F831BE8CE916F6107A2C28CCF298B88B7CC5064531784A2B4C891393483B4| |0229155722966A4D34DF4205D5EA20FE9F12343B02FB2A820072574FE83695461BE| |9FD88603CC56EC4367D6A716CC2CD1228CB22347D1E83B863C749CB8841C3B415CC| |68C6F21CA21CA3A6861215A5888169684DE4649248DE60005070B1367C0E966E864| |EE08A67D07332F45C8DE23680C53FA494A3B9940BA007E122BFE1BB81F533789B79| |0B1DBC43BC83D500744E301CA1CA3C6A7A982057A0B8ADE823A0C2683695CC48D53| |07D3B1E138054413A2FD093A8C848F18208E21DF832A2299A7A25B22249EB907FB1| |C009A410EE6878C5191312A44947196321DA6CC1E405C9C68FC3EEEDEEC03E22364| |6A09DC8ACC52393CD1541BF901CC4951294995D245D96C23BD463C8B495E836A4E8| |8E78C7D81DB36FF1B9DF37F89BF906F8C3746B495F984C6EC67E217E257E4C237E2| |3EB20CC88943CE3DC1435C78865C7C4E7C417C89AC40904AF75D5665AB695415A28| |DF8112B5C01E4C5C9E6499C27719EC4530A1343878F71238A4AFFDDD6D787FC326E| |E98622046094CCA07D673F88B14566EA7E3807FF2512D8966D0DEF94ED021EC5F7A| |1C80C461E0C45DEC5B2F603DC05FB1FA45158DFCDF61BD4F7B2FD774F3F07390A62| |1D170727970627970727E6580E0C58FE031F96D03D| |-------------------------------------------------------------------|
-
Don't let the totally supa dupa awesome disguise fool you. That's a panda. And there are many more roaming around on Excel. There are some penguins, pixies and fleas too from what I've seen. But those are not as cool as pandas. FACTS!

-
I started on Torchbearer too because of the name is symbolic to CoH's history. But then I found my old SG/Coalition on Excelsior. It'll be a bit of a cultural shock if you do test the waters over at Excelsior. Watch out for Pandas, they are all over that shard.
-
Are you having a hard time finding groups because of low population or because people don't take the initiative to form groups but they are always waiting for others to form a group so they can ask to join? I can definitely see the former being an issue on low population servers. I play mostly on Excelsior nowadays and I'll often see the latter. A dozen people asking for group in LFG over a relatively long period of time not one of those asking taking the initiative to form one and just start inviting. I also see people afraid to ask to join teams when there are obviously teams recruiting in LFG. One guys was adding an offer to pay with his request to join teams. Long story short I got him invited to our coalition and now he has an easier time getting on teams within that circle, without the need to offer pay to team. I've also invited all the people LFG but don't want to form their own teams, offer mission arcs they can run in their level range, and run those missions. Over a few missions I'll ask the mission holders if they are comfortable taking the star, and transition team lead to that person after they agree. I stay around, help them with setting rep/mission and teaching them how to recruit, and hang around for a few missions before I leave. They end up actually doing it! It's not terribly hard to start a team and now they know. The thing about a community is that sometimes you need to reach out, sometimes you need to coax people to participate. That's the other observation I have about this game. There are less people that are willing to reach out and engage, or they have their own inner cliques and choose to isolate themselves within those circles. I know that within my coalition, a lot of the vets that got back are a solitary bunch that only hang out with people within the coalition which are mostly refugees from the CoH SNAP. I can't tell you how many times I've seen people remark "I don't join Pick up Groups or invite people outside my circle because various reasons usually centered around PuG horror stories." How do you foster a community and attract new people if you shut yourselves in?
-
Extremely good point! I think that is something I omitted from my posts. I implied it, but I should have explicitly stated it. I'm all for giving players a choice. If they understand what's all out there they can make their own decisions about how they want to play the game, and that gives them more opportunities to latch on to something that can keep them coming back.
-
Streamers and boob physics Mommy mayhem just got real. Watch Excelsior and Everlasting go red for DAYS!
-
Don't skip cosmic burst. It does good damage and you can use it to stack stuns with Thunder Strike or Force of Thunder. From a survival perspective do you think melee or S/L defense the moment you think of the term blapper? How many mob do you think you can get within melee range at once? 5, 6? Are mobs using melee attacks against you when they first spot you approaching? What about mobs that run away and shoot you from a distance, or scattered mobs on certain maps that aren't clumped together. Do you think that just because you have melee powers that means you need to STAY in melee range? I see a lot of players shooting for melee defense on a melee blaster and by itself it's a complete waste of time. Some mobs are perfectly content shooting you and melee defense does nothing against those. S/L covers more attacks but non-s/l attacks will get through. Range defense catches all range attacks thrown at you and as long as you can maneuver and keep at Tiny bit of distance between mobs and you, you force them to either chase you or shoot you. In my experience S/L defense and Range defense form a good "catch all" combo. Ranged will take care of most range attacks and S/L covers most melee stuff and a lot of AoE attacks as well. If I need to prioritize my defenses, it will always be range first, then S/L. The game has mechanics that allow you to keep your distance even when using melee attacks. I know that procs are all the rage but I see that build running out of end a lot. You are going to be cycling some very high DPA attacks that are not slotted for any endurance reduction, and your recovery is not going to be able to keep up. Procs makes more sense for ATs that have solved for survival because they can afford to redirect slotting to more offense. Blasters are in the other spectrum, they do damage already, they need survival to balance it out. You can get that through teaming and getting buffs, but if you want to be more self sufficient that's going to impact your build design. You also have zero slow resistance. You won't feel the pain unless you go up against mobs that slow, but even a caltrop patch can just show you how annoying not having any slow resist is. Blasters are not meant to stand still and faceroll stuff even if they have high defense, and a slow/immobile blaster is a dead blaster. Slow resistance also resists -recharge effects, have a few council galaxies land hits on you and see how your recharge plummets. Do you like that? no? then build for some slow resistance.
-
Did you miss the part where I said I PL from time to time? It's literally in what you quoted. I never said anything about nerfing AE, I literally also said that in what you quoted. I'm not going to rehash this. Internet arguments go nowhere, but at least now I have a few more dense people to add to my list.
-
Reviving a classic - time to bring my Fire/Electric into modern times!
Nemu replied to Onlyasandwich's topic in Blaster
You could definitely go that route as long as your can keep stuff inside your control zone. Remember that both powers also have a target cap. I can also make the argument that the time you spend positioning mobs is also time lost killing and time spent taking hits. Range defense is especially important vs scattered mobs and vs adds and the reality is that you won't have the luxury to clump every mob and make use of the TS/FOT chain. My build has almost softcapped range defense and around 40% S/L. The thought is that I can skimp on S/L a little with all the melee range mitigation and that allows me some wiggle room to proc the power that can benefit the most from procs which for me is shocking grasp. Since it's a DoT the extra procs add more bang for the buck compared to other powers that deliver good damage up front already. That said if you want to go all damage and you have sufficient support/skills that enable you to do so, go for it and try it out. If you feel it wanting then there's always the defense route. -
Reviving a classic - time to bring my Fire/Electric into modern times!
Nemu replied to Onlyasandwich's topic in Blaster
You will need it from time to time if you've been attacking a long time without pause. But I use it as another layer of mitigation to drain stuff i.e Weakened Hami during LGTF. You don't need it, but I include it because it's an emergency end recovery tool when you need it, and the set bonuses are decent. I would imagine you'll need it more than me with a proc heavy build. Your build is more offense oriented for sure but 43% global recharge may take some wind from under the sails from those powers you proc and wish to spam, even with the aid of the 2 FF procs. I built mine to be a tank-mage, and part of that magic is being able to get TS and FoT recharge down to where I can reasonably chain them for a couple of cycles, which accords me the ability to face tank a group with a few +4 bosses (and look good doing it) from time to time. Scorp shield has synergy with that game plan to add an additional layer of mitigation on top of the active soft controls, and it's also an opportunity for more global recharge slotting. I'll admit that without scorp shield or a decent amount of s/l defense I'm reluctant to stay in melee, and that kind of goes against the point of taking 2 PBAOE KD powers with the intention to cycle them in the thick of melee no? I'll also admit that even with Scorpion shield and the 2 KD powers I still joust hits, over time you sort of develop a 6th sense of when bosses and other threats are going to retaliate with a big attack and that's when you joust away and let dumb mob AI work to your advantage. And if you do get hit by a big attack as you joust away, you make sure they can't follow up with a second big hit to finish you off. -
Plenty of people have put up their Nerf AE comments in their posts but mine gets quoted and singled out even though mine made no such calls to nerf AE or powerleveling. I'm not responding to any of the other Pro-AE comments that aren't quoting me, because I read the posts and take them into context before I respond. Frankly I detest the responses directed at me because you hide your fear of losing AE for YOUR own enjoyment behind some noble pretense of "this is going to cause other people to suffer." I can just as well use your own argument to me that "you don't know that" on that claim. Whereas I am genuine about my feelings about helping newcomers learn and love this game and AE is one of many tools that I have at my disposal for enablement, I'm not sure if your pro-AE intentions are rooted in the same cause. Whereas I'm calling for everyone to help newcomers in different ways you are just calling to "not touch my AE." No I think your intentions are just selfish, and you just don't want something YOU love taken away. And that's perfectly fine, but don't try to spin it as something that benefits everyone. That argument is weak. If people want to respond to the Nerf AE rants, go respond directly to those, and leave me and my posts out of it.
-
Blaster. Avoid ATs with Mez protection. They teach newcomers nothing about the game. If you want to teach him the various nuances of the game and establish good fundamentals, go blaster. If they are supported/built/played well they can wreck shop and they are exhilarating to play, if they are supported/built/played poorly they die with a look. Experiencing that dichotomy and learning that not everything in this game is derp lol melee ROFLSTOMP with incarnates will make him a better player overall. And he can take those fundamentals and be a better teammate when he playes support ATs as well.
-
I never said anything about nerfing AE/Powerleveling and yet people dive right into this "Don't Nerf AE" rhetoric. Let me put this into simpler language so the "DON'T NERF AE" crowd can understand. You farming for inf, you multiboxing and PLing your own alts or you trading PLs with other farmers - I don't care. I PL too from time to time. I see nothing wrong with that. You inviting some random newbie that just started this game to a farm to fast track them to 50 and thinking that you are being helpful - I have a problem with that thought process. I care more about changing people's mindset about how they can help new players in their COH journey so that it's a memorable one that will keep those newbies coming back. Too often it's just power-leveling. It's not the only path and I don't believe that's the best path. As for the fire farm for influence comment. What about teaching newbies to craft and convert IOs, how to turn merits into inf, etc... How about teaching them craft cheap builds to speed run TFs so they can rack up merits/hami-Os in a short time and turn that into profit, and then use that profit to upgrade/fund alts? Nah that requires too much effort to write and explain stuff to people new to the game right? Much easier to just let them sit on a farm, which they've already sat through for 50 levels, and further solidify in their mind that the only way to make inf or do anything in this game is through farms right? Simple language time: There are other methods than power leveling and farming to enable and help newcomers to the game. You just need to be wiling to put in the effort. Not everyone will listen, but you will be giving those that do listen an option and the ability to choose between farming/PL vs the alternatives. You don't need to defend AE, you don't need to write up elaborate justifications for why we should keep AE. None of that is relevant to what I'm talking about. Is that clear?
-
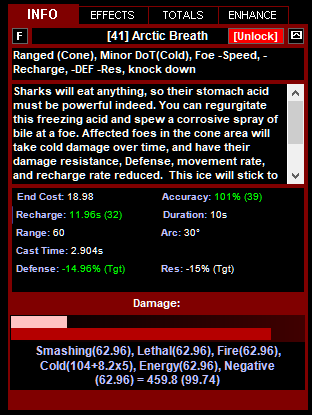
I took spirit shark but it's not used and I don't even bother slotting it, I needed a pre-req to get to arctic breath and I didn't really care whether I picked spirit shark or school of sharks. I'll share my build. It doesn't place high emphasis on extreme levels of survival for the reasons I mentioned but it hits the important marks. This Villain build was built using Mids Reborn 3.2.17 https://github.com/LoadedCamel/MidsReborn Click this DataLink to open the build! Crabby Baney Panda: Level 50 Natural Arachnos Soldier Primary Power Set: Bane Spider Soldier Secondary Power Set: Bane Spider Training Power Pool: Leaping Power Pool: Speed Power Pool: Fighting Power Pool: Leadership Ancillary Pool: Leviathan Mastery Villain Profile: Level 1: Single Shot -- SprSpdBit-Acc/Dmg(A), SprSpdBit-Rchg/Global Toxic(3), SprSpdBit-Acc/Dmg/EndRdx/Rchg(3) Level 1: Bane Spider Armor Upgrade -- UnbGrd-Max HP%(A), ImpArm-ResDam/EndRdx(5), ImpArm-ResDam(5), ImpArm-ResDam/Rchg(7) Level 2: Burst -- Apc-Dmg(A), Apc-Acc/Dmg/Rchg(13), Apc-Acc/Rchg(13), Apc-Dmg/EndRdx(15), Apc-Dam%(15), Apc-Dmg/Rchg(17) Level 4: Combat Jumping -- LucoftheG-Def/Rchg+(A), Ksm-ToHit+(17), WntGif-ResSlow(19) Level 6: Build Up -- GssSynFr--ToHit(A), GssSynFr--ToHit/Rchg(19), GssSynFr--ToHit/Rchg/EndRdx(21), GssSynFr--Rchg/EndRdx(21), GssSynFr--ToHit/EndRdx(23), GssSynFr--Build%(23) Level 8: Hasten -- RechRdx-I(A), RechRdx-I(25) Level 10: Tactical Training: Maneuvers -- LucoftheG-Def/Rchg+(A), ShlWal-Def/EndRdx(25), ShlWal-Def(27), ShlWal-ResDam/Re TP(27) Level 12: Venom Grenade -- Rgn-Dmg(A), Rgn-Acc/Dmg/Rchg(29), Rgn-Acc/Rchg(29), Rgn-Dmg/EndRdx(31), Rgn-Knock%(31), Ann-ResDeb%(31) Level 14: Pulverize -- SprDmnofA-Acc/Dmg(A), SprDmnofA-Acc/Dmg/Rchg(33), SprDmnofA-Dmg/EndRdx/Rchg(33), SprDmnofA-Acc/Dmg/EndRdx/Rchg(33), SprDmnofA-Rchg/DmgFear%(34) Level 16: Kick -- Empty(A) Level 18: Frag Grenade -- SprFrzBls-Acc/Dmg(A), SprFrzBls-Dmg/EndRdx(34), SprFrzBls-Acc/Dmg/EndRdx(34), Bmbdmt-+FireDmg(36), OvrFrc-Dam/KB(36), FrcFdb-Rechg%(36) Level 20: Tactical Training: Leadership -- HO:Cyto(A) Level 22: Mental Training -- Run-I(A) Level 24: Cloaking Device -- LucoftheG-Def/Rchg+(A), LucoftheG-Def/EndRdx(37), LucoftheG-Def(37), LucoftheG-Def/EndRdx/Rchg(48) Level 26: Shatter -- Hct-Dmg(A), Hct-Acc/Dmg/Rchg(37), Hct-Acc/Rchg(39), Hct-Dmg/EndRdx(39), Hct-Dam%(39), FrcFdb-Rechg%(40) Level 28: Tough -- HO:Ribo(A), StdPrt-ResDam/Def+(40), StdPrt-ResKB(40) Level 30: Weave -- LucoftheG-Def/Rchg+(A), Rct-Def(42), Rct-Def/EndRdx(42), Rct-ResDam%(42) Level 32: Crowd Control -- SprAvl-Acc/Dmg(A), SprAvl-Dmg/EndRdx(43), SprAvl-Acc/Dmg/EndRdx(43), Arm-Dam%(43), FuroftheG-ResDeb%(45), FrcFdb-Rechg%(45) Level 35: Maneuvers -- LucoftheG-Def/Rchg+(A), LucoftheG-Def/EndRdx(45), LucoftheG-Def/EndRdx/Rchg(46), LucoftheG-Def(46) Level 38: Spirit Shark -- Empty(A) Level 41: Arctic Breath -- ShlBrk-%Dam(A), PstBls-Dam%(46), Bmbdmt-+FireDmg(47), ImpSwf-Dam%(47), IceMisTrmt-+ColdDmg(47), TchofLadG-%Dam(48) Level 44: Surveillance -- AnlWkn-Acc/Rchg/EndRdx(A), AchHee-ResDeb%(48) Level 47: Combat Training: Offensive -- Acc-I(A) Level 49: Wolf Spider Armor -- GldArm-3defTpProc(A) Level 1: Conditioning | Hidden Level 1: Brawl -- Empty(A) Level 1: Sprint -- UnbLea-Stlth(A) Level 2: Rest -- Empty(A) Level 1: Swift -- Empty(A) Level 1: Hurdle -- Empty(A) Level 1: Health -- Pnc-Heal/+End(A), Mrc-Rcvry+(7), Prv-Absorb%(9), NmnCnv-Regen/Rcvry+(9) Level 1: Stamina -- PrfShf-End%(A), PwrTrns-EndMod(11), PwrTrns-+Heal(11) Level 50: Musculature Radial Paragon Level 50: Born In Battle Level 50: High Pain Threshold Level 50: Invader Level 50: Marshal ------------ ------------ | Copy & Paste this data into Mids Reborn : Hero Designer to view the build | |-------------------------------------------------------------------| |MxDz;1488;731;1462;HEX;| |78DA65944B4F135114C7EF7466280C1428E5512808949616DA4E0B115DF94004132| |8A60682C64D73A1039DA469EBB41AFB01FC06463451578ABA51164A30BAF103B0F1| |1BB872C52331317161EAE99C736DD159F4D773EEB9F7FCCFB98FE5FB57DB3637172| |E33A9772EC74BA5F4ACC537B2F94229BD52C8654CC3725EE7E5BB16CFC98CB1AE39| |8BAFAF5746AEF0BC511949F17C863BC11DFC774E49AF45A4578A66C6B08433B86A7| |1336FE6B7D2D77866CB289F0E1283AC2D5528E4F4A4C18B6069B6B152348C8CCBFE| |BB606E65CB30D021A2606E296B167DF34573435F9B9F5D4D278D7B262F67793EBDC| |C4B65C3AA78416280D127D9BF5507CB298C4D29CC71875844BE6DAD07C9EC976C3B| |95007842C030B2298874FC8D6555558A3AECE0369D1847B6278853C8CE18B2175A2| |70B39728F8483BFC11C5258970F33D7D4A898A3AAAA2F7066D74B64F70EF115ADF8| |9AF806E9870C4ECA20392380A916E6257E84A55B44A12D94DEBB20DB83038BC4259| |4D10451AD14ACB64EE3F283678933C833E788E789DF71723BCC72495883E27A88CE| |9147C46DE263E4E813A403B477506B5947153E563B6A6ED10BF77BDCAFD10FC43DE| |49843457EC375C61EA0984F50AE872A609E198022B3CFE0EC11CE9E18B323DF81B3| |4F34A68F1A13E8247623E31E644D623FD5A6F68F63AE4018393E419C24469021D22| |443453E71027C175153A8961B4E40C88B54206848C81922391347B83F13C7C41F58| |AD1BA286859CE1A7D892C967C4E7C40B983E7A092745498E1B32F945263F658A52E| |1312A38460DA8250E8AFD09DAFBB3EB622C2C0E49B849B6E5C7F6B1AB3AED8BBE83| |65E9ED68C70F30F92E743D42CAA5C85774C6BF003D0ADB87415DEC933E802BEE813| |3219C8969AC6549A95FDFEAA0226E3D44305B63F2944BC63429A57E8D9964C71D6A| |F57568EAD1FFAE63ADF1B118A5BBB2888F43F321DACD6BD8B113ADF1F9D9C6D4DA0| |9EE89F61399F40084FE1B5A8371B3D1B8D568DC6E34FE0011B0E481| |-------------------------------------------------------------------|
-
You interpret my comment of "stop enabling" as "remove AE" Not the same. People's choices and their actions have consequences and that's what's driving people away. AE is a tool like any other. Bridges existed long before AE and the removal of AE isn't going to stop people from PLing. People may think they have good intentions inviting a newbie to their fire farm to sit all the way to 50 and incarnates. Their intention might be good, but choices and actions have consequences. I'm not asking to remove AE, I'm talking about a need to change the mindset in how to best enable new comers to encourage retention. A community is good only if there is a community, and these enablers (let me spell it out for you "I want my freedom" fighters, enablers are people) are achieving the opposite of what they hope to accomplish through their current methods.
-
It's as much about retention as it is recruitment. Unpopular opinion but stop enabling newcomers to shortcut the game straight to 50. Sitting in a fire farm with 2xp doesn't give these players any appreciation of the game and when they hit 50 incarnates trivialize the game and they think that's all there is to it. Skipping to 50 in 2 hours doesn't give you anytime to create bonds with the characters you make and that's a powerful emotion that draws people back. At that point there's nothing that makes this game sticky because in their mind COH is about fire farming and wrecking everything endgame with incarnates. Wouldn't you move on if that's all you think this game offers? There are good kinds of enablement and bad kinds of enablement in this regard. Giving newcomers influence so they can get a head start on their COH journey is good. Giving them advice on how to play/build/make inf is good. But carrying them straight to 50 and beyond and depriving them of the real game experience is terrible. I know people think they are being helpful doing this and this is what constitutes a good community in their opinion but choices have consequences. And I believe we are reaping what we sow right now. This may or may not be the biggest culprit that contributes to the declining population but I believe it is an important one that should be recognized.
- 487 replies
-
- 31
-

-

-

-

-

-
I initially went down the route of investing heavily into the cones from Leviathan with more conventional slotting via artillery and other sets to shore up AoE. It was more AoE for sure but slow as heck as you noted. With the introduction of the Ice Mistral set I revisited my bane and respecced it to only use Arctic Breath as a proc monster and that's working out significantly better. Kill speed matters and Quality > Quantity. I want to re-emphasize that the lack of AoE burst is the biggest weakness for Banes. No DDR, no reliable AoE soft control, no heal or click temporary god modes, and a heavy single target focus makes it weak against large packs of enemies with debuffs. And you can't overcome that weakness by sacrificing slots to build for more defense and more resists when you are going up against the likes of vanguard/rularuu/resistance that can strip all of that away in a few seconds. Kill speed matters, and killing stuff fast has side benefits such as mob fear AI and too few build makers recognize these subtle in game mechanics and instead push for that 45% def/75% resist build goal like it's the holy grail. Likewise going thematic with mace mastery isn't the best choice if performance is a priority. I know there are people that want that thematic match and that's fine, that's a conscious decision they make and I hope they recognize the pros and cons of going that direction. But if they recognize the weakness with Banes and they want to patch it up, ditch shatter armor and take Arctic Breath.
-
If the rest of my rotation are enhanced like that I agree, but they are not. This is a power with base 32 second recharge which recharges in about 9-11 seconds pending FF procs in my build, and it consumes 19 end. It's also a mid-late game pick where you are either at a point where you are able to slot the recovery procs and such into health/stamina to shore up your end management, or you have incarnates that can eliminate any endurance woes period. My point is that AoE alpha strike capabilities will make Banes more well rounded and this is the best option from a performance perspective. There's nothing that compares to arctic breath and this power alone elevates your AoE volley from pew pew status to a mini-nuke that you can use every fight. Take this, completely proc it out, and watch your AoE go from "can't even kill minions" to actually meaningful with stuff falling over DED. AND you still get the benefit of some incidental -def and -res debuffs on those that do survive.
-
The problem with Banes in my experience is that they are not suited for a war of attrition against large packs of moderately difficult enemies that bring debuffs to the table. Whereas some of my blasters can nuke the spawn and trigger mob fear AI, end the fight quicker and survive, Banes do not have that luxury of killing stuff en-mass quickly and that becomes their undoing when fodder are allowed to live to stack up cascading debuffs. Sometimes the best defense is overwhelming offense, but even with the grenade attacks, a Bane's overall AoE alpha strike capability is still lacking. I see a lot of banes taking the thematic approach for mace mastery for a -20% res single target attack, emphasis SINGLE TARGET. It doesn't really patch the AoE weakness. There's a lot to unpack here. This is the complete package - AoE mitigation, damage, debuff all rolled into one. If you want combat effectiveness this is a far superior choice to shatter armor because it helps thin out the fodder that if left unchecked, can stack debuffs on you that leads to cascade failure. If you built your bane halfway decently, you are not in need of yet another single target attack even if it carries a 20% -res. Thanks for attending my TED talk.