Nemu
-
Posts
1424 -
Joined
-
Last visited
-
Days Won
3
Content Type
Profiles
Forums
Events
Store
Articles
Patch Notes
Everything posted by Nemu
-
issue 27 Focused Feedback: Symphony Control
Nemu replied to The Curator's topic in [Open Beta] Focused Feedback
Is it me or does the power preview not play sound at character creation? Am I missing something? I usually don't play with sound on so never noticed this until now. -
Help me find my Forever Scrapper Contest (part 1a of 4, Scrapper Primaries)!
Nemu replied to Yomo Kimyata's topic in Scrapper
That’s what “they” want you to think! -
issue 27 Focused Feedback: Enemy Aggro Revamp
Nemu replied to The Curator's topic in [Open Beta] Focused Feedback
I'd be interested in understanding how this all works and how I can consistently pull off single pulls with this knowledge. I get the rank, distance, and damage done portion and how that impacts aggro, but I'd like to understand how adjacent enemy notifications work. I can definitely see this mechanic being expanded upon where certain factions have a larger notification radius and magnitude vs others. Make difficulty hard enough and you introduce yet another dynamic in how teams handle such encounters. -
issue 27 Focused Feedback: Symphony Control
Nemu replied to The Curator's topic in [Open Beta] Focused Feedback
You are most likely not just Savage leaping and then hopping out. You are more likely to savage leap/rending flurry and get any other opportunistic melee attacks off before moving out. The cumulative cast time on these powers matter, as your pet will have started to move into the mob as you are getting your attacks off. And by the time you port out the pet may not be in the best position to maximize it's targets with any cones it's about to fire. I think the fear can be turned into either a PBAoE or a TAOE, since that's a power with moderate recharge that's more likely to be spammed mid combat. I'd prefer that the mass immob be a TAoE due to reasons I mentioned in my last post. The sleep and the stun can stay cones since they are more likely to be used as openers. -
issue 27 Focused Feedback: Symphony Control
Nemu replied to The Curator's topic in [Open Beta] Focused Feedback
Reverberant doesn't allow dominator/controller ATO slotting, even though it takes all the respective Mez IOs. Is this by design? It would seem that if the design for this pet is to emulate our controls then we would get more bang for the buck by slotting it with ATOs which enhance all mez attributes rather than trying to frankenslot it for each mez type. The pet and cone heavy nature of the set mandates a ranged only play style if you want to position the pet to maximize its coverage. This puts a pretty tight restriction on how you want to optimally build any Symphony control character. I can certainly weave in and out of combat to use my various powers, but the fact that I can't really control when the pet fires it's powers, what it targets, or where it moves to makes a lot harder to play with that kind of fluidity. Unless I just ignore the pet altogether, but that's kind of the draw with this set isn't it? -
issue 27 Focused Feedback: Symphony Control
Nemu replied to The Curator's topic in [Open Beta] Focused Feedback
Focusing on power names: Confounding chant could be changed to Jarring Tritone. Confounding aligns more with confusion by definition and this power stuns. Traditionally tritones were considered very dissonant and unpleasant. One could draw a correlation that it has a stunning effect back in the days when people heard it. Even today most emergency vehicle sirens use tritones to alert people. If I read impassioned serenade I'd think it's a buff or something. Entrancing Serenade should align more with the confuse and "getting stuff to fight for you" nature of the power. Chords of despair sounds so... negative, how about Captivating Encore? Captivating aligns a bit more with the idea that the power holds, chords of despair makes me think it's more fear related. On the powers themselves: I guess the density of cones in the set belies the thought that like sonic blast, the sounds is coming from one place like a person's mouth. A whole orchestral ensemble is bit larger. If you allow your interpretation to be a bit looser (like you are able to conjure sounds instead of blasting them out of your mouth), then it doesn't need to be so cone heavy. Especially the AoE immob. There are enough secondaries that are melee heavy and a cone immob means you need to reposition mid combat and that time spent repositioning + cast time + mobs chasing you since you moved means mobs are never rooted where you wanted them to be. I'm not a stickler for formulaic powerset design but this is one power that I'd prefer to stay as a targetted AoE across all control sets. Likewise if that looser interpretation sticks then where are some opportunities to use drop patches for some powers as well. A Symphony is performed on a set stage right? -
issue 27 Focused Feedback: Sonic Assault
Nemu replied to The Curator's topic in [Open Beta] Focused Feedback
This is all the reason I need to make a sonic assault character. I just need a 64 chevy impala costume so I can roll around paragon blasting let me ride. -
issue 27 Focused Feedback: City Zone Adjustments
Nemu replied to The Curator's topic in [Open Beta] Focused Feedback
Well played! Very diplomatic that this applied to the Mercy AE, since no one plays villain side 😆@Troo has to resort to paying people with panda peepshows to get people to create new alts redside. Troo story. -
issue 27 Focused Feedback: Attack Typing Adjustments
Nemu replied to The Curator's topic in [Open Beta] Focused Feedback
I've been preaching about having S/L/Range defense on squishies, with an emphasis on range defense, for a long time. A lot of people that post competent builds on blaster forums underestimate or totally ignore the value of movement, soft/hard controls, and using positioning to your advantage in their build analysis and breakdown (if they give one at all). These tools have a lot of value and apply to all builds, even melee centric ones. This change will not impact builds that invested in S/L/Range def and use the aforementioned tools all that much. I have builds that run softcap range def + high but not softcap S/L that do just fine even when mixing it up in melee range. The people that strictly rely on S/L def and consider standing in one spot and trading blows like tanks the way to play squishies will have a tougher time adjusting though. People that already eschew melee and build for range defense anyway won't be affected by this change and I can definitely see more people unwilling or unable to put a little more work into their playstyle (not judging, some playstyles can be pretty taxing) shifting to the pure range strategy. I'd like to think that the performance you get out of your builds 20% the build, 80% is directly proportional to the amount of effort you invest in playing it. -
If you could make a new Enhancement type, what would it be?
Nemu replied to Draeth Darkstar's topic in General Discussion
Increase Duration. Imagine longer lasting tornadoes, bonfires, rains, etc… For extra build spice design those sets with low recharge enhancement values. (Recharge set bonus at 5-6 slot is ok though.) ”do you want to recycle your powers quicker or make them last longer?” -
It's good for 5% range defense and 10% global recharge (the whole contagious confusion set). That's all the reason I need to take it on builds where those are applicable. You won't get better bang for your buck on those set bonus numbers anywhere else except for the superior blasters wrath set.
-
I’ll answer both your questions. 1 - My build is more offensively oriented. It’s not really a glass cannon but it doesn’t have as much resists as some other builds posted. I recommend it, but people that think they need both softcap defense and hardcap resists to play an already sturdy AT will want to look elsewhere. 2 - Attack vitals is the gold standard for average builds. As you push towards the upper levels of budget and performance you skip the combos altogether and use blinding feint->ablating strike->sweeping strike for higher damage potential. This is much easier to achieve with defense armor sets. My build achieves it, vengeful slice in that build is is just a set mule for 10% global recharge and 15% global acc. It is not even on my power tray. You can absolutely play with combos if you find the mechanic fun. You won’t be gimp for using them and you’ll still be able to defeat stuff.
-
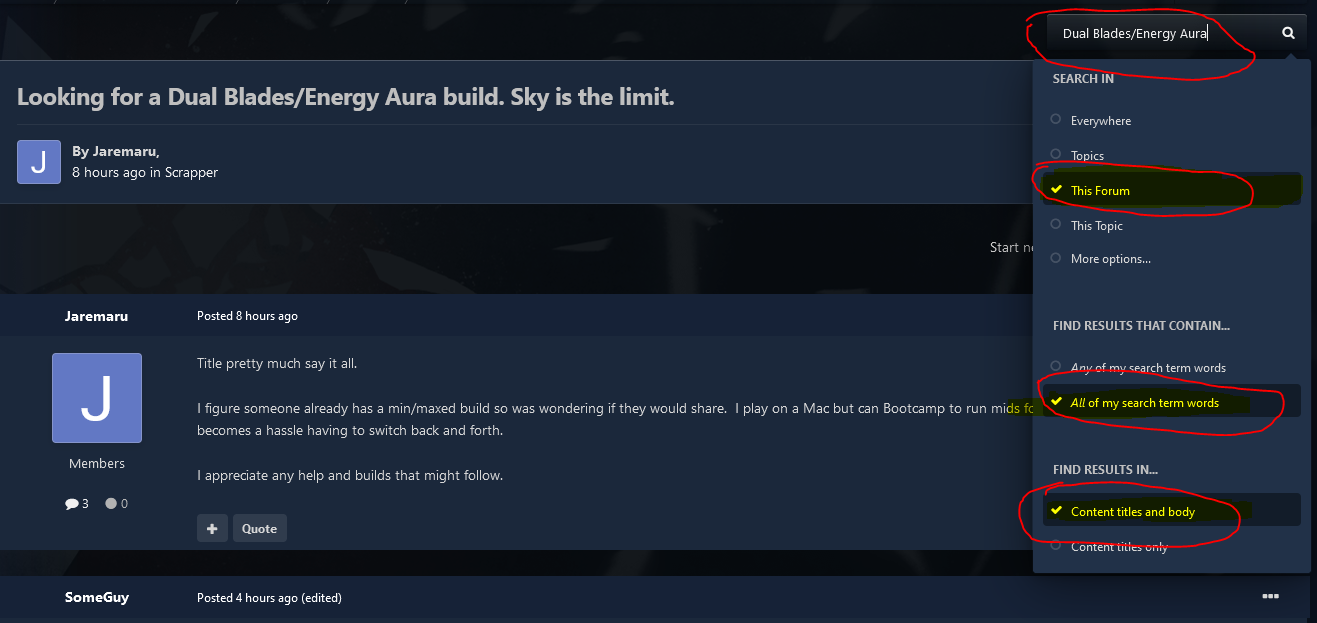
There are a few posts about this combo. Here's how to search for them: This is one of the first hits on the results page. It's still quite relevant.

-
My Forever Scrapper Contest (part 1b of 4, Scrapper Secondaries)!
Nemu replied to Yomo Kimyata's topic in Scrapper
I'll lobby for Ninjitsu. It's a lot better than the stalker version but it's always overshadowed by the obvious candidates. The +end power is truly unique and this set offers you a way to tank LGTF Hami/Mitos through both the -heal and -recovery debuffs without any outside buffs. Defense based builds are easier to build for if you intend to solo +3/8. The low DDR isn't an issue with intelligent play and I know you are fond of active mitigation. It's active, keeps you on your toes, but you do feel like a ninja with your kit. The click mez protection doesn't fit your criteria but I think you'll be able to work with it. The other perceived drawback is the lack of a taunt aura. I never found runners to be that annoying, and having a taunt aura doesn't prevent them from running away in the first place, only how soon they run back to you, so I don't really see it as a big problem. Now imagine pairing it with battle axe. A viking ninja??? A VIKING NINJA!!! The census done in march 2019 shows this combo as a real unicorn, I don't know how many people have tried and stuck with this combo since then but this is a very fun build with a strong immersive theme if you like that sort of thing. @Nemu -
Help me find my Forever Scrapper Contest (part 1a of 4, Scrapper Primaries)!
Nemu replied to Yomo Kimyata's topic in Scrapper
Since this part is only about primaries, I’ll lobby for battle axe. Reasons: - I know that you know that I know that you like unicorns. That is Battle Axe - It’s ripe with FF proc potential and mitigation (the fun and visceral kind) - It feels crunchy - Vikings! Too bad about Kinetic melee, you could make a truly unique hover blasting scrapper with it. @Nemu -
You provided justification for not taking the shields, but you haven’t answered my questions. Understanding what you want to do with the build is the foundation of creating a build that works for you. It helps define expectations and sets a framework for the build. Some other posters will just throw a build at you without telling you how or why. I prefer to teach you to be a better builder. Hence the questions.
-
Looks like a solo build since you skipped the shields. What do you mean by "all rounder?" Goals and objectives with the build? Milestones that you would like to hit?
-
I just wanted to chime in and say that Voltak and that build turned right on a LEFT Turns only ITF, which invalidates everything he posts here. I turned right too...
-
Brainstorm. Why more people don't play there is beyond me. I have characters there more than 2 years old so it's not like they are wiping the servers regularly and even if they did so what? 5 min in character creation and you got you level 50 IOed to the gills character back with minimal effort. Things like economy, toils of leveling, all those pains that people ascribe on the live server go away on brainstorm. Go there.
-
I have a rad/fire brute on my second account. I use it to powerlevel my lowbies on my primary account from time to time. The brute is designed with a singular purpose - fire farms. It never leaves AE, it doesn't do TFs or join normal teams because it doesn't have knockback protection or even plasma shield. Despite those build choices it does fire farms exceptionally well, so much so that I never considered another build on another AT to do the same thing, whether it's another fire farm or a S/L farm. Why is the rad/fire brute the superior choice for fire farms? - 90% fire resist cap that is very easy to achieve through power picks alone. - 2 AoE damage auras that provides free damage while you are activating other attacks, both can take -res procs that further decrease enemy resistance every once in a while - 4 AoE click attacks that you can chain with high enough recharge so that you never have to use single target fillers - Taunt aura, to keep the runners in check, somewhat, and electric fences from patron. - Higher HP, combined with 90% fire resist and 45% fire defense allows you to afk farm if you have enough passive regen. clicking a heal or popping defensive inspirations and such all mean loss of damage. either you are wasting time not doing it or you are not using inspirations to increase your damage. I build my other toons on my primary account to handle regular content. None of them are specced for farms although some of them can do some farming just because my builds organically allows them to do such content. Conversely if I took my rad/fire brute on an +4/8 ITF or up against arachnos it would not fare as well, because the build doesn't incorporate tools to deal with mez/debuffs/damage types that type of content brings. Some builds are better at doing one thing than others. That said you can try to build every single one of your toons around farms with varying degrees of efficacy. If that's your thing go for it.
-
Ok, so it is used for fire farms, back onto the original track then. It's not about the quantities of AoEs, it's about the quantities of AoEs with decently short recharge that you can string together for a seamless AoE Chain and that's why dark consumption and soul drain don't add consistent damage to your output as opposed to just getting more recharge for ball lightning and short circuit to cycle faster. In addition, cast time and base damage matters, we'll get to that in a bit. The +recharge route helps you cycle BL and SC faster, compare that to your SD/DC chain, you can pull that full chain with BL/SC/SD/DC off every 100 seconds since DC is on a 100 second timer, otherwise you can pull off BL/SC/SD every 30 seconds. in between those cycles you are left with BL/SC + potentially 2 fillers, whereas a more recharge focused build can work consistently with BL/SC + 1 filler - repeat, those additional BL/SC casts add up over time, and since they both do higher base damage than SD/DC, they would far outpace the damage that SD and DC contribute when you look at your overall damage output over time. Since soul drain has lower base damage and long cast time than ball lightning I don't even see a BL/SC/SD sequence outdamaging a BL/SC/zapp or lightning bolt/BL sequence. Add the cast time up for BL/SC/SD: 1.3+3.2+2.5 = 7 seconds. BL/SC/zapp (fast snipe)/BL = 1.3+3.2+1.3+1.3 = 7.1 seconds. Discounting snipes single damage, your total AoE damage unbuffed would be 169+188+84 = 441 for your first chain with SD and 169+188+169 = 526 aoe damage for the 4 attack chain, and the snipe adds another 760 single target damage. All at the cost of an additional 0.1 seconds. The numbers are all there in mids. If you apply those values to the damage cap, the difference is amplified even more.
-
You should know that my feedback references your build which I interpreted as a strict fire farm build. But since you've now indicated this is not meant to be a fire farm build, Time for more why's Why is fire def/res important for a non-farming build? S/L is much more prevalent damage type outside of fire farms. So why, for a non-farming build are you choosing to emphasize this investment into 75% fire resist and 45% fire defense? Especially the second build where you dedicated a lot of your resources into hitting 75% fire resist. Why do you think adding two powers, one with a 100 second recharge at best with moderate recharge bonuses + hasten (dark consumption) and another with 30ish second recharge (sould drain), helps your AoE rotation? With high enough global recharge + hasten + ageless you can get the recharge of both short circuit and ball lightning under 6 seconds, it takes a combined 4.5 seconds to cast both which gives you room for 1 filler attack before those are ready to go again. With your slotting which guts global recharge you now have to use 2 fillers (especially if siphon speed misses), but at least you have 2 AoEs, both of which do less base damage than either ball lightning or short circuit, every 30 - 100 seconds that you can throw into your chain. The trade off doesn't seem worth it to me. Why do you need the +dam from soul drain when you can already cap that with FS? Have you looked at the amount of time required for such setup? FS takes about 2.4 seconds which can seem like a lifetime, soul drain takes about 2.5 seconds, you'd be lucky if you can get one off on a fast moving team before stuff starts to die and the FS buff whiffs due to corpse blasting. And if you can reliably keep yourself and the team at the damage cap through FS, the only benefit of Soul Drain is the to hit soooo Why do you need the +to hit from soul drain going the route you went when you can instead build for more recharge and pick up +acc bonuses along the way? More recharge bonuses mean that you are not as dependent on siphon speed to keep your powers recharging faster and that's one less click that you NEED to spam, which makes room for more attacks you can fit in between your other buffs/debuffs. Also, missing with siphon speed won't feel as bad since you will still have a higher global recharge baseline. You also need to hit with soul drain, so a typical engagement when you start is not to start with FS but soul drain first, and then you need to be mindful to keep it up along with all your other buffs. +Acc Bonuses ALWAYS work, and like I said, has synergy with +rech bonuses since most purple sets have both that you can pick up organically. Also, if this is meant to be a non-farm build, a popular destiny for squishies without mez protection is clarion. If you take that you gut your recharge even further which means you are even more dependent on siphon speed, and that you will also need to monitor your end consumption and fit transference into your rotation. You can certainly stick to ageless, but then be prepared to pack a lot of breakfrees.
-
Let's take some more time understanding the Why's Why do you need more AoEs for a fire farming build? Rad/Fire brutes take electrical mastery for electric fences and ball lightning to create a gapless AoE attack chain because both Electric Fences and Ball lightning can be slotted to reduce their respective recharge down to sub 10 seconds. Can you do the same with soul drain and dark consumption and create a gapless attack chain with those two + ball lightning and short circuit? Why do people take fire armor for fire farm builds? Fire armor gives you a higher fire resist starting point so you don't have to make extraordinary investments in your IO bonuses towards fire resist, which allows you to dedicate slots to other bonuses, primarily recharge. Why is recharge desirable for a fire farm build? Recharge allows for quicker cycle of attacks and contributes to the ability to form a seamless attack chain. Incidentally most purple sets that provide recharge at the 5th slot also give a substantial Acc bonus at the 4th slot, which helps with hit chance against +3/4s It's impressive that you squeezed out 75% fire resist on that build, but don't miss the forest for the trees, understand the why's.
-
Battle maiden, dreck, and the unai demon farm existed long before AE. People will just move to those. PL is a tool just as any other tool. Anyone can use it, from seasoned vets that know how to plan builds and play anything with supreme competence to complete noobs that think all COX has to offer is fire farms and 6 slot purples in every power because they think that's what "maxxed out" means. I prefer the latter group use other tools to advance their understanding of the game but they can do whatever they want to do and I can't stop them. If they want to fire farm 24/7 and suck that's their right. I won't lose sleep over it because 1) that's what the star rating system is for and 2) I know I can carry their asses with all my builds.
-
Even for a fire farm build the only numbers you've successfully hit are the def/res numbers. Assuming incarnate level shift you are fighting +3s and some of your powers have less than 95% chance to hit. Go to mids->Options->configuration->Exemping and base values and set your base to hit to 39 to simulate your to hit against +4s. You can find the to hit value for +3s here: https://cityofheroes.fandom.com/wiki/Attack_Mechanics The point of a kin on a fire farm is to ensure the team can stay at damage cap. There are 3 points to this: 1) cycling FS faster helps ensure that the team can stay at damage cap. 2) assault gives a lot less bang for the buck when you have FS. 3) The mob siphon/stacking portion of FS is also not autohit and it will suffer the same pitfall as your siphon speed which in your build only has a 75% chance to hit against +4s. The below thread discusses the mechanics in the second post. When facing the easiest content in the game that doesn't carry any debuffs/mez, anything more than 45% defense and 75% resist is wasted bonuses, and you went over on both. With some rebuilding you can end up with much higher global ACC and global recharge. Since endurance is a non-issue with ageless, you also don't need the extra recovery slots in health and stamina. The challenge with a fire farm build is that it almost requires you to use as many full winter sets in attacks as possible to get to 45/75 which limits your ability to use procs, otherwise you can find a lot more opportunities for damage procs which can help you surpass the damage cap. This Villain build was built using Mids Reborn 3.2.17 https://github.com/LoadedCamel/MidsReborn Click this DataLink to open the build! Electrix Zazz: Level 50 Magic Corruptor Primary Power Set: Electrical Blast Secondary Power Set: Kinetics Power Pool: Leaping Power Pool: Speed Power Pool: Leadership Power Pool: Fighting Ancillary Pool: Flame Mastery Villain Profile: Level 1: Lightning Bolt -- SprWntBit-Acc/Dmg(A), SprWntBit-Dmg/Rchg(3), SprWntBit-Acc/Dmg/EndRdx(3), SprWntBit-Acc/Dmg/Rchg(5), SprWntBit-Dmg/EndRdx/Acc/Rchg(5), SprWntBit-Rchg/SlowProc(7) Level 1: Transfusion -- Pnc-Heal/EndRedux(A), Pnc-Heal/Rchg(7), Pnc-Heal/EndRedux/Rchg(9), Pnc-Heal(9), Pnc-EndRdx/Rchg(11), Acc-I(11) Level 2: Ball Lightning -- Rgn-Dmg(A), Rgn-Acc/Dmg/Rchg(13), Rgn-Acc/Rchg(15), Rgn-Dmg/EndRdx(15), Rgn-Knock%(17), Ann-ResDeb%(17) Level 4: Combat Jumping -- LucoftheG-Def/Rchg+(A), Ksm-ToHit+(19), ShlWal-ResDam/Re TP(19) Level 6: Charged Bolts -- SprScrBls-Acc/Dmg(A), SprScrBls-Dmg/Rchg(21), SprScrBls-Acc/Dmg/Rchg(21) Level 8: Short Circuit -- FuroftheG-ResDeb%(A), FuroftheG-Acc/Dmg/End/Rech(23), SprScrBls-Dmg/EndRdx/Rchg(23), SprScrBls-Acc/Dmg/EndRdx/Rchg(25), SprScrBls-Rchg/+End(25), Arm-Dam%(27) Level 10: Siphon Speed -- Acc-I(A) Level 12: Charge Up -- GssSynFr--Build%(A) Level 14: Hasten -- RechRdx-I(A), RechRdx-I(27) Level 16: Increase Density -- GldArm-3defTpProc(A) Level 18: Maneuvers -- LucoftheG-Def/Rchg+(A), Rct-Def(29), Rct-Def/EndRdx(29), Rct-ResDam%(31), Rct-Def/EndRdx/Rchg(31) Level 20: Speed Boost -- WntGif-RunSpd/Jump/Fly/Rng/EndRdx(A), WntGif-ResSlow(31) Level 22: Kick -- SprBlsCol-Acc/Dmg(A), SprBlsCol-Dmg/EndRdx(33), SprBlsCol-Acc/Dmg/EndRdx(33), SprBlsCol-Acc/Dmg/Rchg(33), SprBlsCol-Dmg/EndRdx/Acc/Rchg(34), SprBlsCol-Rchg/HoldProc(34) Level 24: Tough -- UnbGrd-Max HP%(A) Level 26: Voltaic Sentinel -- BldMnd-Acc/EndRdx(A), BldMnd-Acc/Dmg(34), BldMnd-Dmg/EndRdx(36), BldMnd-Acc/Dmg/EndRdx(36), BldMnd-Dmg(36) Level 28: Zapp -- SprMlcoft-Acc/Dmg(A), SprMlcoft-Dmg/Rchg(37), SprMlcoft-Acc/Dmg/Rchg(37), SprMlcoft-Dmg/EndRdx/Rchg(37), SprMlcoft-Acc/Dmg/EndRdx/Rchg(39), SprMlcoft-Rchg/Dmg%(39) Level 30: Weave -- LucoftheG-Def/Rchg+(A), Rct-Def(39), Rct-Def/EndRdx(40), Rct-Def/Rchg(40), Rct-Def/EndRdx/Rchg(40) Level 32: Thunderous Blast -- SprFrzBls-Acc/Dmg(A), SprFrzBls-Dmg/EndRdx(42), SprFrzBls-Acc/Dmg/EndRdx(42), SprFrzBls-Acc/Dmg/Rchg(42), SprFrzBls-Dmg/EndRdx/Acc/Rchg(43), SprFrzBls-Rchg/ImmobProc(43) Level 35: Transference -- SynSck-Dam/Rech/Acc(A), SynSck-Dam/Acc/End(43), SynSck-EndMod/Rech(45), SynSck-EndMod/+RunSpeed(45), SynSck-EndMod(45) Level 38: Fulcrum Shift -- Acc-I(A), RechRdx-I(46) Level 41: Consume -- SprAvl-Acc/Dmg(A), SprAvl-Dmg/EndRdx(46), SprAvl-Acc/Dmg/EndRdx(46), SprAvl-Acc/Dmg/Rchg(48), SprAvl-Acc/Dmg/EndRdx/Rchg(48), SprAvl-Rchg/KDProc(48) Level 44: Fire Shield -- UnbGrd-ResDam(A), StdPrt-ResDam/Def+(50), UnbGrd-ResDam/EndRdx(50) Level 47: Tactics -- HO:Cyto(A) Level 49: Vengeance -- LucoftheG-Def/Rchg+(A) Level 1: Scourge Level 1: Brawl -- Empty(A) Level 1: Sprint -- Empty(A) Level 2: Rest -- Empty(A) Level 1: Swift -- Run-I(A) Level 1: Hurdle -- Jump-I(A) Level 1: Health -- Pnc-Heal/+End(A), Prv-Absorb%(13) Level 1: Stamina -- PrfShf-End%(A), PwrTrns-+Heal(50) Level 1: Shocked Level 49: Quick Form Level 50: Musculature Radial Paragon Level 50: Ion Radial Final Judgement Level 50: Diamagnetic Core Flawless Interface Level 50: Talons of Vengeance Radial Superior Ally Level 50: Ageless Core Epiphany Level 50: Assault Core Embodiment Level 50: Born In Battle Level 50: High Pain Threshold Level 50: Invader Level 50: Marshal ------------ | Copy & Paste this data into Mids Reborn : Hero Designer to view the build | |-------------------------------------------------------------------| |MxDz;1549;725;1450;HEX;| |78DA6594EB4F526118C0DF170E92081101A25C54481125485CD6A72ED3746BE866F| |5A1E6177606073C1B0903DCCCBFA2EBFCD2F59B9676D9BA6EFD096DD6EA7F683391| |EE5B1FDCE9E13CCF1BC77536F8EDB95FCEFB9E99A533F67C7EEA34E3CE89A25CAD6| |6264A95CA62B956AA5866E4829A3533C61C9345255BABA84B7D73F2F2B21534E17F| |5E99F3F24241C925C9252B1733E390A7E66B798C2FE6F3C9B4BAA0D4D46C95D9674| |BA562725A91CBEA42C1A60B17CA8A92730A7D4EA954E7D5B24397A7D4C27C0D1C7D| |9365359B6CE6CC4C15E5CB4A66066A28952B5DD04C1C7E5E13FC71D67C340B5B951| |84B49CCB4467C88941E11D7916D1BC877DC181C34A3B107B9AF97D887B485887EA6| |B3132A73CE31988F9A74A5FD2872FF18F118F2C071E2674CD209CB34536593D9CB7| |5E5C15D1043C0343A7920C6229C2CFDD8B367801845FAC0C92ADAB09EA2F4278983| |E8D415230E21FD27B09D4D886BC71568AC5D1FAC9D7581AD836159D6B1869E1168D| |841BD70471C3DFDC4F7607092913947B1B60B225CA4945C346270078DC106B2E707| |F13BF203B8B94519B79F8C01A409327AC5EBF25EC551FAAE11AF136F20C33789B79| |06608F689A97C7F30630086EBC613A049DDDBF862C35BC8435F88756203D90D4101| |D146601D33F56F101F139F20A34F89CF9012B411125B09D156A2B49541DACAE0372| |26D2508157B45C5DEE738D0D00BE24BE22BE4F06BE21BE447088C8819237532EE20| |0F6F131BC42DE427F01FE07830F8001D8C441C17D036CC588CE9674EB3C46E6344E| |20EF12EF2C83DE27DE203A41582E3E250C77FE280291FD74F7EEA17CA6ED852521C| |A8E4184032330F2847C41B1CA1D59D95F42B9C6B2AB5A0C4C4A335654D63D3FFAB6| |62571E941C57555DDD6FA103096C03177F62863A86C18949C85B15D7B1DF9758F71| |056F4EEA37DDBDB8A1D3F4706B166DDA0D0E42F07B40A01CDA5BA365B7DF6059315| |A562306E19CCDE076D1285C320A7346E12F1AABEE3C| |-------------------------------------------------------------------| Plenty of people hear 45% def and 75% resist preached and that's all they understand. Understanding why you do what you do will go a long way towards making better builds.