SableShrike
-
Posts
295 -
Joined
-
Last visited
Content Type
Profiles
Forums
Events
Store
Articles
Patch Notes
Everything posted by SableShrike
-
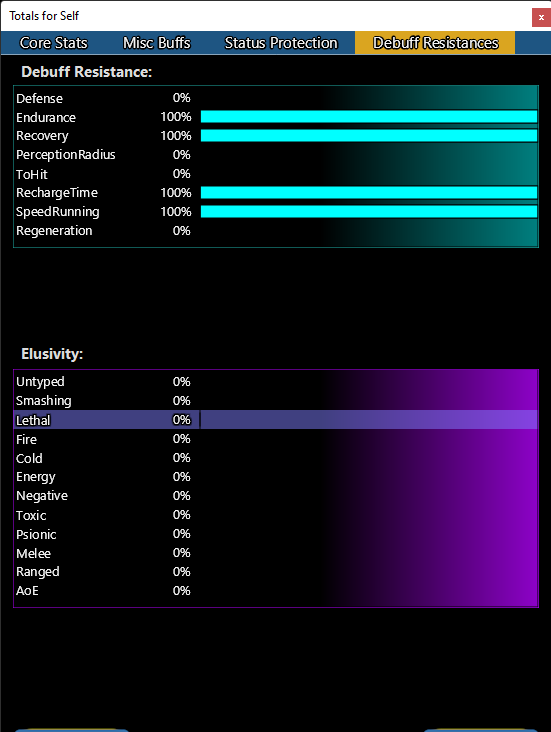
"That sucka think I'm dead, but he don't know: I'm a human tornado!" - Dolemite The release of Storm Blast and all the stormy things got me itching to dust off a tanker concept I've had for a while, but not been 100% happy with. I focused on Resist with this one, capping at 90% Resist to everything but Negative and Toxic with a single Tanker ATO stack. Toxic has a bit of Resist (26%), and Negative is just shy of cap (83.6%). You will get hit, so much of the 32-50 levels are spent muling powers to shore up Resistance to damage and status effects. (I did cheat and take Barrier for my Destiny later on.) After Resists were where I wanted, my main focus was on working Flight in. This proved dual-purpose as the Hypersonic set can help up my Negative Resistance. It's a concept thing, but Hover Tanking is actually very handy in many situations. **coughKnivescough** The best bit of Kinetic Melee on a tank, and one I see many folks overlook, is Repulsing Torrent. Slotted as I have it, it'll strike a massive 51 foot cone, do reliable knockdown on the group, solid AoE damage, and here's the important bit: **Repulsing Torrent Taunts any targets hit for 20 seconds**. Kinetic Melee does not need to take Taunt, you have Repulsing Torrent. It's basically Taunt Plus. EDIT: Update based on two solid days of TFs and Mothership Raids: I've re-evaluated Focused Burst in terms of tanking; I found it more useful than I was expecting. It allows you to hold position and cork a stray Boss to draw aggro. The knockdown on it fires more often than Quick Strike's, as well. Theoretically, you should still be able to hit 4 or 5 Siphon stacks (I've done so in a good number of fights): Body > Smashing > Focused > Body > Smashing => buffed Burst. Other changes are I've moved Flight earlier, as Positron was painful without it. Lastly, this iteration hits the 100% Slow Resistance cap. Tanking +4s for a full team the other day saw Arachnos stacking Slows on me and causing problems. This should greatly alleviate that. Mids' Export is borked again for the forums, so I've attached some screenshots.

-
Forgot to mention: I Ctrl+Leftclick Inner Will to autofire it whenever its conditions are met. This either gives you a small heal or 30 seconds to shrug off Mez without having to do anything.
-
Yes yes, I know everyone's playing Storm Blast now. The Page 6 update brings some really fun changes to Psychic Blast, however. The following build leverages the solid survival in Martial and Mace to softcap your Defense to S/L/E/Ranged. I did take and slot Storm Kick and Eagle's Claw to hit the S/L cap, but honestly I play purely with my ranged attacks. This should be fine to level from scratch 1-50, so you'll have use for Storm Kick early on. Why Psychic Blast? Cuz it's fast as hell now. You have five ranged attacks to sling, and the longest activation time is 1.87 seconds. The other four blasts fire in just about 1 second each (fast Snipe of course). Martial's Reaction Time gives you the Endurance to blast nonstop. Mids has not been updated to reflect my current Page 6 build, but the only differences are as follows: Psionic Dart => Dominate Will, same slotting with a Superior Defiant Barrage set. Will Domination => Psionic Darts, a full set of Artillery. Both Dominate Will and Psionic Darts are new Blaster-specific things, and they blend really well into a fast attack chain. The travel time on Dominate Will is such that it will often land the instant your TK Blast damage hits as well. That lets you spike a Minion in two shots and then Snipe another. I really tried to play with Scramble Minds. It feels slow to activate and on top of travel time just was too long. The status effects it inflicts are too short a duration to make the time spent worthwhile. To add insult to injury, the AoE damage it inflicts is actually far less than your tooltip is showing: secondary targets take only 50% of what the primary target does. This isn't like Trick Shot from Martial Assault. It's not bad, it just doesn't do AoE well. Psi Darts and Psi Tornado are much more useful in that department. I swapped it out for Psi Darts and haven't looked back. Full disclosure: I've not hit the pain that is Praetorian Clockwork yet. That said, Psi rips through a lot of things that most every other set has a hard time with. Cyclops or Minotaur just popped Unstoppable? Doesn't matter. You blow right past it for full damage. Melting tanky mobs in an ITF was surprisingly easy. Paragon Protectors on a Manticore are also easy to hose with your Psi damage. This Hero build was built using Mids Reborn 3.4.7 https://github.com/LoadedCamel/MidsReborn Click this DataLink to open the build! Lovage: Level 50 Science Blaster Primary Power Set: Psychic Blast Secondary Power Set: Martial Combat Power Pool: Concealment Power Pool: Leaping Power Pool: Fighting Power Pool: Leadership Ancillary Pool: Mace Mastery Hero Profile: Level 1: Psionic Dart -- SprDfnBrr-Acc/Dmg/EndRdx/Rchg(A), SprDfnBrr-Acc/Dmg/EndRdx(3), SprDfnBrr-Acc/Dmg/Rchg(5), SprDfnBrr-Acc/Dmg(5), SprDfnBrr-Dmg/Rchg(7), SprDfnBrr-Rchg/+Status Protect(7) Level 1: Storm Kick -- KntCmb-Acc/Dmg(A), KntCmb-Dmg/EndRdx(3), KntCmb-Dmg/Rchg(9), KntCmb-Dmg/EndRdx/Rchg(11) Level 2: Telekinetic Blast -- Thn-Acc/Dmg(A), Thn-Dmg/EndRdx(9), Thn-Acc/Dmg/EndRdx(13), Thn-Dmg/EndRdx/Rchg(13), Thn-Dmg/Rchg(15), Thn-Acc/Dmg/Rchg(15) Level 4: Reach for the Limit Level 6: Psychic Focus -- GssSynFr--Build%(A) Level 8: Will Domination -- Thn-Acc/Dmg(A), Thn-Dmg/EndRdx(17), Thn-Dmg/Rchg(17), Thn-Acc/Dmg/Rchg(19), Thn-Acc/Dmg/EndRdx(19), Thn-Dmg/EndRdx/Rchg(21) Level 10: Burst of Speed -- SprAvl-Acc/Dmg/EndRdx/Rchg(A), SprAvl-Acc/Dmg/EndRdx(25), SprAvl-Acc/Dmg/Rchg(34), SprAvl-Dmg/EndRdx(34), SprAvl-Rchg/KDProc(34) Level 12: Psionic Lance -- Thn-Acc/Dmg(A), Thn-Dmg/EndRdx/Rchg(39), Thn-Dmg/EndRdx(48), Thn-Dmg/Rchg(48), Thn-Acc/Dmg/Rchg(48), Thn-Acc/Dmg/EndRdx(50) Level 14: Infiltration -- BlsoftheZ-ResKB(A), BlsoftheZ-Travel(23), WntGif-RunSpd/Jump/Fly/Rng(23), WntGif-RunSpd/Jump/Fly/Rng/EndRdx(33), LucoftheG-Def/Rchg+(43) Level 16: Stealth -- RedFrt-Def/EndRdx(A), RedFrt-Def/Rchg(37), RedFrt-EndRdx/Rchg(39), RedFrt-Def/EndRdx/Rchg(39), RedFrt-Def(43), RedFrt-EndRdx(50) Level 18: Psionic Tornado -- Artl-Acc/Dam(A), Artl-Dam/End(40), Artl-Dam/Rech(42), Artl-Acc/Dam/Rech(42), Artl-Acc/Rech/Rng(42), Artl-End/Rech/Rng(43) Level 20: Reaction Time -- Heal-I(A), Heal-I(21), EndMod-I(40), EndMod-I(40) Level 22: Combat Jumping -- LucoftheG-Def/Rchg+(A) Level 24: Inner Will -- RechRdx-I(A), RechRdx-I(25) Level 26: Psychic Wail -- SprBlsWrt-Acc/Dmg/EndRdx/Rchg(A), SprBlsWrt-Acc/Dmg/EndRdx(27), SprBlsWrt-Acc/Dmg/Rchg(27), SprBlsWrt-Acc/Dmg(29), SprBlsWrt-Dmg/Rchg(29), SprBlsWrt-Rchg/Dmg%(33) Level 28: Boxing -- Empty(A) Level 30: Eagles Claw -- SprBlsCol-Dmg/EndRdx/Acc/Rchg(A), SprBlsCol-Acc/Dmg/Rchg(31), SprBlsCol-Acc/Dmg/EndRdx(31), SprBlsCol-Dmg/EndRdx(31), SprBlsCol-Rchg/HoldProc(33) Level 32: Tough -- GldArm-3defTpProc(A), StdPrt-ResDam/Def+(45) Level 35: Scorpion Shield -- RedFrt-Def/EndRdx(A), RedFrt-Def/Rchg(36), RedFrt-EndRdx/Rchg(36), RedFrt-Def/EndRdx/Rchg(36), RedFrt-Def(37), RedFrt-EndRdx(37) Level 38: Weave -- Rct-Def(A), Rct-Def/EndRdx(45), Rct-EndRdx/Rchg(45), Rct-Def/Rchg(46), Rct-Def/EndRdx/Rchg(46), Rct-ResDam%(46) Level 41: Maneuvers -- LucoftheG-Def/Rchg+(A) Level 44: Tactics -- RctRtc-Pcptn(A), RctRtc-ToHit(50) Level 47: Vengeance -- LucoftheG-Def/Rchg+(A) Level 49: Grant Invisibility -- LucoftheG-Def/Rchg+(A) Level 1: Defiance Level 1: Brawl -- Empty(A) Level 1: Sprint -- UnbLea-Stlth(A) Level 2: Rest -- Heal-I(A) Level 1: Swift -- Run-I(A) Level 1: Hurdle -- Jump-I(A) Level 1: Health -- Mrc-Rcvry+(A) Level 1: Stamina -- EndMod-I(A), EndMod-I(11) Level 49: Quick Form Level 50: Musculature Core Paragon Level 50: Cognitive Radial Flawless Interface Level 50: Vorpal Core Final Judgement Level 50: Seers Radial Superior Ally Level 50: Rebirth Radial Epiphany Level 50: Freedom Phalanx Reserve Level 50: Portal Jockey Level 50: Task Force Commander Level 50: The Atlas Medallion Level 50: Assault Core Embodiment ------------
-

Ghost Ship: Introduce a little chaos
SableShrike replied to Techwright's topic in Suggestions & Feedback
And make them con even just like the War In the Vale mobs do now! -
Focused Feedback: Storm Blast
SableShrike replied to The Curator's topic in [Open Beta] Focused Feedback
I did all the Overwhelming Force set except the End/Rech, and then one 50+5 Rech IO. I was chasing Defense, but the OF proc seems to fire a LOT when you’re spamming Storm attacks. If you don’t care about set bonuses, just the OF proc is worth it. I’d max Recharge best you can, and add some End Redux. -
Focused Feedback: Storm Blast
SableShrike replied to The Curator's topic in [Open Beta] Focused Feedback
53 Storm/SR/Electric Sentinel with max Damage Incarnates. Fully IO’d out to 45% Defense and decent +recharge. Very solid versus even 54 Arachnos, though they can debuff and kill you sometimes. Mostly it’s the boss Fortunatas as usual. I swapped out my Elec attacks in a few respecs and only use Lightning Field and Rehabilitating. Which brings me to my main finding: using non-Storm Blast attacks in your rotation feels like I’m leaving proc effects on the table. Logically there is a break-point where a non-Storm attack is so good that loss of Storm Cell procs doesn’t matter. Though I don’t know the math for that. Still messing about with what my ideal Storm rotation is. Gust: great for the -Fly and good DPA. Hail: gotta play more with this to decide, hard to choose this over Gust or Cloudburst. Jet Stream: wound up dropping it due to it being the only cone and shorter range. Good while leveling, though, and fun. Storm Cell: love it, but took some getting used to. A great spot for Overwhelming Force. Lotsa knockdown then. Wish the Slow was a bit stronger as it would help keep them in Cat 5 more. Very defensive when proccing, a lot of my survival is due to this. Intensify: a bit random for an “Aim”, but I like it. Very fun to drop Cat 5 after this as it greatly ups the proc chance. Lightning Strike: hits like a truck and procs Stun well on Lts and Minions. Fave power. Chain Lightning: I really like chains, so no complaints here. Damage feels just about right. Procs Ragnarok’s KD IO well. Cloudburst: My only gripe is the damage tick speed. The time to fully deliver its DPS feels too long when combined with its travel time to target. This is the same issue that hamstrings Gravimetric Snare. They almost never tick fully. I would honestly be in favor of a bit lower DPS if it would do it all upfront; the debuffs are a good “linger” effect for the cloud as is. Full Charlie Brown. Cat 5: combos well with Cell to cause sheer pandemonium. Again, you’re locked into using Storm powers to get the most procs outta this. Not an insta-gib nuke, but plays more defensive than the others. In all, Storm feels very controllish to me. It’s a bit random at times; RNG will let me steamroll one group of 54s, but get stuck slogging through another. That’s X-Com, baby. Cell and Cat 5 add a significant level of survival compared to your bog-standard nuke or rain. I know some folks will want max damage upfront from a set, but it’s nice to have a different style. -
Focused Feedback: Blast Power Set Updates
SableShrike replied to The Curator's topic in [Open Beta] Focused Feedback
I’m kinda in the other boat to you and Wav, AA. I find the current state of Incarnate play at 50 to be completely over the top and quickly burn out on it. Guess I’m one of those “back in my day” old farts. Anywho! As you mentioned, the Blaster changes make leveling a new Blast toon much nicer. If we take Incarnates and procs out of the equation, this is a straight upgrade to the powers changed. And honestly, the fact Suppressive was outdamaging Exectioner’s is proof of the craziness the game has evolved to: where mez powers outdamage dedicated DPS powers. Not saying that’s a good or bad thing, but it makes sense they won’t be balancing around edge-case use. Cuz most folks don’t get toons to 50 and fully purple them, it’s better to assume most play is with SOs. -
Been playing about with the sheer insanity that is SR on a Tanker recently. Paired with Storm Kick from MA it's ridiculously easy to hit Incarnate softcap Defense to all Positionals. This lets you do completely stupid stuff like chase obscene levels of +Damage set bonuses and still work in enough +Recharge to leverage it. I managed to squeak in a damage proc for every attack, but the real draw here is that +45% damage set bonus. This is akin to having an extra level 50 Damage IO on every attack. Then we add in Musculature Core and one of the Assault Hybrids for further stupidity. I fit in Eagle's Claw for this one, as I like the guaranteed Stun to detoggle things like Daemon Lords. It also helps up your AoE a bit if you immediately follow Claw with Dragon's Tail. You could easily move stuff around a bit and drop Eagle's for Thunder, Cobra, or Crippling. Crippling is probably your best DPA, but I wanted to leverage Claw for AoE damage here. Cross Punch hits up to 5 targets nearly as hard as Crane Kick or Cobra Strike. This really helps shore up the AoE weakness everyone avoids MA for. Even used as part of your singletarget chain it'll buff your Recharge and ToHit reliably. I'm hitting for about 250 damage at level 50 with it. With your Regen and Recovery powers slotted as I have you've got enough Endurance to fight forever, and you've three passive heal IOs firing so often you out-heal incoming damage. No need to stop attacking to fire Aid Self. Edit: Refined things a bit more. Mainly I've moved up Tough and slotted it to run full-time. Also dropped Combat Jump in favor of Elude; Elude is sometimes handy if you're suffering cascading Defense failure. Focused Accuracy I muled for another 2% damage buff, as I found I wasn't using it much. Focus Chi is enough to make certain you flatten a problem foe. Grand totals for the updated build are 59% Defense to M/R/AoE, and +45% Damage bonus. This Hero build was built using Mids Reborn 3.4.7 https://github.com/LoadedCamel/MidsReborn Click this DataLink to open the build! Level 50 Mutation Tanker Primary Power Set: Super Reflexes Secondary Power Set: Martial Arts Power Pool: Fighting Power Pool: Leadership Ancillary Pool: Energy Mastery Hero Profile: Level 1: Focused Fighting (A) Red Fortune - Defense/Endurance (7) Red Fortune - Defense/Endurance/Recharge (9) Red Fortune - Defense (9) Red Fortune - Endurance (11) Red Fortune - Endurance/Recharge (11) Luck of the Gambler - Defense/Increased Global Recharge Speed Level 1: Storm Kick (A) Mako's Bite - Accuracy/Damage/Endurance/Recharge (45) Mako's Bite - Accuracy/Damage (46) Mako's Bite - Damage/Endurance (46) Mako's Bite - Chance of Damage(Lethal) (46) Superior Might of the Tanker - Accuracy/Damage/Endurance/Recharge (48) Superior Might of the Tanker - Damage/Recharge Level 2: Focused Senses (A) Red Fortune - Defense/Endurance (13) Red Fortune - Defense/Endurance/Recharge (13) Red Fortune - Defense (37) Red Fortune - Endurance (43) Red Fortune - Endurance/Recharge (45) Luck of the Gambler - Defense/Increased Global Recharge Speed Level 4: Boxing (A) Empty Level 6: Practiced Brawler (A) Endurance Reduction IO Level 8: Dodge (A) Shield Wall - Defense/Endurance (19) Shield Wall - Defense/Recharge (19) Shield Wall - Defense/Endurance/Recharge (25) Shield Wall - Defense (37) Shield Wall - +Res (Teleportation), +5% Res (All) Level 10: Kick (A) Empty Level 12: Evasion (A) Red Fortune - Defense/Endurance (48) Red Fortune - Defense/Endurance/Recharge (48) Red Fortune - Defense (50) Red Fortune - Endurance (50) Red Fortune - Endurance/Recharge (50) Luck of the Gambler - Defense/Increased Global Recharge Speed Level 14: Cross Punch (A) Obliteration - Accuracy/Damage/Endurance/Recharge (15) Obliteration - Accuracy/Damage/Recharge (15) Obliteration - Damage/Recharge (42) Obliteration - Damage (43) Obliteration - Chance for Smashing Damage (43) Multi-Strike - Accuracy/Endurance Level 16: Crane Kick (A) Overwhelming Force - Accuracy/Damage/Endurance (17) Overwhelming Force - Accuracy/Damage (17) Overwhelming Force - Damage/Chance for Knockdown/Knockback to Knockdown (25) Superior Might of the Tanker - Accuracy/Damage (36) Superior Might of the Tanker - Recharge/Chance for +Res(All) (36) Hecatomb - Chance of Damage(Negative) Level 18: Agile (A) Shield Wall - Defense (29) Shield Wall - Defense/Endurance (29) Shield Wall - Defense/Recharge (33) Shield Wall - Defense/Endurance/Recharge (34) Shield Wall - Endurance/Recharge Level 20: Dragon's Tail (A) Obliteration - Accuracy/Damage/Endurance/Recharge (21) Obliteration - Accuracy/Damage/Recharge (21) Obliteration - Damage/Recharge (23) Obliteration - Damage (23) Obliteration - Chance for Smashing Damage (37) Multi-Strike - Accuracy/Endurance Level 22: Quickness (A) Run Speed IO Level 24: Focus Chi (A) Gaussian's Synchronized Fire-Control - To Hit Buff (39) Gaussian's Synchronized Fire-Control - To Hit Buff/Recharge (40) Gaussian's Synchronized Fire-Control - To Hit Buff/Recharge/Endurance (40) Gaussian's Synchronized Fire-Control - Recharge/Endurance (40) Gaussian's Synchronized Fire-Control - To Hit Buff/Endurance (42) Gaussian's Synchronized Fire-Control - Chance for Build Up Level 26: Lucky (A) Shield Wall - Defense (27) Shield Wall - Defense/Endurance (27) Shield Wall - Defense/Recharge (34) Shield Wall - Defense/Endurance/Recharge (34) Shield Wall - Endurance/Recharge Level 28: Tough (A) Gladiator's Armor - End/Resist (39) Gladiator's Armor - Resistance (39) Gladiator's Armor - TP Protection +3% Def (All) (42) Steadfast Protection - Resistance/+Def 3% (45) Unbreakable Guard - +Max HP Level 30: Eagles Claw (A) Mako's Bite - Accuracy/Damage/Endurance/Recharge (31) Mako's Bite - Accuracy/Damage (31) Mako's Bite - Damage/Endurance (31) Mako's Bite - Chance of Damage(Lethal) (33) Superior Might of the Tanker - Accuracy/Damage/Recharge (33) Superior Might of the Tanker - Damage/Endurance/Recharge Level 32: Warrior's Provocation (A) Mocking Beratement - Threat/Placate/Recharge/Range Level 35: Focused Accuracy (A) Adjusted Targeting - To Hit Buff/Endurance (36) Adjusted Targeting - Endurance/Recharge Level 38: Elude (A) Luck of the Gambler - Defense/Increased Global Recharge Speed Level 41: Physical Perfection (A) Power Transfer - Chance to Heal Self Level 44: Maneuvers (A) Reactive Defenses - Scaling Resist Damage Level 47: Tactics (A) Rectified Reticle - Increased Perception Level 49: Vengeance (A) Luck of the Gambler - Defense/Increased Global Recharge Speed Level 1: Brawl (A) Empty Level 1: Gauntlet Level 1: Sprint
-
- 1
-

-
Some tips to playing /Storm for folks new to the set: Just because you CAN use a /Storm power does not mean you should. Using Gale after you get a KB>KD IO for it is fine, but constantly using Hurricane to push mobs off the Tank cuz you're "helping" may get you kicked from the team (and rightly so). You honestly should only need Hurricane for one of two situations: protecting the back line from stray mobs, and debuffing AVs. AVs are completely resistant to the Repel effect on Hurricane, so Hurricane away. In all other situations, you're wasting a lot of endurance and slowing the team down by scattering stuff. I have seen some folks herd with Hurricane into corners, but Tankers will herd way faster and more reliably. Tornado is something I just mule and don't use for similar reasons to CONSTANTHURRICANE. Tornado is big damage, but it has an annoying Fear effect and Knockback unless slotted to Knockdown. You can ruin an entire pull with this one power used incorrectly. That being said, if you do want to slot it for Damage, AVs will ignore Fear and just stand there as it chews them. O2 Boost heals, but also cures a fair few of the most annoying debuffs/mez. It'll cure Sleep and Stun, and also protect against Endurance Drain. The End Drain resistance is a handy thing on the friendly Tanker who's herding the Synapse TF, say. Not to be a downer here, but few sets can piss of an entire team like a badly behaved Storm user.
-
Saw folks asking for Beast/ or /Storm build ideas, so here's mine that covers both. This particular build uses Call Hawk and Call Ravens actively for more damage and to drop flyers for your pets. You can switch the personal attacks out for Snow Storm and Gale for -Fly and knockdown if you'd rather. That being said, Beast is going to get attack revamps like Mercs, Ninjas, Necro, and Robot got; you'll probably want most personal attacks then. No ETA on that, but "soon". This is a hybrid build; I've not bothered to cap Ranged and AoE personal Defense for two reasons. One, you want a decent amount of global recharge for /Storm. Two, anything over 32.5% is a waste when you're debuffing with Hurricane. Or just pop one small Luck to hit softcap. Thunder Clap is actually handy when soloing. It locks down minion level enemies permanently, and occasionally Lions will stack their own Stun with it. Again, you can switch that out and slot Maneuvers there instead. /Storm is a hangry boi. The most key IOs you'll wanna aim for first are your Unique IOs for Health and Stamina. The pet aura IOs in Tornado are a very close second. This Hero build was built using Mids Reborn 3.4.7 https://github.com/LoadedCamel/MidsReborn Sable Shrike: Level 50 Magic Mastermind Primary Power Set: Beast Mastery Secondary Power Set: Storm Summoning Power Pool: Flight Power Pool: Leadership Power Pool: Concealment Ancillary Pool: Mu Mastery Hero Profile: ------------ Level 1: Summon Wolves (A) Blood Mandate - Accuracy/Damage (31) Blood Mandate - Damage/Endurance (31) Blood Mandate - Accuracy/Endurance (31) Blood Mandate - Accuracy/Damage/Endurance (33) Blood Mandate - Accuracy (33) Blood Mandate - Damage Level 1: O2 Boost Hamidon Origin:Golgi Exposure (x3) Level 2: Call Hawk (A) Apocalypse - Damage/Recharge/Accuracy (3) Apocalypse - Recharge/Accuracy (3) Apocalypse - Damage/Recharge (5) Apocalypse - Damage/Endurance (5) Apocalypse - Chance of Damage(Negative) (7) Endurance Reduction IO Level 4: Hover (A) Blessing of the Zephyr - Run Speed, Jump, Flight Speed, Range (7) Blessing of the Zephyr - Run Speed, Jump, Flight Speed, Range/Endurance (23) Blessing of the Zephyr - Knockback Reduction (4 points) (29) Kismet - Accuracy +6% Level 6: Train Beasts (A) Endurance Reduction IO Level 8: Call Ravens (A) Ragnarok - Damage/Recharge/Accuracy (9) Ragnarok - Recharge/Accuracy (9) Ragnarok - Damage/Recharge (21) Ragnarok - Damage/Endurance (21) Ragnarok - Chance for Knockdown (23) Endurance Reduction IO Level 10: Steamy Mist (A) Red Fortune - Defense/Endurance (11) Red Fortune - Defense/Endurance/Recharge (11) Red Fortune - Defense (13) Red Fortune - Defense/Recharge (13) Red Fortune - Endurance (15) Red Fortune - Endurance/Recharge Level 12: Summon Lions (A) Blood Mandate - Accuracy/Damage (15) Blood Mandate - Damage/Endurance (17) Blood Mandate - Accuracy/Endurance (17) Blood Mandate - Accuracy/Damage/Endurance (19) Blood Mandate - Accuracy (19) Blood Mandate - Damage Level 14: Fly (A) Blessing of the Zephyr - Run Speed, Jump, Flight Speed, Range (33) Blessing of the Zephyr - Run Speed, Jump, Flight Speed, Range/Endurance (34) Blessing of the Zephyr - Knockback Reduction (4 points) Level 16: Freezing Rain (A) Undermined Defenses - Recharge (46) Undermined Defenses - Defense Debuff/Recharge (46) Undermined Defenses - Recharge/Endurance (46) Undermined Defenses - Defense Debuff/Recharge/Endurance Level 18: Evasive Maneuvers (A) Blessing of the Zephyr - Run Speed, Jump, Flight Speed, Range (34) Blessing of the Zephyr - Run Speed, Jump, Flight Speed, Range/Endurance (34) Blessing of the Zephyr - Knockback Reduction (4 points) (40) Soaring - Endurance/FlySpeed Level 20: Hurricane Hamidon Origin:Enzyme Exposure (x3) Level 22: Summon Dire Wolf (A) Blood Mandate - Accuracy/Damage (42) Blood Mandate - Damage/Endurance (43) Blood Mandate - Accuracy/Endurance (43) Blood Mandate - Accuracy/Damage/Endurance (43) Blood Mandate - Accuracy (45) Blood Mandate - Damage Level 24: Thunder Clap (A) Absolute Amazement - Stun/Recharge/Accuracy (42) Absolute Amazement - Recharge/Accuracy (42) Absolute Amazement - Stun/Recharge (45) Absolute Amazement - Stun/Endurance (45) Absolute Amazement - Chance for ToHit Debuff (50) Rope A Dope - Accuracy/Endurance Level 26: Tame Beasts (A) Endurance Reduction IO Level 28: Fortify Pack (A) Luck of the Gambler - Defense/Increased Global Recharge Speed Level 30: Lightning Storm (A) Overwhelming Force - Accuracy/Damage/Endurance/Recharge (48) Overwhelming Force - Accuracy/Damage (48) Overwhelming Force - Accuracy/Damage/Endurance (48) Overwhelming Force - Damage/Endurance/Recharge (50) Overwhelming Force - Endurance/Recharge (50) Overwhelming Force - Damage/Chance for Knockdown/Knockback to Knockdown Level 32: Tornado (A) Superior Command of the Mastermind - Recharge/Pet +AoE Defense Aura (37) Superior Mark of Supremacy - Endurance/Pet +Resist +Regen (39) Edict of the Master - Defense Bonus (39) Sovereign Right - Resistance Bonus (39) Expedient Reinforcement - Resist Bonus Aura for Pets (40) Call to Arms - Defense Bonus Aura for Pets Level 35: Charged Armor (A) Gladiator's Armor - End/Resist (36) Gladiator's Armor - Resistance (36) Gladiator's Armor - TP Protection +3% Def (All) (36) Steadfast Protection - Resistance/+Def 3% Level 38: Maneuvers (A) Luck of the Gambler - Defense/Increased Global Recharge Speed Level 41: Tactics (A) Rectified Reticle - Increased Perception Level 44: Vengeance (A) Luck of the Gambler - Defense/Increased Global Recharge Speed Level 47: Grant Invisibility (A) Luck of the Gambler - Defense/Increased Global Recharge Speed Level 49: Infiltration (A) Luck of the Gambler - Defense/Increased Global Recharge Speed Level 1: Supremacy Level 1: Brawl (A) Empty Level 1: Sprint (A) Unbounded Leap - +Stealth Level 2: Rest (A) Healing IO Level 1: Swift (A) Flight Speed IO Level 1: Hurdle (A) Jumping IO Level 1: Health (A) Miracle - +Recovery (27) Numina's Convalesence - +Regeneration/+Recovery (29) Panacea - +Hit Points/Endurance Level 1: Stamina (A) Performance Shifter - EndMod (37) Performance Shifter - Chance for +End (37) Endurance Modification IO Level 14: Afterburner Level 1: Alpha Howler Wolf Level 1: Howler Wolf Level 22: Dire Wolf Level 12: Lioness Level 1: Pack Mentality ------------
-
It’s worth revisiting! Lot has changed. Beast/Cold is the easiest combo I’ve played with the primary. Sleet? Check. Shields to cap pets, letting you never need to fire Fortify Pack? Check. (It cancels them critting when fired, dramatically affecting DPS.) Solid debuffs? Check. Defense toggle (Arctic Fog) that you can stack with Maneuvers? Check. My other favorite option is to go Beast/Storm, with the “big trick” there being you can slot Tornado with pet aura IOs. This frees you up for procs, Blood Mandates, or HOs in the Beast pets. /Storm is arguably harder to play well; /Cold is much easier on your reaction time. /Storm is also much more likely to piss off teams in the hands of a bad player.
-
Energy/Martial/Force Blapper build (built in Page 5)
SableShrike replied to SableShrike's topic in Blaster
Fair question! Martial Combat is my favorite version of any Martial Arts on any AT. So yes, I guess Ranged attacks are secondary to me playing the Martial side of things. Blapper at heart, I guess. That said, the two Ranged attacks I did take flow ridiculously well with the three Melee attacks from Martial. They all animate fast enough and hit hard enough that you’ll kill-steal a lot on teams. Numerically you can swap Eagle’s Claw for the Snipe and get better DPS. I’d rather the big kick with a guaranteed Stun to detoggle stuff is all. I like the utility Martial has, so built for that. For clear speeds I’m sure layering more AoE on may help, but there is such a thing as too many attacks. One, slotting more attacks pulls sets off armor or utility toggles. Two, given each attack needs to animate there are only so many attacks you can fire per second. Having eight slotted attacks won’t animate them faster than having five. Yeah, you could mule the extra attacks with sets, but that’s still a lot of enhancement slots burned on something you’re not actually using. As far as kill times? I’d say faster than a Brute, but slower than a Fire Blaster built solely for global recharge and procced AoE. Knockdown is reliable enough to solo anything susceptible you focus on. Storm Kick is guaranteed knockdown from that alone. This is based on the teaming I’ve done; you bust hard targets fast after nuking the trash. And again, this can survive really damn well in melee with the Tanks and Brutes. You won’t replace them so much as fight back-to-back. Your Reaction Time helps melee ATs a great deal, as you snare things for them just by standing nearby. My experience with Reaction Time has been it’s more of a Taunt than Fear aura. It does no damage but debuffs, so 99% of the time stuff swarms me in melee provided someone else isn’t pulling aggro. It pisses mobs off enough that you can herd the melee boys to the ranged mob you beat down first. It’s all about positioning and target priority. I’d still go melee over range with Martial, you leave way too much of the power in the set unused if not in melee. There are enemy-type edge cases like Praetorian Clockwork who are notorious for staying spread out and sniping, but again those are outliers not the norm. I’d say a good 80% of mobs in-game will happily rush into melee and flail with futility as you beat them down. Enemy AI has a range where even Council Marksmen, say, switch over and try to melee you instead of shoot. -
Energy/Martial/Force Blapper build (built in Page 5)
SableShrike replied to SableShrike's topic in Blaster
Data Link, since the above build wasn't posting right. https://www.midsreborn.com/builds/download.php?uc=1723&c=741&a=1482&f=HEX&dc=78DA65944B4F135114C7FFED4CE5D582A594828050286F5AA82B4D4C342A24469A10D9A9D80C3029139BB6E90365E19770636278E8D218FD142EF51BB873A3200FDF1AC57A3A674E72A74C32EDEF9EFFBDFF7BE6DC47EAC135FFDB37F397E1095CCD1AA552FA0AFD96CD6263AA5236CA563E077AFC8BC672D61C585C2B5AF7CC060AF438BDD2378D5CC65C4DCCE6CC626683C7C6445BAC140AF9623991328A65CBC8A65346CE2A54B2ECEA5FC8E7B38979D32858B94CC06ECC5999B532B5DA445A358BA535AB10B4DBD773EB56C95AB6B25679A37DB660AD24E6F2C515935C6B936D745156C3F49E87EBA9FA005D07923A74680C7E7819CE9266430C3E81F70CC1180DF6B86C96E87F5447236E09DC6168C66D81BB0C7EA4192EB85CC8C6836DCD9EC08B2DCD496B93218A270C23D86118956CDA291B4DC9A6DA498BE053025E1FC21EBBEB291C53A0AF0637D8C5437D1B941CA851A5071D64DAA4C4F5263CE5E9C6B12DB0C330814D81670C1769488BEADA82E75E5BD168B2805ABA00BE7326ADF825F08DE10C7E0B443C76DABD38C79130A5D7A6DAB4D167DACA69FC13F8CBD08963862EFC1180535ECA26A8DA0471C04A3B0E058E183AF059E08BE6187F7580B20929367A088F78A65E3CF63ABBE983E6C0478624F618229444582D5618EF7850847C236A7A117119109701EC0AECC94EF9A439ABB1CF7089C676AB36DD52ACA8146B488A3524C51A9262C5A4585D443DAA4D0FEEF3B28CA0225062184559609D611C0F6B7BB009DD64D3A7DAF4C9E19992C3332587674ACE4C5C4E515C0E4F90AAD6AF56AD5F36F90B4A77505506457949CAB032B5362C9B2F2E9B6F5A36DF347E328468A231D56E0C5B5499908E57D4615251B449FCA81B9C14DFA4F876905D42B54B4876ADA4CC28D9614694A8EEBE6FAABDBAFB1EB383746AE74FC6355EC505DD7DD750A37689D17AEC37BBCDE98DB37270521963E5F0A412E5CF3BAA53087775E74E3B64783DE1DEEFD51B218AAB9FB7D05C1758AA0F18F581E5FAC07F3E61E454 -
Energy/Martial/Force Blapper build (built in Page 5)
SableShrike replied to SableShrike's topic in Blaster
Mid's is being shifty posting build info; usually I can make it look nicer than this... This Hero build was built using Mids Reborn 3.4.7 https://github.com/LoadedCamel/MidsReborn Sable Shrike: Level 50 Mutation Blaster Primary Power Set: Energy Blast Secondary Power Set: Martial Combat Power Pool: Leaping Power Pool: Fighting Power Pool: Leadership Power Pool: Concealment Ancillary Pool: Force Mastery Hero Profile: ------------ Level 1: Power Blast SprDfnBrr-Acc/Dmg/EndRdx/Rchg(A), SprDfnBrr-Acc/Dmg/EndRdx(5), SprDfnBrr-Acc/Dmg/Rchg(13), SprDfnBrr-Acc/Dmg(31), SprDfnBrr-Rchg/+Status Protect(37), SuddAcc--KB/+KD(37) Level 1: Storm Kick TchofDth-Acc/Dmg/EndRdx(A), TchofDth-Acc/Dmg(9), TchofDth-Dmg/Rchg(9), TchofDth-Dmg/EndRdx(11), TchofDth-Dmg/EndRdx/Rchg(11), TchofDth-Dam%(13) Level 2: Energy Torrent SprBlsWrt-Acc/Dmg/EndRdx/Rchg(A), SprBlsWrt-Acc/Dmg/EndRdx(3), SprBlsWrt-Acc/Dmg/Rchg(5), SprBlsWrt-Acc/Dmg(34), SprBlsWrt-Rchg/Dmg%(39), SuddAcc--KB/+KD(40) Level 4: Reach for the Limit Level 6: Combat Jumping LucoftheG-Def/Rchg+(A), Ksm-ToHit+(7), ShlWal-ResDam/Re TP(7) Level 8: Boxing Empty(A) Level 10: Burst of Speed SprAvl-Acc/Dmg/EndRdx/Rchg(A), SprAvl-Acc/Dmg/EndRdx(42), SprAvl-Acc/Dmg/Rchg(42), SprAvl-Acc/Dmg(43), SprAvl-Rchg/KDProc(43) Level 12: Aim GssSynFr--Build%(A) Level 14: Tough UnbGrd-ResDam/EndRdx(A), UnbGrd-ResDam/EndRdx/Rchg(15), UnbGrd-ResDam(15), UnbGrd-Max HP%(27), StdPrt-ResDam/Def+(27), GldArm-3defTpProc(29) Level 16: Dragon's Tail Obl-Acc/Dmg/EndRdx/Rchg(A), Obl-Acc/Dmg/Rchg(17), Obl-Acc/Rchg(17), Obl-Dmg/Rchg(23), Obl-Dmg(25), Obl-%Dam(25) Level 18: Weave Rct-Def(A), Rct-Def/EndRdx(19), Rct-EndRdx/Rchg(19), Rct-Def/Rchg(21), Rct-Def/EndRdx/Rchg(21), Rct-ResDam%(23) Level 20: Reaction Time PrfShf-EndMod(A), PrfShf-End%(29), Prv-Heal(31), Prv-Heal/EndRdx(31), Prv-Heal/Rchg(50) Level 22: Super Jump BlsoftheZ-ResKB(A) Level 24: Inner Will Prv-Heal(A), Prv-Heal/EndRdx(33), Prv-EndRdx/Rchg(33), Prv-Heal/Rchg(33), Prv-Heal/Rchg/EndRdx(34), Prv-Absorb%(43) Level 26: Nova Obl-Acc/Dmg/EndRdx/Rchg(A), Obl-Acc/Dmg/Rchg(34), Obl-Acc/Rchg(36), Obl-Dmg/Rchg(36), Obl-Dmg(36), Obl-%Dam(37) Level 28: Throw Sand RzzDzz-Acc/Stun/Rchg(A), RzzDzz-Acc/EndRdx(39), RzzDzz-Acc/Rchg(39), RzzDzz-EndRdx/Stun(40), RzzDzz-Stun/Rng(40), RopADop-Acc/Stun/Rchg(42) Level 30: Eagles Claw TchofDth-Acc/Dmg/EndRdx(A), TchofDth-Acc/Dmg(45), TchofDth-Dmg/Rchg(45), TchofDth-Dmg/EndRdx/Rchg(45), TchofDth-Dmg/EndRdx(46), TchofDth-Dam%(46) Level 32: Maneuvers LucoftheG-Def/Rchg+(A) Level 35: Personal Force Field LucoftheG-Def/Rchg+(A) Level 38: Temp Invulnerability UnbGrd-ResDam/EndRdx(A), UnbGrd-ResDam/EndRdx/Rchg(46), UnbGrd-ResDam(48), UnbGrd-Rchg/ResDam(48) Level 41: Tactics RctRtc-Pcptn(A) Level 44: Force of Nature UnbGrd-EndRdx/Rchg(A), UnbGrd-Rchg/ResDam(48), UnbGrd-ResDam/EndRdx/Rchg(50), UnbGrd-ResDam(50) Level 47: Vengeance LucoftheG-Def/Rchg+(A) Level 49: Grant Invisibility LucoftheG-Def/Rchg+(A) Level 1: Defiance Level 1: Brawl Empty(A) Level 1: Sprint UnbLea-Stlth(A) Level 2: Rest Heal-I(A) Level 1: Swift Run-I(A) Level 1: Hurdle Jump-I(A) Level 1: Health Pnc-Heal/+End(A) Level 1: Stamina SynSck-EndMod(A), SynSck-EndMod/+RunSpeed(3) Level 22: Double Jump Level 50: Musculature Core Paragon Level 50: Freedom Phalanx Reserve Level 50: Portal Jockey Level 50: Task Force Commander Level 50: The Atlas Medallion ------------ -
Below is the build I finally finished last night on Live for Booster Girl, my knockoff Fusionette. Faultline is the best zone blueside, fight me. Anyways! I was "tanking" +4 Devouring Earth in the Terra arc last night for a full team when I realized that maybe this had turned out well. Figured I'd share, as this seems to be doing very well in the Page 5 state-of-the-game. What it has: 1) tons of knockdown to juggle spawns/targets: Burst of Speed > Dragon's Tail > Nova will generally leave only the Bosses left on +3 or +4 2) soft-capped Melee Defense: with Page 5 this is proving handy versus things like Behemoths and Ice Thorns; enemy elemental melee cuts through S/L capped builds now (this build still has about 30% S/L) 3) capped S/L Resistance: this goes a long way to mitigating what few attacks are getting through as most melee is entirely S/L or has a S/L component; you need to know your enemy groups, though, as things like Ghosts in Croatoa can hose you if in large numbers 4) Defiant Barrage AND Inner Will: this level of mez protection combined with high Defense almost add up to playing an armor set with a mez toggle; if Slept or Held, often a single Power Blast is all I need to break free if Inner Will is recharging (this is why I'm using Power Blast; it fires even if you're mezzed) That all being said, she is still a Blaster and can get into trouble that a real Tank would sail through just fine. Nothing else plays exactly like /MC on any other AT, though, so it's a hard one to compare across archetypes. Why no Ki Push? I found that once my defenses started to really get up in %s it was causing me a lot of downtime. This build WANTS things in melee, as you're safest there. I dropped it for Energy Torrent's AoE and haven't looked back. You won't need crazy Recharge values here; I've got a complete chain with the build's 85% global recharge bonus. This isn't built for Pylon times, mind you, but the AoE I kick out on a x8 spawn is notable. You'll always have an attack to fire, and never run out of Endurance to do so. Throw Sand is kinda optional. I liked it thematically so kept it, but you can EASILY swap it out for Maneuvers. Fully slotted Maneuvers will squeak your S/L Defense values up towards that magic 32.5% number, too. Cost wise, I got this done for about 450 mill. You could probably do something similar for a fair bit less if you're willing to take your time and play the market game. The Winter IOs were probably the worst to get a hold of. They're about 20 million each if you're buying them. I'm older these days and have a demanding career, so time saved was more important than influence spent. Still, I probably "overspent" on a fair bit of the IOs I bought to finish this. Cheers! Hope it gives folks some ideas. As always, don't do as I do! It's better to understand why I did it!
-
Supermassive: Human Warshade (Updated for Page 5)
SableShrike replied to SableShrike's topic in Peacebringer & Warshade
Here's what I'm currently building towards on Live; just did a respec after hitting 50. Dropped Hover, but picked up Starless Step for more Warshade fun. It's tight to fit everything in when you "should" take it, but I've tried to do this logically. It ought to have offense and defense in reliable levels at nearly any level. This exemplars really well, and is quite fun on a full team for a Positron, say. This Hero build was built using Mids Reborn 3.4.7 https://github.com/LoadedCamel/MidsReborn Click this DataLink to open the build! Sable Shrike: Level 50 Science Warshade Primary Power Set: Umbral Blast Secondary Power Set: Umbral Aura Power Pool: Leaping Power Pool: Leadership Power Pool: Concealment Hero Profile: Level 1: Shadow Bolt (A) Superior Kheldian's Grace - Recharge/Form Empowerment Level 1: Gravity Shield (A) Unbreakable Guard - Resistance/Endurance (3) Unbreakable Guard - Resistance/Endurance/RechargeTime (27) Unbreakable Guard - Resistance (27) Unbreakable Guard - Endurance/RechargeTime (29) Steadfast Protection - Resistance/+Def 3% (29) Gladiator's Armor - TP Protection +3% Def (All) Level 2: Absorption (A) Unbreakable Guard - Resistance (31) Unbreakable Guard - Resistance/Endurance (31) Unbreakable Guard - RechargeTime/Resistance (31) Unbreakable Guard - +Max HP Level 4: Orbiting Death (A) Superior Avalanche - Accuracy/Damage/Endurance/Recharge (5) Superior Avalanche - Accuracy/Damage/Endurance (5) Superior Avalanche - Accuracy/Damage (25) Superior Avalanche - Damage/Endurance (25) Superior Avalanche - Recharge/Chance for Knockdown Level 6: Shadow Blast (A) Apocalypse - Damage/Recharge/Accuracy (7) Apocalypse - Recharge/Accuracy (7) Apocalypse - Damage/Recharge (9) Apocalypse - Damage/Endurance (9) Apocalypse - Chance of Damage(Negative) (11) Sudden Acceleration - Knockback to Knockdown Level 8: Starless Step (A) Rectified Reticle - To Hit Buff/Recharge (39) Rectified Reticle - To Hit Buff Level 10: Sunless Mire (A) Obliteration - Accuracy/Damage/Endurance/Recharge (11) Obliteration - Accuracy/Damage/Recharge (21) Obliteration - Accuracy/Recharge (21) Obliteration - Damage/Recharge (23) Obliteration - Damage (23) Obliteration - Chance for Smashing Damage Level 12: Dark Detonation (A) Superior Kheldian's Grace - Accuracy/Damage/Endurance/Recharge (13) Superior Kheldian's Grace - Accuracy/Damage/Recharge (13) Superior Kheldian's Grace - Accuracy/Damage (17) Superior Kheldian's Grace - Damage/Endurance/Recharge (19) Superior Kheldian's Grace - Damage/Recharge (19) Sudden Acceleration - Knockback to Knockdown Level 14: Shadow Cloak (A) Red Fortune - Defense/Endurance (15) Red Fortune - Defense/Endurance/Recharge (15) Red Fortune - Defense (17) Red Fortune - Endurance (50) Red Fortune - Endurance/Recharge (50) Luck of the Gambler - Defense/Increased Global Recharge Speed Level 16: Gravity Well (A) Hecatomb - Damage/Recharge/Accuracy (33) Hecatomb - Recharge/Accuracy (33) Hecatomb - Damage/Recharge (33) Hecatomb - Damage/Endurance (34) Hecatomb - Chance of Damage(Negative) (34) Unbreakable Constraint - Chance for Smashing Damage Level 18: Penumbral Shield (A) Unbreakable Guard - Resistance/Endurance (34) Unbreakable Guard - Resistance/Endurance/RechargeTime (36) Unbreakable Guard - Resistance (36) Unbreakable Guard - Endurance/RechargeTime Level 20: Gravitic Emanation (A) Stupefy - Accuracy/Stun/Recharge (37) Stupefy - Accuracy/Endurance (40) Stupefy - Accuracy/Recharge (45) Stupefy - Endurance/Stun (45) Stupefy - Stun/Range (48) Sudden Acceleration - Knockback to Knockdown Level 22: Stygian Circle (A) Preemptive Optimization - EndMod/Endurance/Recharge Level 24: Dark Extraction (A) Superior Essence Transfer - Accuracy/Damage/Endurance/RechargeTime (40) Superior Essence Transfer - Accuracy/Damage/RechargeTime (40) Superior Essence Transfer - Accuracy/Damage (42) Superior Essence Transfer - Damage/Endurance/RechargeTime (42) Superior Essence Transfer - Damage/RechargeTime (50) Superior Essence Transfer - RechargeTime/Global Heal Level 26: Quasar (A) Armageddon - Damage/Recharge/Accuracy (42) Armageddon - Recharge/Accuracy (43) Armageddon - Damage/Recharge (43) Armageddon - Damage/Endurance (43) Armageddon - Chance for Fire Damage (45) Sudden Acceleration - Knockback to Knockdown Level 28: Inky Aspect (A) Accuracy IO Level 30: Shadow Slip (A) Accuracy IO (39) Recharge Reduction IO (39) Recharge Reduction IO Level 32: Eclipse (A) Efficacy Adaptor - EndMod/Accuracy/Recharge (46) Unbreakable Guard - RechargeTime/Resistance (46) Unbreakable Guard - Endurance/RechargeTime (46) Unbreakable Guard - Resistance/Endurance/RechargeTime (48) Unbreakable Guard - Resistance Level 35: Twilight Shield (A) Unbreakable Guard - Resistance/Endurance (36) Unbreakable Guard - Resistance/Endurance/RechargeTime (37) Unbreakable Guard - Resistance (37) Unbreakable Guard - Endurance/RechargeTime Level 38: Combat Jumping (A) Luck of the Gambler - Defense/Increased Global Recharge Speed Level 41: Maneuvers (A) Luck of the Gambler - Defense/Increased Global Recharge Speed Level 44: Tactics (A) Rectified Reticle - Increased Perception (48) Rectified Reticle - To Hit Buff Level 47: Vengeance (A) Luck of the Gambler - Defense/Increased Global Recharge Speed Level 49: Grant Invisibility (A) Luck of the Gambler - Defense/Increased Global Recharge Speed Level 1: Dark Sustenance Level 1: Brawl -
Supermassive: Human Warshade (Updated for Page 5)
SableShrike replied to SableShrike's topic in Peacebringer & Warshade
Hi gang, Yeah, this works just fine fully tricked out. With Clarion on Autofire you can faceroll most enemy groups as easily as any "overpowered" AT can. Was thinking the other day that the reason I tend to like Human Khelds is they "progress" in terms of tricks and power. Yeah, your IO sets and global bonuses will help Forms, but they're a very static ride if you're playing only Forms for 50+ levels. The easy way to test this build out is to just hop on the Beta server and spend a bit of time there to "finish" this with IOs. Then see how far you can crank it up in terms of Notoriety. I can generally run +4x8 when maxed, but as mentioned certain groups can really hose you now and then. Arachnos, for example. Council are a complete stomp, however. I'm still debating fitting Essence Drain in, but the thinking is this: it's good versus a single target, but for any group with 5+ enemies Detonation is better damage and mitigation. Incoming fire from multiple minions will quickly overwhelm the healing from Drain, whereas Detonation will let you sweep the trash faster and mitigate that incoming fire with AoE knockdown. This is not the case with Black Dwarf Drain, where the heal is substantially bigger due to your HP increase. Dwarf Drain lets you fight perpetually in safety, whereas on Human I found I could be overwhelmed by enemy numbers if I wasn't defeating the groups fast enough. My favorite slotting for either Drain is: Touch of the Nictus: Acc/Heal Touch of the Nictus: Acc/End/Heal Touch of the Nictus: Chance for Negative Theft of Essence: Acc/End/Heal Theft of Essence: Chance for +Endurance Touch of Death: Chance for Negative -
How do you guys feel about the current implementation of Antidote and Alkaloid? Personally the activation needs to be way faster if they're gonna keep the travel time. That and I sure wouldn't say no to increasing the radius on Envenom and Weaken.
-
Personally, until they get rid of the annoying triangles of doom on all pets I'm not keen on constantly building around the pet Uniques. It's a bit of a bummer, cuz no other AT has to make themselves look visually worse to use their ATOs. Yes yes, I know. Sacrilege. The visual garbage they cause is that annoying to me, is all. And hey, can't fit in 3 full Blood Mandates with em unless you're running Demons, Thugs, or Necro. There's always tradeoffs. I do agree with you all the way about Noxious, though. It needs a huge look at the recharge times. Poison Trap's easy enough. I dance and constantly retarget. With Evasive Maneuvers you're easily at fly cap. Easy to flit in and drop Trap, that's the only time I ever stay near melee. Lemme see if I can solo a few DE GMs once I've got the last of my purples and I'll get back to ya. Admittedly, I've not done that test yet. No Envenomed Daggers; that's cheating!
-
Been getting my Beast/Poison towards 50 with this, but it'll pretty much work with ANY Mastermind primary. Don't sleep on /Poison, gang. It's turned out to be a hell of a lot of fun. This is not a "sit back and watch" Mastermind. This is flat-out offensive; you perform better by playing like a rabid honeybadger. How to get the most out of /Poison for a Mastermind: Why Mastermind? Mastermind gets two unique and overlooked benefits compared to other Poison Archetypes. Yes, the Noxious Gas uptime sucks, but it's ranged for us. This means you aren't chained to melee and can fly. This makes cones a lot easier to line up, as well as lets you easily build toward Ranged and AoE Defense. The other big plus is pets. Poison is very strong with debuffs, but it can leave little time to actively attack. But wait! All your real damage as a Mastermind is coming from pets; your pets attacking doesn't affect your personal rotations at all. This is huge as it lets you debuff AND attack at the same time. I've tried /Poison on other ATs and MM just plays smoother and faster with it. Healing and Mez Buff Your heal is a noob trap. It's very slow to fire, travels slow, and often your target will die before the heal helps them. If you take it, I'd just mule it with the +Absorb as I have. Same with your Antidote; it's too slow and cuts into your much-more-important debuffing. If you take Antidote it can slot the Resist set Uniques, though. Debuffs This is why you go /Poison. You can neuter and just flat out destroy hard targets. God forbid a teammate also has -Res powers, as you can almost floor AV or GM Resistances. Strong debuffs also let you not "need" to get 45% Defense in things. Anything approaching the 32-35% Defense value is usually enough to "cap" you once you've got your target debuffed. And if you're worried, a small Luck will hit cap of 45% if you're natively at 32.5% or more Defense. Procs Guess what. You can proc the crap out of all your AoE debuffs and do some very respectable damage while you're actively neutering mobs with debuffs. Neurotoxic Breath in particular does reliable AoE damage; almost as reliably as Poison Trap for damage proccing. This trait makes Neurotoxic go from nice to must-have on a /Poison Mastermind. It'll usually do more damage than your MMs maxed out AoE blast AND apply all the debuffs it has. I've tried a bunch of slotting for Poison Trap and the Unbreakable set with Armageddon proc is my fave. Two purple damage procs, maxed Hold and Recharge. You want Trap for every spawn, and an 18 seconds AoE Hold lets your pets murder entire groups in safety. The few lone Bosses you can stack Paralytic on to Hold, or just neuter with Envenom+Weaken. Speaking of Paralytic, it reliably does over 200 damage every shot. The trick to all this stupidity is you keep any Recharge off most of your debuffs. Poison Trap is wierd in that you can put a lotta Recharge on it and it still fires procs reliably. Below is the build I'm currently running, but it's very easy to swap in other powers or a completely different Primary and keep the same ability to shred with debuffs. If you're tired of sitting about as a MM watching your pets fight, I'd seriously give /Poison another look. The more aggressive you play the better with this. Edit: Final Update! I got sick of my T1s dying to a single Foot Stomp, so bit the bullet and threw in all six pet auras. Had to pull some procs off the Holds, but they actually do their job of Holding stuff a little better like this anyways. Procced out Wolves, as they're the best at it and your lowest-level bois if you exemplar. Achilles' in Wolves against a hard target has almost 100% uptime as all three will proc it. ... And this is easily able to S/L farm at +0x8 on the asteroid map. Wasn't expecting that, but there ya are. Pets rarely die, as every time you drop Trap they can attack and regen in safety for 18 seconds. You can just float out of reach as they mill below you. This has 31-32ish Ranged/AoE, and maxed out 75% S/L resistance. The way the Purple Patch works I wouldn't go too high above even-con mobs, as your debuffs drop off in effectiveness fast. Buzzsawing full groups of 50s still gives you the most chance for purple IOs over time anyways. This Hero build was built using Mids Reborn 3.4.7 https://github.com/LoadedCamel/MidsReborn Click this DataLink to open the build! Level 50 Magic Mastermind Primary Power Set: Beast Mastery Secondary Power Set: Poison Power Pool: Flight Power Pool: Fighting Power Pool: Leadership Ancillary Pool: Field Mastery Hero Profile: Level 1: Summon Wolves Hamidon Origin:Nucleolus Exposure (x3) (5) Touch of Lady Grey - Chance for Negative Damage (5) Shield Breaker - Chance for Lethal Damage (7) Achilles' Heel - Chance for Res Debuff Level 1: Envenom (A) Accuracy IO (7) Accuracy IO (9) Endurance Reduction IO (9) Touch of Lady Grey - Chance for Negative Damage (48) Shield Breaker - Chance for Lethal Damage Level 2: Alkaloid (A) Preventive Medicine - Chance for +Absorb Level 4: Weaken (A) Accuracy IO (11) Accuracy IO (11) Endurance Reduction IO (17) To Hit Debuff IO (19) To Hit Debuff IO (48) Cloud Senses - Chance for Negative Energy Damage Level 6: Train Beasts (A) Endurance Reduction IO Level 8: Hover (A) Luck of the Gambler - Defense/Increased Global Recharge Speed (19) Blessing of the Zephyr - Run Speed, Jump, Flight Speed, Range (21) Blessing of the Zephyr - Run Speed, Jump, Flight Speed, Range/Endurance (21) Blessing of the Zephyr - Knockback Reduction (4 points) (27) Kismet - Accuracy +6% Level 10: Neurotoxic Breath (A) Accuracy IO (29) Accuracy IO (29) Endurance Reduction IO (31) Ice Mistral's Torment - Chance for Cold Damage (46) Impeded Swiftness - Chance of Damage(Smashing) Level 12: Summon Lions (A) Superior Command of the Mastermind - Accuracy/Damage/Endurance/Recharge (13) Superior Command of the Mastermind - Accuracy/Damage/Recharge (13) Superior Command of the Mastermind - Accuracy/Damage (15) Superior Command of the Mastermind - Recharge/Pet +AoE Defense Aura (15) Edict of the Master - Defense Bonus (17) Call to Arms - Defense Bonus Aura for Pets Level 14: Fly (A) Blessing of the Zephyr - Knockback Reduction (4 points) (36) Blessing of the Zephyr - Run Speed, Jump, Flight Speed, Range (36) Blessing of the Zephyr - Run Speed, Jump, Flight Speed, Range/Endurance Level 16: Evasive Maneuvers (A) Luck of the Gambler - Defense/Increased Global Recharge Speed (33) Blessing of the Zephyr - Run Speed, Jump, Flight Speed, Range (34) Blessing of the Zephyr - Run Speed, Jump, Flight Speed, Range/Endurance (34) Blessing of the Zephyr - Knockback Reduction (4 points) Level 18: Fortify Pack (A) Luck of the Gambler - Defense/Increased Global Recharge Speed Level 20: Boxing (A) Empty Level 22: Summon Dire Wolf (A) Superior Mark of Supremacy - Accuracy/Damage/Endurance (23) Superior Mark of Supremacy - Accuracy/Damage (23) Superior Mark of Supremacy - Damage (25) Superior Mark of Supremacy - Endurance/Pet +Resist +Regen (25) Sovereign Right - Resistance Bonus (27) Expedient Reinforcement - Resist Bonus Aura for Pets Level 24: Paralytic Poison (A) Lockdown - Accuracy/Endurance/Recharge/Hold (36) Lockdown - Accuracy/Hold (37) Lockdown - Accuracy/Recharge (37) Lockdown - Endurance/Recharge/Hold (37) Lockdown - Recharge/Hold (39) Lockdown - Chance for +2 Mag Hold Level 26: Tame Beasts (A) Endurance Reduction IO Level 28: Poison Trap (A) Lockdown - Accuracy/Endurance/Recharge/Hold (39) Lockdown - Accuracy/Hold (39) Lockdown - Accuracy/Recharge (40) Lockdown - Endurance/Recharge/Hold (40) Lockdown - Recharge/Hold (40) Lockdown - Chance for +2 Mag Hold Level 30: Tough (A) Aegis - Resistance/Endurance (34) Aegis - Resistance/Endurance/Recharge (48) Aegis - Resistance (50) Aegis - Psionic/Status Resistance (50) Aegis - Endurance/Recharge (50) Steadfast Protection - Resistance/+Def 3% Level 32: Weave (A) Red Fortune - Defense/Endurance (42) Red Fortune - Defense/Recharge (42) Red Fortune - Endurance/Recharge (42) Red Fortune - Defense/Endurance/Recharge (43) Red Fortune - Defense (43) Red Fortune - Endurance Level 35: Temp Invulnerability (A) Gladiator's Armor - End/Resist (43) Gladiator's Armor - Recharge/Resist (45) Gladiator's Armor - Recharge/Endurance (45) Gladiator's Armor - Resistance/Rech/End (45) Gladiator's Armor - Resistance (46) Gladiator's Armor - TP Protection +3% Def (All) Level 38: Noxious Gas (A) Recharge Reduction IO (46) Recharge Reduction IO Level 41: Elixir of Life (A) Unbreakable Guard - +Max HP Level 44: Maneuvers (A) Luck of the Gambler - Defense/Increased Global Recharge Speed Level 47: Tactics (A) Rectified Reticle - Increased Perception Level 49: Vengeance (A) Luck of the Gambler - Defense/Increased Global Recharge Speed Level 1: Supremacy Level 1: Brawl
-
I’ll see if I got my old Beast/Storm around somewhere to update it for Page 5. I usually did just fine with it on x8s. Beast is a set you need to build around pet support for, but for the most part they’re rather capable. T1 wolves proc the two Debuff damage procs a LOT. This more than doubles or triples their damage. They are your most-damaging pet. Lionesses aren’t the greatest, but they are very tough. With good IO slotting mine almost never died. Good place to fit in all the +defense pet IOs. Direwolf does a notable amount of AoE, which you can ramp up with the two Slow damage procs. As melee pets, you need to drop some flyers for them. The two bird attacks have -Fly, and Snow Storm is a -Fly toggle if you’d rather. The pets have decent Resist and Defense as baseline, so pretty much any set can be made to add to that. Beast/Pain works surprisingly well, say. But again, have to be able to apply -Fly with your build.
-
Supermassive: Human Warshade (Updated for Page 5)
SableShrike replied to SableShrike's topic in Peacebringer & Warshade
Hi gang, there is a method to the madness. I don’t bother with Hasten as I prefer to just autofire Clarion instead. I have tried it with. As for single-target chains, I don’t see a reason to build a Shade for single-target? Pretty much everything we do is to siphon entire groups, nuke, and raise Essences. Doing so eats up enough time you won’t be bothering with singletarget in most soloing/teams. You have at least two Essences at all times, who are more efficient singletarget DPS than a Human Shade is. (They also stack Slows and can floor a Cyclops or Minotaur’s movement speed). Essence Drain was a hard one to skip, I’ll admit. But in in-game testing, for 5+ enemies in a group Detonation let me clear spawns much faster. One long-activation singletarget vs something that hits the whole group. That’s also why Melee Defense is desirable. You wanna be stunning the entire x8 spawn with Gravitic and Inky, and Melee Defense makes that stupidly safe. Even at levels where you could catch mez soloing without Clarion (many mobs have a stun component to their melee hits, ie Tsoo). Exemping is also why I take every shield. Ever try to face-tank on a Shade without Eclipse and you’ll get why. Sustenance and a shield are enough to let you play melee in Positron, say. I never build anything to only function around a single power; doing so locks out too much solo content. So yeah, there are some reasons! This solos most stuff at x8 just fine; I’ve had a fully tricked out 50 set up very similarly. Just restarted for the Page 5 stuff. x8 Arachnos can be a bit of a pain, as the abundance of Slow they have can mess with cooldowns. But they still die! Cannot stress enough how good Gravitic and Inky to lock every single group is. -
Supermassive: Human Warshade (Updated for Page 5)
SableShrike replied to SableShrike's topic in Peacebringer & Warshade
Just to add some feedback on leveling this (which I’m doing now from a blank start): having Gravitic for even exemplared Positron TFs is nuts. And having Dark Extraction for Synapse is crazy. From Yin on, you have Quasar, Shadow Slip, and Inky Aspect. Human Shades are much easier to level on Live now, and they bring a lot more firepower at the lower levels. -
Mucking about with the reordering of HEAT powers in Mids and figured I'd post this if anyone was interested in it. It's kind of a hybrid of things I've done in the past; Hover and Shadow Step are your main travel. Eclipse is on a 3 second cooldown, and Shadow Slip + Quasar let you annihilate a room every 45 seconds. Gravitic and Inky will stun-lock entire groups before you shred them. Shadow Blast and Detonation give you some flexibility, allowing you to deal with runners. Detonation is actually highly efficient damage against ten targets. Oh yeah, and this has completely soft-capped Melee Defense. Which is pretty handy. I don't actually run Tactics or Maneuvers; but all other toggles I'm using. Only Incarnate power that I consider a "must have" for this is Spiritual Core Paragon for your Alpha. Rest are completely up to yourselves. This Hero build was built using Mids Reborn 3.4.7 https://github.com/LoadedCamel/MidsReborn Click this DataLink to open the build! Sable Shrike: Level 50 Science Warshade Primary Power Set: Umbral Blast Secondary Power Set: Umbral Aura Power Pool: Flight Power Pool: Leaping Power Pool: Leadership Hero Profile: Level 1: Shadow Bolt -- SprKhlGrc-Rchg/FormBuff(A) Level 1: Absorption -- UnbGrd-ResDam(A), UnbGrd-ResDam/EndRdx(3), UnbGrd-Rchg/ResDam(5), UnbGrd-Max HP%(5), GldArm-3defTpProc(45), StdPrt-ResDam/Def+(45) Level 2: Gravity Shield -- UnbGrd-ResDam/EndRdx(A), UnbGrd-ResDam/EndRdx/Rchg(7), UnbGrd-ResDam(7), UnbGrd-EndRdx/Rchg(9) Level 4: Orbiting Death -- SprAvl-Acc/Dmg/EndRdx/Rchg(A), SprAvl-Acc/Dmg/EndRdx(9), SprAvl-Acc/Dmg(11), SprAvl-Dmg/EndRdx(11), SprAvl-Rchg/KDProc(13) Level 6: Shadow Blast -- Apc-Acc/Dmg/Rchg(A), Apc-Acc/Rchg(15), Apc-Dmg/Rchg(15), Apc-Dmg/EndRdx(17), Apc-Dam%(17), SuddAcc--KB/+KD(46) Level 8: Hover -- HypSnc-Fly(A), HypSnc-End/Fly(33), HypSnc-End(43), HypSnc-+Special(43), LucoftheG-Def/Rchg+(46), Ksm-ToHit+(50) Level 10: Penumbral Shield -- UnbGrd-ResDam/EndRdx(A), UnbGrd-ResDam/EndRdx/Rchg(13), UnbGrd-ResDam(19), UnbGrd-EndRdx/Rchg(19) Level 12: Dark Detonation -- SprKhlGrc-Acc/Dmg/EndRdx/Rchg(A), SprKhlGrc-Acc/Dmg/Rchg(21), SprKhlGrc-Acc/Dmg(21), SprKhlGrc-Dmg/EndRdx/Rchg(23), SprKhlGrc-Dmg/Rchg(23), SuddAcc--KB/+KD(46) Level 14: Shadow Cloak -- LucoftheG-Def/EndRdx(A), LucoftheG-Def/EndRdx/Rchg(34), LucoftheG-Def(39), LucoftheG-Def/Rchg+(42) Level 16: Gravity Well -- Hct-Acc/Dmg/Rchg(A), Hct-Acc/Rchg(37), Hct-Dmg/Rchg(37), Hct-Dmg/EndRdx(37), Hct-Dam%(39), UnbCns-Dam%(39) Level 18: Sunless Mire -- Obl-Acc/Dmg/EndRdx/Rchg(A), Obl-Acc/Dmg/Rchg(34), Obl-Acc/Rchg(34), Obl-Dmg/Rchg(42), Obl-Dmg(45), Obl-%Dam(50) Level 20: Gravitic Emanation -- AbsAmz-Acc/Stun/Rchg(A), AbsAmz-Acc/Rchg(31), AbsAmz-Stun/Rchg(33), AbsAmz-EndRdx/Stun(33), SuddAcc--KB/+KD(43) Level 22: Stygian Circle -- PreOptmz-EndMod/End/Rech(A) Level 24: Dark Extraction -- SprEssTrn-Acc/Dmg/EndRdx/Rchg(A), SprEssTrn-Acc/Dmg/Rchg(25), SprEssTrn-Acc/Dmg(25), SprEssTrn-Dmg/EndRdx/Rchg(31), SprEssTrn-Dmg/Rchg(31), SprEssTrn-Rchg/Global Heal(48) Level 26: Quasar -- Arm-Acc/Dmg/Rchg(A), Arm-Acc/Rchg(27), Arm-Dmg/Rchg(27), Arm-Dmg/EndRdx(29), Arm-Dam%(29), SuddAcc--KB/+KD(48) Level 28: Inky Aspect -- Acc-I(A) Level 30: Shadow Slip -- Acc-I(A), RechRdx-I(48), RechRdx-I(50) Level 32: Eclipse -- EffAdp-Acc/Rchg(A), UnbGrd-EndRdx/Rchg(40), UnbGrd-Rchg/ResDam(40), UnbGrd-ResDam/EndRdx/Rchg(40), UnbGrd-ResDam(42) Level 35: Twilight Shield -- UnbGrd-ResDam/EndRdx(A), UnbGrd-ResDam/EndRdx/Rchg(36), UnbGrd-ResDam(36), UnbGrd-EndRdx/Rchg(36) Level 38: Combat Jumping -- LucoftheG-Def/Rchg+(A) Level 41: Stygian Return -- DctWnd-Heal/Rchg(A) Level 44: Maneuvers -- LucoftheG-Def/Rchg+(A) Level 47: Tactics -- RctRtc-Pcptn(A) Level 49: Vengeance -- LucoftheG-Def/Rchg+(A) Level 1: Brawl -- Acc-I(A) Level 1: Dark Sustenance Level 1: Shadow Step -- EndRdx-I(A) Level 1: Sprint -- UnbLea-Stlth(A) Level 2: Rest -- Heal-I(A) Level 10: Shadow Recall -- BlsoftheZ-ResKB(A) Level 1: Swift -- Flight-I(A) Level 1: Health -- Mrc-Rcvry+(A) Level 1: Hurdle -- Jump-I(A) Level 1: Stamina -- EndMod-I(A), EndMod-I(3) Level 50: Freedom Phalanx Reserve Level 50: Portal Jockey Level 50: Task Force Commander Level 50: The Atlas Medallion Level 50: Spiritual Core Paragon ------------ ------------
-
Of my faceplants of late, I find a lot of it tied into Bodyguard and how that functions. Might be worth looking at? To have it work, pets are in Follow Defensive. On teams that means 90% of the time they stand about doing mostly nothing (unless they get tagged by some AoE). Countless new players make the mistake of leaving pets in Defensive and contribute hardly anything with their primary to teams. Using Attack Aggressive has pets aggro and attack at will, but now you have no benefit from Bodyguard anymore. Your HP is pathetically low, and on Incarnate max diff one good hit can oneshot you (thus killing all your pets). So endgame you basically choose to have pets do nothing but stand about to soak hits and occasionally die to stray aggro, or actively engage and risk dying faster than oldschool Live Blasters used to. In short, I don’t think Bodyguard has ever really done anything for MMs outside of preventing PvP ganking. What do you guys think about Bodyguard working regardless of pet stance?
.mbd-MidsRebornv3.5.5(HomecomingIssue_27Page_6-DBVersion_2023.5.519)08_05_202306_46_31.png.584e6cefc1b4f43e950bbd51c117304c.png)