The Beta Account Center is temporarily unavailable
×
Double XP is active on all shards


oedipus_tex
-
Posts
2652 -
Joined
-
Last visited
-
Days Won
4
Content Type
Profiles
Forums
Events
Store
Articles
Patch Notes
Everything posted by oedipus_tex
-
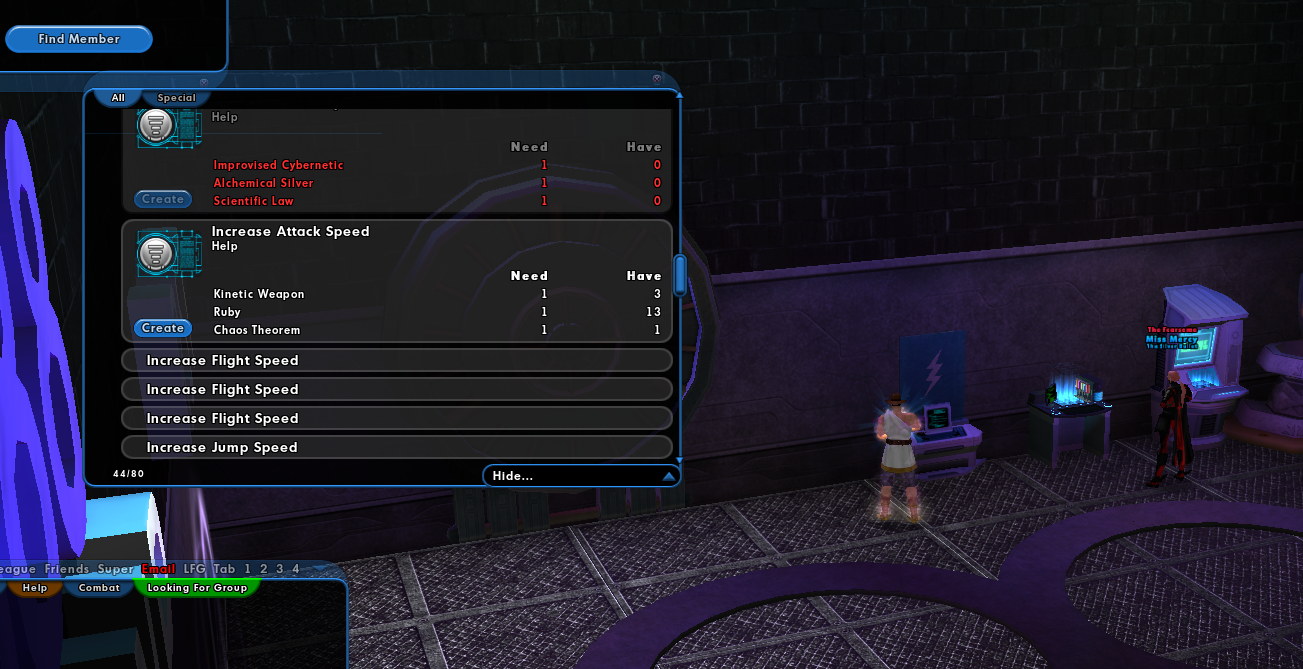
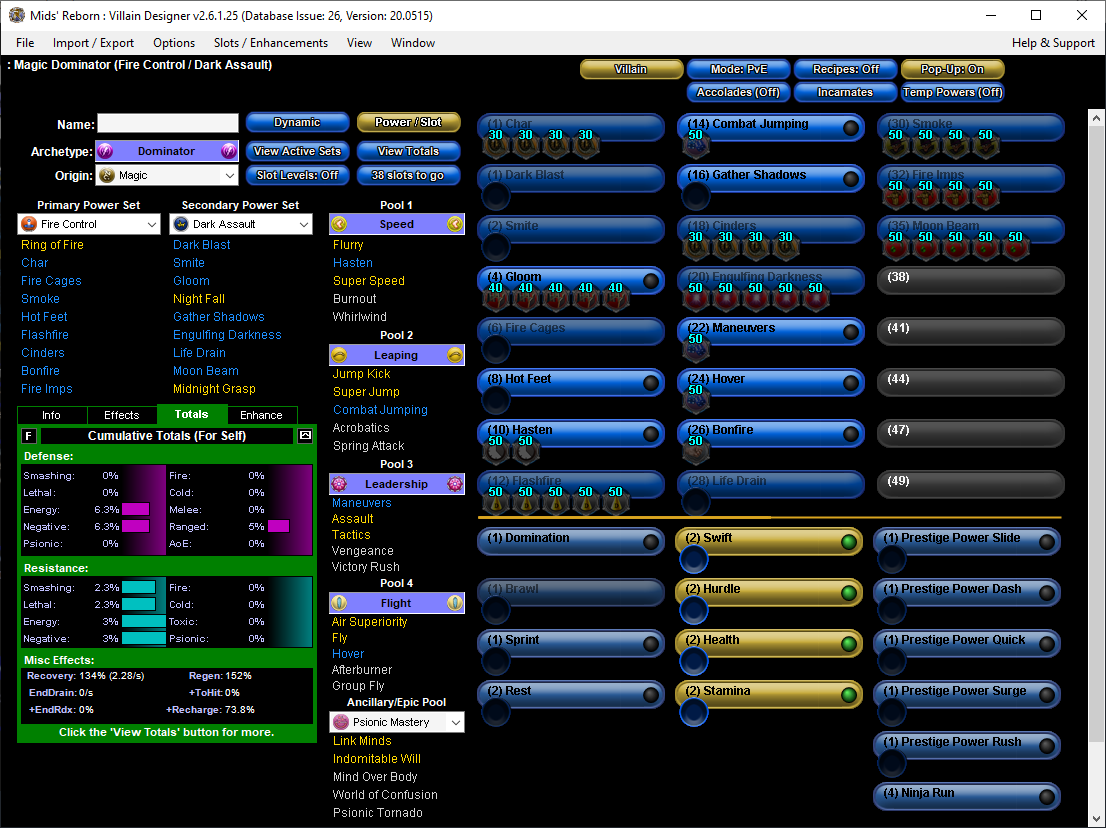
It seems like at this stage of the game hitting level 30-ish is swift business, but the final 20 levels are the harder part. If you're like me you have a number of characters in this not-quite-end-game state. These toons are unlikely to become your "main" (tho they may) and you're looking for a modest investment instead of a billion inf build. What's funny tho is its only the super high end builds we ever talk about, despite most of our toons not being there. So, behold the "Trust Fund Perma Dom," the Dominator who plans to spend (hopefully not too much of) someone else's money. This post defines a "trust fund" Dominator as: A character who is being "sponsored" by other characters have who have managed to acquire a stockpile of cash, generally in the range of 50-100 million influence A character who is either not yet level 50 or is not "main" enough to consider for a more expensive build A character who we want good, but not top end optimized performance. That is, a toon with good Return on Investment. Assumptions Obtaining perma-Domination is our primary goal. Defense or damage procs are nice to have if we can grab them, but obtaining perma dom is the main task at hand. The character is at or around level 35, so we don't get to consider many APP powers yet The character will rely on the hero base +20 Recharge buff to close the perma Dom gap, so we only need to hit around +75% Recharge before Hasten These are just my personal recommendations; other players may feel differently or have better advice Onto the build! General Philosophy In our pursuit of permadom, we still want a viable character. So we will resort to what I call the "Lagniappe method" of selecting powers. Lagniappe is a Louisiana-French word meaning something extra. We grab something extra here and there. If you can select an important power this level, take it The first time there is no important power, choose Hasten (always, no exceptions. there's a whole essay here I could write, but Hasten is the best power available to trust fund Dominators other than their actual controls) The second, third, fourth and fifth times, select a +Defense power (see LoTG rider powers below) Luck of the Gambler Rider Powers Luck of the Gambler +7.5% Recharge plays a huge roll in this build. You can slot it up to 5 times. Hasten - always take this first Combat Jumping Maneuvers Hover Stealth Grant Invis RE: Punch/Tough/Weave. This isn't for you. This eats up too many slots and your build isn't advanced enough to really benefit. If you decide to rebuild for late game, that's the time to consider these powers. Standard Slotting formula Arrange your slot picks so you end up with the following configuration. Most Dominators get some form of these powers. Single target Hold: 4 slots (Basilisk's Gaze) AoE Hold: 4 slots (Basilisk's Gaze) Pet: 4 slots (Expedient Reinforcement) Snipe: 5 slots (Sting of the Manticore) Attack slotting The key to any attack (other than single target melee attacks) is 5 slots. Try to hit 5 slots in at least a couple of single target ranged attacks, aoe attacks, or pbaoe attacks. You probably only have to do it with 1 or 2. Single target ranged: 5 slot Decimation PBAoE: 5 slot Obliteration Ranged AoE: 5 slot Positron's Blast Other powers Some mezz powers have dirt cheap IOs available. If you have a Confuse power: 5 slot Malaise's Illusions If you have a -ToHit power: 4 slot for Cloud Senses (if you need Accuracy) or 4 slot for Dark Watcher's Despair If you have a Stun power: 5 slot Stupefy If you have Bonfire/Earthquake: 1 slot Force Feedback Chance for +100% recharge Gotchas The main gotcha is you can only slot a particular bonus 5 times before it stops stacking. Mainly, this is an issue with the +6.25% bonus that appears on many sets. Example Build Here is one possible example I threw together. This build requires 4 LoTGs, 2 Basilisk Gazes. (The blank powers aren't truly "blank," they just arent filled in order to make what needed to be done for permadom more obvious). Closing the Gap For the final bit of recharge, visit a buff station in a hero base. Build any of the Increase Attack Speed buffs to gain +20 Recharge for 1 hour 30min. Wrapping Up/FAQ Am I really permadom after this? Yes, but only while the base buff lasts. Check on it every so often. How viable is this build versus a much more expensive end game build? Depends. But for any Dominator, going permadom is likely to significantly improve your character. How much does this cost? Much, much less than a true end game build, but still not cheap. The LoTGs are the most expensive individual pieces at around 6 mill each. The attack sets usually run around 2-3 million per piece. If I decide to upgrade this build to an end game build, which pieces carry over to the more expensive build? Good question. In general, not too much really needs to be replaced. Here's a rundown. Usually carried over: Luck of the Gambler almost always carries over. You would have to invest in these no matter what build you are making. Basilisk's Gaze is normally carried over. Sting of the Manticore (Snipe) is normally carried over. Expedient Reinforcement (pets) is normally carried over. Obliteration (PBAoE attack) is often carried over, depending on build needs. Usually not carried over: Cheap-o mezz sets like Malaise's Illusions or Stupefy. They can be directly replaced by better purples or ATOs. This is why they are so cheap to begin with. Some sets have a direct purple replacement Decimation is usually replaced by Apocalypse (but only once per build) Ragnorak often replaces Positron's Blast (but only once per build) In some builds, Armageddon or Superior Avalanche replaces Obliteration So why do top end builds cost so much more? When you start to approach the top end builds, they cost more because they incorporate defense and procs. Melee S/L Defense in particular is expensive. Here's an overview of the modifications: Incorporation of +3% global def procs Incorporation of Winter's Gift sets (not used by trust funders) Superior Ascendancy of the Dominator usually replaces a cheap-o mezz set Resist powers may be slotted with x4 Unbreakable Guard, which provides S/L and Melee defense Adding a 6th slot to Obliteration, if it is kept in the build

-
Sorry I'm not completely following. Did you mean Power Up, which enhances its duration? Domination doesn't enhance Arctic Air (tho it does protect it from being detoggled).
-
Before the proc changes, Contagious Confusion in Arctic Air was pretty effective. It's taken a hard nerf since those days tho. I still usually 6 slot the purple Confusion set for the +10 Recharge and +5 defense.
-
I'd probably do Clarion Radial Epiphany for the combo of mezz breaker and +Special. Kinetics doesn't need Ageless or Rebirth IMO. Barrier would be the only other one I'd really consider.
-
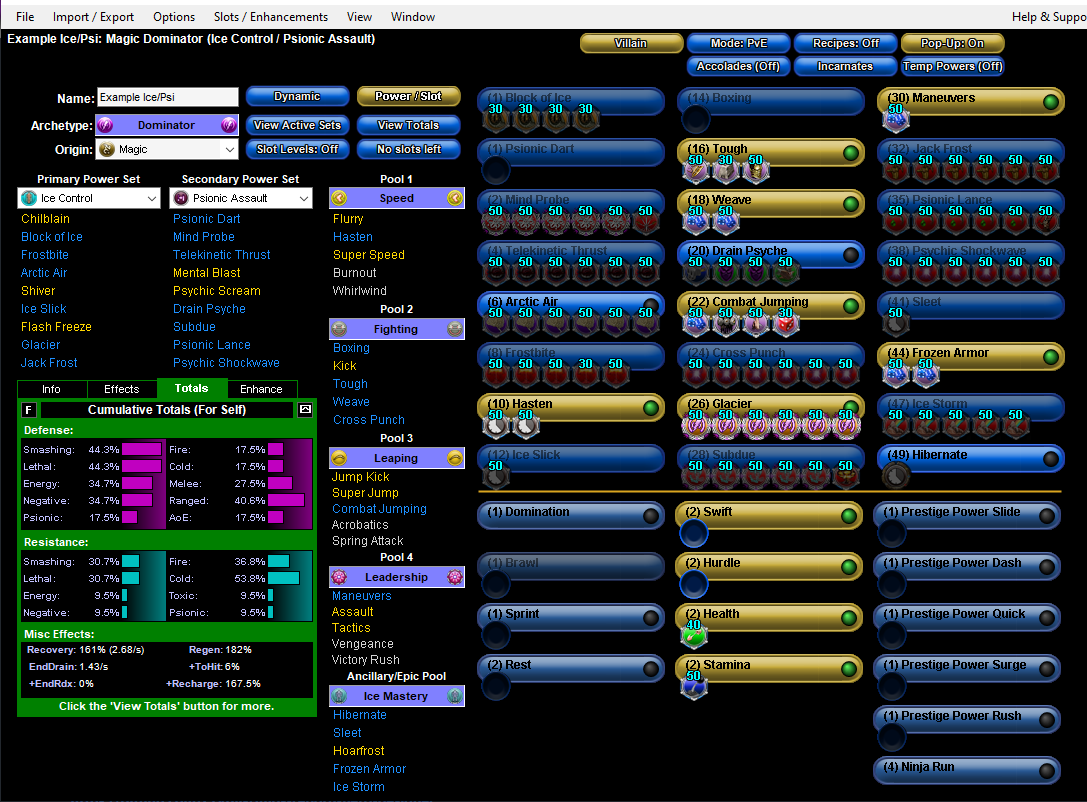
Since you mentioned Ice/Psi as an alt, I happen to a have a build for that for comparison. This one uses the Ice APP instead of Leviathan, but they are somewhat interchangeable. What's different about /Psi is we can assume Drain Psyche is supplying the Endurance. So, this would be paired with Destiny: Barrier, which at T4 keeps you capped to Ranged at all times. Meanwhile, S/L defense is always capped. Villain Plan by Mids' Reborn : Hero Designer 2.6.1.25 https://github.com/Crytilis/mids-reborn-hero-designer Click this DataLink to open the build! Example Ice/Psi: Level 50 Magic Dominator Primary Power Set: Ice Control Secondary Power Set: Psionic Assault Power Pool: Speed Power Pool: Fighting Power Pool: Leaping Power Pool: Leadership Ancillary Pool: Ice Mastery Villain Profile: Level 1: Block of Ice -- BslGaz-Acc/Hold(A), BslGaz-Acc/Rchg(3), BslGaz-Rchg/Hold(3), BslGaz-EndRdx/Rchg/Hold(5) Level 1: Psionic Dart -- Empty(A) Level 2: Mind Probe -- SprBlsCol-Rchg/HoldProc(A), SprBlsCol-Dmg/EndRdx/Acc/Rchg(5), SprBlsCol-Acc/Dmg(7), SprBlsCol-Dmg/EndRdx(7), SprBlsCol-Acc/Dmg/EndRdx(9), Hct-Dam%(50) Level 4: Telekinetic Thrust -- Mk'Bit-Acc/Dmg(A), Mk'Bit-Dmg/EndRdx(9), Mk'Bit-Dmg/Rchg(11), Mk'Bit-Acc/EndRdx/Rchg(11), Mk'Bit-Acc/Dmg/EndRdx/Rchg(42), Mk'Bit-Dam%(43) Level 6: Arctic Air -- CrcPrs-Conf(A), CrcPrs-Conf/EndRdx(13), CrcPrs-Conf%(13), CrcPrs-Conf/Rchg(15), CrcPrs-Acc/Conf/Rchg(15), CrcPrs-Acc/Rchg(17) Level 8: Frostbite -- PstBls-Dam%(A), PstBls-Dmg/EndRdx(45), PstBls-Acc/Dmg/EndRdx(46), PstBls-Dmg/Rchg(46), PstBls-Acc/Dmg(46) Level 10: Hasten -- RechRdx-I(A), RechRdx-I(17) Level 12: Ice Slick -- RechRdx-I(A) Level 14: Boxing -- Empty(A) Level 16: Tough -- UnbGrd-Max HP%(A), StdPrt-ResDam/Def+(19), GldArm-3defTpProc(19) Level 18: Weave -- LucoftheG-Def/Rchg+(A), LucoftheG-Def(50) Level 20: Drain Psyche -- EffAdp-Acc/Rchg(A), TchoftheN-Heal/HP/Regen/Rchg(21), TchoftheN-Acc/Heal(21), DctWnd-Heal/Rchg(23) Level 22: Combat Jumping -- LucoftheG-Def/Rchg+(A), ShlWal-ResDam/Re TP(23), Rct-ResDam%(25), Ksm-ToHit+(43) Level 24: Cross Punch -- Obl-Dmg(A), Obl-Acc/Rchg(25), Obl-Dmg/Rchg(27), Obl-Acc/Dmg/Rchg(27), Obl-Acc/Dmg/EndRdx/Rchg(29), Obl-%Dam(42) Level 26: Glacier -- SprAscoft-Acc/Conf/Hold/Immob/Sleep/Stun/Fear(A), SprAscoft-Conf/Hold/Immob/Sleep/Stun/Fear/Rchg(29), SprAscoft-EndRdx/Rchg(31), SprAscoft-Acc/Conf/Hold/Immob/Sleep/Stun/Fear/EndRdx(31), SprAscoft-Acc/Conf/Hold/Immob/Sleep/Stun/Fear/EndRdx/Rchg(43), SprAscoft-Rchg/+Dmg%(45) Level 28: Subdue -- SprWntBit-Rchg/SlowProc(A), SprWntBit-Dmg/EndRdx/Acc/Rchg(31), SprWntBit-Acc/Dmg/Rchg(33), SprWntBit-Acc/Dmg/EndRdx(33), SprWntBit-Dmg/Rchg(33), Apc-Dam%(42) Level 30: Maneuvers -- LucoftheG-Def/Rchg+(A) Level 32: Jack Frost -- ExpRnf-+Res(Pets)(A), ExpRnf-EndRdx/Dmg/Rchg(34), ExpRnf-Acc/Rchg(34), ExpRnf-Acc/Dmg(34), ExpRnf-Dmg/EndRdx(36), ExpRnf-Acc/Dmg/Rchg(36) Level 35: Psionic Lance -- StnoftheM-Dam%(A), StnoftheM-Dmg/EndRdx/Rchg(36), StnoftheM-Dmg/ActRdx/Rchg(37), StnoftheM-Acc/ActRdx/Rng(37), StnoftheM-Dmg/EndRdx(37), GldJvl-Dam%(39) Level 38: Psychic Shockwave -- Obl-Acc/Dmg/EndRdx/Rchg(A), Obl-%Dam(39), Obl-Dmg(39), Obl-Acc/Rchg(40), Obl-Dmg/Rchg(40), Obl-Acc/Dmg/Rchg(40) Level 41: Sleet -- RechRdx-I(A) Level 44: Frozen Armor -- LucoftheG-Def/Rchg+(A), LucoftheG-Def(45) Level 47: Ice Storm -- Rgn-Knock%(A), Rgn-Dmg/EndRdx(48), Rgn-Acc/Rchg(48), Rgn-Acc/Dmg/Rchg(48), Rgn-Dmg/Rchg(50) Level 49: Hibernate -- RechRdx(A) Level 1: Brawl -- Empty(A) Level 1: Domination Level 1: Quick Form Level 1: Prestige Power Dash -- Empty(A) Level 1: Prestige Power Slide -- Empty(A) Level 1: Prestige Power Quick -- Empty(A) Level 1: Prestige Power Rush -- Empty(A) Level 1: Prestige Power Surge -- Empty(A) Level 1: Sprint -- Empty(A) Level 2: Rest -- Empty(A) Level 4: Ninja Run Level 2: Swift -- Empty(A) Level 2: Health -- Mrc-Rcvry+(A) Level 2: Hurdle -- Empty(A) Level 2: Stamina -- PrfShf-End%(A) ------------ ------------ Set Bonus Totals: 23% DamageBuff(Smashing) 23% DamageBuff(Lethal) 23% DamageBuff(Fire) 23% DamageBuff(Cold) 23% DamageBuff(Energy) 23% DamageBuff(Negative) 23% DamageBuff(Toxic) 23% DamageBuff(Psionic) 14.75% Defense(Smashing) 14.75% Defense(Lethal) 6% Defense(Fire) 6% Defense(Cold) 23.19% Defense(Energy) 23.19% Defense(Negative) 6% Defense(Psionic) 16% Defense(Melee) 29.13% Defense(Ranged) 6% Defense(AoE) 4% Enhancement(Stunned) 4.4% Enhancement(Terrorized) 57% Enhancement(Accuracy) 4% Enhancement(Held) 8% Enhancement(Confused) 8% Enhancement(Immobilized) 8% Enhancement(Sleep) 97.5% Enhancement(RechargeTime) 110.6 HP (10.88%) HitPoints MezResist(Confused) 52.5% MezResist(Held) 52.5% MezResist(Immobilized) 52.5% MezResist(Sleep) 52.5% MezResist(Stunned) 52.5% MezResist(Terrorized) 52.5% MezResist(Teleport) 100% (20% chance) 20.5% (0.34 End/sec) Recovery 42% (1.78 HP/sec) Regeneration 30% ResEffect(SpeedFlying) 30% ResEffect(RechargeTime) 30% ResEffect(SpeedRunning) 26.25% Resistance(Smashing) 26.25% Resistance(Lethal) 38.25% Resistance(Fire) 38.25% Resistance(Cold) 19.5% Resistance(Energy) 19.5% Resistance(Negative) 19.5% Resistance(Toxic) 19.5% Resistance(Psionic) | Copy & Paste this data into Mids' Reborn : Hero Designer to view the build | |-------------------------------------------------------------------| |MxDz;1478;677;1354;HEX;| |78DA6594596F125114C7EF3083140A022D5B5BBA510B2D500A768BD1C498B61A6D4| |99AF8AAD6091DE92805C260521F7D377189C6CFE0FAA2C6BA7D0797AA9F425BAD2F| |462B1EE77F5A1A6702F9DDFBBF67B9E77098FCEA8CFBF189AB4785E49D2EA986B13| |85359D1CB6ABD52B3E7D5A25E908510DED95575A55AD2FA4E16B4D105437790D6BD| |6BB7385D29D76B9552864E77D6FDCDD36386A15E2ED533E45729EB859DBD702D54C| |8E77455D3963CE6F2B85E5CAEEBE5A2DBDCCD6B6A9536DE9DCD92563396F56AE76C| |552F9899F2AA51D76A579AF78DD0ADE2F49DF87765F369C862DD46575584ED23F31| |3A87C061D4D5BFAD0235A4891A0D8A53B8A1039B2BE0DEEBBC1BC09B6DC0273299B| |4927F9CAEC2B5F10B02982AE65A60E0E5F049397C02972B4B3AFFD0CE2B9CF33557| |0FF59E639D0B7084E92AF03BE8A630DF1D24FC191E7CC67C2AC78E409F63172709A| |853624670A9A8F7988E2B572575A5993C8DEC39AC7EC944C8A17116CDE9FB269D51| |696CC2C6D07B157C8C6CF59FC4109DD0A806E3269377BDD90DBAFA39240007E8120| |18CAC336447182882307394E680E36912D30B98D0AAF0D0A11E64E867F216EE437D| |8B9CDFC03461BE0B0408CC3840EE4B177AC418BBE007B5E325F71BED760FA0DE821| |7471DEAE47988C9E8760DF03E67DE63D703887FC7EAAAF1B794537D77784E2F572B| |CDE1FB0EBDF626E3037C1816FCCEF3C21E41B63DFD83A7EC1810FE081F7CC77CCB7| |603C8D3ABC8441F61DE4FEC4B93F71EE6782FB99E07E26B89F11BF10433C25433C3| |95DA4A57806525C5B9A67204A67199EDCCC14628C4E322798E3606E0CEC209F2CE7| |C8D25A28B2882AFFFF8F634DA531976CAE9316CBAC45C95994318B326E51E62DCA8| |2B2FB2E1192A9387DBB6F88C617179D4A7B4F37F62AA7689150C4578BD5E65EE52E| |7AF217045BFADA| |-------------------------------------------------------------------|
-
A constant hazard for both Ice and Electric Control is getting detoggled, which drops your PBAoE aura and allows enemies to resume attacking. Elec Affinity is one of the few secondaries that provides mezz protection, so its always going to pair well with either set. That said, Ice/Time has a ton of synergy and shouldn't be overlooked for reasons Coyote listed.
-
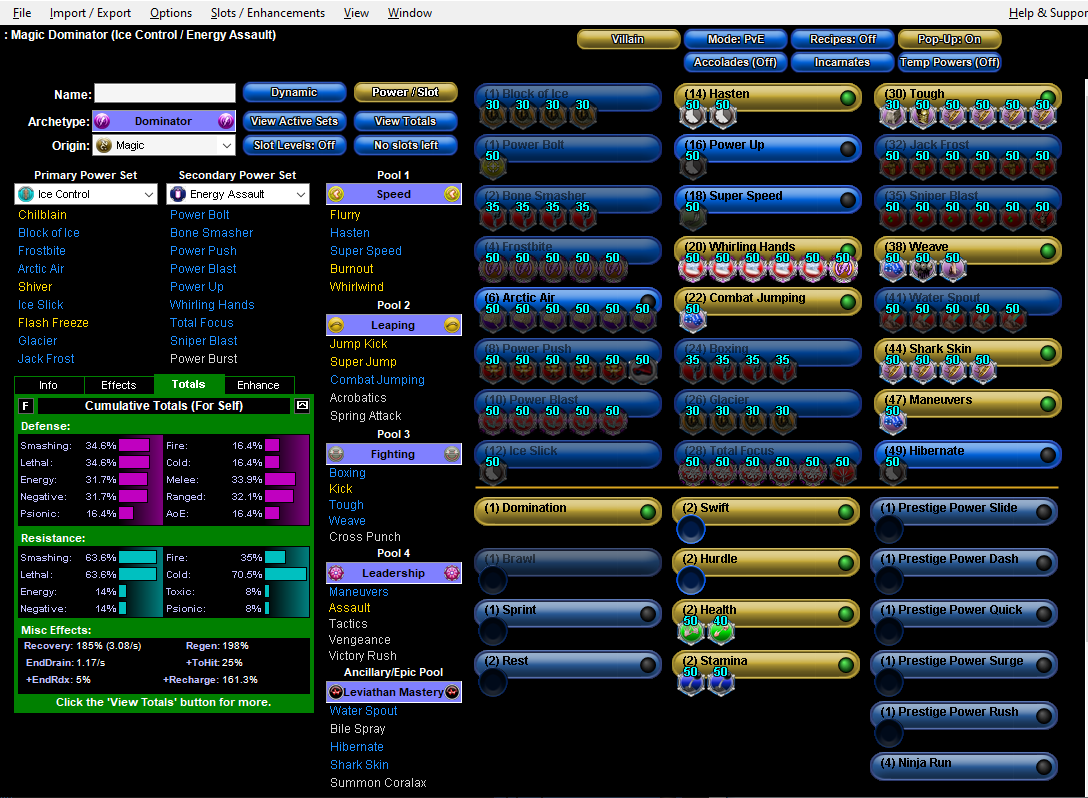
Welcome to the latest episode of "Ice Control is hard to build for," starring you. 🙂 I had to move the pieces around a few times until I came up with something I felt would optimize this combo. There are some hard decisions to make here. Ultimately I felt that Unleash Potential was costing the build too much. It can't be perma'ed and effectively its no different from Purple inspirations. It made more sense, to me, to jettison it and try to get Defense to a couple of positions into the 32.5% range or higher. That way one small purple (+12.5%) will soft cap you. You'll notice I made the difficult decision to move the Chance for +Damage proc from Glacier to Whirling Hands. You lose some Defense from this (+5 Ranged defense, ouch) but the damage proc is much more likely to go off. Note I also swapped the Ice APP for the Leviathan power pool. Here you'll still get Hibernate, but get a S/L resist armor instead of a Defense armor. Water Spout is a power I slept on for a long time without realizing how effective it is. It's especially great for adding safety. You could swap this back if you wanted. Power Push has 100% chance to knockback. Converted to knockdown, this power can create an attack cycle bosses can't escape. You can drop the KD to KB IO if you want, if you consistently plan to use Frostbite first. For the Alpha slot, I swapped to Intuition Paragon Radial, which provides: Hold duration (block of ice and glacier), Defense debuff (Water Spout), Range (all powers), Slow Movement (Arctic Air mainly), ToHit Debuff (not really relevant here) and Damage (most assault powers). Villain Plan by Mids' Reborn : Hero Designer 2.6.1.25 https://github.com/Crytilis/mids-reborn-hero-designer Click this DataLink to open the build! Level 50 Magic Dominator Primary Power Set: Ice Control Secondary Power Set: Energy Assault Power Pool: Speed Power Pool: Leaping Power Pool: Fighting Power Pool: Leadership Ancillary Pool: Leviathan Mastery Villain Profile: Level 1: Block of Ice -- BslGaz-Acc/Hold(A), BslGaz-Acc/Rchg(3), BslGaz-Rchg/Hold(3), BslGaz-EndRdx/Rchg/Hold(5) Level 1: Power Bolt -- Acc-I(A) Level 2: Bone Smasher -- KntCmb-Acc/Dmg(A), KntCmb-Dmg/EndRdx(5), KntCmb-Dmg/Rchg(7), KntCmb-Dmg/EndRdx/Rchg(7) Level 4: Frostbite -- SprAscoft-Acc/Conf/Hold/Immob/Sleep/Stun/Fear/EndRdx/Rchg(A), SprAscoft-Acc/Conf/Hold/Immob/Sleep/Stun/Fear/EndRdx(48), SprAscoft-EndRdx/Rchg(50), SprAscoft-Conf/Hold/Immob/Sleep/Stun/Fear/Rchg(50), SprAscoft-Acc/Conf/Hold/Immob/Sleep/Stun/Fear(50) Level 6: Arctic Air -- CrcPrs-Conf(A), CrcPrs-Conf/Rchg(11), CrcPrs-Acc/Conf/Rchg(11), CrcPrs-Acc/Rchg(13), CrcPrs-Conf/EndRdx(13), CrcPrs-Conf%(15) Level 8: Power Push -- Apc-Acc/Dmg/Rchg(A), Apc-Dmg/Rchg(15), Apc-Acc/Rchg(17), Apc-Dmg/EndRdx(17), Apc-Dam%(19), SuddAcc--KB/+KD(19) Level 10: Power Blast -- SprWntBit-Rchg/SlowProc(A), SprWntBit-Dmg/EndRdx/Acc/Rchg(21), SprWntBit-Acc/Dmg/Rchg(21), SprWntBit-Acc/Dmg/EndRdx(23), SprWntBit-Acc/Dmg(23) Level 12: Ice Slick -- RechRdx-I(A) Level 14: Hasten -- RechRdx-I(A), RechRdx-I(25) Level 16: Power Up -- RechRdx-I(A) Level 18: Super Speed -- BlsoftheZ-ResKB(A) Level 20: Whirling Hands -- SprAvl-Rchg/KDProc(A), SprAvl-Acc/Dmg/EndRdx/Rchg(25), SprAvl-Acc/Dmg/Rchg(27), SprAvl-Acc/Dmg/EndRdx(27), SprAvl-Dmg/EndRdx(29), SprAscoft-Rchg/+Dmg%(29) Level 22: Combat Jumping -- LucoftheG-Def/Rchg+(A) Level 24: Boxing -- KntCmb-Acc/Dmg(A), KntCmb-Dmg/EndRdx(31), KntCmb-Dmg/Rchg(31), KntCmb-Dmg/EndRdx/Rchg(31) Level 26: Glacier -- BslGaz-Acc/Hold(A), BslGaz-Acc/Rchg(33), BslGaz-Rchg/Hold(33), BslGaz-EndRdx/Rchg/Hold(33) Level 28: Total Focus -- SprBlsCol-Acc/Dmg(A), SprBlsCol-Dmg/EndRdx(34), SprBlsCol-Acc/Dmg/EndRdx(34), SprBlsCol-Acc/Dmg/Rchg(34), SprBlsCol-Dmg/EndRdx/Acc/Rchg(36), Hct-Dam%(36) Level 30: Tough -- StdPrt-ResDam/Def+(A), GldArm-3defTpProc(36), UnbGrd-Max HP%(37), UnbGrd-ResDam(37), UnbGrd-ResDam/EndRdx(37), UnbGrd-Rchg/ResDam(39) Level 32: Jack Frost -- ExpRnf-Acc/Rchg(A), ExpRnf-Acc/Dmg(39), ExpRnf-Dmg/EndRdx(39), ExpRnf-Acc/Dmg/Rchg(40), ExpRnf-EndRdx/Dmg/Rchg(40), ExpRnf-+Res(Pets)(40) Level 35: Sniper Blast -- StnoftheM-Acc/Dmg(A), StnoftheM-Dam%(42), StnoftheM-Dmg/EndRdx(42), StnoftheM-Dmg/ActRdx/Rchg(42), StnoftheM-Dmg/EndRdx/Rchg(43), GldJvl-Dam%(43) Level 38: Weave -- LucoftheG-Def/Rchg+(A), ShlWal-ResDam/Re TP(43), Rct-ResDam%(45) Level 41: Water Spout -- Rgn-Knock%(A), Rgn-Dmg/EndRdx(45), Rgn-Acc/Rchg(45), Rgn-Acc/Dmg/Rchg(46), Rgn-Dmg/Rchg(46) Level 44: Shark Skin -- UnbGrd-ResDam(A), UnbGrd-ResDam/EndRdx(46), UnbGrd-EndRdx/Rchg(48), UnbGrd-ResDam/EndRdx/Rchg(48) Level 47: Maneuvers -- LucoftheG-Def/Rchg+(A) Level 49: Hibernate -- RechRdx-I(A) Level 1: Brawl -- Empty(A) Level 1: Domination Level 1: Quick Form Level 1: Prestige Power Dash -- Empty(A) Level 1: Prestige Power Slide -- Empty(A) Level 1: Prestige Power Quick -- Empty(A) Level 1: Prestige Power Rush -- Empty(A) Level 1: Prestige Power Surge -- Empty(A) Level 1: Sprint -- Empty(A) Level 2: Rest -- Empty(A) Level 4: Ninja Run Level 2: Swift -- Empty(A) Level 2: Health -- NmnCnv-Regen/Rcvry+(A), Mrc-Rcvry+(9) Level 2: Hurdle -- Empty(A) Level 2: Stamina -- PrfShf-End%(A), PrfShf-EndMod(9) Level 50: Barrier Core Epiphany Level 50: Assault Core Embodiment Level 50: Degenerative Core Flawless Interface Level 50: Intuition Radial Paragon ------------ ------------ Set Bonus Totals: 18% DamageBuff(Smashing) 18% DamageBuff(Lethal) 18% DamageBuff(Fire) 18% DamageBuff(Cold) 18% DamageBuff(Energy) 18% DamageBuff(Negative) 18% DamageBuff(Toxic) 18% DamageBuff(Psionic) 24.13% Defense(Smashing) 24.13% Defense(Lethal) 6% Defense(Fire) 6% Defense(Cold) 21.31% Defense(Energy) 21.31% Defense(Negative) 6% Defense(Psionic) 23.5% Defense(Melee) 21.63% Defense(Ranged) 6% Defense(AoE) 4% Enhancement(Held) 4% Enhancement(Stunned) 8% Enhancement(Immobilized) 30% Enhancement(Accuracy) 5% Enhancement(Max EnduranceDiscount) 4.4% Enhancement(Terrorized) 8% Enhancement(Confused) 8% Enhancement(Sleep) 91.25% Enhancement(RechargeTime) 7.5% SpeedFlying 137.3 HP (13.5%) HitPoints 7.5% JumpHeight 7.5% SpeedJumping Knockback (Mag -4) Knockup (Mag -4) MezResist(Confused) 55% MezResist(Held) 55% MezResist(Immobilized) 55% MezResist(Sleep) 55% MezResist(Stunned) 55% MezResist(Terrorized) 55% MezResist(Teleport) 100% (20% chance) 24% (0.4 End/sec) Recovery 38% (1.61 HP/sec) Regeneration 45% ResEffect(SpeedFlying) 45% ResEffect(RechargeTime) 45% ResEffect(SpeedRunning) 18% Resistance(Smashing) 18% Resistance(Lethal) 45% Resistance(Fire) 45% Resistance(Cold) 24% Resistance(Energy) 24% Resistance(Negative) 18% Resistance(Toxic) 18% Resistance(Psionic) 7.5% SpeedRunning | Copy & Paste this data into Mids' Reborn : Hero Designer to view the build | |-------------------------------------------------------------------| |MxDz;1530;694;1388;HEX;| |78DA6594C96F127114C76760B02D0529620B5DA048ED225BC16E319A18D3C56821A| |936F1A4E2A49DC0240804D0D8A331DEB59A7852EBAD713BBBFE0D1AAD7AF166BC59| |E9E6761A1FF3BE05929964F2F9FDDEF27BEFF7DE9B495E9BB23D3F79FDB8203A26B| |372A9949ACA5F567372395FB424E5B4BA6016E869A2D75B53A426F3B972319F8D9E| |5A5076D7FEBAF644A9245FC996A3D339A5985EDADD0AD6B93CB9CC171465D1A62F1| |38A5C507369BBBE9951D39932ED1CBBAA45A558CAA805FF74415D88D60F4F285755| |B99C9173A9A45C2A2BC5250FA516A6774C4FB4FA686661CD44F94A82E913F899297| |D61FE30D56C05A18B109784759289F017E70801B23FC3DC73169C678E532C0EA749| |E63766DD7FF83533FE0A7C09BE604E102CEC63B19C37E932EB05F022D396022F31F| |7CACC9F266E41D5B7290A5D84D9360CC698FBE2E037496785B62DC8B5E519CBF63F| |059F303B1E83ABCC23946B2BEAD31AE2FA042801BB5E204DB443E60137288603F60| |EC8FAC8DE0999F32BE7B44970F11916D7238EE55961763D041F307BEE836FB97E1D| |745E3BFB0AEDD505C94492B9D133377AE643CF7CE8990F3D3B4AC774C2B613F3E1C| |77CF8311F7ECCC716A11BF5EEBEC5791CB80D2E8377987D77C110DFD14C39797147| |AF5BD4CFEB3BCC7738F80FDC017F3107FE308F117A11B7B7C2E70D6C809BCCC12D7| |01BDC6156B701F806DE710F0EAD81EFC10FCCE04730CC7125CAB99F7336F5A3B6C1| |59D685B79937084398A3A1098E191E07C7989151708479937C427CAE39843B4770E| |7E1DFE05FA6937288A2BF51E4F0DD260831CC500C73D523357CBB1A3DD5E6E2D3D5| |B4D9604DAB050D963183246E908C1824A30649C22099936A7F0F41D4252D6DB57F8| |4B66E25ADD8A8ADD425A2788E6FDB7C9A38485FBBC17AA3D1FA1ED7B679995935D0| |565CB446B0559A8238CA31E3AEAFF5476A10FC07B8880D8D| |-------------------------------------------------------------------|
-
 I feel like the Control sets stand out as being a ripe place for new powerset development with a lot of untapped potential. This post isn't an idea in and of itself. I just wanted to make a list of "low hanging fruit" for Control sets where new powers could be created from changing a few attributes of some existing powers. This will hopefully help folks job up a few ideas for their designs. Feel free to add/contribute to this list. Arctic Air or Choking Cloud (PBAoE % chance to control aura) with: Immobilize Terrorize Stun Knockdown Knockup Sleep Ice Slick, Static Field or Shadow Field (pulsing, placeable psuedo pet) with Immobilize Stun Terrorize Confuse Knockup Spectral Terror (immobile pet with a mezz power) with Confuse Stun Hold Immobilize Knockdown Knockup Sleep Synaptic Overload or Jolting Chain (chain mezz) with Immobilize Hold Stun Terrorize Knockup Sleep Heart of Darkness or Cinders (clickable PBAoE mezz) with Confuse Terrorize Immobilize Knockdown Knockup Sleep Wormhole with Confuse Immobilize Hold Terrorize Knockup Sleep Mass Confusion or Mass Hypnosis (clickable ranged radial mezz) with Terrorize Knockdown Knockup Sleep Telekinesis (mezz toggle) with Confuse Immobilize Terrorize Knockdown Knockup Sleep Lifegiving Spores (placeable toggle patch) with Hold Confuse Immobilize Stun Terrorize Knockdown Knockup Sleep What else?
 -
There are some interesting ideas here. I'll be honest, I'm not a fan of how City of Heroes handles AV fights in general, so any minor modifications to that system are hard for me to rate. Ideally I'd like to jettison the whole thing and start over. What should be a dramatic and memorable confrontation often is just a click fest against a bag of HP, and minor modifications to that system are unlikely to change that. The kind of game I wish CoX looked to for inspiration both for AV fights and level design is "beat em ups" like Streets of Rage or the old Teenage Mutant Ninja Turtles arcade game. In those games, boss encounters are meaningful. It's partly an aesthetics thing. Boss attacks "connect" with the target and get an audience reaction, and there's a real tangible sense who is taking damage at a given moment, because attacks interrupt each other. That just doesn't happen in CoX. The hard part, of course, is translating a dynamic fighter into an MMO. How mezz should play into that I'm not sure.
-
You can have up to 1000 characters per server so no need to worry if one specifically doesnt work long term. If you love Ice Control and want something better at soloing you could reroll to Ice Control Dominator. Then youd still get Cold Dominations Sleet power at level 35. Ice Control on Dominators is IMO still one of the lower performing Dominator sets, but it's still playable. Having an Assault set takes the bite out of Ice's poor damage. On Doms Ice/Ice is a solid choice although to be honest I'm a bigger fan of Ice/Dark r Ice/Psi which help patch up some of Ice's survivability issues.
-
Unless you are looking for a novelty character specifically, I'd encourage a different combo. Dont get me wrong. Its playable. But it's also two of the weakest sets available to Controllers, and together specifically there is a very limited synergy. A few alternatives: - Dark/Sonic Controller offers many similar powers but is a more suitable pairing. - Sonic/Sonic/Psi Defender gets access to some Mind Control powers while remaining an excellent team debuffer. - Illusion/Sonic Controller at least has pets you can hang Sonics debuff ring on, while being conceptually similar to Mind - Gravity/Sonic Controller is another combo that conceptually could be played as telekinesis and is probably more solid as a combo
-
One other synergy I forgot to mention between Dark and Electric: both sets benefit a lot from Power Boost. Power Boost increases the -ToHit in Dark and most of the heals, absorb, end mod, etc in Electric. So thats another reason I consider them a good pairing.
-
Here's my (unproven) Dark/EA build. I do have a character of this type who is level 46-ish. Haven't actually built this out in game tho to see how this plays. Hero Plan by Mids' Reborn : Hero Designer 2.6.1.25 https://github.com/Crytilis/mids-reborn-hero-designer Click this DataLink to open the build! Level 50 Magic Controller Primary Power Set: Darkness Control Secondary Power Set: Electrical Affinity Power Pool: Flight Power Pool: Leadership Power Pool: Speed Ancillary Pool: Primal Forces Mastery Hero Profile: Level 1: Dark Grasp -- BslGaz-Acc/Hold(A), BslGaz-Acc/Rchg(3), BslGaz-Acc/EndRdx/Rchg/Hold(3), BslGaz-Rchg/Hold(5) Level 1: Shock -- EndMod-I(A) Level 2: Living Shadows -- PstBls-Dam%(A), TraoftheH-Dam%(5), CldSns-%Dam(7), Bmbdmt-+FireDmg(7), Bmbdmt-Dam(9), Bmbdmt-Dam/Rech(9) Level 4: Rejuvenating Circuit -- Heal-I(A) Level 6: Possess -- CrcPrs-Conf%(A), CrcPrs-Conf/EndRdx(13), CrcPrs-Conf(15), CrcPrs-Conf/Rchg(15), CrcPrs-Acc/Conf/Rchg(17), CrcPrs-Acc/Rchg(17) Level 8: Fearsome Stare -- CldSns-ToHitDeb(A), CldSns-Acc/ToHitDeb(19), CldSns-ToHitDeb/EndRdx/Rchg(19), CldSns-Acc/EndRdx/Rchg(21), CldSns-%Dam(21), CldSns-Acc/Rchg(23) Level 10: Galvanic Sentinel -- EndMod-I(A) Level 12: Heart of Darkness -- SprWiloft-Acc/Conf/Hold/Immob/Sleep/Stun/Fear(A), SprWiloft-Conf/Hold/Immob/Sleep/Stun/Fear/Rchg(23), SprWiloft-EndRdx/Rchg(25), SprWiloft-Acc/Conf/Hold/Immob/Sleep/Stun/Fear/EndRdx(25), SprWiloft-Acc/Conf/Hold/Immob/Sleep/Stun/Fear/EndRdx/Rchg(27), SprWiloft-Rchg/Dmg%(27) Level 14: Energizing Circuit -- EndMod-I(A) Level 16: Faraday Cage -- StdPrt-ResDam/Def+(A), UnbGrd-EndRdx/Rchg(29), UnbGrd-ResDam/EndRdx/Rchg(29), UnbGrd-ResDam(31), UnbGrd-ResDam/EndRdx(31) Level 18: Hover -- ShlWal-ResDam/Re TP(A), LucoftheG-Def/Rchg+(31), Rct-ResDam%(34) Level 20: Empowering Circuit -- RechRdx-I(A) Level 22: Haunt -- ExpRnf-Acc/Rchg(A), ExpRnf-Dmg/EndRdx(33), ExpRnf-+Res(Pets)(33), ExpRnf-Acc/Dmg/Rchg(33), ExpRnf-EndRdx/Dmg/Rchg(34), ExpRnf-Acc/Dmg(34) Level 24: Maneuvers -- LucoftheG-Def/Rchg+(A), LucoftheG-Def(46), LucoftheG-Def/EndRdx(50) Level 26: Shadow Field -- UnbCns-EndRdx/Hold(A), UnbCns-Acc/Rchg(36), UnbCns-Acc/Hold/Rchg(36), UnbCns-Hold/Rchg(36), UnbCns-Hold(37) Level 28: Defibrillate -- RechRdx-I(A) Level 30: Hasten -- RechRdx-I(A), RechRdx-I(37) Level 32: Umbra Beast -- ExpRnf-Acc/Dmg(A), ExpRnf-Acc/Rchg(37), ExpRnf-EndRdx/Dmg/Rchg(39), ExpRnf-Dmg/EndRdx(39), SlbAll-Build%(39), OvrFrc-Dam/KB(40) Level 35: Insulating Circuit -- NmnCnv-Regen/Rcvry+(A), NmnCnv-Heal(40), NmnCnv-Heal/EndRdx/Rchg(40), NmnCnv-Heal/Rchg(42), NmnCnv-EndRdx/Rchg(42), NmnCnv-Heal/EndRdx(42) Level 38: Amp Up -- RechRdx-I(A) Level 41: Power Blast -- Apc-Dam%(A), Apc-Dmg/EndRdx(43), Apc-Dmg/Rchg(43), Apc-Acc/Dmg/Rchg(43), Apc-Acc/Rchg(45) Level 44: Temp Invulnerability -- GldArm-3defTpProc(A), UnbGrd-Max HP%(45), UnbGrd-ResDam/EndRdx/Rchg(45), UnbGrd-ResDam/EndRdx(46), UnbGrd-Rchg/ResDam(46) Level 47: Energy Torrent -- FrcFdb-Rechg%(A), PstBls-Acc/Dmg(48), PstBls-Dmg/EndRdx(48), PstBls-Dmg/Rchg(48), PstBls-Dmg/Rng(50), PstBls-Dam%(50) Level 49: Power Boost -- RechRdx-I(A) Level 1: Brawl -- Empty(A) Level 1: Containment Level 1: Prestige Power Dash -- Empty(A) Level 1: Prestige Power Slide -- Empty(A) Level 1: Prestige Power Quick -- Empty(A) Level 1: Prestige Power Rush -- Empty(A) Level 1: Prestige Power Surge -- Empty(A) Level 1: Sprint -- Empty(A) Level 2: Rest -- Empty(A) Level 4: Ninja Run Level 2: Swift -- Empty(A) Level 2: Health -- Mrc-Rcvry+(A), Pnc-Heal/+End(11) Level 2: Hurdle -- Empty(A) Level 2: Stamina -- EndMod-I(A), PrfShf-End%(11), EndMod-I(13) Level 50: Intuition Radial Paragon ------------ ------------ Set Bonus Totals: 18% DamageBuff(Smashing) 18% DamageBuff(Lethal) 18% DamageBuff(Fire) 18% DamageBuff(Cold) 18% DamageBuff(Energy) 18% DamageBuff(Negative) 18% DamageBuff(Toxic) 18% DamageBuff(Psionic) 12.25% Defense(Melee) 9.13% Defense(Smashing) 9.13% Defense(Lethal) 6% Defense(Fire) 6% Defense(Cold) 18.81% Defense(Energy) 18.81% Defense(Negative) 6% Defense(Psionic) 27.88% Defense(Ranged) 6% Defense(AoE) 2.25% Max End 39% Enhancement(Accuracy) 5% Enhancement(Max EnduranceDiscount) 87.5% Enhancement(RechargeTime) 5% Enhancement(Range) 8% Enhancement(Confused) 6% Enhancement(Heal) 4% Enhancement(Stunned) 4% Enhancement(Held) 4.4% Enhancement(Terrorized) 8% Enhancement(Immobilized) 8% Enhancement(Sleep) 7.5% SpeedFlying 137.3 HP (13.5%) HitPoints 7.5% JumpHeight 7.5% SpeedJumping MezResist(Confused) 40% MezResist(Held) 40% MezResist(Immobilized) 40% MezResist(Sleep) 40% MezResist(Stunned) 40% MezResist(Terrorized) 40% MezResist(Teleport) 100% (20% chance) 12.5% (0.21 End/sec) Recovery 48% (2.03 HP/sec) Regeneration 24% Resistance(Smashing) 24% Resistance(Lethal) 26.25% Resistance(Fire) 26.25% Resistance(Cold) 27.75% Resistance(Energy) 27.75% Resistance(Negative) 18% Resistance(Toxic) 18% Resistance(Psionic) 7.5% SpeedRunning | Copy & Paste this data into Mids' Reborn : Hero Designer to view the build | |-------------------------------------------------------------------| |MxDz;1477;674;1348;HEX;| |78DA6594CB4F135114C6EF4CA7601FD8561EE529504A41A0A555F746CBC3284D50D| |4955A27650A2343DB4C6B224B17FE0D2EDCFB4CDCF888FF83D1951AB7C667542820| |BE16663CCCF9688933C9E437F7BBF77CE7BB773ACD5C9DF03F98BE764448C1B4A19| |6CBD974B150318B86A199EE8CBAA0E7C4F6D548F7407D666751624235970A5ABD6A| |F79A6357F2F9C4A4A1E52AA69E538DECD17C5E2FE89515E19B2D52E994A12F2C560| |2F6F38CA6CE6B6679512FFD3FF6DAE3B992A6CD774E96F45C62D6D497C96CAA68E6| |B47236A3962B9AB9D24EF162747F090B5C964BBC9485E85184FC0A7CC3545E33174| |66A6B85E823A414F195EA25D6DCD253D6949B92CD86CF5CD720BBEDF19EBF0AD362| |2E929F0B7EAE28D77E233F37FCDCAA6C6BFE4BCCBDE7C10BCCE04530CB5C0DF3B16| |FD736BEE3DEFBDE831F992D9F40646BFBC0D4298B07593CD8DB1AF9F9E0E7BBE5B2| |B5B6DBCCF63BE05D66E73DF03EF332F935C1AF097E4BA405ECC3B2944058B2FB76F| |FE4F5DDBF99FBB7C01F4C0F6D28C43572E824E65AF97CFBBFF3D820DF66F46A1EE5| |5E55CADE8AECAD553E9FBE0D700BDC94E103AE3343D4338C9E61F48AB7305341E63| |AF977B0BFD2719CEB06A6C1297092199D602E53CE2EE4EC42CE08F5EAE15E520FB4| |28B8413D7AB1875E648B622F31648E614FB13473E82D9F49817A45501B39C79987C| |E82679807E6C0D3E02966896A07917310599E91ED30F63B9CE25E2349300E269863| |E3CCE754338AF73D7A90738DFD01F1BEE378CFF15FCC4DBF1009E44E5C679FF1879| |C61FC11F898997A02E2BB7B411649E44E2277B7B2EB9BB5E8DAFED1ED28D6886336| |E950520EE5904339EC50661CCAAC52FBA71092AD7882B5EFDF5AF5D2ACB47BB65A5| |724E9043D0C29C2DBCFA7B4E658BD5E576409DF9BF706FE3F3056E8F794E235D63F| |932BFF8D| |-------------------------------------------------------------------|
-
In addition, the Dark pet has -ToHit that benefits handsomely from the T9 power. His -ToHit is roughly twice as strong when he's under the effects of the power.
-
At lower levels replacing the Sentinel isn't too difficult. As you continue to level up you'll get more and more clickable powers competing for clicks. That's why a study pet is useful for Electric Affinity. You can pretty much count on the pet always being around to bounce a heal off of when you need it. The Sentinel is harder to keep up full time. Also, keep in mind while you can bounce stuff off the Sentinel, its better to bounce it off something that can benefit from the buffs. Each bounce reduces the strength of the buff. So, if its you, a pet, and the sentinel on a mission, you generally want the power to bounce off the pet first, then hit you.
-
It does, but that pet lasts just 60 seconds. I find it useful to have a reliable full time pet so I can use a macro to instantly target it and start firing chains.
-
Dark Control has a lot of synergy with Electric Affinity IMO. Elec/Elec is also good, if you don't mind how "on the nose" it is and the low damage. Gremlins aren't the most reliably pets though. Gravity is another good pairing. What it shares with Dark is a strong sturdy pet you can reliably bounce chains off of.
-
This is interesting. So each power has its own independent timer? I never really watched the specifics of how the power worked, and rely mainly on Total Focus for entering energy mode. Enter EF mode with other powers is a bit of a gamble. Thanks for the detailed post, I have played this set and didn't put together the logic.
-
I can't say for sure whether Energy Focus can trigger on an un-Stunned mob, though I've personally only seen it happen on Stunned mobs. However a power attribute that flags an aspect of a power to trigger only when a certain flag is true does exist. The extra damage from Controller Containment is built on that. So are powers that Dominate (they read the flag on the caster rather than the target, but same idea).
-
I recently rerolled an Ice/Fiery Dominator I used to main on live to a Fire/Icy Dom. This is the first time I've really had a chance to look at the new Chilling Embrace. Chilling Embrace now has the following stats: Updated to 15 ft radius. -Recharge: 50% -RunSpeed: 50% -Damage: 14% 8.58 Cold Damage / tick I feel like the synergy with Hot Feet is obvious. Chilling Embrace has a smaller radius (15 vs 20ft) and does roughly half as much damage as Hot Feet, but free pulsing damage is free pulsing damage. My question is more around the -Damage. That would scale down against +3 enemies to around 60% strength or so, so is actually about -8.4% damage. However, building strategically, I could combine that with Sleet. Since Sleet debuffs resistance by 30% (~22% versus +3s), I figure the final -Damage number is around -10%. My takeaway from this: This is pretty good on a Dom who will play in melee anyway (Ice, Fire, maybe Electric) Does this power damage sleeping enemies? I seem to recall that it is an oddball and does not. If I remember right, when damage was added to this power players complained it broke their builds that relied on sleep and a flag was put in to only damage un-asleep enemies. This would seem to make it more useful for Electric and Mind, but my mind may be playing tricks on me. Worth it on other Doms?
-
I'd try some kind of Plant, Dark, or Fire Dominator paired with a secondary like /Fire, /Savage or /Energy. The point of Dominators is the Assault set operates sort of like what Lift/Propel does for Gravity. Playing actual Gravity on Doms is often tricky because of the overlap of blast utility, the other sets don't get powers like that so they benefit from gaining access to actual attacks. Plant/Fire is a very straightforward example that dishes good damage and is strong even before going perma-dom.
-
Is the reason you like Gravity the sense of independence and ability to take on enemies head on without fussing with Containment? If so I'd roll a Dominator. Lots of folks over on that forum to help you make a choice.
-
This is an excellent build and advice. Thanks for sharing. One question/note. Do you feel like you're missing out on damage by not taking Gaussian's Chance for Build Up in Spot Prey? Savage Assault is one of the few Assault sets that can slot it.
-
I think you change the 1 to a 0 to get it back to default. I'm not sure, I turned it on a long time ago and it stays on.
-
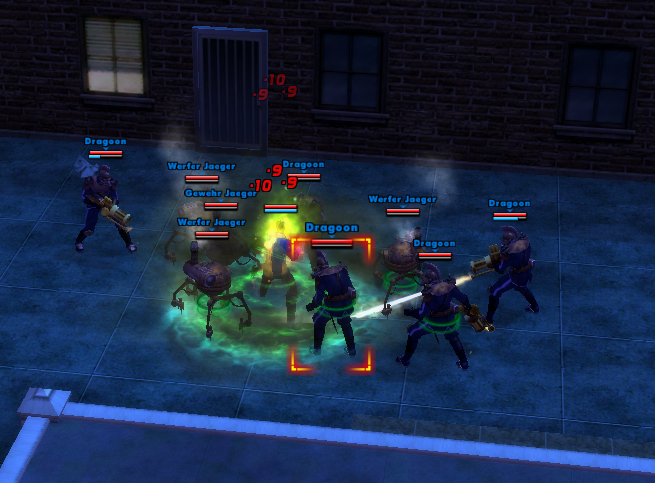
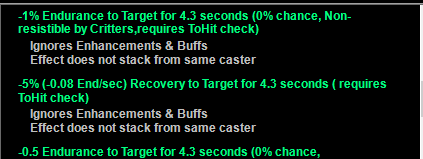
There isn't a whole lot of info on these boards about Electric Control and playing as a sapper build, so I was hoping we could start a discussion to trade tips. I've been "maining" an Elec/Psi Dom since I got back. He replaced the Ice/Fire Dom I used to main. So, here are some things I've learned. Feel free to expand on the discussion or refute my opinions. On Dominators, you probably have to play Electric Control to play a sapper. There is some -Endurance in Electric Assault, but even combined with the Mu pool probably not enough of it to build a sapper. So, most of this discussion will reference that powerset. The Mu power pool is optional(ish). In contrast, you can play a sapper without taking the Mu pool. However, Power Sink is so useful for this type of build that I consider it the heavy favorite if you want to focus on sapping. Some Electric Dominators might prefer a different pool to gain more damage at the expense of being a less reliable sapper. They can probably get the job done, but Mu players will excel at it; the point is not just to drain the enemy's endurance eventually, but drain it as fast as possible, so that it factors into the fight. Endurance drain is a percent, not a fixed value. The takeaway is that the total size of the mob's blue bar doesn't matter in most cases. This is different from Hit Points; when you deal damage, you normally deal 100 HP damage, or whatever, so if the mob has extra HP, you do less relative damage. Endurance drain however will drain an enemy with 1000 total endurance just as efficiently as an enemy with 100 endurance. Mainly this comes into play versus Elite Bosses. They have huge pools of HP and Endurance, but unless they specifically have Endurance Drain resistance they can be sapped as easily as typical enemies. As such, sappers excel versus this class of enemies. Turning on enemy health bars helps with visualization. By default you can only see how much endurance each enemy has when they are targetted. You can use a slash command to turn on enemy health bars all the time: /optionset ShowVillainName 1 /optionset ShowVillainBars 1 Your secondary can have a lot of impact on your capabilities as a sapper. Here's a rundown of various pairings: Electric Assault Despite this being an obvious pairing, I wish this set did more to compliment Electric Control. It's not bad--every attack saps. But I feel like other secondaries offer more. Psi Assault The relevant power is Drain Psyche, which debuffs enemy recovery by -500% for 30 seconds. This pairs excellently with the +Regen in this power, which makes it safe for you to stand on top of enemies while continually sapping their ability to respond. Downside, to maximize this you need a pretty powerful build with lots of global recharge. Energy/Ice/Earth/Dark All four of these have a Power Boost-like power that increases the strength of saps for 10 seconds. The power roughly doubles the strength of the Endurance Drain and -Recovery for this duration. This can result in some scary fast draining. Using Power Sink with 2 end drain IOs immediately after this power will drain a same level enemy of 90% endurance instantly. Other secondaries don't directly impact sapping either negatively or positively. Many Elite Bosses are vulnerable to endurance drain. I haven't done a scientific study, but I can't immediately recall an Elite Boss who isn't vulnerable to being sapped. Power Boosted Power Sink is the best opening move here, if it is available. You probably won't be able to sap an AV. AVs greatly resist sapping, so it's likely not happening unless you are on a team with a bunch of other Electric characters. Endurance drain doesn't interrupt Sleep. Important, because Electric Control can absolutely sleep a mob, then stand on top of them draining their endurance dry until ready to fight. This is mainly a soloist trick. Individual powers have quirks. Here's the stuff that's worth observing: Electric Fence: -11.2 end Tesla Cage: -7 end Chain Fences: -10 end Depending on your build, this may be worth slotting for Endurance Drain. Paired with a Power Boost like power, this can produce some sick AoE -endurance in a 30ft(!) radius. With two End Mod IOs + Power Boost you will drain 25% of the endurance of a same level enemy per cast. Note this power, like all AoE immobilizes, has notoriously low accuracy, so if you plan to use it a lot, you'll want to address that. On my own builds I actually do not personally use this power that often, because I don't need to. However I'm constantly left with the feeling there's an amazing build out there that takes full advantage of Chain Fences. Jolting Chain: Mids says this does -10 end, but it applies to first enemy only Conductive Aura: -10 end per pulse This rolls for accuracy and can miss As noted above, does not break Sleep Pulse rate is roughly every 2 seconds This power costs 0 endurance to run, so even if you run your blue bar dry it will continue running There are many competing schools of thought on how to properly slot this. Some players load it up with accuracy/end mod, some just one slot it. Either can work. Static Field Claims to have -endurance but I've never seen it work and am not quite sure what to make of it. Maybe someone can weigh in. Paralyzing Blast: -7 end Synaptic Overload: -10 end Once again, this only affects the first target Gremlins They have: Energy Brawl: -7 end, up every 4 seconds Jolting Chain: -10, first target only as noted above Shock: Tiny 7ft AoE, it deals minor damage but no end drain Remember, pets don't benefit from Power Boost so these numbers are as they are Interaction between Endurance Drain and Confusion matters. Since Electric Control also has access to Synaptic Overload, a Confusion power, this interaction matters. Confused enemies will help you drain their endurance bars by using their powers. What's interesting is how draining them can technically lower your damage output though by crashing their bars and preventing them from attacking each other. Your Incarnate power choices can make you a better sapper. Rundown below: Alpha Agility Core: 45% endurance Agility Radial: 33% endurance *Musculature Radial: 33% endurance This is usually my choice for the combo of damage + endurance drain Interface Preemptive I feel like we could do an entire study on whether this is "worth it." I have a hard time reading and understanding how much endurance this power actually drains, how the stacking works, and whether its worth investing in. For those interested, here's the readout on Preemptive in Mids. Maybe someone else can explain the value of the mechanics. Players on the Help channel just now, such as crowd sourced advice is, believe that this power should be read as draining 1 end/sec, stacking up to 5 times. That would mean with 5 stacks going you'd be draining 5 end/sec from enemies. If anyone has more info on this it would be much appreciated. One-Off Observations Below is a list of observations that don't easily fit into a category: Enemy AI: Enemies with no endurance seem to have an elevated chance to run away. You'll want to prevent this with immobilizes. Leveling Up: I've found it much easier to play as a sapper after level 40, and particularly after incarnate slotting, than prior to that. Enemy HP early on is low and they usually die before sapping can get to them. That said, Conductive Aura during a low level Sewer Trial will mostly shut down the zombie adds versus that one boss you need to kill for the badge midway through the mission. What else? I'm sure a lot of folks in the community have more to add. I'm eager to trade tricks and tips.