The Beta Account Center is temporarily unavailable
×

Nemu
Members-
Posts
1418 -
Joined
-
Last visited
-
Days Won
3
Content Type
Profiles
Forums
Events
Store
Articles
Patch Notes
Everything posted by Nemu
-
I talked to Bazzoka in game, the reason for Oppressive Gloom is because he wanted melee protection for inferno and anguishing cry. At this time I would like to address two common fallacies I see across a lot of these posts concerning builds for non-melee ATs: 1 - Keeping at range almost always amounts to "I want to be as far away from mobs at possible" This is usually also paired with the build priority for hover blasting and building for range defense softcap 2 - just because a power has a melee or PBAOE tag, that means the build needs to build for melee protection as if the build needs to be designed to be a statue and stay in melee all the time. I'll address point 2 first, the reason I tossed in the first point will be clear later on in this post. Most click powers that have melee/pbaoe tags do not require you to STAY in melee. Jousting is a game mechanic that allows you to minimize your exposure to melee retaliation even if a power has a 3 second cast time like inferno. If you are willing to adopt that playstyle, then there is little need to overcompensate your build for melee protection. When you are able to minimize melee exposure via jousting melee attacks/pbaoes, range defense and to a lesser extent AoE defense become much more important because they act as "catch all" vs all other attacks. By forcing enemies to switch AI to range mode, you can focus your IO bonuses and power selection to favor/synergize with range defense. Which brings me to point 1 Range defense works whether you are 200 ft away from mobs or 8 feet away from mobs. As long as you keep moving between attacks enemies are always playing catch up. These movements do not have to be dramatic like teleporting max distance back or hovering 40-50 feet up in the air, they can be as subtle as moving a few steps away from a mob while/after you execute a power. If you don't mind a bit of jousting when the situation calls for it then I would recommend you build for range defense softcap and then supplement it with a resist shield backed epic/patron. Sets like thunderstrike and artillery makes it pretty easy to softcap range defense if you are going for a budget option.
-
There are very few builds that can go all out on procs in every power. There's no value over proccing starting low recharge powers, those are better reserved for global set bonuses. Most proc builds are selective in which powers gets procced and depend on set bonuses to cover recharge/acc/endurance management of those powers. Higher end builds also build for slow resistance and 2 piece winter IOs are fantastic at offering enough base enhancement for attributes for acc/end and 15% slow resist. Your typical build that leverage procs will have maybe 3 powers that are heavily procced (at least 3 or more procs).
-
Handclap is mitigation and force feedback proc fuel. You can use it as an opener to buy you time to cycle through your nukes, you can use it during rage crash and alternate knockdown with footstomp. It also stuns minions which reduce incoming chip damage while you nuke them. It also takes 2 damage procs. You don’t need cross punch. I am really tired of this “it does no damage therefore it’s not useful” mentality when it comes to evaluating powers. Some of the old guards and “elite” players that run the damage only meta for hard mode keep perpetuating this. Rather look at overall synergy with a build it seems that a vast majority of posters I see are only looking at a specific power in a vacuum. It’s time for that message to change. SYNERGY makes a build better. That’s my grump rant for the day. Thanks for coming to my TED talk.
-
Have you considered synergy instead of nerdy math with numbers? Knockdown is pretty good mitigation and the last two big hitters as well as energy torrent all do that. It can buy you time, reduce incoming spikes of damage and allow your regen to work. Pair that up with strength of will and/or rune of protection and you can create pockets of HP buffers for fights and let inspirations cover the downtime.
-
Anyone get a request to release a name you just got?
Nemu replied to Jawbreaker's topic in General Discussion
I got my namesake back on Excelsior. That made me happy. If someone tries to request that name back I’ll cut them. -
Regeneration is about SPINNING. PSA: If you don't have a staff/regen brute with whirlwind you are nowhere as cool as you think you are. By that metric I am the coolest person in the room...
-
What's your preferred way to play a blaster? Blaster builds are not one size fits all. There are those blaster players that are comfortable going into melee range to punch stuff in the face, and there is also the circle that cling on to this idea that blasters need to avoid melee range at all costs. So let's start there, melee or no melee?
-
The Avalanche KD proc in burn in your original build will cause knockback because the last time I did this, many damage ticks in a short time will build up kd magnitude so much that it becomes knockback. I'd put the proc in a opener power with a large radius like short circuit, then you can open with short circuit, get the knockdown proc to buy you time to cycle through the rest of your PBAOEs. The draw to elec/fire is being a PBAOE machine, If you want to play up to that then lean into ALL the PBAOEs. If you are going to lean into that strategy, then make sure you have the playstyle, the build and tools to support that. You got way too many fully slotted winter sets. If this is not going to be a fire farm build then you don't need that heavy investment in fire/cold defense, and if it IS a fire farm build then you are far short of the defense/resist goal for those types of builds. I'd slot Tesla cage for hold first then damage, if you have slots to spare you can do 4 piece basilisk gaze for the range defense and recharge bonus and 2 damage IOs, you have an opportunity to pair that up with Char to stack holds on bosses. If you want to go balls to the walls PBAOE murder machine, then it's a skippable power since it's not doing you any favors on either AoE or single target damage. Rise of Phoenix is more useful for Hardmode content, less for regular content. If you find yourself dying too much on regular content then there are build and playstyle changes you can make to be more survivable rather than succumbing to the idea that blasters will die a lot and sinking a power pick into a self rez (only inexperienced blasters die a lot on regular content). I have a love/hate relationship with Voltaic sentinel - I love the idea of it, but the actual power is lackluster and doesn't give enough bang for the buck. If I recall it had pathing/zoning issues and can detoggle. It provided marginal value for hard single targets like prolonged AV/GM fights, but outside of that it didn't do as much as I wanted it to. If you are set on fire mastery then you can potentially get a build with 30ish% defense to a few vectors like Range/AoE or Melee to give you enough cushion along with outside buffs to let you stay in melee.
-
Why do you need perma hasten?
-
A few comments based on my own bias, so don't take it as gospel. Hover consumes more endurance than combat jumping, and arc of destruction doesn't work mid air, you have to be low on the ground to use that power The KB enhancement in Arc will cause it to knockback instead of knockdown If endurance is an issue I wouldn't spend those slots for the +dam bonus, looking specifically at those 5 piece shield walls, you can rip 2 slots total out and put it in tough for more S/L resist. Any of the winter sets offer 6% fire/cold resist at 4 slots, Put 4 piece of that in crushing blow to get more ROI with your slots. Here's a rework based on your framework. Crux(1).mbd I prefer focused accuracy. Conserve power has poor uptime and there are inspirations and recovery serum temp powers to help with endurance. To-hit debuff resist is more valuable because I can't get that through other means. Yes you can drop def sweep, however it maybe useful to buffer against heavy -def factions like cims. You can go either way and still be effective.
- 7 replies
-
- 1
-

-
- build advice
- build
-
(and 4 more)
Tagged with:
-
I'd swap charged bolts with lightning bolts and havoc punch with dynamo. Lightning bolts does more damage, and you need that because unlike fire blast electric blast does not get a heavy hitting third single target blast like blaze. Dynamo is your endurance sustain with a side benefit of some regen and incidental damage to close enemies. If there ever was a rule of law for blasters it would be "take your endurance sustain." Most of them open up at level 20. I couldn't fit havoc punch in on my fire elec because it did knockback and I didn't have room to pay the tax in my build, so I favored charged brawl instead. With the number of attacks I have I didn't need Havoc punch either. I tweaked your build and shuffled some powers around. my builds always aim to be self sufficient by level 30 (exemped) so that mean I aim to reach range defense softcap or close by then and I'll have my primary mitigation suite available. Short circuit does not need to slotted heavily for end drain because with the knock downs you will have enough mitigation to buy you time to cast it at least twice. By then you will have killed all the fodder and you can then use a combination of holds, knockdown and end drain to keep harder targets under control. Keep in mind builds are only half the equation. You are going to get out of your comfort zone dropping hover. This build is meant to be mobile, darting in and out of melee as opportunities present themselves. The knockdowns allow you more time to stay in melee but you will eventually need to dart out. Learn to joust, that's why I have combat jumping. Watch the videos below for some tips with that kind of playstyle. Dynamo Elec Elec Blaster v3.mbd
-
By those metrics I'd imagine that in game help channel should be a wealth of legit info but alas... Discord is point in time - you miss the chat and that knowledge is more or less gone. It's not a good medium for stuff like this: One can argue that misinformation can be memorialized on the forums and that's true, but conversely the forums also enable said knowledgeable players to debunk misinformation and provide details on why. Discord less so, the medium doesn't cater itself well to long, thought out, detailed explanations. It's designed for people with short attention spans. I can see people on discord directing people to the forums as a way to promote knowledge, but using discord alone - I have my doubts anyone can learn anything in depth. The problem I see with enablement is that not too many knowledgeable players are willing to put in the time to write up things like what Projector writes up. That kind of insight usually tends to be tribal knowledge and the folks that are "in the know" tend to hang out with other people "in the know" in private discord/sg/circles so that knowledge isn't really being spread to the masses. At most the masses will parrot generic stuff like "you need miracle/numina in health in every build" and I don't see it as any different on general discord or any other medium. Couple this by the fact that most people that play this game aren't generally interested in learning and you get this scenario where the blind leads the blind.
-
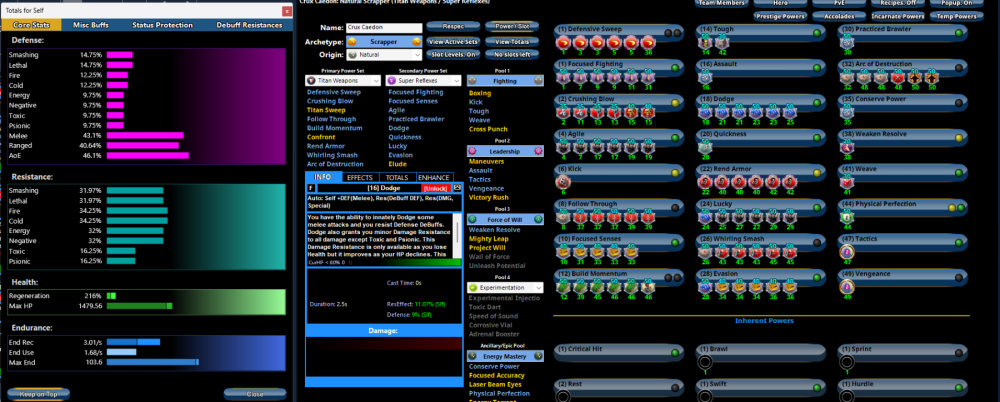
Each of those passives are offering 13% resists at your cutoff point so that's 39% resists that you are getting from scaling resists. Any build expert can tell you that there's no way you can get 70%+ resists on SR scrappers through set bonuses alone without other buffs like rune of protection/scaling resists/melee core, etc... With all the scaling resists turned off these are your real numbers: 30%+ resists is respectable but Melee and range defense are not at softcap. You can cover the former with defensive sweep. I'm more concerned about range defense because that's where a lot of debuffs come from. You can always interact/kill with the stuff you engage with in melee range, but it's the stuff shooting at you from range that you CAN'T interact with that often lands those nasty debuffs on you. Since you picked up practiced brawler at level 30 I'm going to assume this is an end game build, otherwise I can't fathom going without mez protection for 30 levels. The kismet bonus in weave is only active when weave is turned on so that also means no +6% to hit until level 38 or level 33 exemped. you can also swap in an LOTG 7.5 in vengeance for a bit more recharge. That IO in kick is wasteful, 10 million inf slotted into a power you will NEVER use. I'd replace numina with miracle in health as that gives you more end recovery. The tried and true formula for supplementing SR with resists is alternating rune of protection/melee core hybrid. This allows you to shift your defense heavy slotting to other things like offense and endurance management. If you are curious about what a build that alternates rune of protection/melee core may look like here is a mock up ROP Melee SR - Scrapper (Titan Weapons - Super Reflexes).mbd
- 7 replies
-
- 1
-

-
- build advice
- build
-
(and 4 more)
Tagged with:
-
Misinformation is everywhere. I don't like discord because of the ephemeral nature of content posted there. On the forums it can be a bit more sticky. The few times I went to discord I didn't see any enablement/deeper explanations to questions being asked. most of the time it's just "here's a build!" with no further explanation. To me I see discord as the breeding ground for lazy people who aren't willing to learn/aren't willing to teach. But to be fair, I have very limited interaction with discord so I could be wrong.
-
Have you considered adding thunder strike and force of thunder into your rotation? I saw your build in the blaster forums. If you want to be survivable you have to learn to lean into your toolkit, and you skipped a great deal of what makes /elec manipulation strong. We can take the rest of this conversation to your blaster build post. But that quote is how you make a tank mage out of anything /elec manipulation.
-
Through this something miraculous happened: The "anti-farmers" and "pro-farmers" banded together against a common thingy. We need more posts like this to perpetuate this unity. Of course that's not going to happen! So let me change the narrative. "I was on a farm with Group Fly and I put repulsion field on the farmer and then I got booted by the farmer because he hated what I was doing, but I did nothing wrong!"
-
Reading your initial post I would have thought it was kicking you off the team. 😁
-
I wish we'd just make a post called Fire/fire builds and pin it since it's such a popular combo. It seems every week someone is asking for a build. It'll help de-clutter this forum and make way for more interesting builds. such as my storm/elec cyclon panda with whirlwind 😀 I suppose I'll post something useful as well. I looked at both your builds. I have the same types of comments on your build as my comments on this one:
-
Your post reeks of entitlement. "I wanna play my way!!!" Fuck yeah you can, alone.... FYI I do turn off GF and team tp at Null the gull but if a team leader asks me not to do anything and it doesn't significantly impact my performance/contribution to the team and ensures that the team as a whole has fun, then I just suck it up and do it. It's called compromise. In this case how crippling is turning off group fly to what you are able to do for the team? If you don't wish to compromise then don't expect other people to cater to only your needs.
- 420 replies
-
- 21
-

-

-

-

-

-

-
The hardest of Harder content relies on teammates/incarnates for survival so you are going to do a 180 in build philosophy and go all out on damage to get past DPS checks in those encounters. Procs, recharge, and make sure you have good endurance sustain
-
I guess we can allow a third person into the cool people's club...
-
Congrats @Meknomancer You now own the 2nd ice/poison ever in history. Welcome to the cool people club!
-
Seismic/Sonic work JUST FINE for melee oriented blasters. There's only one cone in seismic blast and the shockwave mechanic provides mitigation in melee as a knockback aura. I don't understand where this claim that the set is better suited for range is coming from. I paired Seismic Blast with electric manipulation to double down on knockdowns to mitigate incoming damage in melee. /Sonic has less soft control options but you can proc monster the crap out of all the sonic attacks for more damage.
-
You skipped Seismic Smash, a staple of /earth. A lot of earth powers requires you to be on the ground, I've always found hover clunky for that kind of playstyle. You won't have the endurance to sustain whirlwind. Earth assault is already endurance intensive. Even without WW, since you skipped your most damaging single target attack you will take longer to kill stuff and that = more endurance usage because you are cycling more powers to get the job done. Fissure needs both accuracy and damage slotting. Slot it as an attack with attack sets, not knockback sets, the only IOs from a knockback set that goes into attacks that knockback are forcefeedback proc and the kb-kd proc (if you want to mitigate the knockback) My elec/earth/ice build for reference. I skipped tough/weave but took aid self with field medic because the latter gave aid self a tiny endurance recovery component. Clockwork Panda Sleet Procs - Dominator (Electric Control).mxd

