The Beta Account Center is temporarily unavailable
×


AurianArchive
-
Posts
175 -
Joined
-
Last visited
Content Type
Profiles
Forums
Events
Store
Articles
Patch Notes
Everything posted by AurianArchive
-
Back on the Archery/Ninjitsu Sentinel and looking at changing tertiary powers. This stream also picked back up on the Bugged! Task Forces enforcing maximum level rather than team level.
-
Picking back up on the Archery/Ninjitsu Sentinel, which ran to a hard-crash. While I'm not un-convinced that my graphics card is on it's last legs, a series of videos later (under a Carnage Playlist) document the scale of some of the hardware problems. Some of which were entirely self-inflicted.
-
A followup, to a followup, to a followup, to a... I've entered the mindscape of Dr. Tannis!!!! This is more a Hybrid Theory Rant on role-playing within the constraints of a game. Largely fueled by so called role-players who routinely demanded "MAKE IT BETTER BUT DON'T CHANGE ANYTHING"
-
Following up on the Bugged! Task Force Exploration, the next stream also starts build passes at an Archery/Ninjitsu Sentinel:
-
Bugged! One of the few with a full description in the description field. A player complained about where Synapse Task Force was setting mission difficultly, so I set out to document on the live streams just how many Task Forces were Bugged!
-
Part 2 of the Shield Tanker, Mids Hero Reborn, and set bonus's:
-
Next up: an explanation of set bonus's and using Mids Hero Reborn:
-
For a while now I've been running LiveStreams under a Build Theory tag. If you got questions about designs, about builds, or simply about making enhancements, the series has generally covered it (and will continue to cover it). That being said listing the (relatively) extensive backlog of videos will create a bit of a post flood. I should also note this isn't a complete list of all the Stream's/Videos I've made, but just a re-copy from the forum where I've been posting them. In order to help with search optimization, each post will attempt to state the intent of the stream: The first video is, well, an introduction/test video.
-
I was nudged to respond to this thread here since this question was asked elsewhere: I have a number of different idea's, but NONE of them involve CoH and "3 monitor" support. For starters; CoH doesn't support 21:9+ resolutions, but it doesn't do so with a hard-crash. It simply stops rendering portions of the geometry and textures once you go over a 16:9 ratio. Secondly: CoH is an OpenGL application. The performance of CoH is going to be dependent on your OpenGL driver... and more importantly... if your display adapter is actually capable of PARSING OpenGL calls. Thirdly: We need more information about your system. What Graphics Card are you actually using? Nvidia? Intel? AMD? Is your "Docking" station using DisplayPort-Over-USB-TypeC to parse a native signal from your graphics processor? Or is your "Docking" station merely a graphics adapter simply acting as an extender, e.g Matrox's Multi-Monitor controllers: https://www.matrox.com/en/video/products/gxm/multi-monitor-controllers-and-external-multi-display-adapters My immediate suspicion would be that your Docking Station isn't actually a docking station, but a simplistic graphics adapter with bare DX10 support and no OpenGL support at all. This would explain why mirror mode works, since it's taking the rendered display from your laptop rather than trying to render the game on it's own.
-
Ran into bit of an issue while streaming Build Theory. Current updated (and reinstalled/clean-installed) MHRB crashes out with numerous errors trying to load Sentinels saved under PHD v2.21 A quick run down and it seems to affect most of the July 13 2020 uploaded Sentinel builds here: https://drive.google.com/drive/folders/1Lu6gaSVWRx10mhE9EXDYLE1vzJLzdvH6?usp=sharing The on-camera stream wasn't much helpful in showing the exact errors. OBS's per-window capture methods ignores various overlays:
-

Hybrid Theory: "Your First Resource Generating Character"
AurianArchive replied to AurianArchive's topic in Guides
And a follow-up outlining the selection of a dualbox / teammate powers. Switched to the OBS software encoder so at least this stream completed without an issue. -
Either the forth or fifth attempt... and this one still crashed out. That being said, if you are a new player just getting into City of Heroes and you know that you need to make a character that can be used to afford/fund your subsequent characters, hopefully this video will be of use.
-
issue 27 [Beta] Patch Notes for April 24th, 2021
AurianArchive replied to Jimmy's topic in [Open Beta] Patch Notes
No. Look. If you really want me to go into the history on this, I will, but Geko and subsequent powers "Blew it" on multiple aspects of design. We can discuss how the "power" gap between some blaster sets alone is greater than the entire difference between AT's, or lack of design consistency for hours on end without achieving anything. We can discuss at length how average S/L damage was increased over Elemental Damage, to the point that outside of the Lamba Incarnate Trial and a specific resist hole, there's no in-game benefit to rocking elemental weakeness's against ANY opponent at all as elemental damages do the same amount of damage against WEAK targets as S/L does regardless. We can discuss endlessly how secondary effects that don't work to stop enemies [endurance modification] were used as justification for aggressively low damage (pretty much every electrical attack ever). Kinetic Melee is a set that cannot be [Normalized] on stalker's simply due to the fact that the stalker set was designed AROUND that gimmick. Trying to "Fix" an intentional design implementation made to bring an under-performing set up to performing just tells me who-ever is managing the powers needs to take a 10 minute break and have a longer chat with me first. Now, if you actually are interested in fixing Kinetic Melee as a whole, let me go over the THIS IS HOW YOU DO IT once again. On non-stalker, turn [Power Siphon] into an SO-origin perma-capable toggle/click, convert the knockback on repulsing torrent to a [Knock Towards The Player], and add an Incarnate-Interface proc that applies extra single target damage to Scrappers and an extra splash damage to Tank/Brute's. Job done. As it stands, the Stalker Version is exactly what it should be. A top-tier attack set enhanced by Stalker ATO's. Let me phrase this another way: KINETIC MELEE ON A STALKER IS HOW EVERY SINGLE OTHER STALKER SHOULD BE DESIGNED. You do not, repeat, DO NOT normalize Stalker's Kinetic Melee to other sets. You modify OTHER SETS to have a stand-out gimmick feature that clearly separates the Stalker set from the NON-Stalker Sets. Really. Not that hard. Knock The Normalization Off, you don't understand what you are doing. -
VidiotMaps for Issue 24 and Beyond
AurianArchive replied to Blondeshell's topic in Tools, Utilities & Downloads
For those who are trying this on Linux using Steam/Proton with Homecoming or Island Rum: Homecoming creates a "Data" folder. It's blank, but you can copy the contents of the Data folder from a Windows installation over to the Linux installation, and the overlay should work as expected. For those trying to run Homecoming using Proton, just add a new game, select the homecoming installer, point it to a location in your /home/(account), and let the launcher install. Then remove the Launcher Installer, and this time add a new game with the /home/(account)/(homecoming)/(bin)/(win64)/launcher.exe Then force Proton 5.x as the compatibility mode. The only problem I've found so far (and yes did report it in beta) is that the Login feature is not working. Island Rum does NOT create a Data folder. I wound up with Island Rum in /home/(account)/CoH and forcing Z:\home\(account)\CoH as the install location. You can then create a Data folder: /home/(account)/(CoH)/data Copy over the files from an Existing Windows installation, and now the overlay should work there as well. -
A player was asking about a Fire/Earth Dom on one of the Beta Shards. I ran one up for another player a few years back when we had Sudden Acceleration as a set, but before the set was in the MIDS database. This is just a posting of the fixed version for the Archive. Hero Plan by Mids' Reborn : Hero Designer 2.7.2.10 https://github.com/Crytilis/mids-reborn-hero-designer Click this DataLink to open the build! Fire - Stone - Mace - R2: Level 50 Magic Dominator Primary Power Set: Fire Control Secondary Power Set: Earth Assault Power Pool: Speed Power Pool: Fighting Power Pool: Concealment Power Pool: Leaping Ancillary Pool: Mace Mastery Hero Profile: Level 1: Char -- SprAscoft-Rchg/+Dmg%(A), SprAscoft-Acc/Conf/Hold/Immob/Sleep/Stun/Fear/EndRdx/Rchg(5), SprAscoft-Acc/Conf/Hold/Immob/Sleep/Stun/Fear/EndRdx(7), SprAscoft-EndRdx/Rchg(7), SprAscoft-Acc/Conf/Hold/Immob/Sleep/Stun/Fear(13), SprAscoft-Conf/Hold/Immob/Sleep/Stun/Fear/Rchg(45) Level 1: Stone Spears -- Apc-Dam%(A), Apc-Dmg/EndRdx(42), Apc-Acc/Rchg(42), Apc-Acc/Dmg/Rchg(42), Apc-Dmg/Rchg(45) Level 2: Fire Cages -- SprDmnGrs-Rchg/Fiery Orb(A), SprDmnGrs-Acc/Conf/Hold/Immob/Sleep/Stun/Fear/EndRdx/Rchg(3), SprDmnGrs-Acc/Conf/Hold/Immob/Sleep/Stun/Fear/EndRdx(3), SprDmnGrs-EndRdx/Rchg(5), SprDmnGrs-Conf/Hold/Immob/Sleep/Stun/Fear/Rchg(37), SprDmnGrs-Acc/Conf/Hold/Immob/Sleep/Stun/Fear(37) Level 4: Super Speed -- BlsoftheZ-Travel/EndRdx(A), BlsoftheZ-ResKB(39) Level 6: Stone Mallet -- Hct-Dam%(A), Hct-Dmg/EndRdx(13), Hct-Acc/Rchg(15), Hct-Acc/Dmg/Rchg(17), Hct-Dmg/Rchg(21) Level 8: Hot Feet -- Arm-Dam%(A), Arm-Dmg/EndRdx(9), Arm-Acc/Rchg(9), Arm-Acc/Dmg/Rchg(11), Arm-Dmg/Rchg(11) Level 10: Kick -- FrcFdb-Rechg%(A) Level 12: Flashfire -- AbsAmz-ToHitDeb%(A), AbsAmz-Acc/Stun/Rchg(15), AbsAmz-Stun/Rchg(17), AbsAmz-EndRdx/Stun(27), AbsAmz-Acc/Rchg(37) Level 14: Hasten -- RechRdx-I(A), RechRdx-I(25) Level 16: Power Up -- RechRdx-I(A) Level 18: Cinders -- BslGaz-Acc/EndRdx/Rchg/Hold(A), BslGaz-EndRdx/Rchg/Hold(19), BslGaz-Rchg/Hold(19), BslGaz-Acc/Rchg(21) Level 20: Heavy Mallet -- SuddAcc--KB/+KD(A), SuddAcc-KB/Acc(23), SuddAcc-KB/Acc/Dmg(25), SuddAcc-KB/Dmg/End(29), SuddAcc-KB/Dmg/Rech(29), SuddAcc-KB/Rech(40) Level 22: Stealth -- LucoftheG-Def/Rchg+(A), LucoftheG-Def/EndRdx(23) Level 24: Smoke -- DarWtcDsp-Slow%(A), DarWtcDsp-ToHitDeb/EndRdx(27), DarWtcDsp-Rchg/EndRdx(36) Level 26: Bonfire -- SuddAcc--KB/+KD(A), SuddAcc-KB/Acc(31), SuddAcc-KB/Acc/Dmg(34), SuddAcc-KB/Dmg/End(36), SuddAcc-KB/Dmg/Rech(39), SuddAcc-KB/Rech(40) Level 28: Seismic Smash -- SprBlsCol-Rchg/HoldProc(A), SprBlsCol-Dmg/EndRdx/Acc/Rchg(31), SprBlsCol-Acc/Dmg/Rchg(31), SprBlsCol-Acc/Dmg/EndRdx(34), SprBlsCol-Dmg/EndRdx(34) Level 30: Combat Jumping -- LucoftheG-Def/Rchg+(A), Ksm-ToHit+(40) Level 32: Fire Imps -- ExpRnf-+Res(Pets)(A), ExpRnf-EndRdx/Dmg/Rchg(33), ExpRnf-Acc/Dmg/Rchg(33), ExpRnf-Acc/Dmg(33) Level 35: Scorpion Shield -- LucoftheG-Def/Rchg+(A), ShlWal-Def/EndRdx(36), ShlWal-ResDam/Re TP(45), Rct-ResDam%(46) Level 38: Fissure -- SuddAcc--KB/+KD(A), SuddAcc-KB/Acc(39), SuddAcc-KB/Acc/Dmg(43), SuddAcc-KB/Dmg/End(43), SuddAcc-KB/Dmg/Rech(43), SuddAcc-KB/Rech(46) Level 41: Personal Force Field -- LucoftheG-Def/Rchg+(A) Level 44: Tough -- StdPrt-ResDam/Def+(A), GldArm-3defTpProc(46) Level 47: Mud Pots -- SprAvl-Acc/Dmg/EndRdx/Rchg(A), SprAvl-Acc/Dmg/Rchg(48), SprAvl-Acc/Dmg/EndRdx(48), SprAvl-Dmg/EndRdx(48), SprAvl-Acc/Dmg(50) Level 49: Weave -- LucoftheG-Def/Rchg+(A), LucoftheG-Def/EndRdx(50), LucoftheG-Def/EndRdx/Rchg(50) Level 1: Brawl -- Empty(A) Level 1: Domination Level 1: Prestige Power Dash -- Empty(A) Level 1: Prestige Power Slide -- Empty(A) Level 1: Prestige Power Quick -- Empty(A) Level 1: Prestige Power Rush -- Empty(A) Level 1: Prestige Power Surge -- Empty(A) Level 1: Sprint -- Empty(A) Level 2: Rest -- Empty(A) Level 4: Ninja Run Level 2: Swift -- Run-I(A) Level 2: Health -- Mrc-Rcvry+(A) Level 2: Hurdle -- Jump-I(A) Level 2: Stamina -- EndMod-I(A) Level 0: Freedom Phalanx Reserve Level 0: Portal Jockey Level 0: Task Force Commander Level 0: The Atlas Medallion Level 50: Support Radial Embodiment Level 50: Agility Radial Paragon Level 1: Quick Form ------------ | Copy & Paste this data into Mids' Reborn : Hero Designer to view the build | |-------------------------------------------------------------------| |MxDz;1569;739;1478;HEX;| |78DA65944B4F135114C7EF74A6424BCB43A094776D8196969616DDA820121E46A14| |A646DC8800D4C525BD28E46962E4CDCFA4A34E1F5095C0BE8CEAFE023D10842E24E| |25E2CE987AE6FE0F6D934EDAFEEEFD9F7B9E33D3E4FD09D7AB2B0F468552379ED6F| |3F9F989EC1D23A39BD99C3DA92F198B822EEF94914BF9A2BE39339BB198D4172DDC| |1CAA226357D1617E3C9B3173D974CC3A7EB2E92E99C7F279FD6EDA8C4DEA3973F96| |4279CB35972995B49A56EBBE572CA585A368DCC5283DC5DCDDC33F2C6829136CC55| |97546652FA0A99DB27578CC55829BA5514FDE4CD546ED54B750DD037A0D28F62B55| |0B08BB7B44968427B039EDA65EE80AED7E0C036F8C22DF82A682261935A7FDCA243| |F40F3263E04014EC51391DE553C634E963BBCC1CD5E419ED12D833C21C0603344C1| |5BE8AFA19F1FABE20EF4BAAC5CEB5D823D05C619CA9ED07EB436053907D2958157A| |D7AA46E0533D0C5BF545D07981791EB4510D0EE4118E87F009529C1ACE5D73035AE| |D0CE79C06DBAE73FF49D04F71DCDC8B3B22A4E665AE91A18E73D4494D1321CAD100| |4D6DF844313A3571FA23F303D8F41E5C27FF469E71E32166E73900BDDF30EB8E7DE| |C3BF6C0E057E86EAAAB1933519AAD05699E7A459EE9A51A5A10D7D6B28B3EDB76D0| |4F609BEF379D69E5DCAD8788D975009EE1DC817DB06F0F3CC9BD4175B7F31CDB9FB| |3EF33E6538EF184F918F450BD9D5C6F27D71BFC27E41CC2544B37CFACFB0FEAF51D| |337F338FC04774D68F38AA9FE304A6543CBBD378DEA3C7E016D5D9CB3DF6728F7DD| |C63987B0C738F61EE31CA3D7E770911E27B1BE23C2AF510E11E222D8AAC3D3A845C| |9B942BC6CF686C0B31063771CF063798EB60620D768DE2C5E1638B738E04DFC3442| |3D8A115DF5DFAD025FC25A510AEB0C62B94448572B6423957A1CC5428B35AF11F41| |285271D417DFF3C20F275915B646F12EFC2AD7AED122A8899FE55A08E78ECA351FD| |EAD59A7CC2C63DF2A5BEB65EB85B2F53B3FB9F1FAAF87D68857980E97A6F51F91DE| |061D| |-------------------------------------------------------------------|
-
Looking for a True Archer build (Archery/tactical arrow)
AurianArchive replied to TIto Vendetta's topic in Blaster
Did you check the Archive? https://drive.google.com/file/d/1A9-nBneKLg1sFaWs1G3KiXSzvVyNplDx/view?usp=sharing https://drive.google.com/file/d/1TvLPiqO9MAqDyG_STjjs00AukgUap5MS/view?usp=sharing -
So I did. And.. um.. now that I'm not building towards another player's concept, this is starting to look fairly wicked. [Hasten] slips into perma, barely, and now there's two Achilles Heel procs working to debuff. Villain Plan by Mids' Reborn : Hero Designer 2.6.0.7 https://github.com/ImaginaryDevelopment/imaginary-hero-designer Click this DataLink to open the build! Level 50 Magic Corruptor Primary Power Set: Water Blast Secondary Power Set: Traps Power Pool: Leaping Power Pool: Speed Power Pool: Fighting Power Pool: Leadership Ancillary Pool: Mace Mastery Villain Profile: Level 1: Aqua Bolt -- SprScrBls-Acc/Dmg(A), SprScrBls-Acc/Dmg/Rchg(3), SprScrBls-Rchg/+End(3) Level 1: Web Grenade -- GrvAnc-Hold%(A) Level 2: Caltrops -- Artl-End/Rech/Rng(A), Artl-Acc/Rech/Rng(5), Artl-Acc/Dam/Rech(5), Artl-Dam/Rech(7), Artl-Acc/Dam(7), Artl-Dam/End(9) Level 4: Combat Jumping -- ShlWal-ResDam/Re TP(A), Ksm-ToHit+(9) Level 6: Whirlpool -- OvrFrc-Dam/KB(A), OvrFrc-Acc/Dmg/End/Rech(11), OvrFrc-Acc/Dmg/End(11), OvrFrc-Acc/Dmg(13), AchHee-ResDeb%(50) Level 8: Super Speed -- BlsoftheZ-Travel/EndRdx(A), BlsoftheZ-ResKB(13) Level 10: Triage Beacon -- NmnCnv-Regen/Rcvry+(A), NmnCnv-Heal(15), NmnCnv-Heal/EndRdx/Rchg(15), NmnCnv-Heal/Rchg(17), NmnCnv-EndRdx/Rchg(17), NmnCnv-Heal/EndRdx(19) Level 12: Kick -- FrcFdb-Rechg%(A) Level 14: Tough -- GldArm-3defTpProc(A), StdPrt-ResDam/Def+(19), ImpSki-Status(21) Level 16: Force Field Generator -- LucoftheG-Def/Rchg+(A), LucoftheG-Def/EndRdx(21), LucoftheG-Def/EndRdx/Rchg(23) Level 18: Dehydrate -- SprWntBit-Rchg/SlowProc(A), SprWntBit-Dmg/EndRdx/Acc/Rchg(23), SprWntBit-Acc/Dmg/Rchg(25), SprWntBit-Acc/Dmg/EndRdx(25), SprWntBit-Dmg/Rchg(27) Level 20: Acid Mortar -- AchHee-ResDeb%(A), SprScrBls-Dmg/Rchg(27), SprScrBls-Dmg/EndRdx/Rchg(29), SprScrBls-Acc/Dmg/EndRdx/Rchg(29) Level 22: Water Jet -- Thn-Dmg/EndRdx/Rchg(A), Thn-Acc/Dmg/EndRdx(31), Thn-Acc/Dmg/Rchg(31), Thn-Dmg/Rchg(31), Thn-Dmg/EndRdx(33), Thn-Acc/Dmg(33) Level 24: Tidal Forces -- GssSynFr--Build%(A) Level 26: Steam Spray -- Rgn-Dmg/EndRdx(A), Rgn-Acc/Rchg(33), Rgn-Acc/Dmg/Rchg(34), Rgn-Dmg/Rchg(34), Rgn-Dmg(34) Level 28: Maneuvers -- LucoftheG-Def/Rchg+(A), LucoftheG-Def/EndRdx(36), LucoftheG-Def/EndRdx/Rchg(36) Level 30: Weave -- LucoftheG-Def/Rchg+(A), LucoftheG-Def/EndRdx(36), LucoftheG-Def/EndRdx/Rchg(37) Level 32: Geyser -- SprMlcoft-Rchg/Dmg%(A), SprMlcoft-Acc/Dmg/EndRdx/Rchg(37), SprMlcoft-Dmg/EndRdx/Rchg(37), SprMlcoft-Dmg/Rchg(39), SprMlcoft-Acc/Dmg/Rchg(39), SprMlcoft-Acc/Dmg(39) Level 35: Scorpion Shield -- LucoftheG-Def/Rchg+(A), LucoftheG-Def/EndRdx/Rchg(40), LucoftheG-Def/EndRdx(40) Level 38: Seeker Drones -- Apc-Dam%(A), Apc-Dmg/EndRdx(40), Apc-Acc/Rchg(42), Apc-Acc/Dmg/Rchg(46), Apc-Dmg/Rchg(50) Level 41: Water Burst -- Artl-End/Rech/Rng(A), Artl-Acc/Rech/Rng(42), Artl-Acc/Dam/Rech(42), Artl-Dam/Rech(43), Artl-Dam/End(43), Artl-Acc/Dam(43) Level 44: Trip Mine -- Erd-%Dam(A), Erd-Acc/Dmg/EndRdx/Rchg(45), Erd-Acc/Dmg/Rchg(45), Erd-Dmg/Rchg(45), Erd-Acc/Rchg(46), Erd-Dmg(46) Level 47: Poison Trap -- BslGaz-Acc/EndRdx/Rchg/Hold(A), BslGaz-EndRdx/Rchg/Hold(48), BslGaz-Rchg/Hold(48), BslGaz-Acc/Rchg(48) Level 49: Hasten -- RechRdx-I(A), RechRdx-I(50) Level 1: Brawl -- Empty(A) Level 1: Quick Form Level 1: Prestige Power Dash -- Empty(A) Level 1: Prestige Power Slide -- Empty(A) Level 1: Prestige Power Quick -- Empty(A) Level 1: Prestige Power Rush -- Empty(A) Level 1: Prestige Power Surge -- Empty(A) Level 1: Scourge Level 1: Sprint -- Empty(A) Level 2: Rest -- Empty(A) Level 4: Ninja Run Level 2: Swift -- Run-I(A) Level 2: Health -- Prv-Absorb%(A) Level 2: Hurdle -- Jump-I(A) Level 2: Stamina -- EndMod-I(A) Level 50: Agility Radial Paragon Level 0: Born In Battle Level 0: High Pain Threshold Level 0: Invader Level 0: Marshal Level 1: Combo Level 1 Level 1: Combo Level 2 Level 1: Combo Level 3 ------------ | Copy & Paste this data into Mids' Reborn : Hero Designer to view the build | |-------------------------------------------------------------------| |MxDz;1554;705;1410;HEX;| |78DA6594594F135114C7EF6C9496428142D95A410AB42C2D2DA0AF26E012034D58C| |5F8421A28A511E9382D893EFAE0C7707D4301F523F8215C1289D12745057D55C4F1| |F4FE8F65622799FE6EFFE7DCB3DD9949DD3AEFDDBD74E79C507C13EBE9426169226| |F599B66316F19A97436B7AC09BA5C7407CB86A5D9F44636B3125F4C1733D6D238ED| |2A369D18C7375757E3F356DA2C08EF743EBF1E9FCAA4CDDC46D623FFCC9999CC4AA| |D5C5ECC65D78A64F0FDF35AC95885B59CD971C1CC2DC74F02A6D2CB19FA2950B2DB| |AD54489CEEEB61C197AD8A1E5D88A42ED43E663FF85329FB08B1A04AED1769906D4| |3A93648730BDDC5AC02AB0CA60656EB6080A6A0C9CDB6A24D6A325EF531FD0DE962| |83EA311057373EC2E6F9C07C0F7AF7C0E44BAAC5AF8BB00B832DC573BD53650EEF1| |EEA3CA23C6EE432DC5714A9D52D28D2A76E1EAC9F63CE828D33A04A416BB8EF9ABB| |88A791568B786AED08EA686C5164ED4D21F098E0E399FA9A91B3A91E31037ED0A43| |E1BB8CF861D1DB66DB0F529F309D8BE05FEA6AD7EECD1FCDC7B7B2F6CC108CE2A18| |056F52FC663E9FE6C742FA9C7AC47CC87C0076DD67DE03F3B4B785FB6ED942DF166| |96D5C6FDB59CCB8EB0C787A8C39CA1C011B68561D3CAB0E9E4398E710E639E8E413| |629FD07F3E3DEC53A0DC9DDC4BE70BCCBCE739F319D8B7C3DC656E8326A19BE3777| |3FC08C78D701E9BD0CBBDF526D16F24811EFA87C1581C4CC6C01B5453946B8ACAE7| |5F17FD2E661538603075A6060A0A31C87B070F55F9CC0C1D94E81643DF985FC1D81| |7E63EF847C17B5B7A06E26FA10DBF61BE66BE02BB69B6097ECF128338DB2433A83B| |DE699B2E31395056EC810A6BA242495628A315CA588572B9A4288ACC3255619DD6C| |B5F15A148C55D4FDF0AAEEAC0C35B4BD618FAF8EED40E70E6874E2D0ABF1F4EAD0B| |DA518000CD9EF1C82AE47AD1B1BEEA585F73AC3F054EA6F5D9B1DE77ACFF027EEFF| |897| |-------------------------------------------------------------------|
-
A Speed Edition. Gone is [Time Bomb]. Unless it's radically overhauled, it's just never going to be worth it. The slots are used to buff [Acid Mortar] out and add the Achilles Heel to [Whirlpool] for some more on-damage debuffage. That being said, since Water Blast doesn't have a snipe, I'd be tempted to drop [Tactics] and bring [Seeker Drones] back. Villain Plan by Mids' Reborn : Hero Designer 2.6.0.7 https://github.com/ImaginaryDevelopment/imaginary-hero-designer Click this DataLink to open the build! Level 50 Magic Corruptor Primary Power Set: Water Blast Secondary Power Set: Traps Power Pool: Leaping Power Pool: Speed Power Pool: Fighting Power Pool: Leadership Ancillary Pool: Mace Mastery Villain Profile: Level 1: Aqua Bolt -- SprScrBls-Acc/Dmg(A), SprScrBls-Acc/Dmg/Rchg(3), SprScrBls-Rchg/+End(3) Level 1: Web Grenade -- GrvAnc-Hold%(A) Level 2: Caltrops -- Artl-End/Rech/Rng(A), Artl-Acc/Rech/Rng(5), Artl-Acc/Dam/Rech(5), Artl-Dam/Rech(7), Artl-Acc/Dam(7), Artl-Dam/End(9) Level 4: Combat Jumping -- ShlWal-ResDam/Re TP(A), Ksm-ToHit+(9) Level 6: Whirlpool -- OvrFrc-Dam/KB(A), OvrFrc-Acc/Dmg/End/Rech(11), OvrFrc-Acc/Dmg/End(11), OvrFrc-Acc/Dmg(13), AchHee-ResDeb%(50) Level 8: Super Speed -- BlsoftheZ-Travel/EndRdx(A), BlsoftheZ-ResKB(13) Level 10: Triage Beacon -- NmnCnv-Regen/Rcvry+(A), NmnCnv-Heal(15), NmnCnv-Heal/EndRdx/Rchg(15), NmnCnv-Heal/Rchg(17), NmnCnv-EndRdx/Rchg(17), NmnCnv-Heal/EndRdx(19) Level 12: Kick -- FrcFdb-Rechg%(A) Level 14: Tough -- GldArm-3defTpProc(A), StdPrt-ResDam/Def+(19), ImpSki-Status(21) Level 16: Force Field Generator -- LucoftheG-Def/Rchg+(A), LucoftheG-Def/EndRdx(21), LucoftheG-Def/EndRdx/Rchg(23) Level 18: Dehydrate -- SprWntBit-Rchg/SlowProc(A), SprWntBit-Dmg/EndRdx/Acc/Rchg(23), SprWntBit-Acc/Dmg/Rchg(25), SprWntBit-Acc/Dmg/EndRdx(25), SprWntBit-Dmg/Rchg(27) Level 20: Acid Mortar -- Apc-Dam%(A), SprScrBls-Dmg/Rchg(27), SprScrBls-Dmg/EndRdx/Rchg(29), SprScrBls-Acc/Dmg/EndRdx/Rchg(29), Apc-Dmg/EndRdx(46), Apc-Acc/Dmg/Rchg(50) Level 22: Water Jet -- Thn-Dmg/EndRdx/Rchg(A), Thn-Acc/Dmg/EndRdx(31), Thn-Acc/Dmg/Rchg(31), Thn-Dmg/Rchg(31), Thn-Dmg/EndRdx(33), Thn-Acc/Dmg(33) Level 24: Tidal Forces -- GssSynFr--Build%(A) Level 26: Steam Spray -- Rgn-Dmg/EndRdx(A), Rgn-Acc/Rchg(33), Rgn-Acc/Dmg/Rchg(34), Rgn-Dmg/Rchg(34), Rgn-Dmg(34) Level 28: Maneuvers -- LucoftheG-Def/Rchg+(A), LucoftheG-Def/EndRdx(36), LucoftheG-Def/EndRdx/Rchg(36) Level 30: Weave -- LucoftheG-Def/Rchg+(A), LucoftheG-Def/EndRdx(36), LucoftheG-Def/EndRdx/Rchg(37) Level 32: Geyser -- SprMlcoft-Rchg/Dmg%(A), SprMlcoft-Acc/Dmg/EndRdx/Rchg(37), SprMlcoft-Dmg/EndRdx/Rchg(37), SprMlcoft-Dmg/Rchg(39), SprMlcoft-Acc/Dmg/Rchg(39), SprMlcoft-Acc/Dmg(39) Level 35: Scorpion Shield -- LucoftheG-Def/Rchg+(A), LucoftheG-Def/EndRdx/Rchg(40), LucoftheG-Def/EndRdx(40) Level 38: Tactics -- GssSynFr--ToHit(A), GssSynFr--ToHit/Rchg/EndRdx(40), GssSynFr--ToHit/EndRdx(42) Level 41: Water Burst -- Artl-End/Rech/Rng(A), Artl-Acc/Rech/Rng(42), Artl-Acc/Dam/Rech(42), Artl-Dam/Rech(43), Artl-Dam/End(43), Artl-Acc/Dam(43) Level 44: Trip Mine -- Erd-%Dam(A), Erd-Acc/Dmg/EndRdx/Rchg(45), Erd-Acc/Dmg/Rchg(45), Erd-Dmg/Rchg(45), Erd-Acc/Rchg(46), Erd-Dmg(46) Level 47: Poison Trap -- BslGaz-Slow%(A), BslGaz-Acc/EndRdx/Rchg/Hold(48), BslGaz-EndRdx/Rchg/Hold(48), BslGaz-Rchg/Hold(48) Level 49: Hasten -- RechRdx-I(A), RechRdx-I(50) Level 1: Brawl -- Empty(A) Level 1: Quick Form Level 1: Prestige Power Dash -- Empty(A) Level 1: Prestige Power Slide -- Empty(A) Level 1: Prestige Power Quick -- Empty(A) Level 1: Prestige Power Rush -- Empty(A) Level 1: Prestige Power Surge -- Empty(A) Level 1: Scourge Level 1: Sprint -- Empty(A) Level 2: Rest -- Empty(A) Level 4: Ninja Run Level 2: Swift -- Run-I(A) Level 2: Health -- Prv-Absorb%(A) Level 2: Hurdle -- Jump-I(A) Level 2: Stamina -- EndMod-I(A) Level 50: Agility Radial Paragon Level 0: Born In Battle Level 0: High Pain Threshold Level 0: Invader Level 0: Marshal Level 1: Combo Level 1 Level 1: Combo Level 2 Level 1: Combo Level 3 ------------ | Copy & Paste this data into Mids' Reborn : Hero Designer to view the build | |-------------------------------------------------------------------| |MxDz;1554;708;1416;HEX;| |78DA6594594F135114C7EF7466282D850285B2B5821468D98616D05713708901125| |631BE90090CA511E9D896441F7DF063B8C6185140FD087E0997488C3C292AE8AB22| |D6D3FB3F96899D64FABBFD9FF59E3B331337CEFAB62FDC3A2314FFE8AA99CD2E8CA| |63399753B97CEE8136632B5A80ABADC74878A868569732D692D19F366CECA2C8C50| |54AEEED838B2BEBC6CCC664C3B2B7C93E9F4AA316E99766A2DE9957F666CCB5AAA9| |4CBF3A9E44A8E0CFE7F5E4B5626BB92B25BCED9A945E338E184B968D14F968ADD6C| |A4460CBAAF46045F7997E8D0844868C2D5C5EC067F2A451F21E65C52FB451AE4BCA| |E94EBA47984E6669681653A5305CB353048535065705E51C75499AFFC88FE8635B1| |46FDE8C8ABE9BBB0793F323F80BE1D30F18A7A096822E2C6600BF9DCEF5DB2866F0| |77D1E521D0F6AE99E4B8AD4AAE614E953350B56CF30A7C1DA29D045492B78DF15B7| |914F25AD12F95C9583E8A3B64191BDD785C123829F67EAAF47CDBA6AE40C06409BF| |659C3FBACD9D260DB041B9F319F82CD1BE06F0A0DF0CC0309ECB3B913B650146715| |8A81FD71D81306789DEAD5736CFD4321B5130F98F799F7C0B6BBCC3B609A621B780| |E0D1B984386B426EEBFE9346AB49D024F0E33879883600DCDAE8567D7C27389F05C| |223C178D7CC2EC13FECFA7837DB254BB95F7D2FA1267D0F182F91CECDA626E33374| |19BD0CEF9DB397F94F346B94E807AE8649FCE47E83DFA18EC7E025EA31E62DC434C| |3EFF9AE87633CBC01E9DA9315550508A5E8EED3D70C967A66FBF408FE8FBC6FC0AF| |67F61EE817F14BCB714AB1AEF103BF016B68137CCD7603BED23CEEF59BC17679960| |8634C73B9DA74B8CF514957C4F89355EA2244A94A11265B844B95850144556192FB| |14E6AC5AF8A50A4E2A9A66F0577B5EFE5D082B51FFBF8EED4F671C6074E2D06BF1F| |4EAD0DDA6190002D3FE5955DC8F5BC637DD9B1BEE2587F0A1E4FEBB363BDE758FF0| |574F4F8AE| |-------------------------------------------------------------------|
-
Another just because I was on the forums and I saw a title asking about this combo. This build was actually the turn-around basis for the AR/Traps R2-Speed. I knew going in from my own Dark/Cold corr from live that [Dark Pit] was heading for a trash can. I also knew I'd be looking to pick up [Tenebrous Tentacles]. So after waffling between dropping [Time Bomb] or [Seeker Drones] I went with [Time Bomb] for the drop. Also, from experience, [Blackstar] was an old Crash-Nuke, so it still carries the WhatTheManureBBQ base timing. Okay, fair enough, the Water/Traps could probably benefit from [Hasten] since it also has a longer recharge time, so that spin is probably next. Anyways, with [Hasten] and Agility Radial in play [Blackstar] runs a ~40s recharge timing. Villain Plan by Mids' Reborn : Hero Designer 2.6.0.7 https://github.com/ImaginaryDevelopment/imaginary-hero-designer Click this DataLink to open the build! Level 50 Magic Corruptor Primary Power Set: Dark Blast Secondary Power Set: Traps Power Pool: Leaping Power Pool: Speed Power Pool: Fighting Power Pool: Leadership Ancillary Pool: Mace Mastery Villain Profile: Level 1: Gloom -- SprScrBls-Acc/Dmg(A), SprScrBls-Acc/Dmg/Rchg(42), SprScrBls-Rchg/+End(43) Level 1: Web Grenade -- GrvAnc-Hold%(A) Level 2: Caltrops -- Artl-End/Rech/Rng(A), Artl-Acc/Rech/Rng(3), Artl-Acc/Dam/Rech(3), Artl-Dam/Rech(5), Artl-Acc/Dam(9), Artl-Dam/End(42) Level 4: Combat Jumping -- ShlWal-ResDam/Re TP(A), Ksm-ToHit+(5) Level 6: Moonbeam -- StnoftheM-Dam%(A), StnoftheM-Dmg/EndRdx/Rchg(7), StnoftheM-Dmg/EndRdx(7), Thn-Dmg/EndRdx/Rchg(9), Thn-Acc/Dmg/EndRdx(37), Thn-Acc/Dmg/Rchg(45) Level 8: Super Speed -- BlsoftheZ-Travel/EndRdx(A), BlsoftheZ-ResKB(34) Level 10: Triage Beacon -- NmnCnv-Regen/Rcvry+(A), NmnCnv-Heal(11), NmnCnv-Heal/EndRdx/Rchg(11), NmnCnv-Heal/Rchg(13), NmnCnv-EndRdx/Rchg(13), NmnCnv-Heal/EndRdx(37) Level 12: Kick -- FrcFdb-Rechg%(A) Level 14: Tough -- GldArm-3defTpProc(A), StdPrt-ResDam/Def+(15), ImpSki-Status(15) Level 16: Force Field Generator -- LucoftheG-Def/Rchg+(A), LucoftheG-Def/EndRdx(17), LucoftheG-Def/EndRdx/Rchg(17) Level 18: Night Fall -- Artl-End/Rech/Rng(A), Artl-Acc/Rech/Rng(19), Artl-Acc/Dam/Rech(19), Artl-Dam/Rech(36), Artl-Dam/End(36), Artl-Acc/Dam(37) Level 20: Acid Mortar -- AchHee-ResDeb%(A), SprScrBls-Dmg/Rchg(21), SprScrBls-Dmg/EndRdx/Rchg(21), SprScrBls-Acc/Dmg/EndRdx/Rchg(42) Level 22: Torrent -- OvrFrc-Dam/KB(A), OvrFrc-Acc/Dmg/End/Rech(23), OvrFrc-Dmg/End/Rech(23), OvrFrc-Acc/Dmg/End(36) Level 24: Maneuvers -- LucoftheG-Def/Rchg+(A), LucoftheG-Def/EndRdx(25), LucoftheG-Def/EndRdx/Rchg(25) Level 26: Life Drain -- Apc-Dam%(A), Apc-Dmg/EndRdx(27), Apc-Acc/Rchg(27), Apc-Acc/Dmg/Rchg(29), Apc-Dmg/Rchg(31) Level 28: Tactics -- GssSynFr--ToHit(A), GssSynFr--ToHit/Rchg/EndRdx(29), GssSynFr--ToHit/EndRdx(40) Level 30: Weave -- LucoftheG-Def/Rchg+(A), LucoftheG-Def/EndRdx(31), LucoftheG-Def/EndRdx/Rchg(31) Level 32: Blackstar -- SprMlcoft-Rchg/Dmg%(A), SprMlcoft-Acc/Dmg/EndRdx/Rchg(33), SprMlcoft-Dmg/EndRdx/Rchg(33), SprMlcoft-Dmg/Rchg(33), SprMlcoft-Acc/Dmg/Rchg(34), SprMlcoft-Acc/Dmg(34) Level 35: Scorpion Shield -- LucoftheG-Def/Rchg+(A), LucoftheG-Def/EndRdx/Rchg(40), LucoftheG-Def/EndRdx(40) Level 38: Tenebrous Tentacles -- Artl-End/Rech/Rng(A), Artl-Dam/Rech(39), Artl-Dam/End(39), Artl-Acc/Dam(39) Level 41: Seeker Drones -- SprWntBit-Rchg/SlowProc(A), SprWntBit-Dmg/EndRdx/Acc/Rchg(43), SprWntBit-Acc/Dmg/EndRdx(43), SprWntBit-Acc/Dmg/Rchg(45), SprWntBit-Dmg/Rchg(45) Level 44: Trip Mine -- Erd-%Dam(A), Erd-Acc/Dmg/EndRdx/Rchg(46), Erd-Acc/Dmg/Rchg(46), Erd-Acc/Rchg(46), Erd-Dmg/Rchg(50), Erd-Dmg(50) Level 47: Poison Trap -- BslGaz-Slow%(A), BslGaz-Acc/EndRdx/Rchg/Hold(48), BslGaz-EndRdx/Rchg/Hold(48), BslGaz-Rchg/Hold(48) Level 49: Hasten -- RechRdx-I(A), RechRdx-I(50) Level 1: Brawl -- Empty(A) Level 1: Quick Form Level 1: Prestige Power Dash -- Empty(A) Level 1: Prestige Power Slide -- Empty(A) Level 1: Prestige Power Quick -- Empty(A) Level 1: Prestige Power Rush -- Empty(A) Level 1: Prestige Power Surge -- Empty(A) Level 1: Scourge Level 1: Sprint -- Clr-Stlth(A) Level 2: Rest -- Empty(A) Level 4: Ninja Run Level 2: Swift -- Run-I(A) Level 2: Health -- Prv-Absorb%(A) Level 2: Hurdle -- Jump-I(A) Level 2: Stamina -- EndMod-I(A) Level 50: Agility Radial Paragon Level 0: Born In Battle Level 0: High Pain Threshold Level 0: Invader Level 0: Marshal ------------ | Copy & Paste this data into Mids' Reborn : Hero Designer to view the build | |-------------------------------------------------------------------| |MxDz;1519;712;1424;HEX;| |78DA6594594F534114C7E72EA5B4B4B4A5ECA56C2D6D595A5AF5DD0450638084558| |D2FE4062EA591D09BDB92E8A30F7E0F35C6B800EA47F01B98685CA2717954047D55| |C47A3AE76FB9496FD2FEA6FF33F33F67CEDCE9ECF529DFDE859B67851298DC344AA| |595C9A26D6F5BE5A2ED9A35F285554DD0E3A64FA416585930B6F2E65A66CAB0AFAD| |4CD0A272EB496C627B7D3DB3641B5649F8E68AC5CDCC8C695885ADBC57FE58B44C7| |3CD2F87E70BF98D320502FF67AD997669A36045CE5985D5CC89E1ACB16AD257A96C| |DA373AA98E51FAF85481A7A28AB82E444E17C309E6C830F397529B23C4B22AB5DFA| |4B15C71298D2ED23C4275830D4CDDC56CD498C33AB39D9AA0C9C515459BD6A49F7E| |4C3FA3BAF093BD0BBEAE5742C61A5E0AB9AEE105B3F12E337E8739769B1973737FA| |BBEEEF7AAD4063E70BD4794CFC3395D9E4B8AD4BCCB8A9CE35D62FA16C105667C5E| |C1BE8468C2FE9B6EB19F469A9FFD54FF29DE43738722F7D01C651E1302E86DA08D7| |30683EC190C836417C27E43E8630BFAD8823EC6D0C718FA17473FFF904598D76AE1| |E76414D645EB902E63AD499C658A19A2701BE6B67DE17ADB3F839F98B18FCC10EDA| |D037BEB40DD9DA8BB1375B7905F17FBE95D39EE4977967BDE3DCEECC9307BD3CC30| |F946E01BB98739F799C9074C9DE64431278ADCBDC8DD8BDC619ADA879EF53DE39AF| |B9F824FC05DE6C01EB8C3B40883F01F847F12BE49E40990FF107A35843349E00C12| |388304CEA0424B52E8436A17F766077CC41C7B0C3E640A95EF5EB5FED14355BE2BE| |9832A3D22FD1DFCC6CCED835F997F295F06B565DEF1DAF1B71C1B7F03BE660E522F| |B3B867D951BE2339B04777DCE90A3D627AA4A65446EAA2D93A2557A79CAE53CED42| |917AB8AA2C82C33728CA887DFA139BDF6BF2214B9C213A47F0BD475E0C5E26A34CD| |3BF9E1D40EF8940F9D5A8AE7FD746AFDAC1DB51358ABCC7B651D727CD931BEE2185| |F758CFF01D63BE7D2| |-------------------------------------------------------------------|
-
- 1
-

-
This is a spin on the R2 dropping the Character Concept Experimentation pool in favor of the Speed Pool. [Time Bomb] takes a bit of a hit so it's no longer providing extra Regeneration or more hit points, but it picks up the PvP-Res proc on the basis of... well... if you have time to use [Time Bomb] might as well get a debuff out of it. [Hasten] picks up in the level 50 slot, and while it's about a 4~5s delta off of perma (122.6s/120s :: 2.6x1.75=4.55s), it's not actually doing much else. [Full Auto] falls from 19.93s to 16.17s, and that's about the only usable power with greater than a 1.5s drop. [Time Bomb] benefits, but it's easily the most skippable power outside of [Seeker Drones]. Which, again, was a concept power selection, but still provides a useful longer-term debuff. So, compelling reasons to actually take [Hasten]. The other major reason for going this way is that [Super Speed] will stack with the Celerity Stealth Proc in [Sprint]. So if you are soloing and using [Trip Mine] on a regular basis, you can get a little closer to the intended targets. Personally that timing / delay issue makes [Trip Mine] largely impractical, but I have seen successful uses on BAF, ITF, and LRSF. Villain Plan by Mids' Reborn : Hero Designer 2.6.0.7 https://github.com/ImaginaryDevelopment/imaginary-hero-designer Click this DataLink to open the build! Level 50 Magic Corruptor Primary Power Set: Assault Rifle Secondary Power Set: Traps Power Pool: Leaping Power Pool: Speed Power Pool: Fighting Power Pool: Leadership Ancillary Pool: Mace Mastery Villain Profile: Level 1: Burst -- SprScrBls-Acc/Dmg(A), SprScrBls-Acc/Dmg/Rchg(42), SprScrBls-Rchg/+End(43) Level 1: Web Grenade -- GrvAnc-Hold%(A) Level 2: Caltrops -- Artl-End/Rech/Rng(A), Artl-Acc/Rech/Rng(3), Artl-Acc/Dam/Rech(3), Artl-Dam/Rech(5), Artl-Acc/Dam(9), Artl-Dam/End(42) Level 4: Combat Jumping -- ShlWal-ResDam/Re TP(A), Ksm-ToHit+(5) Level 6: M30 Grenade -- OvrFrc-Dam/KB(A), OvrFrc-Acc/Dmg/End/Rech(7), OvrFrc-Acc/Dmg/End(7), OvrFrc-Acc/Dmg(9) Level 8: Super Speed -- BlsoftheZ-Travel/EndRdx(A), BlsoftheZ-ResKB(34) Level 10: Triage Beacon -- NmnCnv-Regen/Rcvry+(A), NmnCnv-Heal(11), NmnCnv-Heal/EndRdx/Rchg(11), NmnCnv-Heal/Rchg(13), NmnCnv-EndRdx/Rchg(13), NmnCnv-Heal/EndRdx(37) Level 12: Kick -- FrcFdb-Rechg%(A) Level 14: Tough -- GldArm-3defTpProc(A), StdPrt-ResDam/Def+(15), ImpSki-Status(15) Level 16: Force Field Generator -- LucoftheG-Def/Rchg+(A), LucoftheG-Def/EndRdx(17), LucoftheG-Def/EndRdx/Rchg(17) Level 18: Sniper Rifle -- StnoftheM-Dam%(A), StnoftheM-Dmg/EndRdx/Rchg(19), StnoftheM-Dmg/EndRdx(19), Thn-Dmg/EndRdx/Rchg(37), Thn-Acc/Dmg/EndRdx(37), Thn-Acc/Dmg/Rchg(45) Level 20: Acid Mortar -- AchHee-ResDeb%(A), SprScrBls-Dmg/Rchg(21), SprScrBls-Dmg/EndRdx/Rchg(21), SprScrBls-Acc/Dmg/EndRdx/Rchg(42) Level 22: Flamethrower -- Artl-End/Rech/Rng(A), Artl-Acc/Rech/Rng(23), Artl-Acc/Dam/Rech(23), Artl-Dam/Rech(36), Artl-Dam/End(36), Artl-Acc/Dam(36) Level 24: Maneuvers -- LucoftheG-Def/Rchg+(A), LucoftheG-Def/EndRdx(25), LucoftheG-Def/EndRdx/Rchg(25) Level 26: Ignite -- Rgn-Dmg/EndRdx(A), Rgn-Acc/Rchg(27), Rgn-Acc/Dmg/Rchg(27), Rgn-Dmg/Rchg(29), Rgn-Dmg(31) Level 28: Tactics -- GssSynFr--ToHit(A), GssSynFr--ToHit/Rchg/EndRdx(29), GssSynFr--ToHit/EndRdx(40) Level 30: Weave -- LucoftheG-Def/Rchg+(A), LucoftheG-Def/EndRdx(31), LucoftheG-Def/EndRdx/Rchg(31) Level 32: Full Auto -- SprMlcoft-Rchg/Dmg%(A), SprMlcoft-Acc/Dmg/EndRdx/Rchg(33), SprMlcoft-Dmg/EndRdx/Rchg(33), SprMlcoft-Dmg/Rchg(33), SprMlcoft-Acc/Dmg/Rchg(34), SprMlcoft-Acc/Dmg(34) Level 35: Scorpion Shield -- LucoftheG-Def/Rchg+(A), LucoftheG-Def/EndRdx/Rchg(40), LucoftheG-Def/EndRdx(46) Level 38: Trip Mine -- Erd-%Dam(A), Erd-Acc/Dmg/EndRdx/Rchg(39), Erd-Acc/Dmg/Rchg(39), Erd-Dmg/Rchg(39), Erd-Acc/Rchg(40), Erd-Dmg(50) Level 41: Seeker Drones -- SprWntBit-Rchg/SlowProc(A), SprWntBit-Dmg/EndRdx/Acc/Rchg(43), SprWntBit-Acc/Dmg/EndRdx(43), SprWntBit-Acc/Dmg/Rchg(45), SprWntBit-Dmg/Rchg(45) Level 44: Time Bomb -- Erd-%Dam(A), Erd-Acc/Dmg/EndRdx/Rchg(46), Erd-Acc/Dmg/Rchg(46), FuroftheG-ResDeb%(50) Level 47: Poison Trap -- BslGaz-Slow%(A), BslGaz-Acc/EndRdx/Rchg/Hold(48), BslGaz-EndRdx/Rchg/Hold(48), BslGaz-Rchg/Hold(48) Level 49: Hasten -- RechRdx-I(A), RechRdx-I(50) Level 1: Brawl -- Empty(A) Level 1: Quick Form Level 1: Prestige Power Dash -- Empty(A) Level 1: Prestige Power Slide -- Empty(A) Level 1: Prestige Power Quick -- Empty(A) Level 1: Prestige Power Rush -- Empty(A) Level 1: Prestige Power Surge -- Empty(A) Level 1: Scourge Level 1: Sprint -- Clr-Stlth(A) Level 2: Rest -- Empty(A) Level 4: Ninja Run Level 2: Swift -- Run-I(A) Level 2: Health -- Prv-Absorb%(A) Level 2: Hurdle -- Jump-I(A) Level 2: Stamina -- EndMod-I(A) Level 50: Agility Radial Paragon Level 0: Born In Battle Level 0: High Pain Threshold Level 0: Invader Level 0: Marshal ------------ | Copy & Paste this data into Mids' Reborn : Hero Designer to view the build | |-------------------------------------------------------------------| |MxDz;1522;711;1422;HEX;| |78DA6594594F135114C7EF6CB4539616CA2AB42C055A96160AE82B515C628084558| |D2FA481A1346968D329893EFAE0F750638C0BA07E04BF8189C62512A38FA2A0AF8A| |389EDEFFA14CD249CAEFF67FCEFCCF3DE7723B7BEB62CDEE953B9342F14F6553B6B| |D32952B14B6F2C55CC1984DA533AB9AA0C7439F7039B0B290DA4C5B6B89F3B69DDA| |CA16571632EB59ABF1347C616B7D3DB15448E56D513397CB651333562A9FD94CFBE| |497C5BC65ADD5CAE5E54C7AA34801FF49D69A55B03732F9F64BF9CC6AE2D47036B5| |6AD11FBB68156EB7D25686E8A3AA821F4715BDBA10495D0CF4838303E06FA59C23C| |4B22AB53FA441760CC56B90660AD5C3AC027503F46AE0800E36D31C34F9B2A368D3| |9AF4D38FE96B481706D91BF0D58CAF88557D617E06BD7B60C48391967C3C9F54E9D| |DBD87FD1D91BF891A86794D919A6F599139BE25B06691B900F6CE2BDC8710D5DC6F| |F55DF869A4D5C24FAD1D43FDBA1645EEB92E041E13FC9CE36F42CD40009E8120E82| |1BB7A9E5BFD5B21731ADE08196B780DF63E60DE0787EF817FC922C8B309BE22A3A0| |291AFB74196B8CF2D9C5402F859BB84E93F764EE4C3E9F089F4F84CF25C2E7544FB| |DB6701F2DDC472BF7D1CA7D98E4DF067FBDED1C667FE62C7302EC1807C36360907C| |DBD9B7FD21E73C02A38F419D72429C13E2DA61AE1DE6DA3E4AEDE4DE3A5FE22CBA5| |E309F3377C0EE5DE6369827F4B07F0FFB47D937CE7504F9F7B17FDFA12ACFB6FFA0| |4453F4FF607E07A3FB60F21BE890458CE712DBE17BB4CD7C0A0E3F633E01151577B| |174AE435C2FCEF5E25C2F3989FDFF23FF04E7263E2277E4037246DE33DF813D34CB| |51BE67A343F81F4A323B74D79D76E811D38365C519AC888E5628C90A65BC4299A85| |0AE961445915566E49AA326EED99C5EFE5D118A7CC30CD0AF05EFEBC0C72F97A271| |74F2D3AD1D604A876E2D86BC5F6EAD0BDA5133019A33EF93FB90EBEBAEF50DD7FAA| |66BFD1F7472EBAA| |-------------------------------------------------------------------|
-
There's a Beam/Temporal in the Archive. R3 has been updated for recent power sets and enhancements: https://drive.google.com/file/d/1hCsmCLGqAGztnYq9i-ixxWwE5oe80r5W/view?usp=sharing
-
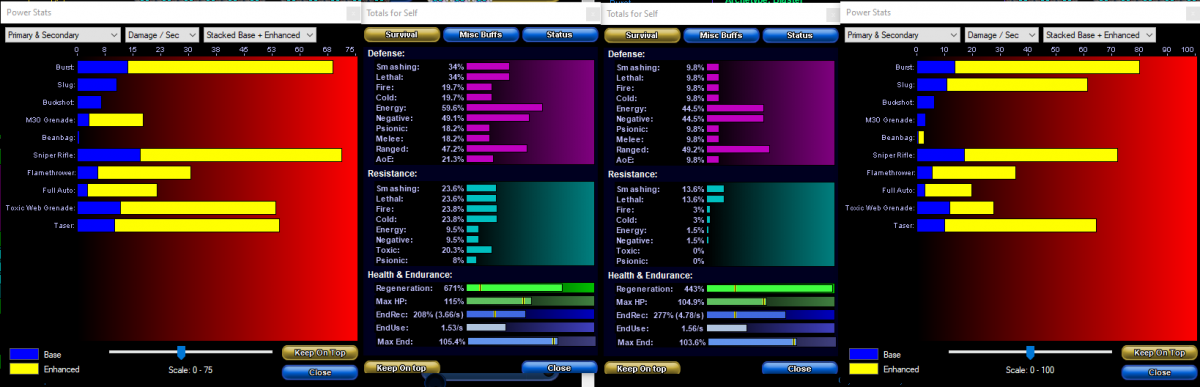
Followup. Since I think a lot of poster's here just don't understand the sheer gap between the builds I do, and why I normally don't bother responding... here's a quick screen of the DPS with my Incarnate choices active, and Chelsea Rorec's choices active. Actually this is slightly more favorable to Chelsea's as I bumped the Hybrid to Reactive Radial for double-hit and bumped the Alpha to T4. Best possibly scenario. On paper, yes, Chelsea's build technically is capable of delivering more DPS... or is it? There's this thing that I call Animation Saturation. It's when you have a reliable attack chain that lets you cycle between powers as they recharge. Using my build as example, [Burst] has an animation/cast of 1s, and a recharge of 1.33s. Sniper Rifle has an animation/cast of 3.67s and a recharge of 4.02. [Ignite] which doesn't show on the charts likely due to a bug has an animation/cast of 4s with a recharge of 6.7. [Flamethrower] has a cast of 2.33 with a recharge of 6.79s. Ergo, by alternating between [Burst], [Ignite], [Burst], [Flamethrower], [Burst], [Sniper Rifle] I can develop a sustained attach chain where by the time I cycle to the next power in the chain, it has a chance to recharge. Thus powers like [Slug], [Toxic Web Grenade], [M30 Grenade] and the ancillary powers become almost irrelevant beyond utility factors. Do I need to put a mob on it's rump for a second? [M30 Grenade] is a good opening attack. Did I just get stuck into melee range with a pesky mez-happy Lieutenant? Good thing I have something in [Tazer]. Do I have time to drop some [Trip Mines]? Well they're just plain evil with the Resist Debuff Proc from the PvP Set. So simply packing more power into a build using Musculature is simply a bad idea. For the most part, it's not actually going to do jack to actually help your build. Why? Because most IO sets do one thing really well. Damage sets, outside of the sniper sets, generally boost damage into ED cap. This is why Cardiac Alpha was so devastatingly powerful when first released. Very few IO sets offered any kind of endurance reduction, so Cardiac by default had the most visible impact by boosting an aspect of builds that was nowhere near ED cap. In the same way Agility and Spiritual offer disproportionate capability to IO builds since so few IO sets really ramp up the Recharge, Endurance Modification, Healing, or other aspects. Thus, when activating Spiritual Core on my Build, and Musculature Radial T4 on Chelsea's build... My [Full Auto] clocks in 21.34dps... Cheslea's only reaches 19.47dps. My [Sniper Rifle] rocks in 98.34dps. Cheslea? 90.08dps. And yes, the Sniper Rifle bar is broken. Okay, in fairness Chelsea's [Burst] and [Flamethrower] do clock in better than mine, 79.45dps/68.33dps and 35.45dps/30.42dps. As mentioned [ignite] is broken on the charts, but that's another win for Cheslea. 792.2 average damage on a 6.68 recharge versus 671 average dps on a 6.7s recharge. I've got [M30 Grenade], Cheslea skipped that. So I've got a little bit more AOE damage to pump out between animation and recharge cycles. Cheslea has more damaged pumped into [Trip Mine] and a slightly better recharge. 9.77s versus 11.25s. But... which is actually more effective? A Trip mine that delivers a resist debuff and makes my other powers more formidable if they aren't splatted outright, or a power that... well... is probably overkill against minions to begin with and not always viable to be used? Okay, if I really wanted to be a prat about it, I could just swap the [Trip Mine] and [Time Bomb] slotting. Still keep the rest of the bonus, but now no longer have a gap between damages. I didn't go that way for, well, testing reasons. Okay, and Cheslea has [LRM Rocket]. Now, I'm going to spare this forum the rant that Powerhouse got elsewhere, but the Live Devs mucked it up by skipping animating [LRM Rocket] for Insta-Snipe. That being said Powerhouse has indicated in the past that should that animation work be performed, [LRM Rocket] would certainly be added to the Insta-Snipe Category. Quite frankly that is the kind of change Tertiary Powers need to make non-Defense oriented sets viable against Defense Oriented powers. Until that change is made though, [LRM Rocket] is basically a huge timing hog that... well... unless you are running solo? You're probably never actually going to be able to use it in a team. So, sure, you can claim you can double nuke... but if you only can do it once and then the rest of the team tells you to quit defending the rear position and catch up... what... exactly... did you gain? Here's a hint. Nothing. You gained nothing. So, big long post, It really comes down to a screenshot. My build is on the left. Chelsea's is on the right. What, exactly, did Chelsea give up in order to get a build that... in real-play does a lot less damage even in contrived scenarios? Answer? Pretty much everything. It's not even close.

-
Don't make challenges you can't keep. First shot is just raw damages. Second shot is all of your incarnate powers out for Apples to Apples. Yeah. No. You're not. You really are not.
-
Well, again, caveat. The only AR I actually have any time-of-play in is the Sentinel Version, AR/Super-Reflexes. Assuming data tracking was accurate I racked up 2,331 hours on 112 logins with her. As far as Sentinel sets went, she wasn't exactly an AV killer. Then again the (damage output) Issues with Sentinels are fairly well documented. In comparison to the Baster version the Sentinel also lost a significant amount of AOE potential even as it gained relative Single Target potential through the (questionable) inherent and [Aim]. My AR/SR turned in a level 50 incarnate-enabled [Full Auto] recharge of ~30s, with the annihilation -resist proc in [Flamethrower] and either [Chain Fences] or [Fire Cages] (I ran both Electric and Fire mastery alt-builds because [Rehabilitating Circuit] was crazy useful in mothership raids) I had little in-play problems with lining up groups for an [Aim] boosted meltdown. The Blaster version of [Full Auto] as based on this thread's build dials in a sub ~20s recharge time... while having the mass distract/slow of [Glue Arrow] and the hold of [ESD Arrow], On paper? It looks solid. That being said, I don't know if there still is a buried Damage Bonus for Sniper Rifle that specifically ties it to Devices [Targeting Drone]. Powerhouse is running up a lot of minor changes the Live Devs never implemented, but I haven't been guilt-tripped into actually making an AR blaster myself. So my big beef with the set may have already been taken care of, and I just didn't notice. The other, well, point I'd make is that, well, last time I checked, character slots aren't really limited. The only real limitations are the in-game economy and the player's ability to sit down and play. My builds use a lot of ATO's, EO's, and Purples that could mean you need to run a metric ton of task forces to afford. Then again, my builds were predicated on the Sekrit Server economy which was completely overhauled to account for a drastically limited player-base. Homecoming's economy is different enough that whether or not you can afford to trick out a build can very well be a factor in whether or not you ultimately play a build.
-
Here's a version that may or may not load. Previous versions of MIDS had issues with loading "invalid slots" The power selection levels should be more optimized and this slotting can be achieved in-game using the Respec function. Villain Plan by Mids' Reborn : Hero Designer 2.6.0.7 https://github.com/ImaginaryDevelopment/imaginary-hero-designer Click this DataLink to open the build! Level 50 Magic Corruptor Primary Power Set: Dual Pistols Secondary Power Set: Traps Power Pool: Leaping Power Pool: Leadership Power Pool: Experimentation Power Pool: Fighting Ancillary Pool: Mace Mastery Villain Profile: Level 1: Pistols -- SprScrBls-Acc/Dmg(A), SprScrBls-Acc/Dmg/Rchg(3), SprScrBls-Rchg/+End(3) Level 1: Web Grenade -- GrvAnc-Hold%(A) Level 2: Caltrops -- Artl-End/Rech/Rng(A), Artl-Acc/Rech/Rng(5), Artl-Acc/Dam/Rech(5), Artl-Dam/Rech(7), Artl-Dam/End(7), Artl-Acc/Dam(9) Level 4: Combat Jumping -- ShlWal-ResDam/Re TP(A), Ksm-ToHit+(9) Level 6: Maneuvers -- LucoftheG-Def/Rchg+(A), LucoftheG-Def/EndRdx(11), LucoftheG-Def/EndRdx/Rchg(11) Level 8: Speed of Sound -- BlsoftheZ-Travel/EndRdx(A), BlsoftheZ-ResKB(13) Level 10: Triage Beacon -- NmnCnv-Regen/Rcvry+(A), NmnCnv-Heal(13), NmnCnv-Heal/EndRdx/Rchg(15), NmnCnv-Heal/Rchg(15), NmnCnv-EndRdx/Rchg(17), NmnCnv-Heal/EndRdx(17) Level 12: Kick -- FrcFdb-Rechg%(A) Level 14: Swap Ammo Level 16: Force Field Generator -- LucoftheG-Def/Rchg+(A), LucoftheG-Def/EndRdx(19), LucoftheG-Def/EndRdx/Rchg(19) Level 18: Bullet Rain -- Artl-End/Rech/Rng(A), Artl-Acc/Rech/Rng(21), Artl-Acc/Dam(21), Artl-Acc/Dam/Rech(23), Artl-Dam/Rech(23), Artl-Dam/End(25) Level 20: Acid Mortar -- SprScrBls-Acc/Dmg/EndRdx/Rchg(A), SprScrBls-Dmg/EndRdx/Rchg(25), SprScrBls-Dmg/Rchg(27), Thn-Dmg/EndRdx/Rchg(27), Thn-Acc/Dmg/EndRdx(29), Thn-Acc/Dmg/Rchg(29) Level 22: Executioner's Shot -- Apc-Dam%(A), Apc-Dmg/Rchg(31), Thn-Dmg/EndRdx/Rchg(31), Thn-Acc/Dmg/EndRdx(31), Thn-Acc/Dmg/Rchg(33) Level 24: Tough -- GldArm-3defTpProc(A), StdPrt-ResDam/Def+(33), ImpSki-Status(33) Level 26: Piercing Rounds -- Rgn-Dmg/EndRdx(A), Rgn-Acc/Rchg(34), Rgn-Acc/Dmg/Rchg(34), Rgn-Dmg/Rchg(34), Rgn-Dmg(36) Level 28: Poison Trap -- BslGaz-Acc/EndRdx/Rchg/Hold(A), BslGaz-Acc/Rchg(36), BslGaz-EndRdx/Rchg/Hold(36), BslGaz-Rchg/Hold(37) Level 30: Weave -- LucoftheG-Def/Rchg+(A), LucoftheG-Def/EndRdx(37), LucoftheG-Def/EndRdx/Rchg(37) Level 32: Hail of Bullets -- SprMlcoft-Rchg/Dmg%(A), SprMlcoft-Acc/Dmg/EndRdx/Rchg(39), SprMlcoft-Dmg/EndRdx/Rchg(39), SprMlcoft-Dmg/Rchg(39), SprMlcoft-Acc/Dmg/Rchg(40), SprMlcoft-Acc/Dmg(40) Level 35: Scorpion Shield -- LucoftheG-Def/Rchg+(A), LucoftheG-Def/EndRdx(40), LucoftheG-Def/EndRdx/Rchg(42) Level 38: Tactics -- GssSynFr--ToHit(A), GssSynFr--ToHit/Rchg/EndRdx(42), GssSynFr--ToHit/EndRdx(42) Level 41: Empty Clips -- OvrFrc-Dam/KB(A), OvrFrc-Acc/Dmg/End/Rech(43), OvrFrc-Dmg/End/Rech(43), OvrFrc-Acc/Dmg/End(43) Level 44: Trip Mine -- Erd-%Dam(A), Erd-Dmg/Rchg(45), Erd-Acc/Rchg(45), Erd-Acc/Dmg/EndRdx/Rchg(45), Erd-Acc/Dmg/Rchg(46) Level 47: Time Bomb -- Erd-%Dam(A), Erd-Acc/Dmg/EndRdx/Rchg(48), Erd-Acc/Dmg/Rchg(48), Erd-Dmg/Rchg(48), Erd-Acc/Rchg(50) Level 49: Seeker Drones -- SprWntBit-Rchg/SlowProc(A), SprWntBit-Dmg/EndRdx/Acc/Rchg(50), SprWntBit-Acc/Dmg/Rchg(50), SprWntBit-Acc/Dmg/EndRdx(51), SprWntBit-Dmg/Rchg(51) Level 1: Brawl -- Empty(A) Level 1: Quick Form Level 1: Prestige Power Dash -- Empty(A) Level 1: Prestige Power Slide -- Empty(A) Level 1: Prestige Power Quick -- Empty(A) Level 1: Prestige Power Rush -- Empty(A) Level 1: Prestige Power Surge -- Empty(A) Level 1: Scourge Level 1: Sprint -- Empty(A) Level 2: Rest -- Empty(A) Level 4: Ninja Run Level 2: Swift -- Run-I(A) Level 2: Health -- Prv-Absorb%(A) Level 2: Hurdle -- Jump-I(A) Level 2: Stamina -- EndMod-I(A) Level 50: Agility Radial Paragon Level 0: Born In Battle Level 0: High Pain Threshold Level 0: Invader Level 0: Marshal Level 14: Chemical Ammunition Level 14: Cryo Ammunition Level 14: Incendiary Ammunition ------------ | Copy & Paste this data into Mids' Reborn : Hero Designer to view the build | |-------------------------------------------------------------------| |MxDz;1557;710;1420;HEX;| |78DA65945B4F13511485CF5C0AB4140BB4946B01A1A51768A180BE9A08680C90140| |435BE90099432496D9B9992E0A30FFE0CAF31C60BA0FE182F89C6CBAB0AFAAA8875| |F7EC6599A493B4DFE9DA67EDEEB3A6D3C59D59EFFEC55BE784E29BC91BB6BD3653B| |4ACED52B968B9168D9CB9AE09BA1AE915AA15D6968D422EBB919ADD36F26B19D32E| |17F376E0A47A7E7B7333B56219255B7833C5623EB590354A6621E7FBFF61236BD95| |B6629203FCFED94B29679235B281B65B3586891E20533B755264BEF5CC95C4F9DB4| |5E34D6B3F46697B3D6CD2E9A2945AF48ABC0555145581722AD0B75048C337F29B53| |D42ACAA52FB4D1ACB1597D2E4929ADE0836301B5CA0CE6CD298410A4493E68AA2CD| |6B5C3BAE86A48B36AAB9B8A6BA3A1459F3B456E9161E3F3393E04CABFEC6F7AAD4B| |C1F78AE23DAE266BFCB7D85FDDE55F69D5A012F335B97C125A64A4D9B71CEE6DBDC| |2F46F9B470BFCA31D187AC7C98AD1DB3B563B638ED6F432E6DC825805C02F2FC6E1| |1443E41E4D3857CFE500B3FBCFE1867DF1565F64474E9ED792824FB1E80F799A3F4| |BD1DECD53BD23C7B7F92B3E987A71F9E4178343A6F27B2EE9CE4FB30581542B427A| |4C8FB31467DBBD1B7FB2CF73B7D069C06A798C393CCBF64ED658FD6FB4E95FD865F| |836F99E1374C9D6608618610320D23D330324DD20C03C865E015CF39F2127C01EE3| |1A3FBE02EB3441842FF21F48FA27F1CFDFD344304F735F288CF107F0C3E61466986| |18CE14FBC2BD139FC14FE047A620CB28321B3D5439C76F7CDEB1AFE00133F99DA9A| |8FC3C563D2978C6B1671C7BC6D1238D1E151A7F029E893DFE9DA477C1E7CCC967E0| |53669FEE78962B7489F9444DA924EAAA13754ABA4E99AA53A6EB944B554551E4B72| |CD455337AEDDF4428527153DE1AA63AF0C05AAD26F9B7FBC3A91D70EE874E2DC6FB| |7E3AB541D68E8204F45EF2C829E4FAAA637DCDB1BEEE58DFA187BB05EBBB8EF53DC| |7FA1F14F2FD13| |-------------------------------------------------------------------|