PLVRIZR
-
Posts
1132 -
Joined
-
Last visited
Content Type
Profiles
Forums
Events
Store
Articles
Patch Notes
Everything posted by PLVRIZR
-
Key (for me) is Rebirth Destiny, for the heal that SD/BA lacks. Resilient Alpha to get your resistances near cap, Mighty Judgement, for more smashy damage, Diamagnetic (my go-to Interface for all melee toons), Lore...pick your flavor and Melee Hybrid for more +res and regen.
-
My pleasure. We had seven tanks (and big shout out to @Spaghetti Betty for helping to lead the herding of Freaks/Sky Raiders) run a 54/8 and we finished in 40 min. even. Purple recipes abounded (even for some of us who already had the MC badge)! Cash money!!!
-
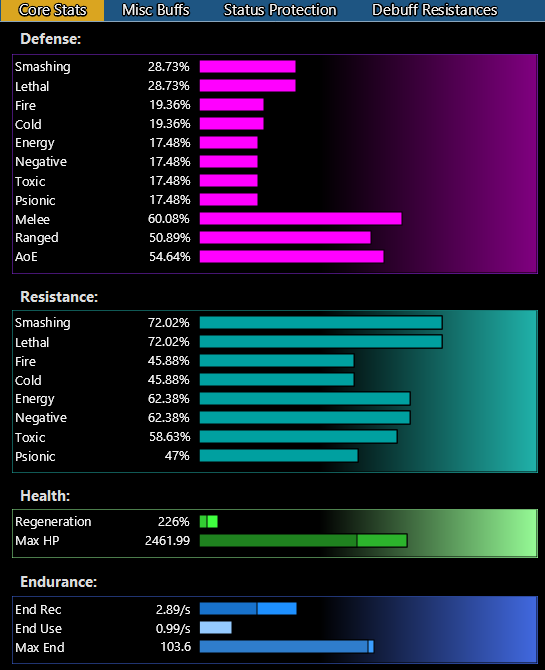
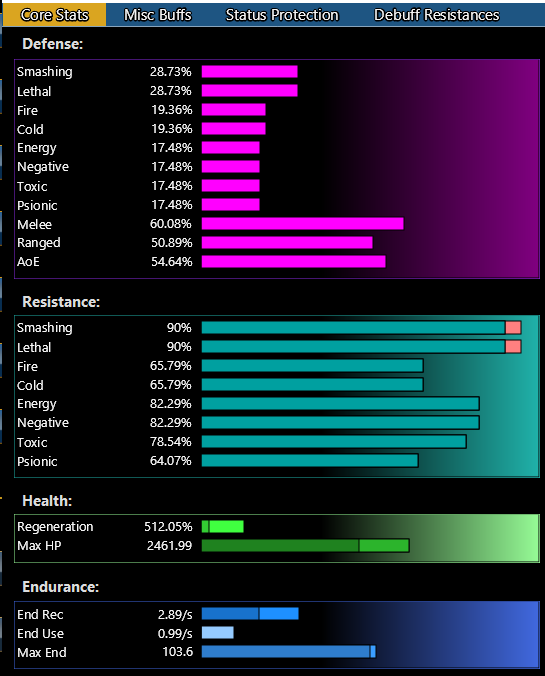
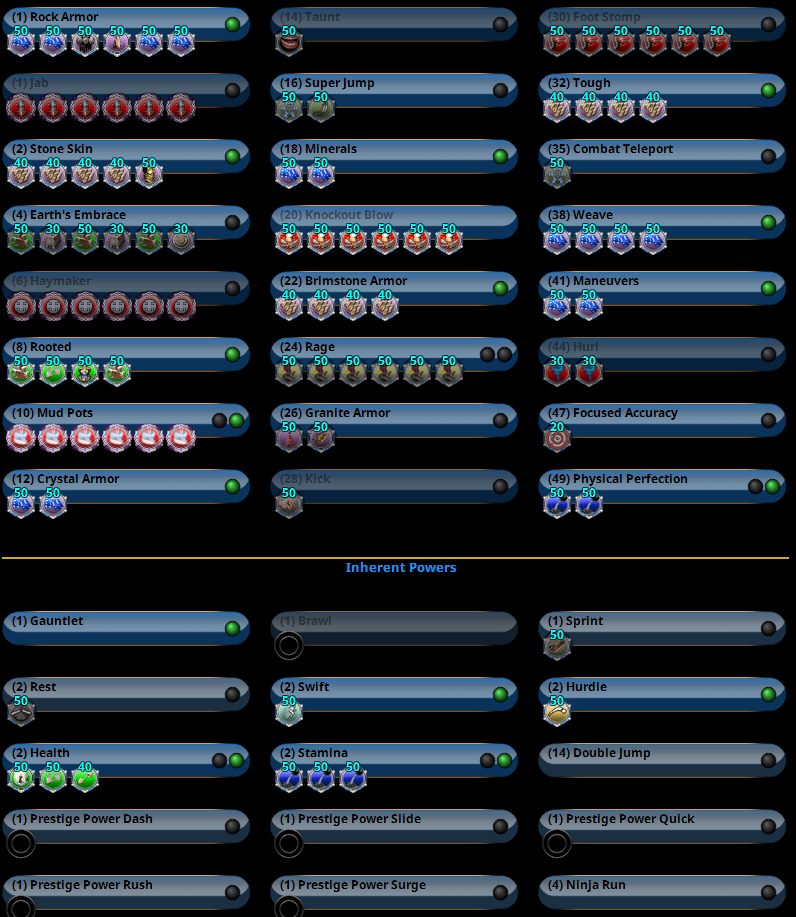
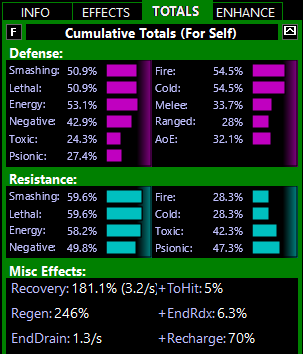
I didn't take the teleport pool (and since I focused on max-survivability) or Clobber, even though I was told by build critics that they would "clobber" me for skipping the single best solo-damage power (I'd rather have middling AoEs, instead), but the Def and Res numbers, without Incarnates or temp powers/tricks, are undeniable. Add the MoT +res, and the resistances are outstanding. Without going power by power, you'll see that I used more Unbreakable Guard sets, for better resistance numbers, took both One with the Shield and Grant Cover, both to mule IOs and for teaming benefits. It also includes super-cheap sets like Multi-Strike (x2) and Crushing Impact, so the build won't break the bank (well comparatively). Add a single stack of MoT and Resilient Alpha and Melee Core (resist with one mob) and the numbers are just silly: Mace to the Face_v3.0.mxd Needless to say...pretty "Untouchable".

-
There are two trains of thought, on this topic. Some of my tanks take a fast-recharging Tier1 or Tier2 attack, to basically guarantee two stacks, if you're keeping those in your attack rotation, and need them for your max numbers. The other (which I use on Fire and Ice armor) is put it in a toggle, so when you're in mob groups, it is an "always on" one stack. Sometimes you'll get two stacks. My current Bio (Bio/Fiery Melee) strategy is putting the MoT in an early AoE attack (Combustion) and GF in a cone AoE (Breath of Fire). This is mostly because FSC gets a full damage set. The build is such that the bonuses (+res and +absorb) are just gravy, rather than needed to be in the calculations for survivability. Also helps in exemp-ing, as the +res is really helpful, when you go back and do the Posi-s and Synapse...
-
Hard to do a direct to direct comparison, without the data chunk or the Mids file attached to your post. Other than your intent to use Fold Space, what are your goals? The tankiest possible? Single Target monster for soloing? A blended approach?
-
Paging @Warboss. His Atomic Minotaur build is exceptional!
-
Ronin challenged us with a +4/8 with no temp powers, and it was no problem. Finished in 33 min. Much fun was had by all and there were at least three team members, who had never done MC, and got purple recipes...so bonus!!!
-
Posted mine, below. Sacrificed some damage for significant survivability. Does more damage than the Elec/Elec tank version, but the tank is sturdier. No taunt on a brute...personal preference. Other differences: 1. Charged Brawl - Full set of Touch of Death 2. Charged Armor - Full set of Aegis 3. Havoc Punch gets the Superior Brute's Fury (procs alot) 4. Jacob's Ladder, took it, since I went with Energy Mastery, instead of an offensive Epic, full set of Obliteration 5. Lightning Field - Full set of Superior Unrelenting Fury (procs alot) 6. Thunder Strike - Needs a KB to KD, or they go flying. Didn't bother with FF +rech, since I use Hasten and the proc in Lightning Field and have FF +rech in Lightning Rod. Cheapo Razzle Dazzle gives End, HP and Melee Def. 7. Build Up - Full set of Gaussians, for the Melee Def (along with alot of other benes) 8. Chain Induction - four slots (limited by other choices), so put a cheapo Pounding Slugfest full set (8% Regen and 2% Damage) 9. Energize - Full set of Preventive Medicine (8.75% recharge) 10. Lighting Rod - needs KB to KD or they go flying. Yes, I put a FF +rech in there 11. Panacea in Health and Power Transfer in Stamina (+HP) means bonus green numbers floating, as well. Incarnates include Ion (for theme), Musculature (for damage), Carnival (for Forge) and Barrier (of course). So I'll say it for everyone else. Tanky Brute?..."I would have put a whole lot more damage in there"... 😁 Let's just say, he farms the "Just teh Council" S/L Dreck map just fine. With no tricks or Incarnates, you get 43% Melee Def. (no DDR, so can be stripped quickly) and right at 90% S/L resist. 90+ Energy (of course) and 54 Neg/63 F-C/66 Psi. Just my $.02 infl and take on the theme. ZZAAPPP_v4.0 - Brute (Electrical Melee).mbd
-
My "titular" toon is Stone/SS. Did the I27p5 update, below. The posted stats are without granite, but with all the other armors on. He mules the Unbreakable Guard 7.5% HP, there, and is practically unkillable. PLVRIZR v5.0_I27p5 update - Tanker (Stone Armor).mbd
-
Welcome. He does alright 😆
-
My pleasure. Here is Heraclea's build (God rest their soul), and my version, which is my take on the same combo: Heraclea_InvDM.mxdDARKNESSREIGNS v4.0.mxd
-
 Because Infl. is SOOOOO easy to get, even at low levels, I begin to slot "set" pieces ASAP. The proc ATOs, as early as 2nd or 3rd level. Then the sets at 7th, 12th, etc., etc., whenever available. SOs in all powers, and upgraded every level. Always.
 -
If you go that direction, here's an idea: NUTCRCKR v6.0_I27p5 update - Tanker (Invulnerability).mxd
-
Yeah, bummer for me, too. I was going to bring NUT (my sturdiest Inv/SS), so anyone with a Hyperstrike or Infinitum-based build should do OK.
-
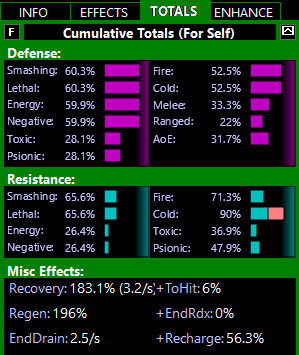
And that's the best part of this game. You can tailor your build to whatever you deem important. You'll also note that @Sovera is a class act, and recognizes that, rather than those who just immediately jump on the opportunity to show how only their opinions and build theories should be followed/respected. I focus on survival, rather than single target damage. So to try to soothe the damaged souls 😆, here are my philosophies and reasons. -I'll start by agreeing that the BotZ KB prot. enhancement was overkill, so I moved it to Taunt and added the sixth piece of Mocking Beratement for another +7.5% recharge. My KB target is 12 pts. and back when this was built, I was hooked on KB numbers. Not really necessary now and 10 is OK. Remember, slow resistance and recharge are key, as you will need Energy Absorption up, as much as possible. With this change, the recharge is 26 sec., which is less than half the time of it's unslotted time. Using Recovery Serums is an option, but after you hit 22, it shouldn't matter. When CoH started, there wasn't much soloing with tanks and your job was to survive and hold aggro, thereby letting the true damage dealers (Blasters and Scrappers) kill things. Your kills were (are in teaming) just gravy. I rarely take both T1 and T2 attacks, on any tank. T1 is a fast recharging and constant attack, so Gauntleted Fist goes there, for lots of +absorb activations. Absorption shields are the same as "free hit points". Many builders don't like the ATOs in AoEs, but I've found that with Icicles (or Blazing Aura and the like), I have one stack, consistently. Rarely, if ever, two stacks, but since I focus on survival (Res. and Def.), I don't need it. -Kick: The perpetual controversy. It's slotted with a Force Feedback +recharge. No I don't often use it, unless exempted. What hurts my soul is to see empty slots in Mids', so it's an easy fix to fill with FF. -Seismic Smash: The bonuses from Char are just too good to pass up. Resistances (including recharge resistance), tasty defense boosts and a sprinkling of end recovery. Wait, and there's another +absorb proc? Sold! Definitely a team approach, rather than solo or as a max damager. -Combat Jumping: Same as what Sovera said and it (usually) is a mule for some of the defense uniques. Since Ice is a defensive set, those go in Frozen Armor, instead. -Taunt: Normally, I one slot it with the Perfect Zinger +psi damage proc, since it's auto-hit and has a base recharge of 10 sec., doesn't need recharge. In this build, it's a full set of Mocking Beratement, for the set bonuses. End, resistance, defense and, most importantly the 6th slot for the aforementioned 7.5% recharge enhancement. -Energy Absorption: Targets and target numbers determine how much end you refill and since you're always at the center of the mob(s), you should refill fully, each activation...so...more defense for me. The bonuses for LotG (Regen, HP, Accuracy and Resistances - especially the Toxic/Psi for the 6th piece) are more important (to me). -Salt Crystals: Yes, required pick for Quicksand (not many are, but I'm a fan of the 'sand) and Stalagmites, but the -Rech proc is valid, once it hits. Having said that, it's usually reserved for bosses and isn't in the regular rotation. Quicksand gets Ice Mistral, mostly for the 5th piece and 6.25% recharge, but also has HP, Accuracy and Recharge debuff resistance. Stalagmites gets Ragnarok for chance of KD and 6% fire resistance. Part of this build's art is that Earth Mastery perfectly fits the theme. AVALNCH: A nearly indestructible muddy snowball that will slow you, knock you down, stun and hold you before pounding you into oblivion. May take a bit longer than a procc'd out damage monster, but when you've got damage around you, the team is incredibly safe. (numbers with no incarnates and one stack of MoT and one mob in EA): And with Incarnates (Resilient and Melee Core - 1 mob):
-
My favorite ice toon is Ice Armor/Stone Melee. This is a leveling build, but also fully kitted out at 50. As with almost all my builds, it is not the absolute maxx, as some of the decisions to eek out that last 1% of whatever, goes against my thematic or fun factors (or just personal preferences). AVALNCH_4.0 - Tanker (Ice Armor).mbd Ice's endurance recovery offsets stone's thirsty attack chain. Stone melee's controls complement Ice's slows and vice versa. Recharge and slow resists are key, as you are dependent on refilling your end bar with Energy Absorption (lvl 22)...which also gives you a +def, for every target in range. If you don't want to continuously get your "butt whooped", take Yomo up on his offer, follow @Sovera's money making tips (in his sig), and buy the handful of uniques, as they become available. You can buy the tanker ATOs immediately (at least get the Might of the Tanker +res and Gauntleted Fist +absorb), as those sets boost your stats immensely. Other uniques come on at various levels starting around lvl 7. Look at the build in Mids' and see those items that are unique. Not dying alot, especially as a tank...when the rest of the team is counting on you being upright, is worth adding those pieces in, early. 😆
-
Here's mine. He's a 2021 build, but he's still very effective at +4/8 and I run the Big Mobs Tunnel fire farm for which the swords do have -def... FRMRBRWN v3.0.mxd
-
Does the Brute version not get Earth's Embrace? (my titular toon is Stone, albeit a tank, and I haven't run stone armor on a broot)
-
Mine is Crimson Prototype in the Market Crash Trial. Some ridiculous mag 100-something KB, if he picks you. Hate having tanks, that *never* get knocked down go flying...
-
We had a blast. We ran +2, +4 then +3 and finished in 40 min. flat. The +2 was too easy and the +4 took awhile, because about half the team were non-50s (and we had ICHS disease). After that, the remaining four tanks did the first mish of the Unai arc and pounded the Banished Pantheon for another 30-ish minutes, at +2/8. @ZemX and I both made 50 (and ended at VL1), on the night and one of our team members got 10 levels? (I lost count of the dings), starting at 31. Great fun was had by all and a special shout-out to @Big Gotter, who joined in the fun. If you've done the "Big Mobs" tunnel fire farm(s), he is the architect of those. See you next week for the Excelsior Hami event!
-
I have never liked the elemental swords (to the point of taking heat for not having the greater versions on my ice and firey melee tanks), but the ice shield and frozen swords sounds amazing. Damn you, @Xandyr, for fueling my altitis 😆
-
Which is the tankiest tank in tank town (with caveats)?
PLVRIZR replied to sutasafaia's topic in Tanker
I used the 3.6.6 and chose "custom". Only problem I still have is exporting builds, in the Mids' format. You can load previous .mxd builds (using the Legacy Build option, and it seems the bonuses all translate), then re-save as an .mbd file. -
Electric Melee adds another teleport AoE and Shield's defenses are so good, you hardly notice the Rage crash, with SS...so two more to consider.
-
This could give you some ideas. Numbers are without any procs, gimmicks or incarnates. Never could warm up to the "glowing pom-poms", though, so haven't played him much past 50. Don't really need incarnates to be effective, for sure: FACESMSHR v2.0.mxd
-
Which maps have no -def?