The Beta Account Center is temporarily unavailable
×
Double XP is active on all shards until October 21st


VertigoIguana
-
Posts
82 -
Joined
-
Last visited
Content Type
Profiles
Forums
Events
Store
Articles
Patch Notes
Everything posted by VertigoIguana
-
Challenge Bounty Posted: 2 Billion up for grabs. Stalker's turn!
VertigoIguana replied to Koopak's topic in Stalker
Well...it is a stalker bounty, I'm sure we'll all be at least a little sneaky. -
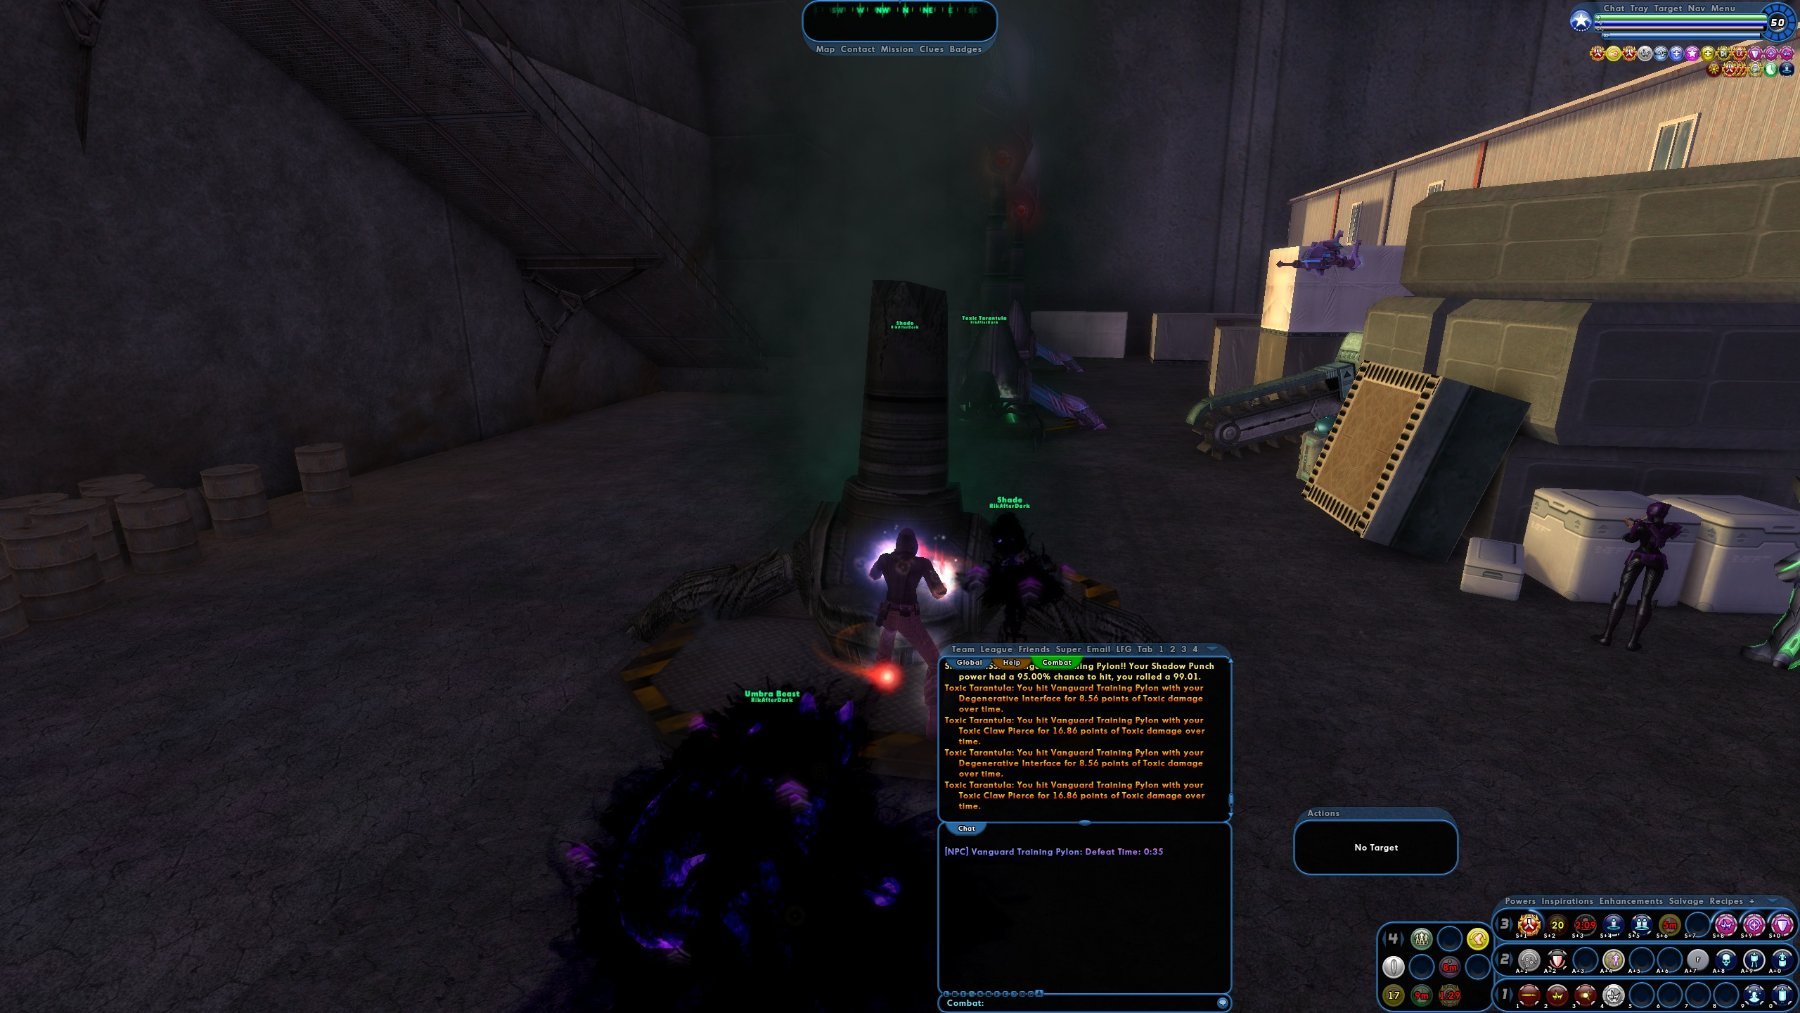
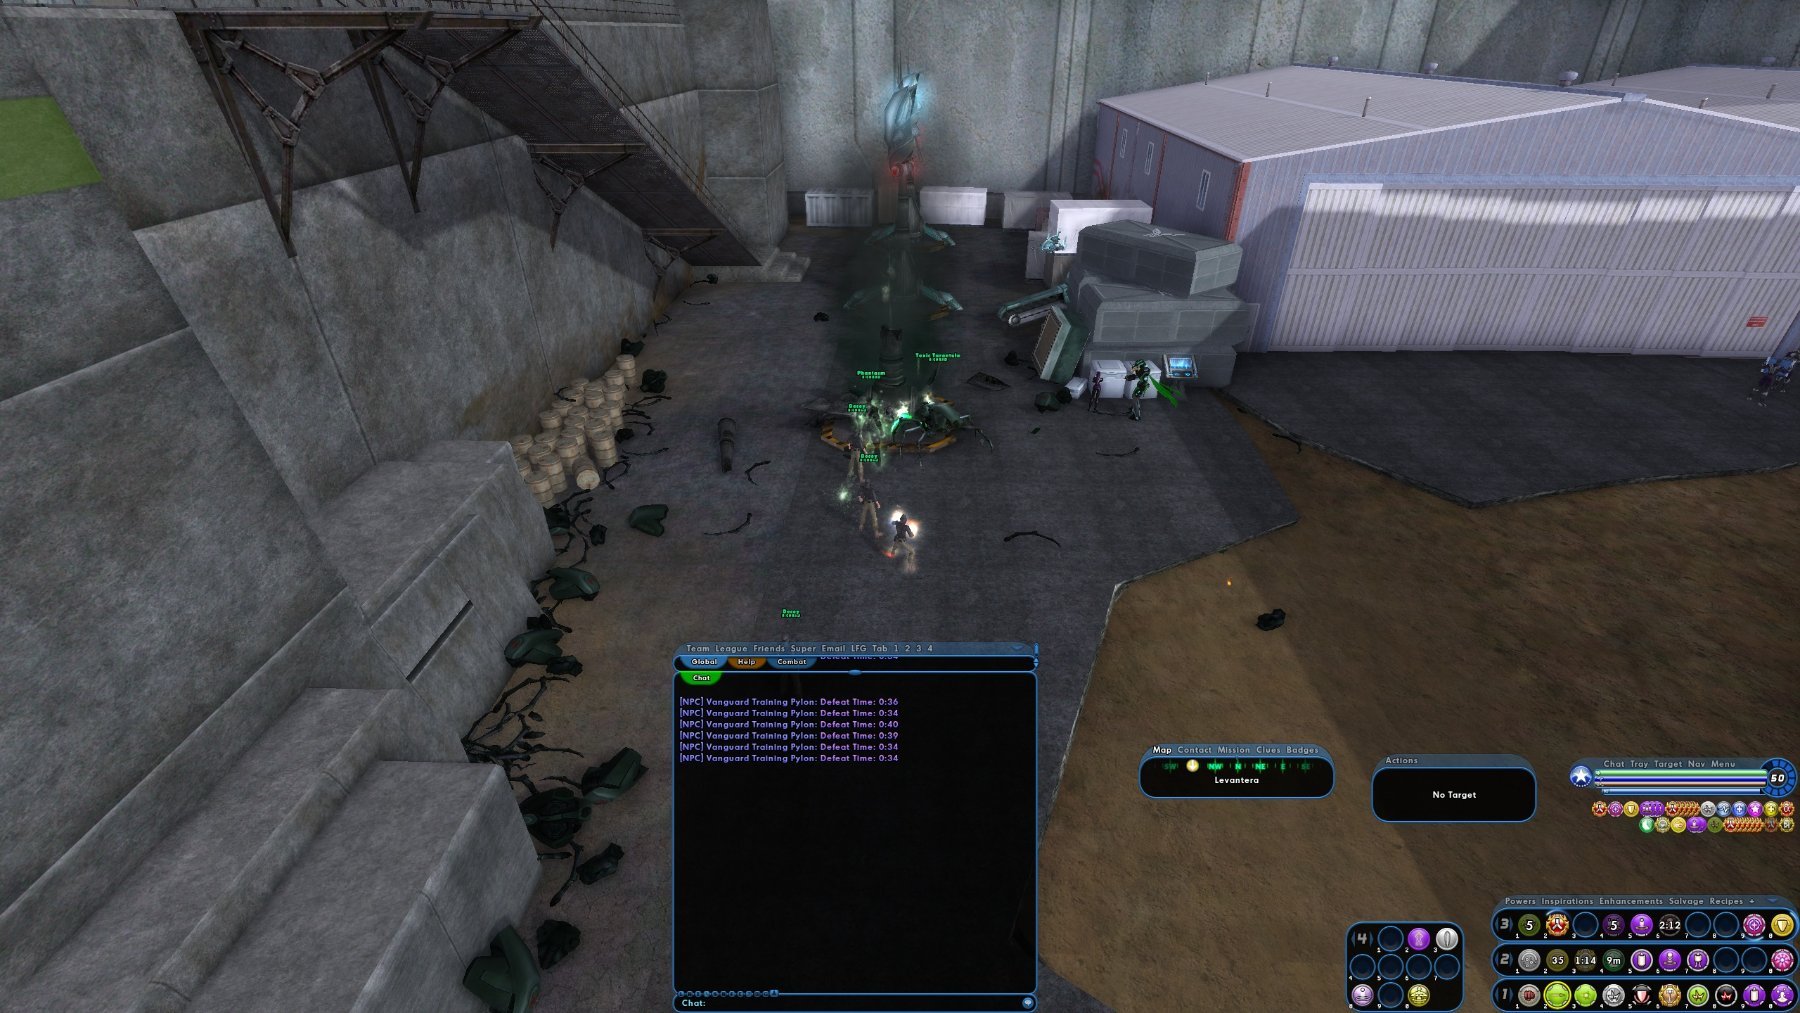
Ok, take two: Updated build - Double checked for no interference - Build is now live Turns out, the answer is always more procs. Still not finding caltrops worth it, that's another second I'd rather be kicking. Realistic for actual gameplay? Ha, no. Even fighting pylons half the time a pet or two will wander off and try to solo the one behind it, or the tarantula will not approach (wasting enflame). But every once in the while, when the stars and pylon regen ticks align, this happens: Run Type: Pylon (Open Beta) Archetype: Dominator Primary Powerset: Illusion Control Secondary Powerset: Martial Assault Epic: Mace Time in seconds: Best: 28 Seconds Burst: Burst Hybrid: Assault - Radial (toggled on) Number of Runs: 1 Version: I27, p7 27.7.5916 Video Link: N/A Temps Used: Offensive Amp, Dagger, and Geas (No insps or Lores) Pylon Dominator (Illusion Control - Martial Assault)2.mbd
-
Ahh, good eye. I didn't notice that before. @Koopak Sorry about that, can you please update the time? I'm redoing the build, and I'll try to catch another sub-30 run on it later this weekend. For now, here's a clean 30sec from the same day.
-
Not that I know of, but it could be fun if you want to try it out. 🙂
-
The plus side is that you don't have to worry about the pets getting wiped out by a stray AoE....and with illusion (or Dark or Mind) you can almost always just perma-confuse them anyway.
-
Yeah, it's interesting. I hadn't thought about it much until recently either. But it seems to work exactly like Hybrid Assault Radial. If you spawn the pets with it active, they get it. If it expires ad you reuse it any pets will also activate it again (as long as they were summoned when it was originally active). I have to agree though other sets would be better in normal gameplay, any of the builds I'm posting here would not be (unless your normal gameplay is limited to knocking down unarmed training dummies). Big fan of energy myself, but Arsenal Assault also looks interesting for my next *real* dom. There's another quirk I wanted to try out.....which is Dark Control's Haunt. I'm really only using illusion for the pets (3 Phantom Army, Phantasm, and Phantom Decoy), but Dark can *also* have 5 pets. Haunt functions similarly to Gang war, since it's a targeted summon. So Haunt > burnout > Haunt means 4 Ghosties plus the Umbral Beast. The other diffrence , is all of darks pets are targetable normally so: 1) Tactics effects them, which give the build up proc in it more targets to proc off of and 2) They can be teleported. I suspect I'm losing a second or two actually getting my pets to the pylon, so I wanted to try summoning everyone then just team teleporting in. Haunt needs a target, but I used a MDC dummy for that (they wont aggro on it, but it works to summon them all). Put the best result I got below. Not a bad time at all, but Illusion is still winning out from pure damage. The haunts are good, but PA just does better DPS. Definitely not a build I'd take into regular content at all, but a fun experiment. Run Type: Pylon (Open Beta) Archetype: Dominator Primary Powerset: Dark Control Secondary Powerset: Martial Assault Epic: Mace Time in seconds: Best: 35 Seconds Burst: Burst - due to Geas Hybrid: Assault - Core (toggled on) Number of Runs: 1 Version: Open Beta 27.7.5886.1 (RC3.5) Video Link: N/A Temps Used: Offensive Amp, Dagger, and Geas (No insps or Lores) Dominator (Darkness Control - Martial Assault).mbd

-
Yeah, thorns was really surprising to me. I never really looked at it much before now. I'm not super sold on Caltrops though. It doesn't proc that reliably, and it takes 45 seconds to do it's full damage (Hopefully the pylon should be long dead by then). I tried swapping out Impale for Thorny Barrage, but wasn't getting times as fast (even though on paper it's better DPA). I think most of the heavy lifting in my build is still coming from Skewer, and faster recharge (from Geas + Offensive booster) and prioritizing shorter filler activations (Build up/Impale) gives me more pokes per second. Tried to record some videos, wasn't able to capture a 32 second video on Thorn yet, but here's a 33. Chain is the same, 32 is just lucky timing I think. I think Frosticus's build could hit it (or better) pretty easily if Geas and booster were used like I did. ----- All that said, I did try Radiation Assault again, but wasn't getting anything better than Thorn so I switched gears over to Illusion/Martial/Mace, and boy did that pay off. The build is still very similar to my others...the main difference from the Thorn build is that I squeezed in a kismet and Tactics to boost up the snipe a little. The theory I had with martial was that since envenomed blades carries over to pets...and one thing Illusion has is a lot of pets....that might be enough to push me under the 30 second mark. Took a bit of playing around with the timing to make sure envenomed blades was staying up on the most pets possible until the end of the fight, but I think I have it mostly dialed in now. Had a bunch of low 30's, and then I caught this one - 29 Seconds. Please forgive the jutter on the video....first time trying to record, not sure what happened there. I tried weaving in caltrops as well (proc'd out), but wasn't getting times as good with it. Run Type: Pylon (Open Beta) Archetype: Dominator Primary Powerset: Illusion Secondary Powerset: Martial Assault Epic: Mace Time in seconds: Best: 29 Seconds Burst: Burst - due to Geas Hybrid: Assault - Radial* (toggled on) Number of Runs: 1 Version: Open Beta 27.7.5886.1 (RC3.5) Video Link: N/A Temps Used: Offensive Amp, Dagger, and Geas (No insps or Lores) Build attached: Pylon Dominator (Illusion Control - Martial Assault).mbd
-
Run Type: Pylon (Open Beta) Archetype: Dominator Primary Powerset: Illusion Secondary Powerset: Thorny Assault Epic: Mace Time in seconds: Best: 32 Seconds Burst: Burst - due to Geas Hybrid: Assault - Core (toggled on) Number of Runs: 20ish (6 in screenshot below) Version: Open Beta 27.7.5877.1 (RC3) Video Link: N/A Temps Used: Offensive amplifier, and Geas (No insps or Lores) Notes: Swapped to Thorns, but otherwise very similar build as before. With Thorns I can fit in both -res procs without Cross Punch, and get Enflame back in the mix. I also dropped the daggers out of rotation. With a fight this short, it seems like just going for more damage is more effective in keeping the times low here. All 6 of these runs *felt* similarly tight, I think it's the timing of the pylons regen ticks that gave me the big range (32s to 40s in the screenshot below). Tried a few without Geas and the Amp as well, and got some similar times, though less consistently good so I left them in in the end. Ran 20 or so total, with lot of mid/low 30s results. The best being a couple at 32s (though they were rare) Screenshot of the best string of runs below. Had to stop when someone came by with Player Buff AOE running, but I don't think I can squeeze any more out of this one. I suspect that I can juice a bit more out of my Rad Assault build with what I learned from this.....especially if I give up any semblance of being usable in actual content. So that'll be next. Build: Pylon Dominator (Illusion Control - Thorny Assault).mbd
-
Run Type: Pylon (Open Beta) Archetype: Dominator Primary Powerset: Illusion Secondary Powerset: Radiation Epic: Mace Time in seconds: Best: 34 Seconds (avg. of 6 best consecutive runs = 36.1) Burst: Burst - due to Geas Hybrid: Assault - Core (toggled on) Number of Runs: 6 Version: Open Beta 27.7.5860 - None of the powers are different than on live to my knowledge. Video Link: N/A Temps Used: Offensive amplifier, Gaes and Envenomed Daggers (No insps or Lores) Notes: I did a bunch of runs to nail down timing. Best results were from starting about 60ft back to set up before engaging: 1) Hit Hasten + Ageless 2) Toggling Hybrid + Summon Phantasm + Tarantula 3) Hit Geas + Summon PA 4) Jump into melee range of pylon, count to 2 to let pets close in and fire off Fusion (Build up) > Poisonous Ray (-res for 30 seconds) > Envenomed Dagger 5) Begin attack chain of Cross Punch > Photon Volley > Contaminated Strike (use as they recharge, with preference to the Rad attacks) and weave in fusion when it's up and Dagger every 10 seconds 6) Pylon go boom. If my timing was off for the first damage - I fired early, or pets decided to hang back an extra second or two- then the timings changed drastically. Got a lot of 38-45 second runs before this until I got the hang of it. Using the Dagger/Poisonous ray too often also made a big impact on timings. I settled on just using Ray once at the start, since it lasts 30 seconds anyway. Pets are all even level, so shouldn't change vs a "real" AV. I tried using the level 50 dummy on the other side of the base as well, but couldn't get the set up right without a couple of the pets deciding to to wander into one of the other bays. Also tried a few different combinations of Incarnate abilities. Hybrid Assault Core definitely won out of Assault Radial. Degen Radial was best for interface, with Reactive Radial nearly even or maybe a half second behind. Build: Mids file Attached Pylon Dominator (Illusion Control - Radioactive Assault).mbd
-
Some could even say it's barely compatible with itself.
-
Focused Feedback: Rikti War Zone Revamp
VertigoIguana replied to The Curator's topic in [Open Beta] Focused Feedback
Thank you! -
Focused Feedback: Rikti War Zone Revamp
VertigoIguana replied to The Curator's topic in [Open Beta] Focused Feedback
Is there any chance a static level-50 dummy could be added as well? Reason: Testing with MMs and level shifted pets has always been thrown off by them conning even to the pylons. A straight level 50 pylon would be more accurate for those cases. -
The zone pylons still exists, but they are level 54 (not leveless, like on live). So MSR is same as ever, though pylon might take an extra couple seconds to melt. For solo DPS testing like in this thread though, they aren't as usfull (since its like fighting a 54 AV, not an even con AV like it ised to be). But, that's why they added the dummy pylons outside the base.
-
There are still some level-less pylons near the Vanguard base that can be used (as well as leveled dummies from 51-54).....only difference with them is the lack of an attack.
-
Focused Feedback: Arsenal Assault
VertigoIguana replied to The Curator's topic in [Open Beta] Focused Feedback
More importantly, why no Bayonet instead of heavy blow, and why not called Buttpoke. Missed opportunity. -
Concealment : Stealth Def Loss and City of Data
VertigoIguana replied to Echo Night's topic in General Discussion
Yep, you are correct. It's the 2.125% number (unenhanced), and it is suppressed when you are mezzed meaning you get 0 defense.. -
Focused Feedback: Irradiated Ground
VertigoIguana replied to Ratch_'s topic in [Open Beta] Focused Feedback
I think the gist of "balancing around SO's" was more centered around the base difficulty of certain content, and overall performance of a set on SOs only. It doesn't mean that IOs themselves won't also be balanced. Addressing situations where IOs specifically are overperforming in a power with a change that really only effects IOs (and brings the power in line with the design standard for other similar powers), doesn't run afoul of that in my mind. -
Focused Feedback: Irradiated Ground
VertigoIguana replied to Ratch_'s topic in [Open Beta] Focused Feedback
On the live servers it does, but not on beta with these changes. I believe each patch actually gets two chances to proc as well due to the duration. 6 slotted with damage procs, it just *melts* Minions and LTs on live, and definitely needed to be fixed. But, I do agree with Sovera....IG is really most of what Rad Melee had going for it, so it could use some animation trims to help it out. -
Yep
-
Stealth IOs still stack with SS, and you can drop one in any of the Sprint powers (Prestige or regular)
-
I don't know that there's much need for specific feedback on it. It's pretty busted when used with procs on the live servers. This brings it in line with other toggles, in that procs will only check every 10 seconds, as opposed to every time a new patch drops (5 secs).
-
Sounds like a blast. If you ever want to run it through, give me shout and I'll bring my Ill/TA. RE: */Time, have you considered /Cold or maybe even /Rad? Cold gives you your extra def, plus some End recovery and a bunch of -res/-regen. Rad lacks the Def, but it's the OG for a reason.
-
Charm or Taser (free origin powers from P2) both work to ignite OSA. Procs in Acid Arrow do great for ignition as well actually. If you're interested, this is how I build mine and it's been quite solid. I don't worry as much about personal defense, since I find having just enough that my defense + flash arrow is effectively soft capped from pre-50 is plenty. That along with perma PA and slow immunity makes it solid enough to handle pretty much anything unless I get overwhelmed by ambushes. Procs in Blind and Ice Arrow are solid damage at lower levels as well. ---- This Hero build was built using Mids Reborn 3.2.17 https://github.com/LoadedCamel/MidsReborn Click this DataLink to open the build! Perspective: Level 49 Magic Controller Primary Power Set: Illusion Control Secondary Power Set: Trick Arrow Power Pool: Fighting Power Pool: Speed Power Pool: Flight Power Pool: Leaping Ancillary Pool: Primal Forces Mastery Hero Profile: Level 1: Blind -- SprEnt-Acc/Hold(A), SprEnt-Acc/Hold/End(3), SprEnt-Hold/Rchg(3), NrnSht-Dam%(5), GhsWdwEmb-Dam%(5), GldNet-Dam%(7) Level 1: Entangling Arrow -- GrvAnc-Immob/EndRdx(A), GrvAnc-Immob(7), GrvAnc-Immob/Rchg(9), GrvAnc-Acc/Immob/Rchg(9), GrvAnc-Acc/Rchg(11) Level 2: Flash Arrow -- DarWtcDsp-ToHitDeb/EndRdx(A), DarWtcDsp-ToHitdeb/Rchg/EndRdx(15), DarWtcDsp-ToHitDeb/Rchg(15), DarWtcDsp-ToHitDeb(17) Level 4: Deceive -- CrcPrs-Conf/EndRdx(A), CrcPrs-Conf(17), CrcPrs-Conf/Rchg(19), CrcPrs-Acc/Conf/Rchg(19), CrcPrs-Acc/Rchg(21) Level 6: Boxing -- SprBlsCol-Acc/Dmg(A), SprBlsCol-Dmg/EndRdx(21) Level 8: Superior Invisibility -- LucoftheG-Def/Rchg+(A) Level 10: Ice Arrow -- HO:Endo(A), NrnSht-Dam%(23), UnbCns-Dam%(23), SprWiloft-Rchg/Dmg%(25), ImpSwf-Dam%(25), IceMisTrmt-+ColdDmg(27) Level 12: Hasten -- RechRdx-I(A), RechRdx-I(27) Level 14: Tough -- GldArm-3defTpProc(A), StdPrt-ResDam/Def+(29) Level 16: Weave -- LucoftheG-Def/Rchg+(A), HO:Cyto(29) Level 18: Phantom Army -- ExpRnf-Acc/Rchg(A), ExpRnf-EndRdx/Dmg/Rchg(31), ExpRnf-Acc/Dmg(31), ExpRnf-Acc/Dmg/Rchg(31), SlbAll-Dmg/Rchg(33), SlbAll-Build%(33) Level 20: Acid Arrow -- SprFrzBls-Acc/Dmg/EndRdx(A), SprFrzBls-Acc/Dmg/Rchg(33), PstBls-Dam%(34), Bmbdmt-+FireDmg(34), TchofLadG-%Dam(34), AchHee-ResDeb%(36) Level 22: Fly -- WntGif-ResSlow(A) Level 24: Combat Jumping -- LucoftheG-Def/Rchg+(A), Ksm-ToHit+(36) Level 26: Spectral Terror -- WiloftheC-Conf/Hold/Immob/Sleep/Stun/Fear/Rchg(A), WiloftheC-Acc/Conf/Hold/Immob/Sleep/Stun/Fear(36), WiloftheC-EndRdx/Rchg(37), WiloftheC-Acc/Conf/Hold/Immob/Sleep/Stun/Fear/EndRdx(37), WiloftheC-Acc/Conf/Hold/Immob/Sleep/Stun/Fear/EndRdx/Rchg(48) Level 28: Disruption Arrow -- SynSck-EndMod/+RunSpeed(A), SynSck-EndMod/Rech(37), SynSck-Dam/Rech/Acc(39) Level 30: Hover -- LucoftheG-Def/Rchg+(A) Level 32: Phantasm -- ExpRnf-Acc/Rchg(A), ExpRnf-Acc/Dmg/Rchg(39), ExpRnf-Acc/Dmg(39), ExpRnf-Dmg/EndRdx(40), OvrFrc-Dam/KB(40), ExpStr-Dam%(40) Level 35: Oil Slick Arrow -- Rgn-Dmg/EndRdx(A), Rgn-Acc/Rchg(42), Rgn-Acc/Dmg/Rchg(42), Rgn-Dmg/Rchg(42), Rgn-Dmg(43) Level 38: Power Blast -- Apc-Dam%(A), Apc-Dmg/EndRdx(43), Apc-Acc/Dmg/Rchg(43), Apc-Acc/Rchg(45), Apc-Dmg(45) Level 41: Energy Torrent -- SprFrzBls-Acc/Dmg(A), SprFrzBls-Dmg/EndRdx/Acc/Rchg(45), PstBls-Dam%(46), Bmbdmt-+FireDmg(46), ExpStr-Dam%(46), JvlVll-Dam%(47) Level 44: Power Boost -- RechRdx-I(A) Level 47: EMP Arrow -- UnbCns-EndRdx/Hold(A), UnbCns-Acc/Rchg(47), UnbCns-Acc/Hold/Rchg(47), UnbCns-Hold/Rchg(48), UnbCns-Hold(48) Level 49: Group Invisibility -- LucoftheG-Def/Rchg+(A) Level 1: Containment Level 1: Brawl -- SprBlsCol-Rchg/HoldProc(A), SprBlsCol-Dmg/EndRdx/Acc/Rchg(11) Level 1: Sprint -- Clr-Stlth(A) Level 2: Rest -- Heal-I(A) Level 1: Swift -- Flight-I(A) Level 1: Hurdle -- Jump-I(A) Level 1: Health -- Mrc-Rcvry+(A), Pnc-Heal/+End(13) Level 1: Stamina -- PrfShf-End%(A), PrfShf-EndMod(13) Level 22: Afterburner Level 50: Intuition Radial Paragon Level 50: Pyronic Core Final Judgement Level 50: Degenerative Radial Flawless Interface Level 50: Banished Pantheon Radial Superior Ally Level 50: Ageless Core Epiphany Level 50: Assault Radial Embodiment ------------ | Copy & Paste this data into Mids Reborn : Hero Designer to view the build | |-------------------------------------------------------------------| |MxDz;1494;710;1420;HEX;| |78DA55944B4F135114C7EF74A6D63E7859688182405B0A0A0C0F85AD0FA08881A40| |A4BA58C758A130B6DA645C04FA146C356E32BC6AD01E24AE2D2E07770AD08E2DAD4| |C3FCCF0D4393E96FCE39F7BC6766767D2294CFA7AF0AA57EBC6094CBD9F1E24AC52| |E160AA6ED9D3596AC9CA05F3063DAE59299AB588F4C1FC9899343F2BC3E5D28AC96| |ADE28A54C45C67AEAFE6F3FABC6DE51E66AFD976714DD4648AE492B6961E54AC95A| |58023CD954CF37E1086C2B125E4DCCF984689CEB44E96AC9C9EB1AD65A3904D17ED| |9C59CECE1AE58A696F34534529BA5E2AF4777C0951F58A2F9A10C39AF07C65EE829| |A4127DA89CB8A239F99541DDA2E674DCC7B60CC80676F316F838139B04C0E0A3BA9| |CA67286B7798DB60FD16F88A0EAA3283BAC8C63BE0B9BBCC05B0310B2A346E2F3B2| |9DE27E8A1F129F89A0C3E360A5F131A5A25F8054FC13F46D05411E1AE23D308DBFC| |115D37BF83BEB5D6EBC8714A1794E9827D8461BF6865AA64ACE1C84ACD0822B4457| |99E64AC939E755C4BDB28893E55BC25B101D3AD7A1B0E3C4EB8F37F9987CC23B0F3| |0A731CB5AE915F58AE35BC85D63BB7C1AE1D017AD040D71E9C12BBC4B0268254561| |3D72C9A62A83942CAA8AC35CAB526FE09A791E389B4C835B564E1915800938B4C03| |1CBC07AE93438C9D3CB103D496FC05A6F6413FA56D97EB6AE7B4EF091DB2BB0E1E4| |D8A4791E2D1F4FC61FE40BA9E0D74B7418E71596B7C0CAD5F18655E665E022F8E80| |DF2846B774EA1E66E3105307FB0799FDE05148885E5966EF2734D4BF030EF012067| |809035C9E1E47B9DF097D72097DFC343DA668BA2C43BF8134FA14330D0E4E3227C0| |37E430244738C423A4A5C95FB5DAE61214F10205069E83332E23BD258899D1E48B4| |F4A258956F603279F03FADE41F9FB94B217CA0397521137E9AE4713A12ED5E1E129| |E32612869E619B2272F26C56B528E9F86435DEE812A6DC969F4997B01976091FE22| |EE13FD1F2D214| |-------------------------------------------------------------------|
-
This, but I use an Acc/Mezz hammi.
-
ill/time buffbot; would you want to team with this guy
VertigoIguana replied to cohRock's topic in Controller
That's really only due to the lack of good -regen options in Time. Outside of that, it is a very very strong buff set (Farsight, especially when paired with powerboost is amazing...plus chronoshift giving permeable +rech), and a strong debuffer as well.