zenijos10
-
Posts
159 -
Joined
-
Last visited
Content Type
Profiles
Forums
Events
Store
Articles
Patch Notes
Everything posted by zenijos10
-
Of all the Armor T9s I've tried, the only one I would ever take is Moment of Glory. It adds something the other powers in regen don't to keep you alive. It can be available pretty regularly It can mule a lot of IOs And most importantly to me It feels GLORIOUS! Raising your hand in the face of your adversary and become the unmovable object frels epic. That said, the power is still totally skippable. I think it needs another 15 seconds of uptime, even if its at half potency for the second 15 seconds.
-
Global: @Zen Cobra Ten Supergroup: Redeemed Base Passcode: REDEEMED-3596 Base Macro: /macroimage InherentBase_Furnace "Teleport: Temple of the Healing Serpent" "enterbasefrompasscode REDEEMED-3596" Status: Done
-
T9s with Crashes might be fine if the same t9 also didn't have crashes. I mean let them be more strategic by giving us at least two options in the same power. Conceptually, it would be awesome if we could get a slider bar (toggled forms like staff, i.e. "safe","risky", "dangerous", "ready to die") on a logarithmic scale and people could choose on the fly. At the lowest end there is no crash and low benefit. Example - Unstoppable (which to me is poorly named, because its guaranteed to stop you): Base Recharge: 1000s Duration: 180s these two fields stay consistent No risk: benefit: 3 damage resistance, i.e. +3% recovery 10 resistance to control effects,, also can act like a 6 minute "break free" crash: none Some risk: benefit: 30 resistance to damage and control effects+ 20% recovery, crash: lose 30% of health and 30% of endurance Large risk: As the power is now. benefit: 70 res 100% recovery, crash: "drained of almost all health and endurance". Extreme risk: As the power is now AND + 50% damage. Crash as is now + you are hit with a guaranteed extreme magnitude stun I think this could add a lot of personal strategy and keep the original flavor of the powers while still matching them to the modern game.
-
Ice armor is obtrusive! (Stone and fire too) Can we get an alternate animations? Maybe: with a large floating ice shield(rock for stone armor) , a few a small ones maybe floating around characters like the particle aura? A tinting effect that "shines" with ice or snow effects. The shine will move down the head and body as if someone was moving a narrow flashlight beam on the character from head to toe. Give an option to make the current armor totally transparent. Something like the purple shields AVs get, except the icon is powerset themed. An eruption of the give element from the ground or sky every so often, resembling bending techniques in Avatar cartoon series. Most players spend a lot of time making our costumes, these obstructive armors(also concealment) damage that aspect of the game. Of course, some people design their characters around these armors, so please keep the original graphics too.
-
3 Days of not being able to spend time in COX...
zenijos10 replied to JnEricsonx's topic in General Discussion
Glad you got your power back! But 3 days is nothing, I once went the better part of a decade!- 2 replies
-
- 11
-

-

-

-
If anyone does build one, Id love to see your unicorn builds! There are a few threads floating around, like this one:
-
My suggestion: Technical / coding / art /content crowd sourcing systems. Talk about systems of generating, testing, and approving new art, costume pieces, storylines, characters, etc. in order to crowd source official homecoming content.
-
Nice! We could make an entire Jem and the Holograms cover band! Gewel and the Digital Illusions.
-
Thanks @Doomguide2005 There are several places I could use them here. I just didn't build in that direction. When I respec at 50, if its too slow that's the first thing I plan to change probably at the expense of fire/cold resists.
-
I was looking for something different. It struck me it would be fun to be a knockdown specialist. I looked over the play statistics and found two power sets I have never played, Sonic Resonance and NRG Blast, additionally, I have never seen one of these in game. So I'm gonna do it! Right now I'm leveling with sudden accelerations kb->kd and otherwise just SOs, but come level 50 I am going to IO up! I'd like help rounding out my build. I intend to use this character on story arc/ radio/ and non-incarnate TF PUGs (any level). I'm not very concerned with Incarnates at all. My goals: I want something a little different than what I am used to. In a normal week, I am likely to play a fire kin, a stick/inv tanker, a water/ nrg man. blaster, and/or a blade/dark stalker. Something fun for me Knockdown galore! Moderately sturdy Incorporate lots of procs- no overarching reason, I just like the idea Play on teams (any level) Build Priorities in order: Knockdown (ST and AOE) Survival Team Utility(beyond knockdown) Damage I would like advice and feedback on the build, particularly on: my choice to build for my own res and any ways to add res to neglected damage types How to proc out powers offensive better, particularly in regards to team utility/ support Which incarnates to choose to fulfill my build priorities General Sonic advice Hero Plan by Mids' Reborn : Hero Designer 2.6.1.25 https://github.com/Crytilis/mids-reborn-hero-designer Click this DataLink to open the build! I earn, Man: Level 50 Technology Defender Primary Power Set: Sonic Resonance Secondary Power Set: Energy Blast Power Pool: Flight Power Pool: Fighting Ancillary Pool: Mu Mastery Hero Profile: Level 1: Sonic Siphon -- EndRdx-I(A) Level 1: Power Bolt -- SuddAcc--KB/+KD(A), Dvs-Hold%(3), Dvs-Acc/Dmg(3), Dvs-Dmg/EndRdx(5), Dvs-Dmg/Rchg(5), Dvs-Acc/Dmg/EndRdx/Rchg(7) Level 2: Sonic Haven -- StdPrt-ResKB(A) Level 4: Energy Torrent -- SuddAcc--KB/+KD(A), SprFrzBls-Acc/Dmg/EndRdx(7), SprFrzBls-Acc/Dmg/Rchg(9), SprFrzBls-Dmg/EndRdx/Acc/Rchg(9), Ann-ResDeb%(11), Ann-Acc/Dmg(11) Level 6: Sonic Barrier -- ImpArm-ResDam/EndRdx(A), ImpArm-EndRdx/Rchg(40) Level 8: Fly -- WntGif-RunSpd/Jump/Fly/Rng(A), WntGif-RunSpd/Jump/Fly/Rng/EndRdx(21) Level 10: Power Burst -- SuddAcc--KB/+KD(A), Dvs-Hold%(25), Dvs-Acc/Dmg/EndRdx/Rchg(25), Dvs-Dmg/EndRdx(27), Dvs-Acc/Dmg(27), Dvs-Acc/Dmg/Rchg(37) Level 12: Sonic Dispersion -- UnbGrd-ResDam(A), UnbGrd-ResDam/EndRdx(13), UnbGrd-EndRdx/Rchg(13), UnbGrd-Rchg/ResDam(15), UnbGrd-ResDam/EndRdx/Rchg(17), UnbGrd-Max HP%(23) Level 14: Hover -- Rct-ResDam%(A), BlsoftheZ-ResKB(15) Level 16: Sniper Blast -- SuddAcc--KB/+KD(A), Dvs-Acc/Dmg(17), Dvs-Hold%(42), Dvs-Dmg/EndRdx(42), Dvs-Dmg/Rchg(43), Dvs-Acc/Dmg/Rchg(43) Level 18: Sonic Repulsion -- SuddAcc--KB/+KD(A), EndRdx-I(19), EndRdx-I(19), EndRdx-I(23) Level 20: Aim -- GssSynFr--Build%(A), AdjTrg-ToHit(43), AdjTrg-ToHit/EndRdx(46), AdjTrg-ToHit/Rchg(46), GssSynFr--ToHit/Rchg(46), GssSynFr--Rchg/EndRdx(48) Level 22: Disruption Field -- EndRdx-I(A) Level 24: Boxing -- Empty(A) Level 26: Clarity -- EndRdx-I(A) Level 28: Power Push -- SprWntBit-Rchg/SlowProc(A), SprWntBit-Acc/Dmg(29), SuddAcc--KB/+KD(29), Dvs-Hold%(31), GldJvl-Dam%(31), Apc-Dam%(34) Level 30: Tough -- UnbGrd-ResDam(A), UnbGrd-ResDam/EndRdx(31), UnbGrd-ResDam/EndRdx/Rchg(50) Level 32: Liquefy -- AchHee-ResDeb%(A), Ann-ResDeb%(33), Lck-%Hold(33), SprFrzBls-Rchg/ImmobProc(33), SprFrzBls-Dmg/EndRdx(34), SprFrzBls-Acc/Dmg(34) Level 35: Explosive Blast -- SuddAcc--KB/+KD(A), Rgn-Dmg(36), Rgn-Dmg/EndRdx(36), Rgn-Acc/Dmg/Rchg(36), Ann-ResDeb%(37), Bmbdmt-+FireDmg(37) Level 38: Nova -- FuroftheG-ResDeb%(A), Obl-%Dam(39), Arm-Dam%(39), ScrDrv-Dam%(39), Erd-%Dam(40), SuddAcc--KB/+KD(40) Level 41: Power Sink -- PrfShf-End%(A), PrfShf-EndMod(42), RechRdx-I(45) Level 44: Charged Armor -- GldArm-ResDam(A), GldArm-End/Res(45), GldArm-RechRes(45) Level 47: Conserve Power -- RechRdx-I(A), RechRdx-I(48) Level 49: Afterburner -- WntGif-RunSpd/Jump/Fly/Rng(A), WntGif-RunSpd/Jump/Fly/Rng/EndRdx(50) Level 1: Brawl -- Empty(A) Level 1: Quick Form Level 1: Prestige Power Dash -- Empty(A) Level 1: Prestige Power Slide -- Empty(A) Level 1: Prestige Power Quick -- Empty(A) Level 1: Prestige Power Rush -- Empty(A) Level 1: Prestige Power Surge -- Empty(A) Level 1: Sprint -- Empty(A) Level 1: Vigilance Level 2: Rest -- Empty(A) Level 4: Ninja Run Level 2: Swift -- Empty(A) Level 2: Health -- Mrc-Rcvry+(A), NmnCnv-Regen/Rcvry+(48) Level 2: Hurdle -- Empty(A) Level 2: Stamina -- PrfShf-End%(A), SynSck-EndMod/+RunSpeed(21), SynSck-EndMod(50) ------------

-
Weekly Discussion 59: Veteran Level Rewards
zenijos10 replied to GM Miss's topic in General Discussion
I see a lot of people here want more difficulty. Maybe veteran levels unlock the additional difficulty. Once someone is vet level 100, they get access to +5 x1 mission difficulties and each x levels they get more difficulty settings culminating in +6 x8 once they hit 999. Let xp and inf for added difficulty be same as for +4 as to not increase the farm rate. -
Weekly Discussion 59: Veteran Level Rewards
zenijos10 replied to GM Miss's topic in General Discussion
I would like Veteran rewards especially badges to go to 999 (this might cause some ambivalence with badge hunters). Perhaps just 5 em every 3 levels other than badges, or even cooler might be some kind of expendable temp power every several levels like a 5 charge lore summon that can be used in conjunction with your normal one. -
What to do with extra Notice of the Wells
zenijos10 replied to wittylibrarian's topic in General Discussion
Real house wives. There is rhwff and rhwri for founders falls in paragon city and for rogue isles. (Not really) -
I messed around some more and came up with a much more expensive build, but it gets lethal/melee defense to the softcap and softcapped resistances of smash, lethal, fire. cold, and psionic. Villain Plan by Mids' Reborn : Hero Designer 2.6.1.25 https://github.com/Crytilis/mids-reborn-hero-designer Click this DataLink to open the build! Moonlight Serious: Level 50 Natural Stalker Primary Power Set: Ninja Blade Secondary Power Set: Dark Armor Power Pool: Fighting Power Pool: Speed Power Pool: Flight Ancillary Pool: Body Mastery Villain Profile: Level 1: Sting of the Wasp -- Hct-Dmg(A), Hct-Dmg/Rchg(3), Hct-Acc/Dmg/Rchg(3), Hct-Acc/Rchg(5), Hct-Dmg/EndRdx(5), Hct-Dam%(7) Level 1: Hide -- LucoftheG-Def/Rchg+(A) Level 2: Flashing Steel -- SprAvl-Dmg/EndRdx(A), SprAvl-Acc/Dmg(7), SprAvl-Acc/Dmg/EndRdx(9), SprAvl-Acc/Dmg/Rchg(9), SprAvl-Acc/Dmg/EndRdx/Rchg(11), SprAvl-Rchg/KDProc(11) Level 4: Dark Embrace -- Ags-ResDam(A), Ags-ResDam/EndRdx(36), Ags-ResDam/Rchg(36), Ags-ResDam/EndRdx/Rchg(43) Level 6: Assassin's Blade -- SprStlGl-Rchg/Hide%(A), SprStlGl-Acc/Dmg(13), SprStlGl-Dmg/Rchg(13), SprStlGl-Acc/Dmg/Rchg(15), SprStlGl-Acc/Dmg/EndRdx/Rchg(15), SprAssMar-Rchg/Rchg Build Up(17) Level 8: Murky Cloud -- Ags-ResDam(A), Ags-ResDam/EndRdx(17), Ags-ResDam/Rchg(34), Ags-Psi/Status(45) Level 10: Shadow Dweller -- LucoftheG-Def/Rchg+(A), ShlWal-ResDam/Re TP(36), Rct-ResDam%(37), Rct-Def/EndRdx/Rchg(39), Rct-Def(40), Rct-Def/EndRdx(40) Level 12: Build Up -- GssSynFr--ToHit(A), GssSynFr--ToHit/Rchg(37), GssSynFr--ToHit/Rchg/EndRdx(37), GssSynFr--ToHit/EndRdx(39), GssSynFr--Build%(39) Level 14: Placate -- RechRdx-I(A) Level 16: Obsidian Shield -- ImpArm-ResDam(A), ImpArm-ResPsi(43), ImpArm-ResDam/EndRdx(48), ImpArm-ResDam/EndRdx/Rchg(50), ImpArm-ResDam/Rchg(50) Level 18: Divine Avalanche -- Mk'Bit-Acc/Dmg(A), Mk'Bit-Dmg/EndRdx(19), DefBuff-I(19), Mk'Bit-Dmg/Rchg(21), Mk'Bit-Acc/Dmg/EndRdx/Rchg(21), Mk'Bit-Dam%(23) Level 20: Dark Regeneration -- Pnc-Heal(A), Pnc-EndRdx/Rchg(23), Pnc-Heal/+End(25), Obl-Dmg(25), Obl-%Dam(27), Obl-Dmg/Rchg(27) Level 22: Boxing -- Empty(A) Level 24: Tough -- StdPrt-ResDam/Def+(A), GldArm-3defTpProc(29), StdPrt-ResKB(40), RctArm-ResDam/EndRdx(42), RctArm-ResDam(43) Level 26: Soaring Dragon -- SprBlsCol-Acc/Dmg(A), SprBlsCol-Dmg/EndRdx(29), SprBlsCol-Acc/Dmg/EndRdx(31), SprBlsCol-Acc/Dmg/Rchg(31), SprBlsCol-Dmg/EndRdx/Acc/Rchg(31), SprBlsCol-Rchg/HoldProc(34) Level 28: Weave -- LucoftheG-Def/Rchg+(A) Level 30: Hasten -- RechRdx-I(A), RechRdx-I(48) Level 32: Golden Dragonfly -- Arm-Dam%(A), Arm-Dmg/Rchg(33), Arm-Acc/Dmg/Rchg(33), FuroftheG-Acc/End/Rech(33), FuroftheG-Acc/Dmg(34), Arm-Dmg(42) Level 35: Hover -- LucoftheG-Def/Rchg+(A), LucoftheG-Def(42) Level 38: Superior Conditioning -- PrfShf-EndMod(A) Level 41: Fly -- BlsoftheZ-ResKB(A) Level 44: Laser Beam Eyes -- TchofLadG-DefDeb(A), AchHee-ResDeb%(45), AnlWkn-%ToHit(45), TchofLadG-DefDeb/EndRdx(46), TchofLadG-%Dam(46), Apc-Dam%(48) Level 47: Soul Transfer -- Prv-Absorb%(A) Level 49: Afterburner -- LucoftheG-Def/Rchg+(A) Level 1: Assassination Level 1: Brawl -- Empty(A) Level 1: Prestige Power Dash -- Empty(A) Level 1: Prestige Power Slide -- Empty(A) Level 1: Prestige Power Quick -- Empty(A) Level 1: Prestige Power Rush -- Empty(A) Level 1: Prestige Power Surge -- Empty(A) Level 1: Sprint -- Run-I(A) Level 2: Rest -- Empty(A) Level 4: Ninja Run Level 2: Swift -- Flight-I(A) Level 2: Health -- Mrc-Rcvry+(A), NmnCnv-Regen/Rcvry+(50) Level 2: Hurdle -- Jump-I(A) Level 2: Stamina -- PrfShf-End%(A), PrfShf-EndMod(46) Level 1: Quick Form ------------
-
Croax, I didn't know about the "attacked" suppression, that's very valuable! Thank you. Also, the ATO synergy part was of help- i moved the ATOs to assassin's blade. Here is the full build with some changes: Villain Plan by Mids' Reborn : Hero Designer 2.6.1.25 https://github.com/Crytilis/mids-reborn-hero-designer Click this DataLink to open the build! Moonlight Serious: Level 50 Natural Stalker Primary Power Set: Ninja Blade Secondary Power Set: Dark Armor Power Pool: Fighting Power Pool: Speed Power Pool: Flight Ancillary Pool: Body Mastery Villain Profile: Level 1: Sting of the Wasp -- Mk'Bit-Acc/Dmg(A), Mk'Bit-Dmg/EndRdx(3), Mk'Bit-Dmg/Rchg(3), Mk'Bit-Acc/EndRdx/Rchg(5), Mk'Bit-Acc/Dmg/EndRdx/Rchg(5), Mk'Bit-Dam%(7) Level 1: Hide -- LucoftheG-Def/Rchg+(A), LucoftheG-Def(48), LucoftheG-Def/EndRdx(48) Level 2: Flashing Steel -- Obl-Dmg(A), Obl-Acc/Rchg(7), Obl-Dmg/Rchg(9), Obl-Acc/Dmg/Rchg(9), Obl-Acc/Dmg/EndRdx/Rchg(11), Obl-%Dam(11) Level 4: Dark Embrace -- Ags-ResDam(A), Ags-ResDam/EndRdx(36), Ags-ResDam/Rchg(36), Ags-ResDam/EndRdx/Rchg(43) Level 6: Assassin's Blade -- SprStlGl-Rchg/Hide%(A), SprStlGl-Acc/Dmg(13), SprStlGl-Dmg/Rchg(13), SprStlGl-Acc/Dmg/Rchg(15), SprStlGl-Acc/Dmg/EndRdx/Rchg(15), SprAssMar-Rchg/Rchg Build Up(17) Level 8: Murky Cloud -- Ags-ResDam(A), Ags-ResDam/EndRdx(17), Ags-ResDam/Rchg(34), Ags-Psi/Status(45) Level 10: Shadow Dweller -- LucoftheG-Def/Rchg+(A), LucoftheG-Def(36), LucoftheG-Def/Rchg(37), Rct-ResDam%(50), ShlWal-ResDam/Re TP(50) Level 12: Build Up -- GssSynFr--ToHit(A), GssSynFr--ToHit/Rchg(37), GssSynFr--ToHit/Rchg/EndRdx(37), GssSynFr--Rchg/EndRdx(39), GssSynFr--ToHit/EndRdx(39), GssSynFr--Build%(39) Level 14: Placate -- RechRdx-I(A) Level 16: Obsidian Shield -- ImpArm-ResDam(A), ImpArm-ResPsi(43) Level 18: Divine Avalanche -- Mk'Bit-Acc/Dmg(A), Mk'Bit-Dmg/EndRdx(19), DefBuff-I(19), Mk'Bit-Dmg/Rchg(21), Mk'Bit-Acc/Dmg/EndRdx/Rchg(21), Mk'Bit-Dam%(23) Level 20: Dark Regeneration -- Pnc-Heal(A), Pnc-EndRdx/Rchg(23), Pnc-Heal/+End(25), Obl-Dmg(25), Obl-%Dam(27), Obl-Dmg/Rchg(27) Level 22: Boxing -- Empty(A) Level 24: Tough -- StdPrt-ResDam/Def+(A), GldArm-3defTpProc(29), StdPrt-ResKB(40), GldArm-ResDam(42), GldArm-End/Res(43) Level 26: Soaring Dragon -- SprBlsCol-Acc/Dmg(A), SprBlsCol-Dmg/EndRdx(29), SprBlsCol-Acc/Dmg/EndRdx(31), SprBlsCol-Acc/Dmg/Rchg(31), SprBlsCol-Dmg/EndRdx/Acc/Rchg(31), SprBlsCol-Rchg/HoldProc(34) Level 28: Weave -- LucoftheG-Def/Rchg+(A), LucoftheG-Def(40), LucoftheG-Def/EndRdx(40) Level 30: Hasten -- RechRdx-I(A), RechRdx-I(48) Level 32: Golden Dragonfly -- Arm-Dam%(A), Arm-Dmg/EndRdx(33), Arm-Acc/Rchg(33), Arm-Acc/Dmg/Rchg(33), Arm-Dmg/Rchg(34), Arm-Dmg(42) Level 35: Hover -- LucoftheG-Def/Rchg+(A), LucoftheG-Def(42) Level 38: Superior Conditioning -- PrfShf-EndMod(A) Level 41: Fly -- BlsoftheZ-ResKB(A) Level 44: Laser Beam Eyes -- TchofLadG-DefDeb(A), AchHee-ResDeb%(45), AnlWkn-%ToHit(45), TchofLadG-DefDeb/EndRdx(46), TchofLadG-%Dam(46) Level 47: Soul Transfer -- Prv-Absorb%(A) Level 49: Afterburner -- LucoftheG-Def/Rchg+(A) Level 1: Assassination Level 1: Brawl -- Empty(A) Level 1: Prestige Power Dash -- Empty(A) Level 1: Prestige Power Slide -- Empty(A) Level 1: Prestige Power Quick -- Empty(A) Level 1: Prestige Power Rush -- Empty(A) Level 1: Prestige Power Surge -- Empty(A) Level 1: Sprint -- Run-I(A) Level 2: Rest -- Empty(A) Level 4: Ninja Run Level 2: Swift -- Flight-I(A) Level 2: Health -- Mrc-Rcvry+(A), NmnCnv-Regen/Rcvry+(50) Level 2: Hurdle -- Jump-I(A) Level 2: Stamina -- PrfShf-End%(A), PrfShf-EndMod(46) Level 1: Quick Form ------------
-
I took a long hiatus and came back to finish this character. I decided I didn't feel like doing the patron missions and made some changes. I would appreciate some feedback or advice. Villain Plan by Mids' Reborn : Hero Designer 2.6.1.25 https://github.com/Crytilis/mids-reborn-hero-designer Click this DataLink to open the build! Moonlight Serious: Level 50 Natural Stalker Primary Power Set: Ninja Blade Secondary Power Set: Dark Armor Power Pool: Fighting Power Pool: Speed Power Pool: Flight Ancillary Pool: Body Mastery Villain Profile: Level 1: Sting of the Wasp -- Mk'Bit-Acc/Dmg(A), Mk'Bit-Dmg/EndRdx(3), Mk'Bit-Dmg/Rchg(3), Mk'Bit-Acc/EndRdx/Rchg(5), Mk'Bit-Acc/Dmg/EndRdx/Rchg(5), Mk'Bit-Dam%(7) Level 1: Hide -- LucoftheG-Def/Rchg+(A), LucoftheG-Def(48), LucoftheG-Def/EndRdx(48) Level 2: Flashing Steel -- SprAssMar-Rchg/Rchg Build Up(A), SprStlGl-Acc/Dmg(7), SprStlGl-Dmg/Rchg(9), SprStlGl-Acc/Dmg/Rchg(9), SprStlGl-Acc/Dmg/EndRdx/Rchg(11), SprStlGl-Rchg/Hide%(11) Level 4: Dark Embrace -- Ags-ResDam(A), Ags-ResDam/EndRdx(36), Ags-ResDam/Rchg(36) Level 6: Assassin's Blade -- Mk'Bit-Dam%(A), Mk'Bit-Acc/Dmg/EndRdx/Rchg(13), Mk'Bit-Acc/Dmg(13), Mk'Bit-Dmg/Rchg(15), Mk'Bit-Dmg/EndRdx(15), Mk'Bit-Acc/EndRdx/Rchg(17) Level 8: Murky Cloud -- Ags-ResDam(A), Ags-ResDam/EndRdx(17), Ags-ResDam/Rchg(34), Ags-Psi/Status(45) Level 10: Shadow Dweller -- LucoftheG-Def/Rchg+(A), LucoftheG-Def(36), LucoftheG-Def/Rchg(37), Rct-ResDam%(50), ShlWal-ResDam/Re TP(50) Level 12: Build Up -- GssSynFr--ToHit(A), GssSynFr--ToHit/Rchg(37), GssSynFr--ToHit/Rchg/EndRdx(37), GssSynFr--Rchg/EndRdx(39), GssSynFr--ToHit/EndRdx(39), GssSynFr--Build%(39) Level 14: Placate -- RechRdx-I(A) Level 16: Obsidian Shield -- ImpArm-ResDam(A), ImpArm-ResPsi(43) Level 18: Divine Avalanche -- Mk'Bit-Acc/Dmg(A), Mk'Bit-Dmg/EndRdx(19), Mk'Bit-Acc/EndRdx/Rchg(19), Mk'Bit-Dmg/Rchg(21), Mk'Bit-Acc/Dmg/EndRdx/Rchg(21), Mk'Bit-Dam%(23) Level 20: Dark Regeneration -- Pnc-Heal(A), Pnc-EndRdx/Rchg(23), Pnc-Heal/+End(25), Obl-Dmg(25), Obl-%Dam(27), Obl-Dmg/Rchg(27) Level 22: Boxing -- Empty(A) Level 24: Tough -- StdPrt-ResDam/Def+(A), GldArm-3defTpProc(29), StdPrt-ResKB(40), GldArm-ResDam(42), GldArm-End/Res(43) Level 26: Soaring Dragon -- Mk'Bit-Dmg/EndRdx(A), Mk'Bit-Acc/Dmg(29), Mk'Bit-Dmg/Rchg(31), Mk'Bit-Acc/EndRdx/Rchg(31), Mk'Bit-Acc/Dmg/EndRdx/Rchg(31), Mk'Bit-Dam%(34) Level 28: Weave -- LucoftheG-Def/Rchg+(A), LucoftheG-Def(40), LucoftheG-Def/EndRdx(40) Level 30: Hasten -- RechRdx-I(A), RechRdx-I(48) Level 32: Golden Dragonfly -- Arm-Dam%(A), Arm-Dmg/EndRdx(33), Arm-Acc/Rchg(33), Arm-Acc/Dmg/Rchg(33), Arm-Dmg/Rchg(34), Arm-Dmg(42) Level 35: Hover -- BlsoftheZ-Travel(A), BlsoftheZ-Travel/EndRdx(42), LucoftheG-Def/Rchg+(43) Level 38: Superior Conditioning -- PrfShf-EndMod(A) Level 41: Fly -- BlsoftheZ-ResKB(A) Level 44: Laser Beam Eyes -- TchofLadG-DefDeb(A), AchHee-ResDeb%(45), AnlWkn-%ToHit(45), TchofLadG-DefDeb/EndRdx(46), TchofLadG-%Dam(46) Level 47: Soul Transfer -- Prv-Absorb%(A) Level 49: Afterburner -- LucoftheG-Def/Rchg+(A) Level 1: Assassination Level 1: Brawl -- Empty(A) Level 1: Prestige Power Dash -- Empty(A) Level 1: Prestige Power Slide -- Empty(A) Level 1: Prestige Power Quick -- Empty(A) Level 1: Prestige Power Rush -- Empty(A) Level 1: Prestige Power Surge -- Empty(A) Level 1: Sprint -- Run-I(A) Level 2: Rest -- Empty(A) Level 4: Ninja Run Level 2: Swift -- Flight-I(A) Level 2: Health -- Mrc-Rcvry+(A), NmnCnv-Regen/Rcvry+(50) Level 2: Hurdle -- Jump-I(A) Level 2: Stamina -- PrfShf-End%(A), PrfShf-EndMod(46) Level 1: Quick Form ------------ Numbers reflect "attacked" suppression.
-
I think this would be great. I totally would be happy to see these changes! As someone who played 100s of hours on the original servers as an MA, I offer a more radical (and possibly not possible and probably unrealistic) set of options designed to modernize the set while increasing consistency and remaining in line with the martial arts theme. Replace Focus Chi with stances or styles that affect the following powers only: Thunder Kick, Storm Kick, Crippling Axe Kick. Feral Tiger: Each attack has a small chance to fire off a proc with the effect of the current focus chi. I don't know how to determine an appropriate proc rate? Make it fire off roughly twice a minute? Drunken Monkey: Each successful attack increases defense (melee, smashing) like parry, but a smaller amount, say 3% for ten seconds. Iron Horse: Each successful attack increases resistance (smashing, lethal, fire, cold) by 3% for ten seconds. Dancing Dragon : Each attack automatically does a magnitude 1 stun in addition to whatever it normally does. Trampling Elephant: Each attack automatically does a magnitude 1 knockdown in addition to whatever it normally does. This would recreate the feeling of classic kung fu flicks by allowing free flowing movement of martial arts style.
-
Does anyone have a Dark/ Assault Rifle Proc Monster build they can share? I will appreciate it.
-
Weekly Discussion 53: How to Increase Villain Population
zenijos10 replied to GM Miss's topic in General Discussion
A lot of folks seem to want to get rid of the ability to switch sides instantly via Null the Gull. I don't believe this will have any real effect on increasing Red side population. I am pro-Null the Gull. I've leveled two 50's now on Homecoming through villain side, probably spending about 85% of my time to 50 on red side. Most of my other 50s have spent at least a little time on redside, either to hang with friends, or to do task forces. Additionally I had somewhere around 10 level 50 villains before the shutdown. In Homecoming, a non-trivial portion of people joining teams or task forces came from Blue side due to LFG requests. I would estimate that if my group was full, at least 1 person came immediately via Null the Gull, and often up to half the group was drafted this way. On many occasions when I was playing a hero and used Null to switch, 7 of 8 people joined via LFG drafting through Null. It seems to me that Removing Null the Gull will simply make it much harder to fill groups and Task Force; unless there were no limitations on who could travel where and accept which missions in which case Null would be obsolete but the ability to join on a whim in redside would still live. Stopping people from being able to leave or join redside on a dime wont do anything about content- and the feeling players get from it. I think very few additional people would be motivated to make Villains if they found out they would be stuck on Villain or have to do alignment missions. I think a larger number of people would just not make a villain. If no other changes were made and only Null was removed, I would probably never make a redside character again. My play rate on characters who are already redside would probably go down too. I think the true root of the issue is that the red content is less compelling to the population at large than blue: Many people feel the Rogue Isles are too drab/bleak Many people don't enjoy the large amount of Arachnos and Longbow Many people don't like the storyline direction their characters are forced into- often working as a lackey and then often as a stupid one Many people feel the stories are often lower in scope than hero stories. i.e. Rob a bank versus save the world. Many people feel there is a lesser feeling of community or places to congregate in the Rogue Isles (i.e. like Atlas Park) Many people feel it is hard to get around -
Weekly Discussion 53: How to Increase Villain Population
zenijos10 replied to GM Miss's topic in General Discussion
I think villain stories and dialogue are generally better written and thats a good reason to play redside. However, everything looks so drab. I think a visual makeover could create a huge long term change. I understand the Rogue Isles are supposed be run down, but they dont have to be consistently dreary. Patchworks and mismatched materials create a good pop of color but dont lose the theming. Here are some more specific suggestions: Create new textures for existing missions, maps Possibly let people keep the old ones if they like, maybe give a color / or dreary to lively slider option for each player Create entirely new maps for newspaper missions -
Welcome to the game! I love Fire/Kins! Fire cages isn't as potent as bonfire. If it is resisted or dodged it can't be applied again until you cast it again. Bonfire will continue to fire off by itself until it ends. Fire cages immobilizes, so enemies can still fight, just not move. Bonfire knocks em down, so they cannot attack (or flee). Anecdotally, I think bonfire foes more damage, but I have no data on this. I'm sure others do though. While fire cages keeps enemies from running, bonfire slows enemies run speed, but makes them run away in fear More importantly though, these powers have excellent synergy. Locking down enemies with immobilize then pulling up a bonfire at their location is absolutely devastating. Eventually, once you have siphon speed, transference, and fulcrum shift, soloing gets A LOT easier. Level 50 Fire/Kin are some of the best soloers in the whole game while still being very much wanted in teams.
-
The general concept of unlocking costume pieces is not new to this game. I think it is an expected and normal mmo feature and I think many people(other than me) enjoy it. The specific concept of unlocking costumes for a given powerset(willpower scrapper armor, invulnerability armor, etc) I think is not in line with this game. I'm not sure what the outcome you are specifically seeking is, so please help me understand. What is the actual challenge you're seeking? Defeat a giant monster every 10 levels without help from higher level characters? I think that would make for compelling missions or taskforces- a costume reward might be nice to go along with it. I think that reward should not be archetype/power based. If the outcome you're seeking is that a lot of people would be showing off armor or items for defeating the monster, I think some people certainly would. I would expect most people to not wear most of the armor most of the time even if they earned it all. If you simply want armor themed on the already-existing monster, I think that's fine too. I think new costume sets are always welcome. Are you saying you want to create and implement a new system of challenges based on class and level (or as mentioned by another enhancements or something?) and let costumes be the reward? I think a new challenge system is a neat idea, but in general, I'd prefer new missions over it. From a lesser resources perspective, would additional challenge options in AE or in Ouroboros based on archetype/powerset or aimed at them (ex, deal more than X or X% damage in a team of 8) resulting in new titles be in the vein you are thinking? In lieu of programmed changes to the game, could a list of challenges be created and uploaded to a website for people to do on their own? screenshots/ video for proof where applicable?
-
Unlocking armor based on action/ badge unlocking seems fine to me, and in the past there have been pieces unlocked by missions/ achievements. I'm generally not a huge fan of it myself though. I don't agree with locking armor to any given archetype or powerset, I don't see how it actually make sense, nor do I think it is something people are clamoring for. I think one of the best design choice that city of heroes ever made was to remove classes/races/etc from costumes (outside of relevant weapon use). Also, thematically, I'm not sure how heroic it is to go around hunting monsters or giants for the purpose of wearing their skin/ body parts in public- although I suppose its not totally out of bounds. Additionally, I see no problem with higher level characters helping lower levels to defeat monster. It is a natural solution- and its part of the design of public zones. If for some reason it was truly important to limit the level then instead of publicly spawning monsters there could be level based missions. All that said, I would not expect many people to wear the full costumes even after they earn the whole set. This is a feature of a lot of other games and MMOs, where you can tell what a character has done by her/his armor/weapon- as such many characters look alike. However, part of the allure of City of Heroes is how unique each character is. In general, you rarely see exact copies of any costumes or of heroes wearing a full costume set.
-
Mid's Reborn: Hero Designer
zenijos10 replied to Metalios's topic in Mids' Reborn Hero Designer's Forum
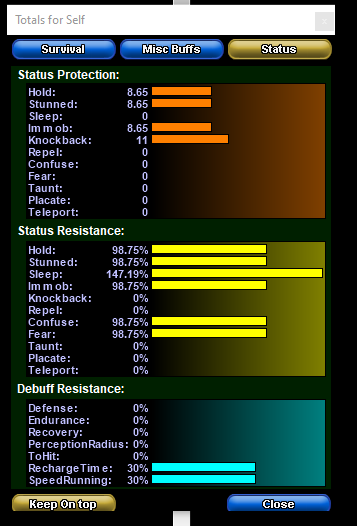
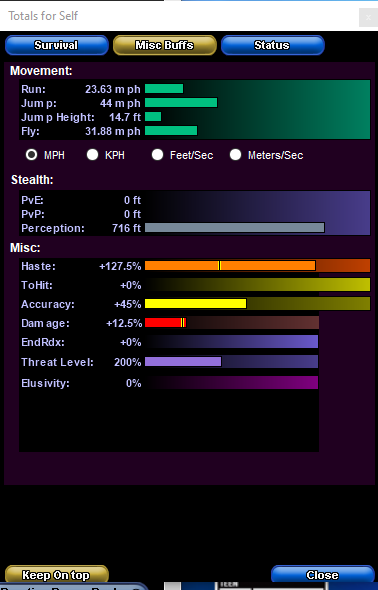
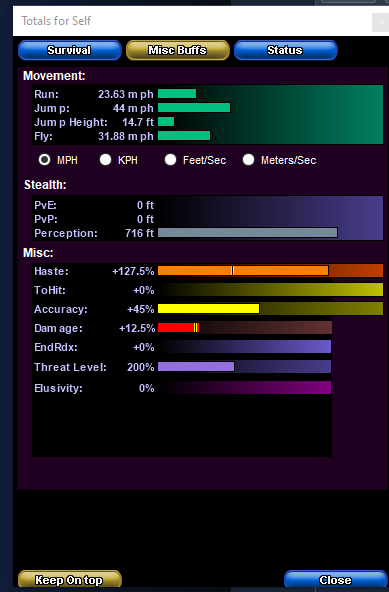
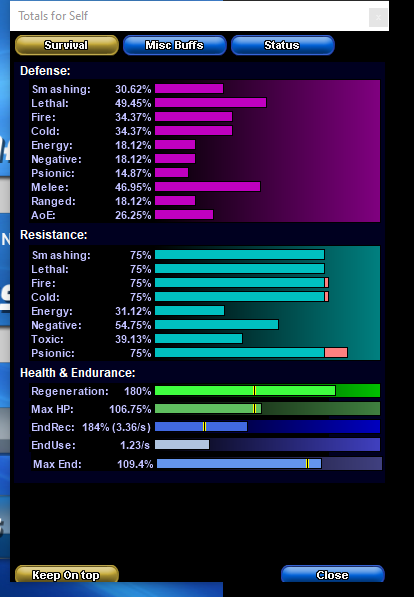
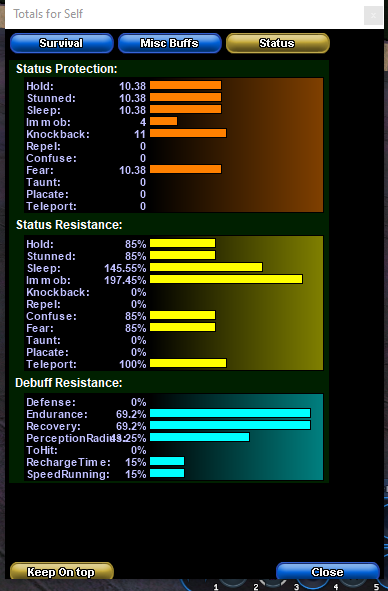
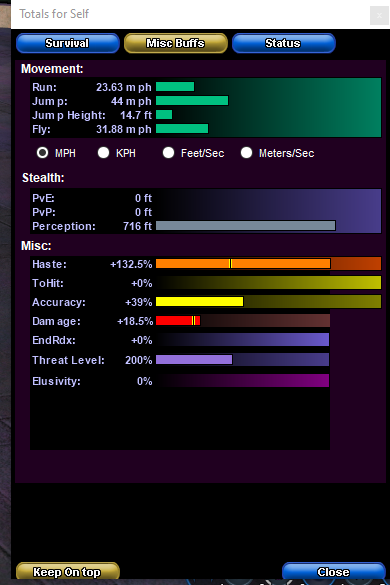
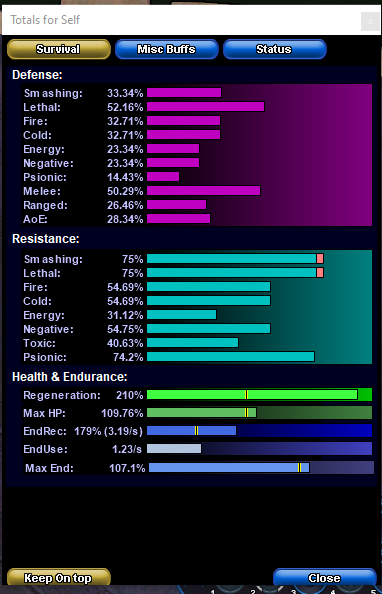
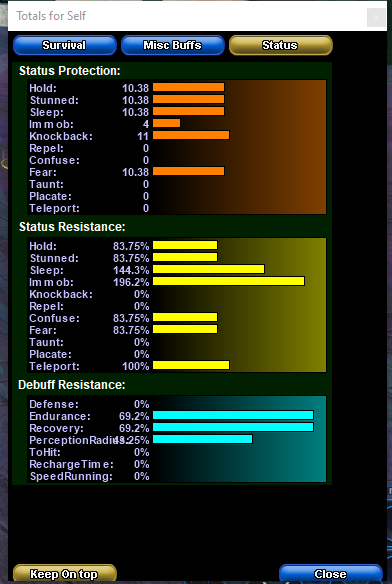
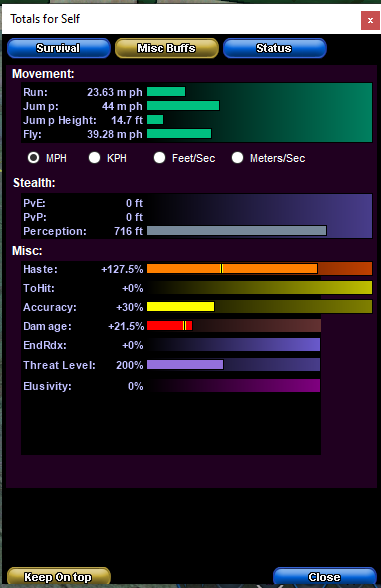
Thank you for making Mids Reborn! I have a feature request. Could you make it that when we export for forum use we can optionally include character sets as they appear on the popout window, ie resistances, defenses, runspeed haste, etc. This, I think is far more useful for the forums and helping people understand a build then seeing set bonuses.