Bopper
-
Posts
3843 -
Joined
-
Last visited
-
Days Won
7
Content Type
Profiles
Forums
Events
Store
Articles
Patch Notes
Everything posted by Bopper
-
If you're looking to be ST focused only, Soul is a great way to go. Shadow Meld can give you a huge Alpha Strike protect even in situations where enemies have heavy def debuffs or to-hit debuffs. Plus the -ToHit and exotic damage type of Moonbeam is great. However it's hard for me to lose out on Ball Lightning as an AoE.
-
I like the approach going for so much recharge. It certainly helps things chain more smoothly. Looking at the chains, I would probably recommend taking EP instead of BS. It has similar DPA and you could use it as a filler for when you have that small GAP. Currently, your gap appears to be ~0.9s, so if you wanted to fill in the gap with an attack instead of something else, you could use it there. I know you're showing me your repeatable rotation, but if you're starting your chain while in Hide, I might recommend going with TF(hide)>AS>ET>Zapp>Gap>ET>AS. You won't be able to chain it since AS>TF>AS is not gapless, but you'll get more AS uptime (at a cost of not as much Assassins Focus uptime). Anyways, if I ever give up on Cross Punch (which only feels like I can use it in the highest density of gameplay, like farms), I will likely re-approach my character to have these levels of recharge and tighten up my rotations more. Thanks for sharing, I will likely use this as a template when I start my 2nd build.
- 35 replies
-
- 1
-

-
- energy melee
- energy aura
- (and 2 more)
-

[HUMOR] I've found a major error in Mids!
Bopper replied to Hyperstrike's topic in Mids' Reborn Hero Designer's Forum
Interesting, although I suppose you can always set your damage to display as damage per cycle which should divide your damage by animation+recharge -
You absolutely might, and I tend to do this as well. But sometimes I just like playing it safe and ensuring I get the Double EF. But we can break it down. I will do all of the following calculations assuming I don't miss a target. I will also provide average probability of a crit for TF given. I'm assuming the 3s total cast time is used for AS, so the probability to proc Hide is 87.538% in my slotting. So the probability that TF crits will be 87.538% + 10% x (100%-87.538%) = 88.78% AS (hide) > TF > ET (fast) > AS (fast) TF (hide) > ET (fast) > AS (fast) AS (slow) TF ET (fast) AS (fast) DMG 994.6 503.4 647.9 392.2 Avg Proc DMG 0.00 159.52 0.00 0.00 Crit Chance 0% 88.78% 10% 66.60% Avg Crit DMG 0.00 125.54 18.20 261.21 Arcana 3.168 2.772 1.188 1.188 Gap 0 0 0 0 Avg DMG 3102.57 Avg Time 8.316 DPA 373.084 TF (hide) ET (fast) AS (fast) DMG 499.4 642.9 389.1 Avg Proc DMG 159.52 0.00 0.00 Crit Chance 100% 10% 66.60% Avg Crit DMG 140.28 18.06 259.14 Arcana 2.772 1.188 1.188 Gap 0 0 0 Avg DMG 2108.40 Avg Time 5.148 DPA 409.557 From the table we can see using TF (hide) instead of AS (hide) winds up providing more burst DPS (410 vs. 373). It turns out, slow version of AS is only 314 DPS, which is less than what our chain DPS would be, so it probably isn't worth using unless the target can be one-shot. EDIT: I will caveat this, the Hide proc has a timeout to it, so it's not a bad idea to start with AS (slow) in hopes of locking out the hide proc for later. Ideally we want the hide proc going off before TF, so if you want to start your lockout up front, you can improve your odds of achieving the AS (fast) that precedes TF to re-proc the hide. All that being said, I have been working on a new build where I use Zapp in my attack chain, and I take Tactics to help increase its Quick Snipe damage. It's still a work in progress, but it has potential. When TF crits, you can pump out 4k damage in about 10s, but if TF doesn't crit you only pump out 3.6k damage in closed to 11s. This is numbers assuming +16.5% To-Hit buff from Tactics and Kismet. *This is not from the build posted, just something I'm play-testing*. These numbers assume Build Up is not active. TF (crits) TF ET (fast) AS (fast) Zapp ET (fast) EP AS (fast) DMG 503.4 647.9 392.2 326.8 647.9 164.8 392.2 Avg Proc DMG 159.52 0.00 0.00 96.381 0.00 0.00 0.00 Crit Chance 100% 10% 66.60% 10% 10% 10% 66.60% Avg Crit DMG 141.40 18.20 261.21 32.68 18.20 16.48 261.21 Arcana 2.772 1.188 1.188 1.584 1.188 1.056 1.188 Gap 0 0 0 0 0 0 0 Avg DMG 4080.48 Avg Time 10.16 DPA 401.46 TF (no crit) TF ET (fast) AS (fast) Zapp ET (slow) AS (fast) DMG 503.4 647.9 392.2 326.8 647.9 392.2 Avg Proc DMG 159.52 0.00 0.00 96.381 0.00 0.00 Crit Chance 10% 10% 66.60% 10% 10% 33.30% Avg Crit DMG 14.14 18.20 261.21 32.68 18.20 130.60 Arcana 2.772 1.188 1.188 1.584 2.904 1.188 Gap 0 0 0 0 0 0 Avg DMG 3641.33 Avg Time 10.82 DPA 336.41
-
Good breakdown. It also highlights the language of the math. You providing 5% more DPS from debuffs is strictly in relation to if no debuffs were used. But when you get into a team of debuffs, your 5% isn't going to be a team improvement of 5%. Let's assume you're in a team of 8, where everyone brings 5% resistance debuffs to improve dps. Thats a total of 40% debuffs, and everyone would do 40% more damage than if they didn't have any debuffs. Now, if you choose to not bring extra debuffs, your team will still have 7 debuffers for a total of 35%. The difference between you adding 5% more debuffs is a 1.40/1.35 = +3.7% team improvement. So when it comes to thinking should I add more debuff or a proc, think of that 3.7% added to all 8 of you for ~30% equivalent improvement of a single contributor. Now...its not always that simple. In the case of Achilles, fury of the gladiator, and annihilation, those don't stack on the same target. So when multiple teammates have that proc any stacks would be wasted and a different slotting option would have been better served. But we know that already. There is no one size fits all when it comes to those procs when you don't know what your teammates are bringing to the table.
-
That would explain a lot.
-
So I did some analysis with your times, using my Pylon calculator to plug in what your times to kill would be, given the amount of HP you took off in 5 minutes. I also applied different resistance values based on the AV's smashing resistance (which would be most of your damage). In short, the DPS for each AV fight increased about 4-5% when using -res instead of dmg procs. I can't do much more with that info as I don't really know your rotation. But here's the thing that gets me... Neuron and Black Swan are practically the same in resistance (0% in everything that is not energy and negative), except they are polar opposites when it comes to E/N. Neuron is weak to negative (-20%) while strong in energy resistance (40%) wheras Black Swan is weak to energy (-30%) while strong against negative (50%). And yet, you were able to kill Black Swan in 5 minutes while you only got Neuron down to 33-40% of its life. I looked at your build and you only have one source of energy damage, which is the Eradication proc in Burn. While you have negative damage procs in Storm, Crane, and CAK (purple). So I thought, shouldn't you have done better against Neuron? I'll admit, I don't know how many proc chances you get with Burn, I know it has an upfront high proc chance plus a pseudopet that will maybe add more chances, but still...it seemed odd. So I gotta ask, did you use Double-Hit? That's energy proc damage, and would be a huge beneficiary of resistance debuffs.
-
Thanks for clarifying. So you're saying % points, not % improvement. In the example of 67% versus 61%, that's actually 9.8% more HP loss (67/61=1.098). I'm good with it reported either way, I just need to know so I can extrapolate it properly. When I get back on a computer I'll look at it more to make sure I follow everything posted. I can address your original question afterwards
-
Excellent info. Two more questions before I think I can give am assessment. What exactly were you changing in your build when you say -res or procs? Is it just CAK that gets tweaked, or I there more to it? Next, how are you calculating 5-8%?
-
It absolutely matters. Not only will it resist your damage, it will resist your resistance debuffs. When you analyze the impact of -res procs through timed tests, you absolutely need to be looking at this for context.
-
Doh...I totally forgot about the 1k cap. So my math was wrong anyways. However, you are showing 5 stacks there, basically, which is very peculiar. Ok, so factoring in the -1000HP cap, you would see a breakdown like this. Max HP Next Debuff HP/sec Original 30677.15 1000 102.257 1 stack 29677.15 1000 98.924 2 stack 28677.15 1000 95.591 3 stack 27677.15 968.700 92.257 4 stack 26708.45 capped 89.028 Now, that could fluctuate at times as your debuffs apply and wear off, but this is a ballpark number. I also recall seeing 5 stacks like this in the past, but I figured it was a display bug as the power data shows the stack limit is 4 for this debuff. Also, by the way, great use of 75% DoT proc. When you have a ton of sources that can trigger the debuff, it's very smart to maximize the DoT as it is a cancel-on-miss DoT that can stack up to 8 times.
-
If I recall correctly, I believe the 4 stacks of -HP debuff will put the max HP of the target to 86.718% of normal (100% - 3.5%)^4. This will reduce the HP/sec from 102.26 to 88.68. That's a nice 13.58 DPS added. But also the 4074.54 HP that you took off is quite significant as well. Gives you a nice headstart for killing the pylon.
-
I think for your test, it would help if you go back to each AV and put a Power Analyzer on them. This way we can see exactly what their resistances are for all damage types and compare that to your attacks' damage types as well as the damage type of your procs. Without this, there are still too many variables that can explain away things. In regards to resistance debuff procs, keep in mind only 1 can be applied per target. So a team of 8 providing redundant resistance debuff procs won't be helpful other than to ensure more reliable uptime. So I agree, if everyone does -resistance procs then you are hurting your team. But if nobody does -resistance procs you are hurting your team. I can think of 3 resistance debuff procs: Annihilation (12.5%), Achilles (20%) and Fury of the Gladiator (20%). That's potentially 52.5% extra resistance debuffs that can be applied to your teams other resistance debuffs. You will want that, even if a +3 AV will have purple patch make those 65% effective (34.125% resistance debuff after PP). To your point, resistance debuff procs while soloing will be more worthwhile than they will be on a team, as damage procs will always add more damage while resistance debuff procs will not stack with others. You're really looking at many variables with varying rules, which will be impossible to quantify from just soloing pylons or AVs.
-
I'm not 100% sure at to what the test is for. On one hand, I would suggest using a pylon because it's a big bag of HP with 20% resistance to everything (and will resist your resistance debuffs by 20%). It will also always be even con, so you don't have to think about purple patch. I see you did some testing against AVs but I'm unsure as to how they con'd to you. Were they +3 or +2? I also don't know their resistance nor do I know what attacks and slotting you had, so all mileage will vary. As for the 5% more damage equate to 5% faster killing? Short answer is no. You have to factor in the regeneration of the target. For example, let's say your DPS is exactly the same as the Target's HPS, you will never kill your target (time to kill = infinity). But if you can do 1 more DPS than HPS, you will eventually kill the target. In this scenario, you increased your damage by only (HPS + 1)/HPS, but your kill time improved infinitely.
-
I'll admit I'm still not 100% sold on Cross Punch for the build. I've only used it before on a tanker and I can notice the difference between having only a 50 degree arc versus the 75 degree arc (not having taunt also exacerbates it). But, it works nice when teamed and a Tank groups the targets for me. Also, while solo, it's why I started using Ball Lightning after Power Crash instead of Cross Punch. Going PC (hide) > BL > CP, that lends itself time for aggro to gather on me during the first two attacks in hopes of maximizing the targets hit with Cross Punch. I still have to think about it though. Taking Kick to buff Cross Punch's damage (13% more damage) and buffs (100% more buffs) is probably not worth it in the long run. In which case I'd probably replace it with Tactics to further buff Zapp and have some resistance to Blind.
-
Funny enough, the first design of this character did take the Teleport Pool (I wanted to use Fold Space), but I went away from it. CT does have a nice ToHit buff, however I think the buff only lasts for the next attack, not the full 6 seconds. I might be misremembering that so correct me if I am wrong. If I am, I might want to revisit adding that in the build
-
Don't sleep on Zapp or Moonbeam. It actually does similar DPA as Energy Punch and Bone Smasher. I could see why you will want Barrage for the -Special mechanic it offers with Energy Focus. If that's the case, I would consider not taking Energy Punch (except for low level content) and using Bone Smasher and Zapp/Moonbeam in your rotation. Remember, Zapp/Moonbeam gets a damage buff when you have increased To-Hit in your build, so you can add a Kismet, Tactics, and/or rely on the high uptime of Build Up to leverage the bonus damage into Zapp/Moonbeam. Some numbers: Energy Punch: 1.16 scale, 1.056s arcana, scaled DPA = 1.098484... Bone Smasher: 1.64 scale, 1.452s arcana, scaled DPA = 1.129476584 Snipe (+0% To-Hit, minimum): 1.75 scale, 1.584s arcana, scaled DPA = 1.1047979... Snipe (+22% To-Hit, maximum): 2.30 scale, 1.584s arcana, scaled DPA = 1.452020... As you can see, if you gain some +To-Hit in your build, you can make Zapp/Moonbeam do far more DPA than both Bone Smasher and Energy Punch. Also, Snipe gives you another purple proc that you can add, which will have a 90% chance to fire even if you slot recharge into the power. With enough recharge in your build, you could do a rotation like this: TF (hide) > ET (fast) > AS (fast) > Snipe > ET (fast)
-
Very interesting. I'll have to look up the power. I assumed it triggers from the power its slotted in, bit perhaps it's a global enhancement that any power can trigger. If that's the case, then yes, I will have no need to slot recharge
-
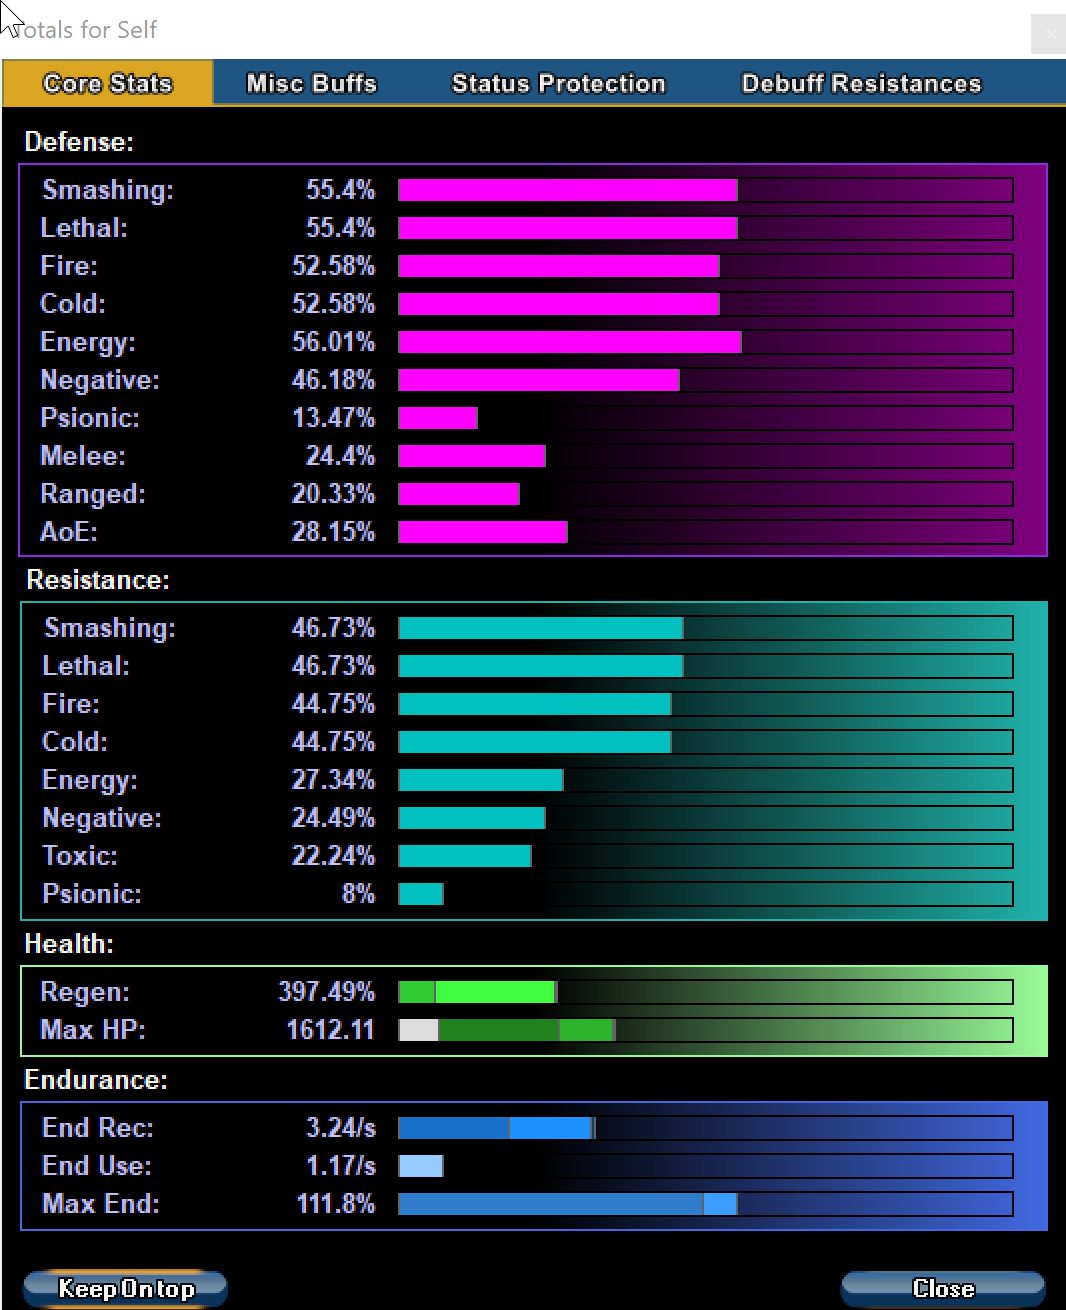
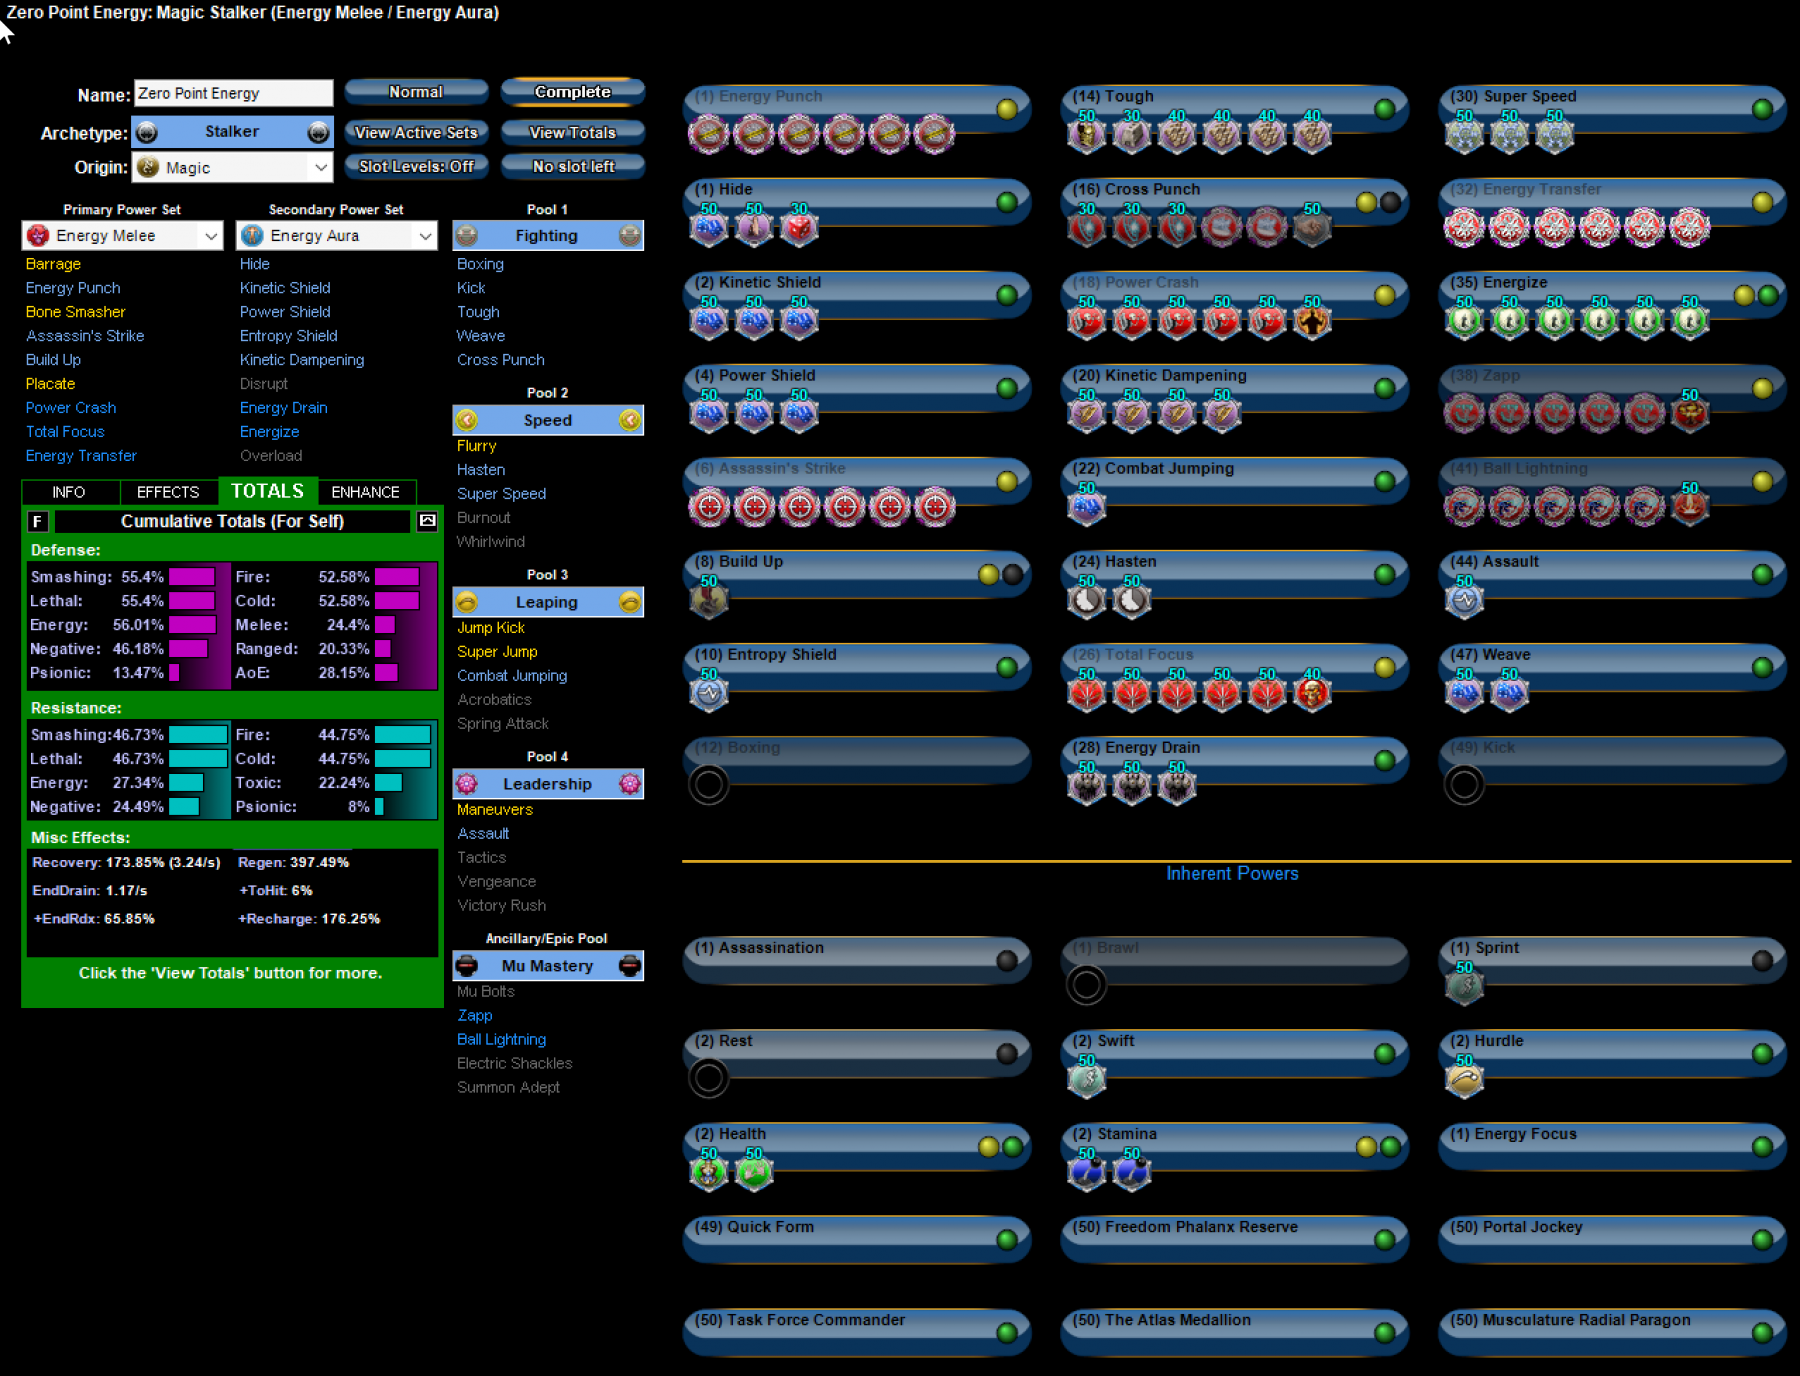
Notes from the Author Edits made to the build: 2021 Feb 28: 2021 Feb 19: Design Goals: High Recharge: I want to have near perma-Hasten while also having my best attacks up more often Be surviable: Softcapped Defenses (45+% to S/L/E/N/F/C), Decent Regeneration (400+%, 25+ HP/sec), No Endurance Issues, Decent Resists (40+% S/L, 30+% in F/C/E/N) DPS for anything: Single Target (wreck Bosses+) AoE (mow through Minion/LT packs) Range (I don't always want to chase, so hurt them from afar) How did those goals work out?: High Recharge: Hasten coolsdown in 120.9s (114.8s when Base Empowerment: Increased Attack Speed is active). 188.75% global recharge (208.75% with base empowerment) Also built in 70% resistance to Slows (90% with Base Empowerment), so no fear of debuffs to my movement or recharge Survivability: Defenses - S/L: 54%, F/C: 53%, E: 53%, N: 43% (Energy Drain can increase this more) Regeneration - 389.5% (26 HP/sec), also Energize is able to heal 600 HP every 33s) Endurance - Energize is nearly perma'd and Energy Drain is on a 21s cooldown, rarely any endurance issues Resists - S/L: 47%, F/C: 44%, E: 28%, N: 25%, T: 22% (a little short on my E/N goals, but acceptable) DPS for anything: Single Target Can burst TF (hide) > ET (fast) > AS (fast) for 2100 damage in 5.15s (~410 DPS) Can chain TF > ET (fast) > AS (fast) while using EP Zapp as filler for sustained chunky damage For big fights: PC > AS > TF > ET (fast) > AS > Zapp > ET. The 71% chance to debuff will create on average 14% more damage for the chain, pushing numbers to approximately 385 to 443 DPS. Without factoring in BU or Hide proc. AoE Can burst PC (hide) > Ball Lightning > Cross Punch for ~185 AoE DPS, and sprinkle in fast AS for bosses PC (hide) > Ball Lightning > Assassins Strike. The AoE does on average ~850 damage in a little over 3s of animation time. With enough targets clustered there's a high probability of getting BU to proc and use it before AS. Range Have Zapp (7s cooldown), Mu Bolts (2s) and Ball Lightning (11s). Zapp is utilized in my ST melee attack chains while Ball Lightning is used in my AoE chains. Mu Bolts is mostly there as filler for when I am truly stuck at range. How does it play?: Updated: I've been playing this character a lot more lately and have definitely played around with some of the ideas mentioned in the comments and most importantly tried various forms of game play to get a feel for what works and what doesn't. Sadly, Cross Punch just didn't work for me. Enemies scatter too often and rarely do they aggro tight enough for me to take advantage of the AoE. So it's gone. The good news, I think my AoE potential is far improved now that I created a build that is able to emphasize more procs and recharge. Power Crash is now strong enough to where I could use it in my ST attack chain and not miss a beat. I might revisit Cross Punch, but I would have to test it with Fold Space and see if I can make good use of it. I have playtested this toon in Fire and S/L farms, and the survivability is very good. It also allowed me to test out Power Crash and Ball Lightning together and wow, the BU proc fires at a fantastic rate. If/when I can hit 16 targets with Ball Lightning, BU will recharge 56% of the time. With Power Crash, 5 targets will recharge BU 23% of the time, and with 10 targets it becomes 40% of the time. I'm not saying this toon is intended to be a farmer, just saying in highly saturated scenarios, the AoE of this build can blossom into something very capable. I often use TF and AS as filler while I wait for PC to come off cooldown. I'm also not sold on Ragnarok as the set for Ball Lightning. I'm very tempted to go with Positron's Blast and get one more proc into the attack. The recharge would go from 8.4s to 11.1s, but the average damage would go up from 169 to 245. Right now I have it in the build as alternative slotting scratch that, I'm going with Positron over Ragnorak. In regular content, I mostly adapt to the situation. I'll usually start with Power Crash on mobs to hopefully one shot Minions and possibly LTs (if I crit and get some procs), then roll into my ST chains. Bosses are dead before a chain ends, Elite Bosses might last up to two chains...might. One of the things I changed from the first build, I went back to using Miracle's recovery in my build. I just didn't like needing to use Energy Drain and/or Energize to fix my endurance issues...I wanted to keep punching. So I threw it back in and feel pretty good about the results so far. Mu Bolts...it's there as a mule. BUT, there are times where I don't mind having the extra range attack. Running a BAF and picking off Prisoners from a far, it's useful. It's nothing more than that, situational utility. Right now, I'm still trying to decide what I want to do to polish off the build. I'd love to find two or three more enhancement slots to patch a few more things. But, I like where it's at. It's tanky, it hits really hard, and it is fun. It solos well and it shines in team content (where others debuffs helps highlight the characters raw damage potential). For exemplaring, I'd probably do some things differently, but given that I usually don't exemplar below level 30, this build fits me well. Original: I'll update this more when I play more. For now, I just want to share the build and get comments/feedback. The Build: Below this line is the original build. Mids build link: Images for the build:

- 35 replies
-
- 1
-
-
- energy melee
- energy aura
- (and 2 more)
-
I disagree. When not at caps with damage, Fury greatly separates the offensive performance away from tankers. Assuming 75% fury (+150% damage) and 100% damage enhancement you're looking at Brutes doing 0.75 x (1 + 1 + 1.5) = 2.625, while Tanks would sit at 0.95 x (1 + 1) = 1.9. In that scenario, the Brute will average 38.2% more damage than the tank. I don't know a good way to add in the extra average damage from the increased AoE for tankers, but let's say it's worth 20% more performance (arbitrarily picked as I nor anyone else has done fair analysis on this). So if we give Tanks that arbitrary buff, 1.9 x 1.2 = 2.28. This makes brutes 15% more than Tanks in this scenario. So it might be more fair to say a Brute is a 9 at damage near base levels, while Tanks are an 7.5-8.0.
-
My opinion is Stalker because of its superior version of Power Crash, having Assassin's Strike, and a fairly controllable avenue to Double Energy Focus from Hide crits. Scrapper, Brute, and Tanker would be a step down from Stalker, but deciding which of those are next best would be a choice of flavor as each has something that makes them stand out: Scrapper gets crits (Double Energy Focus) and has the highest AT damage modifier which pairs greatly with the high scale damage from the set (Total Focus is 3.56 scale, Energy Transfer is 4.56 scale, plus you have solid DPA attacks with Energy Punch and Bone Smasher). Brutes because Fury goes so well with EM's high scale damage. You are right, crit limitations helps make Brutes stand out. Tankers because of their inherent. You get a larger radius with Whirling Hands (12 feet instead of 8 feet, 16 target cap instead of 10 target cap), plus your Power Crash is basically always in EF mode. Other ATs can hit 5 (up to 10 when spending E.F.), while Tankers already can hit 10 (up to 16 when spending E.F.). Now, let's break down Stalker a little bit more. You don't get Whirling Hands (which is slow for meh damage), and you replace that with Assassin's Strike (1s cast time for 2.76 scale damage, or 3s cast time for 7.0 scale damage). When fast AS crits it does 5.52 scale damage which is nearly the same as when ET crits (5.8368). AS is fairly controllable with its crits, so if you think about it, fast AS is similar to having a 2nd fast ET attack. That alone would make Stalker incredibly strong compared to other EM ATs...but wait, there's more. Your Power Crash is on a longer cooldown than other ATs but that also comes with increased damage scale. Your PC will do 1.9518 scale damage compared to the regular 1.2032 scale damage (62.2% stronger AoE attack). That damage scale is the same as Slow version of Arc of Destruction (but animates in 1.8s instead of 2.7s). So sure...your AoE isn't as good as other ATs, but your ST is better than anyone elses and your one AoE attack is a faster animating version of Titan Weapon's T9 attack (same arc and radius, btw). The only Stalker AoE attacks with better DPA than Power Crash (54.8182 DPA | 108.54 base dmg) is Sweeping Strike (65.1084 | 94.5373) and Ablating Strike (61.7891 | 73.4055). That DPA is on par with Scrapper's Whirling Smash (54.7676 | 65.064)... which is impressive given Scrapper's AT modifier. Personally, I like to start a ST attack chain with Slow AS (contains hide proc which should trigger 90% of the time) and I try to re-use Fast AS every 3rd attack in hopes of high crit chance from Assassin's Focus. From the Slow AS starter, I go into the following rotation: TF (if hide proc's from Slow AS, guaranteed Double E.F.) > Fast ET > EP > Fast AS > ET (likely fast if hide proc'd previously) > EP > TF > Fast ET > Fast AS > EP > ET That's a lot of burst damage, and I can always alternate by not going with Slow AS to start but rather Hidden TF to start to guarantee a Double E.F. if I hit my target. Either way, things die quickly. For my AoE attack chain, I have a fully synergized Cross Punch ( 1.651 scale damage in 1.67s cast time) and Ball Lightning (1.02 scale damage in 1.07s cast time). I like to start with P.C. from hidden to get those crits: PC (from hide) > BL > CP > Fast AS > PC > CP > BL > Fast AS That does pretty well when I get saturated with aggro
-
Group Fly doesn't have a -ACC effect. That has been the case for a very long time, but I dont know why the description of the power was never updated to reflect that. Maybe Group Fly is just so unpopular it wasn't worth correcting the info.
-
A lot of good info in your write-up. I wanted to correct one thing and add some context to another. Stamina has a base of 25%, so Numina's 10% recovery is equivalent to a 40% enhancement. For that reason, you should say Numina > Standard SO. One way to treat these is to look at their equivalent added recovery and calculate their equivalent enhancement value: Panacea = +22.5% recovery (equivalent to 90% enhancement in stamina) Performance Shifter proc = +15% recovery (eq. 60% enhancement) Miracle = +15% recovery (eq. 60%) +5 Level 50 IO = +13.25% recovery (53% before E.D.) Level 50 IO = +10.6% recovery (42.4% before E.D.) Numina = +10% recovery (eq. 40%) Standard SO = +8.33% recovery (33.3% before E.D.) This is a perfect power to put your procs in as it is certainly weak (it's a half-Stamina + half-Health power). However, procs can only proc if the power isn't grayed out. So if you exemplar more than 5 levels below the level at which you selected PP, you will lose those procs. Just something to keep in mind when considerring slotting PP with uniques (less worried with Performance Shifter since it's not unique).
-
It's easiest to look at the math in the form of endurance per minute. In the case of Performance Shifter slotted in Stamina, it will after 1.5 procs per minute and 10% endurance per proc for an average of 15 endurance per minute. Recovery translates to endurance per second (at least when you do the math it works out that way). So 2% recovery is equivalent to 2% endurance per minute. So yes, Performance Shifter is WAY BETTER. In regards to slotting Stamina, think of it like this: Stamina is base 25% recovery (25 endurance per second). Slotting Performance Shifter is equivalent to slotting a 60% enhancement (15 end/sec divided by 25 end/sec = 0.60). So you should always slot the PS proc even if you one slot stamina. Keep in mind, a proc is random, so you might be willing to prefer lesser performance over the long run for the reliability of guaranteed recovery. So if you were to 1-slot stamina, use a +5 IO for 53% enhancement.
-
I'd be fine with that. Probably would skip PC.