Nemu
-
Posts
1424 -
Joined
-
Last visited
-
Days Won
3
Content Type
Profiles
Forums
Events
Store
Articles
Patch Notes
Everything posted by Nemu
-
You could go /energy manip if you are not into the karate cow look and prefer something a bit more low key.
-
You may have the force feedback proc enabled. click the yellow dot next to negatron slam to turn it off. You are close to perma-hasten, but not quite there, a few FF procs will get you closeer. Tactics isn't for acc, tactics is for blind and a personal preference. I tried to fit in answers to common and annoying status effects and I absolutely detest being blinded. For this build, tactics provides +to Hit which helps your snipe as well. So win/win there.
-
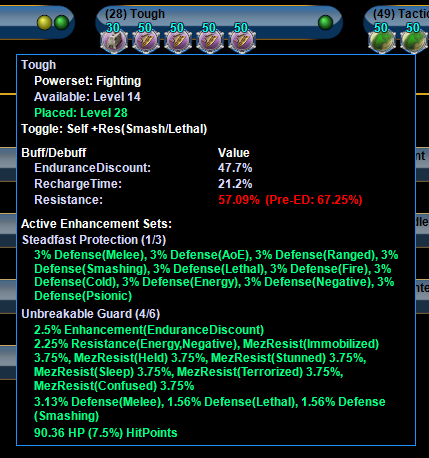
It does not need accuracy, but I think you will find the need to constantly re-toggle it back on bothersome enough that the power doesn't need additional slotting I tend to priority on range defense first still on melee blasters. reasoning is highlighted here: water blast/energy manipulation expensive build help - Blaster - Homecoming (homecomingservers.com) My typical setup for melee blasters focuses on Range defense S/L defense with Scorpion Shield Recharge Slow resist HP Everything else S/L defense will cover most of the melee range stuff, range defense covers everything else. Slow resist is important because a slowed/immobile melee blaster is a dead blaster, and also recharge debuffs suck. For /atomic you don't necessarily have to get S/L to softcap, beta decay can off set a few percentage points of S/L defense. But if you do go the S/L/R defense route slots will be really tight and you'll miss out on some proc opportunities. This is my sketch of the build based on your power pick decisions. This Hero build was built using Mids Reborn 3.0.4.7 https://github.com/Reborn-Team/MidsReborn Click this DataLink to open the build! Level 49 Mutation Blaster Primary Power Set: Fire Blast Secondary Power Set: Atomic Manipulation Power Pool: Speed Power Pool: Leaping Power Pool: Fighting Power Pool: Leadership Ancillary Pool: Mace Mastery Hero Profile: Level 1: Flares -- SprDfnBrr-Acc/Dmg(A), SprDfnBrr-Dmg/Rchg(15), SprDfnBrr-Acc/Dmg/EndRdx(17), SprDfnBrr-Acc/Dmg/Rchg(17), SprDfnBrr-Acc/Dmg/EndRdx/Rchg(19), SprDfnBrr-Rchg/+Status Protect(19) Level 1: Electron Shackles -- HO:Nucle(A) Level 2: Fire Ball -- Artl-Acc/Dam(A), Artl-Dam/End(3), Artl-Dam/Rech(3), Artl-Acc/Dam/Rech(5), Artl-Acc/Rech/Rng(7), Artl-End/Rech/Rng(7) Level 4: Super Speed -- BlsoftheZ-Travel/EndRdx(A), BlsoftheZ-ResKB(5), WntGif-ResSlow(47) Level 6: Positron Cell -- BslGaz-Acc/Hold(A), BslGaz-Acc/Rchg(48), Apc-Dam%(48), UnbCns-Dam%(48), Dcm-Build%(49) Level 8: Fire Breath -- Artl-Acc/Dam(A), Artl-Dam/End(9), Artl-Dam/Rech(9), Artl-Acc/Dam/Rech(11), Artl-Acc/Rech/Rng(13), Artl-End/Rech/Rng(15) Level 10: Combat Jumping -- LucoftheG-Def/Rchg+(A), Ksm-ToHit+(11) Level 12: Aim -- RctRtc-ToHit/Rchg(A), RctRtc-Pcptn(13), GssSynFr--Build%(34) Level 14: Hasten -- RechRdx-I(A), RechRdx-I(34) Level 16: Boxing -- Empty(A) Level 18: Blaze -- SprWntBit-Acc/Dmg(A), SprWntBit-Acc/Dmg/EndRdx(37), SprWntBit-Acc/Dmg/Rchg(39), SprWntBit-Dmg/EndRdx/Acc/Rchg(39), SprWntBit-Rchg/SlowProc(39) Level 20: Metabolic Acceleration -- PreOptmz-Acc/Rech(A), PreOptmz-EndMod/End(21), PreOptmz-EndMod/Rech(21), PreOptmz-EndMod/Acc/End(23), PreOptmz-EndMod/Acc/Rech(33), PreOptmz-EndMod/End/Rech(33) Level 22: Tough -- StdPrt-ResDam/Def+(A), GldArm-3defTpProc(23) Level 24: Weave -- LucoftheG-Def/Rchg+(A), ShlWal-Def/EndRdx(25), ShlWal-Def(25), ShlWal-ResDam/Re TP(27) Level 26: Blazing Bolt -- StnoftheM-Acc/Dmg(A), StnoftheM-Dmg/EndRdx(27), StnoftheM-Acc/ActRdx/Rng(29), StnoftheM-Dmg/EndRdx/Rchg(29), StnoftheM-Dam%(33) Level 28: Atom Smasher -- SprAvl-Acc/Dmg(A), SprAvl-Dmg/EndRdx(34), SprAvl-Acc/Dmg/EndRdx(36), SprAvl-Acc/Dmg/EndRdx/Rchg(37), SprAvl-Rchg/KDProc(37), FuroftheG-ResDeb%(47) Level 30: Maneuvers -- LucoftheG-Def/Rchg+(A), Rct-Def(31), Rct-Def/EndRdx(31), Rct-ResDam%(31) Level 32: Inferno -- SprBlsWrt-Acc/Dmg(A), SprBlsWrt-Dmg/Rchg(40), SprBlsWrt-Acc/Dmg/Rchg(40), SprBlsWrt-Acc/Dmg/EndRdx(43), SprBlsWrt-Acc/Dmg/EndRdx/Rchg(43), SprBlsWrt-Rchg/Dmg%(46) Level 35: Scorpion Shield -- LucoftheG-Def/Rchg+(A), LucoftheG-Def/EndRdx(36), LucoftheG-Def(36) Level 38: Ionize -- RctRtc-ToHit/Rchg(A), RctRtc-ToHit(40) Level 41: Rain of Fire -- Artl-Dam/End(A), Artl-Dam/Rech(42), Artl-Acc/Dam/Rech(42), Ann-Dmg/Rchg(42), Ann-ResDeb%(43) Level 44: Negatron Slam -- SprBlsCol-Acc/Dmg(A), SprBlsCol-Dmg/EndRdx(45), SprBlsCol-Acc/Dmg/EndRdx(45), SprBlsCol-Dmg/EndRdx/Acc/Rchg(45), SprBlsCol-Rchg/HoldProc(46), FrcFdb-Rechg%(46) Level 47: Tactics -- HO:Cyto(A) Level 49: Beta Decay -- AchHee-ResDeb%(A) Level 1: Brawl -- Empty(A) Level 1: Defiance Level 1: Sprint -- UnbLea-Stlth(A) Level 2: Rest -- Empty(A) Level 2: Swift -- Run-I(A) Level 2: Health -- Pnc-Heal/+End(A) Level 2: Hurdle -- Jump-I(A) Level 2: Stamina -- PrfShf-End%(A) Level 49: Quick Form ------------ If you have mastered movement you can absolutely take advantage of your melee attacks without needing S/L defense. I built a dark/atomic this way and picked up leviathan so I can use both POSI fist and Knockout blow. The knockdown in Dark's umbral Torrent helps with setting up opportunities to go in, you could potentially use rain of fire to a similar effect.
-
You can get temp jetpacks from the P2W vendor, they are quite cheap and will last you a long time. I consider the ability to stealth through mobs more important and practical than having to turn on fly every once in a while to get some vertical. I wouldn't ditch beta decay, but I would defer the pick until much later. Here is the real tip I'm going to give you. This has nothing to do with builds. Learn to embrace the strengths of blaster secondaries, in this case the fact that /atomic encourages you to melee. Learn how and when to use those powers. You can hide behind range blasting/hover and play a sentinel wannabe with 1/4 the protection or you can learn to really play a blaster and be a force to be reckoned with. If you can play a hyper aggressive melee blaster successfully, then chances are you would have more mastery of this game and fundamentals than 90% of people that play it.
-
Beta decay is not doing much for you then and I doubt taking it that early give you any benefit when you exemp down Hasten has 3 slots, 2 50+5 IO is enough You don't need fire blast and flares, pick one and dump the other Posi cell can be proc monstered. Put a Kismet ACC in combat jumping or another defense toggle that's always on so you have 95% chance to hit vs +4s Super speed instead of super jump for full invis with a stealth IO in sprint If you plan to exemp down at all your power selection can be tuned a little better with more attacks, there's no need to grab weave by level 22 There is no reason not to find ways to fit in both +res uniques from reactive defense and shield wall You have the blasters wrath ATO but no defiant barrage. Both Blaster ATOS are very good and you should find ways to 6 sloth both I'd try to fit the -res procs in, there are ways to get range softcap and still fit those in and proc monster posi cell.
-
10
-
What's your game plan with this build? Shoot from range? How do you plan to use your melee stuff? Are those just mules for set bonuses or do you actually intend to use them?
-
Form of the soul has an endurance discount buff and that allows you to sustain WW with regen's quick recovery. I tried it on my elec/regen brute and WW sucked my end dry, so quick recovery by itself is not enough.
-
The wintery effects comes from the procs and I don't see any reason to 6 slot any winter set in your build, 5 is enough, and then you can omit the proc. Skip Shout - it's terrible, long root time, slow damage delivery, mediocre damage compared to other hard hitters. you are better of proc monstering echo chamber I offered my take on Sonic/Sonic in this thread How to make a tougher solo 50 blaster? - Blaster - Homecoming (homecomingservers.com)
-
As with the beam/temp thread I have the same comments about your posted build. It lacks focus It wastes slots on set bonuses that don't contribute to your goal of shoring up range defense Do the same exercise I asked @Galamane to do, evaluate each power you slot, gut the sets that don't contribute to your goal and replace them with ones that do, if possible. Pay attention to slotting efficiency, refer to my comparison of Thunderstrike Vs Artillery Vs Blessing of Zephyr. Don't try to do too much all at once, do one thing and focus on it, chances are you will end up well above range softcap that way, then you can cut back to slide in recharge bonuses and whatever else. Few other suggestions on power picks since you want to play ranged. Take fire breath, it does a lot of damage, and you can use another ranged AoE option. Combustion has a bigger radius than fire sword circle and allows you to hover at the edge of melee range and still tag a few mobs, but you might be better off dropping fire sword circle and combustion all together based on your game plan. Panacea +end/+hp is better than any other health unique for end recovery, put that in health.
-
I forgot the thing takes 2 seconds to cast, yuck. Sure, if you have absolutely no other powers to sink those procs in I suppose you can slot cage that way. But there are better options in the secondary or even hero epics if we look at a complete build.
-
10 second recharge on TC no? I don't think it'll be all that great since most procs are 3.5ppm. 16s/20s are the sweet spots for proc monster holds.
-
There is no better time than now to make your own thread, post your build, and get feedback/help on it. Take the principles I discussed in the beam/temp thread and apply them, do your best, and then we can fine tune. Make the effort, reap the rewards.
-
Good. It's footstomp minus the knockup and you don't need to be close to the ground to use it despite the animation. Add Avalanche+proc for the authentic footstomp feels.
-
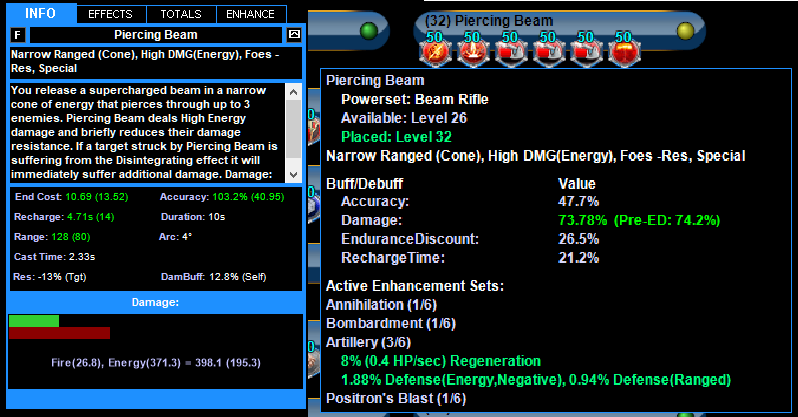
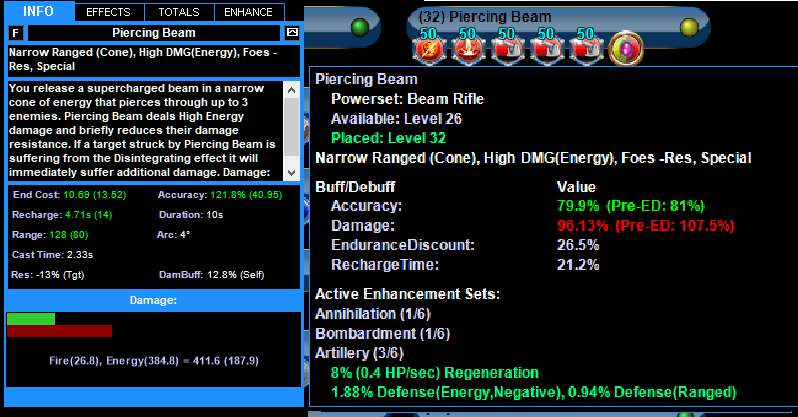
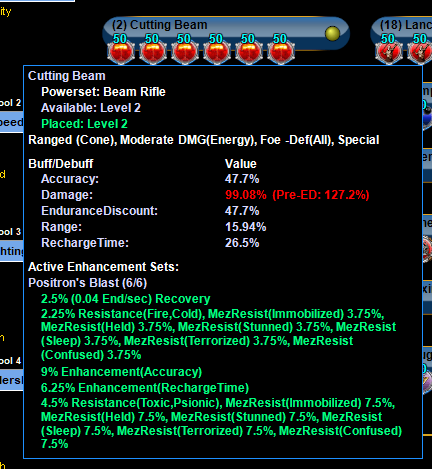
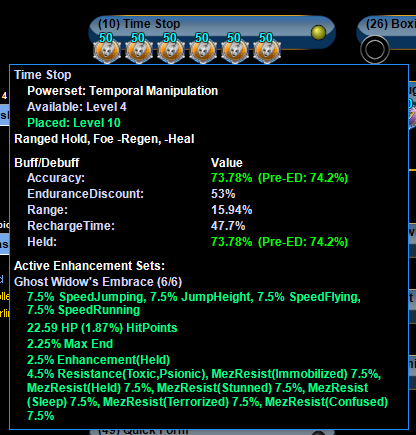
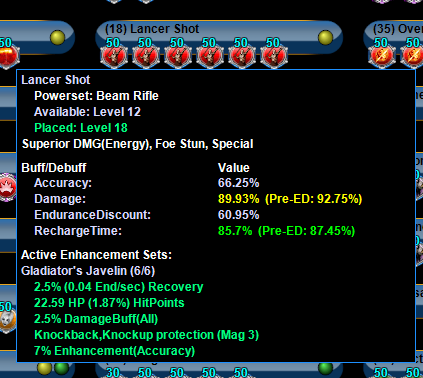
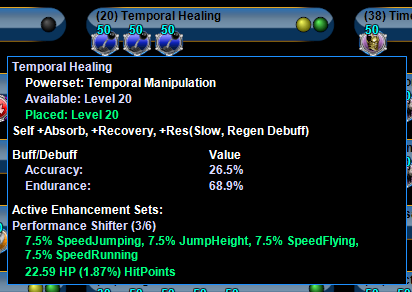
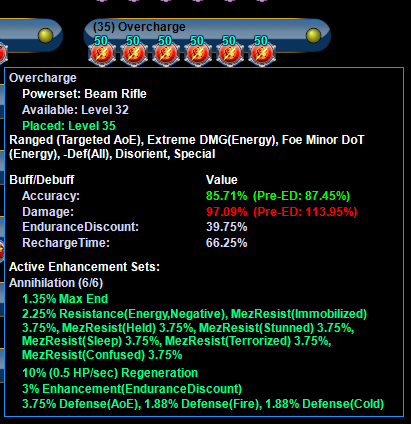
Fair point, you are applying the idea of stacking bonuses with adjusted targeting. Blasters have defiance which adds a damage bonus with each attack. This combo can also rotate build up and aim every 30 seconds. I don't see the value of building for damage bonuses or taking assault on most blasters, they already do enough damage and they can do it fairly fast. If I were to prioritize set bonuses it would rank this way: 1 - Defense: survival is significantly augmented by this more than any other stat 2 - Recharge: should not need explanation, powers recharging faster means you can nuke more, aim/build up more, etc... 3 - Slow resist: Slowed/immobile blaster is a dead blaster, and things that debuff your recharge make you a useless blaster. Don't skimp on slow resist. 4 - HP: Every bit helps Melee players love to stack resists, it's meaningless here. Low AT resist cap + lower HP means the incredible lengths that you can go to stack resists to reach S/L cap or whatever still gets you 3 shot rather than 2 shot. If you get some resist bonuses on within a set that has a more meaningful set bonus that you are chasing great, otherwise don't go out of your way to chase them. Your current build only has 3 Luck of the Gambler 7.5% global recharge IOs. Per the rule of 5 you can have 2 more. If you threw a slot in afterburner/evasive manuevers you can slot an LOTG 7.5, and if you replace assault with vengeance that's another LOGT 7.5. 15% global recharge is way more bang for the buck than 14% global damage and an additional .3 end/sec drain with assault. Penetrating Ray does knockback. Anytime a power does knockdown/back and has a base recharge longer than 10 seconds you should be thinking force feedback proc. This is one of the few powers in the build that you can slot it and you should do so. The decimation build up proc can go into the last slot for lancer shot. It won't trigger all the time but it's nice when it does and will give you a 5 second damage boost. Blasters can still attack with their T1/T2 powers when mezzed, and the defiant barrage ATO has a status protect proc. I would slot Single Shot with the superior defiant barrage set so you can use it to trigger the proc when you are mezzed. The other school of thought is to slot it in an AOE so you can alphas stoke with it and get a lot of procs. But you can net 4% range defense from targeted AoEs with artillery compared to the 2.5% that defiant barrage gives you. Disintegrate is pure damage over time. I'd put the blasters wrath set there for some up front proc damage. Piercing beam is a ranged AoE which takes artillery and you can make up for last range defense with that and get more range bonuses out of that slotting I'd also move the Guassian's build up proc in aim, that will allow you to punch through paragon protector Moment of Glory or Nemesis vengeance. That'll put you here: This Hero build was built using Mids Reborn 3.0.4.7 https://github.com/Reborn-Team/MidsReborn Click this DataLink to open the build! BeamTime: Level 50 Technology Blaster Primary Power Set: Beam Rifle Secondary Power Set: Temporal Manipulation Power Pool: Flight Power Pool: Speed Power Pool: Fighting Power Pool: Leadership Ancillary Pool: Mu Mastery Hero Profile: Level 1: Single Shot -- SprDfnBrr-Acc/Dmg(A), SprDfnBrr-Dmg/Rchg(3), SprDfnBrr-Acc/Dmg/Rchg(3), SprDfnBrr-Acc/Dmg/EndRdx(5), SprDfnBrr-Acc/Dmg/EndRdx/Rchg(5), SprDfnBrr-Rchg/+Status Protect(25) Level 1: Time Wall -- Thn-Acc/Dmg(A) Level 2: Cutting Beam -- AchHee-ResDeb%(A), TchofLadG-%Dam(7), Bmbdmt-+FireDmg(9), Ann-ResDeb%(9), Bmbdmt-Dam(11), HO:Nucle(11) Level 4: Fly -- BlsoftheZ-Travel/EndRdx(A), BlsoftheZ-ResKB(7) Level 6: Disintegrate -- SprBlsWrt-Acc/Dmg(A), SprBlsWrt-Dmg/Rchg(17), SprBlsWrt-Acc/Dmg/Rchg(17), SprBlsWrt-Acc/Dmg/EndRdx(19), SprBlsWrt-Acc/Dmg/EndRdx/Rchg(19), SprBlsWrt-Rchg/Dmg%(21) Level 8: Aim -- RechRdx-I(A), GssSynFr--Build%(29) Level 10: Time Stop -- SprEnt-Acc/Hold(A), SprEnt-Hold/Rchg(13), SprEnt-Acc/Hold/End(13), SprEnt-Acc/Hold/End/Rchg(21), SprEnt-Rchg/AbsorbProc(25) Level 12: Chronos -- RechRdx-I(A) Level 14: Hover -- LucoftheG-Def/Rchg+(A), BlsoftheZ-Travel/EndRdx(15), BlsoftheZ-ResKB(15), Ksm-ToHit+(29) Level 16: Hasten -- RechRdx-I(A), RechRdx-I(31) Level 18: Lancer Shot -- Apc-Dmg(A), Apc-Acc/Dmg/Rchg(31), Apc-Acc/Rchg(31), Apc-Dmg/EndRdx(33), Apc-Dam%(33), Dcm-Build%(37) Level 20: Temporal Healing -- NmnCnv-Heal/EndRdx(A), NmnCnv-EndRdx/Rchg(34), NmnCnv-Heal/Rchg(34), NmnCnv-Heal/EndRdx/Rchg(47), NmnCnv-Heal(47), NmnCnv-Regen/Rcvry+(49) Level 22: Afterburner -- BlsoftheZ-Travel/EndRdx(A), BlsoftheZ-ResKB(23), LucoftheG-Def/Rchg+(27) Level 24: Penetrating Ray -- StnoftheM-Acc/Dmg(A), StnoftheM-Dam%(33), StnoftheM-Dmg/EndRdx(34), StnoftheM-Acc/ActRdx/Rng(36), StnoftheM-Dmg/EndRdx/Rchg(36), FrcFdb-Rechg%(36) Level 26: Boxing -- Empty(A) Level 28: Tough -- StdPrt-ResDam/Def+(A), RctArm-ResDam/EndRdx/Rchg(37), RctArm-ResDam(37), RctArm-ResDam/EndRdx(39) Level 30: Weave -- LucoftheG-Def/Rchg+(A), ShlWal-Def/EndRdx(39), ShlWal-Def(40), ShlWal-ResDam/Re TP(40) Level 32: Piercing Beam -- Artl-Acc/Dam(A), Artl-Dam/End(40), Artl-Dam/Rech(43), Artl-Acc/Dam/Rech(43), Artl-Acc/Rech/Rng(43), Artl-End/Rech/Rng(45) Level 35: Overcharge -- Artl-Acc/Dam(A), Artl-Dam/End(45), Artl-Dam/Rech(45), Artl-Acc/Dam/Rech(46), Artl-Acc/Rech/Rng(46), Artl-End/Rech/Rng(46) Level 38: Time Lord -- GldArm-3defTpProc(A) Level 41: Charged Armor -- Ags-ResDam/EndRdx(A), Ags-Psi/Status(42), Ags-ResDam(42), Ags-ResDam/Rchg(42) Level 44: Maneuvers -- LucoftheG-Def/Rchg+(A), Rct-Def(48), Rct-Def/EndRdx(48), Rct-ResDam%(48) Level 47: Tactics -- EndRdx-I(A) Level 49: Vengeance -- LucoftheG-Def/Rchg+(A) Level 1: Defiance Level 1: Brawl -- Empty(A) Level 1: Sprint -- Empty(A) Level 2: Rest -- Empty(A) Level 2: Swift -- Empty(A) Level 2: Hurdle -- Empty(A) Level 2: Health -- Prv-Absorb%(A), Mrc-Rcvry+(23), Pnc-Heal/+End(50) Level 2: Stamina -- PrfShf-End%(A), PrfShf-EndMod(27) Level 49: Quick Form Level 1: Disintegrating ------------ I played around slots even more after this point and my final version is below: This Hero build was built using Mids Reborn 3.0.4.7 https://github.com/Reborn-Team/MidsReborn Click this DataLink to open the build! BeamTime: Level 50 Technology Blaster Primary Power Set: Beam Rifle Secondary Power Set: Temporal Manipulation Power Pool: Flight Power Pool: Speed Power Pool: Fighting Power Pool: Leadership Ancillary Pool: Mu Mastery Hero Profile: Level 1: Single Shot -- SprDfnBrr-Acc/Dmg(A), SprDfnBrr-Dmg/Rchg(3), SprDfnBrr-Acc/Dmg/Rchg(3), SprDfnBrr-Acc/Dmg/EndRdx(5), SprDfnBrr-Acc/Dmg/EndRdx/Rchg(5), SprDfnBrr-Rchg/+Status Protect(25) Level 1: Time Wall -- Thn-Acc/Dmg(A), Thn-Dmg/EndRdx(11), Thn-Acc/Dmg/Rchg(13), Thn-Acc/Dmg/EndRdx(13), Thn-Dmg/Rchg(15), Thn-Dmg/EndRdx/Rchg(25) Level 2: Cutting Beam -- AchHee-ResDeb%(A), Bmbdmt-+FireDmg(7), Artl-Acc/Dam(7), Artl-Dam/End(9), Artl-Acc/Dam/Rech(9), TchofLadG-%Dam(11) Level 4: Fly -- WntGif-ResSlow(A) Level 6: Disintegrate -- SprBlsWrt-Acc/Dmg(A), SprBlsWrt-Dmg/Rchg(17), SprBlsWrt-Acc/Dmg/Rchg(17), SprBlsWrt-Acc/Dmg/EndRdx(19), SprBlsWrt-Acc/Dmg/EndRdx/Rchg(19), SprBlsWrt-Rchg/Dmg%(21) Level 8: Aim -- GssSynFr--Build%(A) Level 10: Time Stop -- BslGaz-Acc/Hold(A), BslGaz-Acc/Rchg(21), BslGaz-EndRdx/Rchg/Hold(23), BslGaz-Acc/EndRdx/Rchg/Hold(23) Level 12: Chronos -- RechRdx-I(A) Level 14: Hover -- LucoftheG-Def/Rchg+(A), BlsoftheZ-Travel/EndRdx(27), BlsoftheZ-Travel(29), Ksm-ToHit+(29) Level 16: Hasten -- RechRdx-I(A), RechRdx-I(31) Level 18: Lancer Shot -- Apc-Dmg(A), Apc-Acc/Dmg/Rchg(31), Apc-Acc/Rchg(31), Apc-Dmg/EndRdx(33), Apc-Dam%(33), Dcm-Build%(33) Level 20: Temporal Healing -- PreOptmz-Acc/Rech(A), PreOptmz-EndMod/End(34), PreOptmz-EndMod/Rech(34), PreOptmz-EndMod/Acc/End(47), PreOptmz-EndMod/Acc/Rech(47), PreOptmz-EndMod/End/Rech(49) Level 22: Afterburner -- BlsoftheZ-Travel/EndRdx(A), BlsoftheZ-ResKB(39), LucoftheG-Def/Rchg+(49) Level 24: Penetrating Ray -- StnoftheM-Acc/Dmg(A), StnoftheM-Dmg/EndRdx(34), StnoftheM-Acc/ActRdx/Rng(36), StnoftheM-Dmg/EndRdx/Rchg(36), StnoftheM-Dam%(36), FrcFdb-Rechg%(37) Level 26: Boxing -- Empty(A) Level 28: Tough -- RctArm-ResDam/EndRdx(A), RctArm-ResDam/EndRdx/Rchg(37), RctArm-ResDam(37) Level 30: Weave -- LucoftheG-Def/Rchg+(A), ShlWal-Def/EndRdx(39), ShlWal-Def(40), ShlWal-ResDam/Re TP(40) Level 32: Piercing Beam -- Ann-ResDeb%(A), Bmbdmt-+FireDmg(39), Artl-Acc/Dam(40), Artl-Dam/End(43), Artl-Acc/Dam/Rech(43), HO:Nucle(43) Level 35: Overcharge -- Artl-Acc/Dam(A), Artl-Dam/End(45), Artl-Dam/Rech(45), Artl-Acc/Dam/Rech(46), Artl-Acc/Rech/Rng(46), Artl-End/Rech/Rng(46) Level 38: Time Lord -- GldArm-3defTpProc(A), UnbGrd-Max HP%(45) Level 41: Charged Armor -- RctArm-ResDam/EndRdx(A), RctArm-ResDam/EndRdx/Rchg(42), RctArm-ResDam(42), StdPrt-ResDam/Def+(42) Level 44: Maneuvers -- LucoftheG-Def/Rchg+(A), Rct-Def(48), Rct-Def/EndRdx(48), Rct-ResDam%(48) Level 47: Tactics -- EndRdx-I(A) Level 49: Vengeance -- LucoftheG-Def/Rchg+(A) Level 1: Defiance Level 1: Brawl -- Empty(A) Level 1: Sprint -- Empty(A) Level 2: Rest -- Empty(A) Level 2: Swift -- Empty(A) Level 2: Hurdle -- Empty(A) Level 2: Health -- Prv-Absorb%(A), Pnc-Heal/+End(50) Level 2: Stamina -- PrfShf-End%(A) Level 1: Disintegrating Level 49: Quick Form Level 50: Musculature Radial Paragon ------------ You can see I made some significant changes in the slotting. My rationale was that the annihilation -res proc might be better in piercing beam, which is a power I'd use more against AV/GM/hard targets than cutting beam. And that began a cascade reaction that shuffled slotting and the result netted me even more global recharge. If you want to keep the Numina in the sustain stick with the above build. I don't think slotting it for heal/absorb will have any significant impact on survival. People get crazy about heals though, and they do silly things like slot an attack that happens to heal like a heal that happens to do damage or just as a heal. Slotting the sustain with pre-emptive will take care of your end problems which means you can remove the miracle and the extra end mod in stamina and put the elsewhere. Note the nucleus hami O I put in Piercing beam. It was between that and a damage proc. This is where you need to pay attention to detail. Putting a proc in there and turning it one shows average damage of 398.1, but putting a hami-O in there bumps up the damage to 411. Procs are not always better. Look at the numbers whenever you slot a proc and compare the number to the alternatives. Vs We are done for now. I hope both you and @Elia87 and whoever else reading this apiring to make their own builds have learned something. I'm happy to offer my take on builds when you present one and ask for advice. However, builds are only 10-20% of what makes blasters truly successful, especially melee blasters. The rest is understanding of the game, knowing when and where to move, and some skill. If you want to learn how to be the most badass blaster you can be I can help too. @Nemu and I have Jezebel on Torch, Everlasting, Excelsior and Indom.

-
Best blapper is the one you play or anything/anything... yeah... with that out of the way here's my breakdown. For the context of this post when I say mitigation I refer to sustainable mass mitigation, as that is better suited for +4/8 mob density than single target control. I don't consider the 90 second base recharge mez powers sustainable mass mitigation, and I never take those unless they are a REALLY good mule for set bonuses. (i.e. confuse/accurate to hit debuff) I don't need to elaborate on Fire/Elec. It's been a sleeper for a while but I've seeing more of them in the field. It's the best combination of speed/damage, mitigation and utility, no other combo can compare. /Ice and /Martial are fine choices as well. The slow/fear aura is very effective and often underestimated (AND you don't need to retoggle it when mezzed, unlike hotfeet) and they both have a good mix of ST and AoE offense plus mitigation. The only thing I don't like about martial is the inability to slot reach for the limit, that's a quick 1.88% S/L bonus denied. Haven't leveled /temp high enough. It's got loads of slow resist and a recharge bonus so there's that. 2 ST attacks and a PBAoE means it's a decent melee blasting secondary. I wouldn't put it above Elec, Ice/or Martial though because it doesn't have the level of mitigation those sets have. The slow resist I can get through winters and I'd most likely overcap on slow resist even on temp because my builds will end up using a few winter sets anyway to get the numbers I want. /Mental is a contender now with the rework. The hard part will be building for perma drain psyche while trying to fit in all the other bonuses I usually aim for. It'll be in the same tier as temp due to the lack of mitigation. /Fire lacks mitigation and what little it has comes too late and is unreliable. I'd like the set to have another ST attack although I often treat burn that way. (pro tip you can joust burn but only the upfront damage portion will hit) I don't like hotfeet, it's hot garbage for the end cost, the level you get it, and the detoggle. I do like combustion's radius, even with it's animation time and I prefer it over fire sword circle, I'm weird. /Sonic is also middle of the road. I'd rather they put the -res aura in the sustain slot and just make it the sustain. All attacks can hold but it never amounts to much. I can catch maybe 2 minions with the PBAoE and the single target attacks will proc every once in a blue moon to targets that need to be held, so the mitigation potential isn't that great. The sleep protection granted by the sustain is good though, it's one of the better status protections granted by a sustain. If you always have the support of the team to take care of your survival this has a lot of proc monster potential that can push it higher. /Ninja is ok. great for theme, middle of the road on performance. The PbAoE in /Ninja has a tiny radius and that needs to be fixed. Crit mechanic does make me feel giddy when it procs. I have a dark/rad blaster, only reason I made it is to take posi fist AND knockout blow. /Rad looks good on paper but the long animations are disappointing. I do not like detoggleable auras on blasters. that's one more thing I need to manage and I'd rather shoot and punch stuff. I can get the recharge buff through active use of powers that grant me the FF proc, I don't need something that 1 - I need to constantly toggle back on when I get mezzed, 2 - Saturate myself with mobs to get the most benefit. Blasters are not tanks, weaving in and out of combat should be second nature, and when you do that you won't get the full benefit of the aura. At least it has a 15 feet radius and the sustain is one of the better ones. /Plant is ok, Nothing spectacular from a melee blasting perspective. The -regen will be appealing to some but I find it inconsequential and extremely situational and not a compelling reason to pick plant or /temp (/mental is another matter). Thorn bust does have a nice radius and joins the ranks of Combustion, Deafening wave and Psi showckwave. I like PBAoEs with 15 feet radius. /Energy lacks AoE and therefore lacks versatility. It's a good secondary, just not my first pick for a melee blaster. I do recommend it however as the most optimal pairing for electric blast if you want to sap. /Dark suffers from setup and scale. Soul drain is nice when you can feed it, the fact that you need to fire that off first to get the damage buff means you are going to have to skip to the next group to do some real damage on steamrolling teams or worse, someone uses fold space and you get minimal or no buff for the next 30 seconds. I prefer popping build up or aim on my way to the spawn so I can blow them up immediately. It's got good single target attacks but lacks a good sized AoE and mitigation. I think most people will rank it higher than I do but this is my list. /Devices has trip mine! and Time bomb, and taser! /Tactical arrow is for Rambo pandas.
-
Do you wish to play at range because you truly believe you can't survive in melee or because you wish to play a ranged blaster out of principle/concept? /Fire doesn't do anything for ranged blasters. and Ignoring your entire secondary is a pretty bad investment as there are better secondaries that cater to pure ranged play. Good melee blasters are a force to be reckoned with. But they take a bit more skill and effort to play compared to melee ATs.
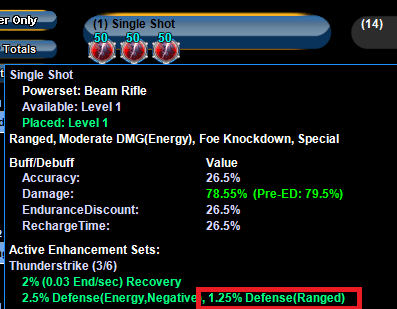
-
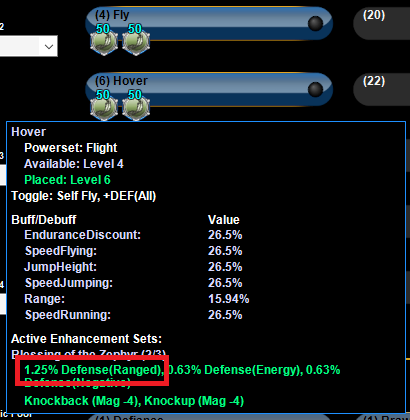
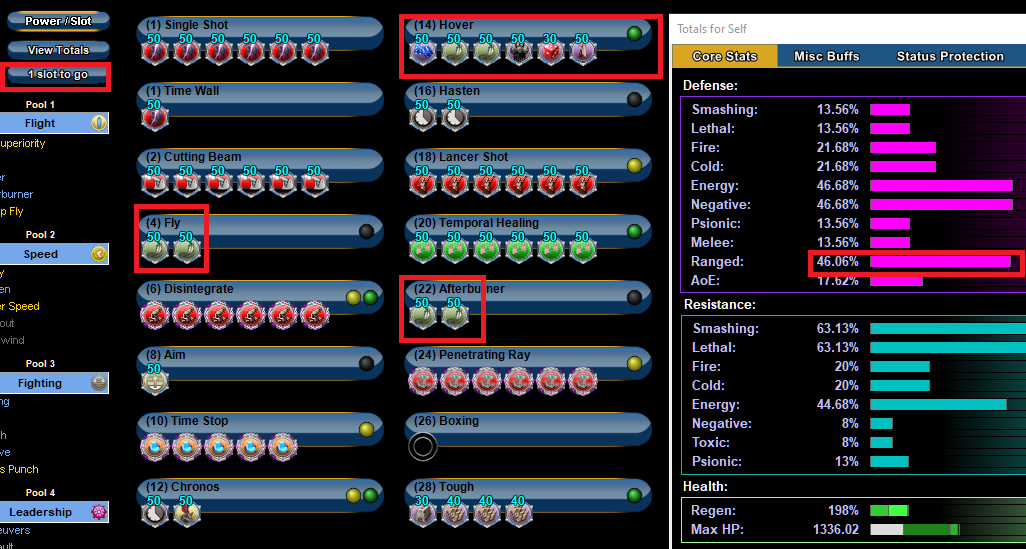
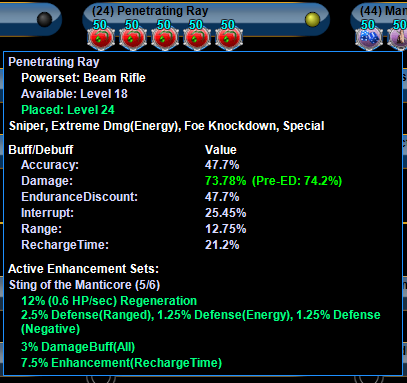
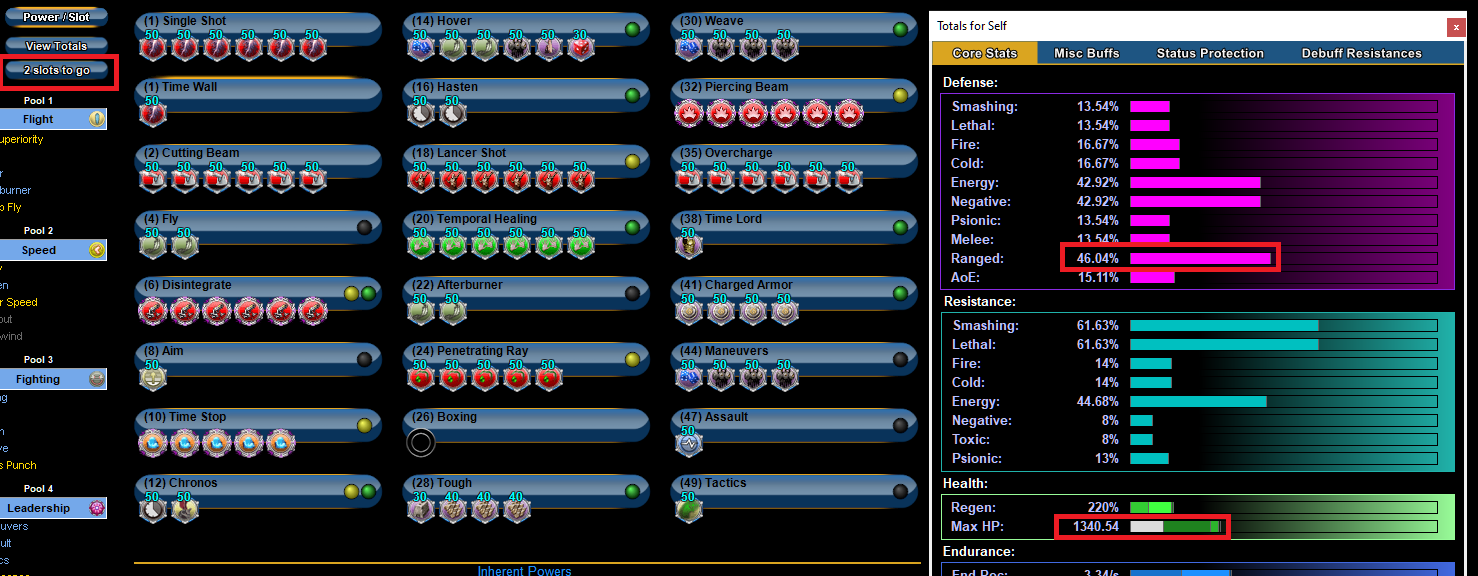
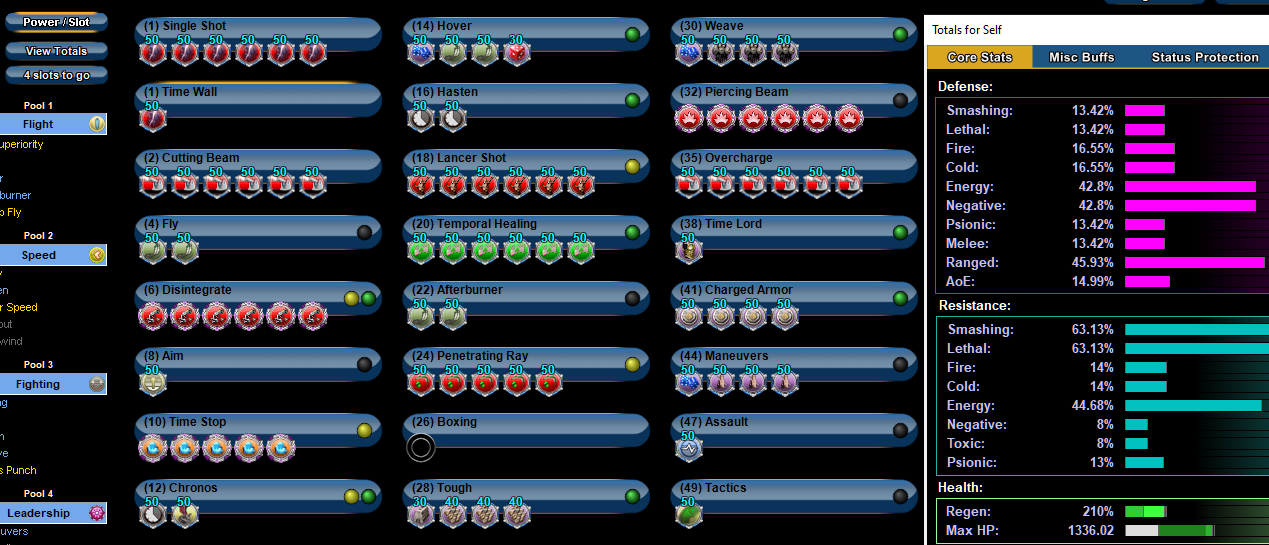
The PVP IO set in lancer shot is still an eyesore though, it doesn't benefit you in ANY meaningful way other than the KB protection, which you can get through blessing of zephyr which is MUCH cheaper. Penetrating ray is 6 slotted with the winter IO set and the last slot again, doesn't give you any benefit, AT ALL. You got what you needed with the 5th slot, you could have used the 6th for a damage proc or allocated that slot elsewhere. But anyway you got to the range softcap. It's much better than what you started out with, and I hope that exercise taught you how to focus your set bonuses and the importance of not wasting slots on bonuses you don't need. Now's comes the part that you can spend a lot more time on - optimization. Optimization is all about figuring out what's the most efficient way to get the bonuses you need so you can free up slots for your secondary goals. Take for example 6 pieces of thunderstrike vs 6 pieces of artillery Thunderstrike - 3.75% range defense at 6 pieces Artillery - 4.07% range defense at 6 pieces Artillery is more efficient than Thunderstrike because it give more range defense for the same number of slots Now we compare Thunderstrike or artillery to Blessing of Zephyr Thunderstrike - 1.25% range defense at 3 slots, 3.75% range defense at 6 slots, for a total of 5 invested slots Artillery - 0.94% range defense at 3 slots, 4.07% range defense at 6 slots, for a total of 5 invested slots Blessing of Zephyr - 1.25% range defense at 2 slots, for a total of 1 invested slot The good thing about thunderstrike and artillery is that you CAN stop at 3 slots and still get some range defense. However if I only have 2 slots available to play with, I can add both slots to a single slotted attack for 1.25% range defense, or I can add one slot each to 2 single slotted travel powers for 2.5% range defense. One option is more efficient than the other. VS x2 Optimization is all about slotting efficiency. How do you reach your goal with the least amount of invested slots? I took the last build and removed all the slots from Time Wall and put them into the travel powers This still allows you to hit the softcap AND it freed up one slot, which you can put into afterburner/evasive manuevers for another Luck of the Gambler 7.5%, because we all love recharge. You don't need time wall slotted fully for damage, chances are it won't see much use anyway. Penetrating ray is next. The winter's bite set gives 2.5 range defense at 5 slots and can be slotted into any ranged attack including snipes. Penetrating ray is a snipe, Sting of the Manticore gives 2.5 defense AND 7.5% global recharge at 5 slots and can only be slotted in snipes. Which one is better? vs The two unique resist procs in hover are next. You copied someone else's build and slotted those without thinking why they did it that way or if it even makes sense. You are already slotting weave and maneuvers with defense sets, wouldn't it make more sense to put them in those powers to reap the benefits of their set bonuses AND SAVE TWO SLOTS? Two slots is worth sacrificing 4 hp and less than .1% range defense for. Vs When you turn Manuevers on you will have 49% defense, 4% more than the softcap, this means we can start cutting back on some of the set bonuses we built up and allocate them to other bonuses. 4% range defense is equal to the defense a full set of artillery gives you, We can start examining our options there. Cutting Beam is a good candidate, it debuffs defense which makes it a good power to fine tune because we can fit an Achilles -res proc in. besides the proc you have a few options, you can chase recharge bonuses or try to fit in more procs. Your recharge is already pretty good with Hasten 7 seconds away from perma, and enhancing the attack with recharge enhancements cut down the chances that the procs will go off. I'd go the proc route Lancer shot is still an eyesore. That set has nothing to offer this build. You are already at the range softcap, so you can splurge and put an apocalypse set in there for 10% global recharge AND save another slot. This is where we are at now after the first round of fine tuning This Hero build was built using Mids Reborn 3.0.4.7 https://github.com/Reborn-Team/MidsReborn Click this DataLink to open the build! BeamTime: Level 50 Technology Blaster Primary Power Set: Beam Rifle Secondary Power Set: Temporal Manipulation Power Pool: Flight Power Pool: Speed Power Pool: Fighting Power Pool: Leadership Ancillary Pool: Mu Mastery Hero Profile: Level 1: Single Shot -- Thn-Acc/Dmg(A), Thn-Acc/Dmg/Rchg(3), Thn-Dmg/Rchg(3), Thn-Dmg/EndRdx(5), Thn-Acc/Dmg/EndRdx(5), Thn-Dmg/EndRdx/Rchg(25) Level 1: Time Wall -- Thn-Acc/Dmg(A) Level 2: Cutting Beam -- AchHee-ResDeb%(A), TchofLadG-%Dam(7), Bmbdmt-+FireDmg(9), Ann-ResDeb%(9), Bmbdmt-Dam(11), HO:Nucle(11) Level 4: Fly -- BlsoftheZ-Travel/EndRdx(A), BlsoftheZ-ResKB(7) Level 6: Disintegrate -- SprDfnBrr-Acc/Dmg(A), SprDfnBrr-Dmg/Rchg(17), SprDfnBrr-Acc/Dmg/Rchg(17), SprDfnBrr-Acc/Dmg/EndRdx(19), SprDfnBrr-Acc/Dmg/EndRdx/Rchg(19), SprDfnBrr-Rchg/+Status Protect(21) Level 8: Aim -- ToHit-I(A) Level 10: Time Stop -- SprEnt-Acc/Hold(A), SprEnt-Hold/Rchg(13), SprEnt-Acc/Hold/End(13), SprEnt-Acc/Hold/End/Rchg(21), SprEnt-Rchg/AbsorbProc(25) Level 12: Chronos -- RechRdx-I(A), GssSynFr--Build%(27) Level 14: Hover -- LucoftheG-Def/Rchg+(A), BlsoftheZ-Travel/EndRdx(15), BlsoftheZ-ResKB(15), Ksm-ToHit+(29) Level 16: Hasten -- RechRdx-I(A), RechRdx-I(31) Level 18: Lancer Shot -- Apc-Dmg(A), Apc-Acc/Dmg/Rchg(31), Apc-Acc/Rchg(31), Apc-Dmg/EndRdx(33), Apc-Dam%(33) Level 20: Temporal Healing -- NmnCnv-Heal/EndRdx(A), NmnCnv-EndRdx/Rchg(34), NmnCnv-Heal/Rchg(34), NmnCnv-Heal/EndRdx/Rchg(47), NmnCnv-Heal(47), NmnCnv-Regen/Rcvry+(49) Level 22: Afterburner -- BlsoftheZ-Travel/EndRdx(A), BlsoftheZ-ResKB(23) Level 24: Penetrating Ray -- StnoftheM-Acc/Dmg(A), StnoftheM-Dmg/EndRdx(34), StnoftheM-Acc/ActRdx/Rng(36), StnoftheM-Dmg/EndRdx/Rchg(36), StnoftheM-Dam%(36) Level 26: Boxing -- Empty(A) Level 28: Tough -- StdPrt-ResDam/Def+(A), RctArm-EndRdx(37), RctArm-ResDam(37), RctArm-ResDam/EndRdx(39) Level 30: Weave -- LucoftheG-Def/Rchg+(A), ShlWal-Def/EndRdx(39), ShlWal-Def(40), ShlWal-ResDam/Re TP(40) Level 32: Piercing Beam -- SprBlsWrt-Acc/Dmg(A), SprBlsWrt-Dmg/Rchg(40), SprBlsWrt-Acc/Dmg/Rchg(43), SprBlsWrt-Acc/Dmg/EndRdx(43), SprBlsWrt-Acc/Dmg/EndRdx/Rchg(43), SprBlsWrt-Rchg/Dmg%(45) Level 35: Overcharge -- Artl-Acc/Dam(A), Artl-Dam/End(45), Artl-Dam/Rech(45), Artl-Acc/Dam/Rech(46), Artl-Acc/Rech/Rng(46), Artl-End/Rech/Rng(46) Level 38: Time Lord -- GldArm-3defTpProc(A) Level 41: Charged Armor -- Ags-ResDam/EndRdx(A), Ags-Psi/Status(42), Ags-ResDam(42), Ags-ResDam/Rchg(42) Level 44: Maneuvers -- LucoftheG-Def/Rchg+(A), Rct-Def(48), Rct-Def/EndRdx(48), Rct-ResDam%(48) Level 47: Assault -- EndRdx-I(A) Level 49: Tactics -- AdjTrg-ToHit(A) Level 1: Defiance Level 1: Brawl -- Empty(A) Level 1: Sprint -- Empty(A) Level 2: Rest -- Empty(A) Level 2: Swift -- Empty(A) Level 2: Hurdle -- Empty(A) Level 2: Health -- Prv-Absorb%(A), Pnc-Heal/+End(50) Level 2: Stamina -- PrfShf-End%(A) Level 1: Disintegrating Level 49: Quick Form ------------ You have 5 free slots to play with now. What are you going to do with them? This is by no means fully optimized, there are still mini-eyesores. But it's a lot closer to the desired result. Making changes, realizing you can shuffle power slots elsewhere to further optimize is part of the process, and you might have to do that 2, 3, or even more times to get to a well optimized build. As with all things in life, if you put in the effort, you can reap the rewards.
-
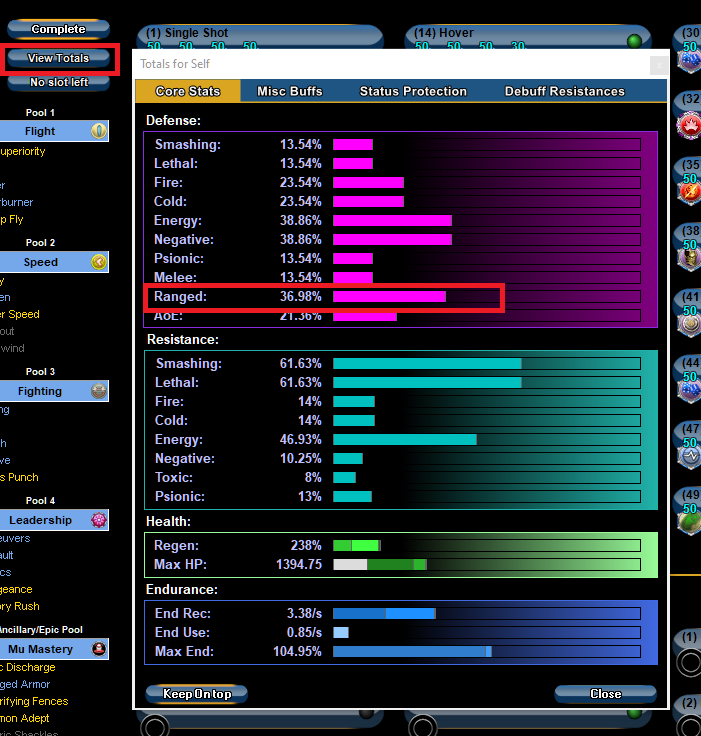
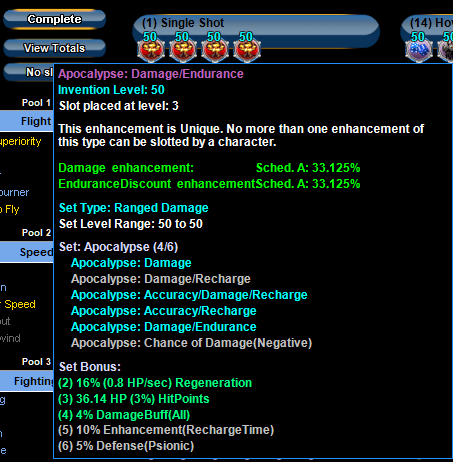
In mids hit totals then look at your numbers Are you at the 45% softcap for range defense? No. You had perfectly good slotting in your original build with a full set of thunderstrikes that gave you range defense and you gutted that slotting to make room for time wall. If you were to slot something with Apocalypse you will always want 5 slots for the recharge bonus. Look at that last bonus at 6 slots, does it align with your goals? My comments on lancer shot and overcharge remain the same. Get you range defense to 45%. then we start the next step which is squeezing in all the extra bonuses/procs.
-
I'm going to break this down so you can help yourself. When it comes to making builds you first need to decide how you want to play it and that'll help you define your goals. If you want to build for all recharge and damage and let teams cover your survival, your priorities are going to be different than if you want to hover blast and be able to hold your own. The former focuses more on recharge bonuses and the later will focus more on defense bonuses. 2nd, defense comes in 2 flavors, defense based on damage type, like smashing/lethal/fire/cold etc... and defense based on attack vector like Melee/range/AoE, If you are going to hover blast that means you plan to keep enemies at range, guess what kind of defense works best when that's your game plan? 3rd You need to have focus on the set bonuses you build for once you determine your game plan. You complain about your defense/resists, then focus on those and ignore the other set bonuses like recharge and +hp and +damage UNTIL you hit the number you want, You first rework of the build should have you evaluating each power pick and the set bonuses you slot in them. Based on your comments start with building for range defense until you can hit the softcap which is 45% Sets that are good for Range Defense are: Blessing of the Zephyr in travel powers, these are very slot efficient Thunderstrike for ranged single target attacks Mako's bite for single target melee attacks Preemptive optimization for numina in your sustain. I prefer preemptive for the slight recharge bonus. Both Blaster ATOS Artillery in your ranged AoEs As a last resort these will also offer range defense but they are not slot efficient Red Fortune Gladiator's Armor Gaussian's Going over your power picks: Do you see any range defense bonuses there? You can put thunderstrike there instead for some range defense hmm recharge and toxic resist at that 6 slot. That 4.5% toxic resist is doing a lot for you huh? Slotting a full set doesn't always mean it's the most optimal. If you wanted to keep the recharge leave it at 5 slots, or You can swap that set for Artillery for 4% range defense No range defense Waste of inf since none of the bonuses really help towards your goals. and you can get knockback protection through blessing of the zephyr This would be a good place for a set of numinas or preemptive optimization for 3.75% range defense Lol melee defense Full set artillery will get you 4% range defense Make just some of those changes and pick up charged armor and you'll have achieved your goal of being more survivable. Then we can fine-tune.
-
Please explain why you took scorpion shield when your game plan is to hover blast. What does S/L defense do for you that range defense doesn’t?
-
I made a bind to buff pets with a single key via change bind files I made macros to summon pets at my feet and then bound those macros to tray 1 slot 1 2 and 3 so I can one button summon/replace pets I also don't use all the numpad binds because there are hardly situations in this game that requires that level of micromanagement, especially now when achieving personal softcap defenses is so easy that you can eat the alpha for the pets. Of the binds I do use, I have one for petcom all attack target (often bound to my personal ST attack, one has that bound to enflame, even if enflame doesn't activate the attack command still triggers), one for petcom all follow defensive (bound to sprint), one for goto, one for follow aggressive (which I rarely use) I don't subscribe to letting pets loose doing their own thing because their AI is as stupid as stupid can be. I find focusing fire one target on a time is much more efficient, whatever AoEs are thrown here that hit additional mobs is just gravy. Doing so also ensures that the pets are where you need them for your support/buff/heals.
-
I see you are a man of taste taking AR and TA A true connoisseur of this combo will take this build in only 1 direction. i27 Rambo Build - Blaster - Homecoming (homecomingservers.com)
-
I only have 1 fire blaster, and it is the reason I came back to CoH. It's my most powerful character and I don't feel the need to do fire/anything else. I do have 4 electric blasters however, I find it more interesting to build and the set really benefits from secondaries that can supplement single target fillers. I play just as aggressively on those as I do my fire blaster but the electric blasters feel slower due to animation times and that makes my teammates happy because they can sneak in some kills. The things that draws me back to electric blast: 1 - Lazy AoE, 2 relatively fast recharging large radius AoEs that don't require a lot of positioning. 2 - End drain, I like it, especially for harder targets. 3 - It pairs well with all the melee heavy secondaries and I love to punch face.
-
Devices is the only other contender for range heavy play but trip mine does require you to get in close. I suppose you could take fold space, lay a bunch of mine and drop mobs on top of it but I don't have the patience for that kind of play, especially on fast paced teams. Playing pure range blasters means you don't have a lot of damage options in the secondary because most of them favor melee range. /TA has oil slick arrow and a few very proccable utility powers that's the best option out of all your other options to pile on more damage. TA may have gotten a nerf on it's utility but it got a buff in damage. I consider that an overall win. With easily achievable softcap the benefits of those utility power pale in value compared to the ability to kill stuff dead quicker. When survival is no longer an issue, damage is the only thing left that matters. If you like recharge all the more reason to go AR because of al lthe knockback FF proc opportunities.