The Beta Account Center is temporarily unavailable
×


Nemu
-
Posts
1418 -
Joined
-
Last visited
-
Days Won
3
Content Type
Profiles
Forums
Events
Store
Articles
Patch Notes
Everything posted by Nemu
-
I challenge the notion that sonic is the best pairing for kin. On paper +dmg and -res looks great, in practice the two powersets combined have no playstyle synergy. One wants you to be at range to apply the cone -res/knockdown and the other wants to be in melee range for heal/FS. Animation time matters - FS is not that fast and neither is howl, you realistically only have enough time to use one of those powers before mobs all die from fast moving teams. Realistically the -Res will only be really noticeable on hard targets and in those fights you often don't have the benefit of a saturated FS. If I wanted to provide debuff/support against those types of targets /kin wouldn't be my choice pick in the first place. I'd much prefer a blast set with very few to no cones to pair with kin. I like the idea of irradiate with both -res procs followed up by FS, that has a lot more synergy than howl/FS both from a playstyle perspective and also from a build perspective, as the -def affords you the luxury of skipping ACC slotting on some kin powers. Empathy has a low barrier for entry but I also challenge the idea that it's a training wheel set. The skill ceiling is pretty high with Emps and good emps are far and in between. Most are lazy and don't understand game mechanics/mob composition/team dynamics. Emps are not like brutes where you can derp your way to 50, not learn anything about the game, and still do ok standing next to someone that knows what they are doing. The difference between a skilled EMP and unskilled EMP is stark. against content where that kind of support matters.
-
Ice Manipulation has a better slow aura than hotfeet and it gets it early. Unlike hotfeet the slow aura in ice doesn't de-toggle when mezzed so you don't need to waste time turning it back on after you use a breakfree. In addition it also gets a knockdown patch. I'd recommend that you both play in melee range and drop rains and PbAoEs and let the slows/knockdown patches provide mitigation. The current builds already have scorpion shield and close to S/L softcap so you are already halfway there. Before we start I'm going to copy something I've been saying for a very long time on the forums: "Blasters are not scrappers or tanks or brutes. The lack of mez protection and reliable layered defenses means you NEED to be mobile, weave in and out of combat. Mobs don't care if you are 70 ft away or 10 ft away, if they can't attack you with melee attacks they will either chase you or shoot you. When you fight in melee range it's good practice to move a little after each attack, just enough to keep mobs chasing you or shooting you. Learning to move allows you to limit your exposure to melee attacks, And the things you CHOOSE to engage in melee will not live long. However the things outside of your melee range/zone of direct mob interaction will shoot you with impunity, often with mezzes and other debuffs. Even for a melee blaster your defense priority should be range defense first. It makes more sense to stack S/L defense next to take advantage of scorpion shield. S/L defense will cover most of the attacks coming at you from melee range, range defense will cover the rest. Being mobile means you don't need to softcap S/L defense, you can have it be a few percentage points lower than the softcap." On the Fire/fire build: You don't need combustion and fire sword circle, It's AoE overkill especially if you are also playing with your friend with her AoEs, and those will lock you in animation for a long time if you go through the entire rotation. Fire sword circle does more damage but has a small radius, Combustion does less damage but has a larger radius. Some people prefer FSC, I prefer combustion even though it has a longer cast time and does less damage. Rune of protection has a fixed recharge now and doesn't benefit from recharge enhancements. Nowadays it's a placeholder for resist uniques like the +3%def or the +7.5% HP uniques. There are other ways to get S/L defense. Same with ring of fire, there are other ways to get S/L defense. Rune of protection is not dependable mez protection. At the very least you should get some immobilization protection. If you can't move as a melee blaster you will die. I'd recommend changing your power picks and pick up combat jumping as it provides immunity to immobilization. Blaster nukes account for a lot of the damage that they do, hasten is recommended so you can use your T9s as often as possible. If you do go the speed pool route, super speed + a stealth IO in sprint will also give you full invisibility against most mobs except for rikti drones, nemesis snipers and a few other mobs that have +perception. This means you don't need stealth. I hate to mule a power I never intend to use with a useful set, see boxing. Cauterizing aura is your sustain, Slot it for end mod first, and you will not have as much a need to slot miracles/numinas to boost your end recovery. You have slotting in there like the 6th slot of winter's bite and 6 slotting fireball that doesn't really do much for your build. 12.5% F/C defense is not trivial but they don't provide a significant benefit overall. S/L and Ranged defense can cover most everything including pure fire/ice/energy/neg energy attacks which are often ranged, if you are mindful of your positioning. On the Ice/Ice build A lot of the same comments as the fire/fire as you followed a similar shell bitter freeze ray is often skipped but it has proc potential I'd also take freezing touch to stack holds and it animates much faster than bitter freeze ray Freeze ray is woefully underslotted, it's now one of the best attacks in the set as it does damage now. Reference this thread for my build approach. Help me fix this mess (Beam/Temp) - Blaster - Homecoming (homecomingservers.com) This is my take on the fire/fire This Hero build was built using Mids Reborn 3.0.4.7 https://github.com/Reborn-Team/MidsReborn Click this DataLink to open the build! Level 50 Magic Blaster Primary Power Set: Fire Blast Secondary Power Set: Fire Manipulation Power Pool: Speed Power Pool: Leaping Power Pool: Fighting Power Pool: Leadership Ancillary Pool: Mace Mastery Hero Profile: Level 1: Fire Blast -- SprDfnBrr-Acc/Dmg(A), SprDfnBrr-Dmg/Rchg(3), SprDfnBrr-Acc/Dmg/Rchg(5), SprDfnBrr-Acc/Dmg/EndRdx(5), SprDfnBrr-Acc/Dmg/EndRdx/Rchg(7), SprDfnBrr-Rchg/+Status Protect(7) Level 1: Ring of Fire -- Thn-Acc/Dmg(A), Thn-Acc/Dmg/Rchg(15), Thn-Acc/Dmg/EndRdx(19) Level 2: Fire Ball -- Artl-Acc/Dam(A), Artl-Dam/End(3), Artl-Dam/Rech(9), Artl-Acc/Dam/Rech(15), Artl-Acc/Rech/Rng(17), Artl-End/Rech/Rng(17) Level 4: Combustion -- Erd-Dmg(A), Erd-Acc/Dmg/EndRdx/Rchg(11), Erd-%Dam(11), FuroftheG-ResDeb%(21), FuroftheG-Acc/Dmg(21) Level 6: Super Speed -- BlsoftheZ-ResKB(A), WntGif-ResSlow(25), BlsoftheZ-Travel/EndRdx(37) Level 8: Combat Jumping -- LucoftheG-Def/Rchg+(A), Ksm-ToHit+(9) Level 10: Fire Sword -- SprBlsCol-Acc/Dmg(A), SprBlsCol-Dmg/EndRdx(27), SprBlsCol-Acc/Dmg/EndRdx(27), SprBlsCol-Dmg/EndRdx/Acc/Rchg(29), SprBlsCol-Rchg/HoldProc(29) Level 12: Aim -- RctRtc-ToHit/Rchg(A), RctRtc-Pcptn(13), GssSynFr--Build%(13) Level 14: Hasten -- RechRdx-I(A), RechRdx-I(19) Level 16: Boxing -- Empty(A) Level 18: Blaze -- SprWntBit-Acc/Dmg(A), SprWntBit-Acc/Dmg/EndRdx(31), SprWntBit-Acc/Dmg/Rchg(31), SprWntBit-Dmg/EndRdx/Acc/Rchg(33), SprWntBit-Rchg/SlowProc(33) Level 20: Cauterizing Aura -- PreOptmz-Acc/Rech(A), PreOptmz-EndMod/End(33), PreOptmz-EndMod/Rech(34), PreOptmz-EndMod/Acc/Rech(34), PreOptmz-EndMod/End/Rech(36), PreOptmz-EndMod/Acc/End(36) Level 22: Rain of Fire -- Ann-ResDeb%(A), Artl-Dam/End(23), Artl-Dam/Rech(23), Artl-Acc/Dam/Rech(37) Level 24: Tough -- GldArm-3defTpProc(A), StdPrt-ResDam/Def+(25) Level 26: Blazing Bolt -- StnoftheM-Acc/Dmg(A), StnoftheM-Dmg/EndRdx(37), StnoftheM-Acc/ActRdx/Rng(39), StnoftheM-Dmg/EndRdx/Rchg(39), StnoftheM-Dmg/ActRdx/Rchg(39) Level 28: Weave -- LucoftheG-Def/Rchg+(A), ShlWal-Def/EndRdx(31), ShlWal-Def(40), ShlWal-ResDam/Re TP(42) Level 30: Maneuvers -- LucoftheG-Def/Rchg+(A), Rct-Def(45), Rct-Def/EndRdx(48), Rct-ResDam%(50) Level 32: Inferno -- SprBlsWrt-Acc/Dmg(A), SprBlsWrt-Rchg/Dmg%(34), SprBlsWrt-Dmg/Rchg(42), SprBlsWrt-Acc/Dmg/Rchg(42), SprBlsWrt-Acc/Dmg/EndRdx(43), SprBlsWrt-Acc/Dmg/EndRdx/Rchg(43) Level 35: Scorpion Shield -- LucoftheG-Def/Rchg+(A), LucoftheG-Def/EndRdx(36), LucoftheG-Def(43) Level 38: Burn -- Erd-Dmg(A), Erd-Acc/Dmg/Rchg(45), Erd-%Dam(45), Arm-Acc/Dmg/Rchg(46), Arm-Dam%(46) Level 41: Hot Feet -- SprAvl-Acc/Dmg(A), SprAvl-Dmg/EndRdx(46), SprAvl-Acc/Dmg/EndRdx(47), SprAvl-Acc/Dmg/EndRdx/Rchg(48), SprAvl-Rchg/KDProc(49) Level 44: Build Up -- RctRtc-ToHit/Rchg(A), RctRtc-ToHit(48) Level 47: Tactics -- HO:Cyto(A) Level 49: Consume -- Erd-Acc/Rchg(A), Erd-Acc/Dmg/Rchg(49), Erd-Acc/Dmg/EndRdx/Rchg(50) Level 1: Defiance Level 1: Brawl -- Empty(A) Level 1: Sprint -- UnbLea-Stlth(A) Level 2: Rest -- Empty(A) Level 2: Swift -- Empty(A) Level 2: Hurdle -- Empty(A) Level 2: Health -- Pnc-Heal/+End(A) Level 2: Stamina -- PrfShf-End%(A) Level 49: Quick Form ------------ | Copy & Paste this data into Mids Reborn : Hero Designer to view the build | |-------------------------------------------------------------------| |MxDz;1375;681;1362;HEX;| |78DA65935B4F135110C7CFEE9EA514286D2D9762B9958B5C0A4B31F185C410418A0| |A4D887C00B2814DD984B49BB6285E13BF811A8D89508437EF5FC5DBA3BE1B8D8089| |0F5ED0D4D9FD4F2B899BECFECE39F33F33B333E7A437CE36BC9CBD352994C0F49A5| |9282C4DD1B768E5F5B499B19785FBF8E86DE3E5A58B663663AD18293B6F411AAF58| |16D71D27972FC29436B3B6B3BE6616ED5C367C3EBB6AE5AD6CD1A80CEA1672B9356| |3D1B1AC95066F386F998E9DCD04BC49CACEAC166916AC9856AC7C61D576DA661C7B| |D9A8844B9BCB6E18777C254A1976D37BC64D57713F655D0829C4B814AA024A95A98| |13592A9839744E529ABA224BCB5C61DF0D82E3855714FFE154D877F09D6EA60630D| |18F2316BC10DDAA561AFD43EA942744851B7C7DC079B26354FDB34E1D22F7AA9F43| |AE7A47F503D5B34064DDF7BCC5B48E3C33F2BBE6605B9FC119EBFCB043F6CD27F1B| |FF79FC0EF32ED87E8F791F9C21753DF6A8F55B142322454389F904317B286680630| |6125C23A642B6207216C1323D2245E33067117E8C289D4F99CFC0EEE7CC17E03552| |47B89391EF6CFB01C67F320FC1DEDFCC5FE034ED6A46065AF34754AB85BBD4C25DE| |AE32E69946D2BFF49EB4968A3EE02556FD63DF7DCB1B657F8BBBED7E08937CC77CC| |B7A0247F31F8D362DC8DCE14BA3970011C9A439C30693B58DBC1DA917D68C60EC0F| |16FD09E235517D7A3EB21D6E28FC0A14DE616385C626E838721217AB8A33D1CA737| |A478FE879BC01B64EDE71EF5F3E91CF9C2E4D3393A81EE8F9E066F927A90F70C6EA| |1F6A325D0D806C776C0E42E7895D409D45449F0E91ADB0423540F834F8E718A2035| |719D90F4EE5C594D7E461E49CE6B9C6F4F5C566F7DB95D566FB13BA5D337FFCF4A1| |710992FC8EA3D168AA7DAABA315E5E8BEFDFF560E8EAEC4A9B603527C3DBAF600DE| |E786DD9C91CF5F61D1D5EB| |-------------------------------------------------------------------| And this is my take on the ice/ice This Hero build was built using Mids Reborn 3.0.4.7 https://github.com/Reborn-Team/MidsReborn Click this DataLink to open the build! Level 49 Magic Blaster Primary Power Set: Ice Blast Secondary Power Set: Ice Manipulation Power Pool: Speed Power Pool: Leaping Power Pool: Fighting Power Pool: Leadership Ancillary Pool: Mace Mastery Hero Profile: Level 1: Ice Bolt -- SprWntBit-Acc/Dmg(A), SprWntBit-Acc/Dmg/EndRdx(3), SprWntBit-Acc/Dmg/Rchg(3), SprWntBit-Dmg/EndRdx/Acc/Rchg(9), SprWntBit-Rchg/SlowProc(9) Level 1: Chilblain -- Acc-I(A) Level 2: Ice Blast -- SprDfnBrr-Acc/Dmg(A), SprDfnBrr-Dmg/Rchg(19), SprDfnBrr-Acc/Dmg/Rchg(19), SprDfnBrr-Acc/Dmg/EndRdx(21), SprDfnBrr-Acc/Dmg/EndRdx/Rchg(21), SprDfnBrr-Rchg/+Status Protect(27) Level 4: Super Speed -- BlsoftheZ-Travel/EndRdx(A), BlsoftheZ-ResKB(5), WntGif-ResSlow(5) Level 6: Aim -- RctRtc-ToHit/Rchg(A), RctRtc-Pcptn(7), GssSynFr--Build%(7) Level 8: Freeze Ray -- SprBlsWrt-Acc/Dmg(A), SprBlsWrt-Dmg/Rchg(37), SprBlsWrt-Acc/Dmg/Rchg(37), SprBlsWrt-Acc/Dmg/EndRdx(40), SprBlsWrt-Acc/Dmg/EndRdx/Rchg(42), SprBlsWrt-Rchg/Dmg%(42) Level 10: Frigid Protection -- PreOptmz-Acc/Rech(A), PreOptmz-EndMod/End(11), PreOptmz-EndMod/Rech(11), PreOptmz-EndMod/Acc/End(13), PreOptmz-EndMod/Acc/Rech(15), PreOptmz-EndMod/End/Rech(15) Level 12: Combat Jumping -- LucoftheG-Def/Rchg+(A), Ksm-ToHit+(13) Level 14: Ice Storm -- Ann-ResDeb%(A), Artl-Dam/End(17), Artl-Dam/Rech(36), Artl-Acc/Dam/Rech(37) Level 16: Hasten -- RechRdx-I(A), RechRdx-I(17) Level 18: Bitter Ice Blast -- Thn-Acc/Dmg(A), Thn-Dmg/EndRdx(42), Thn-Dmg/Rchg(43), Thn-Acc/Dmg/Rchg(43), Thn-Acc/Dmg/EndRdx(43), Thn-Dmg/EndRdx/Rchg(45) Level 20: Ice Patch -- Empty(A) Level 22: Ice Sword -- SprBlsCol-Acc/Dmg(A), SprBlsCol-Dmg/EndRdx(23), SprBlsCol-Acc/Dmg/EndRdx(23), SprBlsCol-Dmg/EndRdx/Acc/Rchg(25), SprBlsCol-Rchg/HoldProc(25) Level 24: Boxing -- Empty(A) Level 26: Tough -- StdPrt-ResDam/Def+(A), GldArm-3defTpProc(27) Level 28: Weave -- LucoftheG-Def/Rchg+(A), ShlWal-Def/EndRdx(29), ShlWal-Def(29), ShlWal-ResDam/Re TP(33) Level 30: Maneuvers -- LucoftheG-Def/Rchg+(A), Rct-Def(31), Rct-Def/EndRdx(31), Rct-ResDam%(31) Level 32: Blizzard -- Artl-Acc/Dam(A), Artl-Dam/End(33), Artl-Dam/Rech(33), Artl-Acc/Dam/Rech(34), Artl-Acc/Rech/Rng(34), Artl-End/Rech/Rng(34) Level 35: Scorpion Shield -- LucoftheG-Def/Rchg+(A), LucoftheG-Def/EndRdx(36), LucoftheG-Def(36) Level 38: Frozen Aura -- SprAvl-Acc/Dmg(A), SprAvl-Dmg/EndRdx(39), SprAvl-Acc/Dmg/EndRdx(39), SprAvl-Acc/Dmg/EndRdx/Rchg(39), SprAvl-Rchg/KDProc(40), FuroftheG-ResDeb%(40) Level 41: Freezing Touch -- Mk'Bit-Acc/Dmg(A), Mk'Bit-Dmg/EndRdx(45), Mk'Bit-Dmg/Rchg(45), Mk'Bit-Acc/EndRdx/Rchg(46), Mk'Bit-Acc/Dmg/EndRdx/Rchg(46), Mk'Bit-Dam%(46) Level 44: Bitter Freeze Ray -- Apc-Dam%(A), Thn-Acc/Dmg(47), Dcm-Build%(48), UnbCns-Dam%(48), Thn-Acc/Dmg/EndRdx(48), Thn-Dmg/EndRdx(49) Level 47: Build Up -- RctRtc-ToHit/Rchg(A), RctRtc-ToHit(47) Level 49: Tactics -- HO:Cyto(A) Level 1: Brawl -- Empty(A) Level 1: Defiance Level 1: Sprint -- UnbLea-Stlth(A) Level 2: Rest -- Empty(A) Level 2: Swift -- Empty(A) Level 2: Health -- Pnc-Heal/+End(A) Level 2: Hurdle -- Empty(A) Level 2: Stamina -- PrfShf-End%(A) ------------ | Copy & Paste this data into Mids Reborn : Hero Designer to view the build | |-------------------------------------------------------------------| |MxDz;1359;645;1290;HEX;| |78DA6594594F13511886CF74CEB0575A0BB24BCB22283A8089D7242E982255941F4| |02630B6A3A49D9492E8A577C625A2D19848CBE295FB1FD27BAF04132F5CD0D46FE6| |7D8B244E32F39CF9B6F32D732673EB7CCB878B77A694113DB7ECACAC2C9C9567C92| |D5A1927EB2DAAE0AA97BB93E2856B4E3EEB2ED9E9451796C99A627ED5F70BC552A8| |C93879CF5F5D764A5E211F4FE7736ED1CD8B868BA6B94261D99EF75D77A9255CCEB| |A8EEFE5B3D1F065DACBE64AF2D65A532DB9C5959CE7775DF0BD45BBB65BC609B709| |D6B73B25BF7EB9D341B246F0A86AF54A2B35A955E40DF9166C7847BE07EFAADA555| |5AA5B85B299200CE2588682DD61838C806D26A9C16E0B1C9466998817313F464299| |FE44F6982167456BD1C62A8B2EA1555D857C0DDB4CD077E650FF027E43EB64191CA| |980C737C84DF0BE7835D2B7F13BF26AFA41FE045B7E8187F6C8DFE011C9BF19BE46| |73BB01DB3FF2DAA7D5654114799BD1CFD82BA62DD46D814375E080C469659CD631F| |435465E11C411C78A57146B004F6C925BE43678F225F85090E0BC1255B9D43D59B7| |73EAED6BACE231F904EC7C4A3E030DC9AE83513AC228A648BA986F578711D6DB7D1| |A356AD1F54067F6B027BDD381AE51F5CE80C94BB08D8B6D1F6DFB687B7407364777| |C96FB0BDCAEF36E843BF89BE25D9CF24FB99623F53F56403B817536A00FB4406B8C| |F60CC08E30FB6816BA21DE677305C46E5C72AE406B9058E6C9353C8ED91788DD277| |F43A67902573E0298FBC41DE04E70463AC6B6C12DFB3CD398F978523C234E4E39CE| |F04E7FF4060C3D7B07936EC753021BD9D404E6AE28C409BAA571F38BFE124537AFF| |2F509DFDB79663891DE734452233428F2F4DFBE79D92DD8392143AB2F39FD5D7839| |2E788FE17D494D185| |-------------------------------------------------------------------| Power selection matters if you plan to exemp down. For each build note how I selected the powers to be exemp friendly. Both have their defenses matured by level 30 and both have a decent attack chain by that point as well.
- 1 reply
-
- 1
-

-
I think infernal has some pure type range attacks that hurt which range defense helps with. The one attack that usually get me is his pbaoe axe attack that bleeds/burns. This happens even if you have softcapped S/L defense, due to no resistances the bleeds/burns will get you. This comes down to jousting melee and really using movement to minimize consecutive melee hits on you. Definitely a lot more work than standing your ground. FYI If you look at my build I have softcapped range defense and 40% s/l, the remaining 5% is easily covered by the debuffs in your powersets. Since you are loaded, or so I hear... 😬 You can always get the defensive amplifiers, they make a huge difference. From a playstyle perspective, the moment you take a hit you should hop up/back. This will stop the 1-2 KO scenario and buy you time to insp/incarnate/whatever. You can always change your direction mid jump and head back into the fray, and that moment of the AI trying to decide whether to shoot you or chase you may save your life.
-
Your focus on melee defense is misplaced. Scorpion shield already offers S/L defense and you should be building towards that instead of diminishing your S/L investment by focusing on melee defense, There are a lot of people like you that think melee blaster = melee defense. Wrong! There are a lot of people that think melee blaster = you need to stand your ground in melee. Wrong! Blasters are not scrappers or tanks or brutes. The lack of mez protection and reliable layered defenses means you NEED to be mobile, weave in and out of combat. Learning to move allows you to limit your exposure to melee attacks, And the things you CHOOSE to engage in melee will not live long. However the things outside of your melee range/zone of direct mob interaction will shoot you with impunity, often with mezzes and other debuffs. Even for a melee blaster your defense priority should be range defense first. It makes more sense to stack S/L defense next to take advantage of scorpion shield. S/L defense will cover most of the attacks coming at you from melee range, range defense will cover the rest. Being mobile means you don't need to softcap S/L defense. My Dark/Atomic took leviathan for knockout blow and she does fine with 25% S/L defense because I know HOW and WHEN to move. I would also not factor beta decay into your to hit debuff calculations and I certainly would not take it that early in your leveling progression. The power is a trap and encourages you to play like a LOL melee AT and I think you'll spend more time re-toggling it back on that early in your career vs actually getting any mileage out of it. This is how I would build it with scorpion shield, data chunk included if your mids is not as up-to-date as mine. This Hero build was built using Mids Reborn 3.0.4.7 https://github.com/Reborn-Team/MidsReborn Click this DataLink to open the build! Level 49 Magic Blaster Primary Power Set: Dark Blast Secondary Power Set: Atomic Manipulation Power Pool: Leaping Power Pool: Speed Power Pool: Fighting Power Pool: Leadership Ancillary Pool: Mace Mastery Hero Profile: Level 1: Gloom -- SprDfnBrr-Acc/Dmg(A), SprDfnBrr-Dmg/Rchg(3), SprDfnBrr-Acc/Dmg/Rchg(3), SprDfnBrr-Acc/Dmg/EndRdx(5), SprDfnBrr-Acc/Dmg/EndRdx/Rchg(5), SprDfnBrr-Rchg/+Status Protect(7) Level 1: Electron Shackles -- Thn-Acc/Dmg(A), Thn-Acc/Dmg/Rchg(48), Thn-Acc/Dmg/EndRdx(49) Level 2: Umbral Torrent -- FrcFdb-Rechg%(A), OvrFrc-Dam/KB(7), Artl-Acc/Dam(13), Artl-Dam/End(15), Artl-Acc/Dam/Rech(15), Ann-ResDeb%(40) Level 4: Positron Cell -- SprWntBit-Acc/Dmg(A), SprWntBit-Acc/Dmg/EndRdx(19), SprWntBit-Acc/Dmg/Rchg(29), SprWntBit-Dmg/EndRdx/Acc/Rchg(48), SprWntBit-Rchg/SlowProc(48) Level 6: Aim -- GssSynFr--Build%(A) Level 8: Moonbeam -- StnoftheM-Acc/Dmg(A), StnoftheM-Dmg/EndRdx(9), StnoftheM-Acc/ActRdx/Rng(9), StnoftheM-Dmg/EndRdx/Rchg(11), StnoftheM-Dam%(13) Level 10: Combat Jumping -- Ksm-ToHit+(A), LucoftheG-Def/Rchg+(11), WntGif-ResSlow(19) Level 12: Super Speed -- BlsoftheZ-Travel/EndRdx(A), BlsoftheZ-ResKB(17) Level 14: Boxing -- Empty(A) Level 16: Hasten -- RechRdx-I(A), RechRdx-I(17) Level 18: Abyssal Gaze -- Thn-Acc/Dmg(A), Thn-Acc/Dmg/EndRdx(46), UnbCns-Dam%(46), Apc-Dam%(46), Dcm-Build%(47), Thn-Acc/Dmg/Rchg(47) Level 20: Metabolic Acceleration -- PreOptmz-Acc/Rech(A), PreOptmz-EndMod/End(21), PreOptmz-EndMod/Rech(21), PreOptmz-EndMod/Acc/End(23), PreOptmz-EndMod/Acc/Rech(23), PreOptmz-EndMod/End/Rech(27) Level 22: Tough -- GldArm-3defTpProc(A), StdPrt-ResDam/Def+(29) Level 24: Weave -- LucoftheG-Def/Rchg+(A), ShlWal-Def/EndRdx(25), ShlWal-Def(25), ShlWal-ResDam/Re TP(27) Level 26: Life Drain -- Thn-Acc/Dmg(A), Thn-Dmg/EndRdx(43), Thn-Dmg/Rchg(43), Thn-Acc/Dmg/Rchg(45), Thn-Acc/Dmg/EndRdx(45), Thn-Dmg/EndRdx/Rchg(45) Level 28: Atom Smasher -- SprAvl-Acc/Dmg(A), SprAvl-Dmg/EndRdx(34), SprAvl-Acc/Dmg/EndRdx(36), SprAvl-Acc/Dmg/EndRdx/Rchg(37), SprAvl-Rchg/KDProc(37), FuroftheG-ResDeb%(37) Level 30: Maneuvers -- LucoftheG-Def/Rchg+(A), Rct-Def(31), Rct-Def/EndRdx(31), Rct-ResDam%(31) Level 32: Blackstar -- SprBlsWrt-Acc/Dmg(A), SprBlsWrt-Dmg/Rchg(33), SprBlsWrt-Acc/Dmg/Rchg(33), SprBlsWrt-Acc/Dmg/EndRdx(33), SprBlsWrt-Acc/Dmg/EndRdx/Rchg(34), SprBlsWrt-Rchg/Dmg%(34) Level 35: Scorpion Shield -- LucoftheG-Def/Rchg+(A), LucoftheG-Def/EndRdx(36), LucoftheG-Def(36) Level 38: Positronic Fist -- Mk'Bit-Acc/Dmg(A), Mk'Bit-Dmg/EndRdx(39), Mk'Bit-Dmg/Rchg(39), Mk'Bit-Acc/EndRdx/Rchg(39), Mk'Bit-Acc/Dmg/EndRdx/Rchg(40), Mk'Bit-Dam%(40) Level 41: Negatron Slam -- SprBlsCol-Acc/Dmg(A), SprBlsCol-Dmg/EndRdx(42), SprBlsCol-Acc/Dmg/EndRdx(42), SprBlsCol-Rchg/HoldProc(42), SprBlsCol-Dmg/EndRdx/Acc/Rchg(43) Level 44: Ionize -- HO:Membr(A) Level 47: Tactics -- HO:Cyto(A) Level 49: Beta Decay -- AchHee-ResDeb%(A) Level 1: Brawl -- Empty(A) Level 1: Defiance Level 1: Sprint -- UnbLea-Stlth(A) Level 2: Rest -- Empty(A) Level 2: Swift -- Run-I(A) Level 2: Health -- Pnc-Heal/+End(A) Level 2: Hurdle -- Jump-I(A) Level 2: Stamina -- PrfShf-End%(A) Level 49: Quick Form ------------ | Copy & Paste this data into Mids Reborn : Hero Designer to view the build | |-------------------------------------------------------------------| |MxDz;1367;675;1350;HEX;| |78DA4D944B4F135114C7EF746E414A2B8516DAF26E2BB43C3A1413A3A2864401A3D| |084C0072093766C079A76524AA24B17EED5684C944271E5FB3BF809D4E84E37AE5C| |09262E7CA0A9A7F33FADDC74EE6FE69C73CFF99F3B779ABA3EE77E75F9E6AC503C9| |7F2FAE6E6DA459ACB46C999D2B3665AD4472B5D2136AFADE885AC91D1E6F4D20642| |471B9ED52DCB2A96CADA8A9E31F5B2592CACA5F482696DE5ED07E15E2E16F3DA92A| |15B6621EBB21F562DC3C878ECDB05339B2B93A3A31195314A9B39D30ACD5B665A6B| |9448E96983A6FAFD8D20A91AA6CBF4D3A4D475D69C424821A6A570284C072855A60| |45B9CE0E931C1A3E61015C28014535530B907AEFB393DE5576E39B0FEB36AD3AD3A| |6D1E97CC1630F605FEB3945F8536A93E41CDAE6760FF7370EA05F325B841F59CA82| |79C4FA99E5F8A3CD95A394FEB1B61C71D7BCB7C07BADE83EE0F600FBDB636AC71B4| |FD452FAE6EC566571FF44529A61DB594F68FE8CDFB0954C8E7611D9E1A0D11214B0| |7322A1D13A8E26516486127EF526705B6C41EF30A3226A6416D9BEC316215FEF3B4| |4B3E7E83BE1FD805FF4FE62FB0E737F310ECFD03AAA4A99B35759F4457FD017429C| |917804F0DD483C8175C404CF02AD8BB0816497F88F58758FFF80E73179C64BD93DC| |D7E463F002E9EF63FD7DDBD015AE80D11DF04495B9C79C45DD4ED238C01A0758E3E| |03E7C8307CCEFA0451A87B8CED043D8861F31B7991530BCC3DC050FBD4244F83444| |B84ED4CBF483B3D4C708E71FB986DE46B3CC1CD30463EBCC0DF00CAD8DF3098DDF4| |68F6377987799F7C1F17BE00CAD99E01336314390AAF0D17E68C823B453B09DA3B8| |24C7255FD319F2D13B96CD2F977EF5D31996CDFF81DAD2FF7BFA0071EA9665F33B1| |68ABDE2AB8B2C1CA524D0C7C1515B187BB77FD41647DCB7A3B607A8B038DED459FB| |076F4ACB01| |-------------------------------------------------------------------| My Dark/Atomic with Leviathan is also posted earlier in this thread for reference.
-
Having to rely on rains means your AoE delivery will be slower and you will need to pay attention to people with wormhole or fold space. I took frost breath on my ice/temp in addition to both rains. However, I don't find it nearly as satisfying to play as my fire/elec. There are scenarios where the rains are better but for the most part I prefer the immediacy and spammability of fireball. I made an ice/storm corruptor after I finished the blaster and that one is much more fun to play. Load up on recovery serums and you are good to go.
-
Data chunk included this time. This Hero build was built using Mids Reborn 3.0.4.7 https://github.com/Reborn-Team/MidsReborn Click this DataLink to open the build! Level 50 Science Scrapper Primary Power Set: Fiery Melee Secondary Power Set: Regeneration Power Pool: Leaping Power Pool: Speed Power Pool: Concealment Power Pool: Experimentation Ancillary Pool: Blaze Mastery Hero Profile: Level 1: Fire Sword -- SprScrStr-Acc/Dmg(A), SprScrStr-Dmg/Rchg(3), SprScrStr-Acc/Dmg/Rchg(3), SprScrStr-Dmg/EndRdx/Rchg(5), SprScrStr-Acc/Dmg/EndRdx/Rchg(5), SprScrStr-Rchg/+Crit(7) Level 1: Fast Healing -- Mrc-Rcvry+(A) Level 2: Cremate -- Hct-Dmg(A), Hct-Acc/Dmg/Rchg(9), Hct-Acc/Rchg(9), Hct-Dmg/EndRdx(23), Hct-Dam%(43) Level 4: Quick Recovery -- PrfShf-End%(A), SynSck-EndMod(40), SynSck-EndMod/Rech(40), SynSck-Dam/Rech/Acc(40), SynSck-Dam/Acc/End(42), SynSck-EndMod/+RunSpeed(43) Level 6: Build Up -- GssSynFr--Build%(A) Level 8: Combat Jumping -- LucoftheG-Def/Rchg+(A), WntGif-ResSlow(15), ShlWal-ResDam/Re TP(17), Rct-ResDam%(17), Ksm-ToHit+(46) Level 10: Reconstruction -- Pnc-Heal/EndRedux(A), Pnc-EndRdx/Rchg(11), Pnc-Heal/Rchg(11), Pnc-Heal/EndRedux/Rchg(13), Pnc-Heal(15) Level 12: Hasten -- RechRdx-I(A), RechRdx-I(13) Level 14: Stealth -- LucoftheG-Def/Rchg+(A) Level 16: Integration -- NmnCnv-Regen/Rcvry+(A) Level 18: Fire Sword Circle -- Arm-Dmg(A), Arm-Acc/Dmg/Rchg(19), Arm-Acc/Rchg(19), Arm-Dmg/EndRdx(21), Arm-Dam%(21), FuroftheG-ResDeb%(23) Level 20: Resilience -- GldArm-3defTpProc(A), StdPrt-ResDam/Def+(49) Level 22: Grant Invisibility -- LucoftheG-Def/Rchg+(A) Level 24: Dull Pain -- Pnc-Heal/EndRedux(A), Pnc-EndRdx/Rchg(25), Pnc-Heal/Rchg(25), Pnc-Heal/EndRedux/Rchg(27), Pnc-Heal(27) Level 26: Incinerate -- SprBlsCol-Acc/Dmg(A), SprBlsCol-Acc/Dmg/EndRdx(31), TchofDth-Dam%(33), Mk'Bit-Dam%(33), GldStr-%Dam(33), Dmg-I(43) Level 28: Instant Healing -- Pnc-Heal/EndRedux(A), Pnc-EndRdx/Rchg(29), Pnc-Heal/Rchg(29), Pnc-Heal/EndRedux/Rchg(31), Pnc-Heal(31) Level 30: Experimental Injection -- Prv-Absorb%(A) Level 32: Greater Fire Sword -- SprCrtStr-Acc/Dmg(A), SprCrtStr-Dmg/Rchg(34), SprCrtStr-Acc/Dmg/Rchg(34), SprCrtStr-Dmg/EndRdx/Rchg(34), SprCrtStr-Acc/Dmg/EndRdx/Rchg(36), SprCrtStr-Rchg/+50% Crit(36) Level 35: Char -- SprWntBit-Acc/Dmg(A), SprWntBit-Acc/Dmg/EndRdx(36), SprWntBit-Dmg/EndRdx/Acc/Rchg(37), Dcm-Build%(37), UnbCns-Dam%(37), Apc-Dam%(39) Level 38: Moment of Glory -- LucoftheG-Def/Rchg+(A), RechRdx-I(39), RechRdx-I(39) Level 41: Toxic Dart -- SprWntBit-Dmg/Rchg(A), SprWntBit-Acc/Dmg/Rchg(42), SprWntBit-Rchg/SlowProc(42) Level 44: Fire Blast -- Apc-Dmg(A), Apc-Acc/Dmg/Rchg(45), Apc-Acc/Rchg(45), Apc-Dmg/EndRdx(45), Apc-Dmg/Rchg(46) Level 47: Fire Ball -- PstBls-Acc/Dmg(A), PstBls-Dmg/EndRdx(47), PstBls-Dmg/Rchg(47), PstBls-Acc/Dmg/EndRdx(48), PstBls-Dam%(48), Ann-ResDeb%(48) Level 49: Adrenal Booster -- RechRdx-I(A), RechRdx-I(49) Level 1: Critical Hit Level 1: Brawl -- SprBlsCol-Dmg/EndRdx(A), SprBlsCol-Acc/Dmg/Rchg(7) Level 1: Sprint -- UnbLea-Stlth(A) Level 2: Rest -- Empty(A) Level 2: Swift -- Empty(A) Level 2: Hurdle -- Empty(A) Level 2: Health -- Pnc-Heal/+End(A) Level 2: Stamina -- PrfShf-End%(A) Level 50: Freedom Phalanx Reserve Level 50: Portal Jockey Level 50: Task Force Commander Level 50: The Atlas Medallion ------------ | Copy & Paste this data into Mids Reborn : Hero Designer to view the build | |-------------------------------------------------------------------| |MxDz;1400;669;1338;HEX;| |78DA6593D94F135114C6EFB45310688B6CB27561A7B430B43E199790288B2028B18| |96FA60EE54A26D6D2B48D01DF4CD4447D7179F0C5278D89B8BDA8D1BFC1F5CF3031| |02263E9B7A98EF039B38C9E477E7BB73CEF9CE99B90B6B93FED733D72694113C91B| |34BA54C3A5BB40B055DAC4D671D9DCF6AB573D5CADDB5BB9359D039ADAD694717D7| |B10EEF6D4DEA8B3A5FD2D659BDA2F3BA68979DD5BCF22FAEAEE6AC796D179CFC4AB| |DFB902E68BDDCE42E67F3579C92B3E4E49CF27AABAB4CAD492AE7B2CE97DDF8E6A9| |8293B58EE7ECAB3AB36097CA52B643FCF4CB7D7DC798B1E3B0E2531FBD4AA54CE5F| |9447E06CD2FE457B0E61B38F92F56A939590C9BEA86680634D318F2B8EFED8B9123| |E08138184F80D312E3A507EF4368C33F4CF027B9098E6C81F16DF0A6C4FA143CF83| |6985FB45A7AA86D335C2DD80DCFFB4F91BFC1B13FF25AD854531253873C665D087B| |F5613202FAA360B007EC939806D4311A1282549DF29301D90B7036017A38295A23B| |5C673D06E89D6C4DE9B0EC17FF361F208D87A943CC6FE26507F56625B58BFE520B4| |64BBE1F61394BD36CEA58DF567446BE75CDAD963077BEC608F5DECB18B3DDE96984| |EE4F175DEC5CC23F7C19E8C72BF79CF2585E71862E2613CCF496C3767DACD7A21D6| |0BB15E84F522AC773A2EF639A3F026B43B9227CA19452FA076AF4D2E9159B07F99D| |4E0E380527D8CED7BC6BDE7E0C04BF211FA1898C57C8752E0BCD41D847FCF206738| |C4EFBBCB33E23786FC9ED806FFD117E42BF0897848700E8951E41EB5C87132098E8| |D814F25C6E2DCAD3798A7F5967C078EBF273F90DF31AFB4784A22D648D2E72EA3E6| |DE99AD844CC5AB62A87BF05AF3009C37ABCEB6179E164D4AA21915B9D466FDDE69A| |7B2F59FB25DADF4C2E1AF6A8D277E51B4149D9DAF5ADB55EBA5AAF55FBE65CA33| |-------------------------------------------------------------------|
-
At least build SOME slow resistance. All that recharge and you'd still get wrecked with a few slows on you. Ignoring layered mitigation through defense/resists, slows are the bane of regen. Even more so here as you are even more dependent on clicks to survive. This Hero build was built using Mids Reborn 3.0.4.7 https://github.com/Reborn-Team/MidsReborn Click this DataLink to open the build! Level 50 Science Scrapper Primary Power Set: Fiery Melee Secondary Power Set: Regeneration Power Pool: Leaping Power Pool: Speed Power Pool: Concealment Power Pool: Experimentation Ancillary Pool: Blaze Mastery Hero Profile: Level 1: Fire Sword -- SprScrStr-Acc/Dmg(A), SprScrStr-Dmg/Rchg(3), SprScrStr-Acc/Dmg/Rchg(3), SprScrStr-Dmg/EndRdx/Rchg(5), SprScrStr-Acc/Dmg/EndRdx/Rchg(5), SprScrStr-Rchg/+Crit(7) Level 1: Fast Healing -- Mrc-Rcvry+(A) Level 2: Cremate -- Hct-Dmg(A), Hct-Acc/Dmg/Rchg(9), Hct-Acc/Rchg(9), Hct-Dmg/EndRdx(23), Hct-Dam%(43) Level 4: Quick Recovery -- PrfShf-End%(A), SynSck-EndMod(40), SynSck-EndMod/Rech(40), SynSck-Dam/Rech/Acc(40), SynSck-Dam/Acc/End(42), SynSck-EndMod/+RunSpeed(43) Level 6: Build Up -- GssSynFr--Build%(A) Level 8: Combat Jumping -- LucoftheG-Def/Rchg+(A), WntGif-ResSlow(15), ShlWal-ResDam/Re TP(17), Rct-ResDam%(17), Ksm-ToHit+(46) Level 10: Reconstruction -- Pnc-Heal/EndRedux(A), Pnc-EndRdx/Rchg(11), Pnc-Heal/Rchg(11), Pnc-Heal/EndRedux/Rchg(13), Pnc-Heal(15) Level 12: Hasten -- RechRdx-I(A), RechRdx-I(13) Level 14: Stealth -- LucoftheG-Def/Rchg+(A) Level 16: Integration -- NmnCnv-Regen/Rcvry+(A) Level 18: Fire Sword Circle -- Arm-Dmg(A), Arm-Acc/Dmg/Rchg(19), Arm-Acc/Rchg(19), Arm-Dmg/EndRdx(21), Arm-Dam%(21), FuroftheG-ResDeb%(23) Level 20: Resilience -- GldArm-3defTpProc(A), StdPrt-ResDam/Def+(49) Level 22: Grant Invisibility -- LucoftheG-Def/Rchg+(A) Level 24: Dull Pain -- Pnc-Heal/EndRedux(A), Pnc-EndRdx/Rchg(25), Pnc-Heal/Rchg(25), Pnc-Heal/EndRedux/Rchg(27), Pnc-Heal(27) Level 26: Incinerate -- SprBlsCol-Acc/Dmg(A), SprBlsCol-Acc/Dmg/EndRdx(31), TchofDth-Dam%(33), Mk'Bit-Dam%(33), GldStr-%Dam(33), Dmg-I(43) Level 28: Instant Healing -- Pnc-Heal/EndRedux(A), Pnc-EndRdx/Rchg(29), Pnc-Heal/Rchg(29), Pnc-Heal/EndRedux/Rchg(31), Pnc-Heal(31) Level 30: Experimental Injection -- Prv-Absorb%(A) Level 32: Greater Fire Sword -- SprCrtStr-Acc/Dmg(A), SprCrtStr-Dmg/Rchg(34), SprCrtStr-Acc/Dmg/Rchg(34), SprCrtStr-Dmg/EndRdx/Rchg(34), SprCrtStr-Acc/Dmg/EndRdx/Rchg(36), SprCrtStr-Rchg/+50% Crit(36) Level 35: Char -- SprWntBit-Acc/Dmg(A), SprWntBit-Acc/Dmg/EndRdx(36), SprWntBit-Dmg/EndRdx/Acc/Rchg(37), Dcm-Build%(37), UnbCns-Dam%(37), Apc-Dam%(39) Level 38: Moment of Glory -- LucoftheG-Def/Rchg+(A), RechRdx-I(39), RechRdx-I(39) Level 41: Toxic Dart -- SprWntBit-Dmg/Rchg(A), SprWntBit-Acc/Dmg/Rchg(42), SprWntBit-Rchg/SlowProc(42) Level 44: Fire Blast -- Apc-Dmg(A), Apc-Acc/Dmg/Rchg(45), Apc-Acc/Rchg(45), Apc-Dmg/EndRdx(45), Apc-Dmg/Rchg(46) Level 47: Fire Ball -- PstBls-Acc/Dmg(A), PstBls-Dmg/EndRdx(47), PstBls-Dmg/Rchg(47), PstBls-Acc/Dmg/EndRdx(48), PstBls-Dam%(48), Ann-ResDeb%(48) Level 49: Adrenal Booster -- RechRdx-I(A), RechRdx-I(49) Level 1: Brawl -- SprBlsCol-Dmg/EndRdx(A), SprBlsCol-Acc/Dmg/Rchg(7) Level 1: Critical Hit Level 1: Sprint -- UnbLea-Stlth(A) Level 2: Rest -- Empty(A) Level 2: Swift -- Empty(A) Level 2: Health -- Pnc-Heal/+End(A) Level 2: Hurdle -- Empty(A) Level 2: Stamina -- PrfShf-End%(A) Level 50: Freedom Phalanx Reserve Level 50: Portal Jockey Level 50: Task Force Commander Level 50: The Atlas Medallion ------------
-
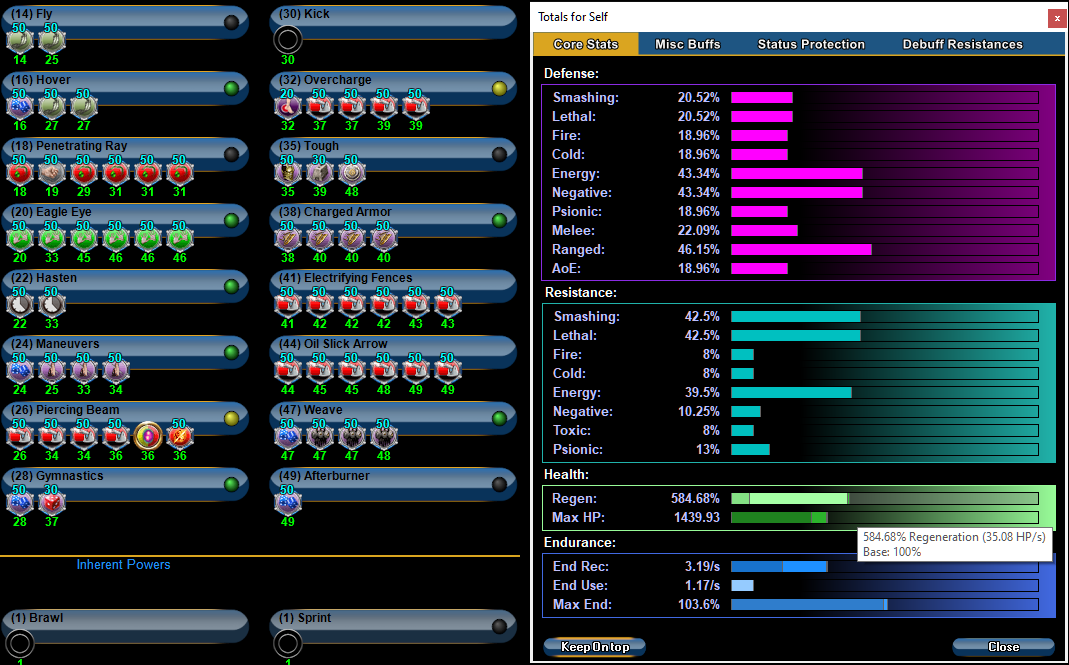
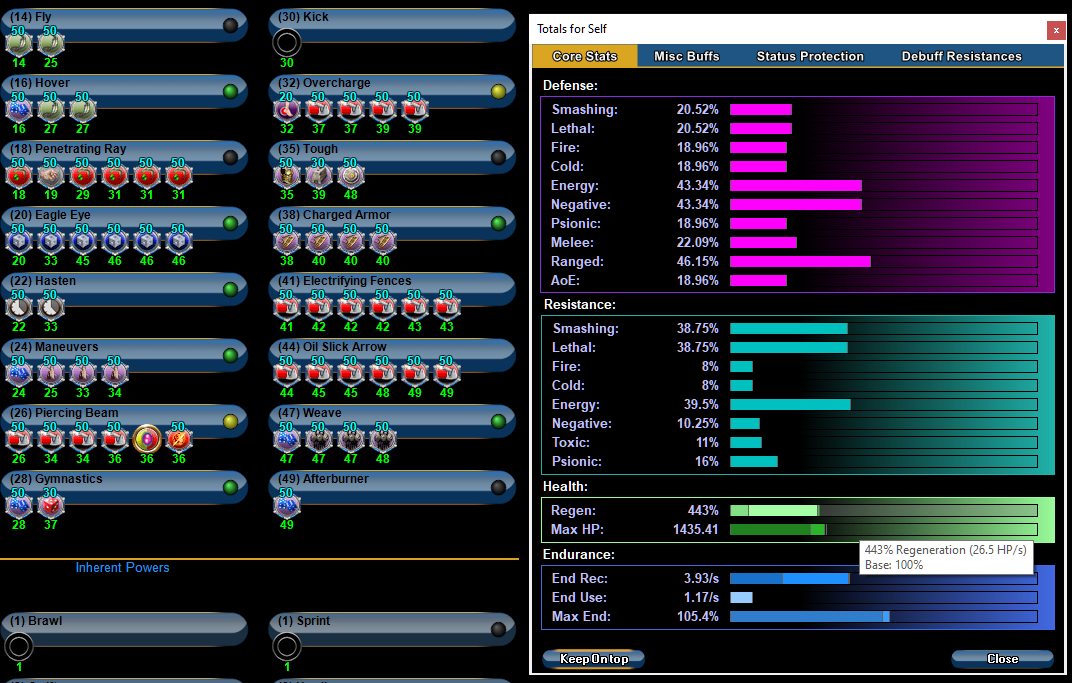
Your priorities are influenced by the ATs you build for and your overall build goals. Gaussians are great for super reflexes/ninjitsu/shield defense armor sets that rely on all 3 positional defense vectors. The total defense bonus is unparalleled and the recovery bonus helps with most of those sets which don't have self sustain options. On blasters the recovery bonus is inconsequential, The +HP and +DAM are useful but if we are going to go that route and look at all the bonuses, I'd rather take a melee attack and slot it with Makos for +HP, +DAM, +S/L resist AND more range defense. You also need to look at the build as a whole and not sets by themselves in a vacuum. Yes I prioritize defense but you see me making recommendations on shuffling slots around to make room for procs and recharge bonuses in this thread, Spending 5 slots for 2.5 range defense while I could invest those 5 slots for 3.75 or 4% defense AND free up slots so I can squeeze in more recharge bonuses/useful procs is inefficient. Gaussians is not a bad set, but it's not my first pick for blasters. However I do have blasters that 6 slotted aim or build up with it, like my latest ice/temp This Hero build was built using Mids Reborn 3.0.4.7 https://github.com/Reborn-Team/MidsReborn Click this DataLink to open the build! Blast From Da Past: Level 50 Science Blaster Primary Power Set: Ice Blast Secondary Power Set: Temporal Manipulation Power Pool: Speed Power Pool: Leaping Power Pool: Fighting Power Pool: Leadership Ancillary Pool: Mace Mastery Hero Profile: Level 1: Ice Bolt -- SprDfnBrr-Acc/Dmg(A), SprDfnBrr-Dmg/Rchg(3), SprDfnBrr-Acc/Dmg/Rchg(3), SprDfnBrr-Acc/Dmg/EndRdx(5), SprDfnBrr-Acc/Dmg/EndRdx/Rchg(5), SprDfnBrr-Rchg/+Status Protect(7) Level 1: Time Wall -- Thn-Acc/Dmg(A), Thn-Acc/Dmg/Rchg(46), Thn-Acc/Dmg/EndRdx(46) Level 2: Frost Breath -- Artl-Acc/Dam(A), Artl-Dam/End(7), Artl-Dam/Rech(9), Artl-Acc/Dam/Rech(9), Artl-Acc/Rech/Rng(11), Artl-End/Rech/Rng(11) Level 4: Super Speed -- BlsoftheZ-Travel/EndRdx(A), BlsoftheZ-ResKB(36) Level 6: Combat Jumping -- LucoftheG-Def/Rchg+(A), Ksm-ToHit+(37) Level 8: Freeze Ray -- SprBlsWrt-Acc/Dmg(A), SprBlsWrt-Dmg/Rchg(13), SprBlsWrt-Acc/Dmg/Rchg(13), SprBlsWrt-Acc/Dmg/EndRdx(15), SprBlsWrt-Acc/Dmg/EndRdx/Rchg(15), SprBlsWrt-Rchg/Dmg%(17) Level 10: Chronos -- RctRtc-ToHit/Rchg(A), RctRtc-Pcptn(37) Level 12: Ice Storm -- Ann-ResDeb%(A), Ann-Dmg/Rchg(39), Artl-Dam/Rech(39), Artl-Acc/Dam/Rech(39), Artl-Dam/End(40) Level 14: Hasten -- RechRdx-I(A), RechRdx-I(34) Level 16: End of Time -- SprAvl-Acc/Dmg(A), SprAvl-Dmg/EndRdx(17), SprAvl-Acc/Dmg/EndRdx(33), SprAvl-Acc/Dmg/EndRdx/Rchg(33), SprAvl-Rchg/KDProc(34), FuroftheG-ResDeb%(34) Level 18: Bitter Ice Blast -- SprWntBit-Acc/Dmg(A), SprWntBit-Acc/Dmg/EndRdx(19), SprWntBit-Acc/Dmg/Rchg(19), SprWntBit-Dmg/EndRdx/Acc/Rchg(25), SprWntBit-Rchg/SlowProc(27), Dcm-Build%(27) Level 20: Temporal Healing -- PreOptmz-Acc/Rech(A), PreOptmz-EndMod/End(21), PreOptmz-EndMod/Rech(21), PreOptmz-EndMod/Acc/End(23), PreOptmz-EndMod/Acc/Rech(23), PreOptmz-EndMod/End/Rech(25) Level 22: Boxing -- Empty(A) Level 24: Tough -- StdPrt-ResDam/Def+(A) Level 26: Weave -- LucoftheG-Def/Rchg+(A), ShlWal-Def/EndRdx(29), ShlWal-Def(29), ShlWal-ResDam/Re TP(33) Level 28: Future Pain -- SprBlsCol-Acc/Dmg(A), SprBlsCol-Dmg/EndRdx(40), SprBlsCol-Acc/Dmg/EndRdx(40), SprBlsCol-Dmg/EndRdx/Acc/Rchg(42), SprBlsCol-Rchg/HoldProc(42) Level 30: Maneuvers -- LucoftheG-Def/Rchg+(A), HO:Cyto(31) Level 32: Blizzard -- Artl-Acc/Dam(A), Artl-Dam/End(42), Artl-Dam/Rech(43), Artl-Acc/Dam/Rech(43), Artl-Acc/Rech/Rng(43), Artl-End/Rech/Rng(45) Level 35: Scorpion Shield -- LucoftheG-Def/Rchg+(A), Rct-Def(36), Rct-Def/EndRdx(36), Rct-ResDam%(37) Level 38: Time Lord -- GldArm-3defTpProc(A), UnbGrd-Max HP%(49) Level 41: Tactics -- RctRtc-ToHit(A), RctRtc-ToHit/Rchg(49) Level 44: Aim -- GssSynFr--ToHit(A), GssSynFr--ToHit/Rchg(45), GssSynFr--Build%(45), GssSynFr--Rchg/EndRdx(46), GssSynFr--ToHit/Rchg/EndRdx(48), GssSynFr--ToHit/EndRdx(48) Level 47: Time Stop -- BslGaz-Acc/Hold(A), BslGaz-Acc/EndRdx/Rchg/Hold(47), BslGaz-Acc/Rchg(47), BslGaz-EndRdx/Rchg/Hold(48) Level 49: Burnout -- RechRdx-I(A), RechRdx-I(50) Level 1: Defiance Level 1: Brawl -- Empty(A) Level 1: Sprint -- UnbLea-Stlth(A) Level 2: Rest -- Empty(A) Level 2: Swift -- Run-I(A) Level 2: Hurdle -- Jump-I(A) Level 2: Health -- Pnc-Heal/+End(A) Level 2: Stamina -- PrfShf-End%(A) ------------ The set of gaussians tops up both my S/L and Range defenses. I could have gone another way and allocated 3 of those slots to time wall, replace 2 slots with rectified reticle and still get the numbers I wanted but 6 slotting gaussians made more sense since it gave better bonuses AND provides better enhancement values.
-
My builds are tight, and there are more slot efficient ways to get what I want than 6 slotting gaussians. You do you and post your uber build and the reader can decide for themselves which one they prefer.
-
Efficiency. Read my breakdown in the post I referenced. Help me fix this mess (Beam/Temp) - Blaster - Homecoming (homecomingservers.com)
-
In this meta where billion inf god tier builds are easy to copy, the only glaring hole those builds have for most squishies is mez protection. I know, I've played a lot of melee blasters that have their defenses softcapped by level 30. I don't need fort, but I can tell you even with softcapped defenses mezzes do get through more often than you think, And it's even worse for those not using IOs. You think slapping fort on a blaster on SOs with no defense helps with the mez issue? It doesn't. Why do you think people take ROP even on those high end builds? Because they know they can't count on support players to do their jobs. Surely people that play empaths have been mezzed before and they understand how disruptive that is not only to themselves but to their team. This makes it even more amazing to me the number of people that downplay the importance of any anti-mez, not just clear mind, in the support arsenal.
-
There's one thing I care about more than any other buff in Emp's arsenal and it's not listed here. All the forts and RAs in the world mean nothing when those without mez protection can't do anything due to mezzes. Sure they aren't dying, but they are also not contributing. Conventional wisdom nowadays is to ignore the anti-mez powers and I hardly see people using them reactively, much less proactively, and that is a terrible shame. If you can't be bothered to use clear mind even reactively, and keep in mind there are 45 levels before clarion, maybe play something else. People that are truly great emps use clear mind. This is excluding solo emps of course, do whatever the heck you want when you solo.
-
I'm always down and ready for a SPINNING good time. You name the date and the place and I'll be there!
-
You got to the S/L softcap which is good but what's the game plan with this build? Stay at range and blast or punch face when the situation presents itself. I ask because I noticed you skipped all the melee attacks except for the PBAoE and that' a sign that you aren't really interested in melee blasting.
-
You don't need the annihilation -res proc in every attack that can take it, 1 is enough. They don't stack, taking multiples only increase your chances of proccing it. It's a nice quality of life bonus but not a necessity, I'd leave one in rain of fire and be done with it. In general I treat the -res procs as uniques, If I have slots to spare I'll do multiples to increase the chance that it'll proc but most of the time slots are tight and I don't have that luxury. If you fill the 6 slot in fire breath with artillery you'll be over the softcap. Also, 44.9% is good enough, you don't NEED to be at 45%. You can also squeeze a bit more % out of weave and maneuvers by boosting the Def and Def/end IOs in them, not the LOTG 7.5 though, keep that attuned so you can enjoy the bonuses at level 22. You can squeeze in more recharge. You have a lot of single slotted powers you don't plan to use, drop them. You already dipped into leadership, tactics is always useful and vengeance is another quick 7.5% lotg mule. combustion or consume aside, if you don't plan to use the really close range attacks those are on the chopping list to see if there are better alternatives. and there is. Since you went over with range defense with the changes you made in fire breath you can drop fire sword, refund 5 slots. The 6.25% recharge from posi is good but a 10% recharge from armageddon is better, and fireball gives more bang for the buck with another set of artillery. With those changes you have an opportunity to slot consume/combustion with 5 piece armageddon for a net recharge gain. Also I noticed you are slotting the defense powers with Def/End/Recharge enhancements. Go Def and Def/end, they all recharge fast enough and you get better values out of the former 2. Here's what the tuned version can look like This Hero build was built using Mids Reborn 3.0.4.7 https://github.com/Reborn-Team/MidsReborn Click this DataLink to open the build! Level 50 Magic Blaster Primary Power Set: Fire Blast Secondary Power Set: Fire Manipulation Power Pool: Flight Power Pool: Fighting Power Pool: Leadership Power Pool: Speed Ancillary Pool: Mu Mastery Hero Profile: Level 1: Flares -- SprDfnBrr-Acc/Dmg/EndRdx(A), SprDfnBrr-Acc/Dmg/Rchg(3), SprDfnBrr-Dmg/Rchg(3), SprDfnBrr-Rchg/+Status Protect(5), SprDfnBrr-Acc/Dmg/EndRdx/Rchg(5), SprDfnBrr-Acc/Dmg(7) Level 1: Ring of Fire -- Acc-I(A) Level 2: Fire Ball -- Artl-Acc/Dam(A), Artl-Dam/End(7), Artl-Dam/Rech(9), Artl-Acc/Dam/Rech(9), Artl-Acc/Rech/Rng(11), Artl-End/Rech/Rng(11) Level 4: Fly -- WntGif-ResSlow(A) Level 6: Rain of Fire -- Rgn-Knock%(A), Rgn-Acc/Rchg(15), Rgn-Dmg/EndRdx(15), Rgn-Acc/Dmg/Rchg(17), Rgn-Dmg/Rchg(48), Ann-ResDeb%(48) Level 8: Hover -- LucoftheG-Def/Rchg+(A), Ksm-ToHit+(13), BlsoftheZ-Travel(17), BlsoftheZ-ResKB(19) Level 10: Fire Breath -- Artl-End/Rech/Rng(A), Artl-Acc/Rech/Rng(40), Artl-Acc/Dam(40), Artl-Dam/End(43), Artl-Dam/Rech(45), Artl-Acc/Dam/Rech(45) Level 12: Aim -- RechRdx-I(A), GssSynFr--Build%(13) Level 14: Kick -- Empty(A) Level 16: Tough -- GldArm-3defTpProc(A), StdPrt-ResDam/Def+(27) Level 18: Weave -- LucoftheG-Def/Rchg+(A), ShlWal-ResDam/Re TP(19), ShlWal-Def(21), ShlWal-Def/EndRdx(36) Level 20: Blaze -- Apc-Dmg(A), Apc-Acc/Dmg/Rchg(21), Apc-Acc/Rchg(23), Apc-Dmg/EndRdx(23), Apc-Dam%(25) Level 22: Cauterizing Aura -- PreOptmz-EndMod/End/Rech(A), PreOptmz-EndMod/Acc/Rech(27), PreOptmz-EndMod/Acc/End(29), PreOptmz-EndMod/Rech(29), PreOptmz-EndMod/End(31), PreOptmz-Acc/Rech(31) Level 24: Maneuvers -- LucoftheG-Def/Rchg+(A), Rct-ResDam%(31), Rct-Def/EndRdx(34), Rct-Def(50) Level 26: Blazing Bolt -- Dcm-Build%(A), StnoftheM-Dam%(36), StnoftheM-Acc/Dmg(36), StnoftheM-Dmg/EndRdx/Rchg(37), StnoftheM-Dmg/ActRdx/Rchg(37), StnoftheM-Acc/ActRdx/Rng(37) Level 28: Hasten -- RechRdx-I(A), RechRdx-I(39) Level 30: Afterburner -- LucoftheG-Def/Rchg+(A), BlsoftheZ-Travel/EndRdx(45), BlsoftheZ-ResKB(46) Level 32: Inferno -- SprBlsWrt-Rchg/Dmg%(A), SprBlsWrt-Acc/Dmg/EndRdx/Rchg(33), SprBlsWrt-Acc/Dmg/EndRdx(33), SprBlsWrt-Acc/Dmg/Rchg(33), SprBlsWrt-Dmg/Rchg(34), SprBlsWrt-Acc/Dmg(34) Level 35: Build Up -- RechRdx-I(A) Level 38: Charged Armor -- UnbGrd-Max HP%(A), UnbGrd-Rchg/ResDam(39), UnbGrd-EndRdx/Rchg(39), UnbGrd-ResDam/EndRdx/Rchg(40) Level 41: Electrifying Fences -- Artl-End/Rech/Rng(A), Artl-Acc/Rech/Rng(42), Artl-Acc/Dam/Rech(42), Artl-Dam/Rech(42), Artl-Dam/End(43), Artl-Acc/Dam(43) Level 44: Tactics -- HO:Cyto(A) Level 47: Combustion -- FuroftheG-ResDeb%(A), Arm-Dmg(48), Arm-Acc/Dmg/Rchg(49), Arm-Acc/Rchg(49), Arm-Dmg/EndRdx(50), Arm-Dam%(50) Level 49: Vengeance -- LucoftheG-Def/Rchg+(A) Level 1: Defiance Level 1: Brawl -- Empty(A) Level 1: Sprint -- UnbLea-Stlth(A) Level 2: Rest -- Empty(A) Level 2: Swift -- Flight-I(A) Level 2: Hurdle -- Jump-I(A) Level 2: Health -- Pnc-Heal/+End(A) Level 2: Stamina -- PrfShf-End%(A) Level 49: Quick Form ------------ If you want to venture into melee blasting we can work on that too.
-
It has less value when you have softcapped defenses. It's biggest benefit is the invisibility it provides when stacked with a stealth IO. From a slot economy perspective it's 4 slots for 6.25% global recharge vs evasive man with 7.5% global recharge and 1.25% range defense at 3 slots. If you wanted it to cushion against -def you could take it, although it won't really do all that much. Both it and glue arrow are fairly weak debuffs, and since that build already has electric fences you can certainly swap out glue for flash. Finally as a blaster your mantra is always going to be kill stuff quick before it kills you. You only need enough defenses to survive the retaliation. So, would you rather blast stuff and kill them or use weak debuffs on stuff and not kill them?
-
You have softcapped range defense with hover turned on. I have the same comments about your build as I have with @Elia87's Beam/TA build. Much of what I said there about under-slotted weave/maneuvers and 6 slotted gaussians and power pick progression applies to you. I'd drop burn and fit in evasive maneuvers. As potent as burn is it'll find little use with your build and your game plan and evasive is an easy LOTG 7.5 and additional combat movement. You can defer combustion, fire sword and consume until much later, that will allow you to move maneuvers, rain of fire and hover up to complete your defenses and attack rotation by level 30. There aren't any good range defense options for PBAoEs, if you are going to put the superior blaster's wrath with the 5% range defense bonus anywhere consider it in inferno. That way you can slot blaze with apocalypse for another 10% global recharge. You can then slot the fury of the glad -res proc in combustion in place of the obliteration proc.
-
I use soul on my staff/regen brute with whirlwind. Without soul she won't be able keep spinning, and spinning is winning. soooo...
-
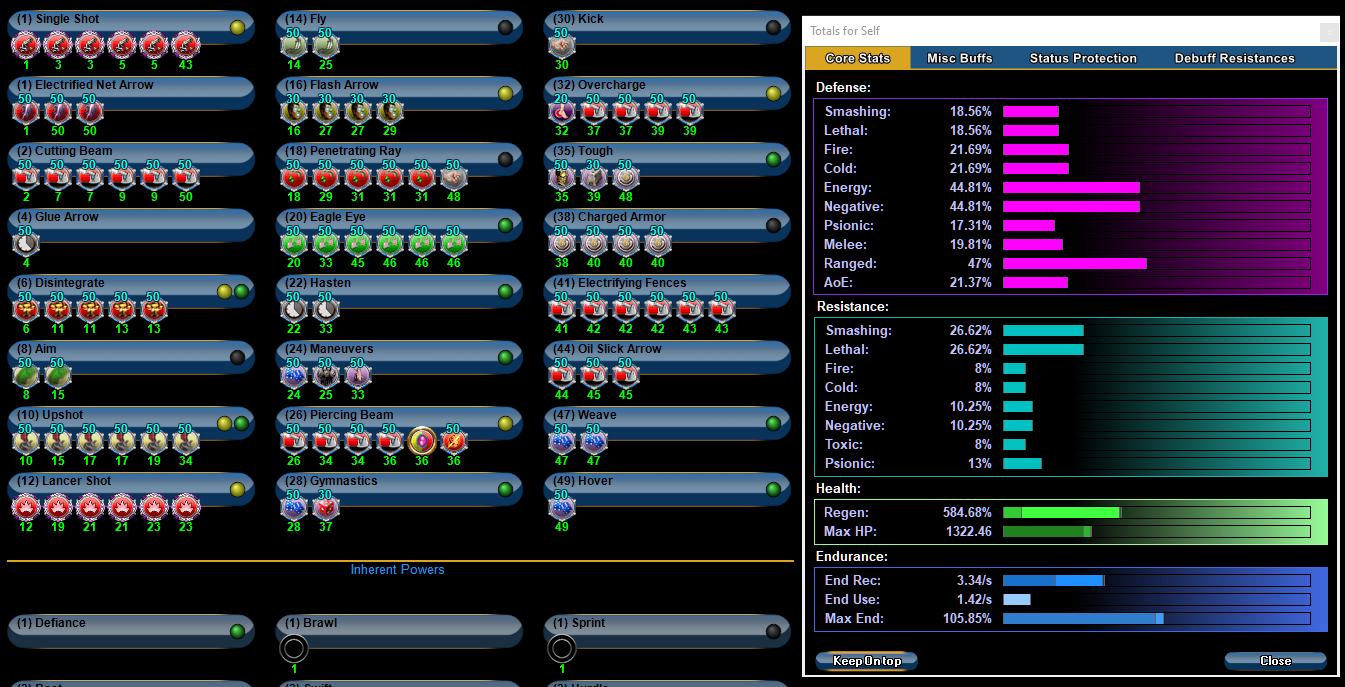
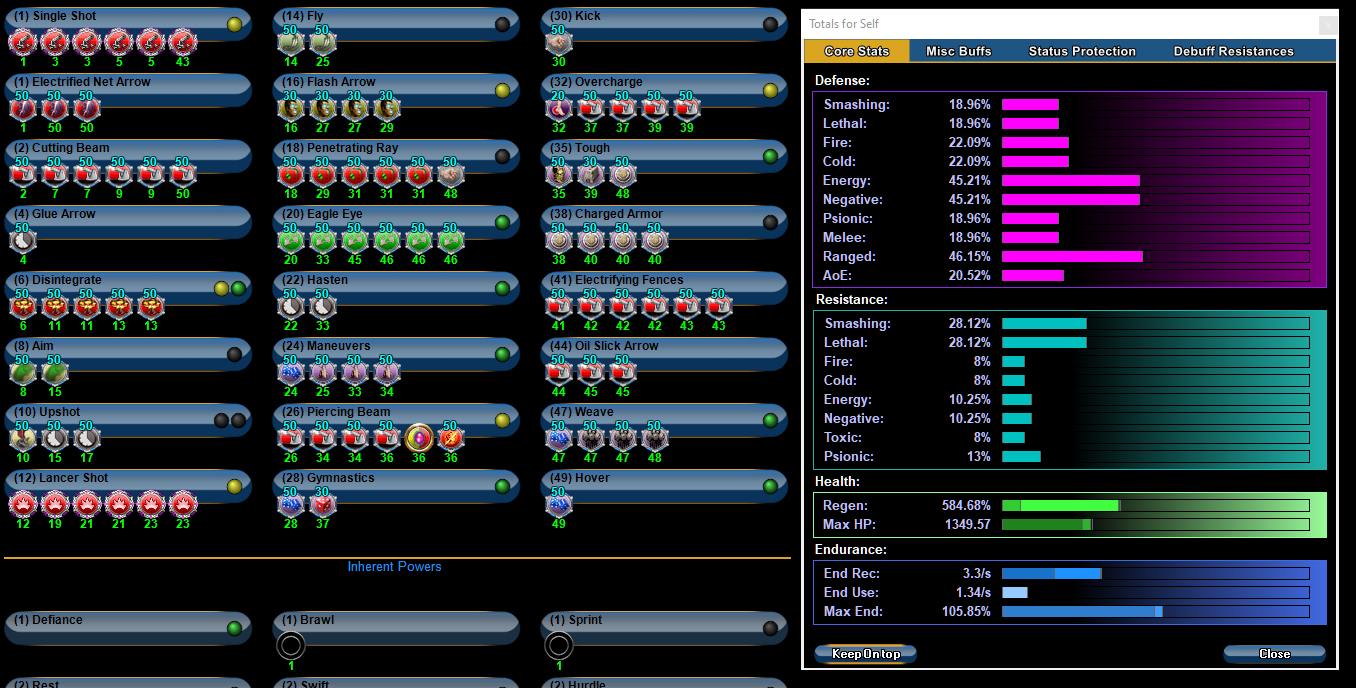
Nice Job, You stacked enough bonuses to get the numbers you were chasing with a subtheme of building for damage bonuses and you paid attention to the rule of 5. Very good first effort👍 Let's talk about power picks/progression as you level up or when you exemp down. One thing I like to do is to make sure that my characters are fully self sufficient by level 30. That means having a good rotation of attacks and mature defenses (at or close to softcap) by that level. You can have fully softcapped range defense by level 30, but that means you need to squeeze in your defensive toggles by then which will consume 5 power picks. Sounds like a lot, but quite doable. This Hero build was built using Mids Reborn 3.0.4.7 https://github.com/Reborn-Team/MidsReborn Click this DataLink to open the build! Level 49 Magic Blaster Primary Power Set: Beam Rifle Secondary Power Set: Tactical Arrow Power Pool: Flight Power Pool: Speed Power Pool: Fighting Power Pool: Leadership Hero Profile: Level 1: Single Shot -- Empty(A) Level 1: Electrified Net Arrow -- Empty(A) Level 2: Cutting Beam -- Empty(A) Level 4: Fly -- Empty(A) Level 6: Disintegrate -- Empty(A) Level 8: Hover -- LucoftheG-Def/Rchg+(A) Level 10: Upshot -- Empty(A) Level 12: Lancer Shot -- Empty(A) Level 14: Aim -- Empty(A) Level 16: Hasten -- Empty(A) Level 18: Penetrating Ray -- Empty(A) Level 20: Eagle Eye -- Empty(A) Level 22: Boxing -- Empty(A) Level 24: Tough -- Empty(A) Level 26: Weave -- LucoftheG-Def/Rchg+(A) Level 28: Gymnastics -- LucoftheG-Def/Rchg+(A) Level 30: Maneuvers -- LucoftheG-Def/Rchg+(A) Level 32: [Empty] Level 35: [Empty] Level 38: [Empty] Level 41: [Empty] Level 44: [Empty] Level 47: [Empty] Level 49: [Empty] Level 1: Brawl -- Empty(A) Level 1: Defiance Level 1: Sprint -- Empty(A) Level 2: Rest -- Empty(A) Level 2: Swift -- Empty(A) Level 2: Health -- Empty(A) Level 2: Hurdle -- Empty(A) Level 2: Stamina -- Empty(A) Level 1: Disintegrating Level 49: Quick Form ------------ This is an outline of how you can fit all those into the build before level 30. You can then continue the rest of your power picks. On some builds I even defer either aim or build up but only one of them, to a late 40s pick so I can get another attack in before level 30. Oil Slick Arrow is your second nuke, It's a must pick at 38 and it deserves more slots. It doesn't proc well though, so I'd go plain 6 piece artillery for the range defense bonus. I like the Force feed proc in the snipe, it's definitely a good place to put it. However I don't like it in kick because it's a power you will NEVER use, so why waste the inf? By the way you have both procs turned on which is why you see perma hasten, click on the yellow dot next to each power with the proc to deactivate the proc. You are pretty close to perma hasten, and a few proc activations will definitely get you there. With Hover on you are actually 2% over the range softcap, which means you have wiggle room to play around with slots. You can look for opportunies to fit in some other procs like the achilles -res and even the decimation build up procs. Upshot is 6 slotted with Gaussians and I noticed that you under-slotted Maneuvers and Weave for actual defense. You have 47% range defense with 6 slotted upshot, but you are consuming more end on Maneuvers and not taking advantage of the +HP set bonuses that reactive defense and shield wall offers at 3 slots. This is my personal preference but if I can I will slot weave with 1 LOTG + 3 Shield wall including the +res unique, and I will slot Maneuvers with 1 LOTG + 3 pices reactive defense including the + res unique. Both sets give +HP at 3 slots and reactive defense gives a little S/L resist as well. Upshot recharges in 26 seconds with perma hasten and 6 slotted. You can remove 3 slots to slot the defense toggles and that still leaves 3 slots in upshot which you can then slot with the build up proc and 2 piece 50+5 recharge IO. You are still over the softcap, and you have similar recharge on upshot, You lose 2.5% damage buff but you get more HP. Flash arrow could be a skippable power. You chased the 6.75% recharge but you could drop flash and pick up afterburner/evasive maneuvers for an easy LOTG 7.5 at the base slot and save yourself 3 slots. The -to hit on the power could be useful at times, but since you are softcapped to range it won't be a game changer. The big benefit is stacking it with a stealth proc in sprint to get full invis against most mobs. Evasive Maneuvers should be taken if you hover blast, as it increases your hover speed in combat and offer -fly resistance. Evasive is yet another toggle that drains end and that's going to impact your endurance consumption. Eagle eye - I see people slotting this and all sustains for heal, a lot of people do this. What is it actually doing for you? Look at the numbers 35 hp per second at level 50, how much are mobs hitting you for at that level? Your end recovery is at 3.19/s 6 Slotting this with pre-emptive optimization, you get: Same defense bonus, a little more recharge bonus, more end recovery to handle the additional toggles, and a loss of 4HP regen per second. Don't slot the blaster sustains for heals. They won't make a meaningful difference in your survival. Slot them for recovery. Enhance for damage. This applies to piercing shot and overcharge. You can also fit an Achilles -res proc in cutting beam as well so you have a faster recharging power that can potentially apply the proc. If you have inf to spare you can maximize proc chances by slotting it with 3 piece frozen blast set, omitting any piece that enhances recharge. This will give you some slow resist as well. You can change the Aegis set in charged shield with the 4 piece unbreakable guard for some endurance discount and the +7.5% HP unique. I don't think the Aegis unique is worth it, it only reduces mez duration, you will have naturally high range defense due to all the bonus stacking that even if you do get mezzed you have enough time usually to react and not get plastered immediately. I'd replace that with a ribosome. those are fairly cheap. You don't need a nucleus in piercing, they are expensive, an annihilation acc/dam will do the job and give you some max end bonus. Played around the build a bit, I'm not a big fan for building for +dmg, so I shuffled some slots and came up with this. This Hero build was built using Mids Reborn 3.0.4.7 https://github.com/Reborn-Team/MidsReborn Click this DataLink to open the build! Level 49 Magic Blaster Primary Power Set: Beam Rifle Secondary Power Set: Tactical Arrow Power Pool: Flight Power Pool: Speed Power Pool: Fighting Power Pool: Leadership Ancillary Pool: Mu Mastery Hero Profile: Level 1: Single Shot -- SprDfnBrr-Acc/Dmg(A), SprDfnBrr-Dmg/Rchg(7), SprDfnBrr-Acc/Dmg/Rchg(7), SprDfnBrr-Acc/Dmg/EndRdx(9), SprDfnBrr-Acc/Dmg/EndRdx/Rchg(9), SprDfnBrr-Rchg/+Status Protect(11) Level 1: Electrified Net Arrow -- Acc-I(A) Level 2: Cutting Beam -- AchHee-ResDeb%(A), SprFrzBls-Acc/Dmg(3), SprFrzBls-Dmg/EndRdx(3), SprFrzBls-Acc/Dmg/EndRdx(5), Bmbdmt-+FireDmg(37) Level 4: Fly -- BlsoftheZ-Travel/EndRdx(A), BlsoftheZ-ResKB(5) Level 6: Disintegrate -- SprBlsWrt-Acc/Dmg(A), SprBlsWrt-Dmg/Rchg(11), SprBlsWrt-Acc/Dmg/Rchg(13), SprBlsWrt-Acc/Dmg/EndRdx(13), SprBlsWrt-Acc/Dmg/EndRdx/Rchg(15), SprBlsWrt-Rchg/Dmg%(15) Level 8: Hover -- LucoftheG-Def/Rchg+(A), BlsoftheZ-Travel/EndRdx(46), BlsoftheZ-ResKB(47) Level 10: Upshot -- RechRdx-I(A) Level 12: Lancer Shot -- Apc-Dmg(A), Apc-Acc/Dmg/Rchg(17), Apc-Acc/Rchg(17), Apc-Dmg/EndRdx(19), Apc-Dam%(19), Dcm-Build%(21) Level 14: Aim -- RechRdx-I(A), GssSynFr--Build%(39) Level 16: Hasten -- RechRdx-I(A), RechRdx-I(37) Level 18: Penetrating Ray -- StnoftheM-Acc/Dmg(A), StnoftheM-Dmg/EndRdx(34), StnoftheM-Acc/ActRdx/Rng(34), StnoftheM-Dmg/EndRdx/Rchg(34), StnoftheM-Dam%(36), FrcFdb-Rechg%(37) Level 20: Eagle Eye -- PreOptmz-Acc/Rech(A), PreOptmz-EndMod/End(23), PreOptmz-EndMod/Rech(23), PreOptmz-EndMod/Acc/End(25), PreOptmz-EndMod/Acc/Rech(25), PreOptmz-EndMod/End/Rech(33) Level 22: Kick -- Empty(A) Level 24: Tough -- StdPrt-ResDam/Def+(A), HO:Ribo(33), GldArm-3defTpProc(33) Level 26: Weave -- LucoftheG-Def/Rchg+(A), ShlWal-Def/EndRdx(27), ShlWal-Def(27), ShlWal-ResDam/Re TP(29) Level 28: Gymnastics -- LucoftheG-Def/Rchg+(A), Ksm-ToHit+(29) Level 30: Maneuvers -- LucoftheG-Def/Rchg+(A), Rct-Def(31), Rct-Def/EndRdx(31), Rct-ResDam%(31) Level 32: Overcharge -- Rgn-Dmg/Rchg(A), Rgn-Acc/Dmg/Rchg(39), Rgn-Acc/Rchg(39), Rgn-Dmg/EndRdx(40), Rgn-Knock%(40), AchHee-ResDeb%(49) Level 35: Afterburner -- LucoftheG-Def/Rchg+(A), BlsoftheZ-Travel/EndRdx(36), BlsoftheZ-Travel(36) Level 38: Oil Slick Arrow -- Artl-Acc/Dam(A), Artl-Dam/End(40), Artl-Dam/Rech(43), Artl-Acc/Dam/Rech(43), Artl-Acc/Rech/Rng(43), Artl-End/Rech/Rng(45) Level 41: Charged Armor -- UnbGrd-ResDam(A), UnbGrd-ResDam/EndRdx(42), UnbGrd-ResDam/EndRdx/Rchg(42), UnbGrd-Max HP%(42) Level 44: Piercing Beam -- Ann-ResDeb%(A), Artl-Acc/Dam(45), Artl-Dam/End(45), Artl-Acc/Dam/Rech(46), Ann-Acc/Dmg(46) Level 47: Electrifying Fences -- Artl-Acc/Dam(A), Artl-Dam/End(47), Artl-Dam/Rech(48), Artl-Acc/Dam/Rech(48), Artl-Acc/Rech/Rng(48), Artl-End/Rech/Rng(49) Level 49: Glue Arrow -- TmpRdn-EndRdx/Rchg/Slow(A) Level 1: Brawl -- Empty(A) Level 1: Defiance Level 1: Sprint -- Empty(A) Level 2: Rest -- Empty(A) Level 2: Swift -- Empty(A) Level 2: Health -- Empty(A) Level 2: Hurdle -- Empty(A) Level 2: Stamina -- Empty(A) Level 1: Disintegrating Level 49: Quick Form ------------

-
You could go /energy manip if you are not into the karate cow look and prefer something a bit more low key.
-
You may have the force feedback proc enabled. click the yellow dot next to negatron slam to turn it off. You are close to perma-hasten, but not quite there, a few FF procs will get you closeer. Tactics isn't for acc, tactics is for blind and a personal preference. I tried to fit in answers to common and annoying status effects and I absolutely detest being blinded. For this build, tactics provides +to Hit which helps your snipe as well. So win/win there.
-
It does not need accuracy, but I think you will find the need to constantly re-toggle it back on bothersome enough that the power doesn't need additional slotting I tend to priority on range defense first still on melee blasters. reasoning is highlighted here: water blast/energy manipulation expensive build help - Blaster - Homecoming (homecomingservers.com) My typical setup for melee blasters focuses on Range defense S/L defense with Scorpion Shield Recharge Slow resist HP Everything else S/L defense will cover most of the melee range stuff, range defense covers everything else. Slow resist is important because a slowed/immobile melee blaster is a dead blaster, and also recharge debuffs suck. For /atomic you don't necessarily have to get S/L to softcap, beta decay can off set a few percentage points of S/L defense. But if you do go the S/L/R defense route slots will be really tight and you'll miss out on some proc opportunities. This is my sketch of the build based on your power pick decisions. This Hero build was built using Mids Reborn 3.0.4.7 https://github.com/Reborn-Team/MidsReborn Click this DataLink to open the build! Level 49 Mutation Blaster Primary Power Set: Fire Blast Secondary Power Set: Atomic Manipulation Power Pool: Speed Power Pool: Leaping Power Pool: Fighting Power Pool: Leadership Ancillary Pool: Mace Mastery Hero Profile: Level 1: Flares -- SprDfnBrr-Acc/Dmg(A), SprDfnBrr-Dmg/Rchg(15), SprDfnBrr-Acc/Dmg/EndRdx(17), SprDfnBrr-Acc/Dmg/Rchg(17), SprDfnBrr-Acc/Dmg/EndRdx/Rchg(19), SprDfnBrr-Rchg/+Status Protect(19) Level 1: Electron Shackles -- HO:Nucle(A) Level 2: Fire Ball -- Artl-Acc/Dam(A), Artl-Dam/End(3), Artl-Dam/Rech(3), Artl-Acc/Dam/Rech(5), Artl-Acc/Rech/Rng(7), Artl-End/Rech/Rng(7) Level 4: Super Speed -- BlsoftheZ-Travel/EndRdx(A), BlsoftheZ-ResKB(5), WntGif-ResSlow(47) Level 6: Positron Cell -- BslGaz-Acc/Hold(A), BslGaz-Acc/Rchg(48), Apc-Dam%(48), UnbCns-Dam%(48), Dcm-Build%(49) Level 8: Fire Breath -- Artl-Acc/Dam(A), Artl-Dam/End(9), Artl-Dam/Rech(9), Artl-Acc/Dam/Rech(11), Artl-Acc/Rech/Rng(13), Artl-End/Rech/Rng(15) Level 10: Combat Jumping -- LucoftheG-Def/Rchg+(A), Ksm-ToHit+(11) Level 12: Aim -- RctRtc-ToHit/Rchg(A), RctRtc-Pcptn(13), GssSynFr--Build%(34) Level 14: Hasten -- RechRdx-I(A), RechRdx-I(34) Level 16: Boxing -- Empty(A) Level 18: Blaze -- SprWntBit-Acc/Dmg(A), SprWntBit-Acc/Dmg/EndRdx(37), SprWntBit-Acc/Dmg/Rchg(39), SprWntBit-Dmg/EndRdx/Acc/Rchg(39), SprWntBit-Rchg/SlowProc(39) Level 20: Metabolic Acceleration -- PreOptmz-Acc/Rech(A), PreOptmz-EndMod/End(21), PreOptmz-EndMod/Rech(21), PreOptmz-EndMod/Acc/End(23), PreOptmz-EndMod/Acc/Rech(33), PreOptmz-EndMod/End/Rech(33) Level 22: Tough -- StdPrt-ResDam/Def+(A), GldArm-3defTpProc(23) Level 24: Weave -- LucoftheG-Def/Rchg+(A), ShlWal-Def/EndRdx(25), ShlWal-Def(25), ShlWal-ResDam/Re TP(27) Level 26: Blazing Bolt -- StnoftheM-Acc/Dmg(A), StnoftheM-Dmg/EndRdx(27), StnoftheM-Acc/ActRdx/Rng(29), StnoftheM-Dmg/EndRdx/Rchg(29), StnoftheM-Dam%(33) Level 28: Atom Smasher -- SprAvl-Acc/Dmg(A), SprAvl-Dmg/EndRdx(34), SprAvl-Acc/Dmg/EndRdx(36), SprAvl-Acc/Dmg/EndRdx/Rchg(37), SprAvl-Rchg/KDProc(37), FuroftheG-ResDeb%(47) Level 30: Maneuvers -- LucoftheG-Def/Rchg+(A), Rct-Def(31), Rct-Def/EndRdx(31), Rct-ResDam%(31) Level 32: Inferno -- SprBlsWrt-Acc/Dmg(A), SprBlsWrt-Dmg/Rchg(40), SprBlsWrt-Acc/Dmg/Rchg(40), SprBlsWrt-Acc/Dmg/EndRdx(43), SprBlsWrt-Acc/Dmg/EndRdx/Rchg(43), SprBlsWrt-Rchg/Dmg%(46) Level 35: Scorpion Shield -- LucoftheG-Def/Rchg+(A), LucoftheG-Def/EndRdx(36), LucoftheG-Def(36) Level 38: Ionize -- RctRtc-ToHit/Rchg(A), RctRtc-ToHit(40) Level 41: Rain of Fire -- Artl-Dam/End(A), Artl-Dam/Rech(42), Artl-Acc/Dam/Rech(42), Ann-Dmg/Rchg(42), Ann-ResDeb%(43) Level 44: Negatron Slam -- SprBlsCol-Acc/Dmg(A), SprBlsCol-Dmg/EndRdx(45), SprBlsCol-Acc/Dmg/EndRdx(45), SprBlsCol-Dmg/EndRdx/Acc/Rchg(45), SprBlsCol-Rchg/HoldProc(46), FrcFdb-Rechg%(46) Level 47: Tactics -- HO:Cyto(A) Level 49: Beta Decay -- AchHee-ResDeb%(A) Level 1: Brawl -- Empty(A) Level 1: Defiance Level 1: Sprint -- UnbLea-Stlth(A) Level 2: Rest -- Empty(A) Level 2: Swift -- Run-I(A) Level 2: Health -- Pnc-Heal/+End(A) Level 2: Hurdle -- Jump-I(A) Level 2: Stamina -- PrfShf-End%(A) Level 49: Quick Form ------------ If you have mastered movement you can absolutely take advantage of your melee attacks without needing S/L defense. I built a dark/atomic this way and picked up leviathan so I can use both POSI fist and Knockout blow. The knockdown in Dark's umbral Torrent helps with setting up opportunities to go in, you could potentially use rain of fire to a similar effect.
-
You can get temp jetpacks from the P2W vendor, they are quite cheap and will last you a long time. I consider the ability to stealth through mobs more important and practical than having to turn on fly every once in a while to get some vertical. I wouldn't ditch beta decay, but I would defer the pick until much later. Here is the real tip I'm going to give you. This has nothing to do with builds. Learn to embrace the strengths of blaster secondaries, in this case the fact that /atomic encourages you to melee. Learn how and when to use those powers. You can hide behind range blasting/hover and play a sentinel wannabe with 1/4 the protection or you can learn to really play a blaster and be a force to be reckoned with. If you can play a hyper aggressive melee blaster successfully, then chances are you would have more mastery of this game and fundamentals than 90% of people that play it.
-
Beta decay is not doing much for you then and I doubt taking it that early give you any benefit when you exemp down Hasten has 3 slots, 2 50+5 IO is enough You don't need fire blast and flares, pick one and dump the other Posi cell can be proc monstered. Put a Kismet ACC in combat jumping or another defense toggle that's always on so you have 95% chance to hit vs +4s Super speed instead of super jump for full invis with a stealth IO in sprint If you plan to exemp down at all your power selection can be tuned a little better with more attacks, there's no need to grab weave by level 22 There is no reason not to find ways to fit in both +res uniques from reactive defense and shield wall You have the blasters wrath ATO but no defiant barrage. Both Blaster ATOS are very good and you should find ways to 6 sloth both I'd try to fit the -res procs in, there are ways to get range softcap and still fit those in and proc monster posi cell.
-
10