The Beta Account Center is temporarily unavailable
×


ZemX
-
Posts
1968 -
Joined
-
Last visited
-
Days Won
6
Content Type
Profiles
Forums
Events
Store
Articles
Patch Notes
Everything posted by ZemX
-
Not weird at all. You don't have trouble finding a solo challenge these days. It's teaming at level 50 that's become a joke, mostly. So yeah, I am totally looking forward to being able to play at 50 on a team and not have it be just a rolling explosion that obliterates all in its path. Fun to watch the first time. Boring as all hell afterwards.
-

What are the powersets with the least rooting and/or fastest animations?
ZemX replied to c67f's topic in Archetypes
There are probably exceptions, but generally speaking, powers that affect enemies root you for the duration of the animation. Powers that affect only yourself and/or your allies usually don't unless it's part of the theme of the power (e.g. Hibernate). Powers that summon pets, including stationary pets like Spirit Trees or Triage beacons that only buff/heal allies, still root you for their animation. So... look for buff/heal sets among support powersets and self-defense/passive armor sets among melee types. e.g. Super Reflexes has nothing that roots you. But sets that have accurate heals/endurance drains like Radiation, Bio, and Energy Armors (to name a few) have a power or two that can root you. Toggle heavy armor sets will only root you if the toggle can affect enemies and then only when you activate the toggle... not when it is later affecting enemies while enabled. So Dark Armor for example, despite having a lot of powers that affect enemies, only really roots you during combat when you use the AoE heal since you're probably leaving the other toggles running. It's a bit different with attack sets. While you are running an attack chain, you're rooted, whether that chain is composed of many light/fast attacks or fewer slow/heavy attacks. The difference, I suppose, is that the fast chain gives you more opportunities to break off, change your mind. A good example is found in the DFB trial. It can suck if you just started a long animation power at the same time you notice a green bubble forming beneath you while fighting the Hydra heads. You're rooted for maybe three seconds doing Sands of Mu instead of 1 second doing a tier 1 fast attack, say. So if that's what you mean, go with fast attack sets for the most chances to move if you need to move. Sets like claws, katana, savage melee, I don't know the blast sets as well. Archery probably? There's a mix of long/short animations in most I think. Snipes and Nukes being long rooting powers. etc. -
Coincidence?!

-
Half rhetorical. It does feel a bit to me like it's not much different than x4 if I am splitting spawns, aside from the total number of mobs you have to get through to complete it. But I was also curious what others thought of it. So thanks for that. It is completely up to the people who run challenges to agree on a set of rules if there's to be any competition on it. This one seemed more to be like an exploratory "Can you do it?" and nobody was hiding HOW they were doing it. So no foul, in my book. If this ever progressed to the point where people were competing, like Trapdoor or Pylons, there'd probably be clear times added to the mix and that would sort who is having to pull and split vs. who can hop in and handle the entire spawn at once.
-
The Yin and Yang of PuGs for me is that I put up with the bad ones in order to get what I really want out of them: Something different every time. I rarely run Incarnate level content. Super boring to me. Mid-level TFs and mission teams, preferably at as high a difficulty level as the team can handle. These end up NOT being teams where whole spawns vaporize in a couple seconds. These are teams where it actually matters that team members are doing something reasonably approaching tactics. It's not super difficult, but it's not face-rolling either.
-
Fair point. Maybe for something with an already lengthy animation or a big AoE.
-
While my Rad/Staff could do it at +1/x8, it wasn't going to happen at +4/x8. Not without picking each spawn apart with careful pulls, at which point... am I really doing x8? The problem wasn't Tar Patch since I can just run away from it. It was the toHit debuffs. No Focused Accuracy exemplared to 29. I had Tactics and a Kismet IO only and that wasn't enough. My Last Hit Chance was floored around 11%. And that's the ballgame.
-
Unless I'm doing something wrong, no it won't. Placate + Stealth AS is going to be around 4s ArcanaTime and will deal scale 7 damage. Quick AS, even without the crit, is scale 2.76 damage in 1.188s cast time. And it gets better from there with crit chances. Placate may see some use in strictly solo Stalker builds, but it's no use on a team or in improving the Stalker's damage output. The entire idea of Placate hails from the original faulty assumption in the creation of the AT that it would be some sort of hit-and-run assassin type. Yet even way back then you were doing better to stay and scrap after your initial AS. Nowadays when you can build a Stalker to be tremendously sturdy, I usually try to fit Provoke into the build somewhere as getting things to attack me ends up being a bigger problem than stopping them FROM attacking me.
-
Oh wow... do a search on Enervating Field over at CoD. Positron, Antimatter, and Bile all have unresistible 30% res debuff. The kicker? That includes the Positron Signature Summon! 😈
-
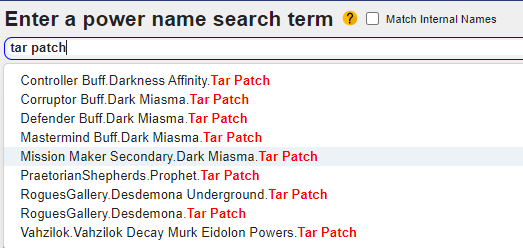
Ah ha! Figured out why I missed this the first time. I had turned off "Show PvP Data" in the top margin of City of Data. This unresitable -res effect only affects players. All player accessible versions of Tar Patch were changed at some point to something that redirects to "Dark Miasma.Tar" which does not contain the unresistible effect. All NPC versions are still the old Pets.TarPatch which has the unresistible (against players) res debuff. So just Prophets, Desdemona, Decay Murk Eidolons, and AE. https://cod.uberguy.net/html/entity.html?entity=vahzilok_decay_murk_eidolon_boss Interesting to note the Mission Maker version is unresistible. I've never done any of the AE801s but now I wonder if this features in any of them.
-
Okay, completed normal +1/x8. I am ordinarily built well enough for level 29 but that Tar Patch nearly sent me to the hospital a few times. Mainly, don't want to be surrounded and def floored WHEN it hits. Because then you have a couple seconds to run and hide around a corner. Well.. I did anyway. Safest to pull and get into a bit of a retreating fight until the Prophets drop their patches. Then I can stand and fight. Staff did okay with it's two AoEs at this level. I don't even have Ground Zero and Radiation Therapy procced up.. though I plan to soon probably. That would have made this slightly easier.
-
Confirmed. The dang Tar Patch is bugged. No wonder these guys are so mean! This is my Rad/Staff who even at 50 is not built for capped resistances because I left room for MoT and Sky Splitter's +res bonus to cap me, which they easily do. Except here I don't have access to Sky Splitter... oops. There's +13% res down the tubes. Then I get hit by unresisted Tar Patch. I got very close to dying on the first couple fights. But yeah... it's just a matter of moving out of the tar patch quickly enough and I can take each spawn. Not done yet but if I'm careful, the normal +1/x8 on Rad/Staff should be no big deal. By the way... here's the old bug report. I wonder if it got fixed for Player cast Tar Patch but not all the NPCs that can do it:
-
Which is why I said I thought res debuffs were resisted BY damage resistance. What you're saying would be true only if these tar patches were unresistable. I don't see that in City of Data's description of them at least. Again, unless I am missing something. Edit: I was missing it. It's there in City of Data. The version that Prophets are using is tagged "Ignores Resistance". Sheesh!
-
Okay, I don't get how they dropped your resistances that far. I thought res debuffs were resisted BY damage resistance. Or is Tar Patch not their only res debuff?
-
Well it WAS just straight up +1/x8... 3 hours ago. Damnit, @Werner! 😈
-
So is this +1/x8, enemies buffed, players debuffed, no temps, no insps? Is there anywhere a description of exactly what the enemies buffed and players debuffed effects actually do?
-
That's not toast! And I'm prepared to argue for another 14 pages about it!!
-
Oddly enough... not in this case. Both Panacea and Perf.Shifter offer +end%. So they do scale with max. endurance. My 120end Tanker receives 12hp ticks from Perf. Shifter's +10% end proc (actually 12.09 for some odd reason, but whatever). The other benefit of the proc is that it's always +10% whereas the EndMod, like any enhancement, can scale down when you exemplar. If you never do that, it's not an issue and you'll always be pretty close to the same as the Perf.Shifter with a 50+5 EndMod IO (13.25% vs 15%). But if you do, not only will the EndMod in Stamina be less effective (by a little) but so will all the EndRdx you have slotted in powers. But that Perf.Shifter proc keeps going for 10% end no matter what. As to the unreliability of a proc, if you're in a situation where going one minute without a +10% boost to your end has you bottom out it means you have a serious deficit of overall recovery to address. i.e. Your problem is not the proc's variance. Otherwise there is plenty of time for the proc to happen and you really can consider it equivalent to 15% end/min. I don't think we're talking huge differences either way in Stamina but it's a bigger difference in powers that offer less base recovery than Stamina. Like Physical Perfection. On the flip side, powers that offer more base recovery than Stamina are better with an EndMod first.
- 35 replies
-
- 1
-

-
- question
- invulnerability
- (and 1 more)
-
Or it implies the defense wasn't keeping me alive, in which case ANYTHING makes me "stronger" if I can trade some defense for it. That's the point I'm making. We're Immortal, Dying, or Dead. If that defense isn't contributing to me being Immortal or at least not dying quickly enough to become dead before the fight is won... then it's effectively of zero benefit. More to the point, if it's not already doing that for me in cases where defense debuffs are NOT in play, then it most certainly isn't helping me in cases where they ARE. Yeah this depends a little on how one plays. If you solo a lot and rely on Incarnates, it's a different story. I don't. I team a lot. And I find team ITFs that aren't L44 challenge mode laughably easy, defense or no defense for Barrier to add on to. I also exemplar a lot, so my basic build strategy ignores Incarnates. They are a bonus, not a crutch. For Rad Armor at least, the wall is 90% res AND an 1100hp Absorb shield AND a decent self heal (that I rarely use). This is why I noticed no problem when I gave up on aiming for IO defense. So yeah, I did aim for more recharge and that debuff resistance. Even shaving a few seconds off of Particle Shielding is more significant to my survival than defense I can't count on when I need it most. If it's of more benefit to Fire Armor then I believe you. I have never tried it.
-
I dumped defense and got tougher on the ITF and weaker nowhere else. If there's a perception problem anywhere it was that the defense was doing me any good in the first place. It turns out the only place I needed it was the only place it abandoned me. I'm more than tough enough to survive when enemies AREN'T hitting me 95% of the time, so what do I need defense for? To avoid debuffs but only when one of them isn't defense debuff? I'm gonna stick with Def w/DDR + res stacked on top is tougher than Res wo/DDR + Defense stacked on top, even if you can't reach res caps in the former case. You don't need to. Of course... tough enough is all you DO need in any case. So one being tougher than the other isn't always (or even often) going to matter. This discussion can only really be about surviving the game's hardest challenges. Anything else? Even a decently built Tanker is nigh-indestructible. Any normal ITF ("normal" being run at 54 with a 50+1 Incarnate and a decent team) is a complete pushover these days.
-
Sure, but only when you're not up against a crowd of defense debuffers is my point. I found that happened often enough that the investment in defense bonuses just wasn't worth it. By shifting that to recharge, regen, and debuff resist bonuses instead it made me better able to survive those fights against def debuffers and didn't affect at all my ability to survive anything else. So win/win. It's nice to have that base of defense on teams where you might catch enough defense buffs to put you safely over the soft-cap, but I usually prefer to be more self-sufficient on a tanker so I'm good in any situation. As for MA, yeah Storm Kick is the shit. But I'd rather stack that defense on a toon with DDR so I decided to try the @Werner-recommended SD/MA Tanker. If I can stop creating alt-tanks, I might even get somewhere.
-
This is my experience with Rad/Staff. It was my first ever Tanker and it was a blast to play. Big, fast, early AoEs on a Tanker. But as a result, I've had exactly the reaction to some of the other sets I've tried that the OP has. The "good" ones like Rad Melee and Dark Melee just are kind of dull getting started. Maybe they are better later on but I am having trouble getting there. It's subjective though. "Slow but hits like a truck" just may not be my thing.
-
This was a lightbulb moment for me when I finally got this about my Rad tanker. I gave up trying to avoid debuffs with fragile non-DDR defense and sought stacking more debuff resist from IOs and pools. 2-slot Winters, Tactics, Focused Acc. Tactics even got me some Confuse protection, which Rad also lacks, so I could stop doing the bidding of succubi (sorry ladies!) Sooo much better now.
-
Yeah, I should have said my problem is really more about the secondary and not entirely about the performance. I have at this point, in various stages of low to mid-levels: SD/Rad, SD/Dark, and SD/MA. And I've taken an Ice/SD Stalker to 50, so I am pretty familiar with how Shield operates. But... the Rad and Dark melee Shield tankers have been kind of a slog. They are both just so uninspiring to play so far. Slow. Late-developing. Lack-luster AoE on Dark. My Rad/Staff just took off and needed no pushing from me to run all the way to 50 on pick-up teams. Big, fast, early AoEs. The Rad has just gotten Irradiated Ground which is both good (or will be once procced up) but also kind of boring. You just stand there and it does damage. Meh. The MA is somewhat interesting and might be the one. It may only have the one AoE but it's fast recharging, decent sized (though not quite as large as Staff's Eye of the Storm), and takes an FF:Rech proc. It also has Storm Kick to provide an extra defense boost which, together with decent DDR, should make it hard to crack. Outside of Shield, I have been considering (but haven't rolled up yet) an Invuln or SR tanker with either Staff or TW as the secondary. ETA: Big reason I might consider SR/Staff, even though I've already got one Staff tanker is the +res on Staff's Form of Body + Sky Splitter. With IOs, Sky Splitter's +res, Might of the Tanker's +res, maybe even that little bit of Absorb from Gauntleted Fist, AND scaling resistances? Who needs a heal? Okay... outside of auto-hit situations, this guy would be very hard to kill even at 40% health.
-
On my Rad tanker, I eventually gave up on bothering much with defense. But Rad already layers absorb, healing, and resistance and that's good in all cases I've found except when I am surrounded by angry, buffed, Cimerorans with no access to Incarnates to keep defense up (level 44 challenge). Aside from that, I haven't needed defense with this build. I'm still trying to find a defense-based tanker I like enough to play to 50. I generally think building resistance onto a defense set is better than building defense on a resistance set because of DDR. Obviously if you can rely on Incarnate abilities for it, that's different, but I exemplar often enough I can't rely on it in general.