
Xandyr
-
Posts
718 -
Joined
-
Last visited
Content Type
Profiles
Forums
Store
Articles
Patch Notes
Posts posted by Xandyr
-
-
On 10/24/2022 at 9:42 PM, Flynnstonez said:
I love your builds, always have and always will mate. I was wondering, with the new Battle Axe buffs, how would you build a Bio/Battle Axe Tanker? Specifically for survivability.
New to Bio, but want to see if this can stack up to my Rad/Mace. Any help would be HUGELY appreciate mate.
thanks!!!!!
Hard to build one in Mids since it's not been updated to reflect all the changes in page 5.
-
Why Tanker?
Well, pull up a seat and let me tell you the story...
Once upon a time...
No. Wait.
In a galaxy far...
No, that's not how it goes.
A long time ago..
Still not it.
Hmm...
Ah yes! Why a tanker?
BECAUSE WE CAN'T STOP!
AND WE WON'T STOP!
BECAUSE WE.
ARE.
GODS.
AMONG.
MEN.
Damn right.
/em micdrop🎤
😎
-
1 hour ago, SableShrike said:
Just FYI, the Kismet only activates when the power it’s in is “on”.
So only when PFF is on and you can’t attack, as kelika mentioned.
D'oh!
-
I'm not at my PC. But I think I put 4 slots in Equip (gladiator unique and resist/end, steadfast unique and maybe the scaling redist?)
Tactical I put maybe 2 gift of ancient?
PFF I put the kismet unique
Can't remember the rest. Once I get a chance I'll pull it up.
I actually like playing my mercs/ff now.
-
1 hour ago, shadowrex said:
A few fixes in this thread:
I think you may have seen it since you've posted in there but just in case.
Ya, I tried that and apparently I'm not that technically intelligent.
-
haha I feel ya.
Just remember to run in Offensive, and when you start getting a little overwhelmed, switch to Defensive. You hit the nail on the head....Bio is "spread out". It hits SEVERAL different things, but doesn't necessarily excel at 1. All 3 things work together in unison, and when they do, it's a sight to behold.
-
You're welcome.
Before I start, make sure your "sliders" are set the same on DNA Siphon/Parasitic/Evolving, and that Incarnate powers are turned off. That's one thing I hate about opening someone else's build... "I have capped defenses and resists and can't die and kill everything just by looking at them!"....only to find out that they have all the Incarnate powers turned on, any slider bars turned to max, BU/Aim/Gaussian's turned on, etc etc.
When I build my toons in Mids, I keep any sliders turned to just 1 (like Evolving Armor...yeah, the more you're surrounded, the higher your resists go. But I always calculate it with just 1 foe in range). I never turn on Incarnates, turn off Gaussian's if I have it slotted) etc. This way I can TRULY see where I'm standing.
Regen IS a big part of Bio's strength. However, I feel with the higher Defenses/Resists, a lower Regen rate will be OK because you're not getting hit as often, and when you do, you're taking less damage. Plus, with more recharge, you can fire off Ablative/DNA Siphon/Parasitic even faster....thus increasing your survivabilty.
-
16 minutes ago, plainguy said:
I have a petless Necro Trick Arrow and the 3 specters from the attacks are very helpful. They hold aggro well.
Is it truly "petless" if you have Spectres?
Imagine how much better the damage and holding aggro/CC would be if you had pets... 🤣
-
 1
1
-
-
With only 1 foe in range of Evolving Armor, and 1 stack of MotT proc, IN OFFENSIVE, you've got capped S/L Resistances, and capped F/C/E/NE defenses.
Ablative is up every 32 seconds, DNA Siphon every 29 seconds, and Parasitic every 90 seconds.
The Blistering Cold IO set works perfectly in Chain Induction, as the proc has a chance to proc on EVERY enemy it chains to.
IF by some chance you see that your End is sucking (remember that DNA Siphon will give you some End every 29 seconds) you *could* turn off Focused Accy. Mids does NOT take into consideration the Performance Shifter Proc, or the Panacea proc. But I don't think you'll have any issue whatsoever (especially since /Electrical Melee has a chance to transfer some End to you with each attack).
With Tactics and Focused Accy, you shouldn't have any problems at all with hitting the bad guys.
Since the new Power level changes, I would take Havoc Punch over Charged Brawl.
For the Alpha, I would consider Agility Core mainly for the Recharge bonus (although the reduce End cost might help as well).
For Hybrid, I strongly encourage Melee Core, and Destiny I'd take Ageless (for the DDR).
-
I'm not sure if I wouldn't build it like this....
This Hero build was built using Mids Reborn 3.4.7
https://github.com/LoadedCamel/MidsRebornClick this DataLink to open the build!
Level 50 Science Tanker
Primary Power Set: Bio Armor
Secondary Power Set: Electrical Melee
Power Pool: Fighting
Power Pool: Leadership
Power Pool: Speed
Power Pool: Leaping
Ancillary Pool: Energy MasteryHero Profile:
Level 1: Hardened Carapace -- UnbGrd-ResDam(A), UnbGrd-ResDam/EndRdx(9), UnbGrd-Rchg/ResDam(11), UnbGrd-ResDam/EndRdx/Rchg(15)
Level 1: Charged Brawl -- PndSlg-Acc/Dmg(A), PndSlg-Dmg/Rchg(3), PndSlg-Dmg/EndRdx(3)
Level 2: Inexhaustible -- NmnCnv-Regen/Rcvry+(A)
Level 4: Jacobs Ladder -- SprAvl-Acc/Dmg/EndRdx/Rchg(A), SprAvl-Rchg/KDProc(46), SprAvl-Acc/Dmg(46), SprAvl-Dmg/EndRdx(46), SprAvl-Acc/Dmg/EndRdx(48), SprAvl-Acc/Dmg/Rchg(48)
Level 6: Environmental Modification -- LucoftheG-Def/Rchg+(A), LucoftheG-Def(7), ShlWal-ResDam/Re TP(7), ShlWal-Def(9)
Level 8: Adaptation
Level 10: Ablative Carapace -- Mrc-Heal/EndRdx/Rchg(A), Mrc-Heal/Rchg(11), Mrc-EndRdx/Rchg(50)
Level 12: Evolving Armor -- UnbGrd-Max HP%(A), UnbGrd-ResDam(13), UnbGrd-ResDam/EndRdx(13), UnbGrd-Rchg/ResDam(15)
Level 14: Kick -- Empty(A)
Level 16: Thunder Strike -- SprMghoft-Dmg/Rchg(A), SprMghoft-Acc/Dmg(17), SprMghoft-Acc/Dmg/Rchg(17), SprMghoft-Dmg/EndRdx/Rchg(19), SprMghoft-Acc/Dmg/EndRdx/Rchg(19), SprMghoft-Rchg/Res%(21)
Level 18: DNA Siphon -- Erd-Acc/Rchg(A), Erd-Acc/Dmg/Rchg(21), Erd-Acc/Dmg/EndRdx/Rchg(23), Mrc-Heal/EndRdx/Rchg(23), Mrc-Heal/Rchg(45), Erd-Dmg/Rchg(50)
Level 20: Tough -- GldArm-3defTpProc(A), GldArm-End/Res(43), StdPrt-ResDam/EndRdx(43)
Level 22: Weave -- LucoftheG-Def/Rchg+(A), LucoftheG-Def(40), LucoftheG-Def/EndRdx(42), LucoftheG-Def/Rchg(42), LucoftheG-Def/EndRdx/Rchg(48)
Level 24: Maneuvers -- LucoftheG-Def/Rchg+(A), LucoftheG-Def(25), LucoftheG-Def/EndRdx(25), Rct-Def/EndRdx(37), Rct-ResDam%(43)
Level 26: Genetic Contamination -- Arm-Dam%(A), Arm-Dmg/EndRdx(27), FuroftheG-ResDeb%(27), ScrDrv-Acc/Dmg(36), ScrDrv-Acc/Dmg/EndRdx(37), ScrDrv-Dmg/EndRdx(37)
Level 28: Chain Induction -- SprBlsCol-Rchg/HoldProc(A), SprBlsCol-Dmg/EndRdx/Acc/Rchg(29), SprBlsCol-Acc/Dmg(29), SprBlsCol-Dmg/EndRdx(31), SprBlsCol-Acc/Dmg/EndRdx(31), SprBlsCol-Acc/Dmg/Rchg(31)
Level 30: Tactics -- GssSynFr--Rchg/EndRdx(A), GssSynFr--ToHit/Rchg/EndRdx(34), GssSynFr--ToHit/Rchg(34), GssSynFr--ToHit(34), GssSynFr--Build%(36), GssSynFr--ToHit/EndRdx(36)
Level 32: Parasitic Aura -- TchoftheN-Acc/EndRdx/Heal/HP/Regen(A), TchoftheN-Acc/EndRdx/Rchg(33), Mrc-Heal/EndRdx/Rchg(33), Mrc-Heal/Rchg(33), Mrc-EndRdx/Rchg(50)
Level 35: Hasten -- RechRdx-I(A)
Level 38: Lightning Rod -- SprGntFis-Dmg/EndRdx/Rchg(A), SprGntFis-Acc/Dmg/Rchg(39), SprGntFis-Dmg/Rchg(39), SprGntFis-Acc/Dmg(39), SprGntFis-Rchg/+Absorb(40), SprGntFis-Acc/Dmg/EndRdx/Rchg(40)
Level 41: Focused Accuracy -- AdjTrg-ToHit/EndRdx/Rchg(A), AdjTrg-ToHit/EndRdx(42), RctRtc-ToHit(45), RctRtc-Pcptn(45)
Level 44: Taunt -- PrfZng-Dam%(A)
Level 47: Super Jump -- BlsoftheZ-ResKB(A)
Level 49: Combat Jumping -- LucoftheG-Def/Rchg+(A)
Level 1: Brawl -- Empty(A)
Level 1: Gauntlet
Level 1: Sprint -- Empty(A)
Level 2: Rest -- Empty(A)
Level 1: Swift -- Empty(A)
Level 1: Health -- Pnc-Heal/+End(A)
Level 1: Hurdle -- Empty(A)
Level 1: Stamina -- PrfShf-End%(A), PrfShf-EndMod(5), PrfShf-EndMod/Acc(5)
Level 8: Defensive Adaptation
Level 8: Efficient Adaptation
Level 8: Offensive Adaptation
Level 47: Double Jump
------------| Copy & Paste this data into Mids Reborn : Hero Designer to view the build | |-------------------------------------------------------------------| |MxDz;1659;730;1460;HEX;| |78DA75955B4F534110C7E79C9E5A2985524B5B102A3791AB157CD67803442C9104E| |36BD394B59C58DBE694A8F8ECF54DF1F6A0281AAFDFC347091AE3DD4FA0224640C0| |4B8ED33367600B6193437FBB3BB33BFF99DDA5FF4C9767F245742F289E03A9782E1| |73B1A4F9F10866B30A18B744240BEB9F0ABA5F15897382ED23911D9AF6762478C64| |3CAD2762FB8C9319236C1BF48B941091EE94488C187A229EA2012819C86452911E3| |D393CA2A7935EAB1715F12161E486F5ACDBEA0F668518F2F05416EDFCDD593D11E9| |4E0B23391AEB8FE74684315A81D134E0F733FF47016EA603600EBF4E0D36C23C811| |B16084A619160D25BE8A402F4E26F580315FA180E11CCE2068A648B7EC7146B9529| |5CC5012B334E074C68D6CC76B8CF7087619C6007DC65B84730871B3865054E08D00| |61BA09CE1306BEA2398472797E4642EE140912CA9087AB1DB94977F90A0137A087E| |A36DB1B29C00D3510C4BB4AC8793E7E1E49572F254AC7F89A4163B2636788559F04| |A1B3BBDF08E3CCAE02DC37B824DF081E12341397C22F88331F9E4657CF045B50A50| |0EDF088230CD604B6B5F91F695A61C18A55F4E831F76D206ADD0C910542C5B0D6D0| |392AD16E0C43771E25BA08CC1A7D865F313F8D03B247B87D8BB82BD2BD87B2BCCF0| |DEB3047F516EA52CB71276ABD6CC66D8C5B0876C1BE014D8CB9C65384DF01A935F2| |51FC12AB841A7AA1AAE335C21D8025719C618AE11F8514B78E5909BCE303CA120EA| |E031C3238687AA1DD63386A704FF50548D9C921A0892845A0831D8A5AB5D732AEB3| |1887AF9A2D5431BA97C832A1B65958D709102DF061718CE339CD3EC1A5E66B84430| |812134CB17AD192654BBBA0F08DAE136823F0FE3042F71EF3639AA36C8916D08E38| |DC81722029F692688331DB24F071F8D6A0DE4665A57172F518B56F82099D1750C07| |34D9CE7A8DACF16977E1026C3FB376BC8E2AF17D1D8F1FEE356FE32D92A5C118C34| |D828506FAB7B01CF6AFD5038BABDFA9E7AD855933FF031704E535| |-------------------------------------------------------------------|
-
5 hours ago, Ashesxvx said:
Thanks, Xandyr. With so much experience with Bio, how do you feel about it's performance when it comes to Hard Mode content? And do you think that Electric Melee is a suitable secondary for a bio tanker?
It's been a while since I've played my Bio tank....and unfortunately I've not done any of the Hard Mode content (the group I run with always wants me to bring a buffer/debuffer instead since there's one dude that only has 1 level 50...a stone tank).
In everything else, I've not had much of a problem at all. I stay in Offensive most of the time. Then, if things do start to go sideways, I'll switch to Defensive for a bit. I think I've only died two or 3 times on that tank? And that's because I wasn't paying any attention or was absolutely pushing my boundaries.
-
On 10/19/2022 at 1:31 PM, High_Beam said:
and like my first marriage, I have significant regrets.
This....hits home. I feel ya.
-
 1
1
-
-
See link in my sig if you have questions about Bio. Might help.
-
I shelved my Necro/Dark and Necro/EA once I hit 50 with them several months ago. now, with these changes, I'm torn between which I should play again. What's your vote?
-X
-
Wish they'd fix the sound. Blows my ears every time I zone. That's the only thing keeping me from playing Necro.
How are you all planning on slotting the upgrades since they take resistance and defense now?
-
Now that it's Live, how are you planning to slot your MMs affected by the changes?
More specifically, how are you going to slot Mercs?
- X
-
On 10/12/2022 at 10:43 PM, Ringo said:
The perfect date doesn't exis-
Well then
Mark me down as scared and ......
-
1
-
-
For Repulsion Field, the description states that by slotting a KB2KD will disable the Repel. That is working as intending, but it is NOT causing any KD at all. I've stood in the middle of numerous mobs with it on (and slotted with a KB2KD), and they do not Repel, and they do NOT KD.
-
1 hour ago, Wavicle said:
It doesn’t show it in the info, but it Does give it to them when you use it.
Correct. I just thought it should be listed as well.
-
 2
2
-
-
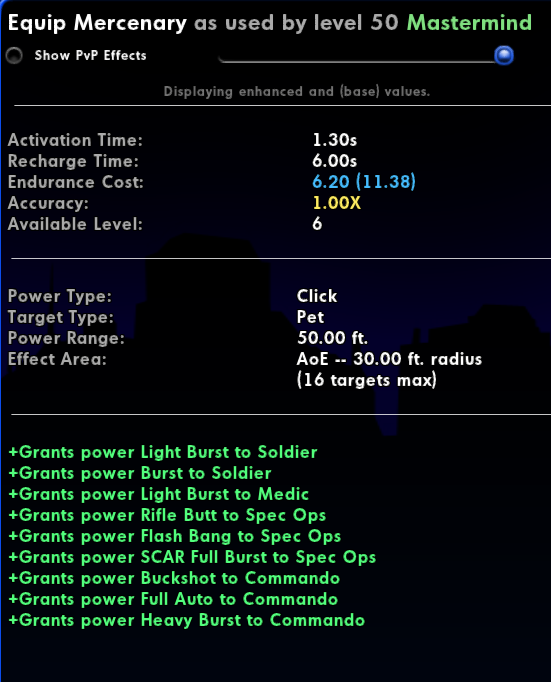
In the description for Equip Mercenary, it doesn't show anything about Resistances (Tactical Upgrade DOES show the Defense buffs it gives). Is this a bug or an oversight?

-
4 hours ago, Player-1 said:
Hi all, just want to clear up a misconception about Focus Fire:
It is not a +Damage Buff, nor is it -Resistance on the target. It is a base damage multiplier where the Mercenary Henchmen will deal X% more base damage before +Dam or -Res takes effect. Comparing it to those effects directly is a bit tricky as they actually multiply the damage even further.Would it be possible to add, like, a reticle/cross hairs, on the MM's target once he/she lands a hit to "spawn" Focus Fire?
-
1
-
-
@sutasafaia, I would recommend WP, then followed by SR. I have a WP/Staff tank that is VERY durable. I lost the tip of my left index finger, so sometimes it is a little struggle for me to use that finger. You could pair it with Staff, Radiation Melee, or perhaps Spines? I mention those last 2 because of their damage aura. Staff can give you +Defense and +Resistance. Broadsword/Katana can also give you a little +Defense. Claws would give you +Damage in Follow Up.
I thoroughly enjoy my WP/Staff. You hit EVERYTHING and it's just a fun set. WP is also "set and forget", allowing you to focus on your attacks.
Holler at my in game if you want/need any help with anything . I'm on Excelsior. @Scarlett Angel
-
Replace Serum with Swap Ammo! I want my Mercs to be firing Incendiary, Cryo, or Chemical Rounds!
-
2
-
-
I need help slecting a secondary ???
in Scrapper
Posted
Bio. Have a mixture of pink and black.
@Scarlett Angel