The Beta Account Center is temporarily unavailable
×

Voltak
-
Posts
1088 -
Joined
-
Last visited
-
Days Won
1
Content Type
Profiles
Forums
Events
Store
Articles
Patch Notes
Everything posted by Voltak
-
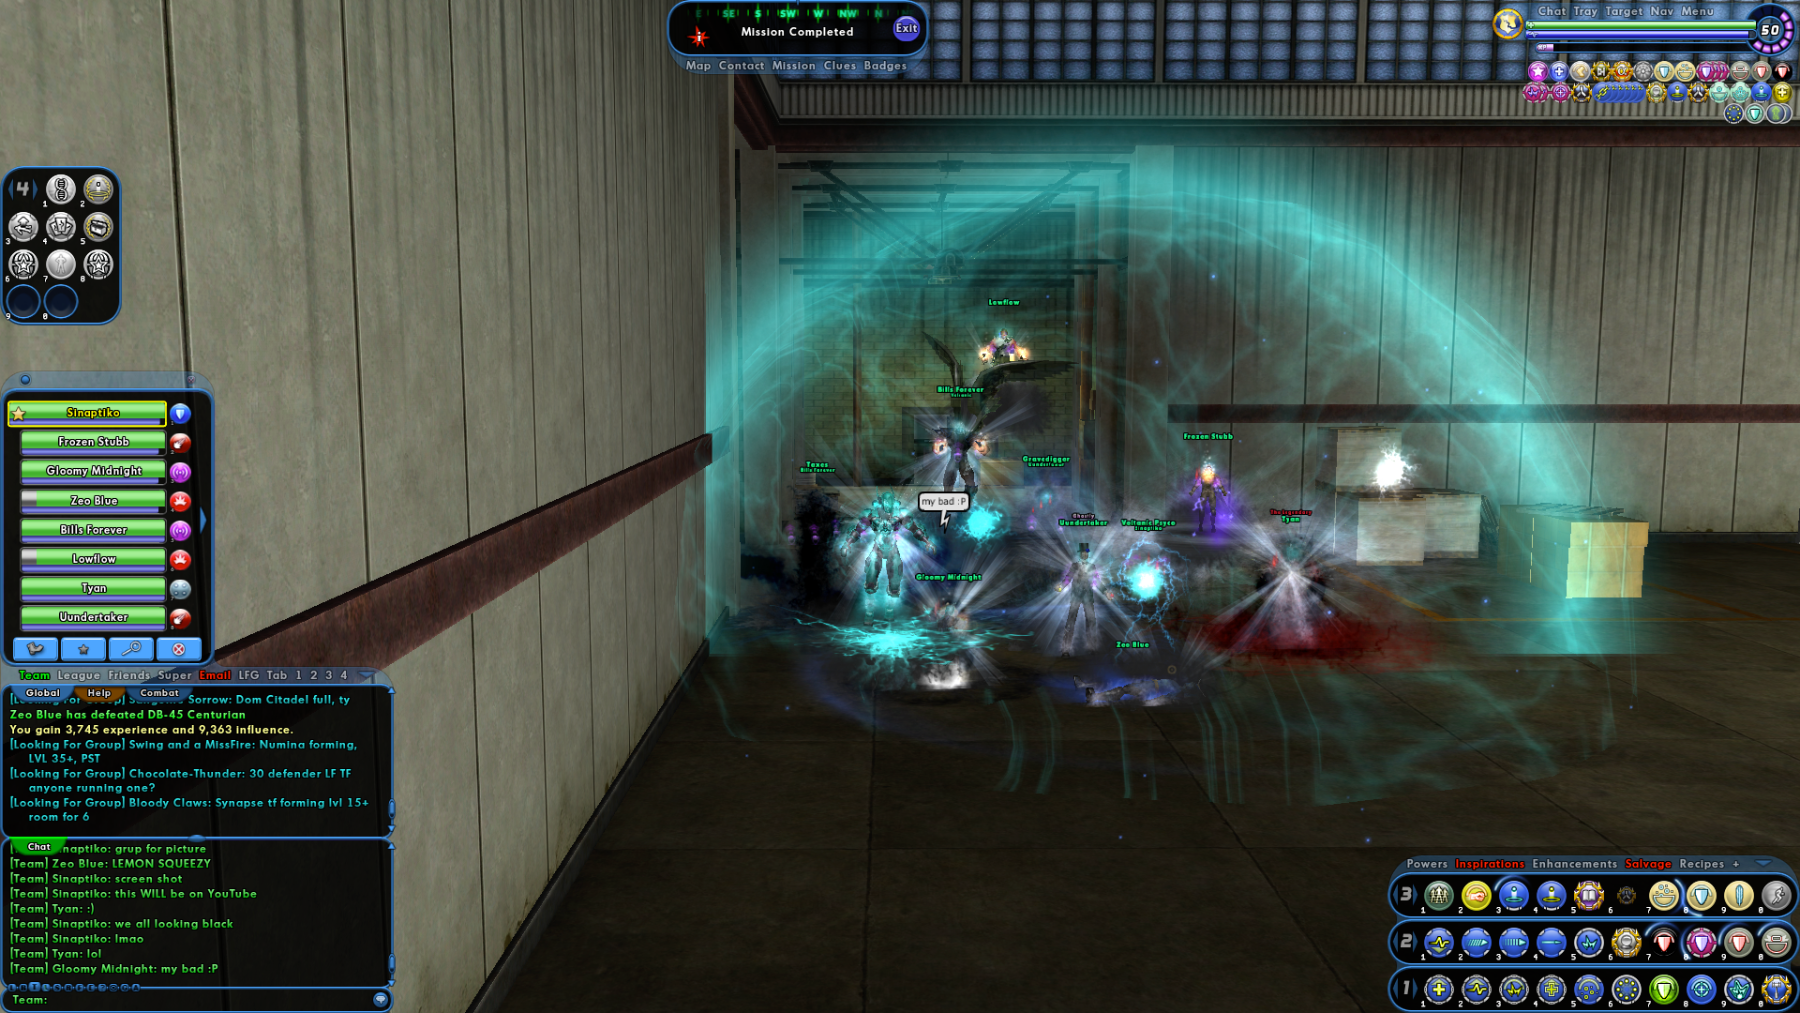
 The build here is what I am running now for the Advanced ITF, 4 STAR A few notes: Dark Embrace Armor - Because Negative Dmg is prevalent in the NEW ITF, more than before. Power Boost - for stronger Absorbs, stronger heals, stronger defense buff, stronger endurance drains, stronger to hit buffs, stronger endurance buffs Destiny - INCANDESCENCE !! PLEASE PLEASE EQUIP THIS ! The tremendous healing buffs is insane. Teleport all your dead team mates at once, teleport even lost team mates or team mates who are running a bit slow during parts 1 or 2 of the ITF. After you teleport them all with Incandescence , then you hit your REZ and you will REZ EVERY SINGLE DEAD TEAM MATE IN ONE SHOT. The rez is up every 30 seconds or so. For Interface, you could go with Reactive because the vast majority of players are going with Degenerative , and that will max out after 5 applications, so going reactive is a big help to the team to lower enemies' resistances. Other options are good, too. I highly recommend you do not get preemptive. You, as a Defender, have the strongest modifier in the game to drain endurance from enemies. You WILL Drain EBs in one shot with the nuke, you will drain them in two shots with Charge up and PB Short Circuit + Ball Lightning, in the rare case, hit one more elec blast if needed, but your pet is also draining everyone in AOE and he fires up those debuffs quickly/frequently. ** FOR AEON RELENTLESS, use this exact build with the only change being that you use CHARGE ARMOR (MU MASTERY) instead of DARK EMBRACE This Hero build was built using Mids Reborn 3.0.4.7 https://github.com/Reborn-Team/MidsReborn Click this DataLink to open the build! Guardian Sinaptico: Level 50 Magic Defender Primary Power Set: Electrical Affinity Secondary Power Set: Electrical Blast Power Pool: Flight Power Pool: Speed Power Pool: Leadership Power Pool: Fighting Ancillary Pool: Soul Mastery Hero Profile: Level 1: Rejuvenating Circuit -- Prv-Heal/Rchg(A), Prv-Heal/EndRdx(3), Prv-EndRdx/Rchg(3), Prv-Heal(5), Prv-Absorb%(5), Prv-Heal/Rchg/EndRdx(7) Level 1: Charged Bolts -- SprDfnBst-Acc/Dmg(A), SprDfnBst-Dmg/Rchg(7), SprDfnBst-Dmg/EndRdx/Rchg(9), SprDfnBst-Acc/Dmg/EndRdx(9), SprDfnBst-Acc/Dmg/EndRdx/Rchg(11), SprDfnBst-Rchg/Heal%(11) Level 2: Lightning Bolt -- Thn-Acc/Dmg(A), Thn-Acc/Dmg/EndRdx(13), SprVglAss-Dmg/EndRdx/Rchg(13), Thn-Dmg/Rchg(15), SprVglAss-Rchg/+Absorb(15), SprVglAss-Acc/Dmg/EndRdx/Rchg(17) Level 4: Galvanic Sentinel -- SynSck-Dam/Rech(A), SynSck-EndMod(31), SynSck-EndMod/Rech(31), SynSck-Dam/Rech/Acc(31), SynSck-Dam/Acc/End(33) Level 6: Energizing Circuit -- SynSck-Dam/Rech(A), SynSck-EndMod/Rech(17), SynSck-Dam/Rech/Acc(19), SynSck-Dam/Acc/End(19), SynSck-EndMod(21), SynSck-EndMod/+RunSpeed(36) Level 8: Faraday Cage -- GldArm-3defTpProc(A), StdPrt-ResDam/Def+(21), RctArm-ResDam/Rchg(23), RctArm-ResDam/EndRdx/Rchg(23), RctArm-ResDam(25) Level 10: Short Circuit -- Erd-Acc/Dmg/Rchg(A), Erd-%Dam(27), Erd-Acc/Dmg/EndRdx/Rchg(29), SprVglAss-Acc/Dmg(33), SprVglAss-Dmg/Rchg(33), SprVglAss-Acc/Dmg/EndRdx(36) Level 12: Empowering Circuit -- HO:Membr(A) Level 14: Hover -- LucoftheG-Def/Rchg+(A), ShlWal-ResDam/Re TP(27), Rct-ResDam%(36) Level 16: Fly -- Srn-EndRdx/Fly(A) Level 18: Hasten -- RechRdx-I(A) Level 20: Zapp -- StnoftheM-Dmg/EndRdx(A), StnoftheM-Dam%(25), StnoftheM-Acc/Dmg(29), StnoftheM-Dmg/ActRdx/Rchg(34), StnoftheM-Dmg/EndRdx/Rchg(37) Level 22: Ball Lightning -- Artl-Acc/Dam(A), Artl-Dam/End(34), Artl-Dam/Rech(37), Artl-Acc/Dam/Rech(37), Artl-End/Rech/Rng(39), Artl-Acc/Rech/Rng(40) Level 24: Maneuvers -- LucoftheG-Def/Rchg+(A), LucoftheG-Def/EndRdx(45), LucoftheG-Def/EndRdx/Rchg(45) Level 26: Insulating Circuit -- NmnCnv-Heal/EndRdx(A), NmnCnv-EndRdx/Rchg(34), NmnCnv-Heal/Rchg(39), NmnCnv-Heal/EndRdx/Rchg(39), NmnCnv-Heal(40), NmnCnv-Regen/Rcvry+(40) Level 28: Aim -- GssSynFr--ToHit(A), GssSynFr--Rchg/EndRdx(42), GssSynFr--ToHit/EndRdx(42), GssSynFr--ToHit/Rchg(48), GssSynFr--ToHit/Rchg/EndRdx(48), GssSynFr--Build%(50) Level 30: Boxing -- Acc-I(A) Level 32: Amp Up -- RechRdx-I(A) Level 35: Dark Embrace -- RctArm-ResDam/EndRdx(A), RctArm-ResDam/EndRdx/Rchg(45), RctArm-ResDam(46) Level 38: Thunderous Blast -- Bmbdmt-Dam(A), Bmbdmt-+FireDmg(42), Bmbdmt-Acc/Rech/End(43), Bmbdmt-Dam/Rech(46), Bmbdmt-Acc/Dam/Rech(46), Bmbdmt-Acc/Dam/Rech/End(50) Level 41: Tough -- RctArm-ResDam/EndRdx(A), RctArm-EndRdx(43), RctArm-ResDam(43) Level 44: Weave -- LucoftheG-Def/Rchg+(A), LucoftheG-Def/EndRdx/Rchg(48), LucoftheG-Def/EndRdx(50) Level 47: Power Boost -- RechRdx-I(A) Level 49: Defibrillate -- RechRdx-I(A) Level 1: Vigilance Level 1: Brawl -- Empty(A) Level 1: Sprint -- Clr-Stlth(A) Level 2: Rest -- Empty(A) Level 2: Swift -- Empty(A) Level 2: Hurdle -- Empty(A) Level 2: Health -- Mrc-Rcvry+(A) Level 2: Stamina -- PrfShf-End%(A) Level 49: Quick Form Level 50: Agility Core Paragon Level 50: Support Core Embodiment Level 50: Portal Jockey Level 50: Task Force Commander Level 50: Freedom Phalanx Reserve Level 50: The Atlas Medallion ------------ Below is the solo build I am currently running. The major differences - No rez power (but just in case, you can buy a rez power from P2W vendor) Charged Armor (Energy Dmg is a lot more prevalent than Neg Energy dmg) Charged Armor is also what I recommend for doing the 801 challenges in AE at the highest levels (because of Energy dmg) This Hero build was built using Mids Reborn 3.0.4.7 https://github.com/Reborn-Team/MidsReborn Click this DataLink to open the build! Guardian Sinaptico: Level 50 Magic Defender Primary Power Set: Electrical Affinity Secondary Power Set: Electrical Blast Power Pool: Flight Power Pool: Speed Power Pool: Fighting Power Pool: Leadership Ancillary Pool: Mu Mastery Hero Profile: Level 1: Rejuvenating Circuit -- Prv-Heal/Rchg(A), Prv-Heal/EndRdx(3), Prv-EndRdx/Rchg(3), Prv-Heal(5), Prv-Absorb%(5), Prv-Heal/Rchg/EndRdx(7) Level 1: Charged Bolts -- SprDfnBst-Acc/Dmg(A), SprDfnBst-Dmg/Rchg(7), SprDfnBst-Dmg/EndRdx/Rchg(9), SprDfnBst-Acc/Dmg/EndRdx(9), SprDfnBst-Acc/Dmg/EndRdx/Rchg(11), SprDfnBst-Rchg/Heal%(11) Level 2: Lightning Bolt -- Thn-Acc/Dmg(A), Thn-Acc/Dmg/EndRdx(13), SprVglAss-Dmg/EndRdx/Rchg(13), Thn-Dmg/Rchg(15), SprVglAss-Rchg/+Absorb(15), SprVglAss-Acc/Dmg/EndRdx/Rchg(17) Level 4: Galvanic Sentinel -- SynSck-Dam/Rech(A), SynSck-EndMod(31), SynSck-EndMod/Rech(31), SynSck-Dam/Rech/Acc(31), SynSck-Dam/Acc/End(33) Level 6: Energizing Circuit -- SynSck-Dam/Rech(A), SynSck-EndMod/Rech(17), SynSck-Dam/Rech/Acc(19), SynSck-Dam/Acc/End(19), SynSck-EndMod(21), SynSck-EndMod/+RunSpeed(36) Level 8: Faraday Cage -- GldArm-3defTpProc(A), StdPrt-ResDam/Def+(21), RctArm-ResDam/Rchg(23), RctArm-ResDam/EndRdx/Rchg(23), RctArm-ResDam(25) Level 10: Short Circuit -- Erd-Acc/Dmg/Rchg(A), Erd-%Dam(27), Erd-Acc/Dmg/EndRdx/Rchg(29), SprVglAss-Acc/Dmg(33), SprVglAss-Dmg/Rchg(33), SprVglAss-Acc/Dmg/EndRdx(36) Level 12: Empowering Circuit -- HO:Membr(A) Level 14: Hover -- LucoftheG-Def/Rchg+(A), ShlWal-ResDam/Re TP(27), Rct-ResDam%(36) Level 16: Fly -- Srn-EndRdx/Fly(A) Level 18: Shock -- Acc-I(A) Level 20: Zapp -- StnoftheM-Dmg/EndRdx(A), StnoftheM-Dam%(25), StnoftheM-Acc/Dmg(29), StnoftheM-Dmg/ActRdx/Rchg(34), StnoftheM-Dmg/EndRdx/Rchg(37) Level 22: Hasten -- RechRdx-I(A) Level 24: Ball Lightning -- Artl-Acc/Dam(A), Artl-Dam/End(34), Artl-Dam/Rech(39), Artl-Acc/Dam/Rech(40), Artl-Acc/Rech/Rng(45), Artl-End/Rech/Rng(45) Level 26: Insulating Circuit -- NmnCnv-Heal/EndRdx(A), NmnCnv-EndRdx/Rchg(34), NmnCnv-Heal/Rchg(39), NmnCnv-Heal/EndRdx/Rchg(39), NmnCnv-Heal(40), NmnCnv-Regen/Rcvry+(40) Level 28: Aim -- GssSynFr--ToHit(A), GssSynFr--Rchg/EndRdx(42), GssSynFr--ToHit/EndRdx(42), GssSynFr--ToHit/Rchg(48), GssSynFr--ToHit/Rchg/EndRdx(48), GssSynFr--Build%(50) Level 30: Boxing -- Acc-I(A) Level 32: Amp Up -- RechRdx-I(A) Level 35: Maneuvers -- LucoftheG-Def/Rchg+(A), LucoftheG-Def/EndRdx(37), LucoftheG-Def/EndRdx/Rchg(37) Level 38: Thunderous Blast -- Bmbdmt-Dam(A), Bmbdmt-+FireDmg(42), Bmbdmt-Acc/Rech/End(43), Bmbdmt-Dam/Rech(46), Bmbdmt-Acc/Dam/Rech(46), Bmbdmt-Acc/Dam/Rech/End(50) Level 41: Tough -- RctArm-ResDam/EndRdx(A), RctArm-EndRdx(43), RctArm-ResDam(43) Level 44: Charged Armor -- RctArm-EndRdx(A), RctArm-ResDam/EndRdx(45), RctArm-ResDam(46) Level 47: Weave -- LucoftheG-Def/EndRdx(A), LucoftheG-Def/EndRdx/Rchg(48), LucoftheG-Def/Rchg+(50) Level 49: Afterburner -- LucoftheG-Def/Rchg+(A) Level 1: Vigilance Level 1: Brawl -- Empty(A) Level 1: Sprint -- Clr-Stlth(A) Level 2: Rest -- Empty(A) Level 2: Swift -- Empty(A) Level 2: Hurdle -- Empty(A) Level 2: Health -- Mrc-Rcvry+(A) Level 2: Stamina -- PrfShf-End%(A) Level 49: Quick Form Level 50: Agility Core Paragon Level 50: Portal Jockey Level 50: Task Force Commander Level 50: Freedom Phalanx Reserve Level 50: The Atlas Medallion ------------ Here is a group picture we took after doing the Highest 801 challenge below the all AV setting So these were all EBs, no AVs. We did this in 21 minutes - only 5 deaths.
-
Hello, Blackjoy Please feel free to join our chnl - Master ITF It's a public chnl and no need for an invite to join us there. We also have Discord.
-
Defenders exempt better if we talk about important primaries or important powers in those primaries. Defenders are also tankier, they are defensively better, the number modifiers for armors, leadership and so on, better.
-
Not true, in fact far far from the truth when we talk about a kinetics soloing. A kinetic corruptor will smoke the Defender. This is also not true when it comes to comparing damage with rains or with any other blast power that checks scourge at every tick. A corruptor short circuit will scourge at every tick if it checks right. The rains, if check, will dramatically increase the dmg as well.
-
You are very welcome. I might not have done so 8 years ago, but I have more time in my hands to do this kind of stuff. The way I see it, if I help others to be better support players, the better support we will all have. Support is the most valuable category of this game in team make up at the highest difficulty of challenges
-
Having ben in Korea and dealing with Korean business professionals, I can attest to this. THis is not something that is a hard fast rule but generally this is embarrassing to them to the point that many will not sell and risk that.
-
Solo or for team play? I have solo'd ITF with my defender and done plenty of two-man teams in that and many other Task Forces. Huge difference there.
-
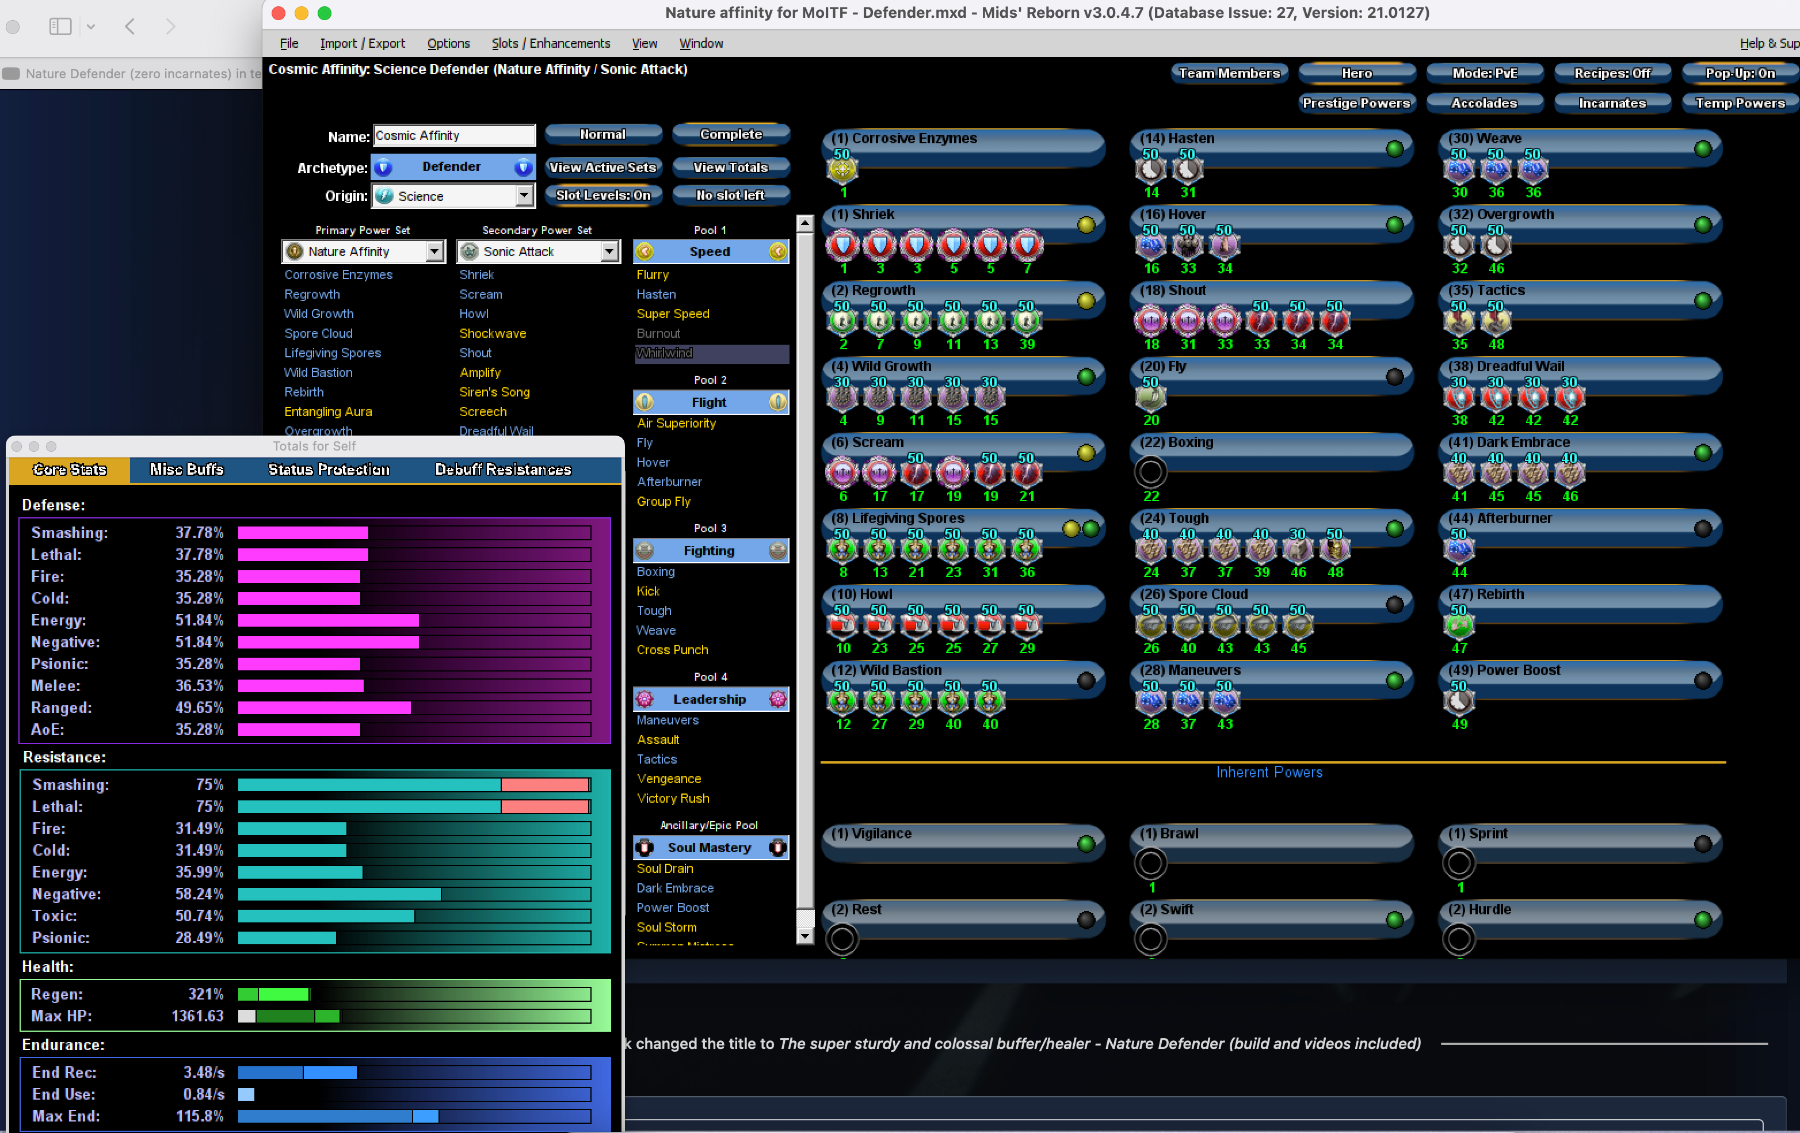
UPDATE ** ( left out ALPHA recommendations, and are now included ) I have received dozens of request to share my build, my Nature/Sonic defender build. I have posted some videos of him in action. He's done the most extreme of game content already and, if well played, he can be a tremendous buffer for the team to try to ensure no one, or the minimal, amount of players die. He's done 1. 801s at the highest of difficulty levels 2. AEON relentless 3. ITF four star 4. Solo'd even level AVs (Tested this with Inferno) He's the only one that comes close to my Elec Affinity in doing the life support, but does things that Elec Affinity cannot do (Nature also cannot provide some things that Elec Affinity can) Wether the build is any good or not depends on what you can do with it, and how you use it. Yes, the main thing is the driver, but a better car will enable you to do better as well. Goes both ways. But my results with the build have left me satisfied with the work put into it. ** Important, this was done BEFORE the changes to Sonic Blast ** I am sharing the build before the changes but you can adjust to sonic blast's revisions. It's no big deal and you can still reach similar numbers. Being a good Nature player takes practice. Being a good player takes practice. The build only goes so far. Remember that Nature is all about angles and positioning and even good timing. And please BLAST with Sonic, for defensive purposes, please blast ! Every time you debuff resistances you also multiply the dmg debuff applied to the enemies. This is a very significant form of defense. Nature has ways to debuff enemy dmg and resistance Sonic will lower resistances They compliment each other well Alpha incarnate recommendations - 1. Spiritual T4 Radial - more healing, more recharge, more to hit buffs (benefiting overgrowth and tactics ) 2. Vigor (more healing, greater end reduction) 3. Agility - more defense, more recharge, more endurance modification This Hero build was built using Mids Reborn 3.0.4.7 https://github.com/Reborn-Team/MidsReborn Click this DataLink to open the build! Cosmic Affinity: Level 50 Science Defender Primary Power Set: Nature Affinity Secondary Power Set: Sonic Attack Power Pool: Speed Power Pool: Flight Power Pool: Fighting Power Pool: Leadership Ancillary Pool: Soul Mastery Hero Profile: Level 1: Corrosive Enzymes -- Acc-I(A) Level 1: Shriek -- SprDfnBst-Acc/Dmg/EndRdx/Rchg(A), SprDfnBst-Acc/Dmg(3), SprDfnBst-Rchg/Heal%(3), SprDfnBst-Dmg/Rchg(5), SprDfnBst-Dmg/EndRdx/Rchg(5), SprDfnBst-Acc/Dmg/EndRdx(7) Level 2: Regrowth -- Prv-Heal/EndRdx(A), Prv-EndRdx/Rchg(7), Prv-Heal/Rchg(9), Prv-Heal/Rchg/EndRdx(11), Prv-Heal(13), Prv-Absorb%(39) Level 4: Wild Growth -- ImpSki-ResDam/Rchg(A), ImpSki-ResDam/EndRdx(9), ImpSki-ResDam/EndRdx/Rchg(11), ImpSki-EndRdx/Rchg(15), ImpSki-Status(15) Level 6: Scream -- SprVglAss-Acc/Dmg/EndRdx/Rchg(A), SprVglAss-Dmg/EndRdx/Rchg(17), Thn-Acc/Dmg/EndRdx(17), SprVglAss-Rchg/+Absorb(19), Thn-Acc/Dmg/Rchg(19), Thn-Acc/Dmg(21) Level 8: Lifegiving Spores -- Pnc-Heal/EndRedux(A), Pnc-Heal/+End(13), Pnc-EndRdx/Rchg(21), Pnc-Heal/Rchg(23), Pnc-Heal/EndRedux/Rchg(31), Pnc-Heal(36) Level 10: Howl -- Artl-Acc/Rech/Rng(A), Artl-End/Rech/Rng(23), Artl-Acc/Dam/Rech(25), Artl-Dam/Rech(25), Artl-Dam/End(27), Artl-Acc/Dam(29) Level 12: Wild Bastion -- Pnc-Heal/EndRedux(A), Pnc-EndRdx/Rchg(27), Pnc-Heal/Rchg(29), Pnc-Heal/EndRedux/Rchg(40), Pnc-Heal(40) Level 14: Hasten -- RechRdx-I(A), RechRdx-I(31) Level 16: Hover -- LucoftheG-Def/Rchg+(A), ShlWal-ResDam/Re TP(33), Rct-ResDam%(34) Level 18: Shout -- SprVglAss-Acc/Dmg(A), SprVglAss-Acc/Dmg/EndRdx(31), SprVglAss-Dmg/Rchg(33), Thn-Dmg/EndRdx/Rchg(33), Thn-Dmg/EndRdx(34), Thn-Acc/Dmg(34) Level 20: Fly -- BlsoftheZ-Travel/EndRdx(A) Level 22: Boxing -- Empty(A) Level 24: Tough -- RctArm-ResDam/EndRdx(A), RctArm-EndRdx(37), RctArm-ResDam/EndRdx/Rchg(37), RctArm-ResDam(39), StdPrt-ResDam/Def+(46), GldArm-3defTpProc(48) Level 26: Spore Cloud -- DmpSpr-ToHitDeb(A), DmpSpr-ToHitDeb/Rchg/EndRdx(40), DmpSpr-ToHitDeb/EndRdx(43), DmpSpr-ToHitDeb/Rchg(43), DmpSpr-Rchg/EndRdx(45) Level 28: Maneuvers -- LucoftheG-Def/EndRdx(A), LucoftheG-Def/Rchg+(37), LucoftheG-Def/EndRdx/Rchg(43) Level 30: Weave -- LucoftheG-Def/Rchg+(A), LucoftheG-Def/EndRdx(36), LucoftheG-Def/EndRdx/Rchg(36) Level 32: Overgrowth -- RechRdx-I(A), RechRdx-I(46) Level 35: Tactics -- GssSynFr--ToHit/EndRdx(A), GssSynFr--ToHit/Rchg/EndRdx(48) Level 38: Dreadful Wail -- Erd-Acc/Dmg/EndRdx/Rchg(A), Erd-Acc/Dmg/Rchg(42), Erd-Dmg/Rchg(42), Erd-Acc/Rchg(42) Level 41: Dark Embrace -- RctArm-ResDam/EndRdx(A), RctArm-ResDam(45), RctArm-EndRdx(45), RctArm-ResDam/EndRdx/Rchg(46) Level 44: Afterburner -- LucoftheG-Def/Rchg+(A) Level 47: Rebirth -- NmnCnv-Heal/Rchg(A) Level 49: Power Boost -- RechRdx-I(A) Level 1: Vigilance Level 1: Brawl -- Empty(A) Level 1: Sprint -- Empty(A) Level 2: Rest -- Empty(A) Level 2: Swift -- Empty(A) Level 2: Hurdle -- Empty(A) Level 2: Health -- Mrc-Rcvry+(A) Level 2: Stamina -- SynSck-EndMod(A), SynSck-Dam/Rech(39), SynSck-EndMod/+RunSpeed(48), SynSck-EndMod/Rech(50), SynSck-Dam/Acc/End(50), SynSck-Dam/Rech/Acc(50) Level 50: Agility Radial Paragon Level 50: Portal Jockey Level 50: Task Force Commander Level 50: Freedom Phalanx Reserve Level 50: Support Core Embodiment ------------
-
Practice, Plant/Psi is great for clearing trash mobs, well, most Plant/ Dark/ in practice has shown to be a true AV killer, it can make AVs kill other AVs. ST confuse beats Seeds for EB and above grade enemies when it needs to be stacked. Also, ST dmg, Dark will beat plant. Also, defensive wise, Dark has huge to hit debuffs It's a real force that has a higher celing of difficult stuff to do. You can check out my many videos using both doms Dark can do more difficult stuff than Plant can
-
Dark/Dark 🙂
-
I have done 4 ITFs now of Sub 1:21 Hours - HM , 4 stars. Also, the sheer amount of xp and influence is drastically higher in ITF HM 4 than AEON SF Today our all Defender and one tank team did 1 hour and 9 minutes, sub 20 deaths. I feel what you are saying. But taking everything into account, xp, inf and those Aethers which are good for costumes , I think the ITF is better investment. I dont like the ITF taking that long, by the way. I want it to be less ambushes Less mobs needed to kill and so on. But as it is , I am just sharing what I am getting per time spent
-
Enjoy, brother. Look at our defensive stats with me on the team as well. 120 Defense Cap'd resists vs everything except Psi and something else I can't remember
-
Voltak here reporting I am going to second that Elec Affinity and Nature blends very well with this build. Elec Affinity more so because Elec Affinity has the absorbs on a 4-5 second cooldown which is tremendously faster than Nature's. In fact, for ITF 4 Stars, it makes sense to build while keeping in mind that the build should be ideally done to synergies with the other support sets. Amazingly this also pairs well Dark Miasma, let alone Thermal/Sonic Resonance, which are the other MAJOR PLAYERS for the new ITF I can vouch for @Dahkness I seen him first hand. I endorse what he does with this baby.
-
This build in that video is certainly good for the iTF as well , if you are not soloing it. This is build is not as good for the LR SF compared to the other ones. The build is not bad vs the LR SF, but the other builds are better, much tanker, especially the one with Psi Mastery, because some AVs and some bosses do have Psi dmg, and because of some defense debuffs in the LR SF, the higher your defenses the more buffer zone you have. Plant/Psi plays very different than Dark. When it comes to AVs vs Dom, Dark obliterates Plant's importance. Plant/Psi is phenomenal vs trash mobs - bosses and lower. But Dark is much better vs anything above that, it's not even close.
-
I am very very sorry. The PUG was indeed a lucky draw. I don't like people quitting TFs, but I understand life happens. But, I know team work is important. I felt very bad that my help was not there due to circumstances beyond my control I felt even worse because someone appreciated that I was there in the team. So, having said that, I am extending an invitation. Let's run again. Join our chnl - Master ITF We are also on Discord Master ITF I will be glad to host a team or have anyone of our veterans host We going to have a great time
-
You are very welcome. I think I wrote something about that in the video. I had no idea what was the motive. I am laughing now as I read your post. That's cool to know
-
THis was basically our motto. Then when we added Pinball Wizards of Kinetics , we did a fulcrum shift then Vengeance, then Fallout , then said "What the hell we needed a blaster for again?"
-
Rad / Sonic Rad / Dark blast (two self heals, dark blast is very fast cast times and rarely resisted dmg) Dark / Sonic Kin / Sonic All solo well. BTW, I grinned my Kin/Sonic from 1 - 50 , easy, no farm at all. Dark and Rad primaries could be tanker Dark miasma is very very tanky
-
This was my first try on Homecoming Live server. We had a decent team, even if some members had no IOs. The buffs and debuffs were strong. I could not finish part 4 of the ITF because of real life issues which needed my attention. I will cover part 2, part 3, and part 4 in another series of videos. Dark Miasma is PERFECTLY made for the new ITF. It is a beautiful blend of buffs and debuffs tailored for the new ITF.
-
As a corruptor, DO NOT take your Tier 1. Save that power slot to take Siren's Song. That's another advantage Corruptor has over the Defender's sonic blast. You can pick there. Defender's cannot skip the tier 1. Don't take Shockwave.
-
BTW, I meant no disrespect at all. You did get a very very good dice roll concerning the spawns that came up. That's awesome.
-
Good video. When you do the Trapdoor test run, turn on Bosses. Again, great video, bud.
-
Have you tried running without inspirations and no temps? Also, a usual good test is not to solo the ITF, but start the ITF, and do missions 1 and 2 alone (should be fast for a tank), or just try mission one , +4x8 difficulty settings.
-
Putting together a well balanced team to fight at the highest levels of the very extreme challenges, specifically the 801 - 10 challenge in the AE. Like most of the time, it is very rare that no one dies in these. These challenges make the AEON Relentless look like child's play. There are all kinds of debuffs hitting the team which can overcome anyone of us at some points, or, in the case of ambushes, they can wipe the whole team out. See for yourselves ! I am playing the Nature/Sonic defender. *** Correction - the Dominator is a Plant/Thorns and not a Plant/Psi **** I caught this after the video was all done at editing and uploading was commencing. @FUBARczar @Linea @EV-300 @AcreIV