Hjarki
-
Posts
1117 -
Joined
-
Last visited
Content Type
Profiles
Forums
Events
Store
Articles
Patch Notes
Everything posted by Hjarki
-
Melee Archetypes - Same sets, different performance?
Hjarki replied to KnaveOfSwords's topic in Archetypes
Rib Cracker increases dps on the target by 7.5%. You also can't use Assassin's Strike as a 1-on-1 replacement due to the difference in their recharge. The result is that the Stalker rotation spends most of its time using relatively low damage basic attacks while the Scrapper rotation focuses exclusively on the high damage ones. -
Melee Archetypes - Same sets, different performance?
Hjarki replied to KnaveOfSwords's topic in Archetypes
Street Justice on a Stalker loses Rib Cracker. This isn't quite as bad as losing Follow Up, but it still reduces the overall dps of the rotation. -
This is the same way I do it - and I'm pretty sure it's slightly wrong both from my observations in game and my general understanding of how servers tend to be implemented. CoH appears to run on a 0.132 sec tick. That is, everything which requires server communication can happen with no more granular of time than 0.132s. That's why you get arcanatime. You send a message to the server saying "I want to activate this power". On the next tick, it recognizes the message and starts counting one per tick until it's counted the right number of ticks - at which point the power activates. Because you can never hit the tick exactly, there's always a 'dead tick' between powers. So if your power takes 1.0 sec to activate, that's means the server has to count at least roundup(1.0 / 0.132) = 8 ticks before it will let the power activate. Add a 'dead tick' between power activations that occurs because you can never precisely hit the exact moment when a tick occurs and you've got your arcanatime. However, this would also apply to durations and recharges. So let's say you have a power with a 1.0 sec activation and a 10.0 sec recharge. You'd see something like: 0 tick: Before you activate power 1 tick: The first tick after you activate power and we start counting 8 tick: You finish the count and start your recharge count 9..83 ticks: Counting down the recharge 84 tick: Recharge up and power is ready if you want to use it (same spot as our 0 tick above) This entire sequence takes 11.088 sec. The sequence where we just use arcanatime for activation (but not recharge) would be 11.188 sec (a tenth of a second longer). If we're waiting to activate our power, it would be 11.22 sec. Essentially, we're double-counting that 'dead tick' by assuming recharge/duration are continuous while activation is discrete. The reason I think it works this way is that I've noticed that you don't need to fully close rotations to make them work. If you miss by a little bit, you're still activating powers as quickly as they can possibly activate. Moreover, it makes sense that they're using the same tick-based timekeeping for everything (not just activation). Note: Some powers activate midway through the animation. I assume this activation is also impacted by arcanatime but has no impact on when the recharge starts counting, only when the duration starts counting.
-
What it does is summon a pseudo pet. That pseudo pet will, every 0.2 sec for 15 sec, pick its favorite 16 enemies within 30 yards. If you drop it on 50 enemies, it will keep picking new enemies as the old ones die. Every one of those ticks has a chance to Scourge based on the health total when the tick lands (rather than, as with most other ultimates, when the power was activated). Moreover, the power itself ticks for 3.7258 damage but it Scourges for 4.488 damage. To make this even better, you can drop -resist fields into the Blizzard. So you can run a sequence like Aim (with Gaussian's), Blizzard (which mightily debuffs the enemies' to hit and other features making it difficult for them to strike back), Sleet (which will increase the damage by about 30% due to the -resist). In terms of secondary, I'm not a big fan of Time Manipulation. It tends to solve problems you don't really need solving in the clunkiest way possible (long recharge group clickies) while not delivering the goods on the high impact powers (like -resist) that you really want. Between Storm and Cold, it's a tough call. Storm will have serious end issues without Incarnates but it will generally do more damage. Storm is also really hard to manage without AE knockback suppression powers (like Controller Immobilizes). Cold is a better buffing spec if you're running with people who can benefit from +defense or +max hp. I'd probably give the edge to Cold on a Corruptor.
-
Power Surge (Electric Armor): Purpose/effect of hold enhancement sets ?
Hjarki replied to MrZork's topic in Archetypes
The reason you slot it for Hold is because you've already got far more resist than you could ever hope to use and Hold sets are really, really good. -
Tankers have 400 more base health than Brutes. While SR builds don't focus exclusively on health, they do tend to put a considerable emphasis on it despite receiving none from the armor set itself. So you can probably expect that disparity to grow by 30% or more even with identical slotting - and the slotting isn't identical because Tankers have to devote a lot less effort into hitting defensive breakpoints.
-
Melee Archetypes - Same sets, different performance?
Hjarki replied to KnaveOfSwords's topic in Archetypes
A partial list: Martial Arts. Storm Kick grants universal defense on Brutes/Tankers but not Stalkers/Scrappers (it doesn't even grant AE on Stalkers). Dark Melee/Claws. These grant +damage special benefits that don't exist on Stalkers (Stalkers get generic Build Up). Dark Melee/Street Justice. These have AE with incredibly small radius that the Tanker innate fixes. Radiation Melee/Spines. These have damage auras, which can neither crit (negative for Scrappers) nor benefit from Tanker innate. Stalkers don't even get the damage auras, which are a major reason players tend to take these sets in the first place. Fiery Melee. Tankers get a second PBAoE. Everyone else gets another single target attack. Kinetic Melee. Stalkers get standard Build Up. Everyone else gets a damage-increasing mechanic that is widely viewed as useless. Staff Fighting. While non-Stalkers all get the same set, Tankers doubling the target cap is a big deal for the large radius Cones from this set. The armor sets deviate in more predictable ways: Scrappers. Scrappers only receive taunt auras on non-damaging powers - and not even all of them (Super Reflexes has a taunt aura for Brutes/Tankers but not Scrappers). Playing a melee AT without a taunt aura is often difficult as you spend far too much time chasing runners, leading many Scrapper players to automatically write off about half the armor sets. Stalkers. Every Stalker armor set has at least one defense toggle (although it doesn't provide much actual defense) and none have damage/taunt auras. The ATOs also provide different bonuses. Scrappers/Stalkers get +10% recharge from both ATO sets, meaning they need less offensive diversity (controls, melee, ranged, etc.) than Tankers/Brutes. -
Target Drone also has an additional +60% buff that occurs with your first attack. This makes the alpha strike with your ultimate convenient while also giving you a constant boost to damage during the fight itself. In theory, if you can drop the recharge on Build Up enough, you'll eek out slightly more damage - you lose the activation time of Build Up but gain the larger average bonus. Given the choice, I'd take Targeting Drone over Build Up.
-
DDR is less of an issue than many make it out to be. Cascading defense failures are a feature of large spawns rather than single tough opponents, so there are plenty of options for melee to deal with it in primary. Consider that Bio (a primarily defense-based set) has both low S/L (L is the primary delivery mechanism for most -def) and no DDR. But people are happy to play it. Debuffs are also a concern. Being 90% immune to every type of damage is nice, but if you're getting hit 100% of the time with Negative damage you probably can't hit the broad side of a barn. Likewise, getting hit 100% of the time with Psi damage means you can't realistically use any of your abilities more than once. Blinds are bad and if even one Endurance Drain from the right kind of Sapper hits, you can get de-toggled (and dead). While resist-based sets are normally better with debuff resistance than Defense-based sets, they're not that much better. The larger issue is that Defense powers are simply more useful to a build than Resist powers. With a single Resist power, you can slot every Resist set unique in the game while still improving the power itself to the ED cap. Resist sets give bonuses like F/C Defense, Melee Def and Psi Def which, while nice, generally aren't what you want. On the other hand, you need five Defense powers to slot all your LotG +recharge. Having additional ones to mule the other Defense uniques can come in handy as well. You can two-slot most Defense powers just fine. Or, if you want to invest a bit, you can get a pretty hefty bonus to E/N Resist (which is lot harder for most builds to raise than S/L or F/C). Defense powers are incredibly efficient in terms of powers/slots compared to Resist powers due to the peculiarities of the various IO sets. You also have to consider the value of over-cap Resist vs. over-cap Defense. If I just barely stagger to 90% resist, that's all I'll ever need. No matter how you ramp up the difficulty, go into Incarnate content, etc., 90% resist is the cap. Having over 90% resist is only valuable if you're facing significant amounts of -resist debuffing. In contrast, hitting 45% Defense doesn't mean you're done. In incarnate content, the soft-cap rises to 59%. There are a variety of mechanics out there that give special +hit bonuses that require higher defense as well. A set like Stone or Super Reflexes that blows right past the soft-cap without even trying will be able to handle such issues a lot better than a build where you were barely able to hit soft-cap with some very clever slotting. Lastly, there's a perceptual issue. When your Resist-based build goes down under a flurry of blows, it's fairly obvious that the build wasn't good enough for that content. Resist-based builds tend to die to large swarms of enemies that are not individually very dangerous. In contrast, when your Defense-based build goes down, it's because you were 'unlucky'. Defense-based builds tend to be nearly impervious to large swarms but can struggle against that AV because they just can't repel firepower of that magnitude if they do end up getting hit. Even then, most AV deal primarily S/L damage and Defense-based sets tend to build for S/L Resist cap even if they're vulnerable to everything else.
-
The debuff portion and (potentially) the +damage% per enemy hit aren't auto-hit. Only the flat +damage% applied to your allies within 20 yards is auto-hit.
-
Some thoughts: Stone Mallet is lower dpa than Stone Fist so they only time you should be taking Stone Mallet is if you can't work the rotation any other way. Hurl Boulder is terrible dpa, so it doesn't belong in any decent rotation. Stone Melee rotations are tricky because the recharge on Seismic Mallet is simply too long. Seismic Smash is nerfed in Scrapper form (the higher critical rate doesn't offset the lower critical value). It might be easier to build this as a Tanker, where you can include Gloom in the rotation with a perma-Hasten build.
-
Are there any Brute builds that can solo AVs and GMs?
Hjarki replied to meowkittyface's topic in Brute
For a stock level 54 AV with Incarnate Shift, we've got: 5% regen every 15 sec 30,677.2 total health 87% resistance to debuffs from level 65% due to purple patch So our AV regenerates 30,677.2 * 0.05 / 15 = 102.26 health/sec. -500% regen would be -500 * 0.13 * 0.65 = -42.25%. So that -500% regen debuff should translate into 102.26 * 0.4225 = 42.20 dps presuming I've got the mechanics correct above. -
I've done this as a Tanker, but a Brute is a bit trickier. Some concerns: SR Tankers/Brutes ideally want 40%+ resists before the scaling kicks in. On a Tanker, the ATO proc can account for almost a third of this. Staff AE is primarily cones. Going from a 10 target cap to a 5 target cap on 90 degree arc/10 foot range cones is a big deal. Tankers have substantially more health than Brutes and health has an unusually strong impact on SR survivability. The single target attacks for Staff are Mercurial (29.49 dpa), Precise (41.71 dpa), Reach (37.92 dpa) and Skysplitter (49.29 dpa w/mechanic). Given redraw/set mechanics limiting the value of epic/patron nukes, probably the best rotation at achievable levels of recharge would be Precise/Reach/Precise/Skysplitter. The following would be a decent starting place: However, be aware that this build is almost 1000 health short of what a similar Tanker build would be, so it will be far more vulnerable to massive single hits from AV/GM. Either Soul or Body should work - Soul for the Regen/Recovery, Body to put you over 40% resists.
-
Effectively, we're describing a probability distribution only by the mean and the extremes. So while we can guess that it's a normal distribution (sum of independent events), we don't know how tall/narrow that distribution is without going into a lot more details - details that would narrow the generality of what we're discussing. I would argue that the "Defense for AE, Resist for AV" rule applies though. If you're fighting a large number of foes, they must necessarily have a lower damage per hit for that encounter to be survivable. Likewise, the more trials you have, the taller/narrower the probability distribution will be.
-
In terms of the one-shot, you're effectively making the argument that there exists a meaningful body of content which includes enemies that have unmitigated S/L damage above 4219 damage but below 6667 damage. It's more justifiable - and perhaps better to talk about - when you're saying 9450 vs. 3480 or considering the impact of a single Thermal Shield. But I don't see much content threading the needle on single large hits like this - especially when you consider that a comparable Invulnerability (or similar resist-based set) build would have 3400 health at 90% S/L for 34,000 effective health. Not every set can be good at everything and soaking massive hits isn't really in SR's wheelhouse. In terms of the multiple hits, effective health isn't important. Rather the rate of incoming damage vs. regen/healing is. But this is the same for both Toughness and non-Toughness - the only difference is that the non-Toughness build is stable at a lower health total. Ultimately, this is what it boils down to: in 99% of content, Toughness is useless. If you even have it, you should turn it off to save endurance. In the remaining 1% (against extremely hard-hitting AV), it might be useful due to the effective health issue. But you have to hit a very narrow band of usefulness. I understand why people think it's weird to not take the Fighting pool - it's so ingrained in their heads that it's a 'must have'. However, it just doesn't help all that much with SR due to the way scaling resists work - and it might not even help at all. I can't recall any situation where it did.
-
What you're not grasping is that nothing you wrote makes any sense within the context of what you're replying to. You're inventing all sorts of objections to claims never made. It's fairly clear that you either didn't read what I wrote or you didn't understand it. The build info I provided is not necessary to understand what I wrote. With or without the build info, you're arguing against straw men.
-
You don't actually need 100% uptime on Rune of Protection because your goal is to fight at low health totals and capped resists. Rune of Protection does help with the initial engagement against an AV and is a place to slot the uniques. Toughness, on the other hand, is useless most of the time because it simply over-caps your S/L (only) resists. 2740 HP/320% Regen are hardly 'ignoring' health on an SR Tanker. It is, in fact, significantly more than the stats you linked earlier. I'm not sure how having 50%+ Defense is 'ignoring' Defense. The linked stats are also from a Staff Tanker - which means you can realistically expect +35% more Melee Defense if needed. Again, the defenses I posted are not dissimilar to the ones on your linked build so I'm not sure what the complaint is. It wasn't mentioned. Indeed, your response is a bit baffling given how little it has to do with anything I wrote. In Incarnate content you have Incarnate abilities. There's no actual difference in the number of incoming hits between regular content above the soft-cap and Incarnate content above the soft-cap with Incarnate abilities. I'd argue that's the proper design goal - not piling on ridiculous amounts of defense that you never actually use. If you're talking about extraordinarily difficult content, then you've got multiple stacking team buffs (not just Incarnates) that address your concern here as well.
-
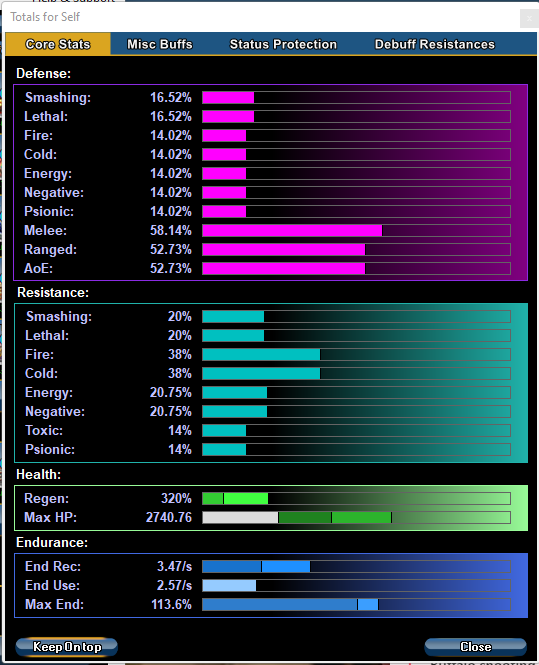
One way to examine this question is to consider 'effective health'. For example, if you're at 70% health and have 25% resists, it would take a hit equal to .7 / (1 - .25) = 93% of maximum health to kill you. Super Reflexes and Reactive Armor add the wrinkle of scaling resists. Presuming you have both, some breakpoints (based on your resists without any of the scaling resists): 30% Resists. This is the steady state point where your effective health stops moving below 60%. A single hit is no more likely to kill you at 10% health than it is at 60% health. 40% Resists. This is the point at which it becomes advantageous to fight at low health. A 40% resist SR Tanker has the same effective health at 20% as they do at 100%. As you move above 40%, you actually have more effective health at low health totals (while also taking far less total damage that needs to be offset with healing/regen). 80% Resists. The "fight better at low health" category ends around here and you're better off just staying at maximum health. However, it should be noted that no SR Tanker has a particularly high effective health. A 90% Resist Tanker with 100% health can take 10 times their total health bar in a single hit. For realistic levels of resist on an SR Tanker (such as recommended elsewhere in this thread), 2.5 times is about the max. Super Reflexes also doesn't grant any bonuses to maximum health. An Invulnerability or Stone Tanker probably has 25% more total health than an SR Tanker. So our Invulnerability Tanker is probably going to have an effective health (vs. S/L) at 100% health five times higher than our Super Reflexes Tanker. With that in mind, effective health is primarily meaningful against AV. Against minions/lt/boss, no individual hit is hard enough to kill you outright so all you're really worried about is total mitigation. So if we focus strictly on AV fights, we can count the 8% from uniques (Shield Wall, non-scaling portion of Reactive) and 13% from ATO proc (presuming we place it in the right power). That 21% and our goal should probably be another 9% from set bonuses at minimum. With both ATO, we get another 12% S/L. As a result, I view Toughness on a SR Tanker to be a poor choice. Unlike the overwhelming majority of builds, you have no particular need for Weave - you've got more than enough Defense mules for every unique and it's nearly impossible to build a sub-soft-cap SR Tanker if you're not actively trying to screw up. With uniques and ATOs, you're already in the 30% - 40% range where your scaling resists cause your health decline to stall at low health. While obviously more resist is always better, all it's really doing is shifting the point you hit maximum resists to a slightly health total. Not taking Toughness means you save: A power pool. You've only got 4, so might as well not waste one. A power pick. Kick/Boxing are wastes of a power pick that you can't do anything with. Endurance. Not having to keeping those two toggles running is a significant endurance savings for a primary that has no endurance management. With that in mind, not taking Toughness also means you no longer have the ability to slot Unbreakable Guard, Gladiator's Armor, Steadfast Protection and Impervious Skin. Luckily, there's an alternative: Rune of Protection. To get to Rune of Protection, you can easily take Mystic Flight - it's a perfectly serviceable travel power that can be used to slot Winter's Chill (amongst other things). Spirit Ward is essentially a dead power - none of the healing uniques function in powers you don't use and you're not going to be using Spirit Ward. Arcane Bolt can potentially be effective. Eyeballing the math, Arcane Power probably only procs once every 25 sec or so. Once it has proc'd, Arcane Bolt is 66 dpa (higher tahn all but the hardest-hitting Tanker attacks) so it can be used to (slightly) increase your single target dps. It's also a good place to dump sets like Apocalypse if needed. You also gain access to Enflame. This allows slotting Ragnarok. Unless I'm misreading City of Data, this deals 26.415 (5.283*5) damage to 5 targets every 3 sec for 60 sec. The frequent patch dropping also means procs activate quite a bit more often than would otherwise occur. In terms of Rune of Protection itself, it provides about +30% to all resists while active (60 sec every 180 sec, no recharge reduction). This isn't useful for churning through endless waves of ITF trash, but it's quite handy when you first engage an AV and having yet gotten a chance to stack your ATO procs. And, of course, it costs zero endurance when you're not using it. Below are the stats for my current SR/Staff Tanker @100% health without ATO proc, Staff resist proc, or Rune of Protection. With all three of those active, I'd have about +56% to all resists.

-
-Regen isn't very useful. -100% Regen on an endgame AV/GM is roughly equivalent to 15 (non-scaling) dps. Certainly, it's great if you're trying to solo even-level AV/GM for kicks, but for teams it's mostly superfluous. +damage/-res are definitely useful, but it becomes a calculation of how much dps you lose vs. how much dps you gain. More importantly, the melee AT brings these abilities as well - they're just lower numbers. So while you can theorize about some perfectly structured group full of defenders, it's a lot easier to just grab 8 melee AT who can all operate effectively independently of one another and who synergize in any combination when you stack them.
-
To amplify this comment a bit, Super Reflexes is... different. A lot of the approaches that players are used to from other sets don't really work all that well with Super Reflexes because they just end up with ridiculously over-capped resists without ever bothering to take advantage of those resists. While I agree on the "build for health" approach, there's only so far you can go with this. Exploiting these virtues to amplify offense is a lot easier and you can still make a very tanky build. One of my more elegant builds is below. It's the sort of build you can only do with a Tanker and while it can't tank everything that could ever be thrown at it, it can do pretty well against most content while still having fairly decent offense. In terms of the rest of the primaries, I tend to view them as: Super Reflexes/Shield. These tend to share the same strength/weaknesses and both can be justified for certain builds. Bio/Stone > Invulnerability/Willpower/Ice. These hybrid sets tend to have similar build structures, but Bio/Stone just do it better with fewer holes and more supplemental benefits. Radiation/Fire/Electric/Dark. Classically, the rule was "Resist for Tankers, Defense for Scrappers". However, the way IO sets are structured makes it very hard to build from a base of a pure resist set (at least on a Tanker). Defense toggles let you equip 5xLotG, the other uniques and only take a minimal number of slots to deliver their benefits. Resist sets tend not to be particularly good at buffing anything you're likely to need - Melee and F/C Def are perhaps the least useful forms of defense and the only stackable Resist special is the not-terribly-useful Psi Resist. I actually think these are more useful for Stalkers since they get Hide and Shadow Meld on even zero-defense sets. However, it's really more about the combination of primary/secondary working synergistically and it's tough to say "X is good" without referencing what it's paired with.
-
No, it's assuming you're playing the actual content in the game. The fact that you can set up an AE mission using parameters found nowhere in the game to create a challenge doesn't alter the underlying reality that support archetypes just aren't very useful in the game because they're buffing allies beyond what is needed. Even running with no temporary powers/inspirations/etc., there really isn't a need for more than what well-designed melee AT can do defensively.
-
Staff is weak single target, but an AE powerhouse. There are three forms: Body, Soul and Mind. You can get up to three stacks. Body provides +15% damage, Mind provides +15% recharge and Soul provides +33% endurance discount. You can also spend these stacks for slightly elevated damage with two 'finisher' moves which give different benefits: Eye of the Storm grants -resist, -defense or -recharge/slow. -Resist is far and away the best of these, but Eye of the Storm itself is the weakest of the AE attacks in the set. Skysplitter grants +resist, +hit or +recovery/regen. Of this, either +resist or +recovery/regen are strong choices. You also get a bit extra smashing, psionic or energy damage (depending on stance) but this is trivial. Personally, I view Staff as a set you take for the purposes of tanking - and it works better on Tankers due to the Cone-centric emphasis. While it's not great at single target damage, it solves so many potential problems with a build that it just makes almost any build easier.
-
Bio Armor, Radiation Armor and Energy Melee can all debuff regen. However, it's probably not worthwhile to use Energy Melee for this purpose.
-
As I see it, the problem with support AT is that the game simply runs off the rails at the high end. When almost anyone with a defense set can hard-cap resists and soft-cap defenses, there isn't much need for these sorts of buffs. Moreover, the stacking nature of these sorts of buffs means that even if you shift the goal posts a bit, you merely end up in a situation where you only need one. Buff/debuffs also aren't created equal. Even significant amounts of -damage barely make a dent in the damage output of serious enemies because of the way the scaling works and their resistances. But even minor amounts of +resist can slice damage taken into a fraction of its value (presuming they're not already hard-capped). Ultimately, I think the only solution is to scale almost everything logarithmically and remove most of the inherent resists to debuffs. On such a scaling, you'd never be able to 'cap' anything - each subsequent buff/debuff would provide less and less benefit - and increasing/decreasing a stat would have the same overall effect with the same numbers. However, this would be a radical departure from the fundamental game mechanics, require everyone to re-build their characters and dramatically change a huge array of playstyles. You'd probably no longer have those +4 Fire Farms and you'd find much of the content far harder than it is now.
-
On most of your attacks, you'll be running +150% or so damage. Adding another 15% would take it from a 2.5x attack to a 2.65x, or a 6% boost. Are you sure this isn't what you're seeing? In any case, if you've got the endurance and the power slot to spare, there's little reason not to take it. Unlike Maneuvers/Tactics which mostly serve as self-buffs (since your group mates will have already capped their hit/defense without your help), Assault is almost always a benefit for the entire group.