Nemu
-
Posts
1424 -
Joined
-
Last visited
-
Days Won
3
Content Type
Profiles
Forums
Events
Store
Articles
Patch Notes
Everything posted by Nemu
-
Hi Sakura Sun, happy to help! First let's define the scope and the game plan: As I mentioned in game one of the easier routes to bump up your survival is building for defense. If your primary playstyle is ranged then high range defense is a good build goal. Accelerate metabolism is a cornerstone buff and people gravitate towards making it perma when building radiation emission. The build in the screenshot is primarily focused on recharge and damage via damage procs. But it has questionable omissions in IO sets such as the other Defender Archetype Origin set (Superior Vigilant Assault) that gives 10% global recharge at just 3 slots. One thing it definitely does not have is the kind of survival that aligns with your goals. My mids export is erroring out so I'm attaching a build via PDF. This version is the "no expense spared" version Expensive Rad Rad.pdf On Page 4 you will see the stat breakdown. Notice the 45% range defense - that's the softcap for most content and it means most mobs will have only a 5% chance of hitting you with a ranged attack. Notice that on top you also have 74% smashing/lethal damage resistance, which is the most common damage type in the game. Notice further down you also have 85% recharge resistance, which means that enemies that apply slows will not instantly neuter your powers recharge timer. This is especially important for accelerate metabolism, as your endurance management depends on it. Hasten and Accelerate metabolism are both perma and you will have one hard hitting single target hold in dominate. The downside to this build is that it uses quite a few expensive Winter IO sets and Purple sets. If you work up the budget it can be something to work towards. Alternatively you can accomplish similar survival/recharge goals without the slow resist through much cheaper IOs: Cheaper Rad rad.pdf The cost difference between the two builds is around half a billion inf. Performance wise, you will start feeling "super" with the cheap version.
-
Do you use your melee powers as a blaster? If no there's no advantage to fire/fire compared to fire/ice. In fact Fire/ice is better because it has more tricks to keep you safe. If you do use your melee powers often and fight big pack of mobs all the time then fire/fire is a good fit. All fire/fire has is damage and if you don't pay attention and/or don't have support you'll die a lot. The fire epic is the pool of choice for range blasters, bonfire with a kb-kd IO is pretty OP. Bad blasters also swear by rise of the phoenix. Fire/fire/fire is thematic and that's why a lot of people play it, similar to ice/ice/cold and elec/elec/elec. Rarely do these samey combos have synergy outside of theme. There's also something to be said about diversifying your damage types. Having said that, there's no reason why you can't keep your fire/ice and still level your fire/fire. The game overall is pretty easy and even the 2nd best or 30th best combo can still hang with the rest and contribute.
-
I would drop static discharge, between psi scream, shockwave and howl you have a full cone chain. That lets you fit in evasive maneuvers for more air mobility. If you plan to take advantage of powers that puts you in melee range you are better off dropping the entire flight pool, pick up combat jumping + super speed and learn to joust. Getting stuck in animation right in the middle of a pack while you are trying to fire off a 2 second AoE is a great way to get yourself in trouble even if you do build for defense. When I see people asking of build help, 90% of the time it's not the build that'll take you to the next level, it's understanding game mechanics. A quick glance at your build tells me that you are probably not at the ranged defense softcap despite the artilleries. You most likely don't have 95% chance to hit +4 mobs either. Recharge looks low for a secondary whose endurance/HP sustain depends on recharge. And as I said you can redirect those slots into static discharge into your other cones. Going 5 slots deep into luck of the gambler just for some S/L resist is also not the most efficient use of slots. For a cookie cutter template I would pick up scorpion shield and build for S/L + Ranged defense. It's possible to still melee blast with pure range defense and a resist shield but that's where mobility becomes even more paramount because you will have to constantly move to trick Mob AI into not meleeing you. If you don't want to do that, then keep a steady supply of lucks, pop one or two before you engage and convert others into purples in your downtime. Here's a quick workup of what a cookie cutter build focused on S/L + Range defense looks like. I always try to keep a healthy dose of slow resist as well, and it's pretty important for Mental Manip. Any slows will neuter the recharge of drain psyche and that's a significant part of your survival on top of your defenses. Sonic Mental.mbd If you want to squeeze more procs in then you'll have to sacrifice defense. A common strategy is to build towards 32.5% defense so that one luck softcaps you. That gives you a bit more room to fit procs in. Just remember if you are going to proc out a hold you still need enough ACC bonuses to make sure it hits. However, based on your comment about catching a lot of aggro, I think you are better off with the cookie cutter template till you learn all the blaster tricks of the trade.
-
You guys are way behind on the Axe trend. That was very 2020. Now whirlwind is the new cool. Don't miss out and pick up whirlwind today!
-
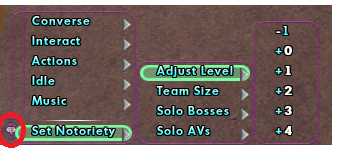
It depends on how far you want to dial up the difficulty. You may or may not know this but you can set your difficulty. There's a speech bubble next to where you type in chat and you can set notoriety and select mob levels in missions relative to your level and the team size. You should have no issues with SOs with the default difficulty level for the most part. It's when you ramp up that you'll start noticing your survival taking a hit. However if you team a lot then your teammates can help out in that department.

-
I have seen a fair share of panda hate I must say. A lot people out there want to make panda steaks. That's constitutes a hostile work environment people.
-
Congrats on your first 50! It'll get easier from here now that you have a 50 to fund your other alts. I looked at your build. I have comments. A full set doesn't always mean the most benefit. This game like many others is about stacking similar stats. And the set bonuses are those stats. In this game the two main stats that people build for are: Defense Recharge Recharge is straightforward, the more is better, until you hit a point of diminishing returns. In general if you can hit 90-100% global recharge bonus that's really good, more global recharge bonuses past that point fall off in effectiveness and bang for the buck. Defense is more complex, there are multiple vectors for defense and people usually focus on 1 or 2 on non-defense oriented ATs/combos. There are a few strategies with blasters. 1 - if you just want to keep at range and shoot and avoid melee, range defense is a catch all and it'll cover 80% of ranged attacks, some range attacks are flagged as AoE and will not check against your range defense. A popular strategy with pure range blaster is to build for high range defense and pick up a resist epic shield, so that anything that does get past your range defense hits for less. 2 - if you want to mix it up and punch face as well then my preference is Smashing/Lethal defense, which covers most attacks in melee range, PLUS range defense, which covers the stuff shooting at you from range. Some examples of where you can clean up and optimize your slotting a bit, this is not what I would actually recommend, it just serves to highlight the general philosophy and approach to building: If you want to stack stats then any slots past the desired stat you want to chase is unnecessary. take recharge for example All these 6 slotted sets provide recharge at the 5th slot. The last slot doesn't provide any meaning synergy/contribution towards a build goal that's focused on recharge. Also, the luck of the gambler Defense/Increased Recharge Speed takes up a SINGLE slot and offers 7.5% recharge bonus and you can slot up to 5 of them in a build. That's the basics. I've done similar exercises with other posters on shoringup their build. If you fancy a read start here. Happy to help if you have any questions afterwards
-
You can try something offbeat like this:
-
I'm not seeing too many procs. You have vengeance and victory rush toggled on and those give you an inaccurate account of your overall stats. If your goal is to play at range why not build for range defense? A full set doesn't mean you get the most out of them. You are overslotted on hover, tactics, maneuvers, weave, frozen armor. Start here if you want a walk through on building with a goal and purpose and optimizing your slots Then stop here for proc slotting on Ice Blast Hope this gives you the perspective you need to succeed. Ping me if you have any questions.
-
The experience of a returning player having to re-learn the ropes.
Nemu replied to crimson72's topic in General Discussion
People like that exist but for the most part the price of most IOs have kept the same over the years. The average price of a regular IO from a regular set hovers around 2-4 mil, depending on how patient you are. That hasn't really changed since 2019. The existence of enhancement converters adds another dimension to getting the IOs you need but unlike vaal orbs you won't ever brick your IO. You really don't have to play the price gouger's game unless you are impatient. There are plenty of other ways to get what you need for your build. Considering most IOs top off at 4 mil, with LOTGs 7.5s hovering around 6 mil, ATOs and a few of the quintessential PVP ios broach 8-10mil, it is very possible to get the core of what you need for a build for under 300 mil. Purples and winter IOs propel a build into the mid-high end spectrum. Most builds you see on the forums are in fact high end builds, people usually ask for "what's the best with an unlimited budget" (which by the way is a terrible way to ask for build advice). There's also the ability to craft your drops and use converters to convert undesirable crafts into more useful sets, keep the ones you can use and sell the others for a modest profit. Finally for those more expensive IOs like purples and winter sets you always have the option to trade for them via merit vendor if you don't want to wait. People will tell you it's not the best way to spend merits but if you get what you need why does that matter? Merits like any other commodity in this game is easy to acquire. You can run a speed Apex/tin in around 30-40 minutes, a speed ITF in another 20, and that'll net you 100+ merits for an hour's worth of playtime on top of influence/drops gained. And again, you don't need a top tier build to run those to start. There are plenty of people that get carried on those when they start and then they upgrade their builds as they accumulate more resources. The hardest journey is the first 50, everything after that will become a lot easier. -
The experience of a returning player having to re-learn the ropes.
Nemu replied to crimson72's topic in General Discussion
This game is nowhere near POE's level of complexity when it comes to itemization and builds. The IOs are defined and there's no variation in their parameters, so you don't need to develop currency generating workflows and spend hours on POE trade/crafting just to find the BIS gear. In addition it's much easier to attain end game goals with this game than POE where most builds just die off when they reach yellow/red maps because at that point itemization becomes so paramount it stymies progress for all but the most hardcore gamers. And those people that claim they have amassed billions upon billions of inf are just flashing their wealth, it's absolute excess and you can kit out your builds with a budget of a few hundred mill which isn't tremendously difficult in this game. You don't need to game the market every waking moment playing this game and still be able to outfit your characters. Compare to live when you still lived in the age of Hamis being Best in Slot, the game evolved beyond the power level that hamis offered with sets and set bonuses first and foremost, and incarnates second. There's really no other game that makes you feel as god-tier with a moderate decent build as this one and you can do so even on a budget without spending billions and billions of inf. I think you are on the right track to improve your gaming experience from a currency standpoint, but I wouldn't get sucked into the idea that you need billions upon billions of influence to succeed and have fun. FYI when I came back I won a few costume contests and then used that to fund my first character, then I ran a lot of speed TFs (more apex/tinmages than I care to admit) to generate a lot of reward merits and I actually used those merits to buy IO recipes from merit vendors to upgrade my build before I started selling drops on the market. Farming came much later and only because I learned about super packs and wanted to generate some extra capital to buy winterpacks during the winter event when they were discounted (that's no longer happening). Bottom line is you don't need to go into the extremes of currency generation, you can still spend the majority of your time playing the game, supplement that with a modicum of selling stuff on the market/farming/speed run stuff for merits, and still generate enough inf to start funding your next alt. -
Making sure I don't add Kurt Angle to the mix, because if that happens my chances at survival drastic go down.
-
The experience of a returning player having to re-learn the ropes.
Nemu replied to crimson72's topic in General Discussion
I find the current player base don't read. They may very well spam in LFG that they are forming teams but they don't read the same channel they post and grab people interested in joining teams. It's far easier to get invites by sending tells to people advertising for teams and even then you may run into people that lack the common courtesy to respond back with a "we are full." I totally get where you are coming from. There are days that I don't want to deal with illiterate players or players that lack common courtesy and it's much easier to close myself in. Fortunately this game is lax enough where you can do just that. On the other hand, if you do give teaming a chance you might find yourself having fun with some cool people, some of which might even make your friend list. If you play mostly on Excel, you can also ask those Sovereign guys that are always kneeling in Oro to invite you to their SG/coalition. That coalition is pretty active. -
The experience of a returning player having to re-learn the ropes.
Nemu replied to crimson72's topic in General Discussion
I forgot to mention the best way to make money is to make @Yomo Kimyata host a build contest and then post creative builds and win. I think I won at least 200000000 billion inf from Yomo at this point. He hasn't paid me yet, but he will. protip: all the creative builds have whirlwind, it's super creative! -
The experience of a returning player having to re-learn the ropes.
Nemu replied to crimson72's topic in General Discussion
As adults we wage war against our greatest archenemy - time. This is a good way to maximize what you want to get out of this game with the time that you have. I think it's great that you took the initiative and did something about your situation to achieve the outcome that you wanted. I can not say the same for the scores more that not only depend on, but demand the generosity of others. I have no doubt that since you took the initiative to change your financial outcome, you'll also have the initiative to do the work and accomplish other things in this game if they compel you. You can make a fire farmer and self level in AE from 1-50+ without begging to sit on farms. It's all a matter of tuning your difficulty settings, start low and crank it up as you level, get more slots, get better enhancements. Another recommendation is to create an alt account. Make that your farming account. I have exactly 1 character on my alt account and I only use it to fire farm. I don't power level every character on my main account that I make, but it's nice to have the option to help a few select combos that don't play as well early game past those hurdles so you can get more fun out of your time. -
Good breakdown but what happens when you add Kurt Angle to the mix?
-
Harsh words but there's truth in what @Zect is saying. It takes some awareness of your goals and what those goals mean to make out whether a build you see/copy aligns with your goals or not. Not everyone has the knowledge built up over years of playing the game to see synergies/holes/playstyles/other requirements to make a build work, and the mere existence of builds posted on the forums don't automatically make those builds "good" for YOU. Defining goals is the first step, and the more specific you are about your goal the better - that includes playstyle preferences, travel preferences, pet powers, etc... Anything other than "I want to be unkillable." or "I want to max out" (WTF does max out mean? you've given your audience nothing to work with with that statement) There are a lot of people that will sacrifice a lot of offense to make "unkillable" builds. The last time I checked you don't get xp/loot from being unkillable, you get those from being able to kill stuff too. And you can't do that if you hit like a kitten. Joke - Don't let tanker players build offensive ATs, they'll try to cram every resist and def bonus into that AT. Even seen a tank player build a blaster? That's comedy. I wish more people took a more analytical approach to making builds by asking the following questions: What can I expect with this combo? How does it play? This is my budget, what can I get out of this? Are there any synergies I can take advantage of? Are there any holes I really need to address? What am I potentially giving up to reach my goals? Any of those questions are magnitudes better than "is this build good?" because the former list anchor the questions to be about YOU, and you get less chances of some rando chiming in about how their build xyz is ubercakes and can solo LRSF with a mids link with no other context. Watch for posters/builders that explain what they do and more importantly why. Those are the ones with enough emotional intelligence to understand that posting in build help is not about flexing their build but to help the requester understand the build. Your chances of getting a build specific to your own goals and needs is much higher with those folks. Onto your build: 1 - Fire Armor needs recharge first and foremost. Healing flames is a cornerstone of fire armor survival. You gave up a lot of recharge focusing on defense and your build doesn't have knockback/knock down powers to take advantage of Force Feedback procs to offset that lack of global recharge bonuses. Your defenses will fail you, your primary doesn't have enough reliable mitigation(specifically AoE mitigation, you can stun a single target but it's that target's buddies that are going to kill you), and at that point healing flames is the only constant that can carry you through a fight. 2 - Fire armor also need a good deal of slow resistance, again, because of healing flames. If you can't spam it and your defenses are stripped and your recharge is neutered by slows, you are dead. 3 - EM is a bit too single target to operate fire farms efficiently regardless of how you supplement it with weak APP AoEs, you are better off just running regular KM ITFs/craft/convert if you want to make inf. 4 - Inefficient slotting: The 6th slot in Fire Shield does nothing for you since you already have capped fire resist. 6 slotting build up gets you less S/L defense than 2 slotting it with rectified reticle. I don't understand the rationale behind energy transfer. It doesn't cost end, it's also not autohit and you skipped ACC slotting in the power 5th slot in combat jumping gives you very little benefit. 2% damage bonus is negligible. Speaking of hitting stuff, it's a good place to put a kismet unique Sprinkling in various psi resistance IOs -see my joke about tankers. Your psi resistance is STILL pitiful, and you'll be better off dedicating those slots to more recharge/offense. In general I see a lot of wasted slots in 6 slotting powers with sets that don't give you fire/cold defense if fire farms is your goal. If general content is your goal there is additional wasted slotting in all the 6 piece winter sets that contribute to Fire/Cold defense, that 6th slot is not needed, You could use more LOTG 7.5 in your defense powers, hide for example. Recharge is good for fire armor and also speeds up total focus recharge to let you build focus. 5 - Assault doesn't do as much as you think it does, I'd rather get tactics or focused accuracy to deal with blinds and in case of the latter, ACC debuffs. 6 - Drop body mastery if you want to do more damage and get more meaningful set bonuses from the slots you potentially save. 7 - Agility does little for you defense wise, the defense boost from pool defense powers enhanced over ED is tiny. The primary reason people choose fire armor is more damage via burn, I would lean into doing damage more as the overall build direction and see this combo more like a melee blaster with mez protection. Dance and weave in and out of combat and kill stuff before they kill you, because dead things don't fight back.
-
In this thread 4th post.
-
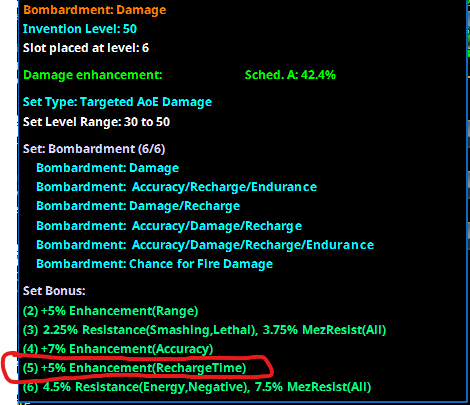
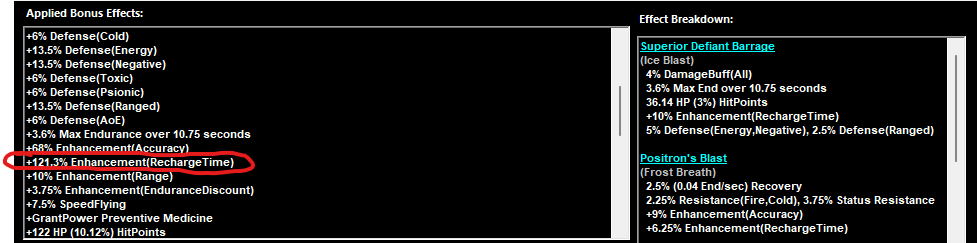
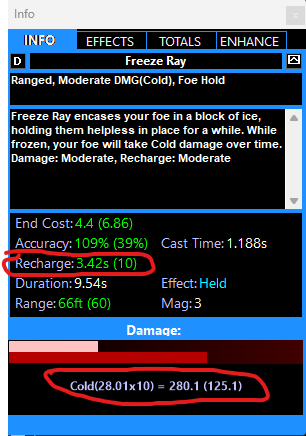
You should really look at the build I posted. It checks all your boxes based on your initial ask. Let's compare and contrast: Your last build, with a 6th set of +10% global recharge by the way. The build I posted half a year ago: Your Freeze Ray: My Freeze Ray, without any recharge slotting Your hasten: My Hasten: All that recharge gets neutered with just a few -recharge debuffs. Your -recharge debuff resistance: Mine: Where's your heart at? Do you really want to do the thing you said you want to do or do you just want to hover blast with range defense covering your survival? If you noticed that my Freeze ray has lower chance to hit against +4s you are correct, assuming you are on teams all the time there are buffs and debuffs that can make up for that, but if you want to make sure you stay above 95% to hit with those powers you can replace the DAM IO with a Nucleus Hami-O, drop grant invis and pick up tactics. Hasten will drop to 118s (oh Noes!) and you will still do almost 2x the damage on freeze ray compared to your build. I'll reiterate, building for recharge for the sake of just recharge is wasting the opportunity to find other things that synergizes with that game plan. Nowadays if recharge is my goal I'll find a way to proc monster at least 1 power, if not more, to squeeze more damage in and get the most benefit out of having high recharge.
-
Pretty F* if your name is F* McF*son
-
I took Musc for more damage and some end drain synergy. Power sink helps refill your end when you are surrounded by mobs and that when you end really starts to tank with whirlwind on. Otherwise I use power sink to drain end from problem mobs as another way to mitigate damage.
-
You can do both. The game has warped to a more damage oriented meta, but that doesn't mean that you need to sacrifice the conventional wisdom about slotting controllers back in the days to do damage today. Storm alone will take care of damage. To begin there are a few things you need to vet out: Playstyle/range (you solo a lot, want more control which is fine, but what about where you want to execute the game plan? at range or within melee range where arctic air can do its thing?) Theme, if any (check) The former will dictate a lot of your survival loadout, the latter will dictate the tools that you have to work with. Arctic air is set defining so we are going to build around that. Survival means you need to be able to stay alive while in the thick of mobs. There are a few ways to accomplish this: 1 - Leverage your toolkit to soft/hard control mobs around you. Storm is especially good at creating controlled chaos and ice is no slouch either, slows really mess with mob AI 2 - Build up defenses with epic armors/set bonuses. 3 - Get teammates to buff you. Monitoring your in game stats can help you make tactical decisions about how to alter your playstyle. 4 - Inspirations. On defense the conventional wisdom is S/L will cover a lot. and most people softcap that for builds that stay in melee and call it a day. I challenge that. Most people worry about the critters in their face so they think melee def/ or S/L is the most important for squishy builds that stay in melee. I think about it this way: if all you got is melee defense then you are not using your tools, and smart people use the tools in their toolkit and interact with those critters in their zone of interaction to mitigate melee damage. What they CAN NOT interact with are those outside of their zone of interaction shooting at them, sometimes with nasty debuffs. Range defense covers that entire vector regardless of damage type. So I tend to build for both S/L defense AND range defense for squishies that favor melee range. It's time to consider synergies with the pairing, there's not a whole lot but that's ok. You could make a case for hurricane as a positioning tool to push stuff into your patches. I've not seen people use that tactic too much nowadays but the rare opportunity may present itself where you can actually take advantage of that. So the game plan with this combo is to stand around in melee range to confuse/slow mobs and then drop lightning bolts/tornadoes/ice storm on them. We also need to consider the major holes in the build that will prevent you from executing your game plan: 1 - It's an end hog. Arctic air is an end hog, Freezing rain, tornado and Lightning storm are all end hogs, all the toggles will suck you dry. Hasten doesn't help either even though it's highly desirable for controllers in general and especially for storm. Solution - This is a build that's going to depend on recovery serums leveling up and on cardiac Alpha for incarnate. 2 - Mezzes can temporarily shut off arctic air. Solution - The rest of your toolkit can create controlled chaos to keep things busy, you have defenses to reduce chances of mezzes landing, and finally clarion/break frees 3 - General survival in melee range Solution - Covered that already above. So the build goals are the following: 1 - S/L and Range defense 2 - Recharge 3 - Enough tools to control stuff On recharge, a single well placed force feedback +rech proc is worth more than a whole set of purples. Don't miss the forest for the trees and solely focus on recharge set bonuses via purples and miss out on slotting FF procs. I'll add a 4th: Slow resistance. All the recharge in the world means nothing if you are slapped with -100% recharge and there are mobs that will do that. Part of your survival relies on your ability to fire off ice slick/tornado and the like and those have a fairly long recharge. You don't need 100% slow resistance, there are temp base buffs and dayjobs that will grant you some, but I'd recommend a healthy amount of it with any high budget build. Keeping with your epic/pool selections this is what I came up with: Veronica Frost (Ice Control - Storm Summoning).mbd If you want a more in depth breakdown of build optimization read through this thread
-
I did recommend you ask for help here. I'll look at this build more closely tomorrow. Are you going Ice/Storm/Cold for theme or is the epic/patron pool flexible? Also, what are you looking to accomplish with this character/build? Based on slotting I'm also assuming budget isn't an issue?
-
Whirlwind gets a bad rap. It's time to bring Cyclone Awareness to the masses. Premise: I wanna use whirlwind, I wanna storm blast, I wanna do something thematic. What rhymes with Storm? You guessed it Cyclone! What else does storm haz? Electricity What else? It's cold! So that's the theme - Storm/Elec/Cold mastery blaster with whirlwind. Synergies: Whirlwind, force of thunder, thunder strike all work together to keep stuff knocked down in storm cell, they all have FF +rech to accelerate my global recharge. Whirlwind is an end hog. Blaster sustains really help here, hence me picking the blaster AT instead of corruptors where I think storm blast can really benefit from scourge. Elec manip also has power sink, so that further solidified my pick for both theme and synergy. Storm shines in content with ambushes or anything with adds. Cat5 lacks the immediacy of most nukes with its slow build up but it lingers, so you can herd mobs into the storm. Anyway mission accomplished. I've built a walking cyclone that pew pews lightning. Here's the build. It's not softcapped, so use lucks as you see fit so you can keep spreading cyclone awareness. Cyclone Panda - Blaster (Storm Blast - Electricity Manipulation).mbd
-
Be a cool person and pair staff with fire armor. Double build up burn crit is hot.