Nemu
-
Posts
1424 -
Joined
-
Last visited
-
Days Won
3
Content Type
Profiles
Forums
Events
Store
Articles
Patch Notes
Everything posted by Nemu
-
Drop pistols and misdirection and invest in intimidate and invoke panic which can both take a disorient proc. The latter is a very good and very underrated alpha breaker in and of itself to boot. Invoke panic also has a base 60 second recharge vs 240 with misdirection which means you can actually use that every fight. Both powers have long enough base recharge that you should fire off the disorient proc reliably every cast. Provoke can also take a disorient proc but it'll have low chance of firing, but it's something. If I were to approach this I'd pick a primary where a blast that has a guaranteed mag 3 stun is baked into a damage dealing power such as those found in Rad blast, sonic blast, beam rifle and to some extent, seismic blast. At least that way you are also dealing damage AND stunning foes with a bread and butter attack. Having said that, you could also stand to dump 2 more damage procs into suppressive fire and leave the last 2 slots with acc/stun to make the duration longer. Losing 3% global stun duration isn't going to be game changing.
- 20 replies
-
- 1
-

-
- corruptor
- dual pistol
- (and 3 more)
-
You are going to get grounded and mez resist doesn't help you at all against -Fly. Even if you had loads of -Fly resist, it just reduces the time you are grounded for but you will still get grounded. With that context, you 6 slot some powers that don't need to be 6 slotted. 6 slotting purples have no value. You are also 5% over the range defense softcap. You can use some -kb in some powers, especially bonfire. I'd also drop hasten. It's the difference between 18 second RoA vs 15 second RoA in the final incarnate build. You are much better off building for Range + AoE def softcap if safety is your focus. I'd also take glue arrow, if you want to keep stuff at bay then it's good area denial and carries -jump and -fly. Normally you'd be hard pressed to get both Range + AoE softcap without making some significant sacrifices to recharge and other bonuses, but it's very doable with tactical arrow. The secret sauce is powers that slow and Ice Mistral's Torment. Since you are using archery as a primary there's less premium on recharge bonuses.
-
I put it in ripper. The cast/recharge times are longish so the proc has a better chance to fire in that power. You'll never use spine burst for single target so it's a poor place for the proc, There were some posts way back about using Spine/Ice for cold farms. For regular play the main draw is the double damage+slow auras. While the build does ok AoE, single target is abysmal. Endurance can also be an issue with double auras, even more so if you take leadership. I took medicine for the endurance return with aid self with field medic on my build.
-
I don't find any value getting into this discourse with you. I do hope that @Mack008 sees that there is another perspective to consider. And if he finds value in that then he/she and I can continue that path. Have a good day.
-
I dislike the "xyz sucks, don't do it and do ABC instead" posts that lack context and adds no value to a discussion as much as the next person. However, that was not the purpose of my post. I offered a perspective, and explained why. Does that not offer a solution to the OP's challenge, which originates from how cumbersome keeping two powers on auto is? If you reduced the number of powers to keep on auto to 1, then doesn't that also address the root of the problem? I'd be happy to share my hastenless /SR , /Nin and /Shield builds to offer additional context and perspective. In fact I have posted a few: Going hastenless was touted as an "elegant" solution to the issue of managing 2 clicks that compete for autopower. And that build still sports 100+% global recharge, which is more than enough for stringing together a decent attack chain. So yes I could have repeated what everyone else has already posted but I feel this might offer a fresh perspective.
-
Or you can just not take hasten. Not all builds need hasten. Especially defense armor melee builds, especially if you don't hold pylon tests as your bible in gauging performance. Most melee builds have 5-6 attacks and that's enough to cycle through a full rotation. It may not be the highest DPS but this game is easy enough that you'll still be able to kill stuff. For example, Dual Blade builds do fine with attack vitals instead of comboless high dps chains, the former doesn't require hasten. So think about WHY you need hasten. It's not hard to build upwards of 90-100% global recharge bonuses on defense based melee builds. And then there's also force feedback procs and what that brings to the table.
-
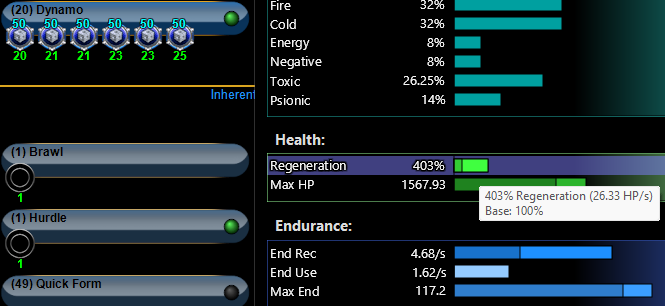
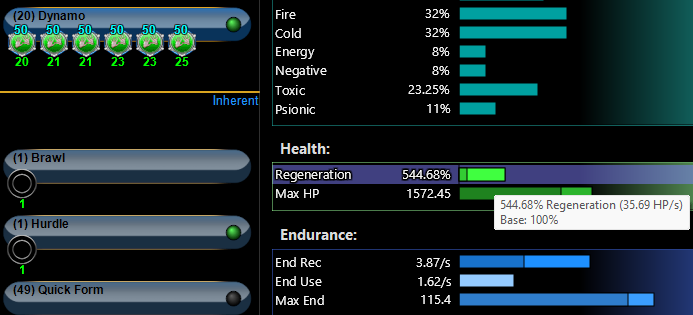
Let's run through the numbers. Screenshots reflect all 4 accolades With Preemptive you get 26.33 hp/s and 4.68 end/s, and 3.75% more global recharge With Numina you get 35.69 HP/s and 3.87 end/s and 5 more max HP In the end I favored pre-emptive because I don't think the extra 10hp/sec regen will help me on a high defense/low resist build, because those moments when I really need regen are the moments I'm most likely to just pop a green. Whereas the extra recovery and recharge helps me more offensively so I don't have to use powersink as often. However, there's nothing wrong with trying that Numina configuration out. If it works for you great! If you change your mind you can always use those unslotters.

-
I had a few people ping me for page 5 updates. It's a slight update with power pick shuffles. Getting Inferno at level 26 makes this build even more exemp friendly. I still kept Electric Fence for an immob vs AVs that love to run. so no major changes other than moving some stuff up earlier in the progression. This Hero build was built using Mids Reborn 3.4.7 https://github.com/LoadedCamel/MidsReborn Click this DataLink to open the build! Jezebel Delias i27 P5: Level 49 Mutation Blaster Primary Power Set: Fire Blast Secondary Power Set: Electricity Manipulation Power Pool: Leaping Power Pool: Speed Power Pool: Fighting Power Pool: Leadership Ancillary Pool: Mace Mastery Hero Profile: Level 1: Flares (A) Superior Defiant Barrage - Accuracy/Damage (40) Superior Defiant Barrage - Damage/RechargeTime (42) Superior Defiant Barrage - Accuracy/Damage/RechargeTime (42) Superior Defiant Barrage - Accuracy/Damage/Endurance (42) Superior Defiant Barrage - Accuracy/Damage/Endurance/RechargeTime (43) Superior Defiant Barrage - RechargeTime/+Status Level 1: Charged Brawl (A) Superior Blistering Cold - Accuracy/Damage (9) Superior Blistering Cold - Damage/Endurance (9) Superior Blistering Cold - Accuracy/Damage/Endurance (11) Superior Blistering Cold - Damage/Endurance/Accuracy/RechargeTime (11) Superior Blistering Cold - Recharge/Chance for Hold Level 2: Fire Ball (A) Artillery - Accuracy/Damage (3) Artillery - Damage/Endurance (3) Artillery - Damage/Recharge (5) Artillery - Accuracy/Damage/Recharge (7) Artillery - Accuracy/Recharge/Range (7) Artillery - Endurance/Recharge/Range Level 4: Combat Jumping (A) Luck of the Gambler - Defense/Increased Global Recharge Speed (5) Kismet - Accuracy +6% Level 6: Super Speed (A) Blessing of the Zephyr - Knockback Reduction (4 points) (13) Winter's Gift - Slow Resistance (20%) Level 8: Hasten (A) Recharge Reduction IO (13) Recharge Reduction IO Level 10: Kick (A) Empty Level 12: Aim (A) Gaussian's Synchronized Fire-Control - Chance for Build Up Level 14: Tough (A) Steadfast Protection - Resistance/+Def 3% (15) Gladiator's Armor - TP Protection +3% Def (All) Level 16: Thunder Strike (A) Superior Avalanche - Accuracy/Damage (17) Superior Avalanche - Damage/Endurance (17) Superior Avalanche - Accuracy/Damage/Endurance/Recharge (48) Armageddon - Chance for Fire Damage (48) Sudden Acceleration - Knockback to Knockdown (49) Force Feedback - Chance for +Recharge Level 18: Blaze (A) Superior Winter's Bite - Accuracy/Damage (19) Superior Winter's Bite - Accuracy/Damage/Endurance (19) Superior Winter's Bite - Accuracy/Damage/Recharge (25) Superior Winter's Bite - Damage/Endurance/Accuracy/RechargeTime (27) Superior Winter's Bite - Recharge/Chance for -Speed & -Recharge Level 20: Dynamo (A) Preemptive Optimization - Accuracy/Recharge (21) Preemptive Optimization - EndMod/Endurance (21) Preemptive Optimization - EndMod/Recharge (23) Preemptive Optimization - EndMod/Accuracy/Endurance (23) Preemptive Optimization - EndMod/Accuracy/Recharge (25) Preemptive Optimization - EndMod/Endurance/Recharge Level 22: Blazing Bolt (A) Sting of the Manticore - Accuracy/Damage (39) Sting of the Manticore - Damage/Endurance (39) Sting of the Manticore - Accuracy/Interrupt/Range (39) Sting of the Manticore - Damage/Endurance/Recharge (40) Sting of the Manticore - Chance of Damage(Toxic) Level 24: Weave (A) Luck of the Gambler - Defense/Increased Global Recharge Speed (27) Shield Wall - Defense/Endurance (47) Shield Wall - Defense (48) Shield Wall - +Res (Teleportation), +5% Res (All) Level 26: Inferno (A) Superior Blaster's Wrath - Accuracy/Damage (31) Superior Blaster's Wrath - Damage/Recharge (34) Superior Blaster's Wrath - Accuracy/Damage/Recharge (37) Superior Blaster's Wrath - Accuracy/Damage/Endurance (37) Superior Blaster's Wrath - Accuracy/Damage/Endurance/Recharge (37) Superior Blaster's Wrath - Recharge/Chance for Fire Damage Level 28: Power Sink (A) Preemptive Optimization - Accuracy/Recharge (29) Preemptive Optimization - EndMod/Endurance (29) Preemptive Optimization - EndMod/Recharge (31) Preemptive Optimization - EndMod/Accuracy/Endurance (34) Preemptive Optimization - EndMod/Accuracy/Recharge (34) Preemptive Optimization - EndMod/Endurance/Recharge Level 30: Maneuvers Hamidon Origin:Cytoskeleton Exposure Level 32: Force of Thunder (A) Absolute Amazement - Stun/Recharge/Accuracy (33) Absolute Amazement - Recharge/Accuracy (33) Sudden Acceleration - Knockback to Knockdown (33) Force Feedback - Chance for +Recharge Level 35: Scorpion Shield (A) Luck of the Gambler - Defense/Increased Global Recharge Speed (36) Reactive Defenses - Defense (36) Reactive Defenses - Defense/Endurance (36) Reactive Defenses - Scaling Resist Damage Level 38: Shocking Grasp (A) Hecatomb - Damage/Recharge/Accuracy (40) Hecatomb - Damage/Endurance (43) Hecatomb - Chance of Damage(Negative) (43) Unbreakable Constraint - Chance for Smashing Damage (46) Ghost Widow's Embrace - Chance of Damage(Psionic) (47) Neuronic Shutdown - Chance of Damage(Psionic) Level 41: Tactics (A) Endurance Reduction IO Level 44: Rain of Fire (A) Artillery - Accuracy/Damage (45) Artillery - Damage/Endurance (45) Artillery - Damage/Recharge (45) Artillery - Accuracy/Damage/Recharge (46) Artillery - Accuracy/Recharge/Range (46) Artillery - Endurance/Recharge/Range Level 47: Electric Fence Hamidon Origin:Endoplasm Exposure Level 49: Build Up (A) Rectified Reticle - To Hit Buff/Recharge (49) Rectified Reticle - To Hit Buff Level 1: Brawl (A) Empty Level 1: Defiance Level 1: Sprint | Copy & Paste this data into Mids Reborn : Hero Designer to view the build | |-------------------------------------------------------------------| |MxDz;1673;753;1506;HEX;| |78DA65945B4F134114C7FFDBDD5A402A60B95F5B10AD2D5D90047D32215CAA429B1| |0F900A4B62BACD6B6694B22BEFBAE466322A03E7AFD14BE6AD4E8A36F3E0B263E78| |41B39EEDD92383DD64777F33E73233FF9933E9EB73CD6F5EA7A6A10567F3994A656| |586BE55ABDC905EAF66AA76B1007A3A16AC1BD6252B1F9EB3F276A612B627CF8497| |A60264E9F1DC572E660AAB56CE4CDA658B5344C5B2BC5E2A15CB55733E6F65AB653| |B6B573756D299825D5ACFF300CD4BC562DE4C5999925D586DAA35964B96950BD630| |69AFAE55C9D0225E39AB5C59B34B3DF3253B6BCA20E94CD6A28FCB1BDD34AF08BDD| |3EED435C8E3F8E96300A70C9C80C670123E015DC06088C1CF60FD97867A6FB1A501| |B705EE3034E1AEC03D861937589D8406DD5FB3F86008F8190C1C623884804003432| |789AD2B69341D1D9A17F4873A060C8C908B5F75F1E393AFE6D28C3EBD06C3E41250| |5D0288C373F1C0472E8DD877A186430FE6A971785F06871A4F297BBB019D22826AD| |220BAB4DA8C8E6092C7BD42FD2DFB2A38FE166CB13CADD81678CC308EB33E0F3E73| |CF046E724F9262DBD49D68C31376398A6702CF19BAF182A1172F192E534848DD891| |0BEB3A51D3F047E3274E297C09EE4FBCD70CEAD0775121D78CBD21DC73B81F7021F| |E01DB88F0C0689D5A544EB5DB28FBD48BA6235C2C402C3381659BEF36EA1A933EFC| |103B60C629321822D8663D8167828F088E12AC5F669FFF6D0F1F78900FD2240BF08| |3028024444808808D0464B1850F77B4096308829EA08E8B0E937A41C167D0829DEC| |230D202DEEE866577F75A8161559A61C93B821D566404BB02DF784D79F21C55A519| |45D4E7491EF379851C17B8C090C0354E6C22C32735446B8A2A6910ADDD20E4324BB| |FB83A405CEA774CEA774CEA774CEA3721F59B90FACD51ACA90E60E2B47B1DE958A3| |DF845270DA04B6689A21F7DC6F32F41B501FC77DDD9A8C18076F262755EFD8C84B5| |E32544FB2689CE24BD3C114F42678E1BBF596086BBE536F8972CCD77ACB7D1EFF55| |8C2E27657C67317670D9CE5FCA47D2DF| |-------------------------------------------------------------------|
-
Ice/Tactical Arrow with Flame Mastery for bonfire + fire armor will suit players with "old man reflexes." You can always stay at range and you have slows and holds to keep stuff at range. The entire Tactical Arrow kit supports range play, unlike most blaster secondaries that favor melee. Build for range defense and you can hover blast to your heart's desire. This combo will give you a large margin for error. You need more than old man reflexes to step into melee range and be effective. Mobility is key for survival. I wouldn't advise those recommendations that push you towards combinations that lean that direction. Having said that you can absolutely be tanky as a melee blaster. Those blasters have way more style.
-
Panda Powah!
-
I prefer a good mix of single target attacks and AoEs for combinations that support it. While AoE is desirable you still need single target. The build is pretty lacking in the ST department. Aside from that, the build suffers from a lack of focus as many other builds do. It's just a collection of different 6 piece sets with no cohesive focus on any specific set bonuses. Having a full set in a power doesn't always mean it's the best slotting and can waste slots which can otherwise be allocated to other powers to achieve meaningful set bonuses/procs. In terms of build philosophy there are a few camps based on the outcome you want: 1 - pure damage, rely on teams for support. 2 - survival first 3 - middle of the road between 1 and 2, with just enough survival so that you don't die when something blinks at you 1 tends to favor recharge/maybe procs. 2 favors defense bonuses such as range defense or typed defenses and shoot for softcap, some would go as far as capping S/L resistance at the cost of neutering their offense even more. 3 shoots for 32.5% ish defense and the rest into recharge/offensive slotting. The idea is one small luck will put you at softcap. This method opens the build up more for more offensive slotting. Most people settle on 2 and 3. 1 is for dedicated team builds/skilled players and I find most players want to be a little more self sufficient than what that build path offers. The original posted build is not a cohesive build, but the game is easy enough that I imagine it's still a playable build. If you want a good build however, first define your goals and expected outcomes.
-
Staff/Regen with whirlwind is the only regen brute you need to play. Staff makes regen 100x better, whirlwind makes staff 10000x better, together that's 1000000x more better. The numbers do not lie!
-
The other aspect of what makes a good build to me is balance. Offensively that means a good mix of single target and area attacks. It also means that when I design my goals I'm not purely focused on my one goal at the abandonment of everything else. Sure I can design a one attack Empath with the medicine pool with softcap defenses to all positions to support the team (cuz I can't healz if I is dead amirite?) However, when I evaluate my goals, I also want to be able to contribute by actually killing stuff, because there is a balance. Also, dead things don't fight back, and you don't get xp for just staying alive. That to me means at the very least 3 single target attacks so I can have a decent rotation just so I have some capacity to solo. I'd also like to have 2-3 AoE attacks in my toolbox as well so I can kill fodder quickly. Bosses may be the most dangerous mobs in a pack but the added damage/debuffs from fodder matters, and it pays to kill them quickly. Power pick progression also matters to me a lot, I try to have 3-4 attacks by level 30 so I have some semblance of an attack chain. Finally understand your toolkit and playstyle, the same powersets can be built and played very differently depending on AT and what you pair it with. On defenders Venomous gas is a power to build around and it favors you debuffing stuff by existing next to them. This means I'm less thrilled about cones in my arsenal because that means I have to move/reposition to maximize my cone coverage. I don't have that issue on masterminds, so I can approach that build differently. Here's my Poison DP defender, the game plan is to exist next to mobs but you'll notice I don't have softcap melee/AoE defense, only high range defense. Defensively I have hail of bullets, poison trap and for lols world of confusion in addition to VG that can deal with stuff trying to melee me. The high range defense + weaken can deal with mobs outside of my zone of interaction that are all too happy to shoot at me. Offensively poison trap pulls double duty as mitigation and damage via proc bombs, and thus the build also has a focus on recharge via set bonuses + FF procs to make sure that and hail of bullets can be up quickly to take out fodder. Procced out dominate acts as a hard hitter that rounds out my single target rotation. I shy away from cones of any type because I know my game plan is to stay next to mobs, call me lazy but I made a conscious decision to stick with pbaoe/targetted AoEs for my AoE options. | Copy & Paste this data into Mids Reborn : Hero Designer to view the build | |-------------------------------------------------------------------| |MxDz;1893;804;1608;HEX;| |78DA7594494C53511486FFD7F7DA0A94A1B6CC20F320436D19424C548C025104D36| |8E24AACCFF28026A56D7890485CBB57A27129BA320E1BC7B5712B2BE34A37C6011C| |001334D185D69377DE95DB923669FADDFF9C7BA6DE7BC72F0E79565E8E1D8652743| |4AE9B6664C898321293C69CFB74346624A206E853744C9F9B8D1BA6591FD61393BA| |9B24BFF08B1C59989A0A8493313399A8F92F9ED213D3C6646068418F47C231733E1| |937911F4E26E381D329C398F4583866E8A95862BAD05A8CC4A667E669552C4C14C6| |9C89A5FCC3A95834103617A333B168645C37E78DB9C50AAA2040DF742BE44F5A059| |E3B009F060D2E5AD46A68C30A29210DDDA82297501E4225999B34E08E66B9787097| |A108F7181A705FC003060A0845DAED54F0DE616572E083808F0C1A3E31B8B0CAE0C| |11A43130D5195C2282ADE729D5D78C350462ECEED54698713A58A6571E10FAC281D| |A8562DE52F0DC22DF93ADD5863CB2E7C16F085211F5F057C53EDD1AC33F4D168F2A| |4306995BA2D900414A05CB152375275859245294427CFB748403F452BDE1E56DA59| |8CCBDC5A09829A0DBD0CBBD12FE01DD752865506853279A5309A1757D8B70357357| |B664B02AE3184709DC14BBB7D529DAA4F4CD18F0DD5864D91728B41A54DA572DBA5| |3844BF9A0A8D2CE572B87211AE0223AA0DA30C5538C1E0A42956CA67A612071DB6C| |B20BBD45BC7C1820D3E21F5B804FBE8CD7286019A67B51CA61A0F79530D1E0978CC| |B0074F043C15F08CC1472DD4CACDD5A29F9B73519D75B2A50E036C79455B1BE5D48| |D38CE1D342124C02EB309C39CA8195D7C079B7180C3ECA70E5AE413D1224E44AB75| |B72CE811D0C7D0869B0296195E53D876F94F68C70F4EB9173F05FC12F09BC141CD7| |54A2DD0A2872D5B1E7A4DE4CB13C059AE6A1F26049C131071D807ECBC009DC14F73| |0DCA0982E2689CA4B2215FAB1A2DF309B2C4741A633B75958387B5CC678716D68EF| |57CD2950CBD9B8FCDC64E4B3B5B36B32C0E050DE21F3BA3D8376B94A04DC3F72C5F| |E21BE23D5D62E8C8D14C30871ECAA1F7E6D0FB72E87925994F687AD047F5C8630E5| |3F121D963225BD0B3850BD9C2B2979E4459B8952DDCCE165E746415F60F0769F8E2| |-------------------------------------------------------------------| There are layers of synergy with this build, and it's hard to see them if one's metric for builds is simply 45% defense and 75% resists which frankly is overkill for all but the hardest encounters. The irony with those hard mode encounters is that you are actually better off leveraging team buffs/barrier than your personal defense for survival, which means you can dump those set bonuses/slots towards debuff/buff/recharge/procs/damage rather than waste them on survival. I think of all my defenders I've ever only done the 45%/75% thing on my traps fender, and that was because it was so easy to do it without going out of my way and sacrificing balance to achieve those numbers. So I'm not saying don't chase those numbers, I'm saying don't go out of your way chasing them and sacrifice balance in the process. Here's my Necro/Poison MM. | Copy & Paste this data into Mids Reborn : Hero Designer to view the build | |-------------------------------------------------------------------| |MxDz;1760;770;1540;HEX;| |78DA7594CB4F135114C6BFE94C29A5A5504B799667455E5AC1BD4244170825559EB| |A21635B60B49D362D18F93374E3BF4078E852B7C677A22BF76A8C46E46944635C98| |7A9833375C6A84107EF39D7BCEF9CE99DB466F5FF0BE793D3200A57230A5E7F3335| |13DBF90CCA50D33E11AD51716737A4A05E01B36D22D31DD4CE8F97943375D24850E| |4FCE8C2DA6D31933329A8CE73269DD8C2F554BC1F38BB3B39158C6C8674C7863994| |C2A3292D4B3863957663D8C6593C94485D013C91C75C8FAADE721F3969137AE1B29| |63612974316BC42352D9A81E4FDA6E976AC94F07FD2D3B21FF14E8715203FA34383| |021E0272CD0F0F520EB00061CA4B851824187159AD3FE29B3A35A111F3618C2F8CA| |701A9B02B6046C33CC5319857E451987827AEEDD84C7D42970006FB96535AD54550| |E5BAA2A828A1529C11F121A351A7098EB9EC23EC30A19734A498A13358A7536845A| |06833CB8A4513417361C56A4145EAE528A4FAC94E18B80CF0CABD4C02D35D0DC58E| |6351EC38A8055862AAC09586758A36C8F94EDF4609C235E4C0B78C79D7C78CF5089| |0F023E3284C97FB934023D34B0733F452AE4A55588A575A0524080A11B550C6D94E| |49797E6470FBF957A01293217908E208033AAE5E53E8D1494470A628A27A9C65501| |2FD95D2D5E0878A6DA0D9E32DCA4A335F25E6BF09B23C7F18BE104B6351B761822D| |862784026EA647B7594664502345B831C69402B473294DA284FDD28866D12B04E65| |9BE5D99AF1832F670BBE0BD817B0C7D08AE7AA0DAF186E50A73679B636B89DF66C1| |E015EA73D5BB9D3BED23E864754A45D9EA05DBC5293EA76CAF63A91E64817861C36| |ECF295E9A20F93FDD6CF3A6CE867E521FDEB91EDF520C6474EE28A803101E30EDBD| |E04838F161C91ED4584BD2A8AF4CAB7B45744A245DF2685D08120BF0BE08E662FF1| |2EC348518E95572820A6C999A42BACEF941D2D29CEEFFE47DF2BD269BA56D5BE659| |36CBB179714EBFBF15BD1593AB7C92E43E26A86C5650DE31E2FEA49F7D10F6DE132| |55E993AA14A68A85E962E15AB170AEBB6893FD247864618084A02CFC05CBFBEAC8| |-------------------------------------------------------------------| It's built and played a lot differently than the Poison/DP. On paper it has even less survival and I imagine a lot of people won't call it a good build. But I can keep up with a +4/8 team , provide damage and support, also drop poison trap in melee range without face planting. There are a few reasons for this: 1 - teams have buffs and ways to split/share aggro 2 - I know how to play my build and use all the tools available to me (that includes the tried and true defense/resist set bonuses) despite the squish factor. Certainly 45% def + 75% resist builds can cover for deficiencies in both 1 and 2. But once you master 2, a world of new build possibilities open up and that's when you can explore off the beaten path, and there are some interesting and fun builds down those other paths.
-
I didn't have any issues opening that old link but here is the data chunk | Copy & Paste this data into Mids Reborn : Hero Designer to view the build | |-------------------------------------------------------------------| |MxDz;1802;739;1478;HEX;| |78DA75945B4F135110C7FFDBDD72AFB416E40E022258A052F503182F240A4D08788| |B51EBA66CE8264DDBB425910FE0BB224894AB6F5E5F8DEFBE6AD4E89BBEF8010413| |1FBCA0A9C3CE8E9ED27493B3FB3B733973CECCEC89DE3855F7FAD5F87168BE93493| |3978B9DA077DECA564567F366DE4EA7B0F354D2687735B1493335634D87277273F1| |841D67875E514ECD6632E96C3E1CB5527933198B9A293B339B74560A9C4925AC2CC| |9C3023513E974323C95B1ACE93A07C72D3363A7667CCE64D49E49E469562FAA692B| |9B4BD89996D3193B1E968051336ED16B87E79A699BFD342651F414BCF4328088010| |F34010F83015DC060A88097E1F6AE6568B4C2D19CA38FA6680C0D373D8EE6003EEB| |2EACB26D3F36041E30F4523A75C55BD3F191BDABF089E13CC9BD8A89C78B15D2047| |776B7CA10C123B6BDE016E8DF662AF1D070977BCC5083270C7BF154E019C33E72AD| |D69448D568D45CA73F24E830D089363ED3459AD7AA916AF1868F5487B702EF18F6E| |03D831F1F187A28924F89A4F93028B62E2CD2A75ECD4C3D96F9B47E39FF259207D4| |DA0624F5FBA17B1DE886215021F0C270ABF29CE12EF906FF17B1E00DE23B6B1AF04| |3E027432B7E196E846D81DF0CF3E4DBA866A411B7DCBC625EE00E43331604161934| |CA4893DA604D28D0039DE42D6AA65AD0A439A568C5112E0515196D8A89DE26656BC| |7A8EEC259864E8C3104C8A943AD75873875C2CF104103C36532E852F3DC85FBBC4A| |08CB0CC35861388C5581358175866D3FD0A3EEB34742F6625377614BE01BC33DB2E| |C53B3DA8715CED841AC09AC0B6C18F27B312C91CB80BAF3015CE10E3984AB02D704| |621EF750D7054C8605F21D54971994FE1A92FE1A8257C06DB461540A54310429E76| |1B59661E9E488F47603998CA86D302239EA368A2E9A42A1DD28B9929C8E192F239F| |308A2F2A9A38F22F3524D78AE4C3FC0B6E966A0658B355AAE9E67A7D2DD52C7112C| |742C5472B84CA6C74A48C3C52467EB48CFC581979B5BFF8CE2DBC0CED12FC0577AF| |F375| |-------------------------------------------------------------------|
-
I've seen your water/poison build and here's my take on your question, and this doesn't apply to just defenders but all builds. This is not about min/maxing, not at first, but it will involve min/maxing, all within the proper context. A good build starts with understanding and defining your game plan. Your game plan is heavily influenced by the powersets you choose, your understanding of the game, and your personal preferences and playstyle. Take poison for example, if you avoid melee and don't take full advantage of ven gas and to a lesser extent, a fully procced out poison trap, would that be a good build? That depends on your definition of "good." It can be a viable build, but that's a really low bar, a lot of builds are viable. Are you getting the most out of poison and playing to its strengths? Most assuredly not. A good build knows its game plan, and exploits synergies with powers to help execute that game plan. It also knows its weaknesses and finds ways to remediate the weaknesses that have the biggest impact. Take your poison/water. Poison does heavy lifting in melee range late game with VG, a heavily procced poison trap has synergy with that game plan (-res debuffs is the only way to increase proc damage and VG does just that), survival is supplemented by the knockdowns in water blast, and the lack of a heal is remediated by dehydrate. If you consider mez effects super important to address then Rune of protection offers some relief. This is the puzzle you have to put together, and we haven't even gotten to slotting. On slotting there's one thing that separates truly good builds apart from merely viable builds - Focus. A smattering of regen bonuses here and some recharge bonuses over there sprinkled with some S/L resist bonuses with a dash of movement speed bonuses, etc... makes a viable build. If you want a good build, learn to ignore the distractions and FOCUS. Your focus comes from understanding the game plan, what you need to do to make that happen, and what holes to patch. You can't do everything, so narrow down your goals to those most important to letting your build do the thing you want it to do. Conventional wisdom is just that - conventional. Its general knowledge people pass around to make themselves look smart and knowledgeable. Those that don't question these from time to time and look at the actual numbers can forever stick to making viable builds. For example, the majority of people I encounter stick numinas/miracles and all the other recovery procs in health in every build. Some builds don't need that extra recovery and those slots are wasted. A lot of people believe softcap defense is the end all be all to survival and will swear by 45% defense and at least 75% S/L resist in every build. If you understood your game plan and the powers in your toolkit you might think out of the box every once in a while. I can get into the nitty gritty about slot economy and optimization but lets just stop here first. Here are some examples of designing a build with a game plan and building it with focus.
-
It's got a mix of layered mitigation, Ablative carapace will put in work. Here's my take on Bio survival:
-
If you read any of my posts you'd know I don't avoid melee, but I'm smart about when I engage melee. Beta Decay works on melee ATs because those guys are too dumb to move and they have the survival aspect covered to play dumb that way. On a Blaster, one mez is all it takes to nullify all the benefit of these auras, 2 - 3 hits is all it takes to face plant the blaster. Maybe it's me but I joust the shit out of my melee stuff. So by my playstyle, beta decay is not a must pick at the level it's available compared to say another actual melee attack. It's a nice bonus when it gives me a boost but by no means a boost I depend on and will go out of my way to put myself in danger for. 12% recharge with one foe in range isn't bad, but it's also not something I consider game changing. Granted that buff can go up to 35% with 10 foes in range, but at examplared levels where you S/L/M defense is in the teens and you have 10+ mobs close to you, I'd be very hesitant to stay in that range for very long unless I have good support. In addition energy blast is full of force feedback proc opportunities which further dilutes the impact of the recharge boost that beta decay offers. Assuming an fully slotted exemplared build you can already have two fairly reliable AoE FF proc triggers in torrent and explosive by level 22, more triggers if you really go all in on the ST attacks too, so is beta decay really going to make THAT much of a difference?
-
I'd drop beta decay as a late game pick, consider that you want to exemplar and be effective, how survivable are you going to be standing close to mobs to reap the full benefit of beta decay at those levels you exemplar at? This and sonic disruption and other toggles that encourage you to stand still in melee range are trap powers, they look great for people that play melee ATs, but you are playing a blaster. As for being effective exemping and how that relates to builds, that's just another set of goals that you have to define for the build. What's your metric of success? Mine is that any of my builds should be defensively sound by level 30, for those with scorpion shield I'd like to at least have respectable range defense (softcap for many of my builds) prior to level 35 when I pick up the shield.. The last patch gave blasters even more offensive potential early - mid game by offering the nuke as early as level 26 and you should absolutely embrace it because nukes are fun. If you are going to take hover then you should try to fit evasive maneuvers early in the build. This is what my outline would look like up to level 30 for a more exemp friendly build. If I dropped the flight requirement I would have fit in more melee powers but compromises had to be made to fit that pool in. This Hero build was built using Mids Reborn 3.4.7 https://github.com/LoadedCamel/MidsReborn Click this DataLink to open the build! Level 49 Technology Blaster Primary Power Set: Energy Blast Secondary Power Set: Atomic Manipulation Power Pool: Flight Power Pool: Leaping Power Pool: Speed Power Pool: Fighting Hero Profile: Level 1: Power Blast -- Empty(A) Level 1: Negatron Slam -- Empty(A) Level 2: Energy Torrent -- Empty(A) Level 4: Fly -- Empty(A) Level 6: Power Burst -- Empty(A) Level 8: Sniper Blast -- Empty(A) Level 10: Combat Jumping -- Empty(A) Level 12: Aim -- Empty(A) Level 14: Hover -- Empty(A) Level 16: Hasten -- Empty(A) Level 18: Evasive Maneuvers -- Empty(A) Level 20: Metabolic Acceleration -- Empty(A) Level 22: Explosive Blast -- Empty(A) Level 24: Kick -- Empty(A) Level 26: Nova -- Empty(A) Level 28: Tough -- Empty(A) Level 30: Weave -- Empty(A) Level 32: [Empty] Level 35: [Empty] Level 38: [Empty] Level 41: [Empty] Level 44: [Empty] Level 47: [Empty] Level 49: [Empty] Level 1: Brawl -- Empty(A) Level 1: Defiance Level 1: Sprint -- Empty(A) Level 2: Rest -- Empty(A) Level 1: Swift -- Empty(A) Level 1: Health -- Empty(A) Level 1: Hurdle -- Empty(A) Level 1: Stamina -- Empty(A) Level 4: Afterburner Level 49: Quick Form ------------ | Copy & Paste this data into Mids Reborn : Hero Designer to view the build | |-------------------------------------------------------------------| |MxDz;850;335;670;HEX;| |78DA85D25F6B82501400F0EB34224D42A25AB81EDAC3607B903DD636B6B1D65E561| |0B5F790BC98205E2983F9F5F6BC7D94FDF906EEE8B171846407AEDCF3BBC7ABD7E3| |F4F5B1FEF13EB967923EF2EDED76F900D7886FD417BE5A07C2176ECCD2A8C230F3B| |5E5DC0E5CEE58E3806FDC18EF38DBAF2D766128369135B71DCF8E3C112CA776E085| |3B3F4B983613C2B79E7CCF5D47F56C3EE176E805AE9A258B907347C79AB404168C7| |1E8ADAC91F01DD8297D447C0CEFD28731608548D201C106E7877D081389BA84AEC1| |E164EA32FA152415EA15F4EBFC7BFC7915BD0D58A35E43BF8144A3AEA1D7A05EA7A| |EA39F8237A837D0DF2E1833A81BF9FE70DE26F526FA2D242DEA2DF423D8BF43BD83| |7E0749977A175D867A53226EA22BE03DEA3DF4E4FF38510EB7A8AF147A94249392C| |29972B8979F6A71837DFD77897F95F84F89B376F15F499EA12997147E01201CEA5B| |-------------------------------------------------------------------|
-
@Itashu Of course, I can't stop you or anyone from copying any builds posted. What's more important to me is that you understand why I did what I did. Not everyone will read all of what I post along with the build but my hope is that those that do will gain better insight that help them construct cohesive builds with a cohesive game plan.
-
@Itashu 30ish defense is good enough if you know your build/game mechanics well and know what you are doing. Aside from the "every build must have numina/miracle/xxx" and the general playbase' blind obedience to that mantra, I have a few other comments on your build. Survival is a combination of hard stats like def/resist, how you play, and how you use your toolkit. On hard stats like def/resist, there are powers that you should invest slots in and those that yield very little ROI. Take stealth for example, 5 slots for the S/L resist in your build. But what's all that extra enhancement in defense netting you numbers wise? Stealth has 1.75% base defense, meanwhile weave has 3.5% base. If you are going to over-enhance a power wouldn't it be wiser to pump those slots/enhancements into weave to squeeze out more defense since it has a higher base value? I propose that you take a look at the other options in your toolkit. Starting with the idea that you can stun/knockdown mobs while you do your thing. Dead things don't fight back, and mobs that don't get a chance to hurt you is just as good as mobs that miss/do less damage against you. You have Tremor that does KD, you can leverage the KD synergy by using IOs in other powers like the Ragnorok kd proc in ball lightning and the Avalanche kd proc in short circuit or even the Overwhelming force KD proc to string together an AoE volley that can KD mobs. Lean into this and slot Tremor for damage and you can have a AoE chain with decent mitigation that can kill stuff and keep them on their backs. Short circuit also drains endurance and if slotted for end drain, two applications should bottom out most mobs if not outright kill them. This way you have some layered mitigation through KD -> end drain and then your hard stats. Take a look at this build: This Hero build was built using Mids Reborn 3.4.7 https://github.com/LoadedCamel/MidsReborn Click this DataLink to open the build! Level 50 Magic Blaster Primary Power Set: Electrical Blast Secondary Power Set: Earth Manipulation Power Pool: Leaping Power Pool: Speed Power Pool: Fighting Power Pool: Leadership Ancillary Pool: Mu Mastery Hero Profile: Level 1: Lightning Bolt (A) Apocalypse - Damage (3) Apocalypse - Damage/Recharge/Accuracy (3) Apocalypse - Recharge/Accuracy (5) Apocalypse - Damage/Endurance (5) Apocalypse - Chance of Damage(Negative) Level 1: Heavy Mallet Hamidon Origin:Nucleolus Exposure (47) Touch of Death - Chance of Damage(Negative) (48) Force Feedback - Chance for +Recharge Level 2: Ball Lightning (A) Ragnarok - Damage/Recharge (27) Ragnarok - Damage/Recharge/Accuracy (29) Ragnarok - Recharge/Accuracy (29) Ragnarok - Damage/Endurance (31) Ragnarok - Chance for Knockdown Level 4: Combat Jumping (A) Luck of the Gambler - Defense/Increased Global Recharge Speed (7) Kismet - Accuracy +6% Level 6: Short Circuit (A) Power Transfer - Damage/EndMod (13) Power Transfer - EndMod (13) Efficacy Adaptor - EndMod/Accuracy/Recharge (15) Armageddon - Damage/Recharge (15) Superior Avalanche - Accuracy/Damage/Endurance/Recharge (17) Superior Avalanche - Recharge/Chance for Knockdown Level 8: Charge Up (A) Gaussian's Synchronized Fire-Control - Chance for Build Up Level 10: Hasten (A) Recharge Reduction IO (11) Recharge Reduction IO Level 12: Zapp (A) Sting of the Manticore - Accuracy/Damage (37) Sting of the Manticore - Damage/Endurance (39) Sting of the Manticore - Accuracy/Interrupt/Range (39) Sting of the Manticore - Damage/Endurance/Recharge (39) Sting of the Manticore - Chance of Damage(Toxic) Level 14: Super Speed (A) Blessing of the Zephyr - Run Speed, Jump, Flight Speed, Range/Endurance (37) Blessing of the Zephyr - Knockback Reduction (4 points) (49) Winter's Gift - Slow Resistance (20%) Level 16: Tremor (A) Superior Avalanche - Accuracy/Damage (17) Superior Avalanche - Accuracy/Damage/Endurance (19) Armageddon - Damage/Endurance (19) Armageddon - Chance for Fire Damage (25) Eradication - Chance for Energy Damage (27) Force Feedback - Chance for +Recharge Level 18: Kick (A) Empty Level 20: Mud Bath (A) Preemptive Optimization - Accuracy/Recharge (21) Preemptive Optimization - EndMod/Endurance (21) Preemptive Optimization - EndMod/Recharge (23) Preemptive Optimization - EndMod/Accuracy/Endurance (23) Preemptive Optimization - EndMod/Accuracy/Recharge (25) Preemptive Optimization - EndMod/Endurance/Recharge Level 22: Tough (A) Gladiator's Armor - TP Protection +3% Def (All) (31) Unbreakable Guard - Resistance/Endurance (50) Unbreakable Guard - +Max HP Level 24: Weave (A) Luck of the Gambler - Defense/Increased Global Recharge Speed (31) Shield Wall - Defense/Endurance (33) Shield Wall - Defense (33) Shield Wall - +Res (Teleportation), +5% Res (All) Level 26: Thunderous Blast (A) Superior Blaster's Wrath - Accuracy/Damage (34) Superior Blaster's Wrath - Damage/Recharge (36) Superior Blaster's Wrath - Accuracy/Damage/Recharge (36) Superior Blaster's Wrath - Accuracy/Damage/Endurance (36) Superior Blaster's Wrath - Accuracy/Damage/Endurance/Recharge (37) Superior Blaster's Wrath - Recharge/Chance for Fire Damage Level 28: Fracture (A) Absolute Amazement - Stun/Recharge (42) Absolute Amazement - Stun/Recharge/Accuracy (42) Absolute Amazement - Recharge/Accuracy (43) Absolute Amazement - Stun/Endurance (43) Absolute Amazement - Chance for ToHit Debuff Level 30: Maneuvers (A) Luck of the Gambler - Defense/Increased Global Recharge Speed (33) Reactive Defenses - Defense (34) Reactive Defenses - Defense/Endurance (34) Reactive Defenses - Scaling Resist Damage Level 32: Seismic Smash (A) Superior Blistering Cold - Damage/Endurance/Accuracy/RechargeTime (40) Superior Blistering Cold - Recharge/Chance for Hold (40) Hecatomb - Damage/Recharge/Accuracy (40) Hecatomb - Damage/Endurance (42) Hecatomb - Chance of Damage(Negative) (48) Unbreakable Constraint - Chance for Smashing Damage Level 35: Charged Armor (A) Steadfast Protection - Resistance/+Def 3% (43) Reactive Armor - Resistance/Endurance (48) Reactive Armor - Resistance/Endurance/Recharge (49) Reactive Armor - Resistance Level 38: Beryl Crystals (A) Endurance Reduction IO Level 41: Voltaic Sentinel (A) Superior Defiant Barrage - Accuracy/Damage (45) Superior Defiant Barrage - Damage/RechargeTime (45) Superior Defiant Barrage - Accuracy/Damage/RechargeTime (45) Superior Defiant Barrage - Accuracy/Damage/Endurance (46) Superior Defiant Barrage - Accuracy/Damage/Endurance/RechargeTime (46) Superior Defiant Barrage - RechargeTime/+Status Level 44: Build Up (A) Recharge Reduction IO Level 47: Tactics (A) Endurance Reduction IO Level 49: Vengeance (A) Luck of the Gambler - Defense/Increased Global Recharge Speed Level 1: Defiance Level 1: Brawl | Copy & Paste this data into Mids Reborn : Hero Designer to view the build | |-------------------------------------------------------------------| |MxDz;1745;756;1512;HEX;| |78DA75945B4F135110C7672F552954C47287022D22D0E25240302698181512A5552| |2896FA659DB4DD9A46937A524FA017C35D1684C14511FFD1CBE6AD4E89B7E03438B| |12A378C93A7B66074F4BDCA4DDDFCE9C99FF9C993D9BBE79A1E5F5ABD4595042E70| |BE6DA5AE61CFE57AC72206DE6ED2C78D741FC0DFAE6CC55B398B772C642C1CA56CA| |76D62C50408CFD2BEB8E532A578C05B35C59CDA4CDA2EDAC17CC8A5D2A42CB72A95| |4305296E9D8C57C503CAC3896950B095CB4F3AB1574B4F2AA9C555E5BB59DAE05C7| |CE1A9C3EBD8E393DBAD58D558DE26FD22B5101BE5C1D60420598D24105836192408| |724C314C1E738C897177D57179E13708FC08079F4E81A42C6D3D451F23645273D69| |595B8119F2F4C249827E98659823188053049DD8584D8A5634E85084E700FC41430| |4ABC45B402A2F10801DAFAA2668816D863BAA80C3709AE119557E049E134C8B29EE| |49B9F8F0826A88610D4D720D4D90009125C83083B7667993CDF00644F031784B701| |CDE31BC67F840308C022169076A083EAA7EF427EE629F26A08AC368FDD74F37D00A| |1BBC934D82A330AFFA7086A01BAAAAE8552F4F4545C93649121F5CBCA086E9C3D24| |60261F84E59DBE107C32E4127FC64F8A5FB3ABF09344CDF21A5513B605AF327FB4D| |132D9B825DB2E8B8B64B5AAB75F188076091960CC125862582395CD923B7A1071E9| |1270A8F09866183E109C3A6E6B7F529C117DC6E9F3CB73E58A2068D438A214D1087| |CB0C5708DAB0F2885C79842B1F822A575363D821F88A9283F2EB3A08F7A969A3F08| |0618CDED25188138C43822427E1228137BD98AC1D134D8C78E50D28FE118C1224C5| |4A846DD41E91A73E82758974B3781B93E73E86C759782640615019343EFE3A43806| |00B0512B240824E880E61EC95217B0C966E474F52F624B98B51BDFEB3E5F6EBF55F| |2261C4B736B5DFAE519B967539037A148AD80AD6A7E64CD5FFD86B0D76CC1EA5791| |E822D866B54F6F6FE1C0FFD7398109EDCDE8696E2F57B775FC6EB3F056E2A8C9172| |0F96830D86EB8D06B3D170A3D1F0172DD7E267| |-------------------------------------------------------------------| The game plan is to leverage the KD procs to augment survival. Aside from the game plan, take a look at the power pick progression. This build allows you to be effective every step of the leveling journey as well as when you exemp. You have your defense numbers by level 30 as opposed to level 44 in your build when you pick up combat jumping. Speaking of combat jumping, mobility is key for builds like these so combat jumping is taken early. Super Speed + stealth proc in sprint gives you full invis against most mobs and that's very useful for blasters to approach undetected for the alpha strike. My outlook is that you don't have go out of your way to chase hard stats, especially resist on a blaster. Killing stuff fast is far more effective and enjoyable.
-
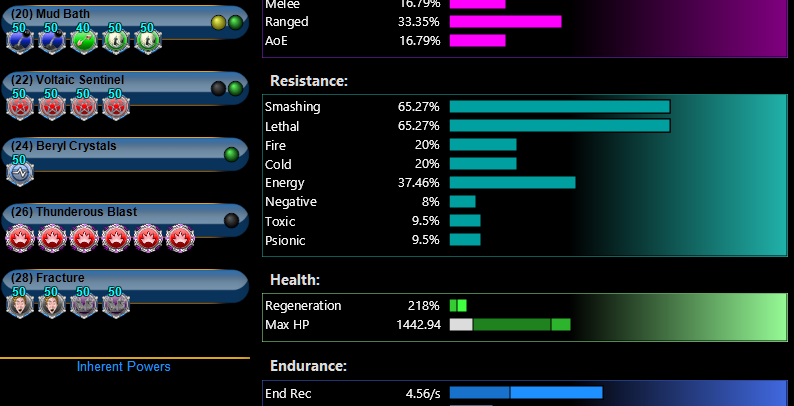
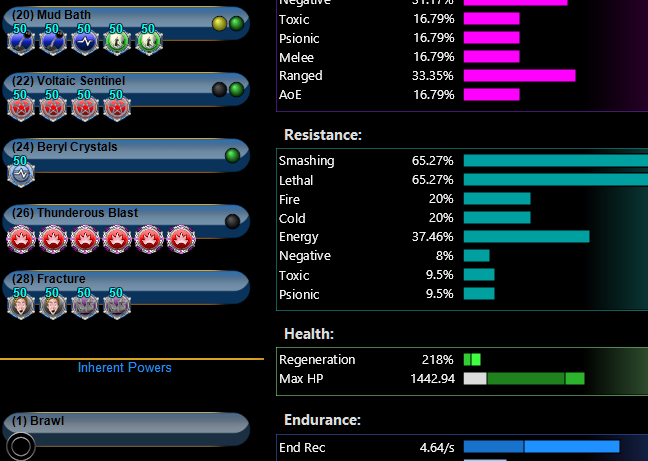
Mudbath with miracle proc = end recovery = 4.56/s Mudbath with the miracle proc swapped out for a level 50 EndMod IO. End Recovery = 4.64/s Blindly following what everyone says are things you need to slot in EVERY build is something I'd really like to eradicate from the minds of aspiring build makers. As for fundamental blaster tips that might also give you some insight into blaster survival. I posted a lot of long winded stuff on that topic. Here's one to get you started:
-
Couldn't have said this better. I'd like to drill into this a bit more. First I absolutely encourage people to explore other ways to build their characters. This game is so forgiving that there are a lot of possibilities for viable, off-meta builds and people can still be effective and have fun with them. But I believe intent is an important starting point for constructing a build. Before we define our build goals, I think it's important to understand WHY those builds goals are important and worth building toward. So this is not a critique of your build, but rather a cross-examination of the intent that led to your decision to focus on these build goals. Obviously there's a lot of emphasis placed on melee range survival in this build. What led you to that? Is the thought process "Martial leans heavily into melee and I want to make a build that allows me to survive in that range for me to take advantage of those powers" or "I specifically want to forego my ranged powers and only take melee powers whenever possible to make a true melee blaster" Those two thought processes are very different starting points for a build. If your build is inspired by the latter then absolutely the build succeeds in what it sets out to do. However, if your starting point is the former then you've left a lot on the table evidenced by the omission of the snipe, your T3 blast and explosive blast. Consider the following scenario: You are fighting mobs with autohit PBAOE auras like envoy of shadows, nosferatu or the nictus AV in ITF. Your defenses does nothing, and S/L resists also doesn't help you survive against neg energy damage. You have no reliable self heal. Let's say the team is also light on healing support. What do you do? get a few licks in and then spam your T1/torrent until your health ticks back up? I suppose that could work, but you could also have a more streamlined ranged chain if you took those ranged attacks as well. Perhaps your counter would be "but I have to take the melee/pbaoe attacks to slot touch of death/obliteration which gives me melee defense, there are no range/target aoe sets that give melee defense, so it is difficut to fit those powers in and dedicate slots to them" So let's examine the importance of melee defense. You have no taunt aura, if anything reaction time will mess with mob AI and make them run away from you from time to time. Most melee attacks have a 7" range. So how many mobs realistically can you bunch up in melee range to have melee defense really work for you? On teams if you are standing next to the tank, I would imagine that gauntlet would have most mobs attacking the tank, so then what are you getting hit with that makes melee defense so paramount to build towards? Have you also considered how you'd manage mobs outside of melee range that are all too happy just to shoot at you, and a lot of those attacks have -def too. What about the other tools in your toolkit? How often do you knock mobs on their backs with your KB attacks? is it enough to chain KD mobs in melee range so you can do your thing? How fast do you kill? Dead mobs don't fight back, how long on average does mobs last in melee range against you and does that justify what you poured into melee defense? Ultimately what is the ROI you are getting on your investment into melee defense? Again, not a critique on your build. The build is fine, you obviously know how to stack set bonuses and you optimized according to the goals you set for the build. I just like to uncover the "WHY" behind setting those specific goals.
-
That's cool, I'm glad your build works for you. I just want to share how I see optimization and building with your requirements in mind.
-
Thanks for catching that. I remember one of the mez provided -kb on my grav/psi dom. So @BazookaTwo, instead of crushing field -> propel do Gravity distortion -> propel. That will save you a slot on propel.
-
@BazookaTwoYou are going to want some kb-kd in singularity and wormhole. Propel doesn't need it, it's mostly single target and by the time you propel something you can crushing field the target first to disable KB for a few seconds, as you want containment damage when you use propel in the first place. Wormhole is an opener, your opening sequence is not going to be crushing field first then wormhole, so kb-kd is essential here. The whole point of enflame on singularity is to have Sing suck mobs up and burn them down, without the kb-kd mobs will bounce right off and you won't be able to maximize the potential of enflame. You also don't need to 6 proc the ST hold on every single controller build. Gravity has propel, and it eases the need to get more DPS out of your controls by stuffing procs in them. Storm also has damage but matures mid-late game. So you can shift those slots elsewhere if you are looking at the big picture. All in all you can use more force feedback procs and not in gale because it's not going proc very consistently in that power and also you don't have any investment in gale for ACC or kb-kd. There are the powers that FF will trigger consistently in - wormhole, tornado, lightning storm, and water spout. I'd replace Gale with O2 boost now that you can take the Tier 2 on character creation. It provides immunity to stun and sleep to teammates and is a much more useful power on teams. If you want more survival put a preventive medicine absorb proc in spirit ward. You are not going to be actually using that toggle too often and the proc triggers passively even if you aren't using the power. Steamy mist can also take resist enhancements if you care to bump up your resists more. Most people do it because it covers a lot of damage types. I would happily rip the 3 sunk sluts into hurricane for a paltry 5% global recharge and allocate those slots to tornado, lightning storm and water spout for more consistent FF proc triggers. Sometimes you have to look at the bigger picture. Are you going to use bile spray or is having the power for concept reasons (and never using it) enough? Storm thrives on chaos where containment has a minimum impact, bile spray needs containment to do more damage. Dimensional shift is often misused and a very situational power. If you care more about recharge then it's better off to get an LOTG mule/utility like hover or Maneuvers. You also don't have high psi defense, you have elusive mind turned on. The build I created for you adheres to your build requirements and power preferences. It's more cohesive and stacks up relevant stats more efficiently. Look at the bonuses to ranged and AoE defense, slow resistance, recharge, etc.... It's slightly cheaper and doesn't rely on full purple sets to accomplish these goals. It also doesn't lag behind in the recovery department and sports decent end reduction in key powers you want to spam. The 4 FF recharge procs will bump up that 78% global recharge bonus significantly which means you can spam more freezing rains/tornadoes etc which is what makes storm powerful. Take a look at that build, there is a method behind the madness. If you have any questions I'm happy to answer them.