Nemu
-
Posts
1424 -
Joined
-
Last visited
-
Days Won
3
Content Type
Profiles
Forums
Events
Store
Articles
Patch Notes
Everything posted by Nemu
-
Disagree. EF helps immobilize AVs, FOT is the quickest recharging area control of all blaster T8s and it can be used in conjunction with thunder strike to keep mobs knocked down around you. The fact that both TS and FoT has a chance to also stun is a bonus. Unlike other form of low mag hard control that other blaster T8s feature, knock down doesn't care about critter rank. If you ever lived a melee blaster life at all you'd appreciate how useful that form of mitigation can be in helping you face tank content. It has a lot of synergy with storm because the knockdowns keep stuff in storm cell. I went all in on theme and took whirlwind, the game plan is to use the knockdowns to keep stuff on their butts around me and to trigger FF procs so I can storm more. This is what I'm running with. I have enough softcap melee blasters on my roster so I went a different direction and went all in on theme: This Hero build was built using Mids Reborn 3.4.7 https://github.com/LoadedCamel/MidsReborn Click this DataLink to open the build! Level 49 Technology Blaster Primary Power Set: Dark Blast Secondary Power Set: Electricity Manipulation Power Pool: Leaping Power Pool: Speed Power Pool: Leadership Ancillary Pool: Cold Mastery Hero Profile: Level 1: Gloom (A) Superior Defiant Barrage - Accuracy/Damage (3) Superior Defiant Barrage - Damage/RechargeTime (3) Superior Defiant Barrage - Accuracy/Damage/RechargeTime (5) Superior Defiant Barrage - Accuracy/Damage/Endurance (7) Superior Defiant Barrage - Accuracy/Damage/Endurance/RechargeTime (7) Superior Defiant Barrage - RechargeTime/+Status Level 1: Charged Brawl (A) Superior Blistering Cold - Accuracy/Damage (9) Superior Blistering Cold - Damage/Endurance (9) Superior Blistering Cold - Accuracy/Damage/Endurance (11) Superior Blistering Cold - Damage/Endurance/Accuracy/RechargeTime (11) Superior Blistering Cold - Recharge/Chance for Hold Level 2: Electric Fence (A) Empty Level 4: Combat Jumping (A) Luck of the Gambler - Defense/Increased Global Recharge Speed (5) Kismet - Accuracy +6% (48) Winter's Gift - Slow Resistance (20%) Level 6: Umbral Torrent (A) Superior Frozen Blast - Accuracy/Damage (48) Superior Frozen Blast - Accuracy/Damage/Endurance (48) Bombardment - Chance for Fire Damage (49) Force Feedback - Chance for +Recharge Level 8: Aim (A) Rectified Reticle - To Hit Buff/Recharge (47) Rectified Reticle - Increased Perception (47) Gaussian's Synchronized Fire-Control - Chance for Build Up Level 10: Super Speed (A) Blessing of the Zephyr - Run Speed, Jump, Flight Speed, Range/Endurance (40) Blessing of the Zephyr - Knockback Reduction (4 points) Level 12: Moonbeam (A) Sting of the Manticore - Accuracy/Damage (13) Sting of the Manticore - Damage/Endurance (13) Sting of the Manticore - Accuracy/Interrupt/Range (15) Sting of the Manticore - Damage/Endurance/Recharge (17) Sting of the Manticore - Chance of Damage(Toxic) Level 14: Hasten (A) Recharge Reduction IO (15) Recharge Reduction IO Level 16: Thunder Strike (A) Superior Avalanche - Accuracy/Damage (17) Superior Avalanche - Accuracy/Damage/Endurance (37) Multi-Strike - Accuracy/Damage/Endurance (37) Sudden Acceleration - Knockback to Knockdown (37) Force Feedback - Chance for +Recharge Level 18: Tenebrous Tentacles (A) Ragnarok - Damage (19) Ragnarok - Damage/Recharge/Accuracy (19) Ragnarok - Recharge/Accuracy (36) Ragnarok - Damage/Endurance (36) Ragnarok - Chance for Knockdown Level 20: Dynamo (A) Preemptive Optimization - Accuracy/Recharge (21) Preemptive Optimization - EndMod/Endurance (21) Preemptive Optimization - EndMod/Recharge (23) Preemptive Optimization - EndMod/Accuracy/Endurance (23) Preemptive Optimization - EndMod/Accuracy/Recharge (25) Preemptive Optimization - EndMod/Endurance/Recharge Level 22: Life Drain (A) Superior Winter's Bite - Accuracy/Damage (40) Superior Winter's Bite - Accuracy/Damage/Endurance (40) Superior Winter's Bite - Accuracy/Damage/Recharge (43) Superior Winter's Bite - Damage/Endurance/Accuracy/RechargeTime (45) Superior Winter's Bite - Recharge/Chance for -Speed & -Recharge Level 24: Power Sink (A) Preemptive Optimization - Accuracy/Recharge (25) Preemptive Optimization - EndMod/Endurance (27) Preemptive Optimization - EndMod/Recharge (27) Preemptive Optimization - EndMod/Accuracy/Endurance (29) Preemptive Optimization - EndMod/Accuracy/Recharge (29) Preemptive Optimization - EndMod/Endurance/Recharge Level 26: Blackstar (A) Superior Blaster's Wrath - Accuracy/Damage (33) Superior Blaster's Wrath - Damage/Recharge (34) Superior Blaster's Wrath - Accuracy/Damage/Recharge (34) Superior Blaster's Wrath - Accuracy/Damage/Endurance (34) Superior Blaster's Wrath - Accuracy/Damage/Endurance/Recharge (36) Superior Blaster's Wrath - Recharge/Chance for Fire Damage Level 28: Force of Thunder (A) Absolute Amazement - Stun/Recharge/Accuracy (31) Absolute Amazement - Recharge/Accuracy (31) Sudden Acceleration - Knockback to Knockdown (31) Force Feedback - Chance for +Recharge Level 30: Whirlwind (A) Endurance Reduction IO (33) Sudden Acceleration - Knockback to Knockdown (33) Force Feedback - Chance for +Recharge Level 32: Maneuvers (A) Luck of the Gambler - Defense/Increased Global Recharge Speed (39) Shield Wall - Defense/Endurance (39) Shield Wall - Defense (39) Shield Wall - +Res (Teleportation), +5% Res (All) Level 35: Snow Storm (A) Endurance Reduction IO Level 38: Tactics (A) Endurance Reduction IO Level 41: Frozen Armor (A) Luck of the Gambler - Defense/Increased Global Recharge Speed (42) Steadfast Protection - Resistance/+Def 3% (42) Gladiator's Armor - TP Protection +3% Def (All) (42) Reactive Defenses - Defense/Endurance (43) Reactive Defenses - Scaling Resist Damage (43) Unbreakable Guard - +Max HP Level 44: Shocking Grasp (A) Crushing Impact - Accuracy/Damage (45) Crushing Impact - Accuracy/Damage/Endurance (45) Neuronic Shutdown - Chance of Damage(Psionic) (46) Ghost Widow's Embrace - Chance of Damage(Psionic) (46) Unbreakable Constraint - Chance for Smashing Damage (46) Hecatomb - Chance of Damage(Negative) Level 47: Build Up (A) Recharge Reduction IO Level 49: Vengeance (A) Luck of the Gambler - Defense/Increased Global Recharge Speed Level 1: Brawl (A) Empty Level 1: Defiance Level 1: Sprint | Copy & Paste this data into Mids Reborn : Hero Designer to view the build | |-------------------------------------------------------------------| |MxDz;1638;722;1444;HEX;| |78DA7594494F144114C75F6F220388E30CFB3A080A0C34485CAE469644191222DEB| |133D3CE3434D39DA149E4037857A33151C0ABEBCDF805BC6AD4E84D6F9E15130F8A| |4BDAD7FDEA494D904ABAFBD7F596FA57BDAA9ABB3A55FFEA65EE2C280D93AEB5BAB| |A780EDF815D495CB2F3A5B2E77AC575885A0D3E6DC2B678D12A17ED8239655596C9| |7F902D0B6BBEEF550273DAB5F341C5C93BC1FAE29C5576FC35D70A1CAF0CF5F39EE| |79A39DBF29D723111FF2CF8B65D68E4FE825D592D397E5DFC3FE33AC552909CF69D| |BC39E9B905CC150DB3DE8A6A32F838697C29C02D34F0A5039CD04105854125D0412| |338003A83416043751AECBD4E96837083E12641026E31DC2628540543883F213668| |C635D3A4ACAA064D8A90F2073BBA7418830E2DEE59C28918BB5942CD8067947D0C9| |E33A8460CE3704D8D61391DD5653748AD810DB4A474306193E121F91E4531B59248| |A5163E90E5387C2470315D9DB29B4EAF83D7105BEAE10DC35B8243F08EE030BC27E| |8C3011AA4D92A0D90655F014BF8699434E88DB0A18B2C5B04FD1080804FDC2366BB| |82F292B2BC244C90E5089C643825660BA719CE105CC19094BC5352F09D0648C30F8| |61D8266F8C9F08BA0157E137828A249DE294DF04017CBF888E131C1303C211881A7| |04CB18D2A2FCAB5868B4B0885616D1CE22DA5944278BE864113E8A689356C26883B| |BB48D7AE11E410636183619B634B124F7091C8CED90F75C07E468B1BA618E4154A1| |9BABD08F65EE92F75C577C10E3B1856F2FFB26D1B7475A2CAD870FC03198D1045C6| |0982528E2A74F3E4D7D3C400AD30D48E960802D0EC60CCAC51DE48186A2F58E4EDA| |104C68A2673B825A2CCF374DD46987C0C5D8AC34B49185CB10FB8EC4873C068BF28| |DC20A8D300AE75501598212BA9AF20C4C3E00699CC1B86C19679D9D3AC82D8C9EE8| |0EC9E8D5375398DBC7715EFFFF25F439519D80FDB7F7F6676815BEEC13F1756FFF1| |D9AF08BE1EABB259C1DAE9E67F8173ED9DA96| |-------------------------------------------------------------------| Gloom = Hailstones Aim = Intensify Umbral Torrent = Storm Cell Moonbeam = Direct Strike Tenebrous Tentacles = Chain Lightning Life Drain = Cloudburst Blackstar = Cat 5
-
SS is pretty sucky at lower levels especially if you follow an end game build which skips either jab or punch and even haymaker which means you'll only have 1 attack until level 20. There's definitely a case for taking all the attacks for leveling and then respec them out as your build matures with this powerset. For lower level xp the trick is to run story arcs and focus on mission completion and story arc completion bonuses. Killing everything is the more inefficient way to level up through arcs and unless you are gunning for mob defeat badges you can get through a lot of story arcs, earn lots of xp and merits without a heavy focus on fighting.
-
It's a terrible build. Not because of the concept but because you didn't invest enough into doing damage with whatever tools you have left. Without your primary your ability to kill things will greatly depend on trip mine, taser, and gun drone. I would find ways to do more damage from pools and leverage procs if at all possible. Since you are skipping all your primary it gives you a great excuse to explore pool options other than fighting. And even after you took fighting/stealth your def is only at 25%, I'd see a reason to take those two if your goal is to hit 32.5% or softcap but if you aren't going to get there, there are more fun powers to take. Here's what I came up with: This Hero build was built using Mids Reborn 3.4.7 https://github.com/LoadedCamel/MidsReborn Click this DataLink to open the build! Level 49 Technology Blaster Primary Power Set: Dark Blast Secondary Power Set: Devices Power Pool: Teleportation Power Pool: Leaping Power Pool: Speed Power Pool: Experimentation Ancillary Pool: Force Mastery Hero Profile: Level 1: Gloom Hamidon Origin:Nucleolus Exposure Level 1: Toxic Web Grenade (A) Superior Defiant Barrage - Accuracy/Damage (7) Superior Defiant Barrage - Damage/RechargeTime (7) Superior Defiant Barrage - Accuracy/Damage/RechargeTime (9) Superior Defiant Barrage - Accuracy/Damage/Endurance (11) Superior Defiant Barrage - Accuracy/Damage/Endurance/RechargeTime (11) Superior Defiant Barrage - RechargeTime/+Status Level 2: Caltrops (A) Ice Mistral's Torment - Chance for Cold Damage (3) Impeded Swiftness - Chance of Damage(Smashing) (3) Bombardment - Chance for Fire Damage (5) Positron's Blast - Chance of Damage(Energy) (5) Annihilation - Chance for Res Debuff Level 4: Teleport Target (A) Accuracy IO Level 6: Taser (A) Superior Blaster's Wrath - Accuracy/Damage (13) Superior Blaster's Wrath - Damage/Recharge (15) Superior Blaster's Wrath - Accuracy/Damage/Recharge (15) Superior Blaster's Wrath - Accuracy/Damage/Endurance (17) Superior Blaster's Wrath - Accuracy/Damage/Endurance/Recharge (17) Superior Blaster's Wrath - Recharge/Chance for Fire Damage Level 8: Combat Jumping (A) Luck of the Gambler - Defense/Increased Global Recharge Speed (9) Kismet - Accuracy +6% Level 10: Targeting Drone Hamidon Origin:Cytoskeleton Exposure Level 12: Hasten (A) Recharge Reduction IO (13) Recharge Reduction IO Level 14: Super Speed (A) Blessing of the Zephyr - Run Speed, Jump, Flight Speed, Range/Endurance (19) Blessing of the Zephyr - Knockback Reduction (4 points) Level 16: Smoke Grenade (A) Dark Watcher's Despair - To Hit Debuff (43) Dark Watcher's Despair - To Hit Debuff/Recharge/Endurance (45) Dark Watcher's Despair - To Hit Debuff/Recharge (45) Dark Watcher's Despair - To Hit Debuff/Endurance Level 18: Combat Teleport (A) Winter's Gift - Slow Resistance (20%) Level 20: Field Operative (A) Luck of the Gambler - Defense/Increased Global Recharge Speed (21) Synapse's Shock - EndMod (21) Synapse's Shock - EndMod/Recharge (23) Synapse's Shock - EndMod/Increased Run Speed (23) Synapse's Shock - Damage/Rechage (29) Synapse's Shock - Damage/Accuracy/Endurance Level 22: Fold Space (A) Accuracy IO (37) Recharge Reduction IO Level 24: Trip Mine (A) Superior Avalanche - Accuracy/Damage (25) Superior Avalanche - Accuracy/Damage/Endurance (25) Armageddon - Chance for Fire Damage (27) Overwhelming Force - Damage/Chance for Knockdown/Knockback to Knockdown (27) Fury of the Gladiator - Chance for Res Debuff (29) Force Feedback - Chance for +Recharge Level 26: Toxic Dart (A) Apocalypse - Damage (39) Apocalypse - Damage/Recharge (39) Apocalypse - Damage/Recharge/Accuracy (40) Apocalypse - Recharge/Accuracy (40) Apocalypse - Damage/Endurance Level 28: Time Bomb (A) Eradication - Accuracy/Damage/Recharge (34) Eradication - Damage/Recharge (34) Eradication - Accuracy/Damage/Endurance/Recharge (36) Multi-Strike - Damage/Recharge (37) Sudden Acceleration - Knockback to Knockdown (37) Force Feedback - Chance for +Recharge Level 30: Gun Drone (A) Expedient Reinforcement - Accuracy/Recharge (31) Expedient Reinforcement - Accuracy/Damage (31) Expedient Reinforcement - Damage/Endurance (31) Expedient Reinforcement - Accuracy/Damage/Recharge (33) Expedient Reinforcement - Endurance/Damage/Recharge (34) Expedient Reinforcement - Resist Bonus Aura for Pets Level 32: Whirlwind (A) Endurance Reduction IO (33) Sudden Acceleration - Knockback to Knockdown (33) Force Feedback - Chance for +Recharge Level 35: Repulsion Field (A) Endurance Reduction IO (36) Sudden Acceleration - Knockback to Knockdown (36) Force Feedback - Chance for +Recharge Level 38: Temp Invulnerability (A) Steadfast Protection - Resistance/+Def 3% (39) Gladiator's Armor - TP Protection +3% Def (All) (45) Unbreakable Guard - Resistance (46) Unbreakable Guard - Resistance/Endurance (46) Unbreakable Guard - +Max HP Level 41: Repulsion Bomb (A) Superior Frozen Blast - Accuracy/Damage/Endurance (42) Explosive Strike - Chance for Smashing Damage (42) Bombardment - Chance for Fire Damage (42) Positron's Blast - Chance of Damage(Energy) (43) Superior Frozen Blast - Damage/Endurance (43) Force Feedback - Chance for +Recharge Level 44: Experimental Injection (A) Preventive Medicine - Chance for +Absorb Level 47: Corrosive Vial (A) Touch of Lady Grey - Chance for Negative Damage (47) Positron's Blast - Chance of Damage(Energy) (47) Superior Frozen Blast - Damage/Endurance/Accuracy/RechargeTime (48) Bombardment - Chance for Fire Damage (48) Achilles' Heel - Chance for Res Debuff (49) Superior Frozen Blast - Recharge/Chance for Immobilize Level 49: Personal Force Field (A) Luck of the Gambler - Defense/Increased Global Recharge Speed Level 1: Brawl (A) Empty Level 1: Defiance Level 1: Sprint | Copy & Paste this data into Mids Reborn : Hero Designer to view the build | |-------------------------------------------------------------------| |MxDz;1619;725;1450;HEX;| |78DA75944B4F135114C7FFD3B923525EF27E0BA53C0B0C60E24EA351D0C48012604| |F9A32A98DB5D3949AC0CA27FA114C1471E746598AE8CEB8954FA01BE342C3ABA8B8| |7061EA9939F7CAAD864966E677CFFB9EFB9858182DDD783F7E1646D9F964747E7EF| |61C7DB34E2638E3C4AEA6DCA41B5F84F714D1DB2875B353D154DC99B347A3996B6C| |5FAF34D337D2693793B52F46E7E24E761E5593AE9BB4679CA4E389A3D9849B2AF54| |5E34E349D48C583FE603AED3873353E8E2DA49D4CE2BA9362E3AAB17422665F7033| |316776C24FB1D84095B4D39BA881FEE44DE06B006815E8C108C188C020064C1F867| |08A4C84899B9EA971E0647962DFE4080C050186A3301982100A2C865B5E142D8C30| |506EF99A009E197E1101045822B00E095FB89A2E6AA6A979C344139BDCA69FA5976| |7E111FB94E231433996153C61388615054F19EA28419116C62842AD21E7F41B7E79| |77E857ACD7508C93DCA20E722ED19D4BD00F59838430999469AD37CAF0813B5E858| |F0C77495EA145312BB0C69A08D61906F04AC11B866E8A5BA9175589669ED13D1A56| |EB8DA95633AAC1A690B0CD50879C822D8616EC329875F0FDFE165EAB3ADFA9E6B64| |4BFFA83B5CD5BF55866E706AC2838CDF536E19329E18C29332DB1EA4A84CE8BBE43| |1A31202789410536430F86140C33DC279766684534639BF776085B0A7618C2C8789| |517D3143E0B391759C4036FADF5AEB522C79AE3D853F04DC1778676FC6008619FA1| |9396A54D6B49A08D74D256A66C57295F501F3A74DB0E651B56B66165BB4AB65D7A8| |FBAA8F3FE9CBA71C2945B63DF9447F9A7825F0CABB4037BF51EF5628D13F4619112| |547B20CF609F3A8311BC141264119769A1FAB582691FEC708229D2D8DA2EB76C6CB| |08FADC2110879C1C84C4378CBB987F19A55CF29DAB016860672EBB688C21BCC7BE9| |4148145E52F9F1430C27856E477283E53BC1C200CA3EF78F9C3064CA737B89063D0| |2BB87B8EEFD2F7FC8CD781729BC0CF27F003B69D45D| |-------------------------------------------------------------------| Teleport target and fold space are great ways to teleport mobs into your minefield and your build is the perfect excuse to take those powers. You have 3 more attacks in the form of toxic dart, corrosive vial and repulsion bomb. Most of the long recharge powers are loaded with procs and there are plenty of force feedback procs to help them recharge faster, and that recharge bonus also helps trip mine, caltrops, time bomb and gun drone recharge faster.
-
Incarnates help patch your weaknesses and fire farms and regular content are two different circumstances that require different types of holes patched up. The alpha and destiny picks are game changers and the two that impact performance the most. There are no nasty debuffs in fire farms and softcap fire defense and hardcap resists is the baseline for survival. What you really need for a fire farm assuming those two are checked is damage, via faster recharging powers/procs, and making sure you don't run out of end spamming attacks. Ageless core ephiphany destiny single-handedly takes care of all these issues. Which means you can dedicate the rest of your incarnate choices to more damage. muscalature, degenerative, assault, Ion. Normal content has a lot more debuffs and hardmode sometimes require barrier for the rez. Which means you need more consistent ways to manage your endurance, as the build is an end hog without conserve power. Higher difficulty mobs can also be harder to hit. Vigor core alpha would be a good pick, it helps with acc, end redux and heal, if you are really sucking end then move to cardiac core. Ageless radial can be helpful against debuffs and barrier should be in your arsenal for hardmode. Degen is still useful, judgement, lore and hybrid is personal preference.
-
Since you wanted to use this as your fire farm build here's my tweak of it. The goal is to make the build suitable for general play as well as fire farms. Your original build was missing the other scrapper ATO, and I catalysed the ones you were using in the final build. Stone skin was also overslotted for res instead of a balance of def+res. For a build with no hasten it was also lacking slow resist to make sure you are not a sitting duck waiting for stuff to recharge when you get hit with recharge debuffs. This is the final build once you have all the expensive pieces in play. I reshuffled power picks so that you can have your basic defenses at softcap by level 30. This Hero build was built using Mids Reborn 3.4.7 https://github.com/LoadedCamel/MidsReborn Click this DataLink to open the build! Level 50 Mutation Scrapper Primary Power Set: Radiation Melee Secondary Power Set: Stone Armor Power Pool: Leaping Power Pool: Concealment Power Pool: Leadership Power Pool: Fighting Ancillary Pool: Body Mastery Hero Profile: Level 1: Radioactive Smash (A) Superior Scrapper's Strike - Accuracy/Damage (3) Superior Scrapper's Strike - Damage/Recharge (3) Superior Scrapper's Strike - Accuracy/Damage/Recharge (5) Superior Scrapper's Strike - Damage/Endurance/Recharge (5) Superior Scrapper's Strike - Accuracy/Damage/Endurance/Recharge (7) Superior Scrapper's Strike - Recharge/Critical Hit Bonus Level 1: Stone Skin (A) Steadfast Protection - Resistance/+Def 3% (9) Aegis - Resistance/Endurance (9) Aegis - Resistance/Recharge (11) Aegis - Psionic/Status Resistance (11) Red Fortune - Defense/Endurance (13) Red Fortune - Defense Level 2: Rock Armor (A) Luck of the Gambler - Defense/Increased Global Recharge Speed Level 4: Combat Jumping (A) Defense Buff IO (7) Kismet - Accuracy +6% Level 6: Stealth (A) Red Fortune - Defense/Endurance (34) Red Fortune - Defense Level 8: Radiation Siphon (A) Hecatomb - Damage (46) Hecatomb - Damage/Recharge/Accuracy (47) Hecatomb - Recharge/Accuracy (47) Hecatomb - Damage/Endurance (48) Hecatomb - Chance of Damage(Negative) Level 10: Mud Pots (A) Superior Avalanche - Accuracy/Damage (21) Superior Avalanche - Damage/Endurance (23) Superior Avalanche - Accuracy/Damage/Endurance (23) Superior Avalanche - Accuracy/Damage/Recharge (25) Superior Avalanche - Accuracy/Damage/Endurance/Recharge (25) Superior Avalanche - Recharge/Chance for Knockdown Level 12: Earth's Embrace (A) Preventive Medicine - Heal (13) Preventive Medicine - Heal/Endurance (15) Preventive Medicine - Endurance/RechargeTime (15) Preventive Medicine - Heal/RechargeTime (17) Preventive Medicine - Heal/RechargeTime/Endurance (17) Preventive Medicine - Chance for +Absorb Level 14: Super Jump (A) Winter's Gift - Slow Resistance (20%) Level 16: Rooted (A) Preventive Medicine - Heal (49) Preventive Medicine - Heal/Endurance Level 18: Maneuvers (A) Luck of the Gambler - Defense/Increased Global Recharge Speed (19) Reactive Defenses - Defense (19) Reactive Defenses - Defense/Endurance (21) Reactive Defenses - Scaling Resist Damage Level 20: Crystal Armor (A) Luck of the Gambler - Defense/Increased Global Recharge Speed (33) Red Fortune - Defense/Endurance (34) Red Fortune - Defense Level 22: Devastating Blow (A) Superior Critical Strikes - Accuracy/Damage (37) Superior Critical Strikes - Damage/RechargeTime (37) Superior Critical Strikes - Accuracy/Damage/RechargeTime (37) Superior Critical Strikes - Damage/Endurance/RechargeTime (40) Superior Critical Strikes - Accuracy/Damage/Endurance/RechargeTime (42) Superior Critical Strikes - RechargeTime/+50% Crit Proc Level 24: Boxing (A) Superior Blistering Cold - Accuracy/Damage/Endurance (34) Superior Blistering Cold - Accuracy/Damage/Recharge Level 26: Atom Smasher (A) Armageddon - Damage (42) Armageddon - Damage/Recharge/Accuracy (42) Armageddon - Recharge/Accuracy (43) Armageddon - Damage/Endurance (43) Armageddon - Chance for Fire Damage (43) Fury of the Gladiator - Chance for Res Debuff Level 28: Tough (A) Aegis - Resistance/Endurance (29) Aegis - Resistance (29) Aegis - Resistance/Recharge (36) Aegis - Endurance/Recharge (36) Aegis - Resistance/Endurance/Recharge Level 30: Weave (A) Luck of the Gambler - Defense/Increased Global Recharge Speed (31) Red Fortune - Defense/Endurance (31) Red Fortune - Defense (31) Shield Wall - +Res (Teleportation), +5% Res (All) Level 32: Irradiated Ground (A) Scirocco's Dervish - Accuracy/Damage (45) Scirocco's Dervish - Damage/Endurance (45) Scirocco's Dervish - Accuracy/Recharge (45) Scirocco's Dervish - Accuracy/Damage/Endurance (46) Scirocco's Dervish - Chance of Damage(Lethal) (46) Achilles' Heel - Chance for Res Debuff Level 35: Conserve Power (A) Recharge Reduction IO (48) Recharge Reduction IO Level 38: Brimstone Armor (A) Gladiator's Armor - TP Protection +3% Def (All) (39) Aegis - Resistance/Endurance (39) Aegis - Resistance/Recharge (39) Aegis - Resistance Level 41: Physical Perfection (A) Performance Shifter - Chance for +End (48) Regenerative Tissue - +Regeneration Level 44: Minerals (A) Luck of the Gambler - Defense/Increased Global Recharge Speed Level 47: Fusion (A) Gaussian's Synchronized Fire-Control - Chance for Build Up Level 49: Geode (A) Recharge Reduction IO Level 1: Brawl (A) Superior Blistering Cold - Accuracy/Damage (36) Superior Blistering Cold - Damage/Endurance Level 1: Critical Hit Level 1: Sprint | Copy & Paste this data into Mids Reborn : Hero Designer to view the build | |-------------------------------------------------------------------| |MxDz;1654;732;1464;HEX;| |78DA6594594F135114C7FF6DA796420B96B20A944529A5955A502201DCD144A5099| |1C4D75AE80893D4B6692B5AFD122E0FBEB8BE98F8314C7C52D0AFA1C86282E21633| |9ECEE9291798E436BF3BE7DCB3FC7BEEC4EF4E795696A7CFC2567F219D2C1412B3F| |3F9642EA7E76BE2B78BC9A291CDA0FCB86805C49488EB695D8F5E4BA60CCB83F79D| |55F3947E53CF14F4E86C319BD113E7F2B7B2797866B2D974745A4FE68CCC82CFDA5| |CCE2C190563CE481BC5528398537ABEB068E4BCD6FE92B1B0582CFB5FCC19F3D1F3| |D95429114F168A7ABED446F5F4D11A1DA01F1BE4319DC07B0730ACC18E0F02CB0C1| |A56043E321CC02786EFE17D615A69DBA5A106319BE5528361865A8C0AD496C10D0F| |EA19B6288C4D0943219BD9B785047428169B0301546AF8072B93975C9CAA8B53E2F| |74AFC31EAD6A5B8682E04ED5694218418A2181408331C4384619BAA73AB4DBAF154| |B32C4D78C6D082E7022F18DAF052E015C30F0A53A786A9C36756D1832F0CF55815F| |8CA70106B02EB0CADD4AE178A565E74B0E527256850856890043149E0A3C33EC5C5| |E113A11BB1E1B0B46AC4264313B6F8D06F8AEB570ED9FD72A8679FD213A474B3DA6| |4336E70FB4790149813986718408A61103A83CDC583546DA5158FD8D28BC70C9394| |A97D67684C673BC6EC9528E302130C614C0A9C1238C3CD392853873A1A1D32B89D3| |8215099E0C3181138CE4083842E55CF2E912620D204449A00AE72CA71AABC5BD5A8| |1B4B3CD3477147A024700F9541BD2FF0965AF06B9875F055AE6AD487086472197ED| |13FD7AF96D78F11AE21285D06A5B9A0B4FB9AA62BA46A1FC213B911A7F972FFA1B8| |11F5BE46A4ED93D45B74E78B60D2E60D1FFE4B6762EA991857E946A7B6FB2342F84| |0ABE8FC90A17B8F8B39AD417D4C5A0ECE33A3A99ED6B7C4A407EBB5BB43D01A6295| |36F758284E2FAB740857E8FD4019AE737F1BFBA38438CAB73D162AA3225B0F56B50| |AACC9C06F0A6C33944B34DF85775F6DF38C1FD6DF537DF11F0C1BCB6A| |-------------------------------------------------------------------|
-
The IOs that will give you the most bang for the buck when you are working your way up: Force Feedback +rech Get these before anything else, put it in heavy mallet, tremor and fault. For an SO or generic only build (starting out) Recharge is a premium. You can certainly work in the recovery IOs with remaining funds, but by getting more recharge you also indirectly help your end management via a faster recharging DNA siphon.
-
Unless you are running 4* hardmode ALL THE TIME you really don't need the kind of extreme high end survival that tanks provide. And despite all the "I want a 4* hardmode godmode insert your AT build" sentiment that I see on these forums I can tell you that not too many people run that stuff religiously. Because if they did they'd understand that those build can still die. That kind of content depends a lot more on buffs and end AVs are also DPS checks so you also need to balance survival with damage. It's nice to have the option but the option is overkill for the rest of game content. Coming from playing a lot of melee blasters I also understand the power of the alpha strike and active mitigation on top of builds that support that playstyle. Rad/SS is the poster child of a combo with so many proccable AoE powers that you can use those as your initial AoE alpha strike to take out all fodder and greatly reduce incoming damage. In that respect it's very much like a blaster leveraging a nuke to kill things dead before they can retaliate. That's what experience taught me and the mindset that I come from. And this is my Rad/SS build: This Hero build was built using Mids Reborn 3.4.7 https://github.com/LoadedCamel/MidsReborn Click this DataLink to open the build! Nuka Panda: Level 49 Science Tanker Primary Power Set: Radiation Armor Secondary Power Set: Super Strength Power Pool: Leaping Power Pool: Speed Power Pool: Leadership Power Pool: Fighting Ancillary Pool: Leviathan Mastery Hero Profile: Level 1: Alpha Barrier (A) Unbreakable Guard - Resistance (48) Unbreakable Guard - Resistance/Endurance (49) Unbreakable Guard - RechargeTime/Resistance Level 1: Jab (A) Superior Might of the Tanker - Accuracy/Damage (11) Superior Might of the Tanker - Accuracy/Damage/Recharge (13) Superior Might of the Tanker - Damage/Endurance/Recharge (15) Superior Might of the Tanker - Accuracy/Damage/Endurance/Recharge Level 2: Proton Armor (A) Unbreakable Guard - Resistance (15) Unbreakable Guard - Resistance/Endurance (17) Unbreakable Guard - +Max HP Level 4: Haymaker (A) Hecatomb - Damage (7) Hecatomb - Damage/Recharge (7) Hecatomb - Damage/Recharge/Accuracy (9) Hecatomb - Recharge/Accuracy (9) Hecatomb - Damage/Endurance (11) Superior Might of the Tanker - Recharge/Chance for +Res(All) Level 6: Combat Jumping (A) Luck of the Gambler - Defense/Increased Global Recharge Speed (17) Kismet - Accuracy +6% (29) Winter's Gift - Slow Resistance (20%) (29) Shield Wall - +Res (Teleportation), +5% Res (All) (33) Reactive Defenses - Scaling Resist Damage Level 8: Radiation Therapy (A) Perfect Zinger - Chance for Psi Damage (34) Obliteration - Chance for Smashing Damage (34) Eradication - Chance for Energy Damage (34) Scirocco's Dervish - Chance of Damage(Lethal) (37) Touch of the Nictus - Chance for Negative Energy Damage (40) Theft of Essence - Chance for +Endurance Level 10: Fallout Shelter (A) Gladiator's Armor - TP Protection +3% Def (All) Level 12: Hasten (A) Recharge Reduction IO (13) Recharge Reduction IO Level 14: Beta Decay (A) Achilles' Heel - Chance for Res Debuff Level 16: Hand Clap (A) Explosive Strike - Chance for Smashing Damage (40) Perfect Zinger - Chance for Psi Damage (43) Sudden Acceleration - Knockback to Knockdown (45) Force Feedback - Chance for +Recharge Level 18: Particle Shielding (A) Preventive Medicine - Heal (19) Preventive Medicine - Heal/Endurance (19) Preventive Medicine - Endurance/RechargeTime (25) Preventive Medicine - Heal/RechargeTime (27) Preventive Medicine - Heal/RechargeTime/Endurance (27) Preventive Medicine - Chance for +Absorb Level 20: Knockout Blow (A) Ghost Widow's Embrace - Chance of Damage(Psionic) (21) Touch of Death - Chance of Damage(Negative) (21) Perfect Zinger - Chance for Psi Damage (23) Hecatomb - Chance of Damage(Negative) (23) Unbreakable Constraint - Chance for Smashing Damage (25) Force Feedback - Chance for +Recharge Level 22: Ground Zero (A) Shield Breaker - Chance for Lethal Damage (45) Perfect Zinger - Chance for Psi Damage (45) Touch of Lady Grey - Chance for Negative Damage (46) Eradication - Chance for Energy Damage (46) Scirocco's Dervish - Chance of Damage(Lethal) (46) Obliteration - Chance for Smashing Damage Level 24: Rage Hamidon Origin:Membrane Exposure Level 26: Maneuvers (A) Luck of the Gambler - Defense/Increased Global Recharge Speed Level 28: Tactics (A) Endurance Reduction IO Level 30: Foot Stomp (A) Scirocco's Dervish - Chance of Damage(Lethal) (31) Obliteration - Chance for Smashing Damage (31) Perfect Zinger - Chance for Psi Damage (31) Eradication - Chance for Energy Damage (33) Armageddon - Chance for Fire Damage (33) Force Feedback - Chance for +Recharge Level 32: Taunt (A) Perfect Zinger - Chance for Psi Damage Level 35: Spirit Shark (A) Superior Winter's Bite - Accuracy/Damage (36) Superior Winter's Bite - Accuracy/Damage/Endurance (36) Superior Winter's Bite - Damage/Endurance/Accuracy/RechargeTime (36) Apocalypse - Chance of Damage(Negative) (37) Gladiator's Javelin - Chance of Damage(Toxic) (37) Explosive Strike - Chance for Smashing Damage Level 38: Boxing (A) Absolute Amazement - Stun (39) Absolute Amazement - Stun/Recharge (39) Absolute Amazement - Stun/Recharge/Accuracy (39) Absolute Amazement - Recharge/Accuracy (40) Absolute Amazement - Stun/Endurance Level 41: Arctic Breath (A) Impeded Swiftness - Chance of Damage(Smashing) (42) Shield Breaker - Chance for Lethal Damage (42) Touch of Lady Grey - Chance for Negative Damage (42) Bombardment - Chance for Fire Damage (43) Positron's Blast - Chance of Damage(Energy) (43) Ice Mistral's Torment - Chance for Cold Damage Level 44: Tough (A) Steadfast Protection - Resistance/+Def 3% Level 47: Gamma Boost (A) Synapse's Shock - EndMod (47) Synapse's Shock - Damage/Rechage (47) Synapse's Shock - EndMod/Recharge (48) Synapse's Shock - Damage/Recharge/Accuracy (48) Synapse's Shock - Damage/Accuracy/Endurance Level 49: Weave (A) Luck of the Gambler - Defense/Increased Global Recharge Speed Level 1: Brawl (A) Empty Level 1: Gauntlet Level 1: Sprint | Copy & Paste this data into Mids Reborn : Hero Designer to view the build | |-------------------------------------------------------------------| |MxDz;1619;754;1508;HEX;| |78DA75544B4F535110FEEEA320A5805079684B790894D27279C49589890F34515A4| |2AC89CBE6861E6903B44D5B8CC4B51BE3F34F1863FC012EDCB897ADF111576E94A7| |891AE3C2D4E99D73E000F124B7FDCECC9CF9BE9939F7A6EECC04D6DF26CFC3085C5| |A762B95CC0DB7B024CA8DE985BC282C08D0F2CFAD2EB9FDF36E21EB36D236C21199| |19714B142AC2B9EE66F36E355F2C642E94578AE59074A7C4B2104E7AB544385D2D8| |BC2623587C07CB1B8EC24855BCA1716FDDE265D1222DBA6EC5951AEE4F2A5166F7F| |25BF98AB5260F87229BFE05C2CAF564526296E135BCE2D64526EA52ACA6B3D24A98| |F9EFB51FA31A056CD047E5AC0948D09FC623089DF0C12FE83B1647DC71E3FDE3308| |E00383567C64F080080C9DC05004AD8AE038FE307088C0C27EACCFC288E9791A105| |56094C131C4141833A5884F9CA68BFAEDD3286D1F3A0DC9F4970CBD36C208716C18| |B30CFAF183C12312DC68ECD559F335A2C204039E3A0FEC985E9A01DC856719420FB| |BA2E8B03CD7434AD3A4894013A6396490E4356B1EA31971C8EE49F0980EB7681AD0| |8237C418A461508BDAF6FB59B3DAB0C69EA89239862F36CF0BF7D8F284D2B56B8CB| |E767C652D1DF8A6C006831E6C3238852D05B6194C117750E3F605B1C27D3D810C19| |A275501741A00B71E6EEC2555326966A9E929A4E5D4D271AB86709554202EB0CC65| |5A7C755A7C7D510A6494DB7DEA36E9CA57FDB423B35F8A4768D6823E71F244F481F| |4AA83ED4BAE70C65EBD56BEB558411451851EA224A543FCE99F2F2C8DA26284D9F9| |686DE3179E8262519D4AB1EC4731ED369BC50E0A50253A6BC5609CB6BE7909AB241| |150CEB777B18D7387604B30A24154899F252CE31F81C00467511A3786678A5C4D40| |C62AAF531983E799F5E418256B6582422AE37385E9F44FDF4EB18E0E8F21C6C704D| |0E3615D8B2E507665B811D0636E59DD4F34EAAC1856DE8AB567F6821661FFC24D59| |247032DAE67DED623C963708AED435F35957AF7A87D802FC2CE7F4E7C3F64274259| |BCA96A365517ECBD9AB1CBE01FBA90D1FF| |-------------------------------------------------------------------|
-
I'll talk about survival first: It helps to have some prior understanding of cornerstones of survival out of the box for any given set. For rad armor the one power that stands out (besides your resist shields) that contributes a lot to survival is particle shielding. It gives you extra HP in the form of an absorb shield, increased regeneration and recovery. It also has a 120 second out of the box recharge timer. I would want to refresh that absorb shield as often as possible so I can continue to take hits. At this point I'll put a mental note to build for some recharge. A build with no defenses is still going to get hit, a lot. The absorb shield alone isn't going to cut it. How do you add further mitigation on top of the absorb? 2 approaches 1 - Get hit for less 2 - Get hit less Your build focuses on 1 so you already understand the value there, so I'm going to discuss 2. There are a few ways to get hit less: 1 - high defense 2 - active mitigation 3 - kill stuff fast first before they hurt you I have no doubt that you can cobble together a build with high defense, but all the investment that you can dedicate to defense can and will be stripped away very easily with a few debuffs. I'm going to discuss the other two. Active mitigation is another way to get hit for less, especially if they exist in powers you are going to be using anyway. Footstomp is a great example of a power that serves dual purposes, it's damage, but it's also mitigation. Knockdowns are very useful for the majority of game content. Unlike hard controls that require stacking mags against higher ranked critter, knock works against most critters regardless of rank and knocked down mobs usually takes around 3 seconds to get back up. Besides footstomp SS also has handclap, if you have enough recharge to spam footstomp and handclap you can keep mobs knocked down. Knocking them down instead of knocking them back keeps them in footstomp and other AoE range so you can not only mitigate damage but keep hurting them. That's another way to get hit less besides building for high defense. In addition, both powers can also slot a FF recharge proc, which not only help them recharge faster but also particle shielding. That's the first synergy I can leverage. (Note: If you wanted to explore more options for knockdown there are also procs that knockdown like the ragnorak or overwhelming force procs) Finally there's killing stuff before they kill you. This is a bit more advanced as it delves into the principals of procs. Rage is a cornerstone power of SS and it offers some very significant bonuses to your ability to do damage. It provides +to hit and +damage and can be easily double stacked with some recharge (recharge again, this seems like a theme for this combo). What this means is that instead of the traditional method of slotting attacks with ACC/Dam you could potentially leave that to Rage, and instead slot damage procs in some of your attacks to further increase your damage potential, with the added benefit that damage procs still do full damage during rage crash. The principal of proc monster build require the following: Enough global recharge to cycle proc powers frequently - you can do this via force feedback procs + global recharge bonuses Enough acc/to hit to ensure that proc powers can hit, since you are most likely not slotting much ACC into such powers - Rage can offset the lack of acc slotting Enough damage in proc powers to enhance their base damage - Rage takes care of this again Enough endurance management since you are not going to be slotting much end reduction in proc powers - Radiation Therapy and Particle shielding takes care of this Since recharge seems to be a recurring theme let's see what tools in your kit benefits from it: Rage Particle shielding Radiation therapy Ground zero All your attacks, especially the ones that can be loaded with procs You don't have to go full proc with your build, but you can leverage these synergies a bit more than your original build , which just went down the 90% resist to everything while skipping key powers and sacrificing other synergies route.
-
Skipping rage and knockout blow really hurts the build offensively. KO blow especially is not something that people skip. Ask yourself this: Besides building for 90% resists, what other tools in your kit helps you with survival? What do those tools need to be effective? You've shown that you understand stacking set bonuses. Level 2 of build making is spotting synergies and coming up with a game plan. Hint - not all game plans revolve around building for softcap defense or hardcap resists.
-
I'd double down on @Spaghetti Betty's approach and go ALL all out on offense/procs There are a few ways to handle survival 1 - kill stuff fast 2 - use soft/hard control tools at your disposal (knockdowns are super useful) 3 - cap resists/softcap defense This Hero build was built using Mids Reborn 3.4.7 https://github.com/LoadedCamel/MidsReborn Click this DataLink to open the build! Level 50 Magic Tanker Primary Power Set: Electric Armor Secondary Power Set: Super Strength Power Pool: Fighting Power Pool: Leaping Power Pool: Concealment Power Pool: Speed Ancillary Pool: Leviathan Mastery Hero Profile: Level 1: Charged Armor (A) Unbreakable Guard - Resistance (3) Unbreakable Guard - Resistance/Endurance (5) Unbreakable Guard - Resistance/Endurance/RechargeTime Level 1: Punch (A) Hecatomb - Damage (7) Hecatomb - Damage/Recharge (7) Hecatomb - Damage/Recharge/Accuracy (45) Hecatomb - Recharge/Accuracy (46) Hecatomb - Damage/Endurance Level 2: Conductive Shield (A) Unbreakable Guard - Resistance (3) Unbreakable Guard - Resistance/Endurance (5) Unbreakable Guard - Resistance/Endurance/RechargeTime Level 4: Kick (A) Empty Level 6: Static Shield (A) Steadfast Protection - Resistance/+Def 3% (9) Unbreakable Guard - Resistance (11) Unbreakable Guard - Resistance/Endurance (11) Unbreakable Guard - Resistance/Endurance/RechargeTime (49) Steadfast Protection - Knockback Protection Level 8: Combat Jumping (A) Luck of the Gambler - Defense/Increased Global Recharge Speed (9) Blessing of the Zephyr - Knockback Reduction (4 points) (40) Winter's Gift - Slow Resistance (20%) Level 10: Infiltration (A) Luck of the Gambler - Defense/Increased Global Recharge Speed Level 12: Energize (A) Preventive Medicine - Heal (13) Preventive Medicine - Heal/Endurance (13) Preventive Medicine - Endurance/RechargeTime (27) Preventive Medicine - Heal/RechargeTime (27) Preventive Medicine - Heal/RechargeTime/Endurance (29) Preventive Medicine - Chance for +Absorb Level 14: Tough (A) Unbreakable Guard - Resistance (15) Unbreakable Guard - Resistance/Endurance (15) Unbreakable Guard - +Max HP Level 16: Cross Punch (A) Superior Avalanche - Accuracy/Damage (17) Superior Avalanche - Accuracy/Damage/Endurance (17) Scirocco's Dervish - Chance of Damage(Lethal) (19) Obliteration - Chance for Smashing Damage (19) Eradication - Chance for Energy Damage (25) Force Feedback - Chance for +Recharge Level 18: Lightning Reflexes (A) Run Speed IO Level 20: Knockout Blow (A) Touch of Death - Chance of Damage(Negative) (21) Perfect Zinger - Chance for Psi Damage (21) Ghost Widow's Embrace - Chance of Damage(Psionic) (23) Hecatomb - Chance of Damage(Negative) (23) Unbreakable Constraint - Chance for Smashing Damage (25) Force Feedback - Chance for +Recharge Level 22: Power Sink (A) Synapse's Shock - EndMod (34) Synapse's Shock - Damage/Rechage (36) Synapse's Shock - EndMod/Recharge (36) Synapse's Shock - Damage/Recharge/Accuracy (36) Synapse's Shock - EndMod/Increased Run Speed (45) Synapse's Shock - Damage/Accuracy/Endurance Level 24: Rage (A) Adjusted Targeting - To Hit Buff/Endurance/Recharge (39) Adjusted Targeting - Recharge (45) Adjusted Targeting - To Hit Buff/Recharge Level 26: Hand Clap (A) Absolute Amazement - Recharge/Accuracy (37) Explosive Strike - Chance for Smashing Damage (40) Perfect Zinger - Chance for Psi Damage (40) Sudden Acceleration - Knockback to Knockdown (43) Force Feedback - Chance for +Recharge Level 28: Hasten (A) Recharge Reduction IO (29) Recharge Reduction IO Level 30: Foot Stomp (A) Scirocco's Dervish - Chance of Damage(Lethal) (31) Obliteration - Chance for Smashing Damage (31) Perfect Zinger - Chance for Psi Damage (31) Eradication - Chance for Energy Damage (34) Armageddon - Chance for Fire Damage (34) Force Feedback - Chance for +Recharge Level 32: Lightning Field (A) Superior Might of the Tanker - Accuracy/Damage (33) Superior Might of the Tanker - Damage/Endurance/Recharge (33) Superior Might of the Tanker - Accuracy/Damage/Endurance/Recharge (33) Superior Might of the Tanker - Recharge/Chance for +Res(All) (46) Superior Avalanche - Damage/Endurance (46) Superior Avalanche - Recharge/Chance for Knockdown Level 35: School of Sharks (A) Ragnarok - Damage (37) Ragnarok - Damage/Recharge (37) Ragnarok - Damage/Recharge/Accuracy (47) Ragnarok - Recharge/Accuracy (47) Ragnarok - Damage/Endurance Level 38: Weave (A) Luck of the Gambler - Defense/Increased Global Recharge Speed (39) Shield Wall - +Res (Teleportation), +5% Res (All) (39) Reactive Defenses - Scaling Resist Damage Level 41: Arctic Breath (A) Impeded Swiftness - Chance of Damage(Smashing) (42) Shield Breaker - Chance for Lethal Damage (42) Touch of Lady Grey - Chance for Negative Damage (42) Ice Mistral's Torment - Chance for Cold Damage (43) Positron's Blast - Chance of Damage(Energy) (43) Bombardment - Chance for Fire Damage Level 44: Grounded (A) Gladiator's Armor - TP Protection +3% Def (All) (48) Gladiator's Armor - Resistance (48) Gladiator's Armor - End/Resist Level 47: Taunt (A) Perfect Zinger - Chance for Psi Damage Level 49: Stealth (A) Luck of the Gambler - Defense/Increased Global Recharge Speed Level 1: Brawl (A) Empty Level 1: Gauntlet Level 1: Sprint | Copy & Paste this data into Mids Reborn : Hero Designer to view the build | |-------------------------------------------------------------------| |MxDz;1674;757;1514;HEX;| |78DA75944B4F135114C7FFF3288FD25291B7A5206F4AA5B488EE4C7C8009B14D483| |0C68D69863A9689A534D381485CBB73EFC6674CFC0C7E00DFCAD6C4D7CA8DF23451| |135DD5D33973E15AC224D3FEEE3DE79EF33FE7DE3BE91B5381B577A9D35002E7F24| |6A994B96814AE9BB62F6DE4AC2C2A4F2DBD119ECD4C99D7CC42C98C4FE7CDAC635B| |D9CC197B71C90E7BD6B49937CDF8DC729178CEB1CD42CE5940707669291F3F6FE51| |61CAB900BB8A394691469D0E40E660A2B56C99AB7F296B3EA7767E68AA679B56BBA| |6865E367ED65C7CCA4CC15CB70168C42266D941CD35EED204DFDF43E0BD18F02F19| |455E097062475A8F8CDA0E30FC398FF7F5F1D18525D4B0D86058C301C4394610CA3| |0C2F28932267520ECEA452CB34ECF9D2A04C0F5E520C9FACC087761A4674D489607| |E11CC2F8225D0C13E6D14B55656508B56C575A9C36716398C302F0A916FBDACA05E| |F8BE260D0D52145F03BEF19A00BE0B586738820D019B0C5DD862D02841501613141| |5348A0A1AF197E1F6201082A2EDA60CE1AEEE5A0EE1BE809B70E1B0DB3917B655B7| |EC0EDCE2E2DE90F22629259A68775C4B9276B6796F73CABE6664E87F58470B4ABCB| |8058B5C7F1B62AA07330CBB09DE5202EA92B21BA615EB2CAF171B0CFDD814B02560| |47F78ECC36C304A96997C2A8ED78C80986F0581CAF070C09F2EDDC3B9465BD13E98| |AA51E03582568AEEC69496CEE574E302A04F7D12684A58E2861C4E0ED9307939420| |22B726E2769AFADA2D3ADD2D12748B96F7E294EAD5ED657A4EADE9914F4D0FDEF3E| |AA3F820E0A3804FDE85C33DDD83470C97C9D0275F803E4C7082011C1730C910C709| |012719742A77503AD4EAA038D443B8A079F093E14B001891058FE0095FA3286A340| |FD6386E148D3EAFB14FE181CA33AFA8EE987CCC6398E004E318D7DC8D1A47D2036A| |755C3E9F71D1D820094FC8B731218477E9909F72E5AD7C29A2FAFFDFAA726ABFA3C| |6C16775D9932C0A87D8AAFADC89D03B55F384BDA2A44BAC6AFB80A53FF6CFDF6111| |57C89294F51AD513F3D513B3D513FF00CBFEDE76| |-------------------------------------------------------------------| The idea here is to let rage take care of your damage and acc boost and then go wild on procs, which are not affected by rage crash. During rage crash you can use footstomp + handclap for mitigation, both also take force feedback procs to boost your recharge so you can rage more. Arctic breath is another proc monster pseudo nuke that you can get in your 40s and it will help you alpha strike a mob as you make your approach. Energize and Powersink also helps you with your end because there's NO end reduction in all the powers I procced.
-
Forums steer towards peak performance and can get into 30 page "discussions" about it. Willpower is fine for the "casual" crowd and based on what you've posted it'll be a a good fit because it just works without you having to time clicks and such. Also, SO WHAT if you can't solo +4/8? A lot of people ask for builds with "aspirations" to do that. Most build request thread asks for something along the lines of "god builds that can solo +4/8/hamidon," but my guess is that the reality is that it's a "nice to have" rather than a necessity. In addition, +4/8 council is much different than +4/8 arachnos or vanguard. Incarnates also trivialize some of those encounters, you are never going to get capped resists AND defenses to everything with IO set bonuses, but destinies can make even the poorest builds god mode for a few seconds. The mark of a good player is knowing what you can and can not handle and adjusting as the situation calls for it. For example I had an ice tank express reluctance to tank +4/8 Resistance stating his defenses gets shredded by them. I told him instead of standing in one spot in the open and trying to fight them, round them up around a corner. That simple adjustment made all the difference in the world to his survival because now he (and the rest of the team) can use AoEs more efficiently and dispatch mobs quicker, instead of taking potshots which debuff his defense from mobs he can't reach. If willpower suits your playstyle go for it and make the best of it. I had a DM/WP build on live and there's nothing wrong with it.
-
It's easy to overlook synergy if you evaluate each power in a vacuum. Consider what you are trying to accomplish which is to be a melee blaster (requiring the ability to survive in melee range). Consider your offensive toolkit, which includes rains that force mobs to run (thus a need to keep them in the rain). Your ability to rotate knockdowns with thunderstrike and force of thunder can help you solve for both of those objectives.
-
You skipped force of thunder, tell me, in your own words. why.
-
Good points. My first draft had hasten and tentacles with the stun proc instead of the presence pool and that was truly endurance heavy due to the fact that I was spamming tentacles/torrent. The hasten crash also contributed to quite a few "oops where all my toggles go?" moments. This one is more manageable as a complete build for exemped content but I imagine those leveling the traditional way will lean on recovery serums and blue pills quite a bit until they have their slots filled out. End game I took vigor because all 3 attributes that it boosts helps my build. I took spectral interface for the immob. Destiny is a toss up. I took ageless for the debuff resist and the +rech but I could just as well swap it out for incan/barrier if the situation called for those.
-
I decided to followup on my comments from this thread about how to build a corruptor with a focus on stun. I chose Defender for my own take. Scouring through the primaries/secondaries I found Dark Pit from Dark blast which doesn't need proc gimmicks to stun. I also weighed the pros/cons of powers that can stun with a reasonable ~60 seconds or less base recharge from support sets and settled on Force Field (even though the chance to stun on Force Bomb is only 10% 😞) The game plan is lean on oppressive gloom, invoke panic and dark pit to stack stuns, but as I said in the other thread this is a gimmick so I need other toys to stay alive. Thus the following synergies: FF allows the build to softcap vs all positions + PSI Dark blast gives me a heal Force Bomb and Torrent both KD, and I love KD for the mitigation and for the FF procs Invoke panic is also a fear which helps break alpha strikes, and it also takes a stun proc. If I wanted more stun shenanigans I could drop torrent and pick up tentacles and stick yet another stun proc in it. However the proc chances aren't great and from a pure utility perspective I valued the KD from torrent more. This Hero build was built using Mids Reborn 3.4.7 https://github.com/LoadedCamel/MidsReborn Click this DataLink to open the build! Bubble Panda: Level 50 Science Defender Primary Power Set: Force Field Secondary Power Set: Dark Blast Power Pool: Leaping Power Pool: Fighting Power Pool: Presence Power Pool: Leadership Ancillary Pool: Dark Mastery Hero Profile: Level 1: Deflection Shield (A) Luck of the Gambler - Defense/Increased Global Recharge Speed (3) Luck of the Gambler - Defense Level 1: Gloom (A) Apocalypse - Damage (3) Apocalypse - Damage/Recharge (5) Apocalypse - Damage/Recharge/Accuracy (5) Apocalypse - Recharge/Accuracy (7) Apocalypse - Damage/Endurance (9) Apocalypse - Chance of Damage(Negative) Level 2: Repulsion Bolt (A) Sudden Acceleration - Knockback to Knockdown Level 4: Moonbeam (A) Sting of the Manticore - Accuracy/Damage (9) Sting of the Manticore - Damage/Endurance (11) Sting of the Manticore - Accuracy/Interrupt/Range (11) Sting of the Manticore - Damage/Endurance/Recharge (27) Sting of the Manticore - Chance of Damage(Toxic) Level 6: Insulation Shield (A) Luck of the Gambler - Defense/Increased Global Recharge Speed (7) Luck of the Gambler - Defense Level 8: Combat Jumping (A) Kismet - Accuracy +6% (42) Winter's Gift - Slow Resistance (20%) Level 10: Kick (A) Superior Blistering Cold - Accuracy/Damage (46) Superior Blistering Cold - Damage/Endurance Level 12: Dispersion Bubble (A) Luck of the Gambler - Defense/Increased Global Recharge Speed (13) Shield Wall - Defense/Endurance (13) Shield Wall - Defense/Endurance/Recharge (15) Shield Wall - Defense Level 14: Tough (A) Gladiator's Armor - TP Protection +3% Def (All) (15) Aegis - Resistance/Endurance (17) Aegis - Endurance/Recharge (17) Aegis - Resistance/Endurance/Recharge (25) Aegis - Resistance (25) Aegis - Psionic/Status Resistance Level 16: Provoke (A) Empty Level 18: Weave (A) Luck of the Gambler - Defense/Increased Global Recharge Speed (19) Shield Wall - Defense/Endurance (19) Shield Wall - Defense (21) Shield Wall - +Res (Teleportation), +5% Res (All) Level 20: Maneuvers (A) Luck of the Gambler - Defense/Increased Global Recharge Speed (21) Reactive Defenses - Defense (23) Reactive Defenses - Defense/Endurance (23) Reactive Defenses - Scaling Resist Damage Level 22: Force Bomb (A) Superior Vigilant Assault - RechargeTime/PBAoE +Absorb (27) Superior Vigilant Assault - Damage/Endurance/RechargeTime (34) Superior Vigilant Assault - Accuracy/Damage/Endurance/RechargeTime (36) Stupefy - Accuracy/Endurance (36) Overwhelming Force - Damage/Chance for Knockdown/Knockback to Knockdown (36) Force Feedback - Chance for +Recharge Level 24: Torrent (A) Superior Vigilant Assault - Accuracy/Damage (37) Superior Vigilant Assault - Accuracy/Damage/Endurance (37) Superior Vigilant Assault - Damage/RechargeTime (37) Sudden Acceleration - Knockback to Knockdown (40) Force Feedback - Chance for +Recharge Level 26: Damping Bubble (A) Karma - Knockback Protection Level 28: Life Drain (A) Devastation - Accuracy/Damage (29) Devastation - Damage/Endurance (29) Devastation - Damage/Recharge (31) Devastation - Accuracy/Damage/Recharge (31) Devastation - Accuracy/Damage/Endurance/Recharge (31) Devastation - Chance of Hold Level 30: Blackstar (A) Superior Defender's Bastion - Accuracy/Damage (33) Superior Defender's Bastion - Damage/Recharge (33) Superior Defender's Bastion - Damage/Endurance/Recharge (33) Superior Defender's Bastion - Accuracy/Damage/Endurance (34) Superior Defender's Bastion - Accuracy/Damage/Endurance/Recharge (34) Superior Defender's Bastion - Recharge/Chance for Minor PBAoE Heal Level 32: Tactics (A) Endurance Reduction IO Level 35: Oppressive Gloom Hamidon Origin:Endoplasm Exposure Level 38: Dark Pit (A) Absolute Amazement - Stun/Recharge (39) Absolute Amazement - Stun (39) Absolute Amazement - Stun/Recharge/Accuracy (39) Absolute Amazement - Recharge/Accuracy (40) Absolute Amazement - Stun/Endurance (40) Razzle Dazzle - Chance of Immobilize Level 41: Intimidate (A) Empty Level 44: Invoke Panic (A) Glimpse of the Abyss - Accuracy/Recharge (45) Nightmare - Accuracy/Recharge (45) Glimpse of the Abyss - Accuracy/Fear/Recharge (45) Unspeakable Terror - Disorient Bonus Level 47: Dark Embrace (A) Steadfast Protection - Resistance/+Def 3% (47) Unbreakable Guard - Resistance (47) Unbreakable Guard - Resistance/Endurance (48) Unbreakable Guard - Resistance/Endurance/RechargeTime (48) Unbreakable Guard - +Max HP Level 49: Soul Drain (A) Superior Avalanche - Accuracy/Damage (49) Superior Avalanche - Damage/Endurance (49) Superior Avalanche - Accuracy/Damage/Endurance (50) Superior Avalanche - Accuracy/Damage/Recharge (50) Superior Avalanche - Accuracy/Damage/Endurance/Recharge (50) Superior Avalanche - Recharge/Chance for Knockdown Level 1: Vigilance Level 1: Brawl | Copy & Paste this data into Mids Reborn : Hero Designer to view the build | |-------------------------------------------------------------------| |MxDz;1628;729;1458;HEX;| |78DA75944B4F135114C7FFED0C56DE963714E4A1C87B6879B836884D849610FD00C| |DD04ECB686D9B0209AE0C26EE15176E7C4601A3AE7C7E098D1A71E5C218D782899A| |E0C2D4C39C3970917893E9FDDD7B1EF79C734F6F7471BCECCDEBC809782A4EA6CDB| |9B9D8B895B432092BEF3B1BB7AD4CDC028DB2B1859999B4D5366D6612A68F361A45| |2B36B6904C1AE16C3E6EC5C2B6954E34ED48CE9899949530C6CDFCF9D818B99E47D| |974369B36229699B333A9726711B653B3F3B4F23BABA899B1730B6973DECE662A45| |997CCDCDDA39FFA99C1D676F517266E52F3650206DF425BDF4E3818C02612D7D211| |D5ED430ACFCA35204F47B5D9501061D86C020C30104190E22C490A2C9A3B821975F| |7547B24A124D91E81ADEC2357EC75082F7021F189AB0CE304BD6456A064592C101C| |9A08ECAEE53557CF843738B8E1E04344E85548A5595625CE5E806708DE11C1D54AA| |A868A5725019C2DB5E8A094E335460824123BFE56AF1CA31C4275620C8D68730243| |0CCD0801181518626725309A5789528D0804EFB7E3526BFC45425315549283598E4| |93FD6454AD1A558B510D3658B70E9B023FD828EDDDEE0CCF6E22B518D5DD9B18626| |8C708C3112C795CF8A2B97085BBE0114DF5BBDD54D0EB1164A3A318160809B80DD2| |25D617686A54CBD0882DBEC8C72409A8750EE03EF747331E08AC301CC6AAC09AC04| |38627E4A64575D382A79C411B9E093C1778A1B979BF1478C5504D156E557BBD9564| |8EE4122974A87DD681E33453CBF708AC510C9D6A0C9D98E4F48F6142202210F5BA2| |59A1258F4381509500CDD6AADBAB9659A69BF4FBDFD3E7CE2DBEAC74781CF02EBEC| |6C89C236D4BFA8817A9618F8C9391BF8C530882D81DF0C9769A266F7EC6414C44DB| |ED9206E09DC6608E18EC05D817B0C53FADE87A8D0ACEF7BBC9659B517D719223AD4| |51A04FE3424DEBAAADF31E39F5F956B2D7A97312ED6FFC677FB3645F10ED9C760F2| |668D1A5E3FB7E951B5E37CE6586C95E2A91124DE12F8C50D144| |-------------------------------------------------------------------| This is a late blooming build and I made some conscious decisions to focus on getting defense prior to level 35 which is the earliest I can pick up oppressive gloom. The rest of the stun kit comes shortly after that pick. From an exemplar perspective this build will still be tanky despite the lack of stuns for earlier levels because of that decision to invest in defense power picks early on. Game play when the build gets all its toys looks like this: Target the boss, hug the boss, alternate invoke panic and dark pit, force bomb and do other stuff while those are on cooldown, steal bamboo from boss while it's dazed, Nom Nom Nom Nom Nom!
-
You are right that it's REALLY REALLY hard to get Ranged and AoE softcap without making really weird power picks and sacrifices in slotting to boot. The general consensus is that there'll be far more Range attacks that you'll need to cover than AoEs if you go with a pure ranged build so a lot of builds will softcap range and that's it. However powersets that feature a lot of slows may have an easier time with AoE defense. The key is Ice Mistral's Torment. This Hero build was built using Mids Reborn 3.4.7 https://github.com/LoadedCamel/MidsReborn Click this DataLink to open the build! Level 49 Natural Blaster Primary Power Set: Beam Rifle Secondary Power Set: Tactical Arrow Power Pool: Leaping Power Pool: Flight Power Pool: Fighting Power Pool: Leadership Ancillary Pool: Flame Mastery Hero Profile: Level 1: Single Shot (A) Superior Defiant Barrage - Accuracy/Damage (13) Superior Defiant Barrage - Damage/RechargeTime (13) Superior Defiant Barrage - Accuracy/Damage/RechargeTime (15) Superior Defiant Barrage - Accuracy/Damage/Endurance (15) Superior Defiant Barrage - Accuracy/Damage/Endurance/RechargeTime (17) Superior Defiant Barrage - RechargeTime/+Status Level 1: Glue Arrow (A) Ice Mistral's Torment - Endurance/Slow (3) Ice Mistral's Torment - Damage/Recharge (3) Ice Mistral's Torment - Damage/Slow (5) Ice Mistral's Torment - Accuracy/Damage/Endurance (5) Ice Mistral's Torment - Accuracy/Damage/Endurance/Recharge (7) Ice Mistral's Torment - Chance for Cold Damage Level 2: Cutting Beam (A) Artillery - Accuracy/Damage (7) Artillery - Damage/Endurance (9) Artillery - Damage/Recharge (9) Artillery - Accuracy/Damage/Recharge (11) Artillery - Accuracy/Recharge/Range (11) Artillery - Endurance/Recharge/Range Level 4: Combat Jumping (A) Kismet - Accuracy +6% Level 6: Disintegrate (A) Superior Blaster's Wrath - Accuracy/Damage (17) Superior Blaster's Wrath - Damage/Recharge (31) Superior Blaster's Wrath - Accuracy/Damage/Recharge (31) Superior Blaster's Wrath - Accuracy/Damage/Endurance (34) Superior Blaster's Wrath - Accuracy/Damage/Endurance/Recharge (34) Superior Blaster's Wrath - Recharge/Chance for Fire Damage Level 8: Hover (A) Luck of the Gambler - Defense/Increased Global Recharge Speed Level 10: Upshot (A) Empty Level 12: Lancer Shot (A) Superior Winter's Bite - Accuracy/Damage (25) Superior Winter's Bite - Damage/RechargeTime (40) Superior Winter's Bite - Accuracy/Damage/Endurance (40) Superior Winter's Bite - Accuracy/Damage/Recharge (40) Superior Winter's Bite - Damage/Endurance/Accuracy/RechargeTime (48) Superior Winter's Bite - Recharge/Chance for -Speed & -Recharge Level 14: Fly (A) Blessing of the Zephyr - Run Speed, Jump, Flight Speed, Range (33) Blessing of the Zephyr - Knockback Reduction (4 points) (49) Blessing of the Zephyr - Run Speed, Jump, Flight Speed, Range/Endurance Level 16: Kick (A) Empty Level 18: Penetrating Ray (A) Sting of the Manticore - Accuracy/Damage (19) Sting of the Manticore - Damage/Endurance (19) Sting of the Manticore - Accuracy/Interrupt/Range (27) Sting of the Manticore - Damage/Endurance/Recharge (27) Sting of the Manticore - Chance of Damage(Toxic) Level 20: Eagle Eye (A) Preemptive Optimization - Accuracy/Recharge (21) Preemptive Optimization - EndMod/Endurance (21) Preemptive Optimization - EndMod/Recharge (23) Preemptive Optimization - EndMod/Accuracy/Endurance (23) Preemptive Optimization - EndMod/Accuracy/Recharge (25) Preemptive Optimization - EndMod/Endurance/Recharge Level 22: Tough (A) Gladiator's Armor - TP Protection +3% Def (All) (43) Aegis - Resistance/Endurance (45) Aegis - Resistance/Recharge (45) Aegis - Resistance/Endurance/Recharge (48) Aegis - Resistance (48) Aegis - Psionic/Status Resistance Level 24: Gymnastics (A) Luck of the Gambler - Defense/Increased Global Recharge Speed Level 26: Overcharge (A) Artillery - Accuracy/Damage (34) Artillery - Damage/Endurance (36) Artillery - Damage/Recharge (36) Artillery - Accuracy/Damage/Recharge (36) Artillery - Accuracy/Recharge/Range (37) Artillery - Endurance/Recharge/Range Level 28: Weave (A) Luck of the Gambler - Defense/Increased Global Recharge Speed (29) Shield Wall - Defense/Endurance (29) Shield Wall - Defense (31) Shield Wall - +Res (Teleportation), +5% Res (All) Level 30: Oil Slick Arrow (A) Ice Mistral's Torment - Endurance/Slow (37) Ice Mistral's Torment - Damage/Recharge (37) Ice Mistral's Torment - Damage/Slow (39) Ice Mistral's Torment - Accuracy/Damage/Endurance (39) Ice Mistral's Torment - Accuracy/Damage/Endurance/Recharge (39) Ice Mistral's Torment - Chance for Cold Damage Level 32: Maneuvers (A) Luck of the Gambler - Defense/Increased Global Recharge Speed (33) Reactive Defenses - Defense/Endurance (33) Reactive Defenses - Scaling Resist Damage Level 35: Bonfire (A) Force Feedback - Chance for +Recharge (45) Overwhelming Force - Damage/Chance for Knockdown/Knockback to Knockdown Level 38: Fire Shield (A) Steadfast Protection - Resistance/+Def 3% (46) Aegis - Resistance/Endurance (46) Aegis - Resistance/Recharge (46) Aegis - Endurance/Recharge (47) Aegis - Resistance/Endurance/Recharge (47) Aegis - Resistance Level 41: Electrified Net Arrow (A) Ice Mistral's Torment - Endurance/Slow (42) Ice Mistral's Torment - Damage/Recharge (42) Ice Mistral's Torment - Damage/Slow (42) Ice Mistral's Torment - Accuracy/Damage/Endurance (43) Ice Mistral's Torment - Accuracy/Damage/Endurance/Recharge (43) Ice Mistral's Torment - Chance for Cold Damage Level 44: Evasive Maneuvers (A) Luck of the Gambler - Defense/Increased Global Recharge Speed Level 47: Aim (A) Gaussian's Synchronized Fire-Control - Chance for Build Up Level 49: Flash Arrow (A) Siphon Insight - Chance for +ToHit Level 1: Brawl (A) Empty Level 1: Defiance Level 1: Sprint | Copy & Paste this data into Mids Reborn : Hero Designer to view the build | |-------------------------------------------------------------------| |MxDz;1644;701;1402;HEX;| |78DA75945B4F135110C7FFDBDD524A5BB0DC2B72E9850A456A417D57541E040C41D| |F9BB55D4B93429B52A27E003F838982A831C17AF9123E6BD4E893FAE207504C7CC0| |6BD6E9CE4E384DC34976F7B7E7CCCECC7FCE9C5DBA7921F8FAD5E25968A1F325736| |3233B47F79A55F55D366B9B55B384C6F0D1157117B22BE67AC1CAA7E72C732DBB52| |BC5EB24664E5CA66A552AED6D257CD5CAD98334BD973D56AF90682CBE57229BD689| |995E27A21E0BCCC978A85D55A88B981B4D2256679ABBAB15AAC745FAC14736469AE| |59D92527C0AD41CA234657B6976E1A64D85EBA19C08C812034010F4327740183E10| |8BC0CDBC916377EAFB3E241874080813C0A8418DAD0C96052369AEA46832E260643| |3BBC026D0C1DF009B433F4539575C50D74FCA3E7B0816B14C0AB06F0E2AEEE4AB9C| |730822D816D8628EE0BEC30F829804F0DE0439FE6ACEC5021FC5056FCB069204F81| |036AE0009E70E9065167388EA702CF049E339CC40B8600050E296E3C217CF4382B6| |3F8CC90C127060FD976A9A974712A16A512567C1861BC81F34537DE0ABC63388AF7| |021F181E92C01E55480FF639B75EFC14F8C5D08FDF027F44EC5F069D92EB53DDF46| |15677B628850C97F20466044E696E194E0B9C61784CD90CA81B31201B5120951135| |40445A292AAD1497568A4B2BC5A59512D24A06E539A4B8D18724C031CCEB2E5C928| |659607844590DABB187E53424E43424E43424E53424E53424E5348429F6A8BAD9A3| |127B0C7BBA0B3F1876E9113B383AB616C36D8F5BBD2F6C52A7C7B89AD5B8533A2AF| |9B4947C5A4A3E8D5986B4D43E2DB5DF227113AA9B09113729E22645DCA4884B89B8| |94887B9902A6D49D9B127139DAB9F4C1CFC4A6973A4B7940A1338A48EAF5A0BB070| |6D46137AE46AF478DE6FF92BD7888E1B2A1DAD1BCC6F35F3B9A1D88FD5EEB7C9453| |F976C817DF5BE7EFB0ACDD54734E369D1784D48905B2C8A813FF018D35CE55| |-------------------------------------------------------------------|
-
It could work against you. You are assuming the people that run ahead aren't capable of soloing mobs by themselves. There are a few things I see that compound the issue discussed here: 1 - People join teams and solo, they don't need a team, they just want an audience (I do that sometimes as well). But they can't read team dynamics and adjust accordingly. 2 - Poor to non-existent targeting priority. Most people I see just tab and latch onto whatever that target is. Bosses are 99% of the time the highest threat/hardest to take down and it wouldn't be as much an issue if they were focused down first. Instead you get folks that two shot minions/LT and think that's it and move on to the next group, leaving the things that actually NEED to be DPSed down to teammates less capable of doing so. Honestly #2 irks me more than #1. Like if you are here flexing then actually do something more impressive than 2 shoting minions. That's fucking scrub tier.
-
I find that teams without lol melee usually are more cohesive. Especially if you know you can carry the team and you invite a lot of lowbies that do not dare stray too far off from the team.
-
The powerset you'd love, but you know will never be implemented
Nemu replied to SteelR4t's topic in General Discussion
I just want panda roll as a travel power. But I know it'll never be implemented. -
The way defense works is that it checks for the highest defense that you have against attacks that have the appropriate tags. For example if your range defense is 48% and your S/L defense is at 43%, A lethal ranged attack will only check against your range defense because that's the highest. When you start building for typed defenses then you also need to cover all the types. Positional defense are more catch all, they don't care about whether a ranged attack is fire/cold/energy, etc... If you are building for pure ranged hover blasting it's much more efficient to build for range defense. There are typically 3 flavors of build direction: All out offense no defense - Geared towards teaming where your weaknesses can be covered by other players/buffs/debuffs. Most people don't go this way, they prefer to be a little more self sufficient. All the mitigation in the world! - The most self sufficient route, turns blasters into tank mage lite at the cost of offense, the cost varies depends on how you build it, some people go overboard and sacrifice a lot more than necessary, some build for enough defense and still retain respectable offense. Middle ground - Usually build enough defense so that one small luck can help reach softcap, frees up room for more offensive slotting/procs. My patches and procs ice/ta build is one such example. Regardless of direction, good blasters players share the following traits: Understanding of game mechanics/mobs and understanding your priorities for each engagement Fully leveraging your toolkit, whether that's your mitigation tools, your defense bonuses from the build, game mechanics such as line of sight or jousting, or even the simple act of moving. Knowing where you should plant yourself and when you should move. Blaster players that build for softcap and think they can stand in one spot and derp it out like a scrapper will have a harder time than those that choreograph their battle plan intelligently.
-
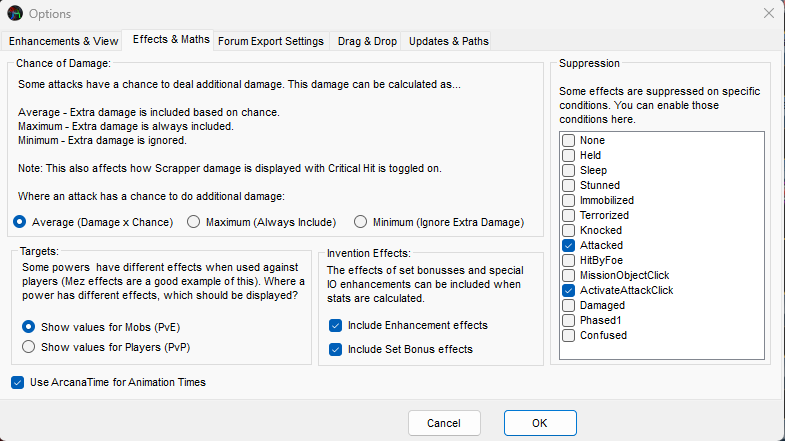
Let's think this one through. Your game plan is to stay at range which means attacks coming at you will have either a Range tag or an AoE tag. If an attack is ranged it doesn't matter what type it is, S/L/F whatever it doesn't matter as long as you have range defense. Same applies to AoE attacks. If you follow your game plan and stay at range you never have to deal with the melee component, the simplest solution to maintain your range game plan is to hover/move. So WHY is there a need to softcap those various typed defense when you could just focus on Ranged/AoE defense and call it a day? Go to configuration - options - effects and maths and check the "attacked" box on the right to see your true defenses in combat. A few other Mids tips that you may find useful later on: If you put procs in powers there will be green or green + yellow buttons that automatically turn on for the power. Screenshot above has a Guassian's build up proc in upshot. Upshot does not have infinite duration, so turning on the power skews your to hit and makes you think you can hit anything. Another example: Hail of bullets is the T9 for dual pistals and I slotted a force feedback +recharge proc in it because it does knockdown. The proc gives 5 seconds of +100% global recharge. Leaving it on makes people claim their build has perma hasten when they do not. Turn those dials off. Additionally, Hail of Bullets gives you 5 seconds of increased Melee/Range/AoE defense, so again, people will claim they have softcap defenses when they do not. The yellow dial will turn off proc effects such as the force feedback +rech, the green dial will turn the power off completely so in this case you won't see either the inherent +defense nor the proc effect. Most folks that stick to the range hover blasting route build for range softcap with a resist shield. Most favor flame mastery for bonfire because it's another piece of area denial that's very effective and can be made perma. I'd also recommend glue arrow, it carries -jump and -fly, great for keeping stuff away from you. For the more adventurous you can also up your damage potential by leveraging damage procs, this does mean that you sacrifice survival. A good compromise is around 32.5% defense so a small luck can softcap you. This gives you some build freedom to cram in more procs. Here are some examples you can reference:

-
Not sure what the consensus on where to put the chance to hide proc for energy melee is but I put it in Total Focus. It then triggers hide and you get a free Energy transfer +HP crit out of it. The build has a lot of 6 slotted sets and it seems excessive. Deflection provides S/L resist and most builds slot for that and let set bonuses cover lost enhancement opportunities for melee defense in that power. Here's what I did with mine, I opted for more offense. This Villain build was built using Mids Reborn 3.4.7 https://github.com/LoadedCamel/MidsReborn Click this DataLink to open the build! Agent Blu: Level 50 Technology Stalker Primary Power Set: Energy Melee Secondary Power Set: Shield Defense Power Pool: Leaping Power Pool: Fighting Power Pool: Leadership Power Pool: Experimentation Ancillary Pool: Mu Mastery Villain Profile: Level 1: Barrage (A) Superior Assassin's Mark - Accuracy/Damage (3) Superior Assassin's Mark - Damage/RechargeTime (5) Superior Assassin's Mark - Accuracy/Damage/RechargeTime (7) Superior Assassin's Mark - Damage/Endurance/RechargeTime (7) Superior Assassin's Mark - Accuracy/Damage/Endurance/RechargeTime (21) Superior Assassin's Mark - RechargeTime/Rchg Build Up Level 1: Hide (A) Luck of the Gambler - Defense/Increased Global Recharge Speed Level 2: Bone Smasher (A) Superior Stalker's Guile - Accuracy/Damage (23) Superior Stalker's Guile - Damage/Recharge (23) Superior Stalker's Guile - Accuracy/Damage/Recharge (27) Superior Stalker's Guile - Damage/Endurance/Recharge (29) Superior Stalker's Guile - Accuracy/Damage/Endurance/Recharge Level 4: Combat Jumping (A) Luck of the Gambler - Defense/Increased Global Recharge Speed (5) Kismet - Accuracy +6% (15) Luck of the Gambler - Defense Level 6: Assassin's Strike (A) Superior Blistering Cold - Accuracy/Damage/Endurance (29) Superior Blistering Cold - Damage/Endurance/Accuracy/RechargeTime (34) Touch of Death - Damage/Endurance (34) Mako's Bite - Chance of Damage(Lethal) (34) Touch of Death - Chance of Damage(Negative) Level 8: Build Up (A) Gaussian's Synchronized Fire-Control - To Hit Buff (9) Gaussian's Synchronized Fire-Control - To Hit Buff/Recharge (9) Gaussian's Synchronized Fire-Control - To Hit Buff/Recharge/Endurance (11) Gaussian's Synchronized Fire-Control - Recharge/Endurance (11) Gaussian's Synchronized Fire-Control - To Hit Buff/Endurance (21) Gaussian's Synchronized Fire-Control - Chance for Build Up Level 10: Kick (A) Empty Level 12: Deflection (A) Luck of the Gambler - Defense/Increased Global Recharge Speed (13) Unbreakable Guard - Resistance (15) Unbreakable Guard - Resistance/Endurance (17) Unbreakable Guard - Resistance/Endurance/RechargeTime (33) Unbreakable Guard - +Max HP Level 14: Battle Agility (A) Luck of the Gambler - Defense/Increased Global Recharge Speed (17) Reactive Defenses - Defense (19) Reactive Defenses - Defense/Endurance (19) Reactive Defenses - Scaling Resist Damage Level 16: Active Defense (A) Recharge Reduction IO Level 18: Power Crash (A) Superior Avalanche - Accuracy/Damage (43) Superior Avalanche - Accuracy/Damage/Endurance (43) Superior Avalanche - Damage/Endurance (45) Superior Avalanche - Accuracy/Damage/Endurance/Recharge (45) Superior Avalanche - Recharge/Chance for Knockdown Level 20: Tough Hamidon Origin:Ribosome Exposure Level 22: Total Focus (A) Hecatomb - Damage/Recharge (39) Hecatomb - Damage/Recharge/Accuracy (40) Hecatomb - Recharge/Accuracy (40) Hecatomb - Damage/Endurance (40) Hecatomb - Chance of Damage(Negative) (47) Superior Stalker's Guile - Recharge/Chance to Hide Level 24: Weave (A) Luck of the Gambler - Defense/Increased Global Recharge Speed (25) Shield Wall - Defense/Endurance (25) Shield Wall - Defense (27) Shield Wall - +Res (Teleportation), +5% Res (All) Level 26: Energy Transfer (A) Superior Blistering Cold - Accuracy/Damage (37) Superior Blistering Cold - Damage/Endurance (37) Touch of Death - Accuracy/Damage (39) Mako's Bite - Chance of Damage(Lethal) (39) Touch of Death - Chance of Damage(Negative) Level 28: Shield Charge (A) Armageddon - Damage/Recharge (33) Force Feedback - Chance for +Recharge (45) Armageddon - Damage/Recharge/Accuracy (46) Armageddon - Recharge/Accuracy (46) Armageddon - Damage/Endurance (46) Armageddon - Chance for Fire Damage Level 30: Maneuvers (A) Red Fortune - Defense/Endurance (31) Red Fortune - Defense/Recharge (31) Red Fortune - Endurance/Recharge (33) Red Fortune - Defense/Endurance/Recharge (48) Red Fortune - Defense (48) Red Fortune - Endurance Level 32: Speed of Sound (A) Winter's Gift - Slow Resistance (20%) Level 35: Zapp (A) Sting of the Manticore - Accuracy/Damage (36) Sting of the Manticore - Damage/Endurance (36) Sting of the Manticore - Accuracy/Interrupt/Range (36) Sting of the Manticore - Damage/Endurance/Recharge (37) Sting of the Manticore - Chance of Damage(Toxic) Level 38: Ball Lightning (A) Ragnarok - Damage/Recharge (42) Ragnarok - Damage/Recharge/Accuracy (42) Ragnarok - Recharge/Accuracy (42) Ragnarok - Damage/Endurance (43) Ragnarok - Chance for Knockdown Level 41: Grant Cover (A) Endurance Reduction IO Level 44: Tactics (A) Endurance Reduction IO Level 47: True Grit (A) Steadfast Protection - Resistance/+Def 3% (47) Preventive Medicine - Chance for +Absorb Level 49: Against All Odds (A) Endurance Reduction IO Level 1: Assassination Level 1: Brawl | Copy & Paste this data into Mids Reborn : Hero Designer to view the build | |-------------------------------------------------------------------| |MxDz;1741;779;1558;HEX;| |78DA7594594F535110C7FF77A9B5A5A560419652369542D1827B5CE3023C4049301| |835A0D60AD7B6A1B6A42D097579F4DD9DB8461371F92E1A41F01BF8CA92B83F983A| |DCB9078F25DCE4B6BFF39F33E7CCCC9973FB27BB5C1FDE878F41719F4C46B3D9C86| |02E9A1C3332CED3C6483C954EA663790D80E378CC48E51A4F2427EC34AAB52645FA| |8DA46184BA53462696E741BD307519578C54D6080DC6134672540CE11A48A793A1B| |0111D4FA4626E73D09388C57334F208D3A891C9C613E315E6B87B72DCC824AED2EE| |D15C229DAAEA1E4F8C8456F79F88F447B3392393AFA6B05AE8BDE7A01F05E229D88| |0491DD8A943459E41C735860DB82EE00643056E320C07FE5F86DE4AC5B43CA00D14| |C9A22B98D14CCB66CC0AF8C4508B39863ACC5B262A9F2679AB9A5857C71F12FC3A4| |A51C1CA43DAC90669271BEEEAD672F7199A304C968083600C96125951744C91B7FD| |5F0A059B1DAF5473CA464C0B78CDE0C41B016F55AB10EF18540AD821054183023D8| |850814AE4329488445CF8C6B996E23B43197E3134E237C379F2764BDE9A5B789761| |91A76CC29280AF0C17C8C9A3D0398A503C685F49DA81471461B91C4C399E7281827| |82EE019C376BC10F09241A314BD92B7E2C52EDEB11E4749B06B78421B544A55B055| |22C0F569412B43006D0282AA195500EDAC84F099D7D369A72A39ED2A9176357A340| |B7A45EFF4313CA6BD6BE436A8C16D0E7C2BEE0818E23668116DD022DAE03215CDA7| |486DE0C301D53A8C5BAA5588830C3B7048C061014718CA2972BF7CADFC702A568D4| |A04B8146B613743074A05781806824083DC4D0DF071965FE8AF593EC2667CE454B6| |6046C0AC80395879CF33FC7401DB64EF6DD8CD81B7618F80BD02F6F1F904B19F952| |8D5A855BEECAD748DCC295E4ABB5DB6B40BCB45F209C94D13324FD6BF72DA0B9CD2| |259AD2A9AC5EC1023AD959874F87FC140A75458229D22D0BAFA30FE8F2D7897485F| |505E79ACF96A92FAEA32F15E9548F26CDFA5AF62A660375E00C9FDDF2DAB953AA75| |E39775B3289DF8C10D391D2C4AB08F844E59087B69A2B45AE1ACB34838572C0C150| |BA78A85BFE054EA87| |-------------------------------------------------------------------|
-
I only took soul transfer because it also carries a stun. I'd use exec shot as the name implies, as a finisher. I'm also setting realistic expectations on the build, it's not going to solo +4/8 where mobs have more HP and exec shot can't get it done. This build is probably more comfortable at even con to maybe +2. Also there's nothing stopping you from doing the ol' "hop and fire at the peak of your jump" to turn KB into ghetto KD. I do that with power thrust all the time on my blaster. It's a "pro" move😀
- 20 replies
-
- 2
-

-

-
- corruptor
- dual pistol
- (and 3 more)
-
I got you fam! Thought about that when I made the conscious decision not to pick up swap ammo. Pistols only does -def, no kb Executioner's shot is only single target and have a 70% chance to kb. HOB knocks down. I thought about that one while building and checked the mag - only 0.4. Piercing does -res, which is a benefit to a build not using special ammo. So really only executioner's shot which I find acceptable.
-
Besides Hail of Bullets being left on, your defenses might be lower still in game because when you are attacked infiltration loses all of its defense bonus. In mids go to options - configuration - effects and maths and check the "attacked" box to the right. Half sounds like a lot but let's put it against actual numbers: Base stun duration of Supp. Fire is a bit over 9 seconds, let's just call it 10. So 1% increased duration = .1 second which means you are losing .3 seconds. Meanwhile a standard level 50 crafted stun IO gives 42.4% increase stun duration. Now if you look at Oppressive gloom, base stun duration is just a little over 7 seconds. So the value you get out of those stun duration bonuses is even less. Also the stun bonuses do not work on procs. As someone that has built gimmick builds that focus on stun I can tell you the key is not stun duration but density and frequency of powers that stun/proc stun and how quickly you can cycle them. And even then from EXPERIENCE I can also tell you that you should temper your expectations about how reliably and how complete your coverage is on stunning stuff around you. The last thing I will tell you is that you should not rely on this gimmick as your only means for survival. At best it's to supplement your survival and at worst it's just for giggles. You should make sure that your build has survival covered by other means as well. Dropping seeker is unexpected as the power STUNS and your concept greatly benefits from multiple AoE powers that can stun or proc stun. Supp. Fire being single target can only do so much. I can tell you something else from experience. When you are invested in such a concept where stun is the primary goal you will be cycling all your powers that can stun/proc stun with little room to fit in actual attacks, which is why it's more conducive to have an attack that also stuns so you can include that in your chain to do some actual damage. I'm going to say something that you don't want to hear but this is more for the general public reading this and trying to get ideas on this topic, but I'll come back to your build in a moment. If I were to build for stun then I'd look for synergies, that means multiple AoE powers that can stun/proc stun in my toolkit, preferably ones that also deal damage. Bonus points for single target stuns that I can squeeze in the build as well, preferably ones that also do damage. As I scour through the combinations a few things stand out: Rad Blast, Dual Pistols, Beam Rifle, Force Field, and Storm Summoning. I'd probably do DP/Force Field. DP has more force feedback opportunities and Force field has a quick recharge AoE Stun/Knockdown in force bomb AND offers survival comparable to traps. Storm is just OP and can quickly warp into focusing on tornado/lightning storm instead of building towards stun. Back to your build: Here's my vision of how to maximize the gimmick. The goal is to stuff it with as many aoe powers that stun/proc stun as I can and make sure I have good recharge to cycle them consistently and have decent defenses. I made this a budget build with no purples or winter IOs, and I shot for 1 luck short of softcap on most positions. I can also tell you right now this is not a build for the unseasoned. Oppressive gloom demands that you stand in the danger zone and you are still a squishy. Looking at the enhanced recharge on seeker and invoke panic they are still not enough to form a seamless stun chain that you can sustain forever and ever. If you are not quick with insp usage and know how to use the tools in your kit, you will have a harder time finding success. This Villain build was built using Mids Reborn 3.4.7 https://github.com/LoadedCamel/MidsReborn Click this DataLink to open the build! Maximizing Stun with DP Traps: Level 49 Technology Corruptor Primary Power Set: Dual Pistols Secondary Power Set: Traps Power Pool: Leaping Power Pool: Speed Power Pool: Leadership Power Pool: Presence Ancillary Pool: Dark Mastery Villain Profile: Level 1: Pistols (A) Superior Scourging Blast - Damage/RechargeTime (3) Superior Scourging Blast - Accuracy/Damage/RechargeTime (3) Superior Scourging Blast - Damage/Endurance/RechargeTime Level 1: Caltrops (A) Ice Mistral's Torment - Endurance/Slow (13) Ice Mistral's Torment - Damage/Recharge (15) Ice Mistral's Torment - Damage/Slow (15) Ice Mistral's Torment - Accuracy/Damage/Endurance (19) Ice Mistral's Torment - Accuracy/Damage/Endurance/Recharge (21) Ice Mistral's Torment - Chance for Cold Damage Level 2: Web Grenade (A) Empty Level 4: Combat Jumping (A) Luck of the Gambler - Defense/Increased Global Recharge Speed (5) Kismet - Accuracy +6% Level 6: Super Speed (A) Blessing of the Zephyr - Run Speed, Jump, Flight Speed, Range (7) Blessing of the Zephyr - Run Speed, Jump, Flight Speed, Range/Endurance (7) Blessing of the Zephyr - Knockback Reduction (4 points) Level 8: Bullet Rain (A) Force Feedback - Chance for +Recharge (9) Overwhelming Force - Damage/Chance for Knockdown/Knockback to Knockdown (9) Ice Mistral's Torment - Damage/Slow (11) Ice Mistral's Torment - Accuracy/Damage/Endurance (11) Ice Mistral's Torment - Accuracy/Damage/Endurance/Recharge (13) Ice Mistral's Torment - Chance for Cold Damage Level 10: Acid Mortar (A) Analyze Weakness - Accuracy/Recharge (48) Shield Breaker - Accuracy/Recharge Level 12: Suppressive Fire (A) Rope A Dope - Accuracy/Stun (21) Stupefy - Accuracy/Stun/Recharge (25) Gladiator's Net - Chance of Damage(Lethal) (27) Ghost Widow's Embrace - Chance of Damage(Psionic) (27) Neuronic Shutdown - Chance of Damage(Psionic) (29) Gladiator's Javelin - Chance of Damage(Toxic) Level 14: Hasten (A) Recharge Reduction IO (37) Recharge Reduction IO Level 16: Force Field Generator (A) Luck of the Gambler - Defense/Increased Global Recharge Speed (17) Shield Wall - Defense/Endurance (17) Shield Wall - Defense (19) Shield Wall - +Res (Teleportation), +5% Res (All) Level 18: Executioner's Shot (A) Force Feedback - Chance for +Recharge (40) Superior Scourging Blast - Accuracy/Damage (42) Superior Scourging Blast - Accuracy/Damage/Endurance/RechargeTime (42) Superior Scourging Blast - RechargeTime/PBAoE +End Level 20: Poison Trap (A) Basilisk's Gaze - Accuracy/Hold (37) Basilisk's Gaze - Accuracy/Recharge (39) Basilisk's Gaze - Endurance/Recharge/Hold (39) Basilisk's Gaze - Accuracy/Endurance/Recharge/Hold Level 22: Maneuvers (A) Luck of the Gambler - Defense/Increased Global Recharge Speed (23) Reactive Defenses - Defense (23) Reactive Defenses - Defense/Endurance (25) Reactive Defenses - Scaling Resist Damage Level 24: Seeker Drones (A) Stupefy - Accuracy/Recharge (29) Stupefy - Endurance/Stun (31) Stupefy - Accuracy/Endurance (31) Stupefy - Stun/Range (31) Stupefy - Accuracy/Stun/Recharge Level 26: Hail of Bullets (A) Force Feedback - Chance for +Recharge (34) Obliteration - Accuracy/Recharge (36) Obliteration - Damage/Recharge (36) Obliteration - Accuracy/Damage/Recharge (36) Obliteration - Accuracy/Damage/Endurance/Recharge (37) Obliteration - Chance for Smashing Damage Level 28: Provoke (A) Empty Level 30: Intimidate (A) Glimpse of the Abyss - Accuracy/Recharge (40) Glimpse of the Abyss - Accuracy/Endurance (40) Glimpse of the Abyss - Fear/Range (47) Glimpse of the Abyss - Accuracy/Fear/Recharge (47) Glimpse of the Abyss - Chance of Damage(Psionic) (48) Unspeakable Terror - Disorient Bonus Level 32: Invoke Panic (A) Glimpse of the Abyss - Accuracy/Recharge (33) Glimpse of the Abyss - Accuracy/Endurance (33) Glimpse of the Abyss - Endurance/Fear (33) Glimpse of the Abyss - Accuracy/Fear/Recharge (34) Glimpse of the Abyss - Chance of Damage(Psionic) (34) Unspeakable Terror - Disorient Bonus Level 35: Oppressive Gloom (A) Stupefy - Accuracy/Recharge (45) Stupefy - Endurance/Stun (45) Stupefy - Accuracy/Endurance (46) Stupefy - Stun/Range (46) Stupefy - Accuracy/Stun/Recharge Level 38: Dark Embrace (A) Steadfast Protection - Resistance/+Def 3% (39) Gladiator's Armor - TP Protection +3% Def (All) (46) Unbreakable Guard - Resistance (49) Unbreakable Guard - Resistance/Endurance (49) Unbreakable Guard - Resistance/Endurance/RechargeTime (49) Unbreakable Guard - +Max HP Level 41: Piercing Rounds (A) Superior Malice of the Corruptor - Accuracy/Damage (42) Superior Malice of the Corruptor - Damage/Recharge (43) Superior Malice of the Corruptor - Accuracy/Damage/Recharge (43) Superior Malice of the Corruptor - Damage/Endurance/Recharge (43) Superior Malice of the Corruptor - Accuracy/Damage/Endurance/Recharge (45) Superior Malice of the Corruptor - Recharge/Chance for Negative Energy Damage Level 44: Tactics (A) Endurance Reduction IO Level 47: Triage Beacon (A) Preventive Medicine - Chance for +Absorb Level 49: Soul Transfer (A) Recharge Reduction IO Level 1: Brawl (A) Empty Level 1: Scourge Level 1: Sprint | Copy & Paste this data into Mids Reborn : Hero Designer to view the build | |-------------------------------------------------------------------| |MxDz;1651;729;1458;HEX;| |78DA75945B4F135110C7677BB622A5B554EE02D272BF948A7E0223C544A54923BC3| |71BBAC0C6D2DDECB6117C10D1F85D7CF0FA197CD5C4078C46F0F6010013351105D6| |E9CE193924F624DBFCCE9C993973FE737A72ABD9E8EB57B397418B4F970CCF2B4CD| |BAE5B752AB61B99371796CB76C95E5A1300D09B3356AD15EB8E555E4ACE55AAE5E4| |6DABB29CCCE693F3AEE1780D358F7FA1859B4679C92C66B255A354C85B5EC52E79A| |DC7AB57AA8B8B99200CA279DB2E65664DC3C1BC916032E7986631CEF6A2E97ACB96| |9308E639A36C39D59251B1EC7262C6B1163259C3BD55C8195EC574D73AB18601FC8| |69AF147031E7E084D3AC0451D4230CC3042F05B3BE91B06680C072B5188109C8126| |8628C1598811B4C219827D4DCD023E4E7C1CD08EBA0825BD26A04D0B227438AC49A| |6C300BA84D56AC3F02114B89C822D866D82313C59C3F1467EB8011ED2CA69F82A24| |C86A235C6D84AB8D72B50798A151ADAA11DE509A0B204450D538EED4A4EAD204773| |579E607049D30435B9E83154D82A105D13D90A6A57E3C5C4CDD29061310AC0C321C| |E2725C71117196A819AE0A09D78514FE06C1049697D08E85100916620406A9B3633| |0CA30467084FE2D4A93440B6C86827A07E12DC130BC63784F90C013B4A9E5B57179| |EDB02B24EC09A9C877021F3D3A9420BD03D629A807EE119C870D86FB0C52D8493C5| |C97DAE52E3E5C0A0E0806E090E188C10F496141B6052BEF56EF6437DDC96EB4F72A| |DA857B614B93DA7D64F8449081CF0C5F34794336658F314D9F7A43FA384D92D3246| |19B41A649719A14A759C762FB55A9FA59AA344B9566A92659AA49966A03A387D422| |8602DD83065E12D2F707C114FC64F8C5B04F9046C547D534A3F058C8CBF384601C9| |E323C63782EA3E105410B4A32A1A4C12B9EA24BFE07AD19A5A538D9A19847318029| |35668AFF183D3AA8C3AF7DB5FE5DD38327ABC8767FB68E635EFFFFA3B41339F9E6B| |1FF5E1DFB6E1DFBB73A76FFE478398E0F9C5286FF175102FC03| |-------------------------------------------------------------------|