Nemu
-
Posts
1424 -
Joined
-
Last visited
-
Days Won
3
Content Type
Profiles
Forums
Events
Store
Articles
Patch Notes
Everything posted by Nemu
-
That's Energize. It heals, gives you a regen boost, and reduces endurance cost globally dramatically, all the more reason to have it on auto.
-
I don't think you'll see any practical difference in fury generation, you could argue that if you are spamming fault constantly as mitigation that'll cut into your fury generation because mobs aren't attacking you as much. There was a similar thread on Ice Armor which was notorious for lowering fury generation back on live, in which various posters dismissed that long standing claim with the fury changes on HC.
-
Stone/dark is typically perceived as safer but that pairing is not for the faint of heart because it will absolutely wreck your end bar. You really need to invest in end recovery/end reduction if you are to make the combo work so depending on your budget for IOs, it may be a painful slog to 50. It does offer more single target damage than Elec/Dark at the cost of AoE, and the only AoE damaging power is available late at 32. Elec/Dark can be just as safe as Stone/dark except people usually skip lightning clap, whereas stone melee has fault which is an analog that people usually don't skip. Between Thunderstrike, Lightning clap and oppressive gloom you have a good chance to keep mobs around you flopping/disoriented. Elec is generally regarded as having more AoE potential, but the single target falls way behind stone melee. If you can stomach the leveling pains and have the budget to invest I'd go Stone/Dark. If you want to venture off the beaten path go Elec/Dark
-
If the scrapper/sentinel version ever got ported to tanks it would be a really good hami tank. The stalker version may need some fine tuning, seems to me there are a few dud powers that while flavorful, are not used much. Given how the stalker ATO has really changed the game perhaps replace smoke bomb, as flavorful as it is, with the end regain power. I'd like to see all melee defense sets get at least 50% DDR outside of the T9 given how prevalent -def is. I don't feel that ninjitsu has enough layered mitigation to justify it's low DDR. The blaster version is poo, the damage for the melee attacks need to be adjusted up to be competitive with blaster melee powers from other sets. I'd love to have shinobi offer a few modes in addition to the +stealth and +movement buffs: Poison Blade- additional minor toxic damage added to all sword attacks - this should make Ninja Training melee attacks do the most damage among all blaster secondaries in their respective tiers. Shadow Assassin - original mode of occasional build up and the persistent small passive to hit and damage buffs. A third mode that complements ranged play - perhaps increased perception, increased range, and large passive to hit bonus. I can't decide on blaster smoke flash. It's very flavorful and very unique mitigation but the current state of the game makes it a skip because there aren't too many situations where I as a blaster would placate everyone and then not attack. I want to play blasters, not tactical retreat specialists.
-
You won't get mezzed if mezzes can't hit you in the first place, food for thought. The reality is that you will still get mezzed, either with acrobatics or with high defenses, no matter how high your defense enemies still have a 5% chance to hit you. Acro will let you shrug off one hold but doesn't do anything against sleeps and stuns. Unlike acro, defense bonuses from sets still work when you are mezzed, so you are still a little bit harder to hit. Combining inspirations into breakfrees should be second nature to blasters and they can partially solve for the mez issue with breakfrees and rune of protection while leveling up, and clarion destiny when they get to incarnate levels. Regarding teaming, there will be times where you will be the lone blaster on an all melee team, or on a team with little support, and there will also be times where you are on teams with selfish support players that play poorly or don't adopt to team dynamics. It doesn't hurt to build for survival, blasters already do enough damage out of the gate. The idea of the holy trinity is greatly downplayed in this game, people will invite whoever and run content, and the reason why some of those "poorly balanced" teams do well is because people build for survival so they can take care of themselves. Here is an semi-budget example of a build using your powersets tuned for ranged defense. Some notes about the build: - It makes up for the loss of hasten by using the force feedback chance for 100% global recharge proc in many of the attacks. Those procs give you 100% increased global recharge for 5 seconds when they trigger and the sheer number of powers I put them in will increase the chances that you will get a trigger. - Energize is perma so you should not run into any endurance issues even with minimal investment of end recovery slotting. This should be your autopower. - There are IO sets for melee powers that have good bonuses for ranged defense, that's why total focus is included. The superior ATO slotted in TF gives you 5% ranged defense. - Bonfire with the kb-kd converter is a game changer, it will cause mobs in a large area to be continuously knocked down so you can pick them off. This is a must pick power for the typical hover blaster. - I took combat jumping because it provides complete immunity to immobilization. The difference between mez protection (combat jumping) vs resist (weave) is that resist only shorten the duration of the mez. - The chance to build up proc goes in aim, so when you use aim it gives you a build up effect too for more damage. - Your accuracy rating is 95% or more without tactics, and with tactics higher to buffer you against debuffs. - You have almost 60% resist to the most common damage types in the game, layered on top of your ranged defense. - Afterburner is a self affecting power but it also gives you increased flight speed and another place for a luck of the gambler 7.5% global recharge IO. Turn this on to travel around. - The power pick order is chosen so that when you run lower level content exemplared you are at ranged defense softcap by level 30 if you slot your powers with Attuned IOs (You don't need to attune the Armageddon purple set and the PvP IOs such as shield wall). With this build you don't need to hang back and wait for others to establish aggro before you start shooting, you can be much more aggressive. Hero Plan by Mids' Reborn : Hero Designer 2.7.2.10 https://github.com/Crytilis/mids-reborn-hero-designer Click this DataLink to open the build! Level 50 Mutation Blaster Primary Power Set: Energy Blast Secondary Power Set: Energy Manipulation Power Pool: Flight Power Pool: Leaping Power Pool: Fighting Power Pool: Leadership Ancillary Pool: Flame Mastery Hero Profile: Level 1: Power Bolt -- SprDfnBrr-Acc/Dmg(A), SprDfnBrr-Dmg/Rchg(3), SprDfnBrr-Acc/Dmg/Rchg(5), SprDfnBrr-Acc/Dmg/EndRdx(5), SprDfnBrr-Acc/Dmg/EndRdx/Rchg(7), SprDfnBrr-Rchg/+Status Protect(7) Level 1: Power Thrust -- Acc-I(A) Level 2: Energy Torrent -- SuddAcc--KB/+KD(A), FrcFdb-Rechg%(3), Artl-Acc/Dam(15), Artl-Acc/Dam/Rech(15), Artl-Dam/End(17), Dtn-Acc/Dmg/EndRdx(17) Level 4: Fly -- BlsoftheZ-Travel/EndRdx(A), BlsoftheZ-ResKB(13) Level 6: Power Burst -- FrcFdb-Rechg%(A), Thn-Acc/Dmg(19), Thn-Acc/Dmg/EndRdx(19), Thn-Dmg/EndRdx(23), Thn-Acc/Dmg/Rchg(23) Level 8: Sniper Blast -- StnoftheM-Acc/Dmg(A), StnoftheM-Dmg/EndRdx(9), StnoftheM-Acc/ActRdx/Rng(9), StnoftheM-Dmg/ActRdx/Rchg(11), StnoftheM-Dmg/EndRdx/Rchg(11) Level 10: Combat Jumping -- LucoftheG-Def/Rchg+(A), Ksm-ToHit+(13) Level 12: Build Up -- RechRdx-I(A) Level 14: Aim -- GssSynFr--Build%(A) Level 16: Energize -- NmnCnv-Heal/EndRdx(A), NmnCnv-EndRdx/Rchg(27), NmnCnv-Heal/Rchg(37), NmnCnv-Heal/EndRdx/Rchg(37), NmnCnv-Heal(37), NmnCnv-Regen/Rcvry+(48) Level 18: Power Blast -- FrcFdb-Rechg%(A), Thn-Acc/Dmg(34), Thn-Acc/Dmg/Rchg(36), Thn-Acc/Dmg/EndRdx(36), Thn-Dmg/EndRdx(36) Level 20: Hover -- LucoftheG-Def/Rchg+(A), BlsoftheZ-Travel(21), BlsoftheZ-Travel/EndRdx(21) Level 22: Boxing -- Empty(A) Level 24: Tough -- GldArm-3defTpProc(A), RctArm-ResDam/EndRdx(25), RctArm-ResDam/EndRdx/Rchg(25), RctArm-ResDam(48) Level 26: Explosive Blast -- SuddAcc--KB/+KD(A), FrcFdb-Rechg%(27), Artl-Acc/Dam(33), Artl-Acc/Dam/Rech(33), Artl-Dam/End(34), Dtn-Acc/Dmg/EndRdx(34) Level 28: Weave -- LucoftheG-Def/Rchg+(A), ShlWal-Def/EndRdx(29), ShlWal-Def(29), ShlWal-ResDam/Re TP(31) Level 30: Maneuvers -- LucoftheG-Def/Rchg+(A), Rct-Def(31), Rct-Def/EndRdx(31), Rct-ResDam%(33) Level 32: Nova -- Arm-Dmg/Rchg(A), Arm-Acc/Dmg/Rchg(42), Arm-Acc/Rchg(42), Arm-Dmg/EndRdx(42), Arm-Dam%(43) Level 35: Bonfire -- SuddAcc--KB/+KD(A), Artl-End/Rech/Rng(40), Artl-Dam/Rech(43), Artl-Acc/Dam/Rech(43) Level 38: Total Focus -- SprBlsWrt-Acc/Dmg(A), SprBlsWrt-Dmg/Rchg(39), SprBlsWrt-Acc/Dmg/Rchg(39), SprBlsWrt-Acc/Dmg/EndRdx(39), SprBlsWrt-Acc/Dmg/EndRdx/Rchg(40), SprBlsWrt-Rchg/Dmg%(40) Level 41: Fire Shield -- StdPrt-ResDam/Def+(A), UnbGrd-Max HP%(46), UnbGrd-ResDam(48), UnbGrd-ResDam/EndRdx(50) Level 44: Char -- Lck-Acc/Hold(A), Lck-Acc/Rchg(45), Lck-Rchg/Hold(45), Lck-EndRdx/Rchg/Hold(45), Lck-Acc/EndRdx/Rchg/Hold(46), Lck-%Hold(46) Level 47: Tactics -- EndRdx-I(A) Level 49: Afterburner -- LucoftheG-Def/Rchg+(A), BlsoftheZ-Travel/EndRdx(50), BlsoftheZ-Travel(50) Level 1: Brawl -- Empty(A) Level 1: Defiance Level 1: Quick Form Level 1: Prestige Power Dash -- Empty(A) Level 1: Prestige Power Slide -- Empty(A) Level 1: Prestige Power Quick -- Empty(A) Level 1: Prestige Power Rush -- Empty(A) Level 1: Prestige Power Surge -- Empty(A) Level 1: Sprint -- Empty(A) Level 2: Rest -- Empty(A) Level 4: Ninja Run Level 2: Swift -- Flight-I(A) Level 2: Health -- Pnc-Heal/+End(A) Level 2: Hurdle -- Jump-I(A) Level 2: Stamina -- PrfShf-End%(A) Level 0: Freedom Phalanx Reserve Level 0: Portal Jockey Level 0: Task Force Commander Level 0: The Atlas Medallion Level 50: Musculature Radial Paragon Level 50: Clarion Core Epiphany ------------ Once you understand the power of defense in this game you can try your hand at a melee blaster. It's an experience like no other and I'd be happy to teach you techniques that help you succeed.
-
Sentinels. low learning curve, ranged, you don't need to worry about mez. As with any build they can be very sturdy with investment, and certain armor secondaries have self heal/end management/stealth tools so that leveling them is not a chore either. I think a xxx/ninjitsu sentinel will suit your goals well.
-
I member when mobs stacked and you could one shot them, and yourself, with energy transfer. I member when you joined a low level TF beyond your level range you prayed to god you don't disconnect (ahem old skool posi). I member when fire/dev blasters were a thing and smoke grenade was OP, and there was a guide that told you to blast mobs on the street and then leave them because there will be street sweeping teams that will clean up the mess you made and you'd still get xp. I member when I learned jousting from pvpers. That completely changed the way I played this game. I member the nictus crystals that used to spawn in missions when a Kheldian was on the team. They were hard by yester-year's standards but a pushover now with IOs. Bring those back please!
-
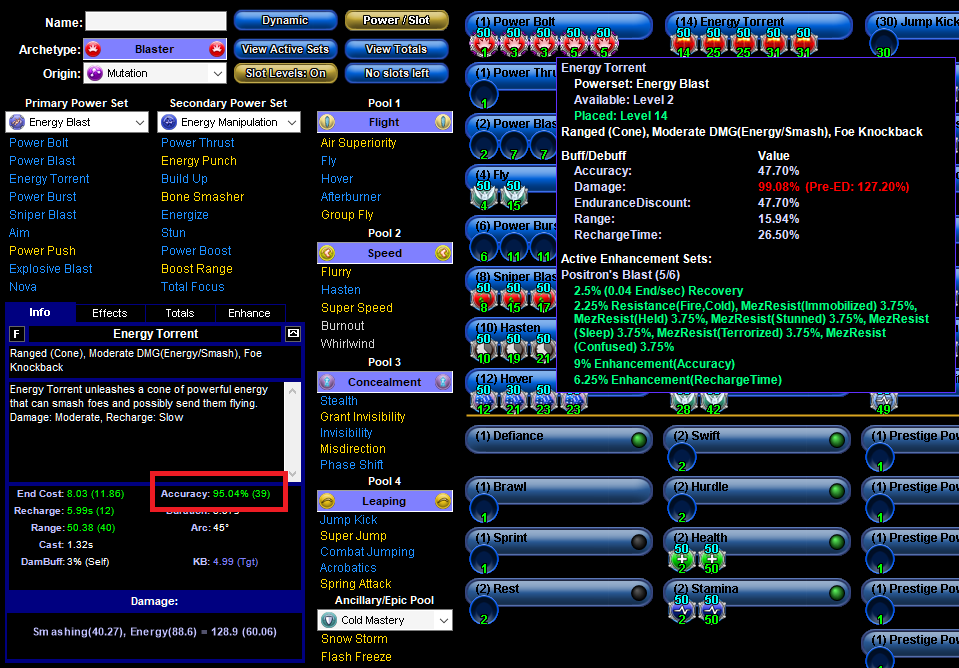
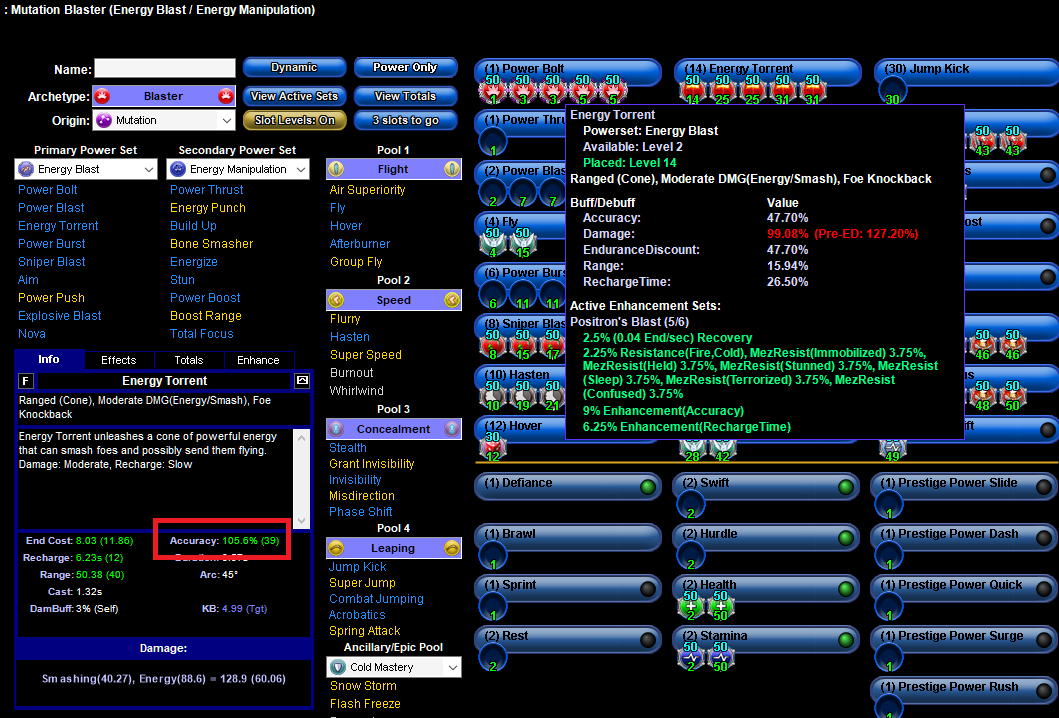
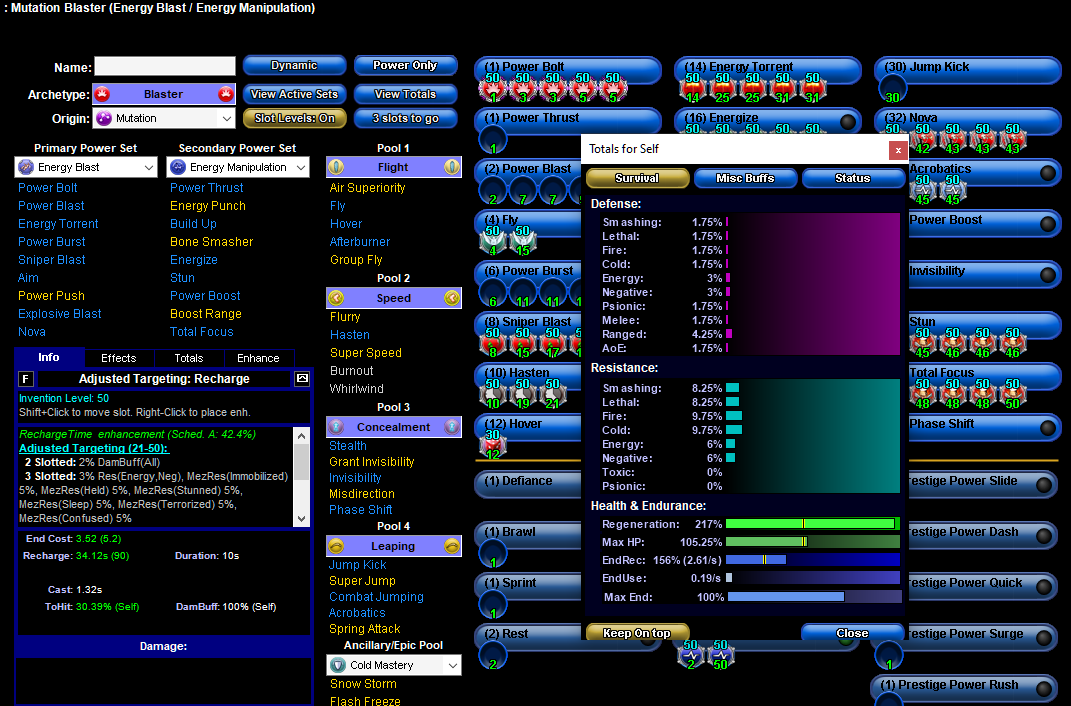
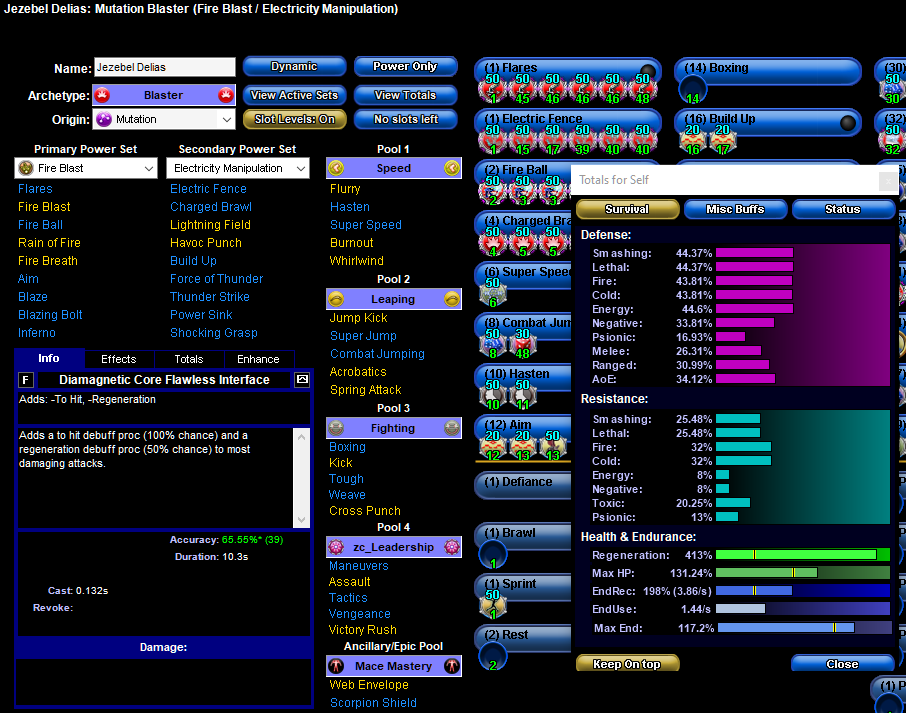
Mids will make your build planning a lot easier, but kudos for taking the time to put down your build on a spreadsheet. You'll be an expert with builds in no time! Here is the forum for Mids, you can download the application in the second sticky thread: https://forums.homecomingservers.com/forum/74-forum/ It's not perfect, there are errors in the mids database but it's mostly accurate, and it sure beats tracking everything on excel. I took your build and replicated it in mids, for other posters interested in helping out here it is: Hero Plan by Mids' Reborn : Hero Designer 2.7.2.10 https://github.com/Crytilis/mids-reborn-hero-designer Click this DataLink to open the build! Level 50 Mutation Blaster Primary Power Set: Energy Blast Secondary Power Set: Energy Manipulation Power Pool: Flight Power Pool: Speed Power Pool: Concealment Power Pool: Leaping Hero Profile: Level 1: Power Bolt -- SprBlsWrt-Acc/Dmg(A), SprBlsWrt-Dmg/Rchg(3), SprBlsWrt-Acc/Dmg/Rchg(3), SprBlsWrt-Acc/Dmg/EndRdx(5), SprBlsWrt-Acc/Dmg/EndRdx/Rchg(5) Level 1: Power Thrust -- Empty(A) Level 2: Power Blast -- Empty(A), Empty(7), Empty(7), Empty(9), Empty(9) Level 4: Fly -- Srn-EndRdx/Fly(A), Srn-EndRdx(15) Level 6: Power Burst -- Empty(A), Empty(11), Empty(11), Empty(13), Empty(13) Level 8: Sniper Blast -- StnoftheM-Acc/Dmg(A), StnoftheM-Dmg/EndRdx(15), StnoftheM-Acc/ActRdx/Rng(17), StnoftheM-Dmg/ActRdx/Rchg(17), StnoftheM-Dmg/EndRdx/Rchg(19) Level 10: Hasten -- RechRdx-I(A), RechRdx-I(19), RechRdx-I(21) Level 12: Hover -- LucoftheG-Def/Rchg+(A), LucoftheG-Def/EndRdx(21), LucoftheG-Def(23), LucoftheG-Def/Rchg(23) Level 14: Energy Torrent -- PstBls-Acc/Dmg(A), PstBls-Dmg/EndRdx(25), PstBls-Dmg/Rchg(25), PstBls-Dmg/Rng(31), PstBls-Acc/Dmg/EndRdx(31) Level 16: Energize -- NmnCnv-Heal/EndRdx(A), NmnCnv-EndRdx/Rchg(33), NmnCnv-Heal/Rchg(33), NmnCnv-Heal/EndRdx/Rchg(33), NmnCnv-Heal(34) Level 18: Stealth -- LucoftheG-Def/Rchg+(A), LucoftheG-Def(34), LucoftheG-Def/EndRdx(34), LucoftheG-Def/Rchg(36) Level 20: Build Up -- AdjTrg-ToHit(A), AdjTrg-ToHit/Rchg(36), AdjTrg-ToHit/EndRdx/Rchg(36), AdjTrg-EndRdx/Rchg(37), AdjTrg-Rchg(37) Level 22: Aim -- AdjTrg-ToHit(A), AdjTrg-ToHit/Rchg(37), AdjTrg-ToHit/EndRdx/Rchg(39), AdjTrg-EndRdx/Rchg(39), AdjTrg-Rchg(39) Level 24: Combat Jumping -- RedFrt-Def/EndRdx(A), RedFrt-Def/Rchg(40), RedFrt-EndRdx/Rchg(40), RedFrt-Def/EndRdx/Rchg(40), RedFrt-Def(42) Level 26: Explosive Blast -- JvlVll-Dam%(A), JvlVll-Acc/Dmg(27), JvlVll-Dam/Rech(27), JvlVll-Dam/End/Rech(29), JvlVll-Acc/End/Rech(29), JvlVll-Acc/Dmg/End/Rech(31) Level 28: Afterburner -- Srn-EndRdx(A), Srn-EndRdx/Fly(42) Level 30: Jump Kick -- Empty(A) Level 32: Nova -- Arm-Dmg(A), Arm-Dmg/Rchg(42), Arm-Acc/Dmg/Rchg(43), Arm-Acc/Rchg(43), Arm-Dmg/EndRdx(43) Level 35: Acrobatics -- EndRdx-I(A), EndRdx-I(45), EndRdx-I(45) Level 38: Power Boost -- RechRdx-I(A) Level 41: Invisibility -- EndRdx-I(A) Level 44: Stun -- CrsImp-Acc/Dmg(A), CrsImp-Dmg/EndRdx(45), CrsImp-Acc/Dmg/Rchg(46), CrsImp-Acc/Dmg/EndRdx(46), CrsImp-Dmg/EndRdx/Rchg(46) Level 47: Total Focus -- CrsImp-Acc/Dmg(A), CrsImp-Dmg/EndRdx(48), CrsImp-Acc/Dmg/Rchg(48), CrsImp-Acc/Dmg/EndRdx(48), CrsImp-Dmg/EndRdx/Rchg(50) Level 49: Phase Shift -- EndRdx-I(A) Level 1: Brawl -- Empty(A) Level 1: Defiance Level 1: Quick Form Level 1: Prestige Power Dash -- Empty(A) Level 1: Prestige Power Slide -- Empty(A) Level 1: Prestige Power Quick -- Empty(A) Level 1: Prestige Power Rush -- Empty(A) Level 1: Prestige Power Surge -- Empty(A) Level 1: Sprint -- Empty(A) Level 2: Rest -- Empty(A) Level 4: Ninja Run Level 2: Swift -- Empty(A) Level 2: Health -- Heal-I(A), Heal-I(50) Level 2: Hurdle -- Empty(A) Level 2: Stamina -- EndMod-I(A), EndMod-I(50) ------------ The blaster ATOs are unique, so you can't have 3 sets of them, hence the 5 empty slots in power blast and power burst. Before we start here is some recommended reading, it will help you understand how defense works in this game, it's not tremendously complicated compared to other games. https://dechskaison.blogspot.com/2011/01/why-is-softcap-so-important.html Here is another link that discusses accuracy, a bit more convoluted but worth a read Let's talk about ACC first, take a look at the ACC stat for energy torrent, it has a 95% acc rating against mobs +3 to you, which is the effective cap because you always have a 5% chance to miss no matter how high your ACC is. Now I'm going to slot hover with just one kismet +to hit IO and get rid of the set of luck of the gamblers which gives you 9% acc bonus and this is what happens: The higher acc rating buffers debuffs that some enemies throw out. I hope that gives you some perspective on the benefits of to-hit vs ACC. Now let's look at your survival, I hope you read the softcap article. This is what you have: Not much defense, not much resist. This is what high end blaster builds can have, the difference in survival is very noticeable. Getting these numbers is not cheap, but it can be done. Ranged hover blasters build for ranged defense softcap rather than typed defense and that is achievable too (and cheaper to do). Plus they often pair their softcap range defense with a resist epic shield so they can get 50+% resistance to a few damage types as well. General comments about what you have right now: Jump kick is unnecessary, you can replace that with a power from the epic pool. Acrobatics and phase shift are both relics in today's CoH but if you are going to keep them you don't need to 3 slot Acro with end reduction, just one will do. If you hop onboard the building for defense bandwagon you can sub those out all together for powers that align with your defense goal better. Hasten doesn't need to be 3 slotted at 50, you can using enhancement boosters and boost two level 50 recharge IOs, so you can shave a slot from hasten and put it somewhere else Assuming you have a PC, download mids, play around in it, figure out your build goals, ask more questions here, and we'll help you revise.

-
It's a good place for a steadfast proc which brings it up to 21% resist to smashing and lethal, at the ED cap you are looking at about 29%. Is that 8% worth additional slots? It really depends on your build priorities, sometimes chasing set bonuses means you have to make compromises here and there. You don't need end redux anymore because SB and ID are now area buffs and also you have transference. Most fire/kins trollers I've seen play like derpy lol melee ATs, mass immob -> FS -> fireball because that what fire/kin farm builds did. If you are planning to be more team oriented you have to shift your mindset. Here are some team oriented fire/kin tips: SB and ID towards the end of a combat engagement so that the team is ready to go for the next engagement, even easier if your target a mob that's aggroed on to a teammate and apply those buffs through the mob. Sometimes for your own survival AoE is bad, stick to char for the harder targets and focus on support and let your teammates handle the fodder, take this advice to heart especially during lower level content where you don't have all your defenses and your are controls are not as effective. There are lowbie - mid level teams that do +2 or + 3 content and if you play like a noob fire/kin prepare to win noob prizes. If a teammate is in trouble select the teammate and fire off transfusion, works best on melee ATs since they are most likely targeting something next to them. The aggro monkeys are not necessary when you team, you got 7 other aggro monkeys that do a better job (maybe, can't trust the lol melee types though). When the lol melee runs ahead and leave the bosses behind, that's when you summon the aggro monkeys to do their job for them. There are lots of ways to build a fire/kin. Most go with a defense epic so they can get S/L defense among other types/positional so they can stay in melee and take advantage of FS. I think you can do just as well taking a resist epic and building for ranged defense, because things in melee range are going to get locked/burned down. So here is a semi-budget example of that. Mezzes is your biggest weakness so I took rune of protection and clarion. Hero Plan by Mids' Reborn : Hero Designer 2.7.2.10 https://github.com/Crytilis/mids-reborn-hero-designer Click this DataLink to open the build! Level 50 Magic Controller Primary Power Set: Fire Control Secondary Power Set: Kinetics Power Pool: Sorcery Power Pool: Leaping Power Pool: Fighting Power Pool: Leadership Ancillary Pool: Soul Mastery Hero Profile: Level 1: Char -- BslGaz-Acc/Hold(A), BslGaz-Acc/Rchg(3), BslGaz-EndRdx/Rchg/Hold(3), BslGaz-Acc/EndRdx/Rchg/Hold(5) Level 1: Transfusion -- TchoftheN-Acc/Heal(A), ThfofEss-Acc/Heal(11), TchoftheN-Acc/EndRdx/Rchg(17), TchoftheN-Heal/HP/Regen/Rchg(17), ThfofEss-Heal/Rchg(21) Level 2: Fire Cages -- SprWiloft-Acc/Conf/Hold/Immob/Sleep/Stun/Fear(A), SprWiloft-Conf/Hold/Immob/Sleep/Stun/Fear/Rchg(5), SprWiloft-EndRdx/Rchg(7), SprWiloft-Acc/Conf/Hold/Immob/Sleep/Stun/Fear/EndRdx(7), SprWiloft-Acc/Conf/Hold/Immob/Sleep/Stun/Fear/EndRdx/Rchg(9), SprWiloft-Rchg/Dmg%(9) Level 4: Mystic Flight -- BlsoftheZ-ResKB(A) Level 6: Combat Jumping -- LucoftheG-Def/Rchg+(A), Ksm-ToHit+(11) Level 8: Arcane Bolt -- Thn-Acc/Dmg(A), Thn-Dmg/EndRdx(40), Thn-Dmg/Rchg(43), Thn-Acc/Dmg/Rchg(43), Thn-Acc/Dmg/EndRdx(43), Thn-Dmg/EndRdx/Rchg(46) Level 10: Siphon Speed -- PcnoftheT-Acc/Slow(A), PcnoftheT-Dmg/Slow(40), PcnoftheT-Acc/EndRdx(40), PcnoftheT-Rng/Slow(50), PcnoftheT-EndRdx/Rchg/Slow(50), PcnoftheT--Rchg%(50) Level 12: Flashfire -- Stp-Acc/Rchg(A), Stp-EndRdx/Stun(13), Stp-Acc/EndRdx(13), Stp-Stun/Rng(15), Stp-Acc/Stun/Rchg(15) Level 14: Boxing -- Empty(A) Level 16: Increase Density -- StdPrt-ResDam/Def+(A) Level 18: Cinders -- BslGaz-Acc/Hold(A), BslGaz-Acc/Rchg(19), BslGaz-EndRdx/Rchg/Hold(19), BslGaz-Acc/EndRdx/Rchg/Hold(21) Level 20: Speed Boost -- WntGif-ResSlow(A) Level 22: Maneuvers -- LucoftheG-Def/Rchg+(A), ShlWal-Def/EndRdx(23), ShlWal-Def(23), ShlWal-ResDam/Re TP(25) Level 24: Tough -- GldArm-3defTpProc(A), UnbGrd-ResDam(25), UnbGrd-ResDam/EndRdx(27), UnbGrd-Rchg/ResDam(27), UnbGrd-ResDam/EndRdx/Rchg(31) Level 26: Bonfire -- SuddAcc--KB/+KD(A), FrcFdb-Rechg%(39) Level 28: Weave -- LucoftheG-Def/Rchg+(A), Rct-Def(29), Rct-Def/EndRdx(29), Rct-ResDam%(31) Level 30: Hot Feet -- ScrDrv-Acc/Dmg(A), ScrDrv-Dmg/EndRdx(31), ScrDrv-Acc/Rchg(34), ScrDrv-Acc/Dmg/EndRdx(37), ScrDrv-Dam%(39) Level 32: Fire Imps -- ExpRnf-Acc/Rchg(A), ExpRnf-Acc/Dmg(33), ExpRnf-Dmg/EndRdx(33), ExpRnf-Acc/Dmg/Rchg(33), ExpRnf-EndRdx/Dmg/Rchg(34), ExpRnf-+Res(Pets)(34) Level 35: Transference -- PreOptmz-Acc/Rech(A), PreOptmz-EndMod/End(36), PreOptmz-EndMod/Rech(36), PreOptmz-EndMod/Acc/End(36), PreOptmz-EndMod/Acc/Rech(37), PreOptmz-EndMod/End/Rech(37) Level 38: Fulcrum Shift -- Acc-I(A), Acc-I(39) Level 41: Dark Embrace -- UnbGrd-ResDam(A), UnbGrd-ResDam/EndRdx(42), UnbGrd-Rchg/ResDam(42), UnbGrd-Max HP%(42) Level 44: Dark Obliteration -- Artl-Acc/Dam(A), Artl-Dam/End(45), Artl-Dam/Rech(45), Artl-Acc/Dam/Rech(45), Artl-Acc/Rech/Rng(46), Artl-End/Rech/Rng(46) Level 47: Rune of Protection -- UnbGrd-ResDam(A), UnbGrd-EndRdx/Rchg(48), UnbGrd-Rchg/ResDam(48), UnbGrd-ResDam/EndRdx/Rchg(48) Level 49: Siphon Power -- Acc-I(A) Level 1: Brawl -- Empty(A) Level 1: Containment Level 1: Prestige Power Dash -- Empty(A) Level 1: Prestige Power Slide -- Empty(A) Level 1: Prestige Power Quick -- Empty(A) Level 1: Prestige Power Rush -- Empty(A) Level 1: Prestige Power Surge -- Empty(A) Level 1: Sprint -- Empty(A) Level 2: Rest -- Empty(A) Level 4: Ninja Run Level 2: Swift -- Run-I(A) Level 2: Health -- Pnc-Heal/+End(A) Level 2: Hurdle -- Jump-I(A) Level 2: Stamina -- PrfShf-End%(A) Level 50: Vigor Core Paragon Level 50: Clarion Core Epiphany Level 50: Support Core Embodiment ------------
-
Welcome to the best game evar! 1/4 and 2/3 probably mean difficulty. First number is the level increase in mobs, second is the spawn size. So 1/4 means mobs are +1 level relative to the mission and spawned for a team of 4. You can adjust your difficulty through the little speech bubble icon at the bottom right of the chat box where you type. There are options for notoriety there. Pack mentality is a autopower, under your health bar there are buff icons, right click there and unselect the hide autopowers radial dial and you'll start seeing pack mentality stacks.
-
Yup, as with all other builds, you gotta pay to win. DA on SOs is painful and an exercise of sheer willpower. With Dark armor it's more like pay to get your endurance under control, then pay again to be less squishy. Here is a semi budget endgame build, no purples, no winters, no ATOs, but a few essential PVP IOs. It'll do ok, until you face things that slow you. Don't skip your early attacks, without them you don't have an attack chain. Hero Plan by Mids' Reborn : Hero Designer 2.7.2.10 https://github.com/Crytilis/mids-reborn-hero-designer Click this DataLink to open the build! Level 50 Magic Tanker Primary Power Set: Dark Armor Secondary Power Set: Kinetic Melee Power Pool: Leaping Power Pool: Fighting Ancillary Pool: Energy Mastery Hero Profile: Level 1: Dark Embrace -- UnbGrd-ResDam(A), UnbGrd-ResDam/EndRdx(3), UnbGrd-ResDam/EndRdx/Rchg(3), UnbGrd-Max HP%(5) Level 1: Quick Strike -- TchofDth-Acc/Dmg(A), TchofDth-Dmg/EndRdx(7), TchofDth-Dmg/Rchg(34), TchofDth-Acc/Dmg/EndRdx(34), TchofDth-Dmg/EndRdx/Rchg(36), TchofDth-Dam%(36) Level 2: Body Blow -- Mk'Bit-Acc/Dmg(A), Mk'Bit-Dmg/EndRdx(36), Mk'Bit-Dmg/Rchg(37), Mk'Bit-Dam%(37), Mk'Bit-Acc/Dmg/EndRdx/Rchg(37), Mk'Bit-Acc/EndRdx/Rchg(40) Level 4: Super Jump -- BlsoftheZ-Travel/EndRdx(A), BlsoftheZ-ResKB(5) Level 6: Obsidian Shield -- StdPrt-ResDam/Def+(A), UnbGrd-ResDam(27), UnbGrd-ResDam/EndRdx(33), UnbGrd-ResDam/EndRdx/Rchg(33), UnbGrd-Rchg/ResDam(33) Level 8: Smashing Blow -- Mk'Bit-Acc/Dmg(A), Mk'Bit-Dmg/EndRdx(9), Mk'Bit-Dmg/Rchg(9), Mk'Bit-Acc/EndRdx/Rchg(11), Mk'Bit-Acc/Dmg/EndRdx/Rchg(11), Mk'Bit-Dam%(15) Level 10: Murky Cloud -- UnbGrd-ResDam(A), UnbGrd-ResDam/EndRdx(17), UnbGrd-Rchg/ResDam(17), UnbGrd-ResDam/EndRdx/Rchg(19) Level 12: Cloak of Darkness -- LucoftheG-Def/Rchg+(A), LucoftheG-Def/EndRdx(13), LucoftheG-Def(13) Level 14: Combat Jumping -- Ksm-ToHit+(A), LucoftheG-Def/Rchg+(15), LucoftheG-Def(43) Level 16: Dark Regeneration -- ThfofEss-+End%(A), TchoftheN-Heal/HP/Regen/Rchg(19), TchoftheN-Acc/Heal(21), TchoftheN-Acc/EndRdx/Heal/HP/Regen(21), Mlt-Acc/EndRdx(23), ThfofEss-Acc/EndRdx/Rchg(23) Level 18: Boxing -- Empty(A) Level 20: Power Siphon -- RechRdx-I(A) Level 22: Tough -- GldArm-3defTpProc(A), UnbGrd-ResDam/EndRdx/Rchg(34), UnbGrd-ResDam(43), UnbGrd-ResDam/EndRdx(43), UnbGrd-Rchg/ResDam(46) Level 24: Weave -- LucoftheG-Def/Rchg+(A), Rct-Def(25), Rct-Def/EndRdx(25), Rct-ResDam%(27) Level 26: Oppressive Gloom -- RopADop-Acc/Stun(A) Level 28: Burst -- Obl-Dmg(A), Obl-Acc/Rchg(29), Obl-Dmg/Rchg(29), Obl-Acc/Dmg/Rchg(31), Obl-Acc/Dmg/EndRdx/Rchg(31), Obl-%Dam(31) Level 30: Death Shroud -- ScrDrv-Acc/Dmg(A), ScrDrv-Acc/Dmg/EndRdx(42), Mlt-Acc/Dmg/EndRdx(42), Mlt-Dmg/EndRdx(42) Level 32: Taunt -- Range-I(A) Level 35: Conserve Power -- RechRdx-I(A) Level 38: Concentrated Strike -- Mk'Bit-Acc/Dmg(A), Mk'Bit-Dmg/EndRdx(39), Mk'Bit-Dmg/Rchg(39), Mk'Bit-Acc/EndRdx/Rchg(39), Mk'Bit-Acc/Dmg/EndRdx/Rchg(40), Mk'Bit-Dam%(40) Level 41: Physical Perfection -- PrfShf-End%(A) Level 44: Energy Torrent -- Artl-Acc/Dam(A), Artl-Dam/End(45), Artl-Dam/Rech(45), Artl-Acc/Dam/Rech(45), Artl-Acc/Rech/Rng(46), Artl-End/Rech/Rng(46) Level 47: Focused Burst -- Thn-Acc/Dmg(A), Thn-Dmg/EndRdx(48), Thn-Dmg/Rchg(48), Thn-Acc/Dmg/Rchg(48), Thn-Acc/Dmg/EndRdx(50), Thn-Dmg/EndRdx/Rchg(50) Level 49: Cloak of Fear -- EndRdx-I(A), SphIns-%ToHit(50) Level 1: Brawl -- Empty(A) Level 1: Gauntlet Level 1: Prestige Power Dash -- Empty(A) Level 1: Prestige Power Slide -- Empty(A) Level 1: Prestige Power Quick -- Empty(A) Level 1: Prestige Power Rush -- Empty(A) Level 1: Prestige Power Surge -- Empty(A) Level 1: Sprint -- Empty(A) Level 2: Rest -- Empty(A) Level 4: Ninja Run Level 2: Swift -- Empty(A) Level 2: Health -- Pnc-Heal/+End(A), Mrc-Rcvry+(7) Level 2: Hurdle -- Empty(A) Level 2: Stamina -- PrfShf-End%(A) Level 0: Freedom Phalanx Reserve Level 0: Portal Jockey Level 0: Task Force Commander Level 0: The Atlas Medallion Level 50: Cardiac Core Paragon ------------ And since everyone is posting their DA/MA builds here I'll throw mine in as well: OMG no body mastery!!! Sacrilege... Hero Plan by Mids' Reborn : Hero Designer 2.7.2.10 https://github.com/Crytilis/mids-reborn-hero-designer Click this DataLink to open the build! Karate Panda: Level 50 Magic Tanker Primary Power Set: Dark Armor Secondary Power Set: Martial Arts Power Pool: Leaping Power Pool: Fighting Ancillary Pool: Earth Mastery Hero Profile: Level 1: Dark Embrace -- UnbGrd-ResDam(A), UnbGrd-ResDam/EndRdx(11), UnbGrd-ResDam/EndRdx/Rchg(13), UnbGrd-Max HP%(19), UnbGrd-Rchg/ResDam(33) Level 1: Thunder Kick -- Acc-I(A) Level 2: Storm Kick -- KntCmb-Acc/Dmg(A), KntCmb-Dmg/EndRdx(3), KntCmb-Dmg/EndRdx/Rchg(3), KntCmb-Knock%(9), HO:Nucle(9) Level 4: Cobra Strike -- SprMghoft-Acc/Dmg(A), SprMghoft-Acc/Dmg/Rchg(5), SprMghoft-Dmg/EndRdx/Rchg(5), SprMghoft-Acc/Dmg/EndRdx/Rchg(7), SprMghoft-Rchg/Res%(7) Level 6: Super Jump -- WntGif-ResSlow(A), BlsoftheZ-ResKB(29) Level 8: Murky Cloud -- Ags-ResDam/EndRdx(A), Ags-ResDam(13), Ags-ResDam/EndRdx/Rchg(17), Ags-Psi/Status(42) Level 10: Obsidian Shield -- StdPrt-ResDam/Def+(A), StdPrt-ResKB(11), StdPrt-ResDam/EndRdx(19) Level 12: Combat Jumping -- LucoftheG-Def/Rchg+(A), Ksm-ToHit+(34) Level 14: Cloak of Darkness -- LucoftheG-Def/Rchg+(A), ShlWal-Def/EndRdx(15), ShlWal-Def(15), ShlWal-ResDam/Re TP(17) Level 16: Dark Regeneration -- ThfofEss-+End%(A), TchoftheN-Acc/Heal(34), SprAvl-Rchg/KDProc(37), SprAvl-Acc/Dmg/Rchg(40), TchoftheN-Acc/EndRdx/Rchg(40), TchoftheN-Acc/EndRdx/Heal/HP/Regen(46) Level 18: Boxing -- Empty(A) Level 20: Dragon's Tail -- FrcFdb-Rechg%(A), SprAvl-Acc/Dmg(21), SprAvl-Acc/Dmg/EndRdx/Rchg(21), Erd-%Dam(23), Erd-Dmg(29), Erd-Acc/Dmg/EndRdx/Rchg(33) Level 22: Tough -- GldArm-3defTpProc(A), GldArm-End/Res(23), GldArm-ResDam(27) Level 24: Weave -- LucoftheG-Def/Rchg+(A), Rct-Def(25), Rct-Def/EndRdx(25), Rct-ResDam%(27) Level 26: Cloak of Fear -- CldSns-Acc/ToHitDeb(A), CldSns-ToHitDeb/EndRdx/Rchg(31), CldSns-Acc/EndRdx/Rchg(31), CldSns-Acc/Rchg(33) Level 28: Focus Chi -- HO:Membr(A) Level 30: Death Shroud -- ScrDrv-Acc/Dmg(A), ScrDrv-Dmg/EndRdx(31), ScrDrv-Acc/Dmg/EndRdx(34), Mlt-Acc/Dmg/EndRdx(43) Level 32: Warrior's Provocation -- Range-I(A) Level 35: Crippling Axe Kick -- SprBlsCol-Acc/Dmg(A), SprBlsCol-Dmg/EndRdx(36), SprBlsCol-Acc/Dmg/EndRdx(36), SprBlsCol-Acc/Dmg/Rchg(36), SprBlsCol-Dmg/EndRdx/Acc/Rchg(37), SprBlsCol-Rchg/HoldProc(37) Level 38: Eagles Claw -- SprGntFis-Acc/Dmg(A), SprGntFis-Acc/Dmg/EndRdx/Rchg(39), SprGntFis-Acc/Dmg/Rchg(39), SprGntFis-Dmg/EndRdx/Rchg(39), SprGntFis-Rchg/+Absorb(40), SprGntFis-Dmg/Rchg(50) Level 41: Stone Prison -- SprWntBit-Acc/Dmg(A), SprWntBit-Acc/Dmg/EndRdx(42), SprWntBit-Acc/Dmg/Rchg(42), SprWntBit-Dmg/EndRdx/Acc/Rchg(43), SprWntBit-Rchg/SlowProc(43) Level 44: Fossilize -- SprEnt-Acc/Hold(A), SprEnt-Hold/Rchg(45), SprEnt-End/Rchg(45), SprEnt-Acc/Hold/End(45), SprEnt-Acc/Hold/End/Rchg(46), SprEnt-Rchg/AbsorbProc(46) Level 47: Stalagmites -- Rgn-Dmg(A), Rgn-Acc/Dmg/Rchg(48), Rgn-Acc/Rchg(48), Rgn-Dmg/EndRdx(48), Rgn-Knock%(50) Level 49: Oppressive Gloom -- HO:Endo(A) Level 1: Brawl -- Empty(A) Level 1: Gauntlet Level 1: Prestige Power Dash -- Empty(A) Level 1: Prestige Power Slide -- Empty(A) Level 1: Prestige Power Quick -- Empty(A) Level 1: Prestige Power Rush -- Empty(A) Level 1: Prestige Power Surge -- Empty(A) Level 1: Sprint -- UnbLea-Stlth(A) Level 2: Rest -- Empty(A) Level 4: Ninja Run Level 2: Swift -- Run-I(A) Level 2: Health -- Pnc-Heal/+End(A), Mrc-Rcvry+(50) Level 2: Hurdle -- Jump-I(A) Level 2: Stamina -- PrfShf-End%(A) Level 0: Freedom Phalanx Reserve Level 0: Portal Jockey Level 0: Task Force Commander Level 0: The Atlas Medallion Level 50: Ageless Radial Epiphany Level 50: Support Core Embodiment Level 50: Spectral Core Flawless Interface Level 50: Cardiac Core Paragon ------------
-
According to homecoming stats this combo is second last behind Ice/SR in popularity. This makes it even cooler than my super stronk and pretty Titan/Energy Aura. So now I'm like super mega cool. Hold your applause and adulation please... Please.. 10/10 would recommend, just because. And if you are conflicted about theme do what I did - a firefighter gal who time traveled to cim and used her skills with a fire axe to defend herself from the Cim traitors and then time traveled again and learned the way of the ninja so now she's a ninja firefighter. Here, since I'm so super mega cool I'll even share a build with you Hero Plan by Mids' Reborn : Hero Designer 2.7.2.10 https://github.com/Crytilis/mids-reborn-hero-designer Click this DataLink to open the build! Ninja Firefighter Vi: Level 50 Natural Scrapper Primary Power Set: Battle Axe Secondary Power Set: Ninjitsu Power Pool: Leaping Power Pool: Leadership Power Pool: Fighting Ancillary Pool: Body Mastery Hero Profile: Level 1: Chop -- SprScrStr-Acc/Dmg(A), SprScrStr-Dmg/Rchg(9), SprScrStr-Acc/Dmg/Rchg(11), SprScrStr-Dmg/EndRdx/Rchg(11), SprScrStr-Acc/Dmg/EndRdx/Rchg(13), SprScrStr-Rchg/+Crit(13) Level 1: Ninja Reflexes -- LucoftheG-Def/Rchg+(A), LucoftheG-Def/EndRdx(3), LucoftheG-Def(3) Level 2: Gash -- FrcFdb-Rechg%(A), SprBlsCol-Acc/Dmg(31), SprBlsCol-Dmg/EndRdx(34), HO:Nucle(37), TchofDth-Dam%(37), ExpStr-Dam%(37) Level 4: Danger Sense -- LucoftheG-Def/Rchg+(A), LucoftheG-Def/EndRdx(5), LucoftheG-Def(5) Level 6: Shinobi-Iri -- LucoftheG-Def/Rchg+(A), ShlWal-Def/EndRdx(7), ShlWal-Def(7), ShlWal-ResDam/Re TP(9) Level 8: Swoop -- FrcFdb-Rechg%(A), SprBlsCol-Acc/Dmg/EndRdx(15), SprBlsCol-Dmg/EndRdx/Acc/Rchg(15), Hct-Dam%(17), Hct-Dmg(17), TchofDth-Dam%(31) Level 10: Kuji-In Rin -- HO:Ribo(A) Level 12: Combat Jumping -- Ksm-ToHit+(A), WntGif-ResSlow(39) Level 14: Build Up -- GssSynFr--Build%(A) Level 16: Seishinteki Kyoyo -- SynSck-EndMod(A), SynSck-EndMod/Rech(40), SynSck-EndMod/+RunSpeed(42) Level 18: Whirling Axe -- FrcFdb-Rechg%(A), SprAvl-Dmg/EndRdx(19), SprAvl-Acc/Dmg(19), HO:Nucle(21), Erd-%Dam(21), Obl-%Dam(25) Level 20: Kuji-In Sha -- Pnc-Heal/EndRedux(A), Pnc-EndRdx/Rchg(42), Pnc-Heal/Rchg(42), Pnc-Heal/EndRedux/Rchg(43), Pnc-Heal(43) Level 22: Maneuvers -- LucoftheG-Def/Rchg+(A), LucoftheG-Def/EndRdx(23), LucoftheG-Def/EndRdx/Rchg(23), LucoftheG-Def(25) Level 24: Tactics -- HO:Cyto(A) Level 26: Cleave -- SprCrtStr-Acc/Dmg(A), SprCrtStr-Dmg/Rchg(27), SprCrtStr-Acc/Dmg/Rchg(27), SprCrtStr-Dmg/EndRdx/Rchg(29), SprCrtStr-Acc/Dmg/EndRdx/Rchg(29), SprCrtStr-Rchg/+50% Crit(31) Level 28: Boxing -- Empty(A) Level 30: Tough -- StdPrt-ResDam/Def+(A), UnbGrd-ResDam(39), StdPrt-ResKB(39), UnbGrd-ResDam/EndRdx(40), UnbGrd-ResDam/EndRdx/Rchg(40), UnbGrd-Max HP%(43) Level 32: Pendulum -- FrcFdb-Rechg%(A), FuroftheG-ResDeb%(33), SprAvl-Acc/Dmg/EndRdx(33), SprAvl-Acc/Dmg/EndRdx/Rchg(33), Arm-Dam%(34), Arm-Dmg(34) Level 35: Weave -- LucoftheG-Def/Rchg+(A), Rct-Def(36), Rct-Def/EndRdx(36), Rct-ResDam%(36) Level 38: Focused Accuracy -- EndRdx-I(A) Level 41: Physical Perfection -- PrfShf-End%(A) Level 44: Energy Torrent -- FrcFdb-Rechg%(A), Ann-ResDeb%(45), SprFrzBls-Acc/Dmg(45), SprFrzBls-Acc/Dmg/EndRdx(45), Bmbdmt-Dam(46), Bmbdmt-+FireDmg(46) Level 47: Blinding Powder -- CrcPrs-Conf(A), CrcPrs-Conf/Rchg(48), CrcPrs-Acc/Conf/Rchg(48), CrcPrs-Acc/Rchg(48), CrcPrs-Conf/EndRdx(50), CrcPrs-Conf%(50) Level 49: Bo Ryaku -- GldArm-3defTpProc(A) Level 1: Brawl -- Empty(A) Level 1: Critical Hit Level 1: Quick Form Level 1: Prestige Power Dash -- Empty(A) Level 1: Prestige Power Slide -- Empty(A) Level 1: Prestige Power Quick -- Empty(A) Level 1: Prestige Power Rush -- Empty(A) Level 1: Prestige Power Surge -- Empty(A) Level 1: Sprint -- Empty(A) Level 2: Rest -- Empty(A) Level 4: Ninja Run Level 2: Swift -- Run-I(A) Level 2: Health -- Pnc-Heal/+End(A), NmnCnv-Regen/Rcvry+(46), Mrc-Rcvry+(50) Level 2: Hurdle -- Jump-I(A) Level 2: Stamina -- PrfShf-End%(A) Level 0: Freedom Phalanx Reserve Level 0: Portal Jockey Level 0: Task Force Commander Level 0: The Atlas Medallion ------------ Join the cool people club today!
-
Attuned IOs allow you to get those set bonuses even when you exemp down to their minimum level range and the IOs scale with your level. There is no reason not to IO as you go if you have the budget. You could have been following your recharge plan with attuned lotgs, doctored wounds, crushing impact, obliteration, and swap out a set of crushing/obliteration for their purple counterparts when you hit 50. Also take a look at this thread, it highlights key factors for regen survival has a few builds, I'm sure you can take the info there and apply it to your scrapper I'm also a fan of whirlwind with the KD proc on regen. Regen can handle the end drain and it does an ok job knocking mobs down. Dark makes this even more manageable with dark consumption and a theft of essence proc in drain life. Plus WW is also a place to put a force feedback proc and that fits into your recharge strategy, especially if your build focuses on defense softcap first.
-
Vet rewards help farmers and casual players alike. I know many people in my coalition that don't farm, they don't even know where to even begin making IO builds let alone min/maxing, they are reluctant to do Apex/Tiin because it's always speed and they can't keep up and die often, they don't do a lot of itrials because they are timid and they don't know what to do and they really don't want to invest the time to learn. The only assured way they can T3/4 their incarnates is through vet rewards. Stripping vet rewards would hurt that demographic the most as the end game will become even more of a grind for them. Many of us have conscious or unconscious bias towards farming but that should not be the only basis for our arguments for or against vet rewards. People play this game because they enjoy this game, farmers and casuals alike, and surely we can suggest something that helps everyone. Also, I'm still pushing for null the gull's temp power at vet level 9999. For the crazy badge hunters out there give it a badge "Gullified" or "OmnipoGULLLL!!!!"
-
Here comes a new challenger!
-
When you hit vet level 9999 you get the null the gull temp power. You know, the one that makes you omnipotent.
-
What's the Best Gravity Dominator Build You Can Put Together?
Nemu replied to oedipus_tex's topic in Dominator
Villain Plan by Mids' Reborn : Hero Designer 2.7.2.10 https://github.com/Crytilis/mids-reborn-hero-designer Click this DataLink to open the build! Scarlett Schwerkraft: Level 50 Science Dominator Primary Power Set: Gravity Control Secondary Power Set: Psionic Assault Power Pool: Speed Power Pool: Leaping Power Pool: Flight Power Pool: Fighting Ancillary Pool: Ice Mastery Villain Profile: Level 1: Lift -- SprWntBit-Acc/Dmg(A), SprWntBit-Acc/Dmg/EndRdx(5), SprWntBit-Rchg/SlowProc(13), SprWntBit-Dmg/EndRdx/Acc/Rchg(15), SprWntBit-Acc/Dmg/Rchg(25) Level 1: Psionic Dart -- Empty(A) Level 2: Gravity Distortion -- BslGaz-Acc/Hold(A), BslGaz-Acc/Rchg(3), BslGaz-EndRdx/Rchg/Hold(3), BslGaz-Acc/EndRdx/Rchg/Hold(5) Level 4: Super Speed -- WntGif-ResSlow(A) Level 6: Propel -- Apc-Dmg(A), Apc-Acc/Dmg/Rchg(7), Apc-Acc/Rchg(7), Apc-Dmg/EndRdx(9), Apc-Dam%(9), FrcFdb-Rechg%(17) Level 8: Combat Jumping -- LucoftheG-Def/Rchg+(A), Ksm-ToHit+(15) Level 10: Telekinetic Thrust -- SprBlsCol-Acc/Dmg(A), SprBlsCol-Dmg/EndRdx(11), SprBlsCol-Acc/Dmg/EndRdx(11), SprBlsCol-Dmg/EndRdx/Acc/Rchg(13), SprBlsCol-Rchg/HoldProc(17), FrcFdb-Rechg%(31) Level 12: Hasten -- RechRdx-I(A), RechRdx-I(23) Level 14: Hover -- LucoftheG-Def/Rchg+(A) Level 16: Fly -- BlsoftheZ-ResKB(A) Level 18: Gravity Distortion Field -- BslGaz-Acc/Hold(A), BslGaz-Acc/Rchg(19), BslGaz-EndRdx/Rchg/Hold(19), BslGaz-Acc/EndRdx/Rchg/Hold(21) Level 20: Drain Psyche -- PreOptmz-Acc/Rech(A), PreOptmz-EndMod/End(21), PreOptmz-EndMod/Rech(23), PreOptmz-EndMod/Acc/Rech(27), PreOptmz-EndMod/Acc/End(45), PreOptmz-EndMod/End/Rech(45) Level 22: Boxing -- Empty(A) Level 24: Tough -- StdPrt-ResDam/Def+(A), GldArm-3defTpProc(25), UnbGrd-Max HP%(27) Level 26: Wormhole -- SprAscoft-Conf/Hold/Immob/Sleep/Stun/Fear/Rchg(A), SprAscoft-Acc/Conf/Hold/Immob/Sleep/Stun/Fear(34), SprAscoft-Acc/Conf/Hold/Immob/Sleep/Stun/Fear/EndRdx(36), SprAscoft-Acc/Conf/Hold/Immob/Sleep/Stun/Fear/EndRdx/Rchg(37), SprAscoft-EndRdx/Rchg(37), SprAscoft-Rchg/+Dmg%(37) Level 28: Crushing Field -- Artl-Acc/Dam(A), Artl-Dam/End(29), Artl-Dam/Rech(29), Artl-Acc/Dam/Rech(33), Artl-Acc/Rech/Rng(33), Artl-End/Rech/Rng(33) Level 30: Weave -- LucoftheG-Def/Rchg+(A), ShlWal-Def/EndRdx(31), ShlWal-Def(31), ShlWal-ResDam/Re TP(34) Level 32: Singularity -- ExpRnf-Acc/Rchg(A), ExpRnf-EndRdx/Dmg/Rchg(34), ExpRnf-Acc/Dmg/Rchg(43), ExpRnf-Dmg/EndRdx(43), ExpRnf-Acc/Dmg(43), ExpRnf-+Res(Pets)(50) Level 35: Sleet -- Artl-Acc/Dam(A), Artl-Dam/End(36), Artl-Dam/Rech(36), Artl-End/Rech/Rng(39), Artl-Acc/Dam/Rech(40), Artl-Acc/Rech/Rng(45) Level 38: Psychic Shockwave -- SprAvl-Acc/Dmg(A), SprAvl-Dmg/EndRdx(39), SprAvl-Acc/Dmg/EndRdx(39), SprAvl-Acc/Dmg/EndRdx/Rchg(40), SprAvl-Rchg/KDProc(40) Level 41: Frozen Armor -- LucoftheG-Def/Rchg+(A), Rct-Def(42), Rct-Def/EndRdx(42), Rct-ResDam%(42) Level 44: Ice Storm -- Rgn-Dmg(A), Rgn-Acc/Dmg/Rchg(46), Rgn-Acc/Rchg(46), Rgn-Knock%(46), Rgn-Dmg/EndRdx(48) Level 47: Psionic Lance -- StnoftheM-Acc/Dmg(A), StnoftheM-Dmg/EndRdx(48), StnoftheM-Acc/ActRdx/Rng(48), StnoftheM-Dmg/EndRdx/Rchg(50), StnoftheM-Dam%(50) Level 49: Afterburner -- LucoftheG-Def/Rchg+(A) Level 1: Brawl -- Empty(A) Level 1: Domination Level 1: Quick Form Level 1: Prestige Power Dash -- Empty(A) Level 1: Prestige Power Slide -- Empty(A) Level 1: Prestige Power Quick -- Empty(A) Level 1: Prestige Power Rush -- Empty(A) Level 1: Prestige Power Surge -- Empty(A) Level 1: Sprint -- Empty(A) Level 2: Rest -- Empty(A) Level 4: Ninja Run Level 2: Swift -- Flight-I(A) Level 2: Health -- Pnc-Heal/+End(A) Level 2: Hurdle -- Jump-I(A) Level 2: Stamina -- EndMod-I(A) Level 0: Born In Battle Level 0: High Pain Threshold Level 0: Invader Level 0: Marshal Level 50: Musculature Radial Paragon ------------ I prefer sleet and ice storm to fireball and melt armor, and I prefer TK to probe for damage type and as another FF proc holder. Crushing Field prevents KB for a few seconds so I didn't bother putting the conversion proc in. -
Well like I mentioned in my TW/EA thread it'll get a lot better once you get energy drain and that's only 3 levels away. IOs REALLY help, when I leveled mine I was slotting attuned IOs as I went so by level 32 my defenses were fairly solid which meant I didn't need tough/weave, my recharge was also decent thanks to the lotgs and the FF procs, it was enough to get me near perma energize which makes a big difference. In the meantime, how's your end management when energize is up? If it's tolerable during energize uptime consider investing in a few FF procs in all the AoEs that do KD. Yes you'll attack faster but energize will also recharge faster. You can slot crushing impacts into your ST attacks for more global recharge and better end redux, those are not uber expensive. I'm fairly certain the prestige IOs stop working after level 21 but I've been wrong about stuff before.
-
Knowledge ain't' free! I need about tree fiddy.
-
It's a periodic heal. I wouldn't invest too much in it but people see heal on blasters and immediately think "A HEAL I NEED TO SLOT THIS TO ED CAP!" Like all blaster sustains, slotting these power for Heal will not save you when things go south and if you have softcapped defenses an extra 7-9HP per second which tends to be the difference between base slotting and ED cap isn't going to make a huge difference. Some people say but it's some semi respectable % increase in healing/total regen effectiveness!!! Well X% of next to nothing is still next to nothing. I'd just toss a perf shifter proc in it and slot it for end mod if the build has end issues, or 3 piece eradication for some ranged defense. I'd rather slot the heal uniques in health if my builds have room for them.
-
I'm a saaad panda when my doggos die so I built my panda to take the alpha so my doggos can not die. Since y'all are begging for a build... Villain Plan by Mids' Reborn : Hero Designer 2.7.2.10 https://github.com/Crytilis/mids-reborn-hero-designer Click this DataLink to open the build! Alpha Panda: Level 50 Natural Mastermind Primary Power Set: Beast Mastery Secondary Power Set: Kinetics Power Pool: Leaping Power Pool: Concealment Power Pool: Leadership Power Pool: Fighting Ancillary Pool: Mace Mastery Villain Profile: Level 1: Summon Wolves -- SprMarofS-Dmg(A), SprMarofS-Acc/EndRdx(3), AchHee-ResDeb%(3), SlbAll-Acc/Dmg/Rchg(5), SvrRgh-PetResDam(5), CaltoArm-+Def(Pets)(7) Level 1: Transfusion -- TchoftheN-Acc/Heal(A), Prv-Heal(7), TchoftheN-Heal/HP/Regen/Rchg(21), TchoftheN-Acc/EndRdx/Rchg(40), Prv-Heal/Rchg(40) Level 2: Call Hawk -- Thn-Acc/Dmg(A), Thn-Dmg/EndRdx(9), Thn-Dmg/Rchg(9), Thn-Acc/Dmg/Rchg(11), Thn-Acc/Dmg/EndRdx(11), Thn-Dmg/EndRdx/Rchg(19) Level 4: Super Jump -- BlsoftheZ-Travel/EndRdx(A), BlsoftheZ-ResKB(45) Level 6: Train Beasts -- EndRdx-I(A) Level 8: Combat Jumping -- LucoftheG-Def/Rchg+(A), Ksm-ToHit+(33) Level 10: Siphon Speed -- PcnoftheT-Acc/Slow(A), PcnoftheT-Dmg/Slow(19), PcnoftheT-Acc/EndRdx(21), PcnoftheT-Rng/Slow(25), PcnoftheT-EndRdx/Rchg/Slow(25), PcnoftheT--Rchg%(45) Level 12: Summon Lions -- SprMarofS-EndRdx/+Resist/+Regen(A), SprMarofS-Acc/Dmg(13), LucoftheG-Def/Rchg+(13), ExpRnf-+Res(Pets)(15), ExpRnf-Acc/Dmg/Rchg(15), SprCmmoft-Acc/Dmg(17) Level 14: Stealth -- LucoftheG-Def/Rchg+(A), LucoftheG-Def/EndRdx(17), LucoftheG-Def/EndRdx/Rchg(46), LucoftheG-Def(50) Level 16: Increase Density -- StdPrt-ResDam/Def+(A) Level 18: Maneuvers -- RedFrt-Def/EndRdx(A), RedFrt-Def/Rchg(33), RedFrt-EndRdx/Rchg(37), RedFrt-Def/EndRdx/Rchg(39), RedFrt-Def(40), RedFrt-EndRdx(43) Level 20: Speed Boost -- WntGif-ResSlow(A) Level 22: Tactics -- RctRtc-ToHit(A), RctRtc-Pcptn(23), HO:Cyto(23) Level 24: Boxing -- Empty(A) Level 26: Summon Dire Wolf -- SprMarofS-Acc/Dmg/EndRdx(A), SprMarofS-Dmg/EndRdx(27), SprCmmoft-Rchg/PetAoEDef(27), EdcoftheM-PetDef(29), SprCmmoft-Acc/Dmg/Rchg(29), AchHee-ResDeb%(33) Level 28: Tough -- GldArm-3defTpProc(A), UnbGrd-Max HP%(39) Level 30: Weave -- LucoftheG-Def/Rchg+(A), Rct-Def(31), Rct-Def/EndRdx(31), Rct-ResDam%(31) Level 32: Tame Beasts -- EndRdx-I(A) Level 35: Transference -- PreOptmz-Acc/Rech(A), PreOptmz-EndMod/End(36), PreOptmz-EndMod/Rech(36), PreOptmz-EndMod/Acc/End(36), PreOptmz-EndMod/Acc/Rech(43), PreOptmz-EndMod/End/Rech(43) Level 38: Fulcrum Shift -- Acc-I(A), Acc-I(39), RechRdx-I(46) Level 41: Scorpion Shield -- LucoftheG-Def/Rchg+(A), ShlWal-Def/EndRdx(42), ShlWal-Def(42), ShlWal-ResDam/Re TP(42) Level 44: Fortify Pack -- LucoftheG-Def/Rchg(A), RedFrt-Def/Rchg(45), Rct-Def/Rchg(46) Level 47: Call Ravens -- Artl-Acc/Dam(A), Artl-Dam/End(48), Artl-Dam/Rech(48), Artl-Acc/Dam/Rech(48), Artl-Acc/Rech/Rng(50), Artl-End/Rech/Rng(50) Level 49: Siphon Power -- Acc-I(A) Level 1: Alpha Howler Wolf Level 1: Howler Wolf Level 1: Pack Mentality Level 1: Brawl -- Empty(A) Level 1: Prestige Power Dash -- Empty(A) Level 1: Prestige Power Slide -- Empty(A) Level 1: Prestige Power Quick -- Empty(A) Level 1: Prestige Power Rush -- Empty(A) Level 1: Prestige Power Surge -- Empty(A) Level 1: Sprint -- UnbLea-Stlth(A) Level 1: Supremacy Level 2: Rest -- Empty(A) Level 4: Ninja Run Level 2: Swift -- Empty(A) Level 2: Health -- Pnc-Heal/+End(A) Level 2: Hurdle -- Empty(A) Level 2: Stamina -- PreOptmz-Acc/Rech(A), PreOptmz-EndMod/End(34), PreOptmz-EndMod/Rech(34), PreOptmz-EndMod/Acc/End(34), PreOptmz-EndMod/Acc/Rech(37), PreOptmz-EndMod/End/Rech(37) Level 12: Lioness Level 26: Dire Wolf Level 0: Born In Battle Level 0: High Pain Threshold Level 0: Invader Level 0: Marshal Level 50: Barrier Core Epiphany Level 50: Melee Core Embodiment Level 50: Agility Core Paragon ------------ The pets are not enhanced for damage to ED cap but FS and siphon power can remedy that so it was not as big an eyesore for me when I look at the numbers. Jury is still out on the need for perma fortify as I haven't gotten it yet. If I an trying to solo +4/8 then yeah I can see wanting to go that path but I made a /kin to team and I haven't had any major issues with pet survival. If one or two doggos die to a hard hit I'm a sad panda for a second and then I just re-summon them mid combat. Team buffs and aggro redirect usually means no additional doggos die. I'm level 40 right now but I do have my IO slotted and last night I found myself soloing a few even con x8 spawns on a citadel with no issue. I generally don't set pet AI to aggressive, I find that is a good way for pets to aggro half the map. I focus fire and direct all my pets to 1 target at a time through call hawk, and I bind increase density to petcomall follow defensive. I do have my sprint bound to petcomall follow aggressive. But one thing I noticed is that when I change pet ai behavior to aggressive it takes about 10 seconds for the pets to actually change behavior and auto attack nearby targets, not sure if this is WAI or a bug.
-
All this adult stuff bore me. You know what grinds my gears? People that LFM and say they have cookies. They never have any cookies...
-
Because sometimes you will run into situations where you may need to stealth past mobs and stealth plus a stealth IO in sprint will give you full invisibility to most mobs. When you reach that point where you might start doing speed Apex/Tin or other speed TF runs invisibility is a quality of life improvement that's very nice to have. Besides it provides additional defense and is another luck of the gambler recharge mule.
-
What's your budget? People tend to shoot for the stars and give mega expensive dream builds on the forums. If you are starting out and don't play the market you might not have the funds for those types of builds. So here is something that's more budget conscious (still not super cheap but order of magnitudes cheaper than the ATO/purple/winter set builds that people typically post). This build still focuses on recharge, and splashes in some ranged defense where it can. Stealth + the stealth IO in sprint makes you invisible to most enemies and can be helpful if you ever solo. There are a few IOs that are around the 5-7million inf mark but the rest are all below 3 million. Of course if you like the character you can continue to invest and improve the build from there. Hero Plan by Mids' Reborn : Hero Designer 2.7.2.10 https://github.com/Crytilis/mids-reborn-hero-designer Click this DataLink to open the build! Level 50 Magic Defender Primary Power Set: Empathy Secondary Power Set: Water Blast Power Pool: Flight Power Pool: Concealment Power Pool: Speed Power Pool: Leadership Ancillary Pool: Psychic Mastery Hero Profile: Level 1: Healing Aura -- DctWnd-Heal/EndRdx(A), DctWnd-Heal/Rchg(3), DctWnd-Heal/EndRdx/Rchg(3), DctWnd-Heal(5), DctWnd-Rchg(5) Level 1: Aqua Bolt -- Dcm-Acc/Dmg(A), Dcm-Dmg/EndRdx(40), Dcm-Dmg/Rchg(43), Dcm-Acc/EndRdx/Rchg(43), Dcm-Acc/Dmg/Rchg(43) Level 2: Heal Other -- DctWnd-Heal/EndRdx(A), DctWnd-Heal/Rchg(7), DctWnd-Heal/EndRdx/Rchg(7), DctWnd-Heal(9), DctWnd-Rchg(9) Level 4: Water Burst -- FrcFdb-Rechg%(A), PstBls-Acc/Dmg(11), PstBls-Dmg/EndRdx(11), PstBls-Dmg/Rng(13), PstBls-Acc/Dmg/EndRdx(17), PstBls-Dam%(19) Level 6: Fly -- BlsoftheZ-Travel/EndRdx(A), BlsoftheZ-ResKB(19) Level 8: Clear Mind -- Range-I(A) Level 10: Hover -- LucoftheG-Def/Rchg+(A), BlsoftheZ-Travel(21), BlsoftheZ-Travel/EndRdx(21), Ksm-ToHit+(34) Level 12: Fortitude -- LucoftheG-Def/Rchg+(A), LucoftheG-Def/Rchg(13), LucoftheG-Def/EndRdx/Rchg(48), AdjTrg-ToHit/Rchg(48) Level 14: Stealth -- LucoftheG-Def/Rchg+(A), Rct-Def(15), Rct-Def/EndRdx(15), Rct-ResDam%(17) Level 16: Hasten -- RechRdx-I(A), RechRdx-I(25) Level 18: Recovery Aura -- RechRdx-I(A), RechRdx-I(34) Level 20: Dehydrate -- ThfofEss-+End%(A), Thn-Acc/Dmg(46), Thn-Acc/Dmg/EndRdx(46), Thn-Dmg/EndRdx(50), ThfofEss-Acc/EndRdx/Heal(50) Level 22: Maneuvers -- LucoftheG-Def/Rchg+(A), RedFrt-Def/EndRdx(23), RedFrt-Def(23) Level 24: Whirlpool -- Bmbdmt-Dam(A), Bmbdmt-Dam/Rech(25), Bmbdmt-Acc/Dam/Rech(27), Bmbdmt-Acc/Dam/Rech/End(27), Bmbdmt-+FireDmg(29) Level 26: Regeneration Aura -- DctWnd-Heal(A), DctWnd-EndRdx/Rchg(29), DctWnd-Heal/Rchg(31), DctWnd-Heal/EndRdx/Rchg(31), DctWnd-Rchg(31) Level 28: Water Jet -- Dcm-Acc/Dmg(A), Dcm-Dmg/EndRdx(36), Dcm-Acc/EndRdx/Rchg(37), Dcm-Acc/Dmg/Rchg(37), Dcm-Build%(37) Level 30: Resurrect -- RechRdx-I(A) Level 32: Adrenalin Boost -- DctWnd-EndRdx/Rchg(A), DctWnd-Heal/Rchg(33), DctWnd-Heal/EndRdx/Rchg(33), DctWnd-Heal(33), DctWnd-Rchg(34) Level 35: Dominate -- BslGaz-Acc/Hold(A), BslGaz-Acc/Rchg(36), BslGaz-EndRdx/Rchg/Hold(36), BslGaz-Acc/EndRdx/Rchg/Hold(48) Level 38: Geyser -- FrcFdb-Rechg%(A), PstBls-Acc/Dmg(39), PstBls-Dmg/EndRdx(39), PstBls-Dmg/Rchg(39), PstBls-Acc/Dmg/EndRdx(40), PstBls-Dam%(40) Level 41: Mind Over Body -- StdPrt-ResDam/Def+(A), TtnCtn-ResDam/EndRdx(42), TtnCtn-ResDam(42), TtnCtn-ResDam/EndRdx/Rchg(42) Level 44: Steam Spray -- PstBls-Acc/Dmg(A), PstBls-Dmg/EndRdx(45), PstBls-Dmg/Rng(45), PstBls-Acc/Dmg/EndRdx(45), PstBls-Dam%(46) Level 47: Mass Hypnosis -- Acc-I(A) Level 49: Tidal Forces -- GssSynFr--Build%(A) Level 1: Brawl -- Empty(A) Level 1: Quick Form Level 1: Prestige Power Dash -- Empty(A) Level 1: Prestige Power Slide -- Empty(A) Level 1: Prestige Power Quick -- Empty(A) Level 1: Prestige Power Rush -- Empty(A) Level 1: Prestige Power Surge -- Empty(A) Level 1: Sprint -- Clr-Stlth(A) Level 1: Vigilance Level 2: Rest -- Empty(A) Level 4: Ninja Run Level 2: Swift -- Empty(A) Level 2: Health -- Mrc-Rcvry+(A) Level 2: Hurdle -- Empty(A) Level 2: Stamina -- PrfShf-End%(A), PrfShf-EndMod(50) Level 1: Combo Level 1 Level 1: Combo Level 2 Level 1: Combo Level 3 ------------ Builds and roleplaying aside I'd encourage aspiring emps to pay special attention to clear mind. Fortitude might be your best general buff but clear mind is the most important buff for those without mez protection especially pre-incarnate levels. If you've ever been mezzed yourself in combat you know what that feels like, now imagine how the blasters/other defenders etc feel. You can make a difference. In general don't clear mind the tank or the melee ATs unless you are fighting stuff that confuse or blind, but DO clear mind the squishies and kudos to you if you do it proactively. I recommend using it on the ones that lack mez protection towards the end of a fight so that they can engage the next fight without worrying about getting mezzed and you also get to shoot stuff when everyone else engages. Understand what your powers do and use them accordingly. Do this one thing and you are already better than 90% of the emps out there.
-
Your examples are the other extreme that I'm discounting in my comment about common courtesy. Of course we are not going to wait for the dude that decides to go level and go to his base and IO himself for 10 minutes, and if a player chose not to get a travel power and decide to sprint to every mission, sucks to be that player. However, 30 seconds is not all that long of a wait and that's usually the time frame gap for most people with slower travel powers to reach the mission. The scenario I'm talking about are the ones where people that can't even accord their teammates that little bit of time to zone in before they go full lol melee.