-
Posts
461 -
Joined
-
Last visited
Content Type
Profiles
Forums
Events
Store
Articles
Patch Notes
Everything posted by Camel
-
I'm obviously biased because I was touting Energy Melee long before the buffs came. That being said. I've learned to embrace the slower animating Energy Transfer. Fun little fact, it actually has a better proc rate when you aren't in Energy Focus mode. ET is always my opener, followed by TF then followed by the quick ET. After that I'll either use Dominate or throw down a Burn.. Or both! At that point my ET, TF, ET combo is back and by the time I finish that again, Burn and Dominate are ready to go once more. I've actually opted to not even have Energy Punch on my attack bar at all other than the occasional lower-level TFs.
-
Everything Teklord said. I'm going to further reitierate that you should never slot Brawl or Kick to get set bonuses. Try to exclusively slot powers you actually use. Everything in your build should have its place and be useful. If you look at the build I shared, the only power that has zero use is Brawl and I slotted it accordingly. Something like this would get you a lot of mileage. You could slot the D-Sync Acc/Rech... but I mean... 3 of them will run you 600-750 MILLION lol. You could fund almost an entirely new build with that. I never use them unless I naturally get one. Anyways. This build uses the Fire Epic for max DPS. It feels really good with the Psi damage and you'll be grateful to have 2 attacks that don't do almost exclusively Psi damage. Greater Fire Sword is AWESOME. It's your hardest hitting attack before procs and does that much more with them. Corruptor (Psychic Blast - Kinetics).mbd
-
I know it has the best debuff in the set in regard to -to-hit, but it also takes 2 seconds to activate, doesn't do damage, etc. This is why I mentioned that outside of soloing its usefulness starts to wane. It might offer good debuff and hit many enemies in the process... but what good is it doing if every teammate is soft-cap before your debuffs? The 2 seconds activation time is killer. Tar Patch and Darkest Night alone take almost 6.5 seconds, Fearsome takes 2, Spirit Drain takes 2.3 and Blackstar takes 3. That's almost 12 seconds of set-up time before you even decide to do any damage. In today's meta that is an eternity and its mitigation will very frequently go completely unnoticed or have zero impact on the battlefield. Sometimes you don't even need to bother using Darkest Night, if your team is already invincible, it's not mitigating anything and just wasting time. That's just how I've always played though, so Fearsome Stare for my playstyle isn't very useful. A procced Torrent with Force Feedback and the -res proc seems miles away more useful to me. You might be missing out on 10% debuff but you're gaining -12.5% resistance and 5 seconds of +100% recharge. I would be singing a different tune if solo was what was in mind here because the mitigation would be HUGE.
-
Something like this would be pretty fun to play with. It's built with teaming and support in mind, so it doesn't have Dark Pit + OG to stun mobs. It would be handy, no doubt and a bit fun to mess around with... but most of the net positives would be few and far between outside of soloing or teams that are struggling a bit. I also suggest not taking the fear cone as well, because even with procs, you have so many better options for damage/to-hit debuff and the mitigation is next to zero unless soloing. Shadowfall + Tar Patch + Darkest Night is the 'meat and potatoes', so to speak. Buff teammates with +def/res from toggles, debuff enemies and win. Throw in the occasional heal and Howling Twilight for hard targets or.... cuz why not? Nearly max HP, Hasten is recharging at 124 seconds before any procs or recharge increasing Incarnates so you can cycle powers relatively quick, defenses aren't soft-cap, but after applying Darkest Night and a few of your blasts, you'll be at or near soft-cap. Torrent +Tenebrous Tentacles doesn't seem like much at first glance, but 2.7 seconds of activation time between the two of them and Torrent being the longest recharging at less than 6 seconds, it's actually a pretty solid AoE chain. Throw in the occasional Spirit Drain and Black Star with the -res procs which both have a 90% chance to apply (Torrent has a 1 in 3 chance to apply) and you're dishing out some good debuffs to pair nicely with Tar Patch. There are tons of ways to save slots here too or move some things around. The Leaping pool could be dropped for the Flight pool and you could shuffle some things around. Drop Vengeance and take Fly. You'd miss out on the team utility and LoTG but you'd have the option to fly now. Corruptor (Dark Blast - Dark Miasma).mbd
-
DPS spec involving more procs and Psionic Epic. Tanker (Fiery Aura - Energy Melee)DPS.mbd
-
CRUNCH guy here! I still would whole heartedly recommend giving Fire/EM a try! Fire plays unlike a lot of other sets in that it offers a relatively complete PBAoE package in the form of Blazing Aura, Burn and Fiery Embrace! Even if that was your only means of AoE damage this still wouldn't feel bad. But with Whirling Hands + Burn + Blazing Aura + all the extra fire damage procs from Fiery Embrace, your Interface choice... It really adds up. You can bolster this even further with an AoE attack from one of the Epics or Patrons. Even before FA got buffed, I thoroughly enjoyed my Fire/EM, it's still hands down the most single target burst I've ever done on a Tank. Period. If you get a team with a Kinetics user and one or two heavy debuffers you can literally expect to see 1.5k-2k damage off of Energy Transfer while fully buffed in terms of damage and Fiery Embrace. I've had the fire damage proc from FE alone be hundreds of damage, more than some Tanker attacks in general. The buffs to Consume and Temperature Protection are the cherry on top. I didn't even think it needed it but the buff is more than welcome and is absolutely noticeable in terms of survivability. Attached is my updated, in-game version of what I'm currently using. I do have a pure DPS spec in Mids too that uses the new Psionic Epic for more ST burst with Dominate and a general increase across the board in DPS with a Force Feedback charged Psionic Tornado for even more AoE and utility. I haven't tested the DPS spec but I'm leaning towards making that my general build because survivability hasn't been an issue at all. Tanker - Fiery Aura - Energy Melee.mbd
-
I still need to update this. I haven't done a revised version for my FIre/Energy Tank and I'm starting to feel like maybe this is in the works. Do we need more cRuNcH?
-
Fire/Marine/Fire is the ultimate "Blastery" Corrupter. You have your typical Fire Blast shenanigans in the primary, a Blapper style (super cool looking), aggressive targeted teleport that can slot both the - resistance proc and the Force Feedback proc? Love it. Add in a fully procced Char and GFS from the Fire Epic and oooooowie. One of my favorite combos is to blast from range and then teleport in with Whitecap and then follow up with GFS. Corruptor (Fire Blast - Marine Affinity).mbd
-
I have a Fire/Marine/Fire Corrupter and I love it! Some Marine tips: WHITECAP! It's incredible. You can trim it light and just use a +5 Acc IO, the FoG -resistance proc and the Force Feedback +Recharge proc. You can add 3 damage procs as well and it does respectable damage. It really amps up everything the build has to offer when slotted this way. More DPS and more survivability with your long cooldowns coming back online. It's one of my favorite powers ever, it has so much utility. You can even target friendly targets to teleport to them! Just don't try to use it on the control panel in the ITF though! Shifting Tides is pretty good too! I run Ageless and Recovery Serum on all my builds so I don't worry about end drain that much, so I typically slot this with a +5 To-Hit IO or a +5 Damage IO and have been seeing a lot of success. Insta cast it on the most aggressive tank and stay near them to forget about it. You can also keep the toggle on when going through doors, elevators, etc if you time it right and go at the same time with your anchor lol. It gives really nice bonuses across the board and can get you a MEATY amount of +Damage when paired with Tide Pool. You can get massive +Absorb with Barrier Reef if you keep spawning a new one, it overlaps for some time and even on my Corrupter I was able to get to 800 absorb on top of maxed health. So, I technically had 2400 health on my Corrupter. This works on everything, but it's sort of a pain to keep re-spawning it for the advantage it brings. But you can do it! I I try to max out defense values first but don't skip on the absorb values either. Toroidal Bubble and Power of the Depths both offer endurance management, but I've always considered that secondary to the +Res and +HP/Regen. If you have the spare slots, feel free to slot some endurance in there. I mentioned earlier I run Ageless to max DPS in proccy builds, so I wouldn't slot endurance even if I had the spare slots. I skip Brine on all of my Corrupter builds and a fair amount of my Defender builds too. But it has more uses for a Defender and is a pretty good opener on hard targets. Shoal Rush is also skippable and is probably the least useful tool in the set while being pretty handy at times. Auroxis nailed it on the head with Dark Blast AoE. It would still work, but it wouldn't be as seamless as throwing out a PBAoE attack like Fireball after using Whitecap. Tenebrous Tentacles, procced Torrent and the Whitecap slotting I mentioned earlier would rotate really quickly with a full proc build and feel really nice with effort. I would also recommend the Dark Epic as well as the Fire Epic, giving the slight edge to Dark because having Spirit Drain and access to +To-Hit is going to be huge for you since you don't have an Aim style power. I would look into the Leadership pool and grabbing Tactics for that reason alone as well, you can also slot the build up proc in there and the chance goes up the more people who are also running Tactics while teaming. You'll want to be chasing a lot of +To-Hit to make sure you don't encounter too many moments where you wish you had an aim style power.
-
Thanks for sharing this! I had no idea Trip Mine reacted with the FF proc this way, figured it would proc on detonation... but I forgot it follows pseudo-pet rules! My Storm Summoning characters are some of my favorites because of the massive uptime of the FF proc via Lightning Storm and Tornado.
-
@GM Impervium, sorry for tagging you, it's the first time I've ever done something like this. So, I've since taken my Storm/Storm/Dark Corrupter to level 50 and beyond. I earned all 4 passive accolades, (I went the Task Force Commander route) have a fair amount of incarnates (the only T4 I have is Destiny Ageless, which is mandatory on all of my /Storm and Storm/ characters, the rest are T3) and have done everything from standard ITFs, +4 ITFs, MLTFs, +4 MLTFs and more. In certain scenarios, Storm Blast is actually pretty good. But after playtesting an actual character that I have min/maxed, I can honestly say there is a fair amount left to be desired. One change I can think of is having at the bare minimum, Storm Cell being a PBAoE similar to Hurricane, but with an increased radius. Having two powers that are location-based and absolutely integral to the set is a bit much and is very tiresome to micro-manage. Making Storm Cell a 20'-30' radius PBAoE toggle that costs endurance to have up would be a game changer and something I think the community could agree on. Jet Stream would suffer slightly if left as is, but I believe the community as a whole would appreciate the change. There might be better ways.. Maybe making Storm Cell an auto power and giving all of your powers a chance to proc Storm Cell as-is? All I know is that having to always maintain Storm Cell is incredibly arduous once you get your T9 and try to navigate around all of your other powers. Storm Blast actually caters to my playstyle as an exclusive click-only-player... and I can confidently say that having two location-based AoE powers which are essential to the set is too much. Despite my enjoyable experience with Storm Blast, it just feels like it’s lacking in some regards. Forget being /Storm or Storm/ (primary vs. secondary.) C5 and Storm Cell being exclusive location-based AoE powers is so much to micro-manage and even in perfect scenarios, it's a lot. Storm Blast definitely isn't "awful"... but there is a lot that can be improved and I really think keeping the proc mechanics with Storm Cell and C5 the same, but at least changing Storm Cell to a very large radius PBAoE toggle( or something else) that costs endurance would be a great fix. I'm a very good player, (not trying to toot my own horn at all, but I've had a few PUGs with random, great players on some of the most popular TFs and have come within a few minutes or less to the speed record) especially as someone who is a "click" only player (which I feel like caters to non-macro players... macros are sort of redundant when it comes to rain-style powers for good click players, there isn't a single power in this game that activates faster than I can position one of my rain powers)... and even with that advantage of being able to position Storm Cell, Freezing Rain, Tornado (as a Storm Summoning player) and C5... it's just too much. Storm Blast feels like it could use one more a look at. I really think you could leave the entire set as-is but change Storm Cell to a VERY wide toggle that costs endurance and you'd see a large improvement of community acceptance and performance... even if it didn't make the set "perform" better... the fact that you eliminated one more power that you need to actively click, and position would be huge. I've been a huge advocate for Storm Blast and I'm starting to see its shortcomings, it simply has too much setup and will mostly neuter any primary (Defender) and secondary (Blaster/Corrupter) and leave you feeling like you HAVE to use your primary/secondary only. It's akin to having 8 ST attacks and always having 3-4 of them up at all times. While it does mesh well with a fair amount of secondaries/primaries, the fact that you have to prioritize Storm Cell at all times makes the set very clunky. Another potential option/options is making the T9 similar to Fiery Embrace and making it guaranteed damage when you use your blasts? I’ve been viewing Storm Cell and C5 as “extra proc damage”, very similar to Fiery Embrace, but in a rain-power type format. Definitely just spit-balling here but I think the community as a whole agrees that juggling Storm Cell and C5 is too much to micro-manage. Maybe also allowing powers outside of the Storm Blast set having a substantially reduced chance to proc Storm Cell and C5 could work too… it’s just so hard to use powers outside of Storm Blast while using Storm Cell and C5. As it stands, it almost feels like a copy and paste of Ice Blast, where Storm Cell is Ice Storm and C5 is Blizzard. The only difference being that you can skip Ice Storm in a lot of Ice Blast builds, except for maybe outside of Corrupters because of the interaction Ice Storm has with Scourge. The thing with Ice Blast though is that Freeze Ray, Bitter Ice Blast and Bitter Freeze Ray all have better DPA with no gimmick. And that just feels a bit off. Anyways, just felt like throwing this out there. Cheers!
-
Storm Cell is perfect for half of the Scourging Blast (iirc) set. I slotted mine with the Acc/Dam, Acc/Dam/Rech and Acc/Dam/Rech/End. This gives you plenty of Acc/Dam/Rech values. And yes, slotting for Acc/Dam increase both those attributes when the power procs.
-
I think Storm Blast really shines on Corrupters. All the procs from Storm Cell and C5 can Scourge, as well as the DoT damage portion from C5. I’ve seen my DoTs go as high as 15 when C5 gets rolling. I’ve also seen the damage procs go as high as 125 when lighting within C5 procs. Both of which can double in damage on a low health enemy.
-
My Storm/Storm Corrupter is level 50 and I've taken it through all of the Task Force Commander TFs, several +4 kill most ITFs and a handful of fire farms ... and I can say that neither Category 5 nor Jet Stream sucks. Are they a bit wonky? Sure. Sometimes I find myself not casting Category 5 because it would essentially be wasted... But oftentimes it floors the mobs my team and I are working on. It definitely shines on fire farms and +4, end game content and is a bit lackluster on +0 content for the reasons you stated. But even then, I did a Manticore TF where I would stealth to the end of the "defeat security chief and his men" missions and I could wipe the floor with them simply by casting Category 5 and popping off a few blasts. Category 5 is actually one of the highest damaging nukes in the game, it's just very situational at times. Jet Stream? It's a perfectly fine power and even if only a few of the mobs are outside of your Storm Cell, that's certainly not a bad trade off and with a properly slotted Storm Cell you can reposition it almost every mob anyways. I'm not saying Storm Blast 100% doesn't need any tweaks, the thing about Storm Blast is that it requires a fair amount of positional play and skill to be optimal... but like I said, I've taken my Storm/Storm Corrupter from Posi 1 to Numina and beyond and have decimated mobs every step of the way. Your points aren't invalid. I struggle to find opportunities to use C5 on +0 content with a full team, but I can assure you that it shines in a variety of situations. C5 decimates the towers at the end of the ITF, it decimates mobs in fire farms and it decimates mobs while soloing. It just takes some time to get used to and properly utilize.
-
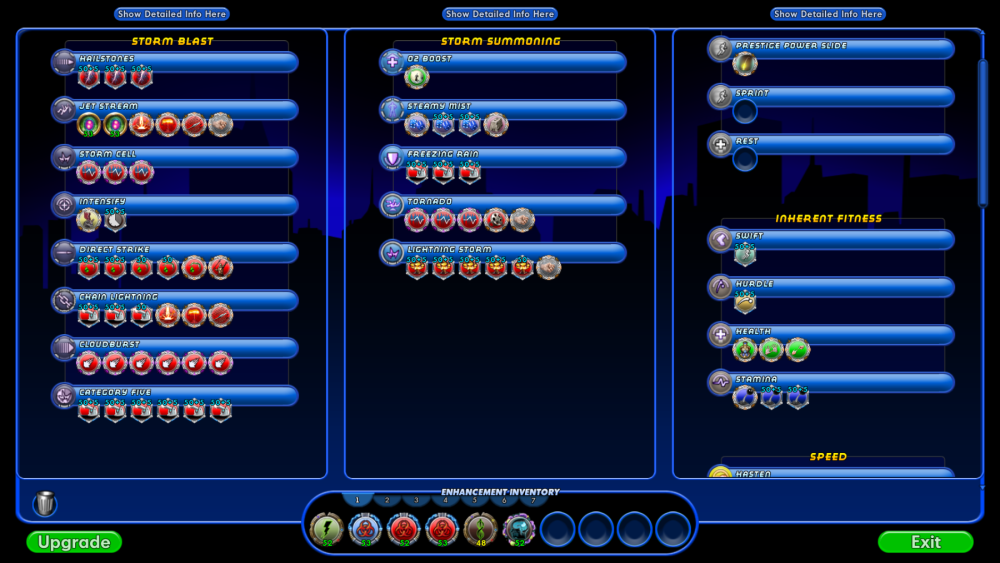
I went Storm/Storm/Dark and will probably stick with it. I can't share an actual build from Mid's but I have some screenshots. This was my first attempt at making a Storm/Storm/Dark. so there might be room for improvement. But as it stands, this build has perma everything, 45ish% to Ranged/Energy/Neg, pretty close to Corrupter HP cap, etc. It takes a bit to get all the goodies rolling, but once you do, the passive damage is pretty insane when your primary and secondary storm powers do their thing.
-
I made an AR/Storm/Dark Corruptor on build 1 beta (when Beanbag was replaced with Aim) it was able to solo a +0x8 ITF in a touch over an hour. Fun and unusual combo. AR/Nature/Dark would work well too. I have a DP/Nature/Dark and it worked rather well.
-
Did a quick little play test with a Storm/Storm/Dark Corrupter tonight. I could definitely tell my Storm Cell and Category 5 were proccing extra damage, but it wasn't until I added a new combat window for pet damage only that I started to get a feel for the set. Essentially, Storm Cell and Category 5 (for all intents and purposes) summon a one-time Lightning Storm like the original Storm Summoning set. These can proc off of any Storm Blast attack and can also Scourge on a Corruptor. Sometimes it hits one target, sometimes more. The max I've seen is four but that was while play testing the Vangaurd dummies in RWZ. I attached a picture of the damage it was dishing out on some mobs in PI. Not sure what the "Split" and "Spread" tags mean in regard to the extra damage procced from Storm Cell, I also noticed a "Focused" proc, too. Upon further investigation, it seems that it's a proc tier system? "Spread" typically had the lowest damage/end drain values, "Split" slightly better and "Focused" had the highest values. 5.93 end drain on Vanguard dummies for Spread, 11.87 for Split and 23.75 for Focused. All in all, it seems pretty good for a first attempt. I basically copied and pasted my personal Storm build with a few minor adjustments... perma hasten, soft-capped defense to Energy/Ranged, etc. It performed rather well and the potential for insane damage is definitely there. I had enough recharge to keep Storm Cell and C5 up rather often and under both of those conditions and with very little play time, things melted. I didn't try to micro manage the repel in Jet Stream (I went 2 Acc/Dam Hami-Os, 3 damage procs and a Force Feedback proc) and it wasn't really bothering me. I did the first few Maria Jenkins AV arc missions at +4x8 and was chewing through Devouring Earth at a decent pace for solo. My only gripe is that it is painfully slow to get things rolling if you also choose Storm Summoning as a primary/secondary. A typical mob engagement for me on my Storm/Storm/Dark was Storm Cell. Freezing Rain, Soul Drain, Intensify, C5, either Ball Lightning/Jet Stream, Lightning Storm and then Tornado. It is a LOT to put down and is somewhat maddening. I even forgot to put Burnout into the mix. But once it was all dropped it reminded me of my Thugs/Storm MM. My initial thoughts were good. The feedback about Storm Cell is the only change I'm all for. With my build, I was able to get the recharge down to around 25 seconds or so with the amount of recharge I'm able to pump out. Solo, this is more than enough, honestly, it's too much. But for teaming it would be a pain to have to lose out on the gimmick of the set every other mob. That being said, the proc damage wasn't anything to scoff at and would happen quite regularly if you were spamming your Storm Blast attacks. Feels pretty solid for a beta set right now, maybe some tweaks needed for QoL, but it's lookin' good so far!
-
They will affect you as well as allies.
-
They pretty much hit the nail on the head, so basically just repeating here... Infrigidate on a Corrupter is pretty meh. If you do have the room for it, it's only real niche is the -defense debuff and to put the Achille's -res proc in it since your Corrupter blast attacks are far superior than a procced Infrigidate. I will always skip Snow Storm, I take Frostwork if I can, being able to use it as a mule for any of the Heal/Resist unique IOs is nice. I have a Beam/Storm Corrupter and took Lancer Shot, but they are correct in that it can be awkward within your rotation. I personally would take it if I could. It helps round out your attack chain at lower levels and can be used in rotation effectively if you view Disintegrate as more of a "debuff" than an actual attack. The damage isn't front loaded like your other powers and oftentimes I find the DoT damage being wasted on some mobs. I like to hit hard targets with Disintegrate and then use Lancer Shot in my rotation afterwards, alongside the snipe and Piercing Beam.
-
They proc on summon regardless of if there are targets or not. 90% chance that it will proc, so if both decide to proc you end up with 10 seconds of +100% recharge, which is almost enough time for Tornado to recharge again.
-
Scourge works just fine on Psy for Corrupters. Storm/Psy on a Defender would be alright, but I feel like the damage would be pretty lackluster.
-
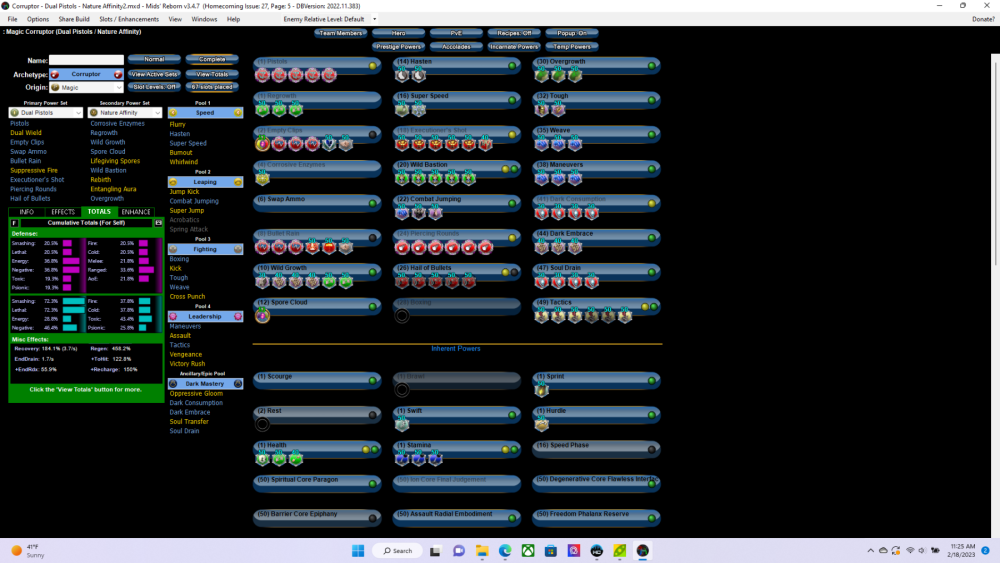
One of my most recent characters I took to T4 Incarnates and fully accoladed is a DP/Nature/Dark Corruptor! I haven't updated my Mids fully so I have to share a screenshot instead.. but this is what I roll with. Between set bonuses, Vigor Alpha, Soul Drain, Tactics and Overgrowth, the accuracy is great. It's sort of akin to having Rage on a Corrupter but without the crash. I'd love to have gotten my defenses a bit higher, but it's practically a non-issue. Even with a measly 36/33% to Energy/Ranged respectively, it still tanks quite well for a Corrupter. Throw Barrier into the mix and... well, you can tank literally everything almost all of the time. The build I posted has perma-everything with a handful of Force Feedback procs via Bullet Rain and Empty Clips, the latter of which is a bit underwhelming, but it's extra AoE which is nice. HP is almost capped, it's only 28 HP away from the Corrupter HP cap. I tried to go Spiritual Alpha for max recharge but found that even with perma-Overgrowth, I was spamming my attacks so quickly that my endurance bar would get pretty low. Honestly, even with Vigor Alpha I can still get my endurance bar to go low. The build mostly focuses on being a personal buffer. I wanted to see if I could have Overgrowth and Soul Drain up at all times for max accuracy and a hefty damage boost... And it works pretty well. Even with the primary focus being offensive, it's still quite defensive and is a great addition to any team, especially if the team stays near you for your goodies! I don't throw any caution to the wind when playing ranged archetypes, I am all up in everybody's grill at all times with this build and can only recall a few faceplants. Definitely recommend the combo.
-

Suggestion: Reduction in complexity for the Invention system.
Camel replied to ZaranBlack's topic in Suggestions & Feedback
Has this.... always been there? O_O -

Suggestion: Reduction in complexity for the Invention system.
Camel replied to ZaranBlack's topic in Suggestions & Feedback
Another idea that would keep the current system in place but require far less effort... Maybe a "search all" option for specific recipes? You could either search the recipe in Wentworths or drag the recipe into the search bar and it would just pull up all the salvage? I agree with it being a bit outdated. I love making new characters and testing out new builds but slotting them takes... quite a bit of time and mental effort. I don't even want to begin to quantify the amount of time I've spent typing in "Platinum" or " Magical Conspiracy" to craft my rare and very rare recipes. -
I have a Psi/Storm/Dark Corrupter. While it doesn't have any rain DoT powers to get boosted by Scourge... it DOES have a neat interaction with the delay in damage on Will Domination. Depending on your distance from the target, it takes a bit of time for Will Domination's damage to hit. This means you can get pretty good spike damage with Will Domination and either Telekinetic Blast/Psionic Lance hitting at the same time and Scourging. Chews through Cyclops' and Minotaur's like butter. It is one of my all-time favorite toons to run +4 ITFs with. The damage is not lacking, the nuke is great and specifically with Storm, you get the benefit of non-Psi damage with your secondary and oodles of recharge with Psionic Tornado, Tornado and Lightning Storm proccing Force Feedback.





.thumb.png.237fa3c1324aa06527b593d541ae9c35.png)
.thumb.png.57e47d53a5996b5cb6d7b625fbb16cd9.png)
