.jpg.4016ff659322822eebeb7394b38f772e.jpg)

Glacier Peak
-
Posts
5296 -
Joined
-
Last visited
-
Days Won
29
Content Type
Profiles
Forums
Store
Articles
Patch Notes
Posts posted by Glacier Peak
-
-
First, I wanted to give a big thanks to @AboveTheChemist for the Freebies Popup Menu, makes testing so much faster!!!!
Summary:
The new travel power IO sets (Thrust, Hypersonic, Launch, and Warp) all improve the travel speed and decrease the endurance costs of each of their respective travel pool powers, mainly due to the fourth IO for each that provides added +movement in addition to unique bonuses that improve the respective travel power even more so than could be achieved with other travel IO sets in each respective category. As you will see below, reaching the speed caps for each travel power is relatively easy thanks in large part to the recent changes here on Homecoming to movement speeds. Improving the travel speed alone can be achieved with the current (live version) travel IO sets rather well, however, the global set bonuses that these sets provide will now need to be weighed for their pros and cons against the benefit of using the new travel IO sets, specifically applying or conserving the fourth slot for the travel pool power or a different power depending on the constraints of the build. Looking at these powers strictly through the lens of travel powers, not combat powers, an inference can be made that they are better than their respective travel IO set compatriots. When looking at them through the lens of travel powers used during combat, there are added benefits from both the global set bonuses and from the unique IOs for each travel set that their travel IO set compatriots do not have. That being said, the unique bonuses provided by the new travel IO sets offer things that are truly unique to IOs, and even to other powers available in the game. For example, Fly Protection from the Hypersonic Flight IO set provides 2.0 Fly Protection, which, when used in conjunction with Hover and Fly (and I believe Evasive Maneuvers?) grants the user 7.0 Fly Protection (or 10 if EM is active, I believe). That is enough to stop nearly any enemy in the game from dropping a player out of the sky. As was mentioned previously in the thread by @Booper, these new travel power IO sets can be slotted in to accompanying travel pool powers. For example, Warp can be slotted in to every power in the Teleportation travel pool except for Fold Space, though the unique proc can only be slotted once in the build (see image at the bottom of the post in the Teleport section for example). As @Booper noted on page 2, the intent was "to have these sets fall between the Universal Travel sets (Blessing, Winter's) and the non-universal Travel IO sets (e.g. Freebird, Unbounded Leap, Celerity, etc). The two-slot and three-slot set bonuses are purposely weak to perform in-line with the non-universals while offering a significant four-slot set bonus to reward anyone willing to invest that many slots into a travel power." The current build for these travel power IO sets accomplishes this based on my testing.
Suggestion and Feedback:
I do not believe that the travel power IO set bonuses should change at all. I think the appropriate amount of consideration should be made by the player for which travel power, what set bonuses, and what unique IOs are worth it. If a player is chasing resistance bonuses and likes using a specific power, they can utilize the travel power IO set that gives them the most bang for their buck with these changes. The Warp Teleportation IO set is a great use of the already inherent base speed of Teleport, which at base value, is faster than the second fastest travel pool power Super Speed at capped running speed. Throw the Warp Teleportation IO set on to Teleport and you nearly double the speed of the second faster travel power at its cap! And you get very useful global set bonuses, and you can utilize one of the few +perception bonus IOs in the game. There is a lot to decide with these new travel power IO sets and I think that is the right direction to go. More options means a more unique experience for the player while balancing the pros and cons.
Edit: I have not tested new changes to the travel power IO sets that have been suggested in this thread. Update may occur later if such changes are patched.
-----------------------------------------------------------------------------
Based on the current Build 1 of Page 3 of Issue 27 on the Beta shard. All builds had no other enhancements slotted during testing. Here are the numbers:
SpoilerBaseline - at Level 50, without any enhancements slotted and no set bonuses out of combat:
Running Speed:
Base + Swift = 19.33 MPH
Base + Swift + Sprint/Prestige Sprints = 33.65 MPH
Base + Swift + Sprint/Prestige Sprints + Super Speed/Speed of Sound = 83.76 MPH
Flying Speed:
Base + Swift = 24.41 MPH
Base + Swift + Hover = 24.41 MPH
Base + Swift + Hover + Fly = 58.97 MPH
Base + Swift + Hover + Fly + Evasive Maneuvers = 70.69 MPH
Base + Swift + Hover + Fly + Evasive Maneuvers + Afterburner = 92.81 MPH
Jumping Speed:
Base + Hurdle = 32.14 MPH
Base + Hurdle + Combat Jump = 32.29 MPH (not a big increase unenhanced)
Base + Hurdle + Combat Jump + Super Jump = 67.80 MPH
Jumping Height:
Base + Hurdle = 10.67 FT
Base + Hurdle + Sprint = 11.07 FT (just a 0.40 FT increase with Sprint activated)
Base + Hurdle + Sprint + Combat Jump = 19.07 FT
Base + Hurdle + Sprint + Combat Jump + Super Jump = 122.27 FT
*Above with Double Jump activated allows a jump height of most zone ceilings.
Teleport Speed (per activation) - 120 MPH (equates to 116 yds (or 348ft) per 1.5 second activation. *Assuming enough endurance to activate power and power is queued before each subsequent activation.
*Note – these numbers can also be applied to the travel pool power comparatives (i.e., Super Speed is comparable to Speed of Sound, outside of the Speed Cap, Fly is comparable to Mystic Flight, outside of using Afterburner, etc.)
Now looking at each travel IO set in their respective travel pool power (i.e., Super Speed, Fly, Super Jump, and Teleport), the following information was gathered.
Running Sets
SpoilerRunning Build 1 - at Level 50, with all 3 Level 50 Quickfoot enhancements slotted in Super Speed/Speed of Sound:
Running Speed:
Base + Swift = 19.33 MPH
Base + Swift + Sprint/Prestige Sprints = 33.65 MPH
Base + Swift + Sprint/Prestige Sprints + Super Speed/Speed of Sound = 118.29 MPH (41% improvement over base stats)
Run Speed increase over base value: 68.9%
Endurance Cost decrease over base value: 68.9%
Set Bonuses:
2 Slotted - Lethal/Smashing Resistance increased by 1.5% and Mez Resistance increased by 2.5%
3 Slotted - Increases maximum health by 0.75%
Observations: Thanks to the Run/End IO of the set, the travel speed increase from the set is greater compared to Celerity, which uses the third IO of the set to provide +Stealth. The set bonuses are also lower than Celerity, which balances the decision between the two Running & Sprints sets.
Running Build 2 - at Level 50, with all 3 Level 50 Celerity enhancements slotted in Super Speed/Speed of Sound:
Running Speed:
Base + Swift = 19.33 MPH
Base + Swift + Sprint/Prestige Sprints = 33.65 MPH
Base + Swift + Sprint/Prestige Sprints + Super Speed/Speed of Sound = 105.01 MPH (25% improvement over base stats)
Run Speed increase over base value: 42.4%
Endurance Cost decrease over base value: 42.4%
Set Bonuses:
2 Slotted - Lethal/Smashing Resistance increased by 2.25% and Mez Resistance increased by 3.75%
3 Slotted - Increases maximum health by 1.5%
Unique Stealth IO
Observations: Thanks to the +Stealth IO of the set, the travel speed increase from the set is lower compared to Celerity, which uses the third IO of the set to provide a Run/End IO. The set bonuses are also higher than Quickfoot, which balances the decision between the two Running & Sprints sets. You get to be invisible, which helps with traveling!
Running Build 3 - at Level 50, with all 4 Level 50 Thrust enhancements slotted in Super Speed/Speed of Sound:
Running Speed:
Base + Swift = 19.33 MPH
Base + Swift + Sprint/Prestige Sprints = 33.65 MPH
Base + Swift + Sprint/Prestige Sprints + Super Speed/Speed of Sound = 120.24 MPH (43% improvement over base stats AND reaches the Running Speed Cap)
Run Speed increase over base value: 91.8%
Endurance Cost decrease over base value: 68.9%
Set Bonuses:
2 Slotted – Improves Recovery by 1.5% base endurance
3 Slotted - Increases area of effect defense by 1.25% and fire and cold defense by 0.625%
4 Slotted – Increases Fire and Cold Resistance by 4.5% and Mez Resistance by 7.5%
Bonus – Increased resistance to Run Speed Debuffs by 20%
Observations: Thanks to the fourth IO in the set, the travel speed increase from the set is higher than both Quickfoot or Celerity, reaching the Running Speed Cap, but Quickfoot nearly reaches the Running Speed Cap with its third IO of the set to providing a Run/End boost. The set bonuses for this set for Mez Resistance are also higher than either Quickfoot or Celerity, and increase Recovery instead of Max Health, allows for build flexibility decisions between the two Running & Sprints sets and this Running set. This IO set provides global increase to recovery, defense, and resistance, as opposed to the Running & Sprints sets which provide global increase to maximum health and resistance, but does not require a fourth IO to do so. Lastly, this set has a unique IO which grants run speed debuff resistance.
Flying Sets
SpoilerFlying Build 1 - at Level 50, with all 3 Level 50 Soaring enhancements slotted in Fly:
Flying Speed:
Base + Swift = 24.41 MPH
Base + Swift + Hover = 24.41 MPH
Base + Swift + Hover + Fly = 58.97 MPH
Base + Swift + Hover + Fly + Evasive Maneuvers = 87.95 MPH
Base + Swift + Hover + Fly + Evasive Maneuvers + Afterburner = 102.27 MPH
Fly Speed increase over base value: 68.9%
Endurance Cost decrease over base value: 68.9%
Set Bonuses:
2 Slotted – Improves Recovery by 1% base endurance
3 Slotted - Increases maximum health by 0.75%
Observations: Thanks to the Fly/End IO of the set, the travel speed increase from the set is greater compared to Freebird, which uses the third IO of the set to provide +Stealth. The set bonuses are also lower than Freebird, which balances the decision between the three Flight sets.
Flying Build 2 - at Level 50, with all 3 Level 50 Freebird enhancements slotted in Fly:
Flying Speed:
Base + Swift = 24.41 MPH
Base + Swift + Hover = 24.41 MPH
Base + Swift + Hover + Fly = 58.97 MPH
Base + Swift + Hover + Fly + Evasive Maneuvers = 85.35 MPH
Base + Swift + Hover + Fly + Evasive Maneuvers + Afterburner = 102.27 MPH
Fly Speed increase over base value: 42.4%
Endurance Cost decrease over base value: 42.4%
Set Bonuses:
2 Slotted – Improves Regeneration by 8% base health
3 Slotted - Increases maximum health by 1.5%
Unique Stealth IO
Observations: Thanks to the +Stealth IO of the set, the travel speed increase from the set is lower compared to Soaring, which uses the third IO of the set to provide a Fly/End IO. The set bonuses are also higher than Soaring, with the first providing regeneration instead of recovery which balances the decision between the three Flight sets. You get to be invisible, which helps with traveling!
Flying Build 3 - at Level 50, with all 4 Level 50 Hypersonic enhancements slotted in Fly:
Flying Speed:
Base + Swift = 24.41 MPH
Base + Swift + Hover = 24.41 MPH
Base + Swift + Hover + Fly = 58.97 MPH
Base + Swift + Hover + Fly + Evasive Maneuvers = 87.95 MPH
Base + Swift + Hover + Fly + Evasive Maneuvers + Afterburner = 102.27 MPH
Fly Speed increase over base value: 91.8%
Endurance Cost decrease over base value: 68.9%
Set Bonuses:
2 Slotted – Increases maximum health by 1.13%
3 Slotted - Increases Ranged Defense by 1.25% and Energy and Negative Energy Defense by 0.625%
4 Slotted – Increases Energy and Negative Energy Resistance by 4.5% and Mez Resistance by 7.5%
Bonus - +2 Fly Protection in the power it is slotted in to
Observations: Just like the other two Flight IO sets, the Fly Speed Cap can be reached by slotting the whole set. The travel speed increase from the set is the same compared to Soaring, but slightly higher than Freebird (by less than 2 MPH), which uses the third IO of the set to provide a Fly/End IO. The set bonuses are similar to Freebird, but the maximum health increase is slightly lower for 1 less slot utilized, and it is also different than Soaring with the first slot bonus providing a maximum health increase instead of a recovery increase which balances the decision between the three Flight sets. Lastly, this set provides a unique Fly Protection IO which increases Fly Protection by 2.0, allowing for a nearly unstoppable ability to fly against any enemy in the game.
Leaping Sets
SpoilerLeaping Build 1 - at Level 50, with all 3 Level 50 Springfoot enhancements slotted in Super Jump:
Jumping Speed:
Base + Hurdle = 32.14 MPH
Base + Hurdle + Combat Jump = 32.72 MPH (due to the passive 0.43 MPH boost from the set bonus)
Base + Hurdle + Combat Jump + Super Jump = 92.79 MPH
Jumping Height:
Base + Hurdle = 10.79 FT
Base + Hurdle + Sprint = 11.19 FT (just a 0.40 FT increase with Sprint activated)
Base + Hurdle + Sprint + Combat Jump = 19.19 FT (increase due to the tiny 0.12 FT from passive set bonus)
Base + Hurdle + Sprint + Combat Jump + Super Jump = 199.01 FT (basically the cap)
Jump Speed increase over base value: 68.9%
Endurance Cost decrease over base value: 68.9%
Set Bonuses:
2 Slotted – Improves all movement speeds by 3% (including Running and Flying)
3 Slotted - Increases maximum health by 0.75%
Observations: Thanks to the Jump/End IO of the set, the travel speed and height increase from the set is greater compared to Unbounded Leap, which uses the third IO of the set to provide +Stealth. The set bonuses are also lower than Unbounded Leap, which balances the decision between the Leaping and Leaping & Sprint IO sets.
Leaping Build 2 - at Level 50, with all 3 Level 50 Unbounded Leap enhancements slotted in Super Jump:
Jumping Speed:
Base + Hurdle = 32.14 MPH
Base + Hurdle + Combat Jump = 33.15 MPH (due to the passive 0.86 MPH boost from the set bonus)
Base + Hurdle + Combat Jump + Super Jump = 83.77 MPH
Jumping Height:
Base + Hurdle = 10.91 FT
Base + Hurdle + Sprint = 11.07 FT (just a 0.40 FT increase with Sprint activated)
Base + Hurdle + Sprint + Combat Jump = 19.31 FT (increase due to the tiny 0.24 FT from passive set bonus)
Base + Hurdle + Sprint + Combat Jump + Super Jump = 169.66 FT
Jump Speed increase over base value: 42.4%
Endurance Cost decrease over base value: 42.4%
Set Bonuses:
2 Slotted – Improves all movement speeds by 6% (including Running and Flying)
3 Slotted - Increases maximum health by 1.5%
Unique Stealth IO
Observations: Thanks to the +Stealth IO of the set, the travel speed and height increase from the set is lower compared to Springfoot, which uses the third IO of the set to provide Jump/End IO increase. The set bonuses are higher than than Springfoot, which balances the decision between the Leaping and Leaping & Sprint IO sets. You get to be invisible, which helps with traveling!
Leaping Build 3 - at Level 50, with all 4 Level 50 Launch enhancements slotted in Super Jump:
Jumping Speed:
Base + Hurdle = 32.14 MPH
Base + Hurdle + Combat Jump = 32.29 MPH
Base + Hurdle + Combat Jump + Super Jump = 100.52 MPH
Jumping Height:
Base + Hurdle = 10.67 FT
Base + Hurdle + Sprint = 11.07 FT (just a 0.40 FT increase with Sprint activated)
Base + Hurdle + Sprint + Combat Jump = 19.07 FT
Base + Hurdle + Sprint + Combat Jump + Super Jump = 232.33 FT
Jump Speed increase over base value: 91.8%
Endurance Cost decrease over base value: 68.9%
Set Bonuses:
2 Slotted – Increases regeneration by 6% of base health.
3 Slotted - Increases Melee Defense by 1.25% and Lethal and Smashing Defense by 0.625%
4 Slotted – Increases Lethal and Smashing Resistance by 4.5% and Mez Resistance by 7.5%
Bonus +Jump Height in power it is slotted in to
Observations: Thanks to the four IOs of the set and the +Jump Height IO of the set, the travel speed and height increase from the set is much higher compared to Springfoot and Unbounded Leap, which uses the third IO of the set to provide Jump/End IO increase or +Stealth IO unique. The set bonuses are higher than both Springfoot or Unbounded Leap, which balances the decision between the Leaping and Leaping & Sprint IO sets. The unique IO gives the player a 232.33 FT Jump Height ceiling (though this is technically irrelevant with Double Jump allowing a player to reach most zone ceilings).
Teleportation Sets
SpoilerTeleporting Build 1 - at Level 50, with all 3 Level 50 Jaunt enhancements slotted in Teleport:
Teleport Speed (per activation) - 196 MPH (equates to 164 yds (or 492ft) per 1.5 second activation. *Assuming enough endurance to activate power and power is queued before each subsequent activation. Approximately 23 seconds/mile.
Range increase over base value: 41.3%
Endurance Cost decrease over base value: 68.9%
Set Bonuses:
2 Slotted – Improves Regeneration by 4% base health
3 Slotted - Increases maximum health by 0.75%
Teleporting Build 2 - at Level 50, with all 3 Level 50 Time & Space Manipulation enhancements slotted in Teleport:
Teleport Speed (per activation) - 177 MPH (equates to 145 yds (or 435ft) per 1.5 second activation. *Assuming enough endurance to activate power and power is queued before each subsequent activation. Approximately 25 seconds/mile.
Range increase over base value: 25.2% (hey that is low!)
Endurance Cost decrease over base value: 42.4%
Set Bonuses:
2 Slotted – Increases regeneration by 8% of base health.
3 Slotted - Increases maximum health by 1.5%
Unique +Stealth IO
Teleporting Build 3 - at Level 50, with all 4 Level 50 Warp enhancements slotted in Teleport:
Teleport Speed (per activation) - 212 MPH (equates to 187 yds (or 561ft) per 1.5 second activation. *Assuming enough endurance to activate power and power is queued before each subsequent activation. Approximately 21 seconds/mile.
Range increase over base value: 54.2%
Endurance Cost decrease over base value: 68.9%
Set Bonuses:
2 Slotted – Increases Toxic and Psi Resistance by 2.25% and Mez Resistance by 3.75%
3 Slotted – Grants a global 1.75% endurance discount to all powers
4 Slotted – Increases range of all powers by 7.5%
Bonus +20% Perception global boost
Warp set slotting example:
Spoiler
-
 1
1
-
 1
1
-
-
47 minutes ago, Bopper said:
1. Does PT:CHS use Base HP or Max HP? (I recognize you indicate it uses Base HP in your guide, just double checking)
Base HP
2. Can the effect be stacked with itself using different powers that aren't auto powers? (i.e., I use Lightning Bolt and assuming proc activates, does the effect also allow the PT:CHS I slotted in Zapping Bolt to go off?)
Yes. They now can also stack from different powers that are auto powers. That was a bug fix introduced sometime this year.
3. Can the effect be stacked with other Chance to Heal Self procs? (i.e., Entropic Chaos: Chance to Heal Self)? I can slot both PT:CHS and Entropic Chaos: Chance to Heal Self in Zapping Bolt for example.
Yes
4. Auto powers seems to have the best chance to proc for this particular proc on this particular build, as all my attacks base recharge are under 15 seconds except for Thunderous Blast (which is a targeted AoE as well). I feel like this proc is a waste of a slot based on the alternative healing I could get out of slotting a Heal IO in one of the my passive regen powers (Fast Healing in particular). On to the question - in what situation would someone want to slot this type of proc?
For Auto Powers: If the equivalent regeneration of the PT:CHS is more than what slotting a Heal IO into another auto-power would offer. In the cheat sheet I show the "equivalent regeneration" for all ATs at both Base HP and Max HP. For your character's current max HP, you'll need to calculate it. Luckily, the relationship is linear, so let's do an example on how to do that.
If you are a Blaster with 1500 HP. Your equivalent regeneration of the PT:CHS is 60% at 1204.8 HP and 39.13% at 1847.3 HP. The equivalent regeneration at 1500 HP is:
ER = 60% + (1500 - 1204.8) x (39.13% - 60%) / (1847.3 - 1204.8)
ER = 50.41%
For Click Powers: This is a huge "it depends". You would have to factor in your probability to hit, probability to proc, and the rate of using your attack. From that you can calculate an average HP/sec which you can translate into an equivalent regeneration.
Bopper you are a great member of this gaming community! Thank you so much for breaking it down for me, and hopefully others who read your awesome guide.
-
1
-
1
-
 1
1
-
-
1 hour ago, Erratic1 said:
Thanks for letting me know how poorly it performs. Its there for the set bonus and the healing was at best icing. Guess that means no icing.
Check out this thread for more in depth numbers and explanation on the proc. I stand corrected, it actually uses base HP.
-
3 minutes ago, Shenanigunner said:
Flying innertubes. siiiigggghhhh.
If you can ride a magic carpet, disbelief should be suspended enough! 😄
-
1
-
-
@Bopper great thread, I've been using it a ton on my Elec/Regen Sentinel trying to maximize every bonus and proc chance. I noticed a few differences between the CoD entry for PT: Chance to Heal Self (henceforth PT:CHS) and the HCWiki and your guide, if you have a chance could you answer my questions below?
1. Does PT:CHS use Base HP or Max HP? (I recognize you indicate it uses Base HP in your guide, just double checking)
2. Can the effect be stacked with itself using different powers that aren't auto powers? (i.e., I use Lightning Bolt and assuming proc activates, does the effect also allow the PT:CHS I slotted in Zapping Bolt to go off?)
3. Can the effect be stacked with other Chance to Heal Self procs? (i.e., Entropic Chaos: Chance to Heal Self)? I can slot both PT:CHS and Entropic Chaos: Chance to Heal Self in Zapping Bolt for example.
4. Auto powers seems to have the best chance to proc for this particular proc on this particular build, as all my attacks base recharge are under 15 seconds except for Thunderous Blast (which is a targeted AoE as well). I feel like this proc is a waste of a slot based on the alternative healing I could get out of slotting a Heal IO in one of the my passive regen powers (Fast Healing in particular). On to the question - in what situation would someone want to slot this type of proc?
-
2 hours ago, Erratic1 said:
I admit I am thinking outside the box...like from where you cannot see the box any longer...perhaps orbit. So I would SERIOUSLY suggest testing this on the test server if you find the build that follows remotely interesting.
This Hero build was built using Mids Reborn 3.0.4.7
https://github.com/Reborn-Team/MidsRebornClick this DataLink to open the build!
Level 50 Magic Tanker
Primary Power Set: Electric Armor
Secondary Power Set: Super Strength
Power Pool: Experimentation
Power Pool: Leadership
Power Pool: Speed
Ancillary Pool: Mu MasteryHero Profile:
Level 1: Charged Armor -- Ags-ResDam/EndRdx(A), Ags-ResDam/Rchg(3), Ags-ResDam/EndRdx/Rchg(3), Ags-ResDam(5)
Level 1: Jab -- TchofDth-Acc/Dmg(A), TchofDth-Dmg/EndRdx(5), TchofDth-Dmg/Rchg(7), TchofDth-Acc/Dmg/EndRdx(7), TchofDth-Dam%(9)
Level 2: Punch -- MghoftheT-Acc/Dmg(A), MghoftheT-Dmg/Rchg(9), MghoftheT-Acc/Dmg/Rchg(11), MghoftheT-Dmg/EndRdx/Rchg(11), MghoftheT-Acc/Dmg/EndRdx/Rchg(13), MghoftheT-Rchg/Res%(13)
Level 4: Speed of Sound -- Empty(A)
Level 6: Static Shield -- Ags-ResDam/EndRdx(A), Ags-ResDam(19)
Level 8: Haymaker -- CrsImp-Acc/Dmg(A), CrsImp-Dmg/EndRdx(21), CrsImp-Dmg/Rchg(21), CrsImp-Acc/Dmg/Rchg(23), CrsImp-Acc/Dmg/EndRdx(23)
Level 10: Grounded -- ImpArm-ResPsi(A)
Level 12: Conductive Shield -- Ags-ResDam/EndRdx(A), Ags-ResDam(25)
Level 14: Lightning Field -- Obl-Dmg(A), Obl-Acc/Rchg(25), Obl-Dmg/Rchg(27), Obl-Acc/Dmg/Rchg(27), Obl-Acc/Dmg/EndRdx/Rchg(29), Obl-%Dam(29)
Level 16: Energize -- Prv-Heal(A), Prv-Heal/EndRdx(31), Prv-EndRdx/Rchg(31), Prv-Heal/Rchg(31), Prv-Heal/Rchg/EndRdx(33), Prv-Absorb%(33)
Level 18: Lightning Reflexes -- Run-I(A)
Level 20: Knockout Blow -- CrsImp-Acc/Dmg(A), CrsImp-Dmg/EndRdx(33), CrsImp-Dmg/Rchg(34), CrsImp-Acc/Dmg/Rchg(34), CrsImp-Acc/Dmg/EndRdx(34), CrsImp-Dmg/EndRdx/Rchg(36)
Level 22: Maneuvers -- Rct-ResDam%(A), ShlWal-ResDam/Re TP(36), LucoftheG-Def/Rchg+(36)
Level 24: Assault -- EndRdx-I(A)
Level 26: Power Sink -- EndMod-I(A)
Level 28: Rage -- RechRdx-I(A)
Level 30: Vengeance -- LucoftheG-Def/Rchg+(A)
Level 32: Toxic Dart -- EntChs-Acc/Dmg(A), EntChs-Dmg/EndRdx(37), EntChs-Dmg/Rchg(37), EntChs-Dmg/EndRdx/Rchg(37), EntChs-Heal%(39)
Level 35: Mu Lightning -- Dcm-Acc/Dmg(A), Dcm-Dmg/EndRdx(39), Dcm-Dmg/Rchg(39), Dcm-Acc/EndRdx/Rchg(40), Dcm-Acc/Dmg/Rchg(40), Dcm-Build%(40)
Level 38: Foot Stomp -- Obl-Dmg(A), Obl-Acc/Rchg(42), Obl-Acc/Dmg/Rchg(42), Obl-Acc/Dmg/EndRdx/Rchg(42), Obl-%Dam(43), FrcFdb-Rechg%(43)
Level 41: Ball Lightning -- PstBls-Acc/Dmg(A), PstBls-Dmg/EndRdx(43), PstBls-Dmg/Rchg(45), PstBls-Dmg/Rng(45), PstBls-Acc/Dmg/EndRdx(45), PstBls-Dam%(46)
Level 44: Static Discharge -- PstBls-Acc/Dmg(A), PstBls-Dmg/EndRdx(46), PstBls-Dmg/Rchg(46), PstBls-Dmg/Rng(48), PstBls-Acc/Dmg/EndRdx(48), PstBls-Dam%(48)
Level 47: Adrenal Booster -- RechRdx-I(A), RechRdx-I(50)
Level 49: Hasten -- RechRdx-I(A), RechRdx-I(50), RechRdx-I(50)
Level 1: Brawl -- Empty(A)
Level 1: Gauntlet
Level 1: Sprint -- Empty(A)
Level 2: Rest -- Empty(A)
Level 2: Swift -- Empty(A)
Level 2: Health -- Mrc-Rcvry+(A)
Level 2: Hurdle -- Empty(A)
Level 2: Stamina -- PwrTrns-EndMod(A), PwrTrns-Dam/Rech(15), PwrTrns-Dam/EndMod(15), PwrTrns-Dam/Acc/End(17), PwrTrns-Dam/Acc/Rech/End(17), PwrTrns-+Heal(19)
------------| Copy & Paste this data into Mids Reborn : Hero Designer to view the build | |-------------------------------------------------------------------| |MxDz;1343;652;1304;HEX;| |78DA6593C973124114C67B60300949C42C98C424068859803080E66EA989566928A| |9C2934B8D23B43025016A18AAE2D183556E7139B9DEBD7971FD03DCFD47DCA2B1A2| |5E5CC6C7BCCF9832530CBF99D7F3757FEFBDEECCC24CC7BD7D67760AA5634FD9A8D| |7F54346E594B47C19A368E645F36AA17B98A3FA8C3C292B75A9CD9665DEB6CCBCBE| |CB9AAF5A8318CDC8B2945AAE51A3E79C6DC94AD12E89DE6CB55AD666172868CECB8| |A6DD866B512708373D22848AB5E326B7EF73D5793B2D0EE3EEE2D9BC5921D9CAD99| |796DB7D5B0A59E69E819A36E4BEB743F191AA1FB6980FE94A645C72B52F49056852| |70DEE60AAD3CC29FFEAB7AA384C98A0B123CC0D47C163CC569D99208DC21A9F72CE| |EBCED37A9EE9BF005E64765C021799D998105EB77C8EF03A748917E4D6C7B3293EB| |8ED863BCDCF656EBA6B392EDC58AF019E606ECE8305E64B9AAF8DE7136D51C575FC| |9C62ED58A31D6BF4638D6734D6896C3A7F7878EC2773CB2FF03773C8010567F38AB| |40168036F39B6F51DF81EFCC00C7D049798AF49DB059F5D09F69EA67C7B385F5F0F| |F20D21DF30F20D23DF30F21D95CC2E2A5490E7F30457788DD103601075A56FFAB06| |65F98756FC8C780BB051C3110E2D876F231A8706C308E7A9376189D1BC67C07A99B| |23D83D238B84882AB65D06AF805799E3D7983A598AA06691EBBCA3C66F80379913B| |7C0DBE01DE634F91A83760CBD8AA25751F4288A1EC5D0A3D8597E37E87512DAC9FB| |9C53EC0173EA21F8087CCC4C3C61DEED14220E6D1CDA04B4096893D026A14D429BA| |31A69D87B1A6A99062354D3147A96FA6FEC2F875481CBA15FF3C444D5D533EBCCAD| |1BCDAA18A488E24696FE9D57443EAF8DECE733F269DD57CB6BCFF9B2EABAD9F8055| |C616EFA0A7E63767F67FE0155A0D713| |-------------------------------------------------------------------|
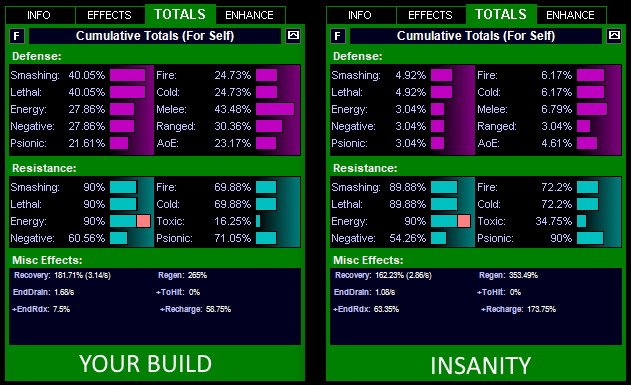
For purposes of comparison I have toggled off Rage, Force Feedback, and powers whose effects are not close to or actually at being up all the time (Hasten, Energize, Adrenal Booster). So what follows is a somewhat arguable comparison. Your build has Hasten down for 22s between uses. My build has Hasten down for just under a second. Fairly, your downtime could come while moving between missions or groups of opponents and even being down, the situation may not henge on having it up. But when Hasten is down for you Energize is on a 59.35s recharge cycle, and 44s while Hasten is up. For my build Energize is pretty much going to stay right around 34.5s--just a few seconds more than its duration. So while the picture below is not completely true, it is not trying to sell you land in a swamp either.
In the realm of a picture being worth a thousand words we have:
- Resistances are comparable with my suggestion having a hair more F/C, a hair less N, double the T (though nothing to write home about) and capped P.
- Recovery is lower on my suggestion but so is expenditure. The gap between them is larger on my side: 1.78/s vs 1.45/s.
- Regen is higher on my side by roughly 100% due to Energize being up near permanently.
- OMG...where did the Defense go in my build??!?!
Yeah, I ignored Defense. Did not even bother to boost Melee or Smash/Lethal. No, Defense is not meaningless on a resistance set...at least in any situation where your Defense is not being debuffed. Remember the opening lines of the post about testing things on the test server? There is a certain amount of safety that comes from opponents within melee range being subjected to Foot Stomp every 6 seconds, having an extra 10 HP/s rolling in (the difference in the build's Regen values), and a 49% heal coming in every 34.5s but in the realm of near equal level opponents who do not debuff defenses your guy is going to be tougher as goes S/L M/R/A. But once the levels start getting turned up and foes have an easier time hitting or facing things which debuff defenses I think things will become more even or possibly swing my way. We could probably theorycraft it out but far easier to slot up a build on the test server to be sure.
A couple quality of life things in my build:
- Speed of Sound comes with Jaunt, which gives you verticality Super Speed does not have
- Adrenal Booster is up for a minute out of roughly every three. That is +43% to both To-Hit and Damage. And that before considering Rage gives you +20% To-Hit and +80% Damage. So when you really want to hit and damage something you can be at +63% To-Hit and +123% Damage. Did I forget to mention is also grants +43% Recharge?
- I have not tested Power Transfer: Chance to Heal but the wiki says it averages 3 procs per minute for 5% health.
Nice write up, I had one thing I wanted to reply to about that PT: Chance for Heal proc - it is not a unique proc, meaning you can slot dozens in your build if you want to; though I wouldn't recommend doing so. The reason being that the return is so abysmally low that even acting as a passive healing mechanic, it does not provide a noticeable improvement to the health bar. I have an Elec/Regen Sentinel and I've slotted PT: Chance for Heal and Entropy Chaos: Chance for Heal in nearly every power, mainly as a niche regen idea to test out. The return on my Elec/Regen Sentinel with capped HP of 5% base HP amounts to around 100 HP when the proc triggers, with some powers at around 95% proc chance, and others below 50% (due to the base recharge of most attacks unfortunately). There aren't many builds out there that could slot as many of these Chance for Heal procs as the one I mentioned, so I figured it was a good proof of concept. That being said, I could gain more HP back from slotting Healing IOs in to one of my passive regen powers than relying on the passive Chance for Heal procs activating.
Edit: Should've said base HP, not max HP.
-
1
-
17 minutes ago, Shenanigunner said:
Inner tubing around any of the water courses would be fun. I wonder if it would be simple to enable movement as about half of emotes allow...?
If I remember correctly during testing, the innertube did allow a brief 3-4 second window to move around, much like other emotes that are being fixed as well. Not really a solution and allowing the emote to override animation sounds super buggy to me, but perhaps as one of the dozens of flying temp powers? I'm just spit ballin here, not for or against really.
-
16 hours ago, Luminara said:
*blink*
*blink blink*
*furiously scratches out Item 457, "Engage players with motorboat chases in innertubes as a distraction while taking control of world"*
*crumples up Master Plan for World Domination*
I was so close... so close.
I was going to recreate Diddy Kong Racing 😥
Edit: With gif!
-
35 minutes ago, DarknessEternal said:
Consider this reporting it as a bug then. I'm seeing a lot of things attacking with 0 endurance that aren't AVs.
Can you provide the enemy group/rank for where you are seeing this? It would help other testers reproduce and confirm.
-
25 minutes ago, Ukase said:
Sorry if it wasn't clear.
I'm long-winded, so I feel like my "suggestions" would be poor use of the Dev's time. The question is about an inf sink. My spending 1 billion for 10M credit towards the last inf badge. Would that be a bad idea?
As for the method used by Voltor (the chap with each AT with all the badges) the strategy has been kill all ITFs at +4/8. I'm not a big fan of ITF. And certainly not doing as many times as it would take to earn 250M more. Well, not a fan doesn't really express my distaste for that TF quite enough. I actually hate it. It was actually my motivating factor in making enough emp merits through a farmer so I wouldn't be a slave to running TFs for reward merits. Everyone loves to do ITF, either as kill most/all, or speedy. I think I'd rather do it 4x speedy than once as a kill most/all. But I'd rather not do it all.
Sure, any map will give progress. And I'll get there eventually. But, never hurts to ask folks what they think. (well, usually it doesn't hurt. Some of you folks are just mean and nasty. But that's okay. I'll live. )Oh I see now, well I think that is kind of an interesting idea. On one hand, you have a badge that requires collecting inf to acquire - creating a shortcut would negate the purpose of the badge and potentially open the door for other types of "I don't feel like grinding the requirements" types of requests in the future. On the other hand, epic badges like that one do require a good deal of investment to acquire - for folks who haven't snagged it, that may seem needless, to others that may be irrelevant. My philosophy with badges, and really anything in this game, is if you want it bad enough, you're going to need to put in the time and effort for the reward. That may be finding the most efficient way to achieve that reward in the end, but it takes some amount of time and effort to do so.
-
1
-
-
4 minutes ago, Ukase said:
Anyone have more than one badge character with all the badges? I know of at least 4 people that crazy besides me. I'm not sure about them (Lorainne, Sentenza, Voltor, Stitch), but with me - it took me a year of goofing off when HC first came out before I even reconsidered badging. I'd done it on live, and was pretty high up there, considering my late start to play (issue 3 - missing out on some anniversary badges & a few others)
I know I had as many as I could possibly get when the game closed.
So, my last badger was complete before the 2xp nerf. I remember it being one of the last ones I got, but I was scratching my head, trying to think why this time around it was taking longer. And then it hit me - I no longer had the option to turn off xp for the 2xINF.
Fun facts for those that don't know:
Influence earned in the market doesn't give progress/credit for this badge.
AE influence doesn't give credit/progress either.
Since there is no more 2xINF, I'm thinking perhaps there might be a way we could find another way to earn credit towards this badge. Like, I dunno - buy it, as an inf sink, maybe?
I give up a billion for 10M credit or something ridiculous like that? or would that be bad form?
I mean, I'll get it eventually, but I do have some alt-itis that is needing attention. Getting a little tired of playing this water/sonic corruptor, despite it being one of my better built characters.I don't see a question in the above post, so I'll just add my two cents. Been playing my main since June 2019 and I still don't have the last inf badge. Sitting at around 364 million inf gained. Vet Level 88. Completed all story arc content, task forces and strike forces, Blue, Red (4 more story arcs for Recluses' Betrayer), and Gold side outside of Incarnate content. Collected 1493/1550 badges. I could farm the inf badge if I wanted, but I think I'll hold off until I have everything else. That amount is just through normal content (soloing mostly), without the 2xINF thing when it was still around either.
For the folks who've got 16 badgers with all the badges, they must've figured out an optimal method for the last inf badge, maybe they will share their thoughts for the folks who want it bad enough.
-
11 minutes ago, Replacement said:
I've been noticing these Sentinel advantages.
I'm very likely going to end up rolling one to go with my 2x elec blasters (literally the only set I've ever duplicated on the same AT).
But just to protect the poor sentinels a bit: remember that Sentinel Nukes are designed to be inline with Lightning Rod; not the true nukes they're named for.
Agreed on your last point. I think with these changes Electric Blast will be in a good place on Sentinels.
-
There's also a great temp you can purchase from the Elf dude in the Ski Chalet for Candy Canes, drops a bunch of rings on the enemy.
There aren't a lot of requirements for anything in this game, except for team size to start (then teammates can quit) and level range.
-
Cross-posting from the Seismic Blast thread:
Jumping in with my anecdotal feedback on Seismic Blast (and Earth Manipulation):
Short and sweet: Amazing sets, both visually and mechanically. I don't play Blaster very much, I am more of a Corruptor sort of player. The added effects (looking at Knockback/Down specifically) add SO MUCH survivability to these sets. Drawback is currently my own learning curve, I don't understand the mechanics well enough yet, lots of circles showing up in my tray around powers. This is not a fault (haha get it!) of the set, I just need to play it more to better understand it. I was able to enjoy Water Blast and Street Justice after a while, I know this will occur eventually for the Seismic Blast/ Earth Manipulation sets.
SpoilerSeismic Blast
1. Testing on an average (subjectively), SO-only Level 50 build (Seismic Blast/Earth Manipulation), with NO RESISTANCE OR DEFENSE powers or set bonuses, fighting mobs in Peregrine Island. I was capable of juggling and manipulating enemy mobs in to the air with my knockback/down powers that they didn't even manage to set off attacks. The viability of knockback/down powers are so underrated in my experience (only played a Storm Defender) but holy smokes - why even bother with chasing resistance or defense when you can just glass canon everything with knockback/down powers. I've got every power from the set selected, I open with Build Up and Seismic Force, drop a knockback/down power (either Upthrust or Tremor) then Meteor (good lord this is such a beautiful power, so much props to the designer, please don't change a thing about it!!!). After this point it is just a matter of juggling the enemies or targeting the main threat in the mob (usually the boss, but maybe the mezzer or special enemy).
2. Power icons are excellent, I may sort of echo what folks have said about certain ones not visually explaining what they are, but at the same time, it is a new set that will be learned eventually so this isn't worth changing IMO. Tombstone is a great power, in fact, all of the powers in the set feel balanced damage-wise (on SOs). The problem isn't that there are a few good ones and the rest are terrible, its that they are all effective and I have to prioritize which to select (this is a great thing to have to do for a build!).
3. As I mentioned above, I am not adept at the set's mechanics just yet. It is not a set you can just pick up and know how to use effectively immediately (I am thinking Fire Blast as the easiest example of this). This is more along the lines of Water Blast and maybe even Psi Blast. That is not to say that is a bad thing, in fact I love the added layer to the set and I hope it continues to exist as such when ported to live.
Earth Manipulation
1. Fracture has a hella long recharge. 1 minute 30 seconds base for a power that does Mag 2 stun for 15 seconds? Okay, I am not a controller so that is fine. I can always build around recharge and +special effects to make this power worth it.
2. I dig the two toggles, Mud Bath and Beryl Crystals. Not much to say about them, but they are a welcomed change from the Absorb Shield I've seen a lot of added to recent Blaster secondary powers that feel too much like Sentinel armors.
3. Seismic Smash is a very heavy hitting power. And it's nicely procable! And it has a Mag 3 hold! Wow!
Other
1. Why is there a ton of powers in the power window:
Spoiler
2. Not seeing the +33% accuracy in my combat attributes window from Beryl Crystals
Spoiler
-
1
-
-
Thunderous Blast on a Sentinel recharges way faster than other sets, I think it's around 120 base recharge actually. With all my set bonuses, Hasten, and Agility T4 active, it's back in around 30 seconds. Makes for a greater opener and finisher, and can proc really well. Drains a bunch of endurance from the enemy too. Even so, Sentinel damage is anemic so it's gotta be used multiple times per fight.
-
1 hour ago, PeregrineFalcon said:
Wait, what?
So the slider that works for everyone else just magically doesn't work for you? So because of this the developers should do a bunch of work on the powers FX? What?
That just doesn't make any sense. Perhaps you can explain it to me.
Reducing max particle count helps too.
-
1
-
-
Just now, ForeverLaxx said:
Honestly I think the whole badge UI needs an overhaul. However, I'm very aware of how much work something like that would actually be and I don't expect it to happen ever.
Some what of a tangent, but I remember getting badges way back when they first came out and thought they were actually things a character would wear on their chest, sort of like military service uniforms, at least the accolades. As more badges were added, I kind of lost the connection - its kind of fourth-wall breaking now.
-
1 hour ago, Without_Pause said:
So this is going to be way easier than I was thinking. Good to know. I have a number of villains I would like to keep as such and seeing how easy it was to get to 21 without trying, I figure I'll skip the work around.
If you've got a second account, you can set up someone to have the villain contact [Lord Schweinzer] who provides endless supply of bank missions without needing to do newspapers. Easy way to chew through the badge if you're getting it multiple times instead of the harder ways out there. Prerequisite for the contact unlock though is to have the Hero Slayer badge and be Level 10.
-
2 hours ago, Without_Pause said:
I see I am at 21 out of 25 signature heroes defeated. Outside of the typical SFs, and DA, what are places/missions to look for them? Can they be repeated if say doing them via SFs?
Bank heists actually.
-
1
-
-
If we get any more 'Master of...' badges, can we maybe get a separate badge section to display them? Really starting to crowd out the Accomplishments/Achievement sections.
-
1
-
4
-
-
I can see it now... arguments will abound, "if THEY get harder difficulty options, WE want easier difficulty options." But just telling someone something is easy is just as subjective as saying art looks good or playing a regen is fun. This game is easy enough for me because I've paid down the risks with my experience over time. Newer players aren't as vested, thus the risks appear in greater number. My point is what may be difficult is entirely subjective. I can guarantee everyone who has played this game has been defeated at least once. Let me ask you something, has the same thing defeated you again or are you better at mitigation that threat with the tools at your disposal? Keep dying to the same thing, but refuse to change your playstyle? Well, as long as you aren't expecting a different outcome, I hope that is fun for you. Otherwise that is a popular definition for crazy.
These advanced difficulty OPTIONS are just that.
-
2
-
1
-
 1
1
-
-
Anecdotal input ahead;
Electric Blast on Sentinel is in a good place. Level 50, T4 Incarnates, fully maxed Set Bonuses with a focus on recharge, Thunderous Blast coming back every 20 or so seconds, VS dropping stacks of Static, end drain city and I'm defeating Level 54 minions and lieutenants like they're conned green. Level 54 bosses are another story, but I'll attribute that to the fact I'm playing a Sentinel.... but it is odd that they take minutes longer to defeat than their minion and lieuts that go down in seconds.
Follow up question. Does the Static mechanic scale against enemy Level? What about enemy rank? Is it only based on their endurance drained?
-
5 hours ago, Shenanigunner said:
Just popped over to Beta to test the new innertube emotes. For those who haven't:
-
There are six:
- /em innertube1: strawberry donut with sprinkles.
- /em innertube2: chocolate donut with sprinkles.
- /em innertube3 : Neon green.
- /em innertube4 : Cow. sigh.
- /em innertube5 : "Naval Academy" (blue-gray camo).
- /em innertube6 : Lifeguard.
- /em innertube random selects/rotates among them.
- They have a slight sound effect on call.
- They only work in water deep enough for the alt to swim in — Ouro pool, Founders canals, oceans, etc.
- Movement cancels the emote; no, you can't scoot around in them. Bummer.
This is a fun one. Thumbs up to the devs!
Ya great work! On beta, hope it makes it to live! Oh a hidden(?) Easter Egg with this emote - if you are using Granite Armor it tilts the tube a bit! Sadly, no animation yet for Dwarf/Squid forms.
Spoiler-
1
-
1
-
There are six:


Focused Feedback: Enhancements
in [Open Beta] Focused Feedback
Posted
Teleport is already, at base values, much better than any other travel power at its highest movement cap. The fact that Teleport can more than double the movement cap of the second fastest travel power, Super Speed, I think, should be noted for its unique circumstances, especially when comparing it to other travel power set IO bonuses.