The Beta Account Center is temporarily unavailable
×


Chelsea Rorec
-
Posts
306 -
Joined
-
Last visited
Content Type
Profiles
Forums
Events
Store
Articles
Patch Notes
Everything posted by Chelsea Rorec
-

How good is the Fighting power pool for blasters?
Chelsea Rorec replied to RooGirl's topic in Blaster
For me taking the fighting pool is hugely dependant on whether the power set i am picking can support it alone. Most blaster sets can and then i will stack it with a patron power mostly charged armour and with a little set bonus you can hit the S/L cap easy. Some sets can be maxed out on S/L resists and ranged defence with the fighting pool and set bonuses only. -
Here is mine. it is a lot of fun. This Hero build was built using Mids Reborn 3.2.17 https://github.com/LoadedCamel/MidsReborn Click this DataLink to open the build! Level 50 Mutation Blaster Primary Power Set: Energy Blast Secondary Power Set: Energy Manipulation Power Pool: Flight Power Pool: Leaping Power Pool: Speed Power Pool: Fighting Ancillary Pool: Mu Mastery Hero Profile: Level 1: Power Blast -- SprDfnBrr-Acc/Dmg(A), SprDfnBrr-Dmg/Rchg(5), SprDfnBrr-Acc/Dmg/Rchg(5), SprDfnBrr-Acc/Dmg/EndRdx(7), SprDfnBrr-Acc/Dmg/EndRdx/Rchg(7), SprDfnBrr-Rchg/+Status Protect(9) Level 1: Power Thrust -- Acc-I(A) Level 2: Energy Torrent -- Artl-Acc/Dam(A), Artl-Dam/End(9), Artl-Dam/Rech(11), Artl-Acc/Dam/Rech(11), Artl-Acc/Rech/Rng(13), Artl-End/Rech/Rng(13) Level 4: Energy Punch -- Mk'Bit-Acc/Dmg(A), Mk'Bit-Dmg/EndRdx(15), Mk'Bit-Dmg/Rchg(15), Mk'Bit-Acc/EndRdx/Rchg(17), Mk'Bit-Acc/Dmg/EndRdx/Rchg(17), Mk'Bit-Dam%(19) Level 6: Power Burst -- Thn-Acc/Dmg(A), Thn-Dmg/EndRdx(19), Thn-Dmg/Rchg(21), Thn-Acc/Dmg/Rchg(21), Thn-Acc/Dmg/EndRdx(23), Thn-Dmg/EndRdx/Rchg(23) Level 8: Fly -- EndRdx-I(A) Level 10: Bone Smasher -- Mk'Bit-Dam%(A), Mk'Bit-Acc/Dmg(25), Mk'Bit-Dmg/EndRdx(25), Mk'Bit-Dmg/Rchg(27), Mk'Bit-Acc/EndRdx/Rchg(27), Mk'Bit-Acc/Dmg/EndRdx/Rchg(29) Level 12: Sniper Blast -- ExcCnt-Acc/Dmg(A), ExcCnt-Dmg/EndRdx(29), ExcCnt-Dmg/ActRdx(31), ExcCnt-Dmg/Rng(31), ExcCnt-Dmg/Rchg(31), ExcCnt-Stun%(33) Level 14: Build Up -- RechRdx-I(A) Level 16: Energize -- Prv-Heal/Rchg/EndRdx(A), Prv-Heal/Rchg(40), Prv-Heal(46), Prv-Heal/EndRdx(50), Prv-EndRdx/Rchg(50), Prv-Absorb%(50) Level 18: Aim -- RechRdx-I(A) Level 20: Combat Jumping -- Krm-ResKB(A) Level 22: Hasten -- RechRdx-I(A), RechRdx-I(33) Level 24: Stun -- Acc-I(A) Level 26: Explosive Blast -- Artl-Acc/Dam(A), Artl-Dam/End(33), Artl-Dam/Rech(34), Artl-Acc/Dam/Rech(34), Artl-Acc/Rech/Rng(34), Artl-End/Rech/Rng(36) Level 28: Power Boost -- RechRdx-I(A) Level 30: Boxing -- Acc-I(A) Level 32: Nova -- SprBlsWrt-Acc/Dmg(A), SprBlsWrt-Dmg/Rchg(36), SprBlsWrt-Acc/Dmg/Rchg(36), SprBlsWrt-Acc/Dmg/EndRdx(37), SprBlsWrt-Acc/Dmg/EndRdx/Rchg(37), SprBlsWrt-Rchg/Dmg%(37) Level 35: Boost Range -- RechRdx-I(A) Level 38: Total Focus -- Mk'Bit-Acc/Dmg/EndRdx/Rchg(A), Mk'Bit-Acc/Dmg(39), Mk'Bit-Dmg/EndRdx(39), Mk'Bit-Dmg/Rchg(39), Mk'Bit-Acc/EndRdx/Rchg(40), Mk'Bit-Dam%(40) Level 41: Tough -- StdPrt-ResDam/Def+(A), GldArm-3defTpProc(42), UnbGrd-ResDam/EndRdx/Rchg(42), UnbGrd-ResDam(42), UnbGrd-ResDam/EndRdx(43), UnbGrd-Rchg/ResDam(43) Level 44: Weave -- Rct-Def(A), Rct-Def/EndRdx(45), Rct-EndRdx/Rchg(45), Rct-Def/Rchg(45), Rct-Def/EndRdx/Rchg(46), Rct-ResDam%(46) Level 47: Charged Armor -- UnbGrd-ResDam(A), UnbGrd-ResDam/EndRdx(48), UnbGrd-Rchg/ResDam(48), UnbGrd-ResDam/EndRdx/Rchg(48) Level 49: Hover -- ShlWal-ResDam/Re TP(A) Level 1: Defiance Level 1: Brawl -- Empty(A) Level 1: Sprint -- Empty(A) Level 2: Rest -- Empty(A) Level 2: Swift -- Empty(A) Level 2: Hurdle -- Empty(A) Level 2: Health -- Pnc-Heal/+End(A), Mrc-Rcvry+(43) Level 2: Stamina -- EndMod-I(A), PwrTrns-EndMod(3), PwrTrns-+Heal(3) Level 49: Quick Form Level 8: Afterburner ------------
-
What is the set you would definitely play on Corruptor?
Chelsea Rorec replied to Lyrium's topic in Corruptor
Ice/Kin Ice/Cold AR/Traps Really loving my AR/TA at the moment. -
Not at all. Infact in team play people will litterally hate you for it. It is a skipable power.
-
I agree Flamethrower and ignite is not killing AV's fast enough. *ahem* Anyone who skips flamethrower is right as the dot is NOT stacking with ignite and murdering EB's/AV's. I totaly do NOT have the ability to one shot +3 mobs and 2 shot with slug and burst. This set totaly needs more DPS. Do you people even know how to AR ?
-
I did this with my elec/elec 49% range def and 74% S/L resists. It's very tanky. This Hero build was built using Mids Reborn 3.2.17 https://github.com/LoadedCamel/MidsReborn Click this DataLink to open the build! Level 50 Mutation Blaster Primary Power Set: Electrical Blast Secondary Power Set: Electricity Manipulation Power Pool: Flight Power Pool: Leaping Power Pool: Speed Power Pool: Fighting Ancillary Pool: Mu Mastery Hero Profile: Level 1: Lightning Bolt -- SprDfnBrr-Acc/Dmg(A), SprDfnBrr-Dmg/Rchg(5), SprDfnBrr-Acc/Dmg/Rchg(5), SprDfnBrr-Acc/Dmg/EndRdx(7), SprDfnBrr-Acc/Dmg/EndRdx/Rchg(7), SprDfnBrr-Rchg/+Status Protect(9) Level 1: Electric Fence -- Acc-I(A) Level 2: Ball Lightning -- Artl-Acc/Dam(A), Artl-Dam/End(9), Artl-Dam/Rech(11), Artl-Acc/Dam/Rech(11), Artl-Acc/Rech/Rng(13), Artl-End/Rech/Rng(13) Level 4: Charged Brawl -- Mk'Bit-Acc/Dmg(A), Mk'Bit-Dmg/EndRdx(15), Mk'Bit-Dmg/Rchg(15), Mk'Bit-Acc/EndRdx/Rchg(17), Mk'Bit-Acc/Dmg/EndRdx/Rchg(17), Mk'Bit-Dam%(19) Level 6: Short Circuit -- PreOptmz-Acc/Rech(A), PreOptmz-EndMod/End(19), PreOptmz-EndMod/End/Rech(21), PreOptmz-EndMod/Rech(21), PreOptmz-EndMod/Acc/End(23), PreOptmz-EndMod/Acc/Rech(23) Level 8: Fly -- HO:Micro(A) Level 10: Havoc Punch -- Mk'Bit-Dam%(A), Mk'Bit-Acc/Dmg(25), Mk'Bit-Dmg/EndRdx(25), Mk'Bit-Dmg/Rchg(27), Mk'Bit-Acc/EndRdx/Rchg(27), Mk'Bit-Acc/Dmg/EndRdx/Rchg(29) Level 12: Zapp -- ExcCnt-Acc/Dmg(A), ExcCnt-Dmg/EndRdx(29), ExcCnt-Dmg/ActRdx(31), ExcCnt-Dmg/Rng(31), ExcCnt-Dmg/Rchg(31), ExcCnt-Stun%(33) Level 14: Charge Up -- GssSynFr--ToHit/Rchg(A) Level 16: Thunder Strike -- SprBlsWrt-Acc/Dmg(A), SprBlsWrt-Dmg/Rchg(33), SprBlsWrt-Acc/Dmg/Rchg(33), SprBlsWrt-Acc/Dmg/EndRdx(34), SprBlsWrt-Acc/Dmg/EndRdx/Rchg(34), SprBlsWrt-Rchg/Dmg%(34) Level 18: Build Up -- GssSynFr--ToHit/Rchg(A) Level 20: Dynamo -- PwrTrns-Dam/Acc/Rech/End(A), PwrTrns-Dam/Acc/End(36), PwrTrns-+Heal(36), NmnCnv-Regen/Rcvry+(36), Prv-Absorb%(50) Level 22: Combat Jumping -- Krm-ResKB(A) Level 24: Hasten -- RechRdx-I(A), RechRdx-I(37) Level 26: Boxing -- Acc-I(A) Level 28: Power Sink -- RechRdx-I(A) Level 30: Tough -- StdPrt-ResDam/Def+(A), GldArm-3defTpProc(37), Ags-ResDam/EndRdx(37), Ags-ResDam/Rchg(39), Ags-ResDam/EndRdx/Rchg(39), Ags-ResDam(39) Level 32: Thunderous Blast -- Artl-End/Rech/Rng(A), Artl-Acc/Dam(40), Artl-Dam/End(40), Artl-Dam/Rech(40), Artl-Acc/Dam/Rech(42), Artl-Acc/Rech/Rng(42) Level 35: Force of Thunder -- AbsAmz-Acc/Stun/Rchg(A), AbsAmz-Acc/Rchg(42), SuddAcc--KB/+KD(43), FrcFdb-Rechg%(43) Level 38: Shocking Grasp -- Mk'Bit-Acc/Dmg/EndRdx/Rchg(A), Mk'Bit-Acc/Dmg(43), Mk'Bit-Dmg/EndRdx(45), Mk'Bit-Dmg/Rchg(45), Mk'Bit-Acc/EndRdx/Rchg(45), Mk'Bit-Dam%(46) Level 41: Weave -- RedFrt-Def/EndRdx(A), RedFrt-Def/Rchg(46), RedFrt-Def/EndRdx/Rchg(46), RedFrt-Def(48), ShlWal-ResDam/Re TP(48) Level 44: Charged Armor -- Ags-ResDam/EndRdx(A), Ags-ResDam/Rchg(48), Ags-ResDam/EndRdx/Rchg(50), Ags-ResDam(50) Level 47: Hover -- LucoftheG-Def/Rchg+(A) Level 49: Evasive Maneuvers -- LucoftheG-Def/Rchg+(A) Level 1: Defiance Level 1: Brawl -- Empty(A) Level 1: Sprint -- Empty(A) Level 2: Rest -- Empty(A) Level 2: Swift -- Empty(A) Level 2: Hurdle -- Empty(A) Level 2: Health -- Pnc-Heal/+End(A) Level 2: Stamina -- EndMod-I(A), PwrTrns-EndMod(3), PwrTrns-+Heal(3) Level 1: Shocked Level 49: Quick Form Level 50: Preemptive Core Flawless Interface Level 50: Assault Radial Embodiment Level 50: Barrier Core Epiphany Level 50: Musculature Radial Paragon Level 8: Afterburner ------------ | Copy & Paste this data into Mids Reborn : Hero Designer to view the build | |-------------------------------------------------------------------| |MxDz;1479;668;1336;HEX;| |78DA6594C94E1B4110867B3C63BC43C0F18281801D8357BC40944B2E5112B8602B2| |848B95A963D36938C6CCB8CA5F0007989EC971CF21AD9DF2367120E59C8224DBAA7| |FEB68D1869FC4D577757FD555DEDFAA33BC14E67F7265342B7CDE6D151E316FFB5F| |4A1B73EB29A96D1EF31F178F8BB8A99C6BD66AFABB74B3BA6DEB28646AB69D29EAC| |9C3F180D06FDA1355E6058C78D7AB3670C4626790CECF7FB6669D734BA8756D0F9A| |EE9CD81D1EBFA9DC1C140D7DB215A2396F089D8CEC068956480FA88FB135FC771AE| |6B83BF65215271A4DA6EC634C6AA1AD314D0459C51418DE87513DB6CFCD88C25986| |3AC8C1D728F8AEAA61D1AD1EF066788410FE825EA7C972AE5A81DF238DB050F8997| |0CF00171E121B1CAE19691DDBF48E3C219F1F23FF03731FA07FC4B0C78E8B09C5C3| |C3738349589C03EE9D1873071C88A435602B21290B50C59DB1C01994BE01D26DF13| |AF7C003F829F886B9F895B1C212927F4DAE51885E339E971EE894A3B9E82CF88C9E| |7E00BF02551A89C971EE7E151A41286472DFC834A71F53BF813BCAF507D4FC85394| |D729824D2C72C6B1A2B11437C660546205CA220D2A7C7251C65E44A388722E51AFD| |86C092B55BE7245A6B8221C72DFE92D0A9CAE90908D2AB80D5E235E17974D1ED72A| |5A2A8316CCA0053368C11C5A30871614A79742643555A3FAE4EAC4FC172A45FE318| |D4DBE6A5DCA5CC781E7D118453446118D5144636CA281349E6356163DEB27ED9B01| |30442CCF827B94BB38BB8294574021CA28441585A8A2103E1EA1244FA81421E3DB3| |C631569ACC098D426F7DF5ED6A6EFB3CD1F56BB68DAD726179C298EE9C4CF4DCA39| |D3D78BA66FE74C49CAEB74CAE852D6A842AE532AB70B1D182F382ADB8ECA3D9107E| |2DB77637C81D4FF263535781566CE3F8233A885A766587472D5EDFFFDB5D7D5| |-------------------------------------------------------------------|
-
It looks terrible. I mean, look at the length of that post. Mouse wheels don't last forever you know ! Short Forum Export plx !
-
Try this This Villain build was built using Mids Reborn 3.2.17 https://github.com/LoadedCamel/MidsReborn Click this DataLink to open the build! Level 50 Natural Stalker Primary Power Set: Ninja Blade Secondary Power Set: Ninjitsu Power Pool: Leaping Power Pool: Leadership Ancillary Pool: Weapon Mastery Villain Profile: Level 1: Sting of the Wasp -- TchofDth-Acc/Dmg(A), TchofDth-Dmg/EndRdx(5), TchofDth-Dmg/Rchg(5), TchofDth-Acc/Dmg/EndRdx(7), TchofDth-Dmg/EndRdx/Rchg(7), TchofDth-Dam%(9) Level 1: Hide -- LucoftheG-Def/Rchg+(A) Level 2: Gambler's Cut -- Mk'Bit-Acc/Dmg(A), Mk'Bit-Dmg/EndRdx(9), Mk'Bit-Dmg/Rchg(11), Mk'Bit-Acc/EndRdx/Rchg(11), Mk'Bit-Acc/Dmg/EndRdx/Rchg(13), Mk'Bit-Dam%(13) Level 4: Flashing Steel -- Obl-Dmg(A), Obl-Acc/Rchg(15), Obl-Dmg/Rchg(15), Obl-Acc/Dmg/Rchg(17), Obl-Acc/Dmg/EndRdx/Rchg(17), Obl-%Dam(19) Level 6: Assassin's Blade -- SprStlGl-Acc/Dmg(A), SprStlGl-Dmg/Rchg(19), SprStlGl-Acc/Dmg/Rchg(21), SprStlGl-Dmg/EndRdx/Rchg(21), SprStlGl-Acc/Dmg/EndRdx/Rchg(23), SprStlGl-Rchg/Hide%(23) Level 8: Super Jump -- Jump-I(A) Level 10: Ninja Reflexes -- RedFrt-Def/EndRdx(A), RedFrt-Def/Rchg(25), RedFrt-EndRdx/Rchg(25), RedFrt-Def/EndRdx/Rchg(27), RedFrt-Def(27), RedFrt-EndRdx(29) Level 12: Danger Sense -- RedFrt-EndRdx(A), RedFrt-Def/EndRdx(29), RedFrt-Def/Rchg(31), RedFrt-EndRdx/Rchg(31), RedFrt-Def/EndRdx/Rchg(31), RedFrt-Def(33) Level 14: Build Up -- AdjTrg-ToHit/EndRdx/Rchg(A), AdjTrg-ToHit/Rchg(36) Level 16: Kuji-In Rin -- RechRdx-I(A) Level 18: Divine Avalanche -- Acc-I(A), Acc-I(34), LucoftheG-Def/Rchg+(34) Level 20: Kuji-In Sha -- StdPrt-ResDam/Def+(A), GldArm-3defTpProc(33), Prv-Heal(33), Prv-Heal/EndRdx(34), Prv-Heal/Rchg(40), Prv-Heal/Rchg/EndRdx(42) Level 22: Combat Jumping -- Krm-ResKB(A) Level 24: Caltrops -- Ann-ResDeb%(A) Level 26: Soaring Dragon -- Mk'Bit-Acc/Dmg(A), Mk'Bit-Dmg/EndRdx(36), Mk'Bit-Dmg/Rchg(36), Mk'Bit-Acc/EndRdx/Rchg(37), Mk'Bit-Acc/Dmg/EndRdx/Rchg(37), Mk'Bit-Dam%(37) Level 28: Smoke Flash -- Acc-I(A) Level 30: Assault -- EndRdx-I(A), EndRdx-I(45) Level 32: Golden Dragonfly -- SprAssMar-Acc/Dmg(A), SprAssMar-Dmg/Rchg(39), SprAssMar-Acc/Dmg/Rchg(39), SprAssMar-Dmg/EndRdx/Rchg(39), SprAssMar-Acc/Dmg/EndRdx/Rchg(40), SprAssMar-Rchg/Rchg Build Up(40) Level 35: Blinding Powder -- Acc-I(A) Level 38: Physical Perfection -- PrfShf-End%(A), PrfShf-EndMod(45), PwrTrns-+Heal(50) Level 41: Targeting Drone -- GssSynFr--ToHit(A), GssSynFr--ToHit/Rchg(42), GssSynFr--ToHit/Rchg/EndRdx(42), GssSynFr--Rchg/EndRdx(43), GssSynFr--ToHit/EndRdx(43), GssSynFr--Build%(43) Level 44: Tactics -- AdjTrg-ToHit/EndRdx(A), AdjTrg-ToHit/EndRdx/Rchg(45), AdjTrg-EndRdx/Rchg(46) Level 47: Shuriken -- Thn-Acc/Dmg(A), Thn-Dmg/EndRdx(48), Thn-Dmg/Rchg(48), Thn-Acc/Dmg/Rchg(48), Thn-Acc/Dmg/EndRdx(50), Thn-Dmg/EndRdx/Rchg(50) Level 49: Web Grenade -- Acc-I(A) Level 1: Assassination Level 1: Brawl -- Empty(A) Level 1: Sprint -- Clr-Stlth(A) Level 2: Rest -- Empty(A) Level 2: Swift -- Run-I(A) Level 2: Hurdle -- Jump-I(A) Level 2: Health -- Pnc-Heal/+End(A), Mrc-Rcvry+(46), NmnCnv-Regen/Rcvry+(46) Level 2: Stamina -- EndMod-I(A), PwrTrns-EndMod(3), PwrTrns-+Heal(3) Level 8: Double Jump Level 50: Musculature Radial Paragon ------------
-
Earth/Storm I used to farm on live with an Earth/Storm and nothing has changed. Probably gotten better now tbh.
-
I see Glue Arrow as 3.7 dps Glue Arrow with Procs 8.83 dps Blazing Arrow at 26.87 dps Fist full of Arrows 12.16 dps Explosive Arrow 6.52 dps All with just 3 dmg IO's Thats what i see in my mids.
-
The main problem i see with your build is you used long forum export. Why do you hate us ? What have we ever done to you ? Just say no to long forum exports !
-
/elec is all melee You're missing out on all the Kapow !
-
A lot of blaster sets have a always on endurance power and with those sets i tend to take fly and combat jumping and ignore hover. CJ stops the floating of fly making it act a bit like hover but with less drift when you release the button. Plus it's def and immob. So if your set can support it then try it. It better movement than hover with the same defence and immob protection thrown in.
-
I tested trip mine some time ago to see if damage inspiration and assault effect trip mine. They do not. I see no reason why tactics or yellows insp would be any different.
-
So adorable that you think it's going to end then. It's never going to end. My poor deluded beautiful flower, welcome to EA.
-
Yes. A short forum export please.
-
Electrical Blast/Manipulation Seems to Be Uncommon
Chelsea Rorec replied to Bojutsu's topic in Blaster
I did this with mine I use force of thunder alot as an opener so i can get into mobs and use short circuit. So don't discount it just because it does no damage. -
Electrical Blast/Manipulation Seems to Be Uncommon
Chelsea Rorec replied to Bojutsu's topic in Blaster
+1 Elec/Elec/Mu Love mine, Really Tanky. -
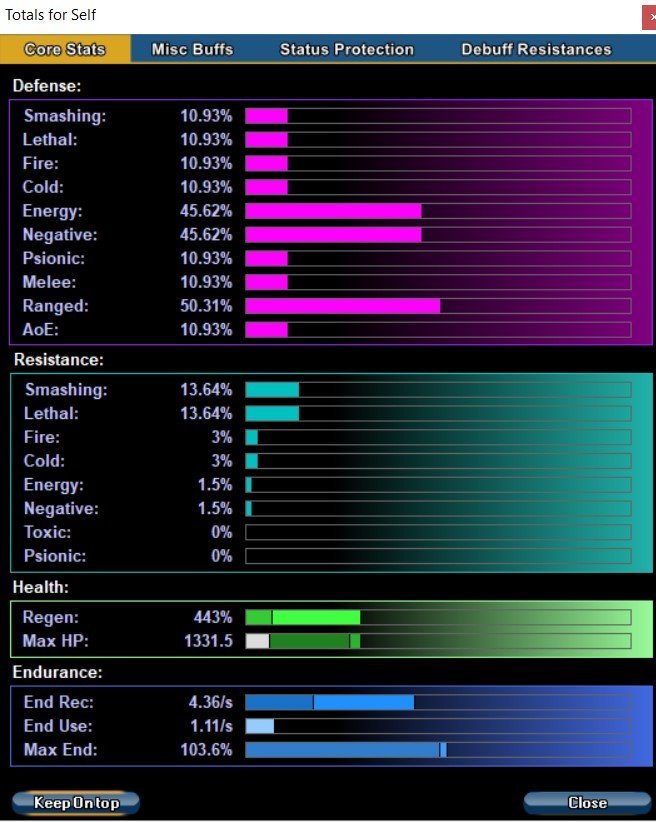
I don't understand why people are having end issues. This is my AR/Dev and this is with assault/tactics/targeting drone running. If you put 1 end mod in field operative you'll have 4 times stamina. 3 slot stamina, 1 numina regen/recovery in FO with 1 end mod and i can run everything even with fly on.

-
Like what has been said previously S/L def and Ranged def are hard to soft cap. What is easier is Ranged def and S/L resists and makes you a lot tankier.
-
If i did that then everyone would start using it and /Regen would get another nerf and i don't want blaming for that 😛 It's not hard to work out.
-
ALLLLLLLLLLLLLLLLLLLLLLLLLLLLLLLLLLLLLL the time 😈
-
My /Regen has capped S/L def, capped S/L resists and high resists over all and capped melee def. Put the high regen on top of that and i have a really OP toon. Do i think regen needs a buff .....sure......*Evil Grin*
-
The stalker proc chance for hide means you can kill 3 right off the bat. Crit from hide with a high dmg power(1)>Assassin strike + proc fires(2)>Crit from hide with a high dmg power(3). repeat as necessary. No reason to pick up unnecessary pool powers for that.
-
Just realised how old this thread is 🤦♀️