The Beta Account Center is temporarily unavailable
×


Chelsea Rorec
-
Posts
306 -
Joined
-
Last visited
Content Type
Profiles
Forums
Events
Store
Articles
Patch Notes
Everything posted by Chelsea Rorec
-
I like AR i've played a lot of different combos and my fav is AR/Dev. I've also tried beam and found it kinda meh. It dosn't have the kick AR does for me. I think it is because it lacks the big hitters like flame thrower and ignite.
-
Toe bombing is a thing. Devices trip mine is uninteruptable. Unlike Traps trip mine. Oh look an unmined toe !
-

Energy Primary Blaster with Devices or Energy Secondary?
Chelsea Rorec replied to Ricktastic79's topic in Blaster
I have an eng/eng and it is a lot of fun. Don't bother with the knockback to knockdown you have better things to do with the slot. Very easy to cap ranged def and S/L resists for a quite tanky blaster. Boost range and Power boost from /eng very usefull. Also Power thrust is just hilarious 🙂 -
Blaster T1 and T2 primary attacks can be used when mezzed. I always put the ATO mez proc in there.
-
1: It is so little damage and when compared to Full auto and Trip Mine/LRM it wasn't worth the power pick. 2: Both but mainly for the Defence. That build also has a lot of damage bounses added to it that it depends on, so changing the sets would completely change the damage output/defence and Acc Enjoy 🙂
-
Ceiling cat is deciding which NPC to kill first.
-
How are Earth/ or /Earth for that matter?
Chelsea Rorec replied to Duck-Smokes-Quack's topic in Blaster
I don't know if it is me but i feel there is a disconnect between the animation and the power hitting the npc which greatly disappoints me and ruins my immersion. Damage on a blaster is not the best. -
Burst and Slug will kill most things with 1 application. For those persistent NPC's Sniper Rifle and Taser. EB,s and AV,s Flamethrower and Ignite + Full auto melts all. Mobs it's LRM Rocket ,Full Auto,Trip Mine slaughters all mobs. Flamethrower if you need it. Open with Sniper rifle which one shots everything then Burst,Slug any others. Sniper Rifle,Burst,Slug,Taser general rotation.
-
For what ?
-
Go for it.. It is a fun build and my all time fav.
-
here you go babe. high def high Acc high to hit and high dmg. This Hero build was built using Mids Reborn 3.0.4.7 https://github.com/Reborn-Team/MidsReborn Click this DataLink to open the build! Level 50 Mutation Blaster Primary Power Set: Assault Rifle Secondary Power Set: Devices Power Pool: Flight Power Pool: Leaping Power Pool: Leadership Power Pool: Speed Ancillary Pool: Munitions Mastery Hero Profile: Level 1: Burst -- SprDfnBrr-Acc/Dmg(A), SprDfnBrr-Dmg/Rchg(3), SprDfnBrr-Acc/Dmg/Rchg(5), SprDfnBrr-Acc/Dmg/EndRdx(7), SprDfnBrr-Acc/Dmg/EndRdx/Rchg(9), SprDfnBrr-Rchg/+Status Protect(46) Level 1: Toxic Web Grenade -- HO:Endo(A) Level 2: Slug -- Thn-Acc/Dmg(A), Thn-Dmg/EndRdx(3), Thn-Dmg/Rchg(5), Thn-Acc/Dmg/Rchg(7), Thn-Acc/Dmg/EndRdx(9), Thn-Dmg/EndRdx/Rchg(17) Level 4: Caltrops -- ImpSwf-Dam%(A) Level 6: Taser -- Thn-Acc/Dmg(A), Thn-Dmg/EndRdx/Rchg(23), Thn-Acc/Dmg/EndRdx(25), Thn-Dmg/EndRdx(37), Thn-Dmg/Rchg(40), Thn-Acc/Dmg/Rchg(42) Level 8: Fly -- HO:Micro(A) Level 10: Targeting Drone -- AdjTrg-ToHit/EndRdx/Rchg(A), GssSynFr--Build%(37), AdjTrg-ToHit/EndRdx(46) Level 12: Sniper Rifle -- ExcCnt-Acc/Dmg(A), ExcCnt-Dmg/EndRdx(13), ExcCnt-Dmg/ActRdx(13), ExcCnt-Dmg/Rng(15), ExcCnt-Dmg/Rchg(15), ExcCnt-Stun%(17) Level 14: Beanbag -- Stp-Acc/Stun/Rchg(A), Stp-Acc/Rchg(25) Level 16: Smoke Grenade -- HO:Lyso(A) Level 18: Flamethrower -- Artl-Acc/Dam(A), Artl-Dam/End(19), Artl-Dam/Rech(19), Artl-Acc/Dam/Rech(21), Artl-Acc/Rech/Rng(21), Artl-End/Rech/Rng(23) Level 20: Field Operative -- LucoftheG-Def/Rchg+(A), NmnCnv-Regen/Rcvry+(42), PwrTrns-EndMod(43), PwrTrns-+Heal(43), Pnc-Heal/+End(43), Prv-Absorb%(46) Level 22: Combat Jumping -- Krm-ResKB(A) Level 24: Assault -- EndRdx-I(A) Level 26: Ignite -- Artl-Acc/Dam(A), Artl-Dam/End(27), Artl-Dam/Rech(27), Artl-Acc/Dam/Rech(36), Artl-Acc/Rech/Rng(36), Artl-End/Rech/Rng(36) Level 28: Trip Mine -- SprBlsWrt-Acc/Dmg(A), SprBlsWrt-Dmg/Rchg(29), SprBlsWrt-Acc/Dmg/Rchg(29), SprBlsWrt-Acc/Dmg/EndRdx(31), SprBlsWrt-Acc/Dmg/EndRdx/Rchg(31), SprBlsWrt-Rchg/Dmg%(34) Level 30: Hasten -- RechRdx-I(A), RechRdx-I(31) Level 32: Full Auto -- Artl-Acc/Dam(A), Artl-Dam/End(33), Artl-Dam/Rech(33), Artl-Acc/Dam/Rech(33), Artl-Acc/Rech/Rng(34), Artl-End/Rech/Rng(34) Level 35: Tactics -- AdjTrg-ToHit/EndRdx(A), AdjTrg-ToHit/EndRdx/Rchg(37) Level 38: Gun Drone -- ExpRnf-Acc/Rchg(A), ExpRnf-Acc/Dmg(39), ExpRnf-Dmg/EndRdx(39), ExpRnf-Acc/Dmg/Rchg(39), ExpRnf-EndRdx/Dmg/Rchg(40), ExpRnf-+Res(Pets)(40) Level 41: Body Armor -- StdPrt-ResDam/Def+(A), GldArm-3defTpProc(42), UnbGrd-Max HP%(50) Level 44: Cryo Freeze Ray -- BslGaz-Acc/Hold(A), BslGaz-Acc/Rchg(45), BslGaz-Acc/EndRdx/Rchg/Hold(45), BslGaz-EndRdx/Rchg/Hold(45) Level 47: LRM Rocket -- Artl-Acc/Dam(A), Artl-Dam/End(48), Artl-Dam/Rech(48), Artl-Acc/Dam/Rech(48), Artl-Acc/Rech/Rng(50), Artl-End/Rech/Rng(50) Level 49: Surveillance -- Acc-I(A) Level 1: Defiance Level 1: Brawl -- Empty(A) Level 1: Sprint -- Clr-Stlth(A) Level 2: Rest -- Empty(A) Level 2: Swift -- Run-I(A) Level 2: Hurdle -- Jump-I(A) Level 2: Health -- Mrc-Rcvry+(A) Level 2: Stamina -- EndMod-I(A), PrfShf-EndMod(11), PrfShf-End%(11) Level 49: Quick Form Level 1: Prestige Power Dash -- Empty(A) Level 1: Prestige Power Slide -- Empty(A) Level 1: Prestige Power Quick -- Empty(A) Level 1: Prestige Power Rush -- Empty(A) Level 1: Prestige Power Surge -- Empty(A) Level 4: Ninja Run Level 50: Musculature Partial Radial Revamp Level 50: Assault Partial Core Graft Level 50: Ion Partial Radial Judgement Level 50: Diamagnetic Partial Core Conversion Level 50: Longbow Partial Core Improved Ally Level 50: Barrier Core Epiphany ------------
-
Electrical Blast / Electricity Manipulation Blaster
Chelsea Rorec replied to Small Onez's topic in Blaster
mine before the changes..honeslty i don't think i'll change it. This Hero build was built using Mids Reborn 3.0.4.7 https://github.com/Reborn-Team/MidsReborn Click this DataLink to open the build! Level 50 Mutation Blaster Primary Power Set: Electrical Blast Secondary Power Set: Electricity Manipulation Power Pool: Flight Power Pool: Leaping Power Pool: Speed Power Pool: Fighting Ancillary Pool: Mu Mastery Hero Profile: Level 1: Lightning Bolt -- SprDfnBrr-Acc/Dmg(A), SprDfnBrr-Dmg/Rchg(5), SprDfnBrr-Acc/Dmg/Rchg(5), SprDfnBrr-Acc/Dmg/EndRdx(7), SprDfnBrr-Acc/Dmg/EndRdx/Rchg(7), SprDfnBrr-Rchg/+Status Protect(9) Level 1: Electric Fence -- Acc-I(A) Level 2: Ball Lightning -- Artl-Acc/Dam(A), Artl-Dam/End(9), Artl-Dam/Rech(11), Artl-Acc/Dam/Rech(11), Artl-Acc/Rech/Rng(13), Artl-End/Rech/Rng(13) Level 4: Charged Brawl -- Mk'Bit-Acc/Dmg(A), Mk'Bit-Dmg/EndRdx(15), Mk'Bit-Dmg/Rchg(15), Mk'Bit-Acc/EndRdx/Rchg(17), Mk'Bit-Acc/Dmg/EndRdx/Rchg(17), Mk'Bit-Dam%(19) Level 6: Short Circuit -- PreOptmz-Acc/Rech(A), PreOptmz-EndMod/End(19), PreOptmz-EndMod/End/Rech(21), PreOptmz-EndMod/Rech(21), PreOptmz-EndMod/Acc/End(23), PreOptmz-EndMod/Acc/Rech(23) Level 8: Fly -- HO:Micro(A) Level 10: Havoc Punch -- Mk'Bit-Dam%(A), Mk'Bit-Acc/Dmg(25), Mk'Bit-Dmg/EndRdx(25), Mk'Bit-Dmg/Rchg(27), Mk'Bit-Acc/EndRdx/Rchg(27), Mk'Bit-Acc/Dmg/EndRdx/Rchg(29) Level 12: Zapp -- ExcCnt-Acc/Dmg(A), ExcCnt-Dmg/EndRdx(29), ExcCnt-Dmg/ActRdx(31), ExcCnt-Dmg/Rng(31), ExcCnt-Dmg/Rchg(31), ExcCnt-Stun%(33) Level 14: Aim -- GssSynFr--ToHit/Rchg(A) Level 16: Thunder Strike -- SprBlsWrt-Acc/Dmg(A), SprBlsWrt-Dmg/Rchg(33), SprBlsWrt-Acc/Dmg/Rchg(33), SprBlsWrt-Acc/Dmg/EndRdx(34), SprBlsWrt-Acc/Dmg/EndRdx/Rchg(34), SprBlsWrt-Rchg/Dmg%(34) Level 18: Build Up -- GssSynFr--ToHit/Rchg(A) Level 20: Dynamo -- PwrTrns-Dam/Acc/Rech/End(A), PwrTrns-Dam/Acc/End(36), PwrTrns-+Heal(36), NmnCnv-Regen/Rcvry+(36), Prv-Absorb%(50) Level 22: Combat Jumping -- Krm-ResKB(A) Level 24: Hasten -- RechRdx-I(A), RechRdx-I(37) Level 26: Boxing -- Acc-I(A) Level 28: Power Sink -- RechRdx-I(A) Level 30: Tough -- StdPrt-ResDam/Def+(A), GldArm-3defTpProc(37), Ags-ResDam/EndRdx(37), Ags-ResDam/Rchg(39), Ags-ResDam/EndRdx/Rchg(39), Ags-ResDam(39) Level 32: Thunderous Blast -- Artl-End/Rech/Rng(A), Artl-Acc/Dam(40), Artl-Dam/End(40), Artl-Dam/Rech(40), Artl-Acc/Dam/Rech(42), Artl-Acc/Rech/Rng(42) Level 35: Force of Thunder -- AbsAmz-Acc/Stun/Rchg(A), AbsAmz-Acc/Rchg(42), SuddAcc--KB/+KD(43), FrcFdb-Rechg%(43) Level 38: Shocking Grasp -- Mk'Bit-Acc/Dmg/EndRdx/Rchg(A), Mk'Bit-Acc/Dmg(43), Mk'Bit-Dmg/EndRdx(45), Mk'Bit-Dmg/Rchg(45), Mk'Bit-Acc/EndRdx/Rchg(45), Mk'Bit-Dam%(46) Level 41: Weave -- RedFrt-Def/EndRdx(A), RedFrt-Def/Rchg(46), RedFrt-Def/EndRdx/Rchg(46), RedFrt-Def(48), ShlWal-ResDam/Re TP(48) Level 44: Charged Armor -- Ags-ResDam/EndRdx(A), Ags-ResDam/Rchg(48), Ags-ResDam/EndRdx/Rchg(50), Ags-ResDam(50) Level 47: Hover -- LucoftheG-Def/Rchg+(A) Level 49: Afterburner -- LucoftheG-Def/Rchg+(A) Level 1: Defiance Level 1: Brawl -- Empty(A) Level 1: Sprint -- Empty(A) Level 2: Rest -- Empty(A) Level 2: Swift -- Empty(A) Level 2: Hurdle -- Empty(A) Level 2: Health -- Pnc-Heal/+End(A) Level 2: Stamina -- EndMod-I(A), PwrTrns-EndMod(3), PwrTrns-+Heal(3) Level 49: Quick Form Level 50: Preemptive Core Flawless Interface Level 50: Assault Radial Embodiment Level 50: Barrier Core Epiphany Level 50: Musculature Radial Paragon ------------ -
Here is mine. 47% ranged def/ 73% S/L resists 42% Energy Lots of fun This Hero build was built using Mids Reborn 3.0.4.7 https://github.com/Reborn-Team/MidsReborn Click this DataLink to open the build! Level 50 Mutation Blaster Primary Power Set: Energy Blast Secondary Power Set: Energy Manipulation Power Pool: Flight Power Pool: Leaping Power Pool: Speed Power Pool: Fighting Ancillary Pool: Mu Mastery Hero Profile: Level 1: Power Blast -- SprDfnBrr-Acc/Dmg(A), SprDfnBrr-Dmg/Rchg(5), SprDfnBrr-Acc/Dmg/Rchg(5), SprDfnBrr-Acc/Dmg/EndRdx(7), SprDfnBrr-Acc/Dmg/EndRdx/Rchg(7), SprDfnBrr-Rchg/+Status Protect(9) Level 1: Power Thrust -- Acc-I(A) Level 2: Energy Torrent -- Artl-Acc/Dam(A), Artl-Dam/End(9), Artl-Dam/Rech(11), Artl-Acc/Dam/Rech(11), Artl-Acc/Rech/Rng(13), Artl-End/Rech/Rng(13) Level 4: Energy Punch -- Mk'Bit-Acc/Dmg(A), Mk'Bit-Dmg/EndRdx(15), Mk'Bit-Dmg/Rchg(15), Mk'Bit-Acc/EndRdx/Rchg(17), Mk'Bit-Acc/Dmg/EndRdx/Rchg(17), Mk'Bit-Dam%(19) Level 6: Power Burst -- Thn-Acc/Dmg(A), Thn-Dmg/EndRdx(19), Thn-Dmg/Rchg(21), Thn-Acc/Dmg/Rchg(21), Thn-Acc/Dmg/EndRdx(23), Thn-Dmg/EndRdx/Rchg(23) Level 8: Fly -- EndRdx-I(A) Level 10: Bone Smasher -- Mk'Bit-Dam%(A), Mk'Bit-Acc/Dmg(25), Mk'Bit-Dmg/EndRdx(25), Mk'Bit-Dmg/Rchg(27), Mk'Bit-Acc/EndRdx/Rchg(27), Mk'Bit-Acc/Dmg/EndRdx/Rchg(29) Level 12: Sniper Blast -- ExcCnt-Acc/Dmg(A), ExcCnt-Dmg/EndRdx(29), ExcCnt-Dmg/ActRdx(31), ExcCnt-Dmg/Rng(31), ExcCnt-Dmg/Rchg(31), ExcCnt-Stun%(33) Level 14: Build Up -- RechRdx-I(A) Level 16: Energize -- Prv-Heal/Rchg/EndRdx(A), Prv-Heal/Rchg(40), Prv-Heal(46), Prv-Heal/EndRdx(50), Prv-EndRdx/Rchg(50), Prv-Absorb%(50) Level 18: Aim -- RechRdx-I(A) Level 20: Combat Jumping -- Krm-ResKB(A) Level 22: Hasten -- RechRdx-I(A), RechRdx-I(33) Level 24: Stun -- Acc-I(A) Level 26: Explosive Blast -- Artl-Acc/Dam(A), Artl-Dam/End(33), Artl-Dam/Rech(34), Artl-Acc/Dam/Rech(34), Artl-Acc/Rech/Rng(34), Artl-End/Rech/Rng(36) Level 28: Power Boost -- RechRdx-I(A) Level 30: Boxing -- Acc-I(A) Level 32: Nova -- SprBlsWrt-Acc/Dmg(A), SprBlsWrt-Dmg/Rchg(36), SprBlsWrt-Acc/Dmg/Rchg(36), SprBlsWrt-Acc/Dmg/EndRdx(37), SprBlsWrt-Acc/Dmg/EndRdx/Rchg(37), SprBlsWrt-Rchg/Dmg%(37) Level 35: Boost Range -- RechRdx-I(A) Level 38: Total Focus -- Mk'Bit-Acc/Dmg/EndRdx/Rchg(A), Mk'Bit-Acc/Dmg(39), Mk'Bit-Dmg/EndRdx(39), Mk'Bit-Dmg/Rchg(39), Mk'Bit-Acc/EndRdx/Rchg(40), Mk'Bit-Dam%(40) Level 41: Tough -- StdPrt-ResDam/Def+(A), GldArm-3defTpProc(42), UnbGrd-ResDam/EndRdx/Rchg(42), UnbGrd-ResDam(42), UnbGrd-ResDam/EndRdx(43), UnbGrd-Rchg/ResDam(43) Level 44: Weave -- Rct-Def(A), Rct-Def/EndRdx(45), Rct-EndRdx/Rchg(45), Rct-Def/Rchg(45), Rct-Def/EndRdx/Rchg(46), Rct-ResDam%(46) Level 47: Charged Armor -- UnbGrd-ResDam(A), UnbGrd-ResDam/EndRdx(48), UnbGrd-Rchg/ResDam(48), UnbGrd-ResDam/EndRdx/Rchg(48) Level 49: Hover -- ShlWal-ResDam/Re TP(A) Level 1: Defiance Level 1: Brawl -- Empty(A) Level 1: Sprint -- Empty(A) Level 2: Rest -- Empty(A) Level 2: Swift -- Empty(A) Level 2: Hurdle -- Empty(A) Level 2: Health -- Pnc-Heal/+End(A), Mrc-Rcvry+(43) Level 2: Stamina -- EndMod-I(A), PwrTrns-EndMod(3), PwrTrns-+Heal(3) Level 49: Quick Form ------------
-
lvl 32 Earth/Earth and it looks like it could be good proc'ed. early on you are 95% ranged with 1 melee power that is high damage. I really wanted more melee powers and you seemed to get pigeon holed into ranged. The Mud heal power is a must even tho it's effects (pbaoe slow) are short ranged and screams there should be more melee powers. In total 4 ranged(1 cone), 1 Target AoE(light dmg), 1 PBAoE (light dmg), 2 Melee (high/Extreme), 2 stuns (1 single target 1 Target AoE) There is still the chance all the AoE's and PBAoE's could be proc'ed and it might turn out awesome. Hitting Ranged Def softcap of 45% is easy and at the same time hitting 75% S/L resists.
-
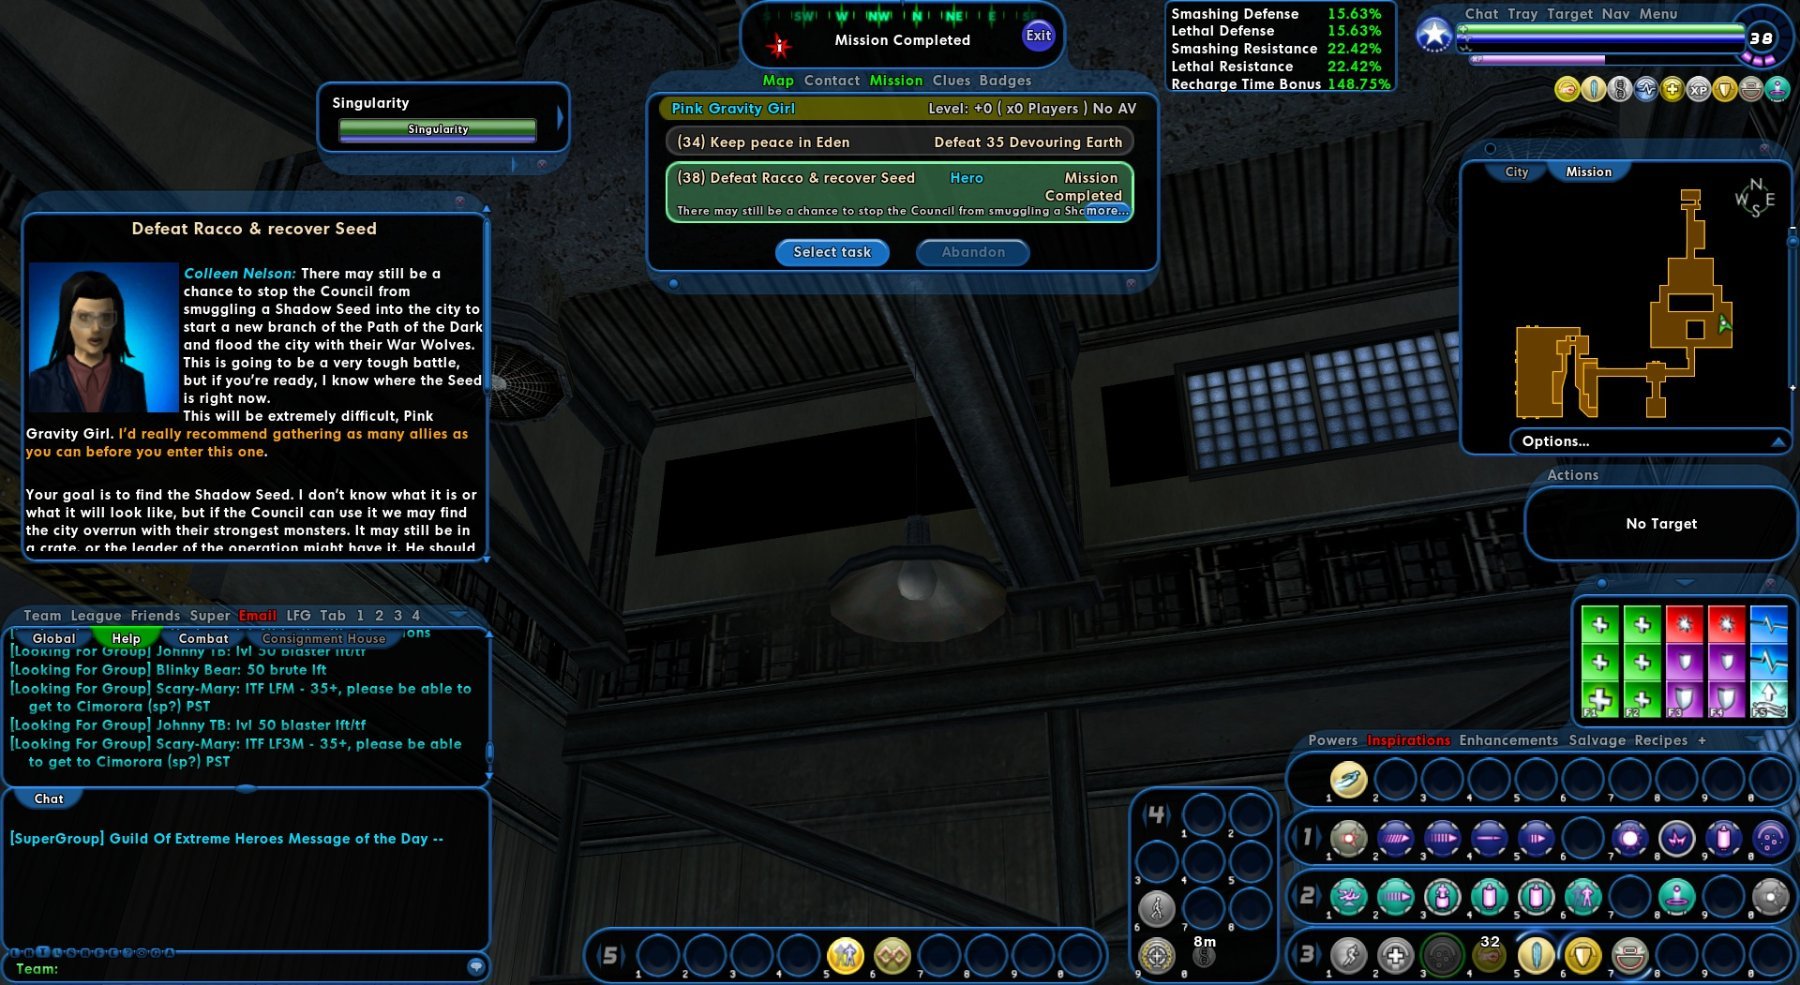
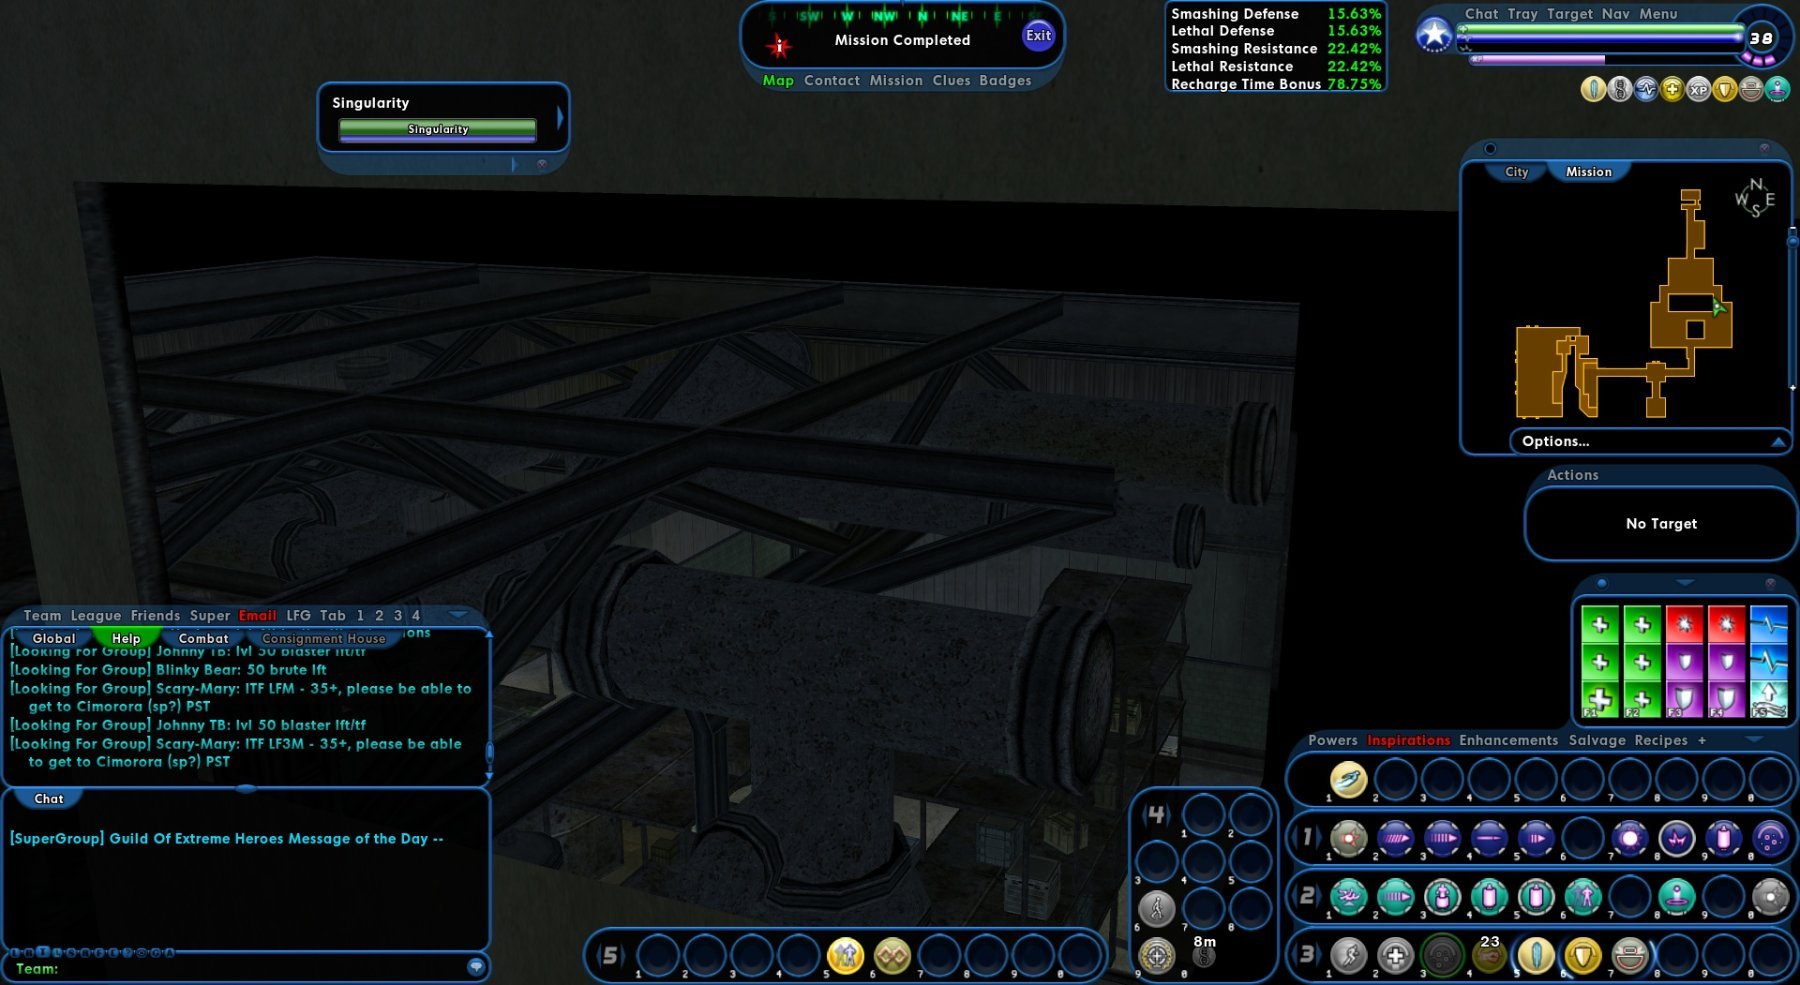
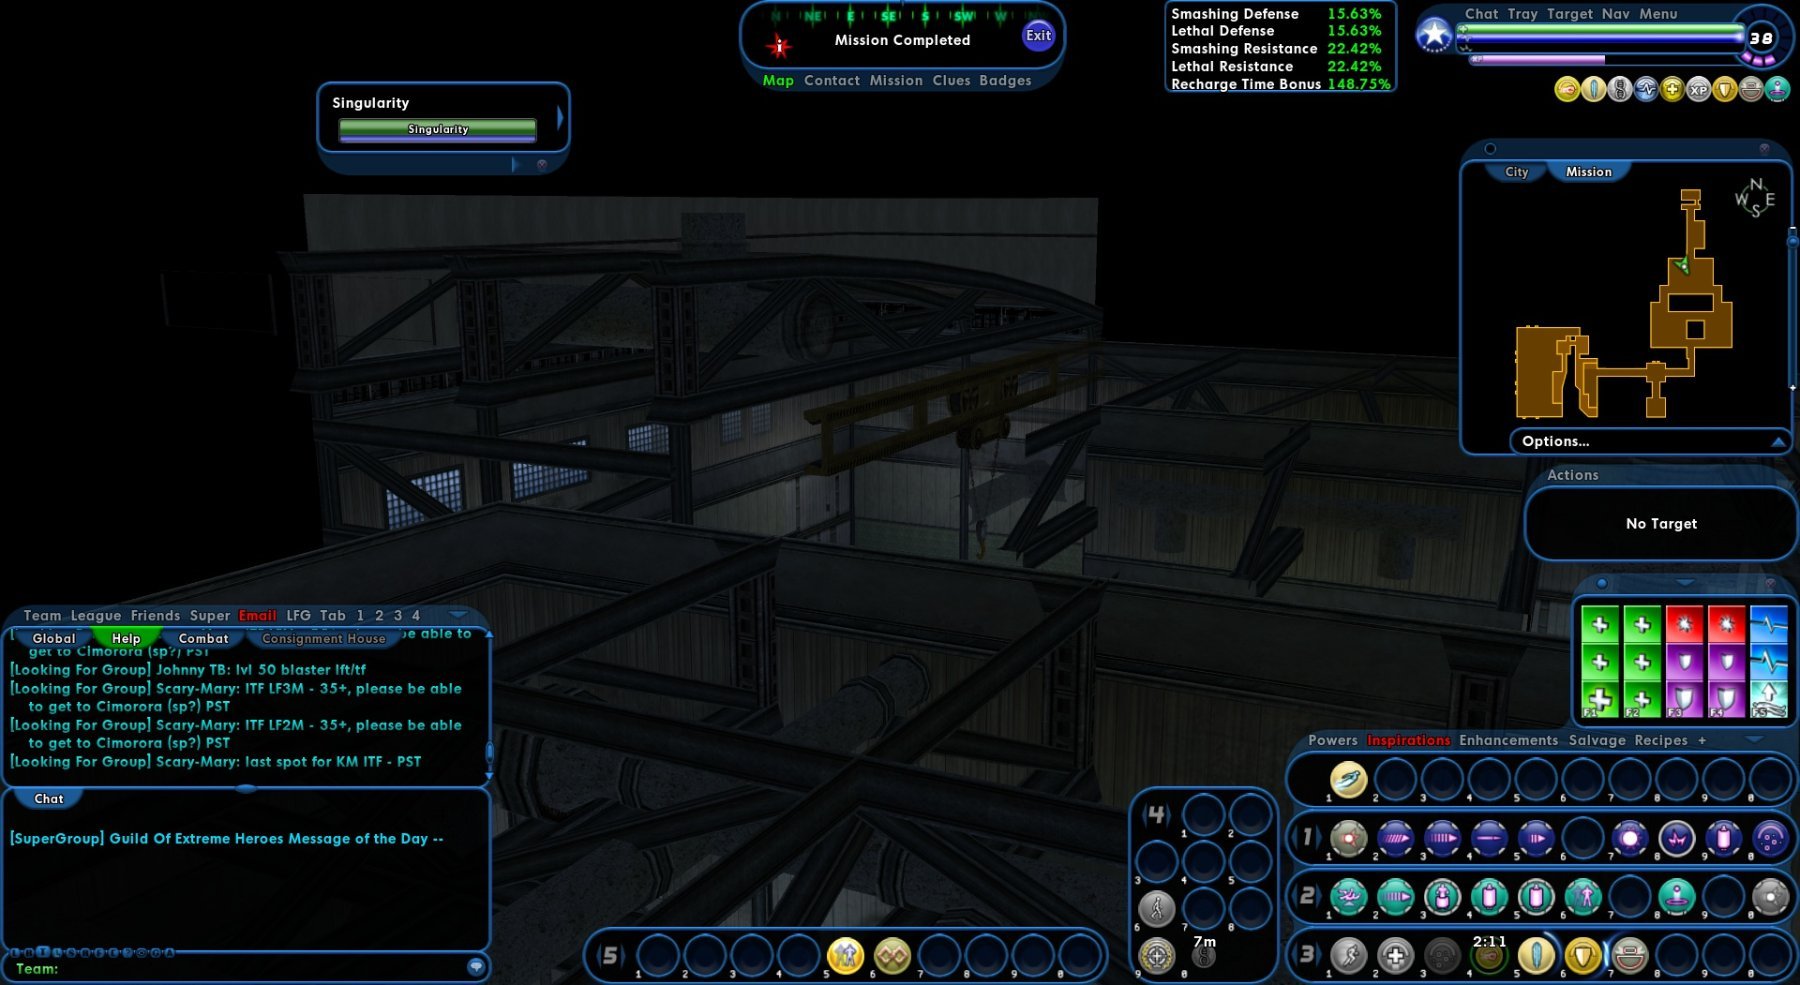
I found a hole in the map for the mission "Defeat Racco & recover Seed" by colleen Nelson. See screenshots. It allows you to go outside the map via the black window.

-
🙂
-
I think this is my new fav blaster. So much fun | Copy & Paste this data into Mids Reborn : Hero Designer to view the build | |-------------------------------------------------------------------| |MxDz;1384;641;1282;HEX;| |78DA6593D96ED35010868F63BB69D284D02D69D38626719790C54D807B249616448| |22A22C165643526711B255616092E790676CAF2063C018F018237002EDA0690B861| |0963CF9F10A996EDEF78CE99F3CFCC1997EE5D09BCDD7E705148C1CB0DA3D3A95CA| |277D76C7B6F1ADD5EDB6808E7F2D213C544E596D1AC9955FD8EE17CB8C6E470AADC| |B3ED56BBAB975B4D6BB752329A96DD6B185DABD514819D56ABA1174DC3B69A35BFF| |B51B64DB31A74875B56ADDEA589D07055D56C77EA961DB96A5BBBFA70FB528FF674| |46F71728A0243D5B1ABD2427C4812A84224441118A047A981332A8302755E6C3F49| |8EF5DE1DA366B609D59B0C03D709FB9ADC1957CA54995F795997E0554998109D0CB| |7C44BA32746547774311A76A609D79DA02F79833FBCC6BA4AB425785DE0CF4E6A03| |707BD30F4C2882FE2E583245FE14D711ED7693F1F6CBE0CDB9E507C53B04DC19624| |C720C72C05615B009FD2FA10F209FDF2F0DC6F66F40FF897B93C0085ECF231F94EB| |3963CFD9EE6628A38F301FC087E623EA3B5B3AC23CFDE965CFFF821EF13FFC9671A| |EF33258A771E39CC4705EA214484FD45E406FB1529FF45D47311F54CA09E09D4338| |17A6AA8A7867A3EA77896B0DF52823564D288A11631478CE2D6CEB1D6EA058E7935| |0F1698EBE799258A6505BE2B2FD867FD007CC9DC7805BE06DF3015D24DC23779C4B| |6B3C7601FFCC64C7F077F300F288F35D4600D7D96465F66D19759F465167D99435F| |3A8797C299A4905F0EF9E590DF26F27B476B3338930CCE44A3B875D8741F7A876C7| |9D4358FBA2E2B02D7806EBAE894467FEFA07862764719FD9F42722D877EB248E396| |E3714B826B71746255FFBFC523C5391A0FBACC83AEFB1C1EE90FBE8C8DBF8E8DFF0| |1A1F4CD39| |-------------------------------------------------------------------|
-
Love this build. Hail of bullets and it's almost capped to melee def as well as ranged so can scrap for a short period. Some resists and heal/Regen and because of the knockdown on 2 powers it is very survivable and makes it very scrappy. Amazingly fluid sets offering a lot of fun.
-
Obvious comment to start a fight.
-
This is the beauty of this game. Ask one question and get a different answer everytime because everyone plays differently. I prefer not to have to visit the Appa salesman and have him scream in my face that i'm broke. 🙂
-
Given the choices offered i would go for ninja blade. Dual Blades is kinda meh and i feel it really dosn't work with stalkers. Ninja blade is very quick and has some good hitters.
-
I tried a melee dark/dark and was like "meh" so went all ranged so that meant dropping Death Shroud and Shadow Maul (hate that power anyway) and havn't looked back since. Touch of Beyond i basicly use as a Recovery buff and i think my build would fall a part without it which is why i don't use Dark Consumption much.🤷♀️ I do agree it needs some love.
-
I'll just leave this here. | Copy & Paste this data into Mids Reborn : Hero Designer to view the build | |-------------------------------------------------------------------| |MxDz;1400;646;1292;HEX;| |78DA65935D4F13511086CF76B7B4F48302B57C95425B0A14D002FE011345BDB0354| |8D1DB6623B52C36DB86B6895EFA37F8C63B6EFC13C69FA362444011D6E9BE2FD0C4| |936C9FEDCC999977E6EC29BC5B0A7D7AFAE181D2C28FAA66A3517A28BFCDF2A6BFD| |06A9A4DAB66ABF6F2C913A7A7B462DA95F25A6EA965564BCB56A359AB36C6AE7DC5| |56BD5EDB6CE69E5BF686595ADD342DDBB22B2AB85CAB55734FAA5665BD1972DFF36| |5B32E9E80FBA7582F97D7C2D8D3DE228E81C775EB75AED0B2ADB68846A9E0E67F3F| |244226E519E9951FAD2DCDF12A6528B5682843233D60974E1AA0DF0BFECC2A2E471| |229D716EF653AC9A7E95EEC37C08097EC02433ED20F9E483E9D5AF437C8D75321D7| |C15E8BDC00FBDF82A352D78B5827E8C3A0DBBA7C29F84F257737FC5A774C736DF34| |71E9709890D5273D0032DFD97E8F1CE15E980030AFE018D944261E455E167BA5209| |439D49AD08FB88EC206E6897DC0347F6C90370F4101C172D7DD4D2B7CBDEF6C0B17| |DF2803C04931FC173A91B65DDE80BF4985C218B606A957C49BE02D3D2478CF389CD| |21DF04A9896F90F31CE4392745E730750EF39C2778CE133CE70CCF39C373CEF09C7| |5C917A7CEF8A0E6CE6CEA3E663775AEBB7BA64EC0E95FE41968486C82B18900B44F| |07C199101906177BC8087B15CDE38C1DDF42BED96D7207BCBB4BEE91FBE06F996D9| |A3348730617629B64BEC90B7C4BF7FE9297E41538EF900AF93E0BB288D5B3EC7986| |3DCFB2E745F6FC47EACCB1F61C6B7F11578EB61C6D3F424A2DD0B6405BCAB8B9DFC| |EA8D1715F1D592A7FEB95EB0185CBC6CD0D569ABBEB6B402C5AA7E5DB7F96EF9D96| |14741FDFDA3C5A127A3CC7F8CE3DA7603E2AA0BE2DF9F0BDA8EC6C77BCEF74BCBBE| |B287D1BF40FE98FD718| |-------------------------------------------------------------------|
-
Death Shroud.. Didn't take it. Touch of Beyond.. Works fine for me. Shadow Maul.. Didn't take it. Dark Consumption.. Took it, rarely use it.
-
I'll probably be the weird one but i got a street justice toon to 50 recently and found it all rather meh. It felt like it had 1 power that actually did anything and only then with 3 stacks of Combo. So if you don't mind waiting for 3 stacks of combo before you see any real damage then give it a shot. I'd rather stick pins in my eyes.