The Beta Account Center is temporarily unavailable
×


Neiska
-
Posts
1415 -
Joined
-
Last visited
-
Days Won
6
Content Type
Profiles
Forums
Events
Store
Articles
Patch Notes
Everything posted by Neiska
-
Thank you both for the input, feedback, and advice. I do see a few changes I will make, but when I was slotting I was mostly chasing Recharge and Defenses, with ways to ensure smooth Resistance/Mezz/END management. I will look at the suggested slotting such as the Spectral Terror but I am at work this exact moment and don't have access.
-
A few thoughts from me. First, I am glad the proposed change was reverted. For some of us, it's the main way we get veteran/incarnate materials. And there seems to be some people that seem to be under the impression that is somehow a bad thing. Secondly, I wonder if it has ever occurred to some folks here that the AE is the only thing keeping some people around. True, I have no evidence of it, I am speaking only for myself. But if the AE was over nerfed, I would likely be looking to moving on before continuing to play, especially if the only other content that can advance me is either A) I have zero desire to do. Or B) involves me having to team with people I would sooner not interact with at all. If a random person is the "gogogogo" sort, or the sort to bring up hot topics of discussion, or to try to lecture me on unwanted advice, then I want very little to do with that person. And I shouldn't be "forced" to play with them, in order to get Emp merits, Veteran Exp, Incarnate Materials, and so on. Which, if the AE exp/drops/money were removed, I would have to do. Now, I am fine with the Dev's "rebalancing" rewards. If they are over or under tuned, then tone them down. This includes even perhaps increasing weekly rewards or ITF rewards and so on. But not "removed entirely," because removing entirely completely removes a tool that many people use. And as time goes on I feel the urge to team with random people less and less, and no amount of "carrot on a stick" is going to change that, and no amount of "stick" is going to either. An additional thought - the community is small enough as it is, and I suspect its only growing smaller. Now, is trying to force changes in rewards and play going to change that, or only make it worse? And perhaps, just perhaps mind you, how some people act or treat others in game might have far more effect on why they have difficulty finding teams, rather than the assumption that everybody is farming and needs to be stopped immediately so they will come join your Raids and Incarnate teams. Because I assure you, if forced to that choice - either play with random people I might not want to doing a task I have zero interest in doing, or play a different game entirely, well, that choice is a rather simple one to me and I am sure it would be for many others, making an already small community, even smaller. Now "you" might not care about that, but I think we can all safely assume that homecoming does. Players need more options, not less. You want people out of the AE? The answer isn't to nerf AE into the ground. It's to make other activities more attractive. Which includes solo activities. Many people like to play the game alone. Shocking news, I know. And outside of Veteran EXP for their EMP merits and threads, what is a solo player to do if they don't want to put up with random teaming?
-
Warning: possible unpopular opinion. My favorite content? The AE. Why? Several reasons. 1. I can go at my own pace. I have to AFK often due to real life things going on, so I can pause my farm, go do what I need to do, and come back and push on. I am also deaf IRL, which makes doing some activities difficult at times, particularly on ITFs where nothing is explained, I am never given time to read anything, and its always "gogogofasterfasterfasterhurryhurryhurry" from the random people you team with. 2. I am not "artificially encouraged" to group with people I just soon avoid interaction with, including but not limited to - people who bring up hot topics, such as religion or politics. The "gogogogofasterfasterfaster" players, the "git gud scrub" players, or the "zomg you took THAT power?" sorts of players. 3. I am rewarded for my invested time doing an activity that I enjoy, instead of getting a lesser reward for doing something I enjoy, OR a greater reward for something I DONT enjoy. But apparently that is going to change, at least according to some polls/claims here on the forums. 4. I can multibox on my own without unduly interfering in the play of others. 5. I control the context of the mission - the damage, their levels, what they are, the map, so on. All of which is very lovely when multiboxing. 6. I can use the AE as a tool to teach others about complex builds or classes, such as Masterminds. 7. I don't have to put up with the antics or trolling behavior from random people in order to advance my character. As an example, I was running DFB yesterday trying to get the badges. Well, 3 runs and we had one random person purposefully sabotaging it. They got booted, then they swapped characters, and did it again. And, apparently, Post 50 veteran exp/rewards are going to get nerfed in AE's. How simply wonderful. So much for "play your way." I might be willing to accept a exp penalty or something, but to be removed entirely more or less feels like a big middle finger. And personally I hope it backfires, but that's just me. Honestly it's reaching the point where more players might just move onto something else rather than be brow-beaten into activities in a game they don't particularly enjoy. AE has already been nerfed before. And they want to nerf it again? I half expect them to just remove it entirely at this point. But that won't "make" people do missions or other things. I expect people will just run PI missions. Personally I will likely do the same, the only difference is I won't be so keen on helping others or allowing random people to join my team. Especially if I have to now do that just to get my incarnate or veteran rewards. So in effect, that might make "less teaming" rather than more. Food for thought.
-
@Troo @Infinitum Thought of a question regarding your Energy Melee/Energy Armor Stalkers, Why is Energy Armor and not Bio Armor higher ST damage? With the offensive stance and all, and I don't see any Damage Buffs from Energy Aura? Just wondering!
-
Hello forums, I would like some feedback on a build I cobbled together. It manages to have pretty good defenses, debuffs, END management, and Perma PA. Without Agility Core, I need a Recharge Reduction in PA, but with Agility Core I can put in a Damage/ACC Hami. I also managed to fit in Arcane Bolt and Fireball, so have some pew-pew options as well. My biggest concern is the gaping hole in toxic resistance, but other than that I think it looks pretty good. Is there anything I am missing or better way to slot this with the powers I picked? I would have loved to try and fit Enflame in to perhaps help the PA with AoE damage (it's fantastic on MM's) but sadly there was simply no room for it, at least in this setup. Thanks bunches in advance! This Hero build was built using Mids Reborn 3.1.2.5 https://github.com/LoadedCamel/MidsReborn Click this DataLink to open the build! Level 50 Magic Controller Primary Power Set: Illusion Control Secondary Power Set: Darkness Affinity Power Pool: Sorcery Power Pool: Speed Power Pool: Leadership Ancillary Pool: Fire Mastery Hero Profile: Level 1: Spectral Wounds -- Apc-Dmg(A), Apc-Dmg/Rchg(3), Apc-Acc/Dmg/Rchg(3), Apc-Dmg/EndRdx(5), Apc-Dam%(5) Level 1: Twilight Grasp -- Prv-Heal(A), Prv-Heal/EndRdx(17), Prv-EndRdx/Rchg(23), Prv-Heal/Rchg(27), Prv-Heal/Rchg/EndRdx(34), Prv-Absorb%(34) Level 2: Deceive -- CrcPrs-Conf(A), CrcPrs-Conf/Rchg(33), CrcPrs-Acc/Conf/Rchg(36), CrcPrs-Acc/Rchg(36), CrcPrs-Conf/EndRdx(37), CrcPrs-Conf%(37) Level 4: Tar Patch -- PcnoftheT-Acc/Slow(A) Level 6: Arcane Bolt -- Dcm-Acc/Dmg(A), Dcm-Dmg/EndRdx(7), Dcm-Dmg/Rchg(7), Dcm-Acc/EndRdx/Rchg(9), Dcm-Build%(9), FrcFdb-Rechg%(11) Level 8: Darkest Night -- DarWtcDsp-ToHitDeb(A), DarWtcDsp-ToHitDeb/Rchg(13), DarWtcDsp-ToHitDeb/EndRdx(15), DarWtcDsp-ToHitdeb/Rchg/EndRdx(17) Level 10: Mystic Flight -- BlsoftheZ-ResKB(A) Level 12: Blind -- SprWiloft-Acc/Conf/Hold/Immob/Sleep/Stun/Fear(A), SprWiloft-Conf/Hold/Immob/Sleep/Stun/Fear/Rchg(31), SprWiloft-EndRdx/Rchg(31), SprWiloft-Acc/Conf/Hold/Immob/Sleep/Stun/Fear/EndRdx(31), SprWiloft-Rchg/Dmg%(42) Level 14: Hasten -- RechRdx-I(A), RechRdx-I(15) Level 16: Shadow Fall -- LucoftheG-Def/Rchg+(A), LucoftheG-Def/EndRdx(25) Level 18: Phantom Army -- SlbAll-Build%(A), ExpRnf-Acc/Rchg(19), ExpRnf-Acc/Dmg(19), ExpRnf-Acc/Dmg/Rchg(21), ExpRnf-EndRdx/Dmg/Rchg(21), RechRdx-I(23) Level 20: Fade -- LucoftheG-Def/Rchg+(A), LucoftheG-Def(37), LucoftheG-Def/EndRdx(48), RechRdx-I(48) Level 22: Maneuvers -- LucoftheG-Def/Rchg+(A), ShlWal-ResDam/Re TP(48), EndRdx-I(49) Level 24: Howling Twilight -- AbsAmz-Stun(A), AbsAmz-Stun/Rchg(25), AbsAmz-Acc/Stun/Rchg(27), AbsAmz-EndRdx/Stun(34), AbsAmz-Acc/Rchg(36) Level 26: Spectral Terror -- GlmoftheA-Acc/Rchg(A), GlmoftheA-EndRdx/Fear(46), GlmoftheA-Acc/EndRdx(46), GlmoftheA-Fear/Rng(47), GlmoftheA-Acc/Fear/Rchg(47) Level 28: Soul Absorption -- SynSck-EndMod(A), SynSck-EndMod/Rech(29), SynSck-EndMod/+RunSpeed(29), SynSck-Dam/Rech/Acc(33), SynSck-Dam/Acc/End(33) Level 30: Group Invisibility -- LucoftheG-Def/Rchg+(A) Level 32: Phantasm -- CaltoArm-Acc/Rchg(A), CaltoArm-Acc/Dmg(42), CaltoArm-Dmg/EndRdx(43), CaltoArm-Acc/Dmg/Rchg(43), ExpStr-Dam%(43), SuddAcc--KB/+KD(45) Level 35: Fire Ball -- Rgn-Dmg(A), Rgn-Dmg/Rchg(40), Rgn-Acc/Dmg/Rchg(40), Rgn-Acc/Rchg(40), Rgn-Knock%(42) Level 38: Dark Servant -- CldSns-ToHitDeb(A), CldSns-Acc/ToHitDeb(39), CldSns-Acc/Rchg(39), CldSns-ToHitDeb/EndRdx/Rchg(39) Level 41: Rune of Protection -- GldArm-3defTpProc(A), StdPrt-ResDam/Def+(45), UnbGrd-Max HP%(45), UnbGrd-ResDam(46) Level 44: Fire Shield -- EndRdx-I(A) Level 47: Tactics -- GssSynFr--ToHit/EndRdx(A) Level 49: Vengeance -- LucoftheG-Def/Rchg+(A) Level 1: Brawl -- Empty(A) Level 1: Containment Level 1: Sprint -- Empty(A) Level 2: Rest -- Empty(A) Level 1: Swift -- Empty(A) Level 1: Health -- NmnCnv-Regen/Rcvry+(A), Pnc-Heal/+End(13) Level 1: Hurdle -- Empty(A) Level 1: Stamina -- PrfShf-EndMod(A), PrfShf-End%(11) Level 6: Arcane Power ------------ No Rune - With Rune -

-
@Voltak - Impressive, thanks for the videos! Seen a lot of suggestions and ideas. I think I am going to try an Illusion/Dark/Fire controller. I don't know if she will be capable of everything posted in this forum, but after talking with friends and on discord I hope it's what I am going for. Something that is good for both solo and team play, who doesn't rely on inspirations/outside buffs to perform, and who can fight AV/GMs if I want to. I might get around to trying the other ideas here, but at the end it was that I have never played a controller past level 10 or so before, certainly never had one fully kitted or slotted out. And Illusion looks really fun. I just hope the /Dark is strong enough on controllers to do what I want to do, but going from here and talks elsewhere it seems it will be. I hope to take Fire Mastery so I can get Fireball for some AoE, and Fire Shield for some S/L resistance. I don't have a build yet, plan on tinkering in mids when I get home. (Posting from work this exact moment.)
-
Thanks bunches. I have only dabbled with Darkness, as I usually like Buffs instead of Debuffs in games, but all the big brains say if you want to push content in CoH, them Debuffs are King. I think I will go Illusion/Darkness/Fire, it just seems to have an overall balance of healing, buffs, debuffs, CC, even END tool which will be nice. And I hope it will be decent enough at groups of trash as well as soloing the big things.
-
Hi forums, Have been reading up on controllers, and tinkered with a few. So far controllers seem like an AT that take a lot of planning but could be rewarding. But I have a question - Why is Time Manipulation not considered a good AV/GM killer? I mean it has -DEF, -Res, some -Regen, and even a heal. Why is it not considered a contender? Are their effects too weak or too short in duration, or something else? Right now I am debating on either Illusion/Dark or Illusion/Storm. I agree with all the things said about /Rad, but I have a /Rad mastermind and didn't like it, the toggles were too small for my liking.
-
So far I see these suggested, with what I think are pros/cons, many of these are new to me so it's all guesswork, feel free to correct me if I have things wrong - Illusion controllers - Pros - Strong endgame, good at Single Targets of all kinds. Cons - Slow/difficult to level, especially solo(?), Unsure how good they are at other content besides big target soloing /Rad and /Dark Corruptors - Pro's - Strong Debuffs, good all around damage(?) Cons - Uncertain how good they are at other content besides soloing AV's/GMs, not sure how durable/tough they are Energy Melee/Energy Aura Stalker - Pro - Super strong ST damage, sneaky Cons - Uncertain how good they are at other content, or how good/bad their AoE damage is. I think this would rely on out dpsing the AV/GM's regen, more than debuffing(?) Poison/Fire Defender - Pros - higher debuff caps(?) Cons - lower damage than Corruptor(?)
-
Thank you everyone. I am curious as to why Rad Emissions stands out, as I can see it has -def, damage, and regen, but I am guessing its the -regen that is the biggie? And I was actually thinking about energy melee, but would have thought scrapper would have been the go-to. I never played a stalker, so that might be fun! In that case I assume its just a case of out damaging an AV's/GM's regen and so on?
-
Hello Forums, I have found myself playing alone more and more recently, as not as many teams or friends can be found, so I want to have a character who will be a strict soloist. Not only on missions, but I would like to also hunt GMs/AVs, perhaps even solo some TFs and so on. I am actually not entirely sure what is or is not possible to solo, both mechanically as well as realistically. Sadly I find myself more and more playing alone these days, with friends on less and less. So I thought I might make a character specifically built for it. So which AT/Build could truly solo from the very beginning all the way to level 50 +4/8 content? Solo AVs? GMs? Maybe even TF's? (I am not even sure what difficulty people mean when I hear them say they solo those things.) So I intend to start a new AT, and "enjoy the journey" from 1-50 as a strict soloist, never teaming once, and never using mailed/shared merits/money/drops. (I guess it could be an "Iron Man" self challenge I guess?) I don't even intend on using the EXP buff. Am open to any AT really, I just found myself musing about it and thought I would ask those that have actually done those things. So what are peoples thoughts? A Tanker? A Scrapper? Mastermind maybe? I am not even sure who the top solo builds/ATs are at the moment. I am not even sure if one AT can even solo "all" of those things, or if they have to be tailor-made to do it, or if there is a "King Soloist" currently? Thanks bunches in advance!
-
I had a Demon/Rad, she performed well. Not fantastic, but not terrible either. My main complaint is the toggles that she and her pets more or less depended upon was teensy. Not like, Tarpit sized, more like Bonfire sized. So you had to clump very tightly together to make sure everything was debuffed. But it was a nice change of pace, to me it felt like a bit of a cross between /Dark and /Nature. I wouldn't call it bad by any means, but there are things that are better certainly. But if you want to mix it up a bit for something with a different feel, it's good enough IMO.
-
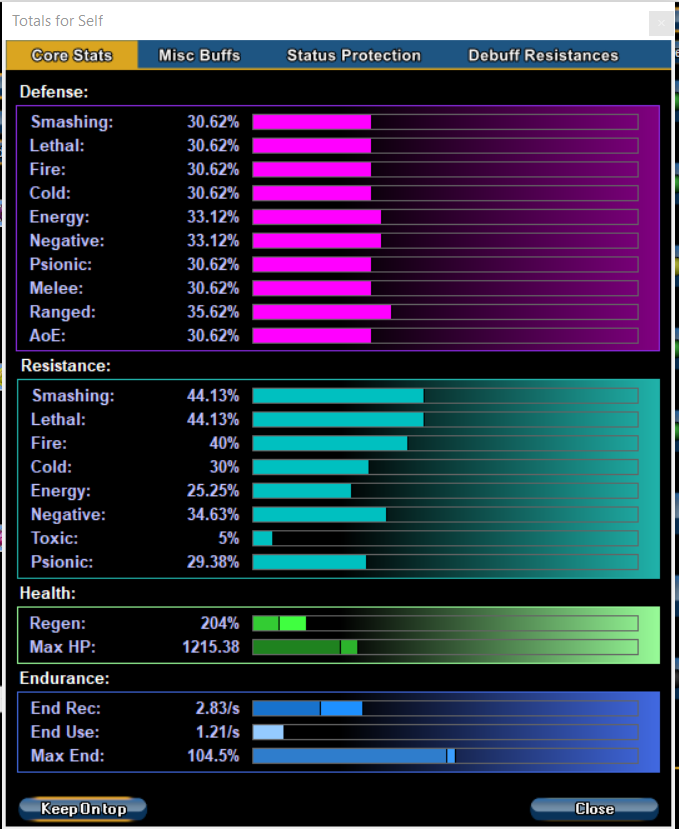
Well, another change to the change. I couldn't quite put my finger on it but the values were still off, then I figured it out. You had all your passives clicked on - The big ones that cause errors in displays are Muscled and Support. Muscled adds to the defense, giving a false positive. Support adds as normal, but you had it enabled. So your values were much higher than the display otherwise indicated. Support adds 15% defense and Muscled (falsely) adds about 3%. But the GOOD news, is that MIDs doesn't account for your T2 protector bot buffs either, which as I have it slotted, is 8.7%. So with that in mind, here are your values without Support or Muscled enabled and not taking Prot Bot buff into account - So add the 8.7%, and you will have roughly 38% Melee DEF and 34.88%, Ranged DEF, respectfully. Your initial values without Support/Muscled enabled, again not accounting for Protector Bot buff - So your "real" current DEF values are - Melee - 24.68%, Ranged - 39.68. In short, with my build you lose roughly 4% Ranged DEF, but Gain 14% Melee DEF, and 20-40% Resistance, depending on which in question, which I would still consider an overall net positive gain. Anyway, sorry for the confusion but I was matching your build against my own and I couldn't figure out how you had 20% more DEF across the board. I generally don't enable Incarnates in MIDs for this very reason as it causes things to go wonky. Sorry for the mix up! I just realized what was going on and didn't want you to go "what the heck?!?" ingame.
-
@NinjaIceBear - I just realized I made a mistake, I forgot to swap out one of the sets for Superior Command, here is the correct one. Apologies! This Hero build was built using Mids Reborn 3.1.2.5 https://github.com/LoadedCamel/MidsReborn Click this DataLink to open the build! NinjaIceBear mk 2: Level 50 Mutation Mastermind Primary Power Set: Robotics Secondary Power Set: Electrical Affinity Power Pool: Flight Power Pool: Fighting Power Pool: Leadership Ancillary Pool: Mu Mastery Hero Profile: Level 1: Battle Drones -- OvrFrc-Dam/KB(A), CaltoArm-+Def(Pets)(3), SprCmmoft-Acc/Dmg(3), SprCmmoft-Dmg/EndRdx(5), SprCmmoft-Acc/Dmg/Rchg(5), SprCmmoft-Rchg/PetAoEDef(7) Level 1: Shock -- PreOptmz-Acc/Rech(A), PreOptmz-EndMod/End(9), PreOptmz-EndMod/Rech(9), PreOptmz-EndMod/Acc/End(11) Level 2: Rejuvenating Circuit -- Pnc-Heal/EndRedux(A), Pnc-EndRdx/Rchg(13), Pnc-Heal/Rchg(15), Pnc-Heal(15), Pnc-Heal/EndRedux/Rchg(17) Level 4: Fly -- Frb-Fly(A) Level 6: Equip Robot -- EndRdx-I(A) Level 8: Hover -- LucoftheG-Def/Rchg+(A), BlsoftheZ-ResKB(50) Level 10: Energizing Circuit -- PreOptmz-Acc/Rech(A), PreOptmz-EndMod/End(19), PreOptmz-EndMod/Rech(19), PreOptmz-EndMod/Acc/End(21), PreOptmz-EndMod/Acc/Rech(21), PreOptmz-EndMod/End/Rech(23) Level 12: Protector Bots -- SvrRgh-PetResDam(A), EdcoftheM-PetDef(23), ExpRnf-+Res(Pets)(25), Rct-ResDam%(25), LucoftheG-Def/Rchg+(27), ShlWal-ResDam/Re TP(27) Level 14: Group Fly -- Frb-Fly(A) Level 16: Faraday Cage -- UnbGrd-ResDam(A), UnbGrd-ResDam/EndRdx(29), UnbGrd-EndRdx/Rchg(29), UnbGrd-Rchg/ResDam(31), UnbGrd-ResDam/EndRdx/Rchg(31), UnbGrd-Max HP%(31) Level 18: Discharge -- PreOptmz-Acc/Rech(A), PreOptmz-EndMod/End(33), PreOptmz-EndMod/Rech(33), PreOptmz-EndMod/Acc/End(33), PreOptmz-EndMod/Acc/Rech(34), PreOptmz-EndMod/End/Rech(34) Level 20: Empowering Circuit -- AdjTrg-ToHit(A) Level 22: Kick -- Empty(A) Level 24: Tough -- ImpArm-ResPsi(A), UnbGrd-ResDam/EndRdx/Rchg(34), UnbGrd-ResDam(36), UnbGrd-ResDam/EndRdx(36), UnbGrd-EndRdx/Rchg(36), UnbGrd-Rchg/ResDam(37) Level 26: Assault Bot -- SprMarofS-Dmg(A), SprMarofS-Dmg/EndRdx(37), SprMarofS-Acc/Dmg(37), SprMarofS-EndRdx/+Resist/+Regen(39), SlbAll-Build%(39), SuddAcc--KB/+KD(39) Level 28: Defibrillate -- FrtHyp-Sleep(A), FrtHyp-Sleep/Rchg(40), FrtHyp-Acc/Rchg(47), FrtHyp-Sleep/EndRdx(48), FrtHyp-Acc/Sleep/Rchg(48), FrtHyp-Plct%(49) Level 30: Weave -- LucoftheG-Def/Rchg+(A), LucoftheG-Def(40) Level 32: Upgrade Robot -- EndRdx-I(A) Level 35: Insulating Circuit -- Prv-Heal(A), Prv-Heal/EndRdx(40), Prv-Heal/Rchg(42), Prv-EndRdx/Rchg(42), Prv-Heal/Rchg/EndRdx(42), Prv-Absorb%(43) Level 38: Charged Armor -- ImpArm-ResPsi(A), GldArm-3defTpProc(43), StdPrt-ResDam/Def+(43) Level 41: Electrifying Fences -- GrvAnc-Immob(A), GrvAnc-Immob/Rchg(45), GrvAnc-Acc/Immob/Rchg(45), GrvAnc-Acc/Rchg(46), GrvAnc-Immob/EndRdx(46), GrvAnc-Hold%(46) Level 44: Amp Up -- RechRdx-I(A), RechRdx-I(45) Level 47: Maneuvers -- LucoftheG-Def(A), LucoftheG-Def/Rchg+(48) Level 49: Tactics -- EndRdx-I(A), GssSynFr--ToHit/EndRdx(49) Level 1: Supremacy Level 1: Brawl -- Empty(A) Level 1: Sprint -- Empty(A) Level 2: Rest -- Empty(A) Level 1: Swift -- Flight-I(A) Level 1: Hurdle -- Jump-I(A) Level 1: Health -- Pnc-Heal/+End(A), NmnCnv-Regen/Rcvry+(7) Level 1: Stamina -- PrfShf-EndMod(A), PrfShf-End%(13), EndMod-I(50) Level 1: Prestige Power Slide -- Clr-Stlth(A) Level 50: Musculature Core Paragon Level 50: Ion Core Final Judgement Level 50: Reactive Core Flawless Interface Level 50: Robotic Drones Core Superior Ally Level 50: Barrier Core Epiphany Level 50: Support Core Embodiment Level 50: Freedom Phalanx Reserve Level 50: Portal Jockey Level 50: Task Force Commander Level 50: The Atlas Medallion Level 1: Battle Drone Level 26: Assault Bot Level 12: Protector Bot Level 4: Afterburner ------------
-
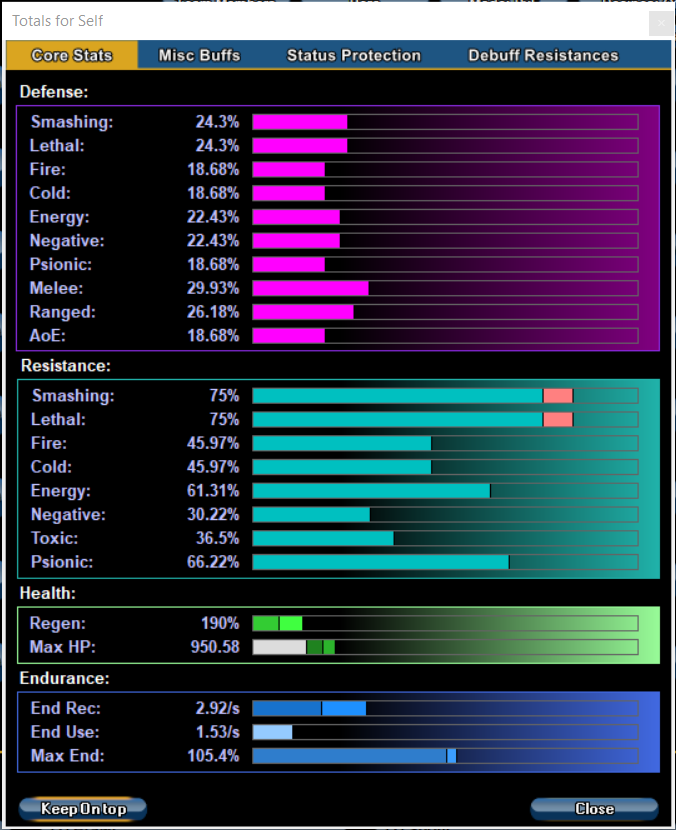
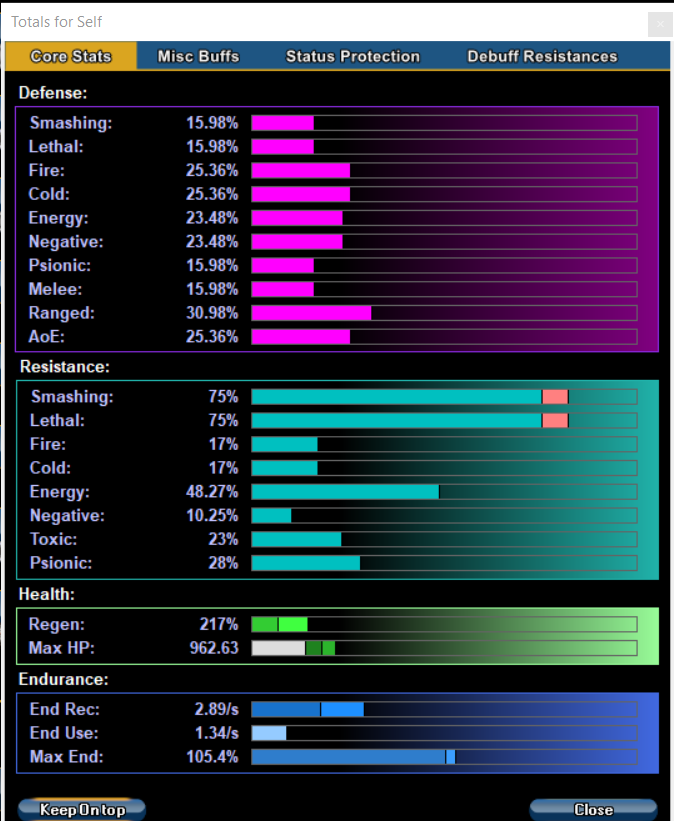
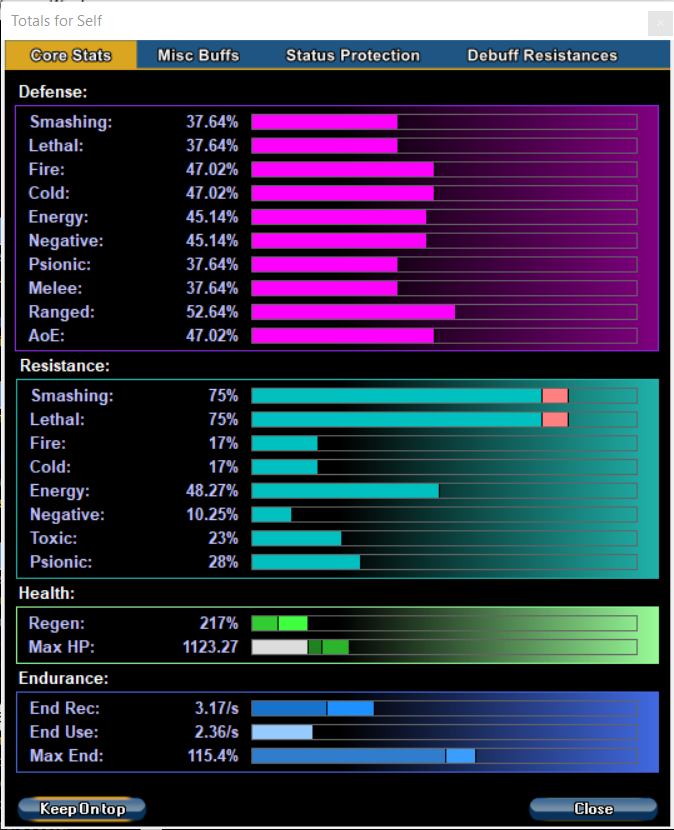
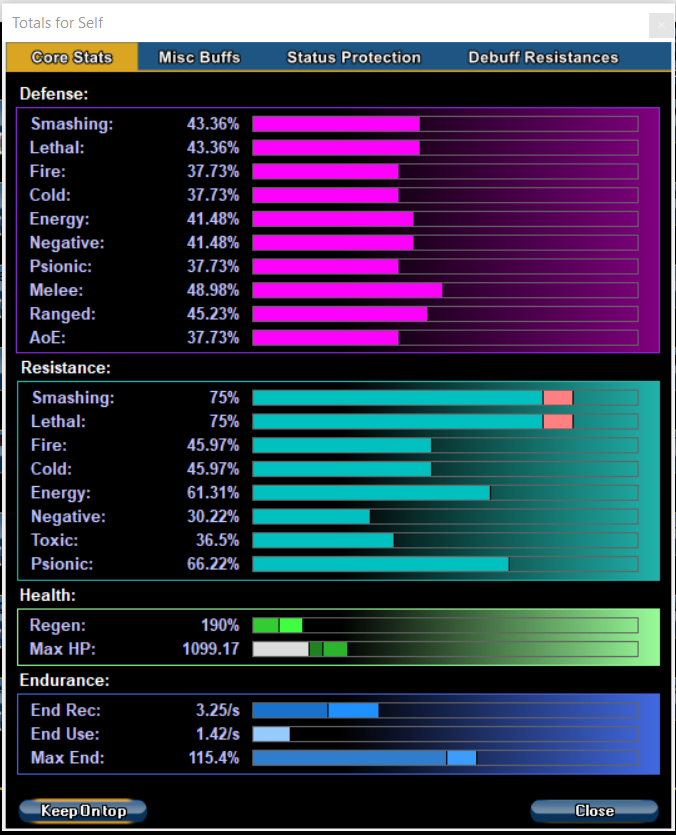
Hello again @NinjaIceBear ! At first pass, this is actually very good! There are a few things I think you missed though! Nothing major, so if you wanted to use this build it should perform well! But here are the things I spotted - 1. You might have forgotten to have Farday's Cage and Hover toggle enabled when looking at values. With them on you are "way" over the S/L resistance cap for MMs, well over the Ranged DEF as well. 2. Your pet slotting is fine, but it could be better. What most MMs do is put 2 parts of Superior Mark of Supremacy into each pet, in order to stack the 10% recharge bonus, then use the 4 piece of Superior Command in another, for a total net of 40% recharge, which is nothing to sniff at! I usually put the 4 Superior Mark into the T3 pet, so along with Soulbound Build up and KB to KD, thats his 6 slots. 3. I moved some of your resist sets and slots around to better optimize. Your build was well over the S/L resistance and had a little wonky Defenses. With a few changes I got you much closer to the caps, but boosted your values in other areas as well. Here is your stats - And here is mine - So You lost a bit of ranged over defense, and I brought your ranged and melee closer to the 45% mark, and boosted your resists across the board, from 20% to 40% or so, I even managed to give your Psionic, Fire, Cold, Negative, and even Toxic Resistance a nice big boost. Personally, I would have made more changes, but you said you mainly play on teams, so I kept Amp Up and Defibrillate. The END use is a bit higher than I would like, but that is also with both Fly and Group Fly on which I doubt you will have enabled all the time. With that toggled off, your END is 1.42/3.25 which is over a 1:2 ratio so that's solid. There are a few other things as well, but I tried to keep within the guidelines that you gave. Hope you like it and that it helps! This Hero build was built using Mids Reborn 3.1.2.5 https://github.com/LoadedCamel/MidsReborn Click this DataLink to open the build! NinjaIceBear mk 2: Level 50 Mutation Mastermind Primary Power Set: Robotics Secondary Power Set: Electrical Affinity Power Pool: Flight Power Pool: Fighting Power Pool: Leadership Ancillary Pool: Mu Mastery Hero Profile: Level 1: Battle Drones -- OvrFrc-Dam/KB(A), SuddAcc--KB/+KD(3), CaltoArm-Acc/Rchg(3), CaltoArm-Acc/Dmg(5), CaltoArm-Dmg/EndRdx(5), CaltoArm-+Def(Pets)(7) Level 1: Shock -- PreOptmz-Acc/Rech(A), PreOptmz-EndMod/End(9), PreOptmz-EndMod/Rech(9), PreOptmz-EndMod/Acc/End(11) Level 2: Rejuvenating Circuit -- Pnc-Heal/EndRedux(A), Pnc-EndRdx/Rchg(13), Pnc-Heal/Rchg(15), Pnc-Heal(15), Pnc-Heal/EndRedux/Rchg(17) Level 4: Fly -- Frb-Fly(A) Level 6: Equip Robot -- EndRdx-I(A) Level 8: Hover -- LucoftheG-Def/Rchg+(A), BlsoftheZ-ResKB(50) Level 10: Energizing Circuit -- PreOptmz-Acc/Rech(A), PreOptmz-EndMod/End(19), PreOptmz-EndMod/Rech(19), PreOptmz-EndMod/Acc/End(21), PreOptmz-EndMod/Acc/Rech(21), PreOptmz-EndMod/End/Rech(23) Level 12: Protector Bots -- SvrRgh-PetResDam(A), EdcoftheM-PetDef(23), ExpRnf-+Res(Pets)(25), Rct-ResDam%(25), LucoftheG-Def/Rchg+(27), ShlWal-ResDam/Re TP(27) Level 14: Group Fly -- Frb-Fly(A) Level 16: Faraday Cage -- UnbGrd-ResDam(A), UnbGrd-ResDam/EndRdx(29), UnbGrd-EndRdx/Rchg(29), UnbGrd-Rchg/ResDam(31), UnbGrd-ResDam/EndRdx/Rchg(31), UnbGrd-Max HP%(31) Level 18: Discharge -- PreOptmz-Acc/Rech(A), PreOptmz-EndMod/End(33), PreOptmz-EndMod/Rech(33), PreOptmz-EndMod/Acc/End(33), PreOptmz-EndMod/Acc/Rech(34), PreOptmz-EndMod/End/Rech(34) Level 20: Empowering Circuit -- AdjTrg-ToHit(A) Level 22: Kick -- Empty(A) Level 24: Tough -- ImpArm-ResPsi(A), UnbGrd-ResDam/EndRdx/Rchg(34), UnbGrd-ResDam(36), UnbGrd-ResDam/EndRdx(36), UnbGrd-EndRdx/Rchg(36), UnbGrd-Rchg/ResDam(37) Level 26: Assault Bot -- SprMarofS-Dmg(A), SprMarofS-Dmg/EndRdx(37), SprMarofS-Acc/Dmg(37), SprMarofS-EndRdx/+Resist/+Regen(39), SlbAll-Build%(39), SuddAcc--KB/+KD(39) Level 28: Defibrillate -- FrtHyp-Sleep(A), FrtHyp-Sleep/Rchg(40), FrtHyp-Acc/Rchg(47), FrtHyp-Sleep/EndRdx(48), FrtHyp-Acc/Sleep/Rchg(48), FrtHyp-Plct%(49) Level 30: Weave -- LucoftheG-Def/Rchg+(A), LucoftheG-Def(40) Level 32: Upgrade Robot -- EndRdx-I(A) Level 35: Insulating Circuit -- Prv-Heal(A), Prv-Heal/EndRdx(40), Prv-Heal/Rchg(42), Prv-EndRdx/Rchg(42), Prv-Heal/Rchg/EndRdx(42), Prv-Absorb%(43) Level 38: Charged Armor -- ImpArm-ResPsi(A), GldArm-3defTpProc(43), StdPrt-ResDam/Def+(43) Level 41: Electrifying Fences -- GrvAnc-Immob(A), GrvAnc-Immob/Rchg(45), GrvAnc-Acc/Immob/Rchg(45), GrvAnc-Acc/Rchg(46), GrvAnc-Immob/EndRdx(46), GrvAnc-Hold%(46) Level 44: Amp Up -- RechRdx-I(A), RechRdx-I(45) Level 47: Maneuvers -- LucoftheG-Def(A), LucoftheG-Def/Rchg+(48) Level 49: Tactics -- EndRdx-I(A), GssSynFr--ToHit/EndRdx(49) Level 1: Supremacy Level 1: Brawl -- Empty(A) Level 1: Sprint -- Empty(A) Level 2: Rest -- Empty(A) Level 1: Swift -- Flight-I(A) Level 1: Hurdle -- Jump-I(A) Level 1: Health -- Pnc-Heal/+End(A), NmnCnv-Regen/Rcvry+(7) Level 1: Stamina -- PrfShf-EndMod(A), PrfShf-End%(13), EndMod-I(50) Level 1: Prestige Power Slide -- Clr-Stlth(A) Level 50: Musculature Core Paragon Level 50: Ion Core Final Judgement Level 50: Reactive Core Flawless Interface Level 50: Robotic Drones Core Superior Ally Level 50: Barrier Core Epiphany Level 50: Support Core Embodiment Level 50: Freedom Phalanx Reserve Level 50: Portal Jockey Level 50: Task Force Commander Level 50: The Atlas Medallion Level 1: Battle Drone Level 26: Assault Bot Level 12: Protector Bot Level 4: Afterburner ------------
-
Hello there @NinjaIceBear My main is Robot/Electric and I would love to give you some input. However I am at work at this exact moment but I will have a look when I get home. But there are a few important questions that are generally asked for build critiques - What sort of activities do you intend to do? Normal missions? AE's? ITF's? GM hunting? Do you intend to play on teams often, or are you more of a lone wolf? What is your preferred difficulty to play on? Do you like to push a build as hard as you can, or do you like to be more relaxed enjoyment kind of play? I will take a look at your build and slotting when I get home, but those questions can factor into how to make a build. As an example, "Amp Up" only works on other players, not pets. So if you solo most of the time, that power is likely skippable. The same with Defibrillate. More to come!
-
Looking for boundry breaks / boundry escapes
Neiska replied to bob_dobbs's topic in General Discussion
I swear I was hanging out at the Pocket D one evening and I saw someone fall by the window. They were only there for a moment in a full free-fall, but it felt like a real sky scraper situation. I suspect the skiing hill was somehow involved but I would never figure out how. That, or it was a staff member having a bit of fun. -
If I may play armchair philosopher a moment, To my view, this is a self-generating issue. True, you don't know how a player might play or act when inviting them, but you have a few options already available - 1. The first, is you may leave, if their inaction bothers you to that extent that you feel motivated to make a post on the forums about it, where I can almost promise you the people in question will not see it. 2. The second, if you are the leader, you can remove them yourself and replace them, or play on. 3. Lastly, you can place that person on ignore and never have to interact with them again, ever. If you don't like a player, you can leave. No one is "forcing" you to interact with them on any level, despite it being a shared space/game. You already have tools in place, able to use as you see fit. The game is effectively a lake that we all must share, and not everyone is fishing for the same thing. In this context, that means not everyone is going to enjoy the same activities. My thoughts on the matter - It really depends on my mood. If I am farming away and in the "zone" then I largely pay little mind to it. You never know what the other person has going on - they might be home sick from work, they might be chasing a toddler, they may be playing while on a zoom call for work, or they may genuinely be otherwise engaged in other activities. So long as no action is required on their part, such as an escort mission, it affects me very little either way. In fact, I have made some very good friends from them being "sitters" in my farms. Mostly this is due to how I farm with Masterminds, something that not many people see often and it often sparks conversation and I am most often all too happy to talk about it. (I am a die hard "pet class" fan in video games.) Sometimes they tell jokes, or stories, even just idle banter I still consider "contributing." Even if they can't help in combat, having someone to converse with certainly helps the farming go faster, and it costs me little either way. Personally, I get more irritated from other kinds of people - 1. The sorts of people who bring up politics and so on in general chat. But I try not to address it or even engage. (I will admit that sometimes passions get the better of me. But I think that is human nature.) When I can, I simply put the person on ignore and go on about my day. Baring in mind that heated conversation on the internet/games rarely changes anyone's views or solves anything, and is generally a unpleasant experience for everyone involved, except for the trolls I suppose. And, life is far too precious a thing. I value my free personal leisure time greatly, so it is far more efficient to simply put the other on my ignore list and move on about my day. 2. Not to offend anyone here directly but, I get more irritated by posts such as these. I largely go by "Live and let live." You do your thing, and I shall do mine. If our things don't align then we shall avoid one another and both be the better for it. Sadly not everyone agrees by that standard. 3. I more often play by myself, with people I know, or just in farms. Why? Well, again not to point the finger at anyone specifically but, the sorts of group leaders who are "GOGOGOGOGO" and rush through things as fast as possible. I do agree, that perhaps it's their 100th time doing that ITF. But I haven't even done all the IFTs yet, and I hit vet level 392 on my main this weekend. I have yet to be on a Mothership raid, or things of that nature. Simply because people rarely take the time to explain anything, and at this point everyone is known exactly what to do. I have completed full story arcs where I don't even know what the story was, or who the big bad guy was, and so on. And unless its with friends, people rarely take the time to "enjoy the scenery," story, or even take a moment to stop and admire the map and details that still hold up today in some circumstances. 4. The "Elite Min/Maxers." While a "power builder" myself, I will never downplay another persons choice of powers or abilities "just for fun" or "just because I like it." My usual reply is "Thats fantastic. Lets see if we can make it the best we can while keeping that which you love about it." and go from there. But there are players out there that make the point that if you take a power that isn't .002% more dps, or superior, then you are, well, I shall avoid their colorful terms for those kinds of players. Not everything has to be mathmatically superior in every circumstance possible. (Though I will hasten to Add that the CoH community is not nearly as bad at this as other game communities, in my experience. I am only describing the sort of other player whom irks me for context. The majority of CoH community has been wonderful to interact with on all levels, with only a few bad apples coming to mind.) You don't like how someone plays? That's okay. Someone else might not like how you play either. And "your" way is not in any way better/morally superior/more correct than theirs. So long as someone isn't talking disrespectfully or trying to flex at me we usually get along just fine. I take a dimmer view from the sorts of people whom say "X people are playing WRONG" than the "door sitters." I am genuinely curious as to what such persons truly expect to be done about it? An AFK auto-boot timer? The formation of a "playstyle police" whom will swoop in and give INF tickets and fines? The creation of a "Player Purgatory" where reported persons accounts will languish until X amount of time has passed? I mean, what precisely do they expect, from an all volunteer staff, with limited resources, and from an activity that is in no way officially prohibited or disallowed? My two cents, for what it's worth.
-
My two favorites are Robots/Electric, and Demons/Time. I have yet to try a fully leveled and incarnated /Storm, but I hear many good things. My Robots/Electric is just a powerhouse, both for solo and teams. Solo, its durable, and flexible, with things like bonfire and group fly, EA shines with healing/absorb/status protection. Making a durable pet set, even more so. Electric also goes quite well with Demons. But my Robot/EA I can go on TFs, Solo, Farm, go GM hunting, and so on. It really is a "can do anything" build which is something I love. On teams she isn't the most damage, but I focus on defense/support when teaming. Keeping everyone's blue bars nice and full, putting down Cages on the tank for status immunity, layering absorbs and heals, and using my damage debuffs if they are even needed at that point. Mostly for teaming I keep my T3 out for mobility, the other pets aren't really needed if you are on a good team. On some teams though, my robos and I were the anchor of the group. But my favorite Demons is my /Time. You get both good resists and defense, and the slow aoe is quite nice to give your demons all the time in the world to chew things down. Softcapping defenses is easy with Power Boost, and they come with their own resist buffs. Plus there is Chrono Shift and the Recharge bonus that lets you perma Hell on Earth. (Or close to it. I haven't played my Demons/Time in awhile, but I believe you could Perma-it.)
-
Personally I never understood why some are so against how others choose to play the game. If you aren't on their team, then what's it to you? True, you can bring up "players who get PL'd arent as skilled" or "it affects the market" points, but that is largely moot. As leveling outside of AE doesn't magically make someone skilled, as well as the low influx of who are actually new players. As far as trading goes, I suspect there are other larger factors than those who use AE. There is some affect certainly, but they are not the end all-be all. Moreover I would argue that the farmers effect on the market is a net positive, unless we want the "average" build to be nothing but level 50 IOs and a single purple set costs people 2 billion inf. It just always stunk of people trying to micromanage/control how other people play. "I don't like doing that activity. So NOBODY should!" et cetera. Though the thought of turning the tables I find amusing. Imagine if it was the farmers going - "There isn't enough demand for all the stuff we put on the market. Nerf the drops outside the AE" or "Nerf missions. All of them. Zero EXP, and remove the badges. If you aren't in the AE then you are a low skill player. You cant clear maps in 4 minutes? Git Gud!" - I mean, that's what the argument sounds like to the farmers.
-
@DocMidknight Sorry for the delayed reply, only just noticed this thread. First off I actually wrote a multibox guide here, with builds and a video - I would urge you to take the same pet-type though, as they all have different feels and style sthat will make multiboxing difficult in an already difficult setup. The ranged pets will hang back and shoot and will be out of range of buffs/heals, and sone of the melee might run off and chase down runners and get squished. So to begin with, all 3 pets of same sort for similar pet control styles/grouping. Far as secondary goes, if you are running a team of 3, i would try to take one defense set, one resistance set, and kinetics. Why kinetics? Its a very large damage boost to all pets present, along with speed/end tools which is nice, and can also help with healing. Out of the Resistance sets, i would recommend EA or Thermal. I feel EA is better overall because it does more than just +res and heal, but Thermal would be easier to manage. Out of the Defense sets, you could get away with a FF and be largely hands free, but Time is also a very strong contender and can also be auto-casted to be almost entirely hands free, aside from rebuffing power boost + farsight. I don't have any great experience with cold so I can't fairly comment. But the guide has much more info and breakdown with screenshots of side by side comparisons, and the video shows how my robot setup plays. Hope this helps! Happy Masterminding!
-
My take - Do I PL in AE? Honestly it depends! I make different characters with different goals in mind - Some just for fun, some to try different power combinations. Sometimes I make characters to play with certain friends or people in my supergroup, and sometimes I make characters entirely at random. Sometimes if I am in a rush just to try something out or make a few tweaks, sure I will PL myself. Sometimes I get the urge to load all 3 of my MMs and absolutely destroy maps too, the power rush is very satisfying. But I have just as many characters that have never stepped foot in AE if they are made to play with certain people or friends. One thing I enjoy is "iron-maning" it. More or less that is when you level up entirely solo on what you find/make yourself, zero trading, zero buying anything, even recipes. Even zero p2w features at all, even the run buffs. But I use AE for more than just an EXP piñata. You can control not just how many enemies there are and what level, but the damage types as well. This makes it very useful for trying out new concepts, such as how strong a builds CC or defenses are, or how much your damage type is resisted, to test your effectiveness vs debuffs. Or entirely new build concepts like a flying/knockback based build, and so on. And while I have no proof I strongly suspect that I am far from the only one to use AE in this manner. One of the big uses I have for AE is actually helping teach other players how to play Masterminds. It is a pretty complex class, not just in builds but in commands/playstyle. (I would argue moreso than other AT's) And being able to pick the damage type, number, difficulty, and kind of enemies is fantastic to help show other people who want to learn how to Mastermind what to do in different situations with different builds, as well as how to get the most out of their pets. I am in the "live and let live" camp. If people want to powergrind then I say let them. If others want to be puritan and play only world content, then that is fine too. Just as people are free to ask "looking for farm" other people are free to say "Sorry but no." The tells might get tiresome after some time, but I think that's part of what you sign up for when playing a game with other people. As far as the AE argument itself? I think it would matter little if they removed the EXP entirely. The big brains would just do the math and figure out what's the next thing to farm, and whatever that is would be the next thing to be farmed to oblivion. Farming is a part of many games that involve character progression, CoH is hardly unique in this. But if the community wants people to leave the AE and do other things, I would argue that the people using the AE need more options, not less. I think things are more equal in exp/money now. But if things outside of the AE gave more, then it might entice them to instead do that. The only real advantage AE has over other activity types is time required to travel/speak to the contacts. But that's because it is static and in one place, more than the design of the AE itself. One thing I would support is changing the bonus merits to bonus exp/inf as well. So that people get more than just extra merits for doing any certain activity week to week. Make it comparable or even superior to the gains in AE and you might see more people doing them. But lastly I do want to point out what many may have missed - unless AE is entirely removed, you will always see some people doing them. Some people simply like to do their own thing or play by themselves, and that's okay. Even if AE was the worst way to level, I do believe that there are some who would continue to use it, because that is their favored mode to play - simply by themselves. No muss, no fuss, no drama. You can't "force" people to play together who don't want to, regardless of what carrot or stick you might try. It will reach a point where people will go "You know what? This isn't for me anymore." and move onto whatever else they choose to enjoy as a hobby. My two cents on the matter!
-
Nor me. The only thing I can think of is he's using custom macros or commands. I would make sure you are in advanced mode, and then drag the various commands to your hotbar. That's how I manage my MMs.
-
If you could customize your Mastermind minions, what would you make?
Neiska replied to Magi 1's topic in Mastermind
For robots id go with more terminator kind of types. For demons I would mix them up, make them more humanoid looking. Undead I would mix it up, mabye ghosts, spirits, vampires, ghouls. For beasts I would go dinosaurs. -
Its hard to say without seeing it, but are they just killing off their targets, or is it mid-combat? Is he using a power that turns only self-abilities on?