The Beta Account Center is temporarily unavailable
×
Frozen Burn
-
Posts
1243 -
Joined
-
Last visited
-
Days Won
6
Content Type
Profiles
Forums
Events
Store
Articles
Patch Notes
Everything posted by Frozen Burn
-
First, Blasters should not stand still in melee anyway - unless you specifically build for that and can handle the pressure. Generally, Blasters should be moving, kiting, jousting, etc. If you don't mind popping in and out of melee range, then you could still take melee attacks and be successful in using them. It's called jousting... after shooting, pop into melee range to hit one or two times, pop out of melee range and shoot again... you can also queue up your melee attack as you run by - you'll animate and hit doing the damage, but your toon will keep running/jumping to the other side to safety , where you can shoot more if need be. These are tried and true blaster techniques that will allow you to use your hard hitting melee powers and still keep you safe. The key to this is your ranged defense (which you would want anyway if you're making a hover-blaster). Beefing up your ranged defense will also help you not get mezzed as most mezzes are "ranged" attacks (so the type doesn't matter). Additionally, as a blaster, you have defiance and your primary T1 & T2 + secondary T1 powers still work for the few times you might get mezzed - I can't tell you how many times that has saved my Blaster's life. But many people skip those low tier powers - but I don't just for that reason. Your control powers are also there to keep you safe, but many skip those as well to their own detriment. There are ways to build and play your blaster (whether hovering or not) and stay alive and stay un-mezzed (or minimally). But comparing the two really does depend on the player and the build, imo. Hover-blasting is a specific playstyle and build of the Blaster AT... so, you do need to consider build options. A well built hover-blaster will be better than a Sentinel. And if you hover-blast and pick a secondary where you DON'T utilize most of the powers, you are gimping yourself and damage output-wise, you'll be about equal to a Sent - maybe even less (I'm not a number cruncher and just generalizing from playing these 2 ATs and witnessing others). Taking a secondary like Devices or Trick Arrow (or even the others I mentioned) - you will out perform the Sentinel while hover-blasting. If you're looking for toe-to-toe blast set vs. blast set and the trade off you get from having that armor on your Sent.... Again, Blasters have higher target caps and higher damage modifier.... so the hover-blaster primary will dish out more damage to more foes vs. the Sent's primary. ...and you can do it at a longer range, too. It really comes down to playstyle and comfortability. You can min/max a blaster to highest of heights - but how you play it is a factor too. You can have the best build in the world, but if you don't play it to its potential, it's all wasted. To me, Sentinels are easier to play - they're like the "plug-in-play" AT. 🙂 So again, go with your playstyle and comfortability. I hope at least some this helps?
-
First off, Martial Combat is not the secondary to pick for hover-blasting. You'll be skipping more powers than taking. If you really just want the quick port into and out of melee, you can pick up Combat Teleport from the Teleportation pool, and then pick a secondary that is suited more to being at range: /Trick Arrow, /Devices, and even /Energy for the boost powers, and /Ninja has plenty of ranged tricks too. As for Sentinels, you have shorter range and lower target caps on AOEs compared to blasters, and lower damage scaler still. Many of the Sent armors give buffs/debuffs when in melee, so staying at pure range on a Sent - to me - has no real benefit other than to just sit back and lazily mash buttons. That's a little boring for me, but that is just my opinion... many like that - and that's okay. I would say, a hover blaster is still better than a Sentinel. But I'm biased towards Blasters over everything. 😄 If you want to try hover blasting, I would suggest leaning towards /TA or /Dev as they give you good control - especially for those times when you you're in a cave and can't hover. With /Dev, Caltrops can really save you there and with enough recharge, you can also have 2 gun drones perma that hover with you and follow you around (and take some aggro off you too). /TA has a lot of control and debuff too.
-
Foathim the Kind Dispersion bubble not working
Frozen Burn replied to TimesSeven's topic in Bug Reports
No worries. Clearly this is misunderstanding all around. Sorry, you took mine the wrong way too. While I was a teen in the '80s, your opening post made it seem like your "Wham" reference was more about the ambush. You stated: "WHAM! Next thing I know I'm in a hospital... Uncalled for!" Yes, you make the song reference/pun in there (clever! - I love a good pun!), but the overall tone and intent of what you wrote was more about not liking the ambush. So, it was easy to take your comment that way versus the '80s group and their song. And asking "Really? No comment on Wham? /smh" IS asking for an opinion. And in an open forum like this, comments are for everyone to weigh in on - otherwise, there is a Direct Messaging system for private messages. And it didn't make sense to me that you would ask more about why someone didn't comment about the '80s group and their song versus the ambush... so, that is why I offered my opinion about the ambush. Again... sorry you didn't like any of that. But there was also nothing damaging or hurtful in my post. You gave me a "sad' emoji, and could have left it at that and nothing further needed to be said. But... Asking/stating: "Sigh, How old are you? Bet you're under thirty" IS belittling and rude. Sure, you may not have meant it that way, but that's how it came across. You clearly could see I didn't catch your meaning, so all you had to do was instead say, "Oh, I meant the '80s group and their song" and all this misunderstanding could have been cleared up immediately, and we could have had a laugh much sooner. Sorry I misinterpreted your meaning. And again, sorry you took mine in the wrong way too. I meant no ill intent either. A sincere, Happy Holidays to you! 🙂 -
"Damn punks are ruining the neighborhood!"
-
I post yellow salvage for 1000 each... so thank you for the extra money! 😄
-
HA! That's the concept for my AR/Energy Blaster... old dude tired of all the gangs messing up his neighborhood. He picks up a gun and pulled a pair of Crey energy gauntlets off some gang members and is now out being a vigilante. 😄
-
First mission offered Blue side is always a hunt - take the second option which is typically a door mish and where story arcs are. Part of the arcs may be a hunt, and sometimes before/after an arc you might get "go see security chief" for a hunt/clean up of a zone... but it's a one and done thing (until you get to the next contact level). 🙂 These hunts are old offerings/content from the beginning days when door content was not as robust. Also, there were a lot of people who didn't want to do story content and just wanted to street-sweep, but this gave them a way to get bonus mission-completion XP too. Yes, they are a pain in the rear-end and I get annoyed too. But I also get nostalgic and remember fondly back to the early days of the game. Mixed emotions! 😄
-
For all the characters that you still need to save, you will need to "edit" them, click through to the end to save them. You may need to also on the "register" / "save" screen, click on the "Show Save Path" button on the lower left corner to be sure you're putting them in a folder / naming them appropriately. It's pretty simple, but tedious. But should solve your issue.
-
I like your reasoning for a Tank. However, Cap wouldn't go up against the Hulk like Thor would. But Cap did go toe to toe with Thanos - Cap got whooped, tired, and torn, but held his ground... so, I'm thinking Cap is more of a Brute who is focused on Tanking and pulling aggro while dishing out the damage - not quite a Tank, but more than a Scrapper. And Taunt is a must - "I can do this all day!" 😄 As for your other MA Cap.... maybe make him one of the guys from the Captain America Corps? Or the Cap from the alternate Earth where he believed Hydra was good and righteous (make him a Rogue or Villain)? Make him into one of the Marvel Zombie Avengers! Turn into a Guardian homage? Patriot from the Young Avengers? Or Red Guardian for more Vigilante/Rogue/Villain goodness Or heck - Bucky Barnes who used more extreme measures as his version of Cap
-
Personally, I feel Street justice is more Cap's style. MA is mostly kicks and Cap punches, knees, and swings his shield around more, which you get that more with Street Justice than you do with MA. But I'm no expert. I think both MA and SJ have merits to be Cap. ....and glad to hear you're not deleting and just rebranding one. 🙂
-
Two very random questions (KB/KD and Regen vs. Res)
Frozen Burn replied to Story Archer's topic in General Discussion
Knock DOWN is just very low mag Knock Back. The KD>KB procs will convert the power's higher mag of KB to 0.67 mag of "KB" which then makes them fall down, instead of backwards. So, as Nemu stated, Footstomp does 0.67 mag of KB already - which knocks them down. So, your proc in it is useless and you can safely put something else in it. I am sure it is confusing as Footstomp's power description probably states "Knock Back" even though it's low mag and foes actually KD. So, you have to be careful about power's descriptions and look at the actual mag of KB they do. I find it's really only some of the powers in the newer powersets that start adding in the description of "Knock Down" - powers from older sets seem to still cling to the KB description even if they in fact KD. (Confused yet?) 😄 And yes, with Footstomp, lower level (conning blue, green, or grey) or even pets, underlings, and such - and Primal Clockwork (including even-con minions and LTs) - will Knock BACK with foot stomp because they don't have any resistance at all or enough to overcome the 0.67 mag. But all other foes should Knock DOWN with Footstomp. -
I joined the Star Wars: The Old Republic (SWTOR) beta with my former SG-mates and then we played live for years, until life just got in the way of gaming. I then mostly solo'd in SWTOR for a few years after, until they kept increasing levels and making a new grind for top gear - that got old. But man, i loved the content! I still pop in every now and then.
-
I have never liked the animations or sounds for Sonic Blast. When the Talons of Vengeance were released with their lyrical singing powers and animations of notes flying through the air - that is what I always thought Sonic Blast should/could be. THANK YOU for giving those animations and sounds with Symphony Control! Is it possible to proliferate those animations and sounds and apply them as options for Sonic Blast and anything relevant/similar in Sonic Manipulation, or even in Sonic Resonance for that matter? Even if not all the powers can be adapted for this alternate animation and sound, perhaps at least some?
-
Temporary Powers: A Blaster Primary
Frozen Burn replied to Hamsquad's topic in Suggestions & Feedback
This is the big issue right here. Anyone who picks this power set has to continually purchase - spend Inf - on new temp powers to have half of their powersets work. That's unfair. It is also possible for someone to use up an entire temp power before a mission or even Task Force or Trial is over and you can't refill. Not all temp powers are available at the P2W vendor either. Additionally, new toons - and especially new players to the game - who do not have Inf to spend at the P2W vendor are out of luck. I get your idea and see why you would want this. It does seem like a nifty idea to have something to boost temp powers. But NOT for a primary set of an AT or even as a secondary set. And you are sorely mistaken if you think Blasters need a hand. Or any other AT for that matter. If anything, this would need to be a Pool Power set open to all. You only need 5 powers in a Pool set and you've outlined them (so then there is no need to come up with anything for powers 6-9). -
Thank you SO much!
-
Foathim the Kind Dispersion bubble not working
Frozen Burn replied to TimesSeven's topic in Bug Reports
Lol. I'm 52 - almost 53. I get it. You don't like it. And that's okay. I totally respect that. But you asked about other's opinions and I gave mine. You don't have to be belittling about an opinion opposite of yours, though. -
Hi and thanks for the quick reply! I have no way to accurately time it. So, I trust you and your data. But from standing. I hit fly. Then turning Fly off, I can count roughly 1s before I drop, and my feet hit the ground at 2s. So, I guess that is why it feels like a 1-2 sec process. If there is anyway to cut that 0.75s down to 0.25s, that would be a HUGE difference and I would be forever grateful (hopefully, others too). 🙂
-
Foathim the Kind Dispersion bubble not working
Frozen Burn replied to TimesSeven's topic in Bug Reports
Sure, I'll comment.... I like the ambush and think it should stay. It keeps things interesting and not monotonous. It also provides a challenge which keeps the game engaging. But, sorry you didn't like it. 🙂 -
I have Fly and when I turn it off, I instantly drop to the ground. This is perfect for timing my actions, especially in combat or just generally moving around. I get up in levels and add in Evasive maneuvers... but when I turn off Fly, I hover for like 1-2 seconds before I actually drop to the ground. This is highly annoying, especially when I'm in combat and trying to time my actions accordingly. Heck, it's just annoying no matter where I fly and I want to land, but don't drop to the ground when I turn of Fly. I end up thinking, "did I not turn it off - is there something wrong with my key bind?" So I then press Fly again, which turns it back on making me hover more. Then I have to turn it back off and just sit for like 1-2 secs more until I finally drop to the ground. ....This is just SO darn annoying. 😄 Is it possible to tighten up EM so that the "hovering" doesn't happen after Fly is turned off?
-
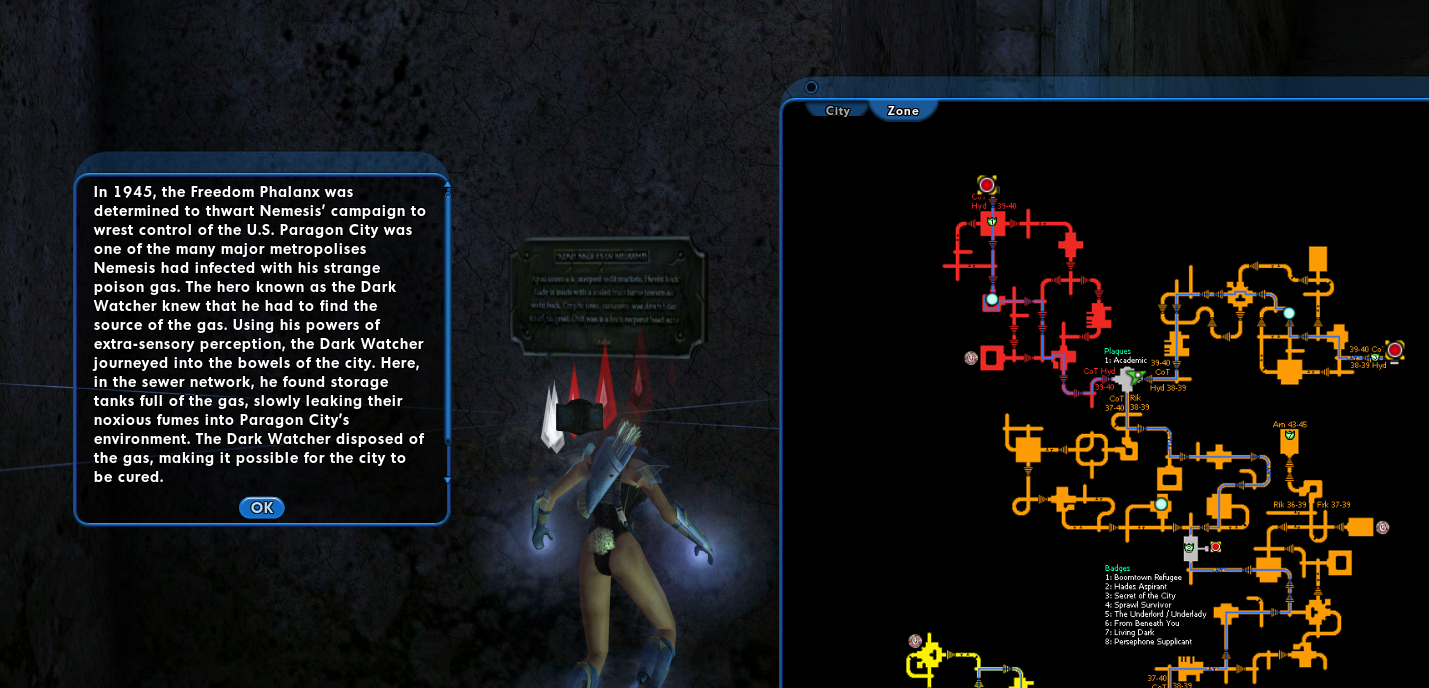
Hi @SonofDorn and welcome to the game/forums! The plaque is there where it's supposed to be. I'm staring at it right now.... Are you SURE you're in the ABANDONED Sewer Network and not the "regular" Sewer Network? They are 2 different zones that look alike. To get to Abandoned Sewer Network, enter the regular Sewers, Turn RIGHT, and go through the door... that will load you into the Abandoned Sewer Network. I suggest going to Steel Canyon or Boomtown to enter the sewers for the plaque. The plaque is where my green arrow is on the map in my pic. It's in the room between the Boomtown entrance (red area to upper left on map) and Steel Canyon entrance (Upper right yellow area). The plaque is on the left wall next to the pipe leading to Steel Canyon. (If you haven't actually been in the Abandoned Sewers yet, there are more exploration badges in here as well, just like the "regular" sewer network.) Good luck!

-
As I mentioned in my previous post just now, yes - Sentinels can be very survivable. My Beam/Atomic is extremely so, and as I mentioned, I took Provoke so I can taunt. One of my SG-mates has an Elec/Invuln Sentinel that just has a hard time dying - largely due to his draining the end of the foes - but that is leveraging your abilities and is what all players should do. I have other SG-mates who are highly survivable with other armors as well. And you are right - you add a blaster to your team, you know what you're getting - lots of offense... and someone who may or may not be taking dirt naps all the time. 🙂 If you add a Sentinel, you know you'll get some damage, but they should be vertical most of the time. Again, I will always play or take a Blaster over a Sentinel... but Sentinels do provide an outlet for many players to enjoy a ranged AT without being yelled at by teammates to buff/debuff others because the only other option was a Defender or Corruptor (or a challenging Epic AT). 😄
-
...Exactly. 😄 You have your Hero ATs that were original to CoH You have your Villain ATs that came with the release of CoV Then came the Epic ATs (Peacebringers, Warshades, Widows, and Soldiers) And then... out from much debate and arguing on the forums about Blaster survivability.... you get the Sentinel. Sentinels were created from a large group of people who liked playing ranged damage characters, but grew tired of faceplanting all the time and feeling "naked" without any means of shields or survivability. The only other option for ranged damage players were Defenders, Corruptors, or the Epic ATs. Epics pigeonhole you into a concept and present their own challenges for building - many are not a fan of either. And many don't want a buff/debuff set as their primary/secondary - they just want to shoot things and not HAVE to go into melee range. So, people therefore asked for an alternate Blast set with scrapper-like shields so they can enjoy being ranged damage, have easier survivability, and don't have to worry about buffing/debuffing others. So... the Sentinel was born. Yes, Sentinels do have lower damage as well as lower range, and this is because they have a defensive/shield secondary. Blasters are nothing but pure damage - higher risk/higher reward. Sentinels have lower risk because of their shield secondary, so lower reward. However, a properly made and played Sentinel can be as survivable as a scrapper, brute, or tank. I actually took Provoke on mine so i could taunt and be a Tank! Blasters can get mez resistance/protection with the Clarion Destiny Incarnate ability (lvl 50+) and /Martial Combat has a "break free" power, but lastly, Blasters have Defiance which allow you to use your Primary T1 & T2 and secondary T1 powers even though you're mezzed... I cannot tell you how many times that has saved my Blaster's life. As mentioned above, having an Assault set as primary basically makes you scrapper. There is no need for this. And Sentinels do have need to occasionally go into melee range to some degree depending on your blast set, which may have PBAOEs or short cones - but also for their armors which might get buffs from foes or debuffs them. So, the incentive is there, if you choose to use it (just like with Blaster secondaries). There are many who play their Sentinels purely at range and are happy with that, and there are others who play them in melee to leverage those PBAOEs and armor abilities. At the end of the day, there are no opportunities to miss with Sentinels - they are what they are: filling a niche as an alternative to Blasters which the game was lacking. But as I mention above, due to their defensive secondary, they will do lower damage and have shorter range as the tradeoff. But with the recent changes to Sentinels, they've improved! ...however, I will still always choose to play a Blaster over a Sentinel. 😄
-
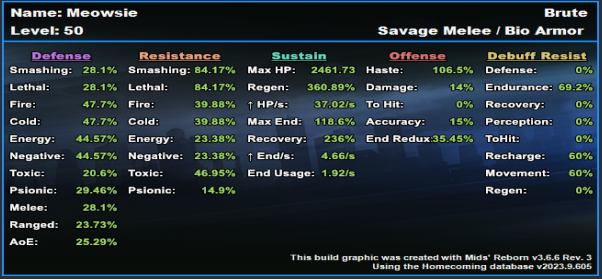
I am no expert in either Savage or Bio.... but I LOVE my Savage/Bio Brute! Below is the build I came up with and is very sturdy. Data Chunk at end, in case you want to play around with it. Meowsie - Hero Brute Build plan made with Mids' Reborn v3.6.6 rev. 3 ────────────────────────────── Primary powerset: Savage MeleeSecondary powerset: Bio ArmorPool powerset (#1): SpeedPool powerset (#2): ConcealmentPool powerset (#3): FightingPool powerset (#4): LeadershipEpic powerset: Energy Mastery ────────────────────────────── Powers taken: Level 1: Savage Strike A: Mako's Bite: Accuracy/Damage3: Mako's Bite: Accuracy/Damage/Endurance/Recharge11: Mako's Bite: Damage/Endurance43: Mako's Bite: Damage/Recharge Level 1: Hardened Carapace A: Aegis: Resistance/Endurance13: Aegis: Resistance/Endurance/Recharge13: Aegis: Resistance31: Unbreakable Guard: +Max HP45: Steadfast Protection: Resistance/+Def 3%45: Gladiator's Armor: TP Protection +3% Def (All) Level 2: Shred A: Eradication: Accuracy/Recharge3: Eradication: Accuracy/Damage/Recharge11: Eradication: Damage43: Eradication: Damage/Recharge48: Cleaving Blow: Accuracy/Damage Level 4: Maiming Slash A: Hecatomb: Damage5: Hecatomb: Damage/Endurance5: Hecatomb: Damage/Recharge/Accuracy43: Hecatomb: Recharge/Accuracy Level 6: Environmental Modification A: Shield Wall: Defense/Endurance7: Shield Wall: Defense7: Shield Wall: Defense/Endurance/Recharge23: Shield Wall: +Res (Teleportation), +5% Res (All)31: Reactive Defenses: Scaling Resist Damage45: Luck of the Gambler: Defense/Increased Global Recharge Speed Level 8: Vicious Slash A: Superior Blistering Cold: Accuracy/Damage9: Superior Blistering Cold: Damage/Endurance9: Superior Blistering Cold: Accuracy/Damage/Endurance40: Superior Blistering Cold: Accuracy/Damage/Recharge Level 10: Adaptation Level 12: Inexhaustible A: Preventive Medicine: Heal15: Preventive Medicine: Heal/Endurance15: Preventive Medicine: Heal/RechargeTime46: Performance Shifter: EndMod46: Performance Shifter: EndMod/Accuracy46: Performance Shifter: EndMod/Recharge Level 14: Blood Thirst A: Gaussian's Synchronized Fire-Control: Chance for Build Up Level 16: Ablative Carapace A: Preventive Medicine: Heal17: Preventive Medicine: Heal/RechargeTime/Endurance17: Preventive Medicine: Heal/Endurance25: Preventive Medicine: Heal/RechargeTime Level 18: Rending Flurry A: Superior Unrelenting Fury: Accuracy/Damage19: Superior Unrelenting Fury: Damage/RechargeTime19: Superior Unrelenting Fury: Accuracy/Damage/RechargeTime25: Superior Unrelenting Fury: Damage/Endurance/RechargeTime34: Superior Unrelenting Fury: Accuracy/Damage/Endurance/RechargeTime37: Superior Unrelenting Fury: RechargeTime/+Regen/+End Level 20: Evolving Armor A: Aegis: Resistance/Endurance21: Aegis: Resistance21: Aegis: Resistance/Endurance/Recharge31: Aegis: Resistance/Recharge Level 22: Hasten A: Invention: Recharge Reduction48: Invention: Recharge Reduction Level 24: Stealth A: Luck of the Gambler: Defense/Increased Global Recharge Speed Level 26: Hemorrhage A: Mako's Bite: Accuracy/Damage27: Mako's Bite: Accuracy/Damage/Endurance/Recharge27: Mako's Bite: Damage/Endurance50: Mako's Bite: Damage/Recharge Level 28: DNA Siphon A: Eradication: Accuracy/Recharge29: Eradication: Accuracy/Damage/Recharge29: Eradication: Accuracy/Damage/Endurance/Recharge37: Numina's Convalesence: Heal37: Numina's Convalesence: Heal/Recharge40: Numina's Convalesence: Heal/Endurance/Recharge Level 30: Kick A: Invention: Accuracy Level 32: Savage Leap A: Superior Brute's Fury: Accuracy/Damage33: Superior Brute's Fury: Damage/Recharge33: Superior Brute's Fury: Accuracy/Damage/Recharge33: Superior Brute's Fury: Damage/Endurance/RechargeTime34: Superior Brute's Fury: Recharge/Fury Bonus34: Superior Brute's Fury: Accuracy/Damage/Endurance/Recharge Level 35: Genetic Contamination A: Superior Avalanche: Accuracy/Damage36: Superior Avalanche: Damage/Endurance36: Superior Avalanche: Accuracy/Damage/Endurance36: Superior Avalanche: Recharge/Chance for Knockdown Level 38: Parasitic Aura A: Numina's Convalesence: Heal39: Numina's Convalesence: Heal/Recharge39: Numina's Convalesence: Heal/Endurance/Recharge39: Performance Shifter: EndMod/Recharge40: Performance Shifter: EndMod/Accuracy/Recharge Level 41: Tough A: Aegis: Resistance/Endurance42: Aegis: Resistance42: Aegis: Resistance/Recharge42: Aegis: Resistance/Endurance/Recharge Level 44: Weave A: Shield Wall: Defense/Endurance48: Shield Wall: Defense50: Shield Wall: Defense/Endurance/Recharge50: Luck of the Gambler: Defense/Increased Global Recharge Speed Level 47: Taunt A: Invention: Recharge Reduction Level 49: Superior Conditioning A: Performance Shifter: Chance for +End ────────────────────────────── Inherents: Level 1: Brawl A: Invention: Accuracy Level 1: Sprint A: Celerity: +Stealth Level 2: Rest A: Invention: Interrupt Reduction Level 2: Swift A: Invention: Run Speed Level 2: Hurdle A: Invention: Jumping Level 2: Health A: Numina's Convalesence: +Regeneration/+Recovery23: Preventive Medicine: Chance for +Absorb Level 2: Stamina A: Synapse's Shock: EndMod/Increased Run Speed Data Chunk: G3d8ACwK7IbjC4cm6nXmLOCfisCGRkgyq66Fyo7AuzHaJO21So8ZN3emTUU8KJLLvhU//5hZvgzAQgsOOdLmBzp5QnEJIiJnqmZVbeB7fqVPef396AnamrWI0KRAStn1AmfVMqWCgqbonkmAmtDfu9tRCuneKe16/xUyS+ihyyhkGiK2IUgYbA+6VYjIRoFZTGLm1MzMZXBTY7Qi1x5mMlTD/6HL7XaSVjrEFjIZ1XdSLBJKRR++eIHeF7FIzQ8xrB62AJoji3Cf3kLlUg8piWAlAEF9Vs4nLHFeuZ+OwoEWUpLh7wIId83i9xHSmAM/gSUlQUr1HILRvADts64DNv5mI8JjISbihBH4cwqm1fvx0Dx9ICBX/MPIxS9++0tpgQKF/OB9Q+3C0eGkIntVnEyeRQhxePT11RoCNsoP/l9odi06WXLDsmqCJbdLTS35oShpJTUSu2zFiFMJmWMqPVEoKEIBzOeid5FmKDQslnTJ3RiCYGZQ3XAhR8gdC/zn5jsOHvd1iTDK3rY9fNsu1d/8mLxqMQARaoNFqXjmv63HuZLZ9AMnU+lWSaivCad8Ca2CBWE4y930aix89w+jMnDbO3jJ1YpW8vkqfCmLWN2W2up/rcKLVPOToifU5JKSenYhDR/5HySV3lH/uEgM6/9DfYzkXnyNVmewbbga0h0UhpY0w+JmjMCsK27RjwJ9QaXH24xSnqKiNPrFwlDJc3DnLQp/w/7Pwx2AXfK233s8uclJW6gn+WGVDRia81hZfVmRSNRj/mLy5Kg3svDLpfxOYzyuIQ5wrUAqRWBdfB6sBDxd3MOK63TPzcpVeHh8mOQo6+b83ajXJe7Jx684Q/VT4mku8FS3KJBJPIELOh6zNO6jTACtLBknNQmjkZpzt1VlILw1RS0tgbACpYBGbLBAinhTWZBTkZQLsoDZClJ+WsysdsPm8ZT5Rh8x9AygmjZ5bzYhNllZU9PC0jhyB6JytizKYTuPXVlwp/xYsereS1UUT2lVVQy8E0P6UOmnpewq0oxVt1UmDNTzUtvWm4Kn0fBMJb6625VujzuFTaB1bjs1N9wDfiz9oZ9ZqpHbCrymzsmLxZCX+YSie0SJlE+85PfUaan2x1ZTQo2h/0MGSkHWudxYxfZqOeVkfDUsCAXcsNf4TpmPVRFyRuqkgXqKFDd/rkhc1M/v9ZZNfGZByOFxHo9UCi/RPYELvQRhswC2ZyImy4qhxMTySkGCytTec3je+i/I6obab+Fc+Mml/qJqeGk806tXhXeY3S6LTF+9x20AIi2PHDM3BawPcSnalVjMMhcUa4UiCMpHHrtV3TzfoE4u4gQdrf7wSj1VRJlmg+SIiwKeby/pznQ2iRzppoteiIbJ7v+K8swUtmnlaRPaaHpFnZVd6bebfy+Y0l3z67ELhwPm6vlwDdY/a9QhcLlDZyPuLC2WJ0MAzN829JNDO0AHnMKWmA7onSnpjDgfHZ5y6ZRVoAcvC2gu1h82zTjdXsllht5UgeKaIQoZYM72CssZmjkg1z0qBxg+j/E5Ts80/8SIYYddJVotfxn7kVaE4ROXRAJ7qptmUp55ymCTeVy8s0hYS5WW8Ey1sis+VjwhZEqmWADNfv2tJRWO/KBntbaNOvrmLqVwDiS0wG21XpOMbCuZHE0AF0ld5cD18GAWEn1E1hMLB1hHExaH7TZn7g2OFhwe0ULlfT+yPdHA86i0g5/HE0dML4eaCvfU8BNE6a1qM0VqHAlsooGxsRbY1GhRbEPfYRdEVEYvTAJJdPMCqVX/prJ56J/gOg8x/jDe7cGKhG0dQQC9UVBAAdQW8fvAdD0si4AkapmC1OLat7zxAcSeoxS/jxXl+BVTrPTKQ22JNmQPcIcauJXDa1Gzvs/tvvmwXj/8vkg9XY+DQASoMwD0gWICmXmpB18kWYQWrZuVqa5gHeB42NG4OrHpjhd1m/mGL7Ic44vWJMZQj/gkNxCFkykro1nBrneIdYHvY1XZJVHViQdr7d+G9yrEX/0ua3UbWatHqyVv0AwJLeBKtDAJHkkbJyjSf57Qo3BWdbWHuvl2N3cJjCBkAp2yc3DKYzZmcMo8RS34Cc9Dr6YpcFO0Dho+/hsAiVA4SPHHM03tEDEiDq1FGp9qegEP3sxfbzl97s07bCupG7N9fprs0kzyyinxcPo6GUXG0x/wAw7bbdQ2n3SwevyBX+EPZxUKmtknTxvGvR99HNGAqpM89XCnuZ+HGeVaEK4GParAO7zpphXlfLUFBm+klmHPHVXFpD285o+Q7elnSu7RrMHPutcOfP0KM7bF3IUO1/tTuMhDETJOl8rIBnhoxUxo2Da/rkrs77baQMTsI+ugt/DOVZ7NZ3lCGXms0xQeaqYVftChPfGXGVXhxUWP/OrF9geZNjG5ZN4OvEoMu16ru8rMkxgz7mpuOtZLaMc61vRYZaeE2gNcr1Gexj3BOJtv9yZRqgbCp4BGC16PdQrY61k2ciZNNtKUvcymu5cq1ZJhOKHpYPHtcjbWwsNcfFWvvp0XgBQ5vs+TqgkbRK+A8V7ionXajvedOQfZtLYPDmrjV2wcxgPlBiWrxj6K/OPIuAor7Ry8y7YHhUK7PyO1ouPNn8QaffgTXiunU2hscII+3RhmAvIaPVULKwJ9g/KzIpNOxVZgvPfwQOkmDyT9X7phO9g28CO1l44qguoZIOeWcw2p5WI1SIE6Jx6rV5ElnkKhKSAvw0ozdoiOZOAE06U3NuRpQnxBu/A7s2DbXLkiy+4xovDP07c7iB8+Oe80Vb1ymiEgnzz8h9lAGMpJCyqritshnFrAtbQ3VrYXulAQ4B9VPQ==
-
Hi! You can download from here: https://midsreborn.com/ Have fun! 🙂
-
My condolences to the family, friends, teammates of Punchy.
Frozen Burn replied to MoggieCanada's topic in General Discussion
Ugh. 19. Breaks my heart.. All my best to Punchy's loved ones. ...and what a great name... "Punchy!"