The Beta Account Center is temporarily unavailable
×


Nemu
-
Posts
1418 -
Joined
-
Last visited
-
Days Won
3
Content Type
Profiles
Forums
Events
Store
Articles
Patch Notes
Everything posted by Nemu
-
Come now, just because it's the best toolkit for that specific challenge doesn't mean other options are off the table. This is also not a post about what's best. We all know that's a Fire/Electric blaster and most certainly not any ATs with their precious mez protection, soft cap defenses AND hardcapped resists. Someone is overcompensating. 😝 This is however, a thread about what is potentially a fun, off meta combo and the thought process behind the design and build.
-
But I already turned in my badge and gun per your instructions @Yomo Kimyata The leech is not dependable. I'd ignore it altogether. During my leveling journey I've been known to take a swig or 50 of recovery serum. My advice is to get the LOTG mules like weave and manuevers but don't actually run them as soon as you pick them up if you plan to be in offensive all the time. Once you get both TS and lightning clap they offer a surprising amount of mitigation (not to me, I've been doing this on my fire/elec for ages, but maybe for you). This is a build that also benefits from mob density, so rather than running +4/1 do +1/8, DNA siphon especially benefits a great deal from this setting and that will make your end issues go away. You can't AFK with a build like this but with some inspiration management you will find +1/8 or even +2/8 doable during leveling. Once you hit 50 you can also do a respec and take adaptation at level 49. This is a minor QoL improvement as it will allow you to push evolving armor up to a pre-level 32 pick, which helps you exemp a teeny bit better.
-
Y'all having a philosophical discussion here that absolutely no one cares about. Let me answer the question straight up Assault Rifle CUZ GUNZ. You can be NURSE GUN BABE or something like that. Not that you will use any attacks though. Cuz you wanna be the best Healer you can be. This Hero build was built using Mids Reborn 3.0.4.7 https://github.com/Reborn-Team/MidsReborn Click this DataLink to open the build! NURSE GUN BABE: Level 50 Natural Defender Primary Power Set: Empathy Secondary Power Set: Assault Rifle Power Pool: Flight Power Pool: Leadership Power Pool: Concealment Power Pool: Medicine Ancillary Pool: Leviathan Mastery Hero Profile: Level 1: Healing Aura -- Heal-I(A), Heal-I(3), Heal-I(3), Heal-I(5), Heal-I(5), Heal-I(7) Level 1: Burst -- Empty(A) Level 2: Heal Other -- Heal-I(A), Heal-I(13), Heal-I(13), Heal-I(15), Heal-I(15), Heal-I(17) Level 4: Fly -- Empty(A) Level 6: Resurrect -- RechRdx-I(A), RechRdx-I(7), RechRdx-I(9), RechRdx-I(9), RechRdx-I(11), RechRdx-I(11) Level 8: Hover -- LucoftheG-Def/Rchg+(A) Level 10: Maneuvers -- LucoftheG-Def/Rchg+(A), EndRdx-I(34), EndRdx-I(34), EndRdx-I(36), EndRdx-I(36), EndRdx-I(36) Level 12: Stealth -- LucoftheG-Def/Rchg+(A) Level 14: Grant Invisibility -- LucoftheG-Def/Rchg+(A) Level 16: Aid Other -- Heal-I(A), Heal-I(17), Heal-I(19), Heal-I(19), Heal-I(21), Heal-I(21) Level 18: Recovery Aura -- RechRdx-I(A) Level 20: Aid Self -- Heal-I(A), Heal-I(23), Heal-I(23), Heal-I(25), Heal-I(25), Heal-I(27) Level 22: Field Medic -- RechRdx-I(A), RechRdx-I(45) Level 24: Resuscitate -- RechRdx-I(A), RechRdx-I(27), RechRdx-I(29), RechRdx-I(29), RechRdx-I(31), RechRdx-I(31) Level 26: Regeneration Aura -- RechRdx-I(A), RechRdx-I(45) Level 28: Group Fly -- Empty(A) Level 30: Phase Shift -- RechRdx-I(A), RechRdx-I(31), RechRdx-I(33), RechRdx-I(33), RechRdx-I(33), RechRdx-I(34) Level 32: Adrenalin Boost -- RechRdx-I(A) Level 35: Shark Skin -- ResDam-I(A) Level 38: Afterburner -- LucoftheG-Def/Rchg+(A) Level 41: Hibernate -- RechRdx-I(A), RechRdx-I(42), RechRdx-I(42), RechRdx-I(42), RechRdx-I(43), RechRdx-I(43) Level 44: Summon Coralax -- RechRdx-I(A) Level 47: Assault -- EndRdx-I(A), EndRdx-I(47), EndRdx-I(47), EndRdx-I(48), EndRdx-I(48), EndRdx-I(48) Level 49: Tactics -- EndRdx-I(A), EndRdx-I(49), EndRdx-I(49), EndRdx-I(50), EndRdx-I(50), EndRdx-I(50) Level 1: Brawl -- Empty(A) Level 1: Sprint -- Empty(A) Level 1: Vigilance Level 2: Rest -- Empty(A) Level 2: Swift -- Empty(A) Level 2: Health -- Heal-I(A), Heal-I(39), Heal-I(40), Mrc-Rcvry+(40), NmnCnv-Regen/Rcvry+(40), Pnc-Heal/+End(43) Level 2: Hurdle -- Empty(A) Level 2: Stamina -- EndMod-I(A), EndMod-I(37), EndMod-I(37), EndMod-I(37), EndMod-I(39), EndMod-I(39) ------------ | Copy & Paste this data into Mids Reborn : Hero Designer to view the build | |-------------------------------------------------------------------| |MxDz;1362;525;1050;HEX;| |78DA7593ED4EDA5018C74F791922144486EF8CE2449D984EAF601165660B1083719| |FB634158A9CA416D216333EEE0AB62BD93DED02F67207ECB1FDCBDC637A02F9C1BF| |E7F93D3DED39EDCF67D9EFE75FDE0825776A9B9E679C5903CBE95B6EAA63FA13D7B| |4058D5CE7AA7BD9D4CEAF3A5AE3A4D14C51547A986734268381DEBC1D9BFE705A9E| |A75DD3B9B1FAFA89E79913DB37BA72605B2273311AD9FA5B5BDE0CFD7CF0BB65993| |4DB1BCA7121F8FFCEB9939EBC96B6F4A76A90B4ADBEEC49C7D29A63D9D34F47AE3B| |19FB23D7685977925A9A8ED1363DDF72A76B745715FA7E8C098C5952EC108E1322C| |698607C067E55E7B5F4A1213E914D814DC1AC2C638E7109CCD0838AC3160F6C06D9| |92B025EBE80D2E302E32A6C996822D555282AC40411ABE34B26A55FCC7971154A93| |6035F06B539CA54642AB2326579F4C8B3152E333E67BCA6F516E02B601D15F215E1| |2B62DE0AE31AE306F8AD463B2FAC554AF01D821A7957E15D45B6016E31BE60ECD17| |DAEC3BBCEBC59F26E620D9BC15B5CA2A48C4E6566D2225805FBB17097DEDB2AC86C| |DA24DBC8B60FC34CAC08514356C39BF89115621F7DF751FB2A82078C0EF5A8C3574| |7B64CEBD0E1D3B12B385F47B048B547A83D42C6791CC1AD043F65AD2749E73E090E| |DE6C7691989F41A104577F2E52A23C4E7EFF4BE6E77417DC7BE07B9AB047FC103EC| |F836A3CE0AF27B63F8F6D5A58BD13C15DC6BF3B6EBD88| |-------------------------------------------------------------------| Steps to success Step 1 - Log in Step 2 - Pick this dude Step 3 - Hold down control key and click healing aura (MOST IMPORTANT STEP!!!) Step 4 - Toggle on Fly, Hover, Evasive maneuvers, Stealth, Maneuvers, Assault, Tactics. Step 5 - Find tank Step 6 - Right click on tank and select "follow" (SECOND MOST IMPORTANT STEP!!!) Step 7 - That's it, you can't be bet at this point.
-
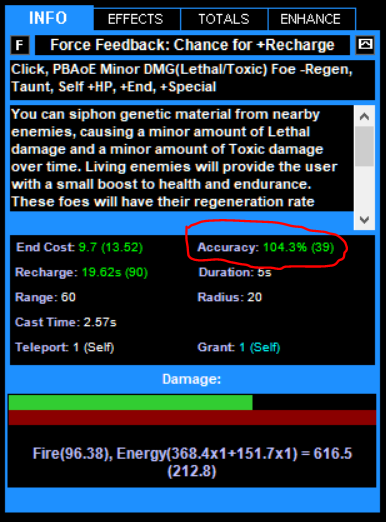
Mids does the math for you. Some tips: Your chances to hit will decrease the higher level mobs are relative to your level. Most seasoned builders will shoot to have chances to hit at 95% bare minimum against +3 mobs, as end game +3 mobs is the highest differential assuming you have alpha incarnate level shift. Some also try to shoot for at least 95% chance to hit against +4 mobs for non-incarnate content. First simulate higher level mobs by going to options - configuration and click on the Exemping and Base Values tab. Set the Base ToHit to 39 to simulate fighting +4s, set it to 48 to simulate fighting against +3s. Hit ok. Now highlight a power and look at the "Accuracy" in the expanded info window. That will tell you your chances to hit and it will factor in the to-hit and acc buffs from your slotting and power picks. No Math required. As long as it's 95% or higher you have the maximum chance to hit against mobs assuming no to-hit debuffs from enemies. Other numbers you should pay attention to: You should slot attacks as attacks and make sure most of all that the damage portion is well enhanced, around 95% is the soft ceiling for enhancing damage, but advanced builders will let that number dip a little if they incorporate damage procs into the slotting. Long recharge powers will benefit from more recharge enhancement, the soft ceiling for enhancing recharge is also around 95% When you are slotting sets they always have a mix of endurance discount and recharge enhancement along with whatever other primary stat they enhance (damage, healing, debuffs, etc) Most of them are "good enough" Stacking set bonuses help you acquire global "always on" benefits such as increased defenses or recharge. That's really the trick to building in mids once you understand the basics of enhancements. Most newbies post builds that lack cohesiveness and a lot of that comes from lack of FOCUS, and a lack of understanding of the overall game plan. I have done several posts where I deconstruct a poster's build and help them define their game plan and build with specific focus. Street Justice/Regen Build Help - Brute - Homecoming (homecomingservers.com) Help me fix this mess (Beam/Temp) - Blaster - Homecoming (homecomingservers.com)

-
I use whirlwind.
-
I got blinded a few times, I hate blind. So I settled on tactics. I'm not dismissing build up, I just can't fit it in with the power choices I settled on. Shield wall goes into weave because it helps with S/L defense. I don't care all that much about F/C/E/N due to the reason I noted about mob factions with mixed type attacks that debuff defense. And that thought process should be very evident in my slotting of environmental protection as well. The ROI that goes into shoring up F/C/E/N defense is not worth it considering that lethal defense debuffs are quite common and that you'd have to invest pretty heavily to get FCNE to the softcap which cuts into your ability to build for more recharge/useful procs. Agreed on resistance as layered mitigation but like I said, if you are used to playing a melee blaster with lower overall HP and lower resists, this build is a cakewalk to pilot. I could, or I could do electric/bio and write up a build/mini guide about it for people looking for something a bit off meta. Pandas are too cute to be fired so NYAH!
-
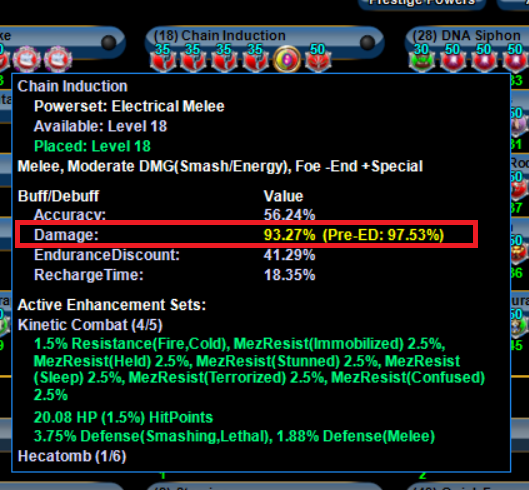
Most bio builds I see try to go for softcap. This build approaches survival differently. Bio is like regen, survival depends on clicks. So it benefits a great deal from high recharge and slow resist. But that's not enough, the clicks don't stop or lower incoming damage and only act as temporary buffers. So you need something on top. Most people go for softcap. I looked for something else. My fire/elec blaster is my favorite character and I have extolled the virtues of cycling AoE knockdowns to augment survival. Electric melee/Bio isn't all that different. It's like playing a melee blaster with mez protection and more survival tricks. A lot of people skip lightning clap or handclap from SS, they are missing out. Chaining AoE knockdown is fun and feels powerful. Give it a try. And it happens all those knockdown powers are ripe candidates for force feedback procs, which means more recharge for the bio clicks. OMG synergy! And when things get really bad? There is Shadow Meld, yet another power that benefits from high recharge. Moonbeam also helps with Electric Melee's notorious single target problem. OMG more synergy! So that's the plan, high recharge, high slow resist, knockdowns galore, profit and fun. This Hero build was built using Mids Reborn 3.0.4.7 https://github.com/Reborn-Team/MidsReborn Click this DataLink to open the build! iPanda: Level 50 Science Scrapper Primary Power Set: Electrical Melee Secondary Power Set: Bio Armor Power Pool: Leaping Power Pool: Fighting Power Pool: Speed Power Pool: Leadership Ancillary Pool: Soul Mastery Hero Profile: Level 1: Charged Brawl -- Hct-Dmg(A), Hct-Dmg/Rchg(3), Hct-Acc/Dmg/Rchg(3), Hct-Acc/Rchg(5), Hct-Dmg/EndRdx(7) Level 1: Hardened Carapace -- UnbGrd-Max HP%(A), UnbGrd-ResDam(43), UnbGrd-ResDam/EndRdx(43), UnbGrd-ResDam/EndRdx/Rchg(43) Level 2: Inexhaustible -- PrfShf-End%(A) Level 4: Combat Jumping -- LucoftheG-Def/Rchg+(A), Ksm-ToHit+(5), WntGif-ResSlow(7) Level 6: Boxing -- SprBlsCol-Acc/Dmg(A), SprBlsCol-Dmg/EndRdx(11), SprBlsCol-Acc/Dmg/EndRdx(15), SprBlsCol-Dmg/EndRdx/Acc/Rchg(46), SprBlsCol-Rchg/HoldProc(46) Level 8: Thunder Strike -- FrcFdb-Rechg%(A), FuroftheG-ResDeb%(9), SprCrtStr-Rchg/+50% Crit(9), Dmg-I(13), SprAvl-Acc/Dmg/Rchg(13), SprAvl-Acc/Dmg/EndRdx/Rchg(15) Level 10: Environmental Modification -- LucoftheG-Def/Rchg+(A), HO:Cyto(11) Level 12: Hasten -- RechRdx-I(A), RechRdx-I(46) Level 14: Tough -- StdPrt-ResDam/Def+(A) Level 16: Ablative Carapace -- Prv-Heal(A), Prv-Heal/EndRdx(17), Prv-EndRdx/Rchg(17), Prv-Heal/Rchg(39), Prv-Heal/Rchg/EndRdx(40), Prv-Absorb%(40) Level 18: Chain Induction -- KntCmb-Acc/Dmg(A), KntCmb-Dmg/EndRdx(19), KntCmb-Dmg/EndRdx/Rchg(19), KntCmb-Knock%(21), HO:Nucle(23), Hct-Dam%(23) Level 20: Adaptation Level 22: Cross Punch -- FrcFdb-Rechg%(A), SprAvl-Acc/Dmg(40), SprAvl-Acc/Dmg/EndRdx(42), Obl-%Dam(45), Erd-%Dam(45), Dmg-I(47) Level 24: Weave -- LucoftheG-Def/Rchg+(A), ShlWal-Def/EndRdx(25), ShlWal-Def(25), ShlWal-ResDam/Re TP(27) Level 26: Lightning Clap -- FrcFdb-Rechg%(A), SuddAcc--KB/+KD(27), AbsAmz-Acc/Stun/Rchg(29), AbsAmz-Acc/Rchg(29) Level 28: DNA Siphon -- ThfofEss-+End%(A), Obl-Acc/Rchg(33), Obl-Dmg/Rchg(33), Obl-Acc/Dmg/Rchg(33), Obl-Acc/Dmg/EndRdx/Rchg(34), Obl-%Dam(34) Level 30: Maneuvers -- LucoftheG-Def/Rchg+(A), Rct-Def(31), Rct-Def/EndRdx(31), Rct-ResDam%(31) Level 32: Lightning Rod -- FrcFdb-Rechg%(A), Arm-Dmg/Rchg(34), Arm-Acc/Dmg/Rchg(37), Arm-Acc/Rchg(37), Arm-Dmg/EndRdx(39), Arm-Dam%(39) Level 35: Moonbeam -- Apc-Dmg/Rchg(A), Apc-Acc/Dmg/Rchg(36), Apc-Acc/Rchg(36), Apc-Dmg/EndRdx(36), Apc-Dam%(37) Level 38: Parasitic Aura -- Pnc-Heal/EndRedux(A), Pnc-EndRdx/Rchg(42), Pnc-Heal/Rchg(42), Pnc-Heal/EndRedux/Rchg(45), Pnc-Heal(48) Level 41: Evolving Armor -- GldArm-3defTpProc(A) Level 44: Tactics -- HO:Cyto(A) Level 47: Genetic Contamination -- SprScrStr-Acc/Dmg(A), SprScrStr-Acc/Dmg/Rchg(49), SprScrStr-Dmg/EndRdx/Rchg(50), SprScrStr-Acc/Dmg/EndRdx/Rchg(50), SprScrStr-Rchg/+Crit(50) Level 49: Shadow Meld -- LucoftheG-Def/Rchg+(A), RechRdx-I(49) Level 1: Critical Hit Level 1: Brawl -- Empty(A) Level 1: Sprint -- UnbLea-Stlth(A) Level 2: Rest -- Empty(A) Level 2: Swift -- Run-I(A) Level 2: Hurdle -- Jump-I(A) Level 2: Health -- Pnc-Heal/+End(A) Level 2: Stamina -- PrfShf-End%(A) Level 49: Quick Form Level 50: Musculature Radial Paragon Level 50: Freedom Phalanx Reserve Level 50: Portal Jockey Level 50: Task Force Commander Level 50: The Atlas Medallion Level 20: Defensive Adaptation Level 20: Efficient Adaptation Level 20: Offensive Adaptation ------------ | Copy & Paste this data into Mids Reborn : Hero Designer to view the build | |-------------------------------------------------------------------| |MxDz;1468;726;1452;HEX;| |78DA65945B4F135110C7CF76B7144A0B02726F291481D2C2D29AF8A062880A98488| |935F5D5346B39C2C6DA36DB9AE8A30FBEF9A046E38B513F81897E0CE3E50B784712| |6F8089924004EB74FF43D9C426CDEF9C993933FF393DD3F9ABD3BE27A7AE4F09A5E| |964CE289532E9AC65148BD2F2A4B3A6CC67A5A04F9D9932F20B868796A15D7F665E| |E6A4D46772325BB6CCAC9183215CF34FCB8B325F92FA09B39039632D1A79339B396| |E5D2E58C2972A14727A521A4533BFE8B737B3E6E25299765E7B972E4AB9D0BC1BB5| |20ADD29259EC9E299A593D5D367297287BBA70852A1AA5B2B4AE7591AE087D37FC8| |23F154D0CBB844868C235C28C80DA28581705DF0C52B8629F51C5962A445013D1DF| |AAED8B6E3037C1B714AB205628F771BE832E4585CDA5B62BA8B123EC3C75BD38A75| |08C1B319AFB9666DBBCB7C1A63BE0F85DE63D708B7AF1A017B7E7066AD54F215FBD| |448C2F48EE4483F03DE25C8FC177A4B301F59406D6E43D445B4D15614ADAC8BEC69| |8404DA64A3E3FF7E7EF54EC1E3E52AE66D8DCCD5F507FDF57E63770F83B38F283B9| |0AFEA11E5AF86C4B8A10D644EB59661ADC7F0EEC9884BE8E187A7D4F75DB70B6727| |3488876BE8B76BE8B9107E875F421382650736CCD65EBD683E849A39E3AF9F7EDE4| |BBE89A456CD769B0670EDC26BDDDA8A376739D9E65E40F24B10FCC83CBA4AF977BE| |B6DC5BBE9DF86AF7F87F9171CA83059630B690AB2A6206BEA5B83AF6F9DF90BDC21| |4D21AE13624D0387C103479847C1E149E631B0FA7385791EC2E3B00DEACC09669C7| |324C015EA6B88CF0C05A06134C8ECE33B0E8113FDE0273A13E1771339085B1BF518| |431E11E3B7F799E2749E03FD39E2E22FC0C44BE62BE66B70D327441C799438DF559| |CDF6B48ABCD6E25A0D566BFBAAD544472CF4B238AEE521A9BAA136C47AD7A1D333D| |8EBC6B4E5B04B675A76D00DA7E7AFFFF3F988BD6F456926D64627D29EFDEFABC636| |D38D6171CEBA7D5F7CF793E38D6CF1C73F10F18BBE547| |-------------------------------------------------------------------| I don't bother softcapping F/C/E/N, there are enough factions with mixed damage types where a few machine gun bursts/claw/sword swipes will start cascade failure. 32.5% to all is enough and that requires relatively low investment cuz I got better things to invest in. I also doubled down on KD and took cross punch, it replaces Jacobs Ladder and is yet another FF proc holder. The KD proc in Chain Induction is also hilarious when it chains to multiple targets. The taunt auras comes late oh noes! Let me explain: 1 - I wanted my LOTG mules first cuz more recharge. 2 - The AoE knockdowns does a good job keeping mobs close. 3 - The Auras are endurance sinks that I can't afford during the leveling process, especially genetic contamination. This build is not unkillable god mode, it takes a bit more skill to play. Here are some tips: Protip - Know when to stand your ground and when not to. If you are experienced in playing a jousting bunny hopping melee blaster this build will be cakewalk. If you are entrenched in the "I stand my ground and we trade blows till one of us fall down" thought process, this build is not for you. Protip #2 - Synapse with this build is the worst TF ever. Protip #3 - The animation time on Ablative Carapace sucks, use it prior to approaching a mob, or after you use a KD power, or take a hop back while you use it so you are not taking hits from melee range and wasting the absorb shield. This is melee blaster 101 - how to move and take advantage of mob AI. Protip #4 - Piggybacking off melee blaster 101. Be prepared to move a lot when up against hard debuff heavy content. Kiting is a fundamental part of the game, learn to move.
-
Since you are working with a limited budget. here are a few must have low level attuned IOs to make your leveling journey easier: Kismet unique, slot this asap in a def power, you can do so as early as level 7, you have to have the defensive power active in order to get the to-hit bonus, for that reason I don't recommend slotting it in powers like stealth which you may have to turn off from time to time for escort/hostage missions. Either the unbound leap or celerity stealth IO, you can slot that in sprint as early as level 12, combine that with super speed or stealth for full invis so you can ghost missions that you don't want to take the time to kill through. A blessing of the zephyr kb protection IO in a travel power. A force feedback proc in water burst, you can slot that as early as level 18 I believe. LOTG 7.5% - these are expensive but best bang for the buck for recharge. You can start slotting the attuned versions at level 22 and they provide a good instant boost to your global recharge. Nice to have IOs but you don't need to get them until you have more disposable budget or slots to spare. Both the annihilation and the achiles heel -res procs. Both +def uniques, you'll want these when you start your real build planning and if your build planning involves building up defense. During leveling, they are luxury items early game and not worth going out of your way to get tough early to slot them, start taking a look at these when you have attacks slotted decently.
-
Water/Ice if you want a good balance of single target, aoe and control. You never have to worry about endurance starting at level 10 when you pick up frigid protection (and you should absolutely pick that up at level 10, no delays). Not only that but the slow aura it provides does wonders against enemy AI, slow auras are very underrated but they are very effective. If you want to get the most out of blasters don't be shy about getting into melee and ice manipulation has tools to help you survive melee range. Temp manipulation doesn't have ranged AoE attacks, just a weak Targetted AoE control power. All builds can get stealth via super speed + stealth IO so field operative from devices isn't a differentiator, targeting drone is though, it basically means you can worry a bit less about missing. Most people I see build /dev blasters to be pure ranged hover blasters but trip mine was recently reworked to allow more agile, non-interruptible toe bombing during combat. I still recommend water/ice. It's a good combo to start your blaster journey with.
-
DB/WP was pretty popular back on live, but I believe that's mostly due to the fact that both were released at the same time. I don't see any great synergies between the two. Sure WP is low maintenance and allows you to focus on DB combos, but DB combos are meh and high end DB builds skip them entirely in favor of a streamlined chain that doesn't look awkward either. WP is one of those secondaries that requires a bit more investment and slotting specific for survival goals, and that takes away your ability to build for damage/recharge. Assuming budget is not an issue, if you want to see the high end of the DB ceiling pair it up with a secondary that offers +recharge, endurance management, and requires relatively low investment into survival. Of all the scrapper secondaries I find Energy Aura to be the most suitable pairing. It's got taunt, recharge, end management, heal and is a defense build that naturally let's you 5x LOTGs and softcap without going out of your way to do so. If you are worried about psi and neg energy, that's what shadowmeld is for, and that also benefits from high recharge.
-
I do believe Diantane has a point. Buff fire blast. It's low damage with its many not high or extreme damage attacks.
-
Wondering why you can't fit both in? Most of the pure ranger builds will skip time bomb, trip mine and taser on /dev, some even skip smoke grenade. You most likely will also skip either the T1 or T2 blast. That leaves 9-10 pool powers, plenty for the typical cookie cutter builds or even the more experimental off the beaten track builds.
-
Interface will not help your survival too much by themselves. Where's your heart at? Do you accept the risk that comes with that type of all out build or is there something deep in your heart tugging at you to be more self sufficient and resilient? There are two approaches you can take, develop your skills at playing a blaster and learn all the tricks in the book - jousting, kiting, inspiration combine/mashing, using LoS, using soft/hard controls, abusing mob fear AI, awareness of mob aggro radius, target finding, mob faction and problem mob awareness, understanding when and when not to be in melee, understanding team dynamics to gauge whether you can go all out or not, etc... Or you can change your build.
-
Just because you chose a patron pool with a S/L def shield doesn't mean you HAVE to build for S/L defense, especially when your power picks shy away from powers that lend themselves to S/L def bonuses. Think outside the box. You can put superior blaster defiance in flares, blaster wrath in fireball, and apoc with the proc in blaze to get the most out of the damage procs. The Apoc proc in flares is a waste, with such high recharge chances are you will never use flares. You put so much emphasis on recharge to a point of diminishing returns (even losing 10% global recharge means inferno recharges only 1 second slower, and you will still have perma-hasten), meanwhile you have no slow resistance. S/L defense isn't a catch all like range defense is with your game plan. Your latest revision has no kb protection. The holes in your build will be pretty glaring if you go up against harder content. A little outside the box thinking can get you something like this: This Hero build was built using Mids Reborn 3.0.4.7 https://github.com/Reborn-Team/MidsReborn Click this DataLink to open the build! Level 49 Magic Blaster Primary Power Set: Fire Blast Secondary Power Set: Devices Power Pool: Leaping Power Pool: Speed Power Pool: Fighting Power Pool: Leadership Ancillary Pool: Mace Mastery Hero Profile: Level 1: Flares -- SprDfnBrr-Acc/Dmg(A), SprDfnBrr-Dmg/Rchg(3), SprDfnBrr-Acc/Dmg/Rchg(3), SprDfnBrr-Acc/Dmg/EndRdx(7), SprDfnBrr-Acc/Dmg/EndRdx/Rchg(7), SprDfnBrr-Rchg/+Status Protect(9) Level 1: Toxic Web Grenade -- SprWntBit-Acc/Dmg(A), SprWntBit-Acc/Dmg/EndRdx(36), SprWntBit-Acc/Dmg/Rchg(36), SprWntBit-Dmg/EndRdx/Acc/Rchg(37), SprWntBit-Rchg/SlowProc(37) Level 2: Fire Ball -- Ann-ResDeb%(A), Rgn-Dmg(9), Rgn-Acc/Dmg/Rchg(11), Rgn-Acc/Rchg(11), Rgn-Dmg/EndRdx(13), Rgn-Knock%(13) Level 4: Super Jump -- BlsoftheZ-Travel/EndRdx(A), BlsoftheZ-ResKB(5), WntGif-ResSlow(40) Level 6: Combat Jumping -- LucoftheG-Def/Rchg+(A) Level 8: Rain of Fire -- Artl-Acc/Dam(A), Artl-Dam/End(15), Artl-Dam/Rech(17), Artl-Acc/Dam/Rech(17), Artl-Acc/Rech/Rng(19), Artl-End/Rech/Rng(19) Level 10: Targeting Drone -- HO:Cyto(A) Level 12: Caltrops -- SprFrzBls-Acc/Dmg/Rchg(A), SprFrzBls-Dmg/EndRdx/Acc/Rchg(42) Level 14: Hasten -- RechRdx-I(A), RechRdx-I(15) Level 16: Kick -- SprBlsCol-Acc/Dmg(A), SprBlsCol-Acc/Dmg/EndRdx(37) Level 18: Blaze -- Apc-Dmg(A), Apc-Acc/Dmg/Rchg(21), Apc-Acc/Rchg(21), Apc-Dmg/EndRdx(23), Apc-Dam%(36) Level 20: Field Operative -- PreOptmz-Acc/Rech(A), PreOptmz-EndMod/End(42), PreOptmz-EndMod/Rech(42), PreOptmz-EndMod/Acc/End(48), PreOptmz-EndMod/Acc/Rech(48), PreOptmz-EndMod/End/Rech(49) Level 22: Tough -- StdPrt-ResDam/Def+(A), GldArm-3defTpProc(23) Level 24: Weave -- LucoftheG-Def/Rchg+(A), ShlWal-Def/EndRdx(25), ShlWal-Def(25), ShlWal-ResDam/Re TP(27) Level 26: Blazing Bolt -- StnoftheM-Acc/Dmg(A), StnoftheM-Dmg/EndRdx(27), StnoftheM-Acc/ActRdx/Rng(31), StnoftheM-Dmg/EndRdx/Rchg(31), StnoftheM-Dam%(34) Level 28: Maneuvers -- LucoftheG-Def/Rchg+(A), Rct-Def(29), Rct-Def/EndRdx(29), Rct-ResDam%(31) Level 30: Assault -- EndRdx-I(A) Level 32: Inferno -- SprBlsWrt-Acc/Dmg(A), SprBlsWrt-Dmg/Rchg(33), SprBlsWrt-Acc/Dmg/Rchg(33), SprBlsWrt-Acc/Dmg/EndRdx(33), SprBlsWrt-Acc/Dmg/EndRdx/Rchg(34), SprBlsWrt-Rchg/Dmg%(34) Level 35: Scorpion Shield -- LucoftheG-Def/Rchg+(A) Level 38: Gun Drone -- ExpRnf-Acc/Dmg(A), ExpRnf-Acc/Dmg/Rchg(39), ExpRnf-EndRdx/Dmg/Rchg(39), ExpRnf-Acc/Rchg(39), Dcm-Build%(40), Apc-Dmg/Rchg(40) Level 41: Web Envelope -- GrvAnc-Immob/Rchg(A), GrvAnc-Acc/Immob/Rchg(43), GrvAnc-Acc/Rchg(43), GrvAnc-Immob/EndRdx(43), GrvAnc-Hold%(46) Level 44: Summon Spiderlings -- ExpRnf-Acc/Rchg(A), ExpRnf-Acc/Dmg/Rchg(45), ExpRnf-EndRdx/Dmg/Rchg(45), ExpRnf-Acc/Dmg(45), ExpRnf-Dmg/EndRdx(46), ExpRnf-+Res(Pets)(46) Level 47: Web Cocoon -- BslGaz-Acc/Hold(A), BslGaz-Acc/Rchg(47), BslGaz-EndRdx/Rchg/Hold(47), BslGaz-Acc/EndRdx/Rchg/Hold(48) Level 49: Vengeance -- LucoftheG-Def/Rchg+(A) Level 1: Brawl -- SprBlsCol-Dmg/EndRdx(A), SprBlsCol-Dmg/EndRdx/Acc/Rchg(5) Level 1: Defiance Level 1: Sprint -- UnbLea-Stlth(A) Level 2: Rest -- Empty(A) Level 2: Swift -- Run-I(A) Level 2: Health -- Pnc-Heal/+End(A) Level 2: Hurdle -- Jump-I(A) Level 2: Stamina -- PrfShf-End%(A) Level 49: Quick Form ------------ | Copy & Paste this data into Mids Reborn : Hero Designer to view the build | |-------------------------------------------------------------------| |MxDz;1356;656;1312;HEX;| |78DA4DD3DB4F13411407E0D9DD59CAAD40E5524AB9154490CB5288E8A306B425020| |9527D269B76533621B0696BA24F5E62E2AB1A1313457D35DE5E35F18F502346137D| |F7495AC14405E37A767FA7D04DBADFF6CCCC999933BB0B974ED7BF4C5E3B2994E0C| |CAA99CF2F4FD3BD60E5F405336BA7857705E817E1F0F292B996B53246C2CE59E81A| |2EB7A42E3ACE7AAE6024CD4CD62AE445FDE2FAFAAA316F998EBD96ADF5FFA41CCBC| |A04FDC7849D5D29504363B957C6CAE5576C2772C6B1D34639E78299B6E8E63D5F6E| |A765F4D2EF94B726C5BBB9BA10528809295485556195C64A58ADC32B0763A578825| |8FF53F6193CFC9C7D01A7BD213C9FF24D43BE49D5B7F6183B05EB8FB32760986AA7| |F9457455ED0B62F22B1C8C22571BF5D1915FE8AD8A1F9BE1B27B730634DD8F3548D| |8A4B355F05080AD86D769540DE7AB9922A426AE1275C8A7D4BDC2BE8EBE867D3451| |10FD95E0083151231A5895DA1A795CE32DAECB1D98A068886B191AC59E5A0C761CB| |6C561FF04BC41BD9BB996CDBF781DBFD93F707C97DD83F1BF50A3B5B4F23A5BC3F4| |D045F9275143496D61B46961AE617B42F3F7D07E1676CCA16FD27B9D79DD91B7C28| |F75BC83DDEFD90F30B60943943FCAF9A39CBF730B793B8BB07B47E3F3A0A571FDBB| |62183F4BF4F0BE7BEEA35FEF0376837D08638FD8C770AF49883E9C81E8E3B96FD2B| |F017E3F064A54DB41298E6CB33B6C110E6E0838A6FAEBDCA57C43182B87CEE15C86| |97D8147B1E8E5D806F42428CF07C2345C446B7D91DB6C4637EB03FE13F9ACFC058C| |DD854FD73333EB29FE0F867D842B58BF35EE3E53A4BC197AB88DB7817E45D1893FB| |DFB33B7FF04C1F1DE65E941CA298E2D225BED7EE7FCD4219C3E9142B6331547DAB3| |236847EA5CAD83DCC3037BCBF62F73F4E7FBE15| |-------------------------------------------------------------------| The last power pick is up in the air. Vengeance is not necessary, even without the LOTG bonus you will still have perma-hasten, and if you wanted more recharge you can just as well take trip mine and 1 slot with force feedback and try to proc it on cast. The other option is to take aim with a gaussian's build up proc for some on-demand burst. Speaking of burst, you get another reliable build up every time you summon gun drone (disclaimer I don't play devices but I'm pretty sure it works because it also works in seeker drones and lightning storm). The build also synergizes with your game plan with almost softcapped range defense, 80% slow resist so you never get slowed down or -recharge debuffed to death, caltrops AND web envelope to make sure mobs stay away, and stay immobilized for rain of fire.
-
So many people begging for inf and it's disgusting. You all should be ashamed of yourselves! Ukase, buddy, let's talk business. I offer panda services for inf. And no one offers panda services like I do. And what's better to sink your inf into than Panda Services? So, do we have a deal?
-
I can understand the pets for theme and if that's an absolute build requirement, then yeah that's the only path that you can go down. On the other hand, If the spiders aren't an absolute build requirement, let's break down your thought process on defense. Your game plan is to stay at range. Of all your power picks the only one that remotely requires you to go into melee is inferno. If you are staying at range most of the time, how many pure fire/cold negative energy ranged attacks can your focus on S/L and incidentally energy defense defend against? How many of those attacks, in addition to all manners of range attacks with other damage types, can you defend against if you built for range defense instead? Now imagine if you took a resist armor so further reduce the damage taken if those attacks break through your high range defense, wouldn't that make more sense based on your game plan?
-
All good questions, here is another: Why mace mastery?
-
Street Justice/Regen Build Help - Brute - Homecoming (homecomingservers.com) I go over some important build goals for regen in this thread and how to approach building towards those goals. If you are up for it read that thread, revise your build, then we can help refine.
-
Thanks, I stand corrected! Explosive knocks mobs back regardless of where the point of impact is, I was under the false impression that the point of impact mattered.
-
Slot attacks as attacks. There are more suitable places to use explosive strike, but it's not in your bread and butter attacks. if you want range defense in your single target blasts go with 3 or 6 piece thunder strike, 6 piece blaster ATOs. You don't need to deal with the KB tax on your single target attacks especially if you are hovering and blasting down, but it's recommended to stick a KD converter in your AoEs, at the very least explosive blast because radial scatter is not conducive to your AoE kill speed. And you really should take explosive blast. I'd also recommend sticking a force feedback proc in Energy Torrent and/or Explosive blast, since one of your goals is recharge. I don't see the point of power boost or boost range really, you are only taking both for stun. Stun is also slotted with a kb proc and that can make your life a bit messy. Energy Torrent and Explosive blast, both of which do damage, provide more immediate mitigation than going through 2 powers and then stun to incapacitate, not even hurt, a group of mobs. You should take Nova asap, it will contribute to about half your damage throughout your blaster playtime. Killing stuff really fast is a really good way to survive and you should be salivating at nuking a full spawn every chance you get. You are tossing way too many slots into stealth and hover. A single LOTG 7.5 in both powers will get defense up to 2%. tossing 3 more slots in either power will only boost defense by another 0.7%, meanwhile you can stick 2 slots in a travel power with blessing of zephyr and get both KB protection and 1.25% range defense. If you goal is range defense why take scorpion shield? Ranged energy damage is still ranged. Wouldn't taking a resist shield for layered mitigation so that if something does get past your range defense you take less damage make more sense with your all ranged game plan? I think Bonfire (with KD proc) and Fire Armor can do far more for you than scorpion shield and web envelope. I'm also not seeing softcapped range defense. With hover on you are only sitting at 37%, with power boost 42%. you are also missing both of the 3% defense uniques. You also don't need to 3 slot hasten and power boost, 2 level 50+5 IOs is enough. Here's a quick draft of my revision, the two empty slots in invis is for 2 slot blessing of Zephyr. This Hero build was built using Mids Reborn 3.0.4.7 https://github.com/Reborn-Team/MidsReborn Click this DataLink to open the build! Level 50 Science Blaster Primary Power Set: Energy Blast Secondary Power Set: Energy Manipulation Power Pool: Flight Power Pool: Concealment Power Pool: Fighting Power Pool: Speed Ancillary Pool: Flame Mastery Hero Profile: Level 1: Power Bolt -- SprDfnBrr-Acc/Dmg(A), SprDfnBrr-Dmg/Rchg(7), SprDfnBrr-Acc/Dmg/Rchg(9), SprDfnBrr-Acc/Dmg/EndRdx(9), SprDfnBrr-Acc/Dmg/EndRdx/Rchg(11), SprDfnBrr-Rchg/+Status Protect(11) Level 1: Power Thrust -- Mk'Bit-Acc/Dmg(A), Mk'Bit-Dmg/EndRdx(43), Mk'Bit-Dmg/Rchg(45), Mk'Bit-Acc/EndRdx/Rchg(45), Mk'Bit-Acc/Dmg/EndRdx/Rchg(45), Mk'Bit-Dam%(46) Level 2: Energy Torrent -- FrcFdb-Rechg%(A), OvrFrc-Acc/Dmg(3), OvrFrc-Acc/Dmg/End(3), OvrFrc-Dmg/End/Rech(5), OvrFrc-Acc/Dmg/End/Rech(5), OvrFrc-Dam/KB(7) Level 4: Fly -- BlsoftheZ-Travel/EndRdx(A), BlsoftheZ-ResKB(13) Level 6: Power Burst -- SprBlsWrt-Acc/Dmg(A), SprBlsWrt-Dmg/Rchg(15), SprBlsWrt-Acc/Dmg/Rchg(21), SprBlsWrt-Acc/Dmg/EndRdx(23), SprBlsWrt-Acc/Dmg/EndRdx/Rchg(23), SprBlsWrt-Rchg/Dmg%(34) Level 8: Sniper Blast -- StnoftheM-Acc/Dmg(A), StnoftheM-Dmg/EndRdx(34), StnoftheM-Acc/ActRdx/Rng(36), StnoftheM-Dmg/EndRdx/Rchg(36), StnoftheM-Dam%(37) Level 10: Hover -- LucoftheG-Def/Rchg+(A), BlsoftheZ-Travel/EndRdx(13), BlsoftheZ-ResKB(15), Ksm-ToHit+(46) Level 12: Aim -- GssSynFr--Build%(A) Level 14: Stealth -- LucoftheG-Def/Rchg+(A), Rct-ResDam%(37) Level 16: Energize -- NmnCnv-Heal/EndRdx(A), NmnCnv-EndRdx/Rchg(17), NmnCnv-Heal/Rchg(17), NmnCnv-Heal/EndRdx/Rchg(19), NmnCnv-Heal(19), NmnCnv-Regen/Rcvry+(21) Level 18: Build Up -- RechRdx-I(A) Level 20: Kick -- ExpStr-Dmg/KB(A), ExpStr-Acc/KB(43), ExpStr-Dam%(43) Level 22: Tough -- StdPrt-ResDam/Def+(A), HO:Ribo(47) Level 24: Weave -- LucoftheG-Def/Rchg+(A), ShlWal-Def/EndRdx(25), ShlWal-Def(25), ShlWal-ResDam/Re TP(27) Level 26: Explosive Blast -- FrcFdb-Rechg%(A), Ann-ResDeb%(27), Artl-Acc/Dam/Rech(29), Artl-Acc/Dam(31), Artl-Dam/End(31), SuddAcc--KB/+KD(31) Level 28: Hasten -- RechRdx-I(A), RechRdx-I(29) Level 30: Afterburner -- LucoftheG-Def/Rchg+(A), BlsoftheZ-Travel/EndRdx(33), BlsoftheZ-ResKB(34) Level 32: Nova -- Arm-Dmg/Rchg(A), Arm-Acc/Dmg/Rchg(37), Arm-Acc/Rchg(39), Arm-Dmg/EndRdx(39), Arm-Dam%(39), SuddAcc--KB/+KD(40) Level 35: Bonfire -- FrcFdb-Rechg%(A), SuddAcc--KB/+KD(36) Level 38: Char -- HO:Nucle(A), GhsWdwEmb-Dam%(40), GldJvl-Dam%(40), Dcm-Build%(42), UnbCns-Dam%(42), Apc-Dam%(42) Level 41: Fire Shield -- GldArm-End/Res(A), GldArm-RechRes(47), GldArm-RechEnd(48), GldArm-Res/Rech/End(48), GldArm-ResDam(48), GldArm-3defTpProc(49) Level 44: Invisibility -- LucoftheG-Def/Rchg+(A), Empty(46), Empty(50) Level 47: Melt Armor -- AchHee-ResDeb%(A), AnlWkn-Acc/Rchg(49) Level 49: Phase Shift -- RechRdx-I(A) Level 1: Brawl -- Empty(A) Level 1: Defiance Level 1: Sprint -- UnbLea-Stlth(A) Level 2: Rest -- Empty(A) Level 2: Swift -- Flight-I(A) Level 2: Health -- Pnc-Heal/+End(A) Level 2: Hurdle -- Jump-I(A) Level 2: Stamina -- PrfShf-End%(A) Level 49: Quick Form Level 50: Musculature Radial Paragon ------------ | Copy & Paste this data into Mids Reborn : Hero Designer to view the build | |-------------------------------------------------------------------| |MxDz;1372;670;1340;HEX;| |78DA4D935D53126114C79F65170810111141D18C17034510AA9946A59CA9B43175C| |6A4BA750837DC8285004B2EBBE83334535697E54CD377E81364537739BD4C175DF5| |32D3754367F77F2076607FBBE73CFFE7FCCFD9DDF5BD4B7DAF2F3F581492FB62B9D| |0686C5DA07353ADDBF3454DD58BAA300E3BFD439CD8DA2CE825753BBDA4ABF5520B| |CBA39D5C7EB756ABD69B9DE47A41D76ABBE54253ABEAC2B551AD96D3CB65ADB4D3F| |49AD72BFA3DADA1DDD4CA5AB3E546D6486A7AC969DEE56BAABA3DB854D38A242B54| |54DACFA8D20A929D30FDCF1ADE24E3D4B60AA1089155844D028F599832E8549856B| |0D2ABBD25CCD874099CD9616ACCDB60EA0E386748592B3DB49831CB910C7E0295CF| |CC2FA0ED2BE8A259CAE650DB92FC11DABE23709EA256DED7FA18EBFB9F8043FBE0F| |053E63330FC1C5C301E13B48AFD2D7C860FC1E83BE67B30F6017490170734B2C32F| |C10B7BEA674FA9BF941E57448EE0826FE13A40CE4D7A37F4929BF5B13FF07397A21| |EEEC57315B9814D661E1CBCC6BC0E0EDD00ABA4F2722D6F125E2D54CB87FD2CBEFB| |54DF47CF6B8FD902655AE3673FFE8064FA4E9FA75B45160AE502DC6B80BD0697E13| |578051C5D050DC9087B1FE1E73BFA1DB9319BD5E47199A930BFE1BD8A509D107B08| |B1F731A618264BE8CB32CE1E4EF0BCC33CEF45CA4E608D75620EB1D83C787281996| |39E03E35CFB05598CF0BB1561DF51CEBDA4DC24F73499C34CE215CC283E83DEA6F6| |291E27AE403B95050F289D606D228BB5E933B2B976F6343383F8EC2C983985B887E| |691E49E93DC73AA4D87C89AE7576E21D2EC39FD06CF317388BA03A4CDF07B90E9CC| |52117CB4E967EC1056BA5F727BEDFF357D66D86543E110C52453F1C3D9FD7E8514C| |5BEBF7A6361F4F0B33796C0BADFBDB147A8B03ADDF5D95EF35188DDFC035BDBC6A0| |-------------------------------------------------------------------|
-
Not bad Crystal87 Look at build up - you invested 5 slots for 2.5% range defense 2 additional slots in fly with blessing of zephyr gives you 1.25% range defense 2 additional slots in kick with explosive strike (low level KB set) give you 1.88% range defense 4 slots for 3.1% range defense is a lot more efficient than 5 slots for 2.5% range defense Charged armor at 4 pieces unbreakable restraint that give you melee defense. Reactive Armor gives range defense at 3 slots. It's not much, but still contributes to your goal way more than sinking slots into bonuses that don't matter. Explosive blast could use a kb-kd converter. I don't believe the Ragnarok KD proc overrides the KB, I'd also try to squeeze in the force feedback proc in both energy torrent and explosive blast. Power picks can be optimized a bit more during the leveling process, hasten and energize can be moved up sooner, especially energize, and I also do not see any benefit to taking power boost. There aren't really any powers that benefit from the secondary effect boost. You took bone smasher only for the set bonus, and you seem to focusing on recharge, you can take the pet from the epic and 6 slot with expedient reinforcement for range defense and recharge, and you can take the hold from the epic and 4 slot basilisk gaze for again, range defense and recharge. I don't imagine based on your posting history that you'll ever be using melee attacks, so these alternatives may work out better for you. Here's my quick edit This Hero build was built using Mids Reborn 3.0.4.7 https://github.com/Reborn-Team/MidsReborn Click this DataLink to open the build! Level 50 Science Blaster Primary Power Set: Energy Blast Secondary Power Set: Energy Manipulation Power Pool: Flight Power Pool: Speed Power Pool: Fighting Power Pool: Leadership Ancillary Pool: Mu Mastery Hero Profile: Level 1: Power Bolt -- SprDfnBrr-Acc/Dmg/EndRdx(A), SprDfnBrr-Rchg/+Status Protect(3), SprDfnBrr-Acc/Dmg/Rchg(3), SprDfnBrr-Acc/Dmg/EndRdx/Rchg(5), SprDfnBrr-Dmg/Rchg(5), SprDfnBrr-Acc/Dmg(7) Level 1: Power Thrust -- Acc-I(A) Level 2: Energy Torrent -- PstBls-Dam%(A), Artl-Acc/Dam(7), Artl-Dam/End(9), FrcFdb-Rechg%(9), Artl-Acc/Dam/Rech(11), SuddAcc--KB/+KD(11) Level 4: Fly -- WntGif-ResSlow(A), BlsoftheZ-Travel/EndRdx(39), BlsoftheZ-ResKB(39) Level 6: Hover -- BlsoftheZ-Travel(A), BlsoftheZ-ResKB(13), LucoftheG-Def/Rchg+(13), Ksm-ToHit+(46) Level 8: Power Burst -- SprBlsWrt-Acc/Dmg/EndRdx/Rchg(A), SprBlsWrt-Rchg/Dmg%(15), SprBlsWrt-Acc/Dmg/EndRdx(15), SprBlsWrt-Acc/Dmg/Rchg(17), SprBlsWrt-Dmg/Rchg(17), SprBlsWrt-Acc/Dmg(19) Level 10: Sniper Blast -- StnoftheM-Dam%(A), StnoftheM-Dmg/EndRdx/Rchg(19), StnoftheM-Acc/Dmg(21), StnoftheM-Dmg/EndRdx(21), StnoftheM-Acc/ActRdx/Rng(23), FrcFdb-Rechg%(23) Level 12: Aim -- GssSynFr--Build%(A) Level 14: Hasten -- RechRdx-I(A), RechRdx-I(25) Level 16: Energize -- NmnCnv-Heal/EndRdx(A), NmnCnv-EndRdx/Rchg(25), NmnCnv-Heal/Rchg(27), NmnCnv-Heal/EndRdx/Rchg(29), NmnCnv-Heal(29), NmnCnv-Regen/Rcvry+(31) Level 18: Afterburner -- LucoftheG-Def/Rchg+(A), BlsoftheZ-Travel/EndRdx(31), BlsoftheZ-ResKB(37) Level 20: Kick -- ExpStr-Dmg/KB(A), ExpStr-Acc/KB(27), ExpStr-Dam%(33) Level 22: Tough -- GldArm-3defTpProc(A) Level 24: Weave -- LucoftheG-Def/Rchg+(A), ShlWal-Def/EndRdx(34), ShlWal-Def(34), ShlWal-ResDam/Re TP(34) Level 26: Explosive Blast -- FrcFdb-Rechg%(A), OvrFrc-Dam/KB(36), Ann-ResDeb%(36), Artl-Acc/Dam(36), Artl-Dam/End(37), Artl-Acc/Dam/Rech(37) Level 28: Build Up -- RechRdx-I(A) Level 30: Maneuvers -- LucoftheG-Def/Rchg+(A), Rct-Def(31), Rct-Def/EndRdx(33), Rct-ResDam%(33) Level 32: Nova -- Arm-Dam%(A), Arm-Dmg/EndRdx(40), Arm-Acc/Rchg(40), Arm-Acc/Dmg/Rchg(42), Arm-Dmg/Rchg(42), SuddAcc--KB/+KD(50) Level 35: Charged Armor -- StdPrt-ResDam/Def+(A), RctArm-ResDam/EndRdx(42), RctArm-ResDam/EndRdx/Rchg(43), RctArm-ResDam(43) Level 38: Tactics -- EndRdx-I(A) Level 41: Electrifying Fences -- Artl-End/Rech/Rng(A), Artl-Acc/Rech/Rng(45), Artl-Acc/Dam/Rech(45), Artl-Dam/Rech(45), Artl-Dam/End(46), Artl-Acc/Dam(50) Level 44: Summon Adept -- ExpRnf-Acc/Rchg(A), ExpRnf-Acc/Dmg(46), ExpRnf-Dmg/EndRdx(47), ExpRnf-Acc/Dmg/Rchg(47), ExpRnf-EndRdx/Dmg/Rchg(48), ExpRnf-+Res(Pets)(48) Level 47: Electric Shackles -- BslGaz-Acc/Hold(A), BslGaz-Acc/Rchg(48), BslGaz-EndRdx/Rchg/Hold(49), BslGaz-Acc/EndRdx/Rchg/Hold(49) Level 49: Vengeance -- LucoftheG-Def/Rchg+(A) Level 1: Defiance Level 1: Brawl -- Empty(A) Level 1: Sprint -- UnbLea-Stlth(A) Level 2: Rest -- Empty(A) Level 2: Swift -- Empty(A) Level 2: Hurdle -- Empty(A) Level 2: Health -- Pnc-Heal/+End(A) Level 2: Stamina -- PrfShf-End%(A) Level 49: Quick Form Level 50: Freedom Phalanx Reserve Level 50: Portal Jockey Level 50: Task Force Commander Level 50: The Atlas Medallion Level 50: Musculature Radial Paragon ------------ | Copy & Paste this data into Mids Reborn : Hero Designer to view the build | |-------------------------------------------------------------------| |MxDz;1423;668;1336;HEX;| |78DA6593CB4F135114C6EF3C4A694B4528EF77CB9B42A16E0C0F2551C1444A8254D| |D1952E9A44C52DB5A4A84A50BFF06139F6B37AE5DF83FA811A35137C6852B29885B| |53CFCCF7159A3849FBBBF39D73CF6BEE5DDDBDD2F0EAEA8345A5052F6753DBDB1B9| |7E4BF6415BDC94DDBCA6D5ACA79BCF2EBA661633D95CB58E9D852CE2A66F6E03E58| |B525770A857CB15435AEA6727661279B2AD9F99C0AACE5F3D9D872D6CE6C95FCEE3| |A59B0AC7410B2A3DAB94CA3FB96B05269ABB8BD6517DA970AF666AC1A7E7547423A| |ABBD0EA968587EE755F5A97894612A153795EE2175D034490DAC53E0DDD3BD4A752| |9579B15681AE269AFA1D5191E97F526F95077E9AFC3BBFF07E205644C06E2E946B7| |E16A235FE13BF20DF4898F073E86E70BB406DA1A5A3597537FC5DC6BAA394EDEA9C| |5FB1CF1CEBC209F81679F924FC0E6C7E0BCECF2B10FDF3EFA68FE00B6BC25DF816D| |EF49F6B520AF01CE25F0125A440A0942D38251F87790F7048DCCD5781D3D74AC835| |D49B0E7067913ECBB05AA36A59A38B326F6DFC7990D712EBAE40E21BE1EBA2F5A48| |E2EE82037BA0213EADF051ADE7300353B47668463B638797610B5F2357C08BE2D5C| |95977720E83DF611BFC49F21C0CF11C0CF1FBE79DDBC1797573264D92BB97B97BAB| |7D1D20CE40993C0617C5AB9FB9FB2F20F7E802390F8ECF91B3609C67CE195E84792| |24EB3726EC6FB84A3A69A0893113024350D7346C361D4A9C9FE31E61EAB473F935E| |92FD4D7AC029F61DE71CDEC8DE28F746CBA86BEA108C1D91BFC1E963F20F68C8DE1| |8EF416C5F77EB9EFE08CE7C223F832D52F70CE73B53FD8EA673515DADD263D6DCE3| |8A3C2A716A952B898C6B2625D134D7EB97FFE4AE5339F84F29FB6B7685F1BD0E6BB| |D1E21FACAC4498D9535B1C759DBED9A75AA667DA7669D089DAEFF01E624D141| |-------------------------------------------------------------------|
-
Unbreakable restraint for the S/L def at 4 slots is probably your best bet, include the +7.5% HP unique. I'd also proc monster shocking bolt - one Nucleus HO and the rest procs. Decimation build up proc should be one of those procs. I typically do not need holds or other hard control with softcapped defenses and the two knockdown AoEs. Therefore I don't treat Shocking Grasp as a hold most of the time, I treat it as a 1 second cast time attack. Because it is a damage over time I loaded it with a few procs to front load damage. One of the appeals of fire/elec is that the combo has loads of fast casting attacks in DPS mode, in the time that it takes for most other sets to execute 2 attacks this combo would have unloaded 3 or 4 high DPA attacks. If you go the resist armor route you lose the luxury of having high S/L defense which is meant to cover most melee range attacks, therefore you'll have to dance a bit more in melee range. I've done melee blasters with a resist shield and KO Blow, it's doable, but requires more movement. It's optimized for me, YMMV
-
Super speed + a stealth IO in sprint gives you invisibility against most mobs. The most practical solution is to purchase some jetpacks from the P2W vendor. That sacrifices nothing. If you really want fly then you can go hover melee blaster and take hover + fly + evasive maneuvers and drop combat jumping, super speed and most likely tactics.
-
I recommend Elec/Staff with whirlwind slotted with the KD proc and FF proc. That combo will be able to handle the end drain and you will bathe in the glory of SPIN. Staff pairs well with non-defense sets so there is also synergy there. Whirlwind offers an additional layer of mitigation.
-
It sounds like you may have a new build that you have not posted but I'm going to give feedback on the one you did post. First of all, I agree with the mentality of kill or be killed, but the build has quite a bit of room for improvement. The build I see has 7 10% recharge bonuses, 2 of which are wasted. If you free up the 10 slots you sunk into those 2 wasted bonuses you can do all sorts of things. One of the firsts things I look for in any build is how many full sets are slotted, are you deliberately building up toxic/psi resist by investing that 6th slot into all your purple sets/positron's blast/Sting of the manticore? Smashing/Lethal damage is much more prevalent per conventional wisdom. Or are you trying to stack mez resist? With your insp mashing and the availability of breakfrees and clarion, I don't really see that much investment into mez resist as generating the best ROI for you. Apoc in flares but blaster's defiance in blaze doesn't make sense to me. I'd switch those two and make blaze even more hard hitting. At high recharge you won't be using flares a lot, so apoc with the proc is better served in a power that you DO use a lot. Besides the proc will proc more often in blaze than it would in flares. Why not take mystic flight instead of fly so you have a teleport to quickly get you in and out of combat if needed? You can put a Guassian's build up proc in aim so you can punch through stacked nemesis vengeance or Paragon Protector MOG on demand. That cost you almost nothing to do. You can slot decimation into fire blast for more recharge, you can get KB protection by using a blessing of zephyr IO in your travel power for far less investment and slots. You can also ditch fire blast and proc monster Char and do way more damage and have some brief personal mitigation against problem targets like sappers or tarantula mistresses. With procs char can become your third hardest hitting single target attack. You have the pvp +3% defense IO but not steadfast protection 3% def, is that an oversight? If you want to do more damage you are also missing out on some proc opportunities, especially the 2 -resist procs and a force feedback proc in bonfire. Cauterizing aura gives more base recovery than stamina, slotting that gives more bang for the buck. With this type of build approach you will have a few holes to plug 1 - General survival (defense/resist/heal/mez), which you address through inspiration mashup. 2 - Slows. your ability to execute your game plan gets completely neutered when there are slows stacked on you, when that happens you essentially have a blaster with no defense and no damage, and all the inspirations in the world won't help the mobs die any quicker. Defensively, the ability to run out of a caltrops or ice storm patch unimpeded makes you less of a sitting duck. I'm aware that win rate goes up with inferno and judgement but there are 44 levels where you don't have access to judgement, and 26 levels where you don't have access to your nuke, assuming that you do exemp from time to time. If you are going to embrace the kill or be killed mantra, don't skimp on slow resist. Here is a revised build that keeps to the principal of kill or be killed for your reference. This Hero build was built using Mids Reborn 3.0.4.7 https://github.com/Reborn-Team/MidsReborn Click this DataLink to open the build! Level 50 Magic Blaster Primary Power Set: Fire Blast Secondary Power Set: Fire Manipulation Power Pool: Sorcery Power Pool: Leaping Power Pool: Speed Power Pool: Fighting Ancillary Pool: Flame Mastery Hero Profile: Level 1: Flares -- SprDfnBrr-Acc/Dmg(A), SprDfnBrr-Dmg/Rchg(3), SprDfnBrr-Acc/Dmg/Rchg(3), SprDfnBrr-Acc/Dmg/EndRdx(5), SprDfnBrr-Acc/Dmg/EndRdx/Rchg(5), SprDfnBrr-Rchg/+Status Protect(7) Level 1: Ring of Fire -- Acc-I(A) Level 2: Fire Ball -- Ann-ResDeb%(A), PstBls-Acc/Dmg(9), PstBls-Dmg/EndRdx(9), PstBls-Dmg/Rchg(11), PstBls-Acc/Dmg/EndRdx(11), PstBls-Dam%(13) Level 4: Mystic Flight -- BlsoftheZ-ResKB(A), WntGif-ResSlow(23) Level 6: Combat Jumping -- LucoftheG-Def/Rchg+(A), Ksm-ToHit+(7), Rct-ResDam%(36) Level 8: Fire Breath -- Rgn-Dmg(A), Rgn-Acc/Dmg/Rchg(13), Rgn-Acc/Rchg(15), Rgn-Dmg/EndRdx(17), Rgn-Knock%(17), PstBls-Dam%(23) Level 10: Combustion -- FuroftheG-ResDeb%(A), Obl-Dmg(37), Obl-Dmg/Rchg(37), Obl-Acc/Dmg/Rchg(37), Obl-Acc/Dmg/EndRdx/Rchg(39), Obl-%Dam(39) Level 12: Aim -- GssSynFr--Build%(A) Level 14: Fire Sword Circle -- Obl-Dmg(A), Obl-Dmg/Rchg(15), Obl-Acc/Dmg/Rchg(25), Obl-Acc/Dmg/EndRdx/Rchg(34), Obl-%Dam(36), Arm-Dam%(43) Level 16: Hasten -- RechRdx-I(A), RechRdx-I(25) Level 18: Blaze -- Apc-Dmg(A), Apc-Acc/Dmg/Rchg(19), Apc-Acc/Rchg(19), Apc-Dmg/EndRdx(21), Apc-Dam%(21) Level 20: Cauterizing Aura -- SprAvl-Acc/Dmg(A), SprAvl-Acc/Dmg/Rchg(40), PrfShf-EndMod(46), PrfShf-End%(49) Level 22: Build Up -- RctRtc-Pcptn(A) Level 24: Kick -- SprBlsCol-Acc/Dmg(A), SprBlsCol-Dmg/EndRdx(40) Level 26: Blazing Bolt -- StnoftheM-Acc/Dmg(A), StnoftheM-Dmg/EndRdx(27), StnoftheM-Acc/ActRdx/Rng(27), StnoftheM-Dmg/EndRdx/Rchg(29), StnoftheM-Dam%(29) Level 28: Tough -- GldArm-3defTpProc(A), UnbGrd-Max HP%(42) Level 30: Weave -- LucoftheG-Def/Rchg+(A), ShlWal-Def/EndRdx(31), ShlWal-Def(31), ShlWal-ResDam/Re TP(31) Level 32: Inferno -- SprBlsWrt-Acc/Dmg(A), SprBlsWrt-Dmg/Rchg(33), SprBlsWrt-Acc/Dmg/Rchg(33), SprBlsWrt-Acc/Dmg/EndRdx(33), SprBlsWrt-Acc/Dmg/EndRdx/Rchg(34), SprBlsWrt-Rchg/Dmg%(34) Level 35: Bonfire -- FrcFdb-Rechg%(A), SuddAcc--KB/+KD(36) Level 38: Hot Feet -- SprAvl-Rchg/KDProc(A), SprAvl-Dmg/EndRdx(39), PcnoftheT-EndRdx/Rchg/Slow(43), TmpRdn-EndRdx/Rchg/Slow(43) Level 41: Fire Shield -- StdPrt-ResDam/Def+(A), HO:Ribo(42), ResDam-I(42) Level 44: Fire Sword -- Hct-Dmg(A), Hct-Acc/Dmg/Rchg(45), Hct-Acc/Rchg(45), Hct-Dmg/EndRdx(45), Hct-Dam%(46) Level 47: Char -- Dcm-Build%(A), UnbCns-Dam%(47), GhsWdwEmb-Dam%(47), GldJvl-Dam%(48), NrnSht-Dam%(48), HO:Perox(48) Level 49: Rise of the Phoenix -- OvrFrc-Dam/KB(A) Level 1: Brawl -- SprBlsCol-Acc/Dmg/EndRdx(A), SprBlsCol-Acc/Dmg/Rchg(40) Level 1: Defiance Level 1: Sprint -- UnbLea-Stlth(A) Level 2: Rest -- Empty(A) Level 2: Swift -- Run-I(A) Level 2: Health -- Pnc-Heal/+End(A), Prv-Absorb%(46) Level 2: Hurdle -- Jump-I(A) Level 2: Stamina -- PrfShf-End%(A) Level 49: Quick Form Level 50: Freedom Phalanx Reserve Level 50: Portal Jockey Level 50: Task Force Commander Level 50: The Atlas Medallion Level 50: Musculature Radial Paragon ------------ | Copy & Paste this data into Mids Reborn : Hero Designer to view the build | |-------------------------------------------------------------------| |MxDz;1416;687;1374;HEX;| |78DA4D94CB4F135114C6EFED4C054A0B4205CADB16287D4E5BE263851884A252122| |26B43C632A99394B62945A926262EDC2B2C4C1424AE144D4C8C1AFD2FD4E8D28D71| |E10A3571650CD633FD0E6D2799F9DD7BCEB9DF3DE73E666163C6F962EEF69490AE7| |3597D6D6D799ABE25A3685FD033665A584F13BDBD6C5EBEA4E732C68A96348B0642| |BD879EA5F542215F2CC1B5A0E7CCC27A562F99F99C702EE6F3596D295F4C1BC5323| |A29432F98B98C039E8261ACB8AACDA499B95A2247E76CC14C6BC9ACBE6A6959FA65| |0FA53146EF592B27697D2A7621542112AAB049A60D5415A60A1EB183D7C4E15311A| |24F546DD38772A427BF2B555BF32BF89A5F838E37CCB7A0F31DB8450929182B952F| |B6AAADBB1F1ADDB46E76E469B37749E47140DD41558CFC46CC8CB5BC5C4BD304C63| |B4F806D27C1A3A798A7599FE7DE20B4F0D89629E88DFE45CCE801F31FE8AF3005E2| |6669542BAF43EB1E7C65EAB958CFC53A6DACE3611D2FEB8CB04E68127D1FD5DA8EB| |1B23D8CFC3CCC24A1033EB52382F84E8D19038FC59909F02645BB3146716F63EFC6| |77C1E82662E2F7C11B14D5C5B574ED90CD4DE780F2E9E17DE9B9CBE3EF8173D671E| |67C7ADF23C7BE0FCC8FE0C027E6675021BD7EAEAF7F02B507FF802AF90639D741DE| |E7A1247C431799F3E0798A1AE6351E7E00DBF187CC6DE60EE87DC4DC059F107C5C9| |3EF0EEFC337D474CBBA1B9CC3D863D8FC3B60E8A595538B083D07F74827C0E732D0| |23ABE7317886BAAA228211D47B9D10E6350AFB315724C00C324360340C3E255D8DE| |F91B64D18578576013E6D15EB128BA096988E79639398F71999E3BC87F1AF881950| |6B77558A4DDEC32DD0ABD6FE019554BD4D9711F32DAAB53B2D64851EB1EF200B47C| |928AAFC59B749E9C5ACD17DF047637C00F1BF1A6D7CFAE643B5CC2B8BE44F705697| |1BDA7A43FB4A433BE5AEB7FF0339E6C960| |-------------------------------------------------------------------| Readers might find some choices questionable so I'll explain a few of my decisions: I put the Ragnarok set in fire breath because the KD will be very useful for stopping mobs from running up to you during the animation. I put the fury of the gladiator -res proc in combustion because it has a larger radius and a slightly longer animation time which means it has a slightly better chance to proc and it can tag more enemies. People tend to be more enamored with FSC, but I find the radius too small and you usually never tag the maximum number of targets allowed for the power. Also, with this type of build, mobs THAT close to you need to die NOW, so I tossed in the Armageddon proc in FSC for some extra punch. Brawl and kick are just mules for slow resist. If you don't like wasting slots in those then take those slots out and 3 slot ring of fire with 3 superior winter's bite, you'll lose 15% slow resist which will take your total slow resist to 65% which is still decent. However with a build like this where survival depends entirely on your ability to dish out damage, I'd lean towards getting as much slow resist as possible.