The Beta Account Center is temporarily unavailable
×


Gobbledigook
-
Posts
1298 -
Joined
-
Last visited
Content Type
Profiles
Forums
Events
Store
Articles
Patch Notes
Everything posted by Gobbledigook
-
Changed a few things on my Fortunata. I changed the interface, alpha and Hybrid. I also added a few procs but the build is still very defensive. Fortunata T4 Musc Radial P, T4 Degen Core, T4 Assault Radial (not sure if core or radial is best on a fortunata) Hybrid on and No pets. 2 minutes 19 seconds. Average is probably around 2.25. quite consistent in it's times. Not the best but not bad for a build with over 60% defence. It could go to 2 mins or below if built more aggressively i think. I keep getting like 2-3 seconds short of of downing the pylon but it regens just before, adding more time. If i can shave that 2-3 seconds off i think it will be more like 2.05 or thereabouts. Just shows how adding a few procs and changing a few things and incarnates can make a big difference to times.
-

999,999,999 inf -or- why I can't stand COV
Gobbledigook replied to fancy ketchup's topic in General Discussion
They gave it you with out any provisos so keep it. -
Mid's Reborn: Hero Designer
Gobbledigook replied to Metalios's topic in Mids' Reborn Hero Designer's Forum
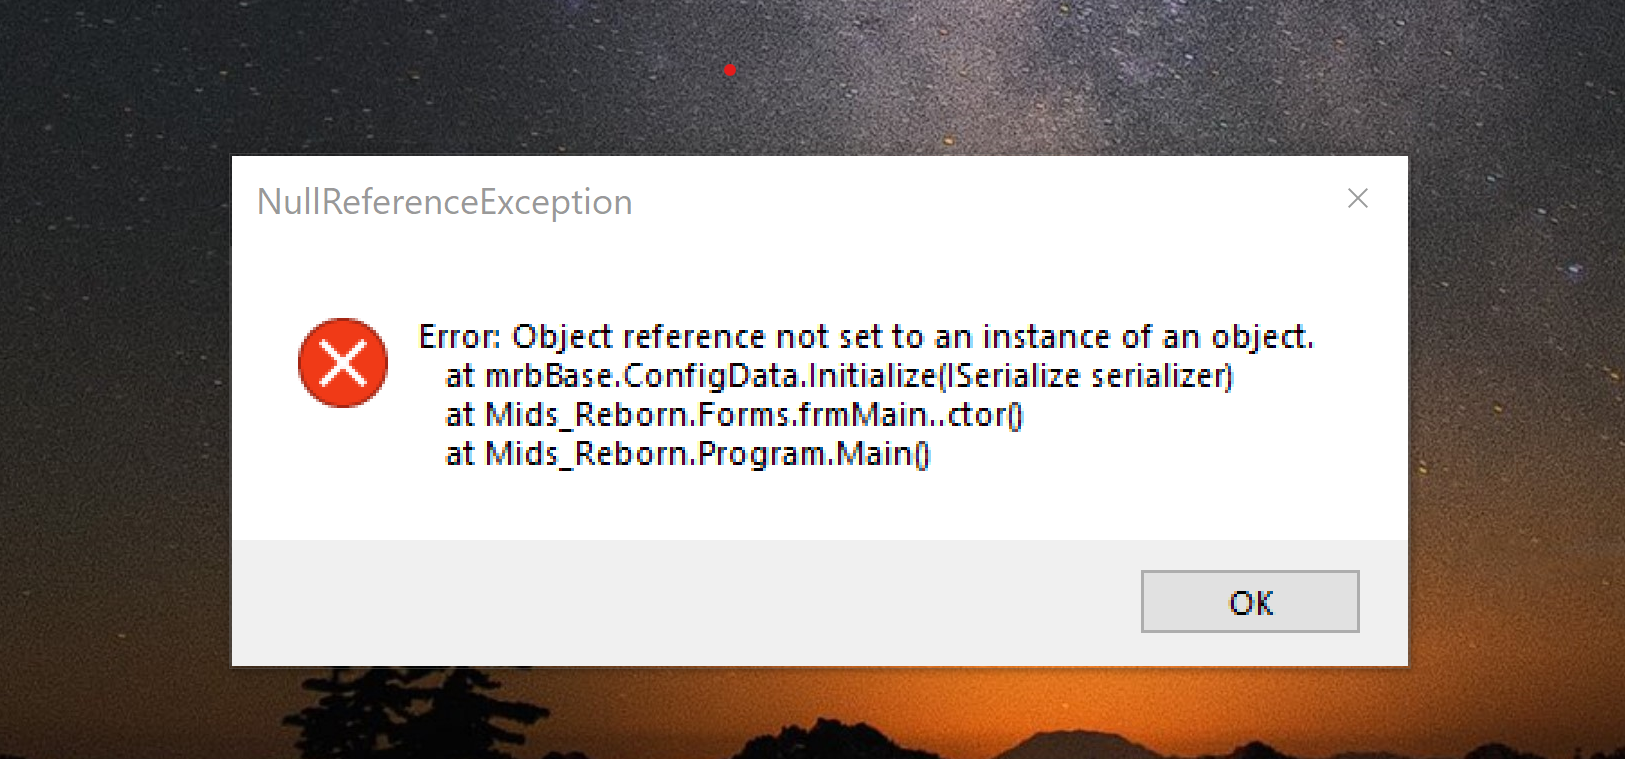
I can not open Mids now that i downloaded the new version 3.2.17 i just get this pop up.
-
Yes. i only mentioned it for Bio in defensive only to make defensive a bit more worth while. The second absorb shield is on a long cooldown and a T9 which other sets get also. Bio and WP do have defences and it is a big part of their survival but i feel it is a little too easily stripped considering that heal debuffs are thrown out also fairly often also, which they also should be resistant to a little more. Either some more DDR or some Regen DR Yes Regen should be the SR in regen debuff resistance.
-
Yes you are but if they have a different damage type and the defences are debuffed it can get rough out there. The absorb shield is pretty sweet though. My answer is kill them fast before they kill me lol. That will boost survival technique also.
-
All the above + Having enough accuracy/to hit also to prevent misses which will lower the dps considerably. Luckily invuln has that built in. Global Recharge also is very good.
-
Have you procced out the DnA Siphon? similar to Rad Therapy. I have both a Rad/SS and a Bio/SS Tanker and i would say the clearing of trash wasn't much different on either of them. The Bio will take down a hard target faster though. Rad is good for jumping from mob to mob though when there is time taken doing that as the AoE's will recover some. But there isn't a huge amount in it. Rad anything is always a good choice but don't underestimate Bio. Bio does need a really good build but Rad is a bit more foregiving.
-
Ok, it wasn't a big buff. But i think the DDR of shield should be reduced also.
-
Well if @Brutal Justice is against it, it must be a good idea lol. And i even defended him on his very popular Defence post 😛
-
Well i would say 90% nigh unbreakable resists and a full heal every 10 seconds or so +regen on top and extra utility in CC is far more than the small resists/breakable defence and regen that WP offers. That full heal is better than the regen WP offers and only needs 2 mobs. I am not asking for a big change just about 15% to the DDR so that the defences stand up a little longer as it is a big part of WPs survival.
-
But they are a defence hybrid set. I know they have heals and some resists etc but then so does invulnerability/stone. Invuln has better defence and resists and has a heal/max health and better DDR. I just think WP certainly could do with a little more help. The new stone armor is pretty impressive but WP isn't and i think defensive stance Bio needs a little more, as it isn't that much of a boost using it not for the damage loss anyway. WP is behind most of the other sets. There are so many sets that are just so much better than WP in survival and damage/utility. Resist sets shouldn't get DDR but they should maybe have some max health added here and there.
-
I think Willpower should get a little more DDR than it has. Maybe around 35-40% or so. Bio should get some DDR added only when it is in defensive stance around 30% or so. Add some heal debuff resistance to Bio in Defensive mode also. Thanks.
-
Rad and bio both have one absorb and one AoE heal that can both be procced out. Rad has meltdown clicky and Bio has Parasitic Aura clicky. If anything Rad is more clicky with GZ as bio is a damage aura constantly on. Bio's absorb is much better than Rads. I know bio on a Tanker is just as tanky and sometimes more, sometimes less depending on mobs than Rad. I am not sure on scrappers though. I sometimes forget i have Parasitic aura, i rarely use it except on extreme content. But Tankers do get the MotT proc to boost the resists. Rad is good but so is Bio.
-
This is what i use at the moment. I think it is ok, plays well anyway. But i am quite new to this class also. You could take more of the ranged attacks instead of the melee if you preferred. Actually scrap that that is an old build sorry. There are some good builds in the Veat section look for a Fortunata build. I seem to have deleted mine when i updated mids but i have it on my character only .
-
Adaptation: An Idea for the Sentinel Inherent
Gobbledigook replied to Calamity Cain's topic in Suggestions & Feedback
To me a Sentinel is like a guard or someone standing watch, guarding an area. Maybe if they have a movable AoE that they can place, maybe similar to faraday cage or even starts when they stop moving for x seconds and stand still. This could apply all sorts of buffs/debuffs to that area and would be fitting to the Sentinel name. At least their armor would get tested more this way as they would need to be close to mobs for the AoE. -
Bio is not weak on AoE either. Proc DNA siphon and a damage aura. Rad is not that far ahead in AoE if at all.
-
I did do some Pylon times back when EM was in beta. EM/Bio low 1 min average times. I did say the buff to EM was nice but a little over the top. To get your times with /rad though is pretty nice.
-
I do around 3.40 on my Fortunata Hybrid build which isn't proc heavy. I did try proc it out which improved it a bit but wasn't worth the trade off in set bonuses. I have only done a few pylon runs with it though to see how it is. The AoE is quite nice on them.
-
I wonder 😛
-
No the combos are not as as bad as in other games but i would not like it to get worse. The ring ones are not to bad its some of the other combo mechanics i like less.
-
How did we get onto procs in a combo mechanics thread lol? This games is pretty old now and so are a lot of us, that played this back in the day. I am not some 15 year old kid on a some Razer mouse/gaming keyboard with much nimbler fingers. There are many reasons why i like this game and the combo sets are not one of them. I tried savage melee and did not like it because of the combo which is a shame as i would love to play an animal type character with it and i like the animations.
-
I stay away from combo/build and spend sets as much as i can. Some combo sets are better non combo. Mark and exploit are not so bad, still prefer not though. I like to set my own rotations.
-
Trapdoor Test Results - the other half of Pylon testing?
Gobbledigook replied to Kanil's topic in Scrapper
Yellow Insps are allowed. -
Trapdoor Test Results - the other half of Pylon testing?
Gobbledigook replied to Kanil's topic in Scrapper
Lol. Fire/Rad won't be broken just lazy. 😛 -
Trapdoor Test Results - the other half of Pylon testing?
Gobbledigook replied to Kanil's topic in Scrapper
I lose quite a bit of survivability in using procs. If i didn't use them then i would be chasing set bonuses and making my character much tougher and almost unkillable. Yes it would be slower going and very safe, even boring , but the inevitable will happen and i would prevail. Procs help lower damage AT's which they need, just as set bonuses help damage AT's build some survival. If they nerf procs then they should nerf the set bonuses that damage AT's can use. Procs are available to Everyone though. Procs on a Tanker are a good way to boost damage. Tankers are still very tough even with procs but are still quite a bit behind the best damage classes in damage. The Might of the Tanker proc might be the problem here. If i didn't have this MotT proc boosting my survival so much then i may find i couldn't use so many procs without losing too much survival. That is why i said it should be split 50/50 to resist/defence, like 3%def/3%resists or so. Why does an Electric Armor Tanker need like 14-21% more resists? maybe to slot procs. I can understand a shield defence Tanker for example wanting more resists though, that and the DDR of shield is what makes it the top choice many times. Slightly off topic though. @Bill Z Bubba