-
Posts
790 -
Joined
-
Last visited
Content Type
Profiles
Forums
Events
Store
Articles
Patch Notes
Everything posted by Auroxis
-

Focused Feedback: Tanker - Archetype Inherent Changes
Auroxis replied to The Curator's topic in [Open Beta] Focused Feedback
@Kai Moon Thanks for testing! I think the OverCap damage reduction numbers are a tad too high, as essentially damage past the first target over the cap is fairly meaningless. I believe proc chance is also impacted. -
@Anderoth I believe this fix is up on Brainstorm (open beta server) if you want to test it.
-

Focused Feedback: Powerset - Electric Control
Auroxis replied to The Curator's topic in [Open Beta] Focused Feedback
FYI on pylon this power won't deal damage, the damage is conditional on the target being held. -

Focused Feedback: Powerset - Electric Control
Auroxis replied to The Curator's topic in [Open Beta] Focused Feedback
@WindDemon21 Regarding Tesla Coil, its damage is comparable to Blizzard so a high recharge is warranted. Maybe not 240s or 120s, but somewhere in between. Edit: This is no longer the case as the damage was halved and chains deal less damage. Also the target cap is 5 -

Focused Feedback: Powerset - Plant Control
Auroxis replied to The Curator's topic in [Open Beta] Focused Feedback
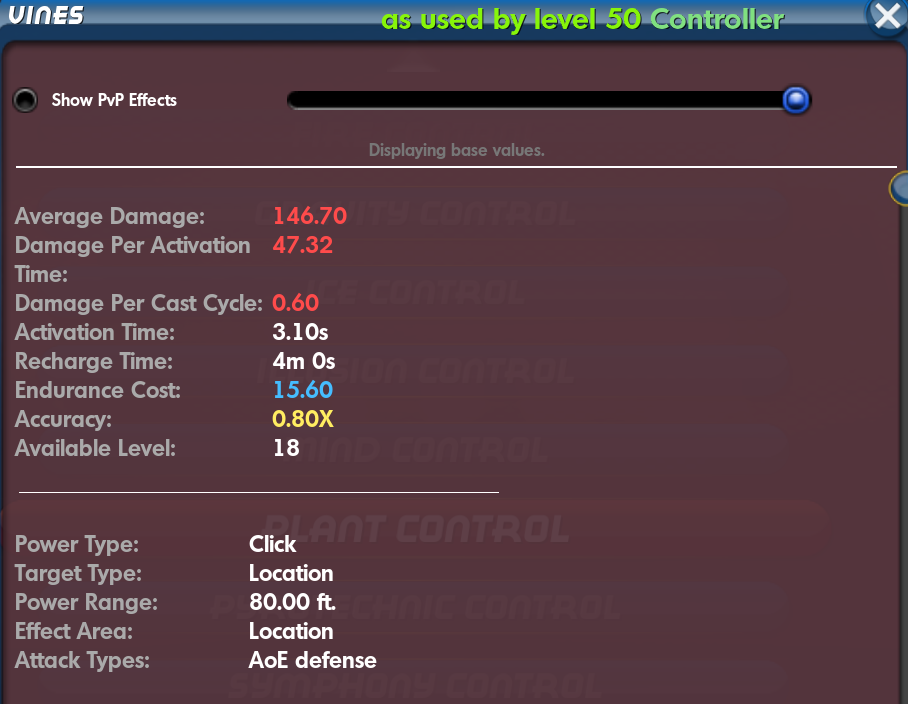
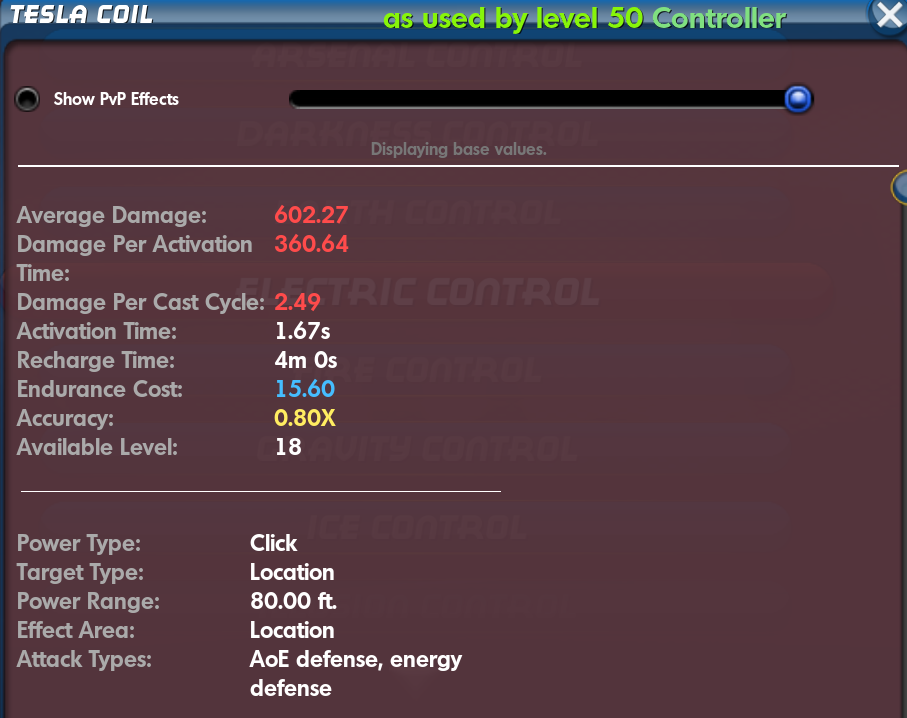
It feels like whatever damage Vines is supposed to do to counteract the creeper nerf just isn't it. If you compare new Vines to new Tesla Coil (renamed from Paralyzing Blast), both location AoE holds with very long recharge and damage conditional on hold, the difference is quite dramatic: -
I really like the overall feel of the powerset, but it's missing some reliable AoE openers. Multipurpose Missiles being at a split target cap of 8 for its stun and fear component means you'll often find yourself with some mobs that aren't CC'd (since some mobs may get both the fear and stun, while others may get neither). I'd much prefer it if the target cap was a little bit higher at 10/10.
-

Focused Feedback: Powerset - Electric Armor
Auroxis replied to The Curator's topic in [Open Beta] Focused Feedback
Power Sink -End lowered from -40 to -20. * This seems like a big missed opportunity to me. While maybe not as powerful as something like the modern Elec Blast, Elec Armor has always been the only armor set having multiple endurance draining capabilities, and now its signature endurance draining power in Power Sink has been reduced to being worse at draining endurance than the equivalent ones in Energy Aura's Energy Drain and Ice Armor's Energy Absorption. If Power Sink's drain isn't meaningful, then so is the case for endurance drain on the damage aura and T9. I'm a big proponent of keeping options available and balanced for players to keep building characters interesting, so it hurts to see a nerf to such a unique feature of the set. *EDIT: There appears to have been a patch note error, the original note said -40 to -20 and not -35. So it's not a big issue now! -
The mission was tailored specifically to benchmark builds for +4x8 missions by Ston, a person known for buildmaking, testing and benchmarking, and has a variety of enemies including an elite boss, rikti, nemesis, and crey with variant mob spread. It's not a cakewalk by any means. The players, well this is gonna sound horribly condescending, but me and @BRADICAL are quite well respected in both the forums and discord community as buildmakers. We would have loved more people to participate in the controller part of benchmarking, but keep in mind that if it was that easy to beat those numbers then others would have joined in. Regarding the fact that there are only 5 controller builds, well there is a reason those builds were chosen. Illusion is the premier DPS primary for controllers due to Phantom Army, and Marine is the premier AoE secondary due to procced Whitecap and one of the best DPS primaries if you have a lot of pets/teammates to trigger Shifting Tides (and illusion has the highest number of active pets). With all that being said, there are definitely a lot of cool and strong builds not on this list! As an example, I've been enjoying Symphony/Sonic/Energy lately, because of the combo of procced Liquefy giving Containment and clear cone positioning to Confounding Chant, Energy Torrent and Dreadful Discord.
-
Ill/Marine/Earth has the highest controller performance benchmark for speedy +4x8 solo clearing.
-
I would double-check that FFB works in Remote Bomb. I remember testing it a couple months ago and it didn't proc for me once.
-
@Uun Regarding Brine spam, it's important to remember these things: 1. The HP debuff is less impactful the lower %HP your target has, meaning that a target with 50000/100000 HP will have their max HP reduced by 500 but their current HP reduced by 250. 2. The HP debuff, while not impacted by AV resists, is also not impacted by resistance debuffs on that AV or damage buffs on yourself, while your attacks are. So against something like Hami with massive resists it's valid to spam, but most AV's do not have that much resistance and fall to the negatives a lot more often. 3. Brine's -res lasts 60s, meaning you will likely not be needing to re-apply it against the vast majority of AV's.
-
Soothing Wave with a heal set is an option like i said, but i find that i never use it. As a sidenote i do 6-slot it on my defender builds as i feel more obligated to support there. Going with 2 or 3 slots on brine is solid (touch of the nictus), i probably should have mentioned that as an option. I just don't use it that often outside of as an opener against AV's or against Hami. +5 Heal IO does the trick for that. To elaborate on barrier reef, you can't get a recharge set bonus if you invest in both, and defense is more important to have at the start of the fight due to debuffs coming your way, while absorb works just as fine if it arrives a bit late to the party.
-
1. Shoal Rush Generally a skip, as of the two must-pick powers it has less slotting options and end-game utility. 2. Soothing Wave You can slot this with a healing set, or just place the Preventive Medicine proc in it: 3. Toroidal Bubble This is where you slot your resistance sets. 3pc Gladiator for the KB protection and defense, Steadfast Protection for defense, and an EndMod IO for endurance: 4. Whitecap As many procs as you can fit while maintaining 95% chance to hit +3 mobs. -Res, purple damage proc, and Force Feedback procs are the highest priority. A high-end build should aim to reach 95% accuracy without any slotting (Kismet IO and Tactics helps): 5. Tide Pool Either an Endurance Reduction IO or a Slow Mod IO. Endurance Reduction will be better while leveling, but you don't have a way to keep stuff from running away as a Corr so the slow mod can help when soloing stuff once your build is fleshed out: 6. Brine Either an Acc/Heal Hami or just a straight-up +5 Heal IO. While leveling you do want Accuracy, but since we already aim to get 95% chance to hit without slotting, you can just slot a Heal IO in there once the build is done: 7. Shifting Tides This is the most interesting slotting. Since the power passively affects both enemies and allies, the ATO proc gives you and your team a heal and endurance pretty much every 10s, and the Gauss proc gives you a build-up at a similar interval. You can split the ATO set by 3-slotting to get more recharge, or you can get more accuracy out of 4-slotting it to help with fully-proccing whitecap: 8. Barrier Reef We always want the LotG IO here. Some people like to slot some defense here, but since its defense is unreliable my preferred slotting is to slot a 5-piece Panacea for the recharge and absorb. Panacea proc can proc on allies in this power: 9. Power of the Depths You always want the 5-piece Panacea here. As for the 6th slot, the EndMod/Rech hami/d-sync or a simple +5 EndMod IO (if you +5 all rech pieces): That's pretty much it, slotting for procs and sets.
-
-
-
You're welcome! For Alpha, I've included the Intuition Radial Alpha in the build as it gives our CC hold more duration, our cones+TP more range, our Spectral Terror+Weakened Resolve more -ToHit and our pets more damage. You could alternatively go for Musculature Core for slightly more pet damage. For Interface, I'd recommend the Reactive or Degenerative radial powers for a good damage proc combined with an offensive debuff. For Judgement, I'd recommend the one you like the most, just avoid the weak ones like Cryonic and Mighty. For Lore, I'd recommend the Banished Pantheon Coreor Longbow Core for sheer firepower, but you can go for lesser ones here for flavor as those are rarely used. For Destiny, you can go with Rebirth Radial for some healing, Barrier for more buffs, or Ageless for more recharge. For Hybrid, you should go with Assault Radial to give your attacks a chance do deal more damage.
-
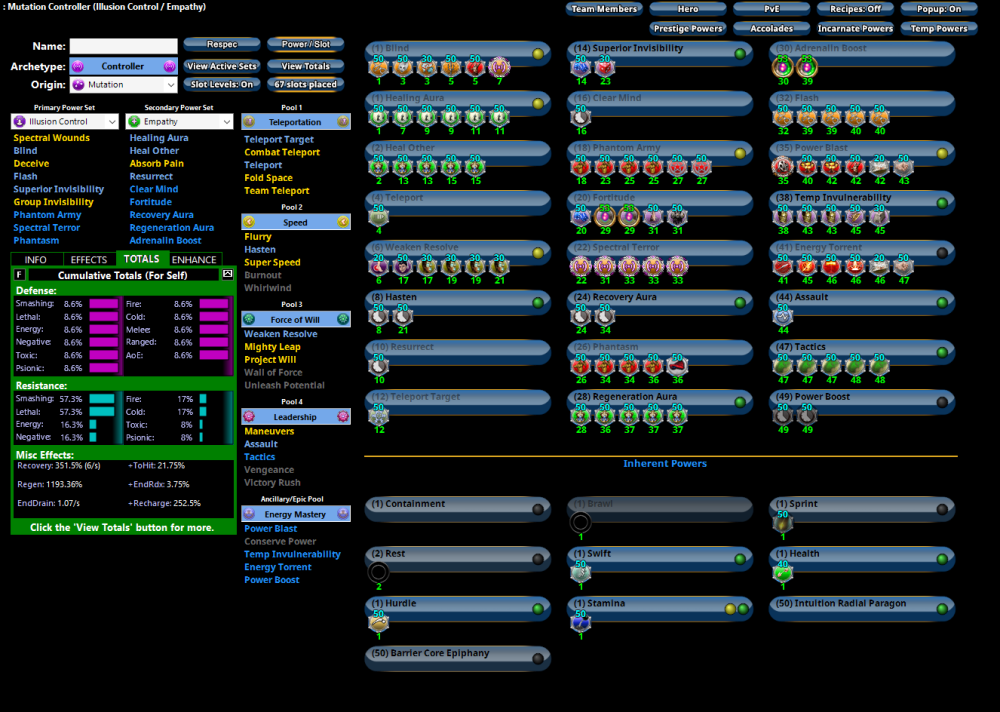
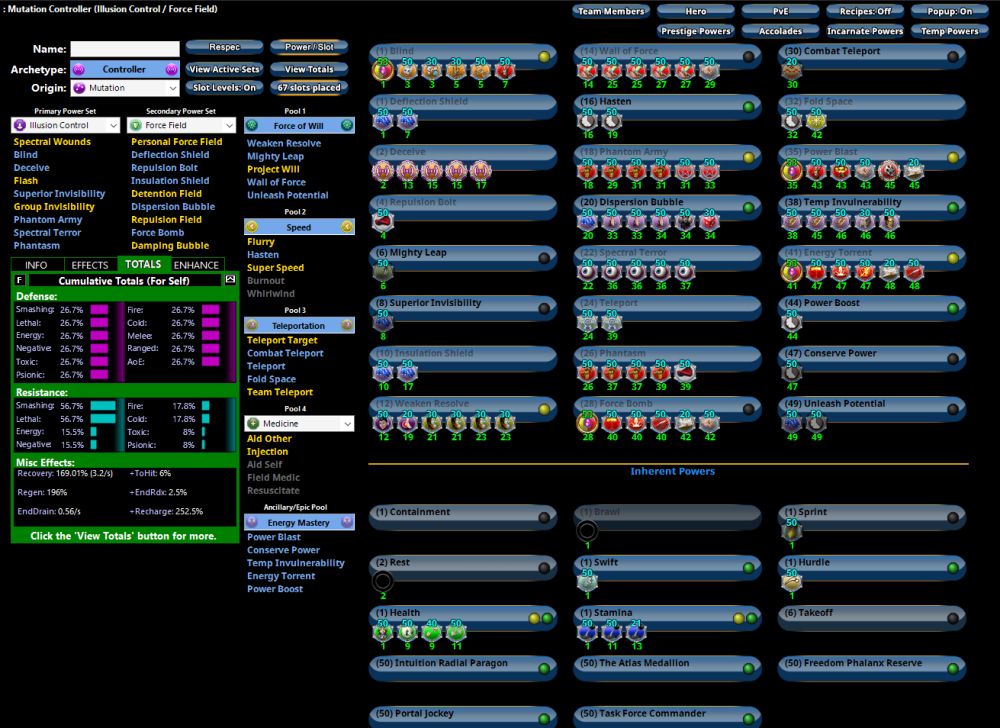
Here's one for you, has the following in its toolkit: 1. Weaken Resolve as an early attack and more -res for your Phantom Army damage 2. Wail of Force as an early spammable AoE and a way to get more recharge for perma Phantom Army via the FFB proc 3. Proc bomb AoE's to have solid AoE damage output and allow PA to focus on LT's and bosses 4. Fold Space to place mobs in your fear and AoE zone 5. Combat TP for cone AoE positioning (you want a powexec_location macro to combat TP to the back for cones) 6. Endurance Sustain cycling of Conserve Power / Unleash Potential to facilitate the proc bomb spam 7. Procced ST attacks for more DPS 8. Power Boost for better FF shields, CC's, and Unleash Potential Optional change: Remove the +def in Deflection/Insulation shields for slots into Deceive+Spectral Terror for +10% ranged defense Controller (Illusion Control - Force Field).mbd Controller (Illusion Control - Force Field) v2.mbd
-
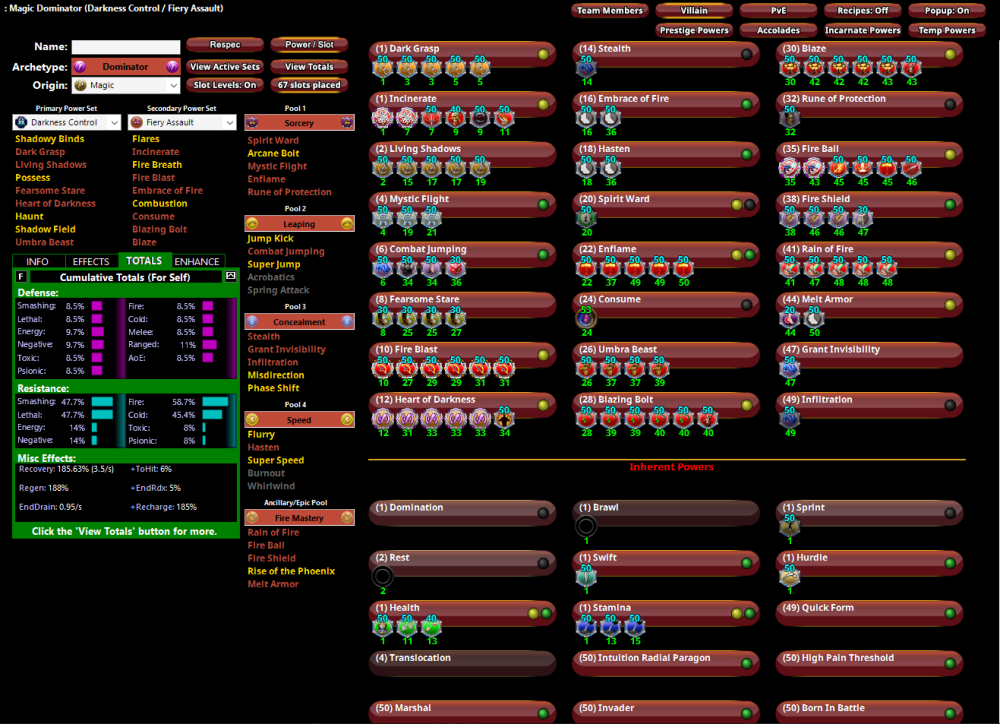
Here's a "firepower" focused magic themed Dark/Fire/Fire build: Dominator (Darkness Control - Fiery Assault).mbd
-
Force Fields' highlights to me are the defense+CC protection you get from Dispersion Bubble and the damage you get from a procced-out Force Bomb. Beam Rifle actually has decent synergy with FF here, as you can fix your lackluster AoE with Force Bomb. You can go further by adding Fold Space+procced Thunder Strike to it. This means having a Fold Space->Force Bomb->Thunder Strike opener that deals more damage than your nuke (which you can add for even more damage), huddles the pack, boosts your recharge, and applies three resistance debuffs (one from force bomb, two from procs). Here is an example of a Beam/FF build that focuses a lot around offensive output while still keeping the Medicine pool you wanted OP. Just keep in mind that slotting procs means you aren't slotting endurance reductions and accuracy, so while leveling up you do want some accuracy slotted and to just be aware that endurance is gonna be your growing pain (recovery boost temp power helps here). Corruptor (Beam Rifle - Force Field).mbd
-
A couple procced AoE's won't be sacrificing much of anything and will greatly boost your clearspeed. On the Bots/FF I've mentioned, I'm fully softcapped and hit 95% accuracy against +3's. And as for the henchmen attacks themselves, even their best AoE attacks will not deal nearly as much damage as a good proc bomb like the ones I mentioned. I guess that if you're just regularly fighting a few targets at once you won't notice a massive difference. But in +4x8 content it's a big deal, and the only reason I'm pressing on this instead of going with the "do your thing" approach, is because telling other MM players proc bombs are suboptimal is just straight-up false. Mastermind (Robotics - Force Field) v3.mbd
-
It's a great example because even if your pets have good AoE you still benefit greatly from thinning the herd for them.
-
The main advantage is in having your henchmen spend their time on hard targets (LT's and bosses) instead of soft targets (minions). It only takes a few well procced AoE attacks to take down minions in a +4x8 group, which lets your henchmen spread their damage optimally and leads to an overall faster clear speed. In addition to the AoE advantages, you can slot -res procs in your attacks to have your henchmen deal more damage. A good example is a Robots/FF MM. You can have your pets go in and let them figure it out, sure. Or you could instead go Robots/FF/Mu with TP, and Fold Space the pack to get them tightened up, follow it up with a procced Force Bomb, procced Thunder Strike, and Electrifying Fences. You then end up with a pack almost depleted of minions, immobilized, and debuffed by two -res procs. These are not just theories, but actual game-tested scenarios I benchmarked. For a simpler setup, I use Force Mastery on my Bots/Cold to have a Sleet + Procced Explosive Blast + Procced Energy Torrent opener.
-
@Maelwys I created both your "spanner in the works" build (procced AS) and the build I posted above on the public test server for some pylon tests. Both builds used the same incarnate slot powers: Musc Radial Alpha, Ageless Core Destiny, Assault Core Hybrid, Degen Core Interface I ran your rotation as I understood it: AS-Zapp-CI-JL-CB-AS-BL-CI-JL-CB And my rotation as I've discussed it: TS-CI-AS-Zapp-CB-CI-AS Pylon times for the JL build: 1:40 1:38 1:44 1:34 1:50 1:52 1:34 1:37 1:48 1:49 Fastest time: 1:34 Slowest time: 1:50 Average: 1:42 Pylon times for the TS build: 1:45 1:43 1:28 1:31 1:25 1:36 1:34 1:39 1:40 1:25 Fastest time: 1:25 Slowest time: 1:45 Average: 1:34 Of course, seeing as Stalker is naturally high-variance due to the many many procs going on this can only say so much. What I did notice is my build's variance is mostly due to not generating as many Focus stacks before AS, while your build's variance is the Hide proc going out of sync and being used on Ball Lightning instead of Zapp.
-
I suppose that in that case you're still weighing TS against JL, which is neither used as an opener nor is significantly faster than TS, with only a 0.4 seconds faster animation time before effect.


