The Beta Account Center is temporarily unavailable
×
We are experiencing intermittent network issues affecting Everlasting and Excelsior


oedipus_tex
-
Posts
2652 -
Joined
-
Last visited
-
Days Won
4
Content Type
Profiles
Forums
Events
Store
Articles
Patch Notes
Everything posted by oedipus_tex
-
Update. I took a recent video of the character. The build is not complete (no purples yet). Damage is not bad, not great. This missions is set to +4 x5, no bosses. I find that is the main comfort zone so far. I can push it up to x8 but it's more work to deal with. Ditto with bosses, the damage just isn't there to deal with them. Overall though I'd say I'm happy with the way this build "feels." The cones are truly huge, especially after activating Clarion, and the character is incredibly sturdy and safe. I do need to become more skilled at playing it tho. 🙂 I have to remember to resort to single target attacks on the final couple of enemies instead of continuing to AoE.
-
Sorry I didn't read closely enough on the question about the Smashing proc in Singy. What Sir and Redlynne posted is correct about how procs work in pet powers. In the video I posted, Singy is slotted with Sudden Acceleration: Knockback to Knockdown. That is why his Repel aura causes knockdown. When Homecoming was new I tried to slot the other proc in him (Overwhelming Force) but it didn't work as expected because Singy's aura doesn't have a damage component. Putting damage procs in him in hopes of it triggering in the aura is not very effective, like other folks mentioned.
-
It works reliably. It's the way my Grav/Storm is built. I have a video below demoing the technique. Note this is not a "proc monster" build or really any build at all. I never got around to IOing this character (yet).
-

Filler-attack suggestions for a leveling Ill/Dark? :)
oedipus_tex replied to synfoola's topic in Controller
If you can afford procs already, I'd go with the Force of Will pool and get both single target attacks. Proc the one that does -Resist with additional -Resist and some damage. That will help your Phantom Army deal extra damage. Wall of Force is pretty nice as a filler AoE altho to be honest probably works best on Controllers with an AoE immobilize because of Containment. It's got good range tho and a generous arc (90 degrees) and isn't a bad place for a Force Feedback proc. -
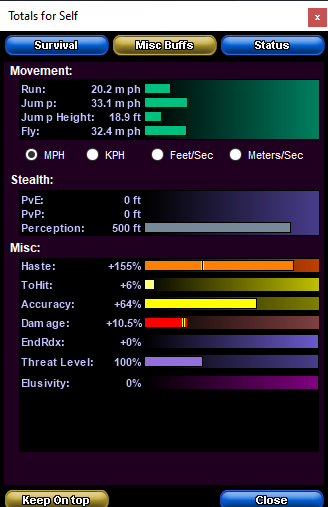
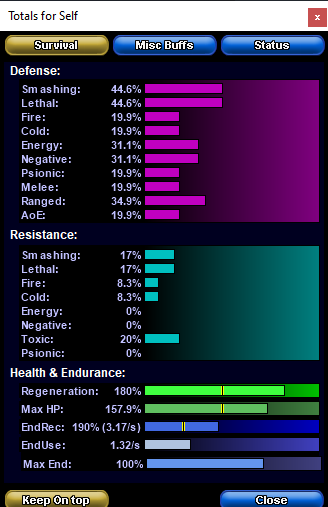
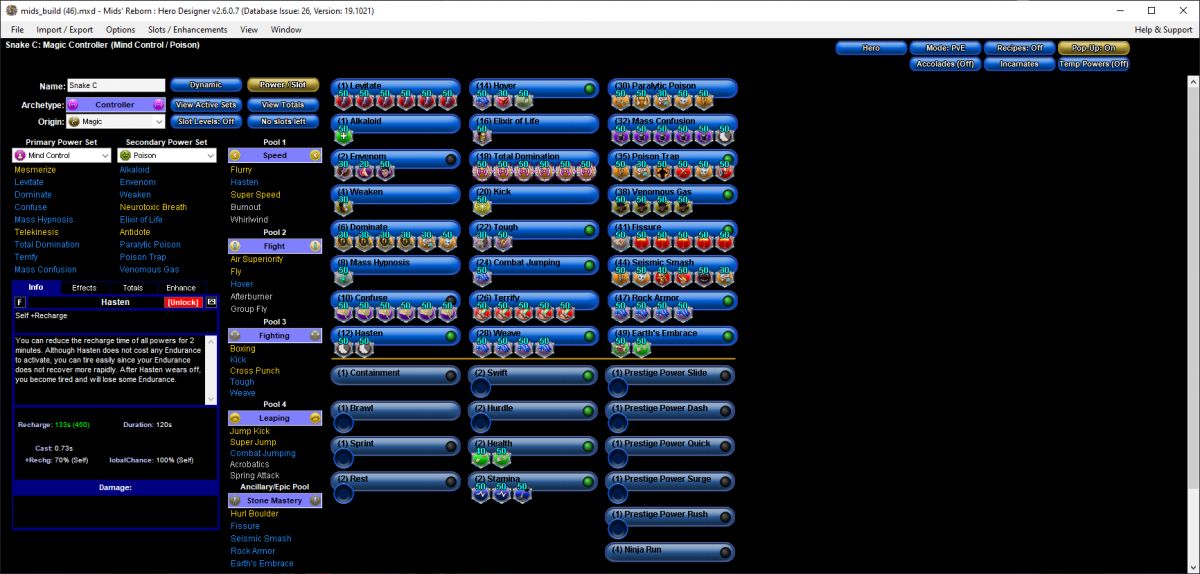
Hi, Thanks for sharing your build. I think you have some good ideas RE: proccing, but overall this build could use tightening up. You generally want to build Controllers for Recharge and/or Defense. I didn't see much of either in the original build, with several chances for easy +Recharge overlooked (e.g. in Defense powers) Be clear about what Alpha slot you will be using. For this build, you have a lot of options. I personally think Nerve Core Paragon would work well here. That power will provide you global Accuracy, which therefor allows you to shortchange Accuracy slotting in many of your powers and slot procs instead. You skipped Hasten. This is missing out on +70% global recharge. Never skip Hasten. If someone tells you to skip Hasten, send them to the forums so we can correct them and tell them to always take Hasten. Overall endurance use with the original build is brutal. I would make cuts wherever possible because Poison is expensive. I'm unsure the Stone APP is the most ideal for your build, but I kept it for theme since you posted it in your original. I'd add more procs to take advantage of your new huge Accuracy bonuses and also take Earth's Embrace for a much needed heal and +max HP buff. An expert may need to look at this build to ensure we haven't exceeded global + MaX HP buffs. This version of the build caps to S/L defense, is one purple away from capping Ranged defense, and has +85% global recharge. Key powers are procced. Don't freak about lack of Accuracy slotting and dropping Tactics. Assuming you go to T4 with Nerve Core Paragon Alpha slot, you're getting 45% Accuracy in every power, which with the +64% Global Accuracy you're slotted for lets you hit enemies up to +4 with 95% chance to hit. To make this build work, I had to drop Mystic Flight for Hover. You can take it back if you want, but you'd lose some defense and recharge speed. Endurance usage is still not perfect with this build. You'll want to think about that with your Destiny slot. However taking an Endurance recharger for your Dest means you're skipping mezz protection in Clarion, so think carefully on this. Hero Plan by Mids' Reborn : Hero Designer 2.6.0.7 https://github.com/ImaginaryDevelopment/imaginary-hero-designer Click this DataLink to open the build! Snake C: Level 50 Magic Controller Primary Power Set: Mind Control Secondary Power Set: Poison Power Pool: Speed Power Pool: Flight Power Pool: Fighting Power Pool: Leaping Ancillary Pool: Stone Mastery Hero Profile: Level 1: Levitate -- Thn-Acc/Dmg(A), Thn-Acc/Dmg/EndRdx(3), Thn-Dmg/EndRdx(3), Thn-Dmg/Rchg(5), Thn-Acc/Dmg/Rchg(5), Thn-Dmg/EndRdx/Rchg(7) Level 1: Alkaloid -- Heal-I(A) Level 2: Envenom -- ShlBrk-%Dam(A), AchHee-ResDeb%(7), TchofLadG-%Dam(9) Level 4: Weaken -- CldSns-%Dam(A) Level 6: Dominate -- BslGaz-Acc/Hold(A), BslGaz-Acc/Rchg(13), BslGaz-Acc/EndRdx/Rchg/Hold(13), BslGaz-Slow%(15), NrnSht-Dam%(15), GhsWdwEmb-Dam%(17) Level 8: Mass Hypnosis -- CaloftheS-Heal%(A) Level 10: Confuse -- CrcPrs-Conf(A), CrcPrs-Conf/Rchg(17), CrcPrs-Acc/Conf/Rchg(19), CrcPrs-Acc/Rchg(19), CrcPrs-Conf/EndRdx(21), CrcPrs-Conf%(21) Level 12: Hasten -- RechRdx-I(A), RechRdx-I(23) Level 14: Hover -- LucoftheG-Def/Rchg+(A), Ksm-ToHit+(23), BlsoftheZ-ResKB(50) Level 16: Elixir of Life -- GldArm-3defTpProc(A) Level 18: Total Domination -- SprWiloft-Acc/Conf/Hold/Immob/Sleep/Stun/Fear(A), SprWiloft-Conf/Hold/Immob/Sleep/Stun/Fear/Rchg(25), SprWiloft-EndRdx/Rchg(25), SprWiloft-Acc/Conf/Hold/Immob/Sleep/Stun/Fear/EndRdx(27), SprWiloft-Acc/Conf/Hold/Immob/Sleep/Stun/Fear/EndRdx/Rchg(27), SprWiloft-Rchg/Dmg%(29) Level 20: Kick -- Acc-I(A) Level 22: Tough -- StdPrt-ResDam/Def+(A), UnbGrd-Max HP%(29) Level 24: Combat Jumping -- LucoftheG-Def/Rchg+(A) Level 26: Terrify -- Rgn-Dmg/Rchg(A), Rgn-Acc/Dmg/Rchg(31), Rgn-Acc/Rchg(31), Rgn-Dmg/EndRdx(31), Rgn-Knock%(33) Level 28: Weave -- LucoftheG-Def/Rchg+(A), LucoftheG-Def(33), LucoftheG-Def/EndRdx(33), LucoftheG-Def/EndRdx/Rchg(50) Level 30: Paralytic Poison -- UnbCns-Dam%(A), Lck-%Hold(34), NrnSht-Dam%(34), GhsWdwEmb-Dam%(34), GldNet-Dam%(36) Level 32: Mass Confusion -- MlsIll-Acc/Rchg(A), MlsIll-EndRdx/Conf(36), MlsIll-Acc/EndRdx(36), MlsIll-Conf/Rng(37), MlsIll-Acc/Conf/Rchg(37), RechRdx-I(37) Level 35: Poison Trap -- GldNet-Dam%(A), NrnSht-Dam%(39), FuroftheG-ResDeb%(39), ScrDrv-Dam%(39), GhsWdwEmb-Dam%(40), Arm-Dam%(40) Level 38: Venomous Gas -- DarWtcDsp-ToHitDeb(A), DarWtcDsp-ToHitdeb/Rchg/EndRdx(40), DarWtcDsp-ToHitDeb/EndRdx(42), DarWtcDsp-Rchg/EndRdx(42) Level 41: Fissure -- FrcFdb-Rechg%(A), PstBls-Acc/Dmg(42), PstBls-Dmg/EndRdx(43), PstBls-Dmg/Rng(43), PstBls-Acc/Dmg/EndRdx(43), PstBls-Dam%(45) Level 44: Seismic Smash -- GldNet-Dam%(A), GhsWdwEmb-Dam%(45), TchofDth-Dam%(45), GldStr-%Dam(46), Mk'Bit-Dam%(46), NrnSht-Dam%(46) Level 47: Rock Armor -- LucoftheG-Def/Rchg+(A), LucoftheG-Def(48), LucoftheG-Def/EndRdx(48), LucoftheG-Def/EndRdx/Rchg(48) Level 49: Earth's Embrace -- DctWnd-Heal/Rchg(A), NmnCnv-Heal/Rchg(50) Level 1: Brawl -- Empty(A) Level 1: Containment Level 1: Prestige Power Dash -- Empty(A) Level 1: Prestige Power Slide -- Empty(A) Level 1: Prestige Power Quick -- Empty(A) Level 1: Prestige Power Rush -- Empty(A) Level 1: Prestige Power Surge -- Empty(A) Level 1: Sprint -- Empty(A) Level 2: Rest -- Empty(A) Level 4: Ninja Run Level 2: Swift -- Empty(A) Level 2: Health -- Mrc-Rcvry+(A), NmnCnv-Regen/Rcvry+(9) Level 2: Hurdle -- Empty(A) Level 2: Stamina -- EndMod-I(A), EndMod-I(11), PrfShf-End%(11) Level 50: Nerve Core Paragon ------------ ------------ Set Bonus Totals: 10.5% DamageBuff(Smashing) 10.5% DamageBuff(Lethal) 10.5% DamageBuff(Fire) 10.5% DamageBuff(Cold) 10.5% DamageBuff(Energy) 10.5% DamageBuff(Negative) 10.5% DamageBuff(Toxic) 10.5% DamageBuff(Psionic) 6% Defense(Melee) 6% Defense(Smashing) 6% Defense(Lethal) 6% Defense(Fire) 6% Defense(Cold) 17.25% Defense(Energy) 17.25% Defense(Negative) 6% Defense(Psionic) 21% Defense(Ranged) 6% Defense(AoE) 4% Enhancement(Stunned) 4% Enhancement(Held) 4.4% Enhancement(Terrorized) 8% Enhancement(Immobilized) 64% Enhancement(Accuracy) 8% Enhancement(Sleep) 10.5% Enhancement(Confused) 85% Enhancement(RechargeTime) 6% SpeedFlying 114.5 HP (11.25%) HitPoints 6% JumpHeight 6% SpeedJumping Knockback (Mag -4) Knockup (Mag -4) MezResist(Confused) 13.75% MezResist(Held) 13.75% MezResist(Immobilized) 13.75% MezResist(Sleep) 13.75% MezResist(Stunned) 13.75% MezResist(Terrorized) 13.75% MezResist(Teleport) 100% (20% chance) 19.5% (0.33 End/sec) Recovery 20% (0.85 HP/sec) Regeneration 8.25% Resistance(Fire) 8.25% Resistance(Cold) 6% SpeedRunning | Copy & Paste this data into Mids' Reborn : Hero Designer to view the build | |-------------------------------------------------------------------| |MxDz;1459;683;1366;HEX;| |78DA6594CB4F135114C6EF4CA794429142A1BCA52050E451A8A0AE0C89884643139| |226AED43A81820DB525B4261A572EFC139418C5D742050C9A6810DDB974E14E134D| |FC035C881A5F0926663C9DEF2B90CC24CDEFDEEF3CEE39E7762676F1886FF5D8951| |1A5F947D3662E9718CD66F2F3D9743A39EF8E9933A949258F279E316793A1518FAC| |5BB71D8ABE91582A3355DC0477D80F5F989E8E4C6453B96C46954D64C5333E974C4| |E95DBCBA3E9D4CCB97C05D685652A33E3B377E349734E36D56373A9C9483C9FCD24| |133133974FCE5FAA9702C2F25BD2141FCBAD16055143E9F7C8DBA07187BC0B96DC0| |7AFD56CC52AD501EDBA684869E95A894BA916F17FAD2B153054E95BDDF659101F17| |E35C9F75DB675982DCACC3FD0E9AEF3DF901DCF59134359BFEF39A9DEFB1C0C37C9| |E37D056045EE6F39EC2B9FED360F5193201D69C254DB05D9295DB4D585A792FFA0A| |925EB155C0A657D4E2ACE03F65D713FD84F81BD25F25EBA9DCE7B2B55571AD623D5| |50FA0D53F241F818D4BE432D8BC02EA726680F9028DA8C3255A2D6BACADC33C9A37| |E11F145B1D6CAA8E353E11342087D130843A770F93FBC90360E82068489E26E4713| |5314FA886F483D10078537A6E61FE96E3886FFB4BF2BEDA785F7BC650E753D9B672| |26AD3F68FB49FE023B7E937F48DEC32D39AF1DB5B9DB99AF8BE7748D707F19BE619| |E1B3E847A1625B6937D75AE410BAF837B5F912FC12F92AA9BE7745FA5ED19F2F63C| |27D7C81760DF3AB8E953AA97FDF5B2C63ED6D29728BC8086EAEF86DE3F8B987EF6B| |0217284354638FB01CE7E80B31FE0ECBF8AEF20FF0B8331DE4B1C6C3676BCA3963C| |85E445C5EA7158071D4AD4A10C3994618732EE50268CAD2F83D26CC5EBDFFA0E581| |B6562D5765ABF6D2B9A7642B3A7557A921D3BBCBF6F2BBA16C22CCB8A5CC0BD151C| |AD317993A270B4FE03E89AF046| |-------------------------------------------------------------------|

-
I didn't look at the posted builds but RE: the comment about resists being low, they shouldn't be, at last for slash lethal. Here's a basic build that hits soft caps and nearly caps s/l resists with 57 slots remaining. Hero Plan by Mids' Reborn : Hero Designer 2.6.0.7 https://github.com/ImaginaryDevelopment/imaginary-hero-designer Click this DataLink to open the build! Level 49 Magic Defender Primary Power Set: Time Manipulation Secondary Power Set: Archery Power Pool: Fighting Ancillary Pool: Soul Mastery Hero Profile: Level 1: [Empty] Level 1: [Empty] Level 2: [Empty] Level 4: Boxing -- Empty(A) Level 6: [Empty] Level 8: [Empty] Level 10: [Empty] Level 12: [Empty] Level 14: Tough -- Ags-ResDam(A), Ags-ResDam/EndRdx(15) Level 16: Weave -- LucoftheG-Def/Rchg+(A), LucoftheG-Def(17), LucoftheG-Def/EndRdx(17), ShlWal-ResDam/Re TP(23), Rct-ResDam%(23) Level 18: Farsight -- LucoftheG-Def/Rchg+(A), LucoftheG-Def(19), LucoftheG-Def/EndRdx(19), LucoftheG-Def/Rchg(21), LucoftheG-Def/EndRdx/Rchg(21) Level 20: [Empty] Level 22: [Empty] Level 24: [Empty] Level 26: [Empty] Level 28: [Empty] Level 30: [Empty] Level 32: [Empty] Level 35: Dark Embrace -- StdPrt-ResDam/Def+(A), GldArm-3defTpProc(36), GldArm-ResDam(36), GldArm-End/Res(36) Level 38: [Empty] Level 41: Power Boost -- Empty(A) Level 44: [Empty] Level 47: [Empty] Level 49: [Empty] Level 1: Brawl -- Empty(A) Level 1: Quick Form Level 1: Prestige Power Dash -- Empty(A) Level 1: Prestige Power Slide -- Empty(A) Level 1: Prestige Power Quick -- Empty(A) Level 1: Prestige Power Rush -- Empty(A) Level 1: Prestige Power Surge -- Empty(A) Level 1: Sprint -- Empty(A) Level 1: Vigilance Level 2: Rest -- Empty(A) Level 4: Ninja Run Level 2: Swift -- Empty(A) Level 2: Health -- Empty(A) Level 2: Hurdle -- Empty(A) Level 2: Stamina -- Empty(A) ------------ ------------ Set Bonus Totals: 6% Defense(Melee) 6% Defense(Smashing) 6% Defense(Lethal) 6% Defense(Fire) 6% Defense(Cold) 6% Defense(Energy) 6% Defense(Negative) 6% Defense(Psionic) 6% Defense(Ranged) 6% Defense(AoE) 9% Enhancement(Accuracy) 15% Enhancement(RechargeTime) 7.5% SpeedFlying 22.89 HP (2.25%) HitPoints 7.5% JumpHeight 7.5% SpeedJumping Knockback (Mag -3) Knockup (Mag -3) MezResist(Confused) 6.25% MezResist(Held) 6.25% MezResist(Immobilized) 6.25% MezResist(Sleep) 6.25% MezResist(Stunned) 6.25% MezResist(Terrorized) 6.25% MezResist(Teleport) 100% (20% chance) 2.5% (0.04 End/sec) Recovery 20% (0.85 HP/sec) Regeneration 11.75% Resistance(Smashing) 8% Resistance(Fire) 8% Resistance(Cold) 8% Resistance(Energy) 8% Resistance(Negative) 8% Resistance(Toxic) 8% Resistance(Psionic) 11.75% Resistance(Lethal) 7.5% SpeedRunning | Copy & Paste this data into Mids' Reborn : Hero Designer to view the build | |-------------------------------------------------------------------| |MxDz;746;344;688;HEX;| |78DA85915D4BC3301486535A1175DF4E27A8081BC8D845DD74F7A29B7A312743052| |F4BE9D22E9035236B615EFA87FC415E7BEB07F803E26913A7338207C27BF2BCE79C| |246D7FD6CD3C5E3C1C2323D7A1EE74EA74B18FC321E64B7D37201E4A6219D6DE177| |74E63DFB76FC9183B7D37249398BA11616165EE5FBB618087F609F74698DFA3EC80| |316A9F936014913058DCADC91D4DB6259933EE6187F9CE1DA174FB6C423CBBC3388| |F2711E3CE0D8B291C3A8D60EE16DC691F96580C03EE6AA69716C84CC0EF82344CA8| |CA1A6995916D43D2B250AE29D5022F2F3D2BBF2159A1ACB42075B3674AFD90FA544| |6A8A87A8AAAA7A47A4AAAA75C54BA2E55FC1F33985E9563CD6A05925D0BD50EE591| |B503A52DF37BDC7306A1BA7A7DFDAFD7EF584885909F0EF51A73221A9ADBD4484B2| |3471A696BE452235709916F13034BA5E01AA9BB5298FF46F1B20AAEF1D37DD3C8AB| |46DE35F2094FF9FA45| |-------------------------------------------------------------------|
-
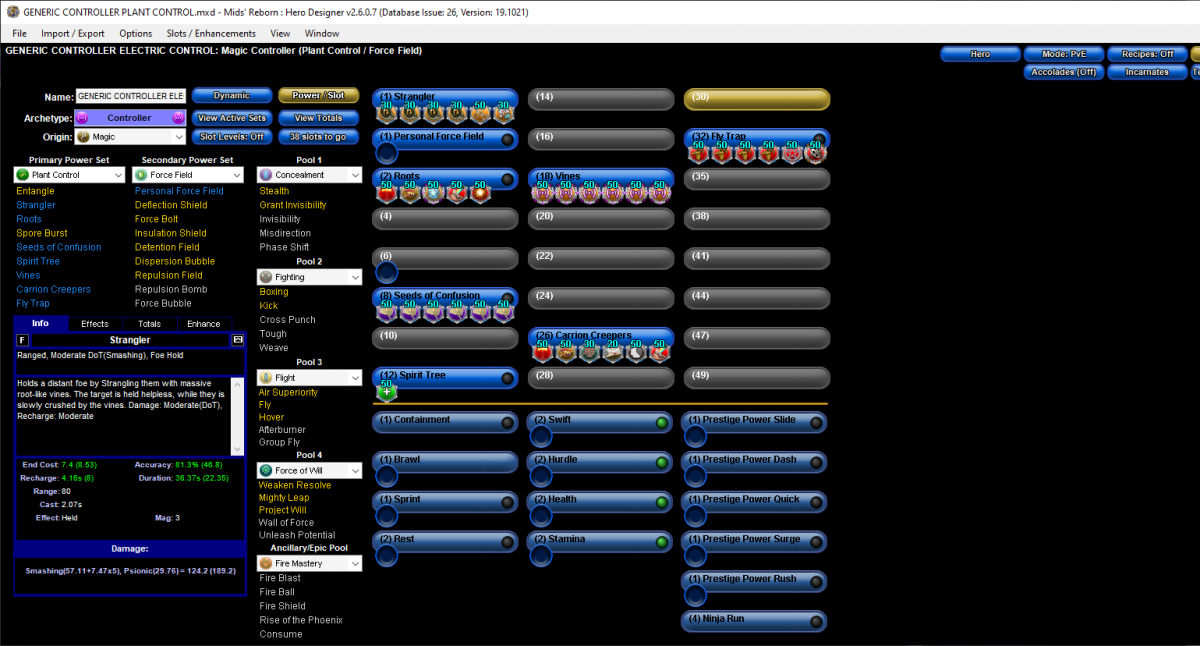
Here's a generic Plant Control build for you to look at. It's for a Controller but Doms shoulld be similar. Basically, think procs. You'll want to try to get around 90 global recharge so you can go perma Dom. Hero Plan by Mids' Reborn : Hero Designer 2.6.0.7 https://github.com/ImaginaryDevelopment/imaginary-hero-designer Click this DataLink to open the build! GENERIC CONTROLLER ELECTRIC CONTROL: Level 49 Magic Controller Primary Power Set: Plant Control Secondary Power Set: Force Field Hero Profile: Level 1: Strangler -- BslGaz-Acc/Hold(A), BslGaz-Acc/Rchg(3), BslGaz-Acc/EndRdx/Rchg/Hold(3), BslGaz-Rchg/Hold(5), UnbCns-Dam%(21), NrnSht-Dam%(21) Level 1: Personal Force Field -- Empty(A) Level 2: Roots -- PstBls-Dam%(A), TraoftheH-Dam%(5), SprOvrPrs-Rchg/Energy Font(17), Rgn-Dmg(19), Dtn-Acc/Dmg(19) Level 4: [Empty] Level 6: [Empty] -- Empty(A) Level 8: Seeds of Confusion -- CrcPrs-Conf(A), CrcPrs-Conf/EndRdx(11), CrcPrs-Conf%(13), CrcPrs-Conf/Rchg(13), CrcPrs-Acc/Conf/Rchg(15), CrcPrs-Acc/Rchg(15) Level 10: [Empty] Level 12: Spirit Tree -- Heal-I(A) Level 14: [Empty] Level 16: [Empty] Level 18: Vines -- SprWiloft-Acc/Conf/Hold/Immob/Sleep/Stun/Fear(A), SprWiloft-Conf/Hold/Immob/Sleep/Stun/Fear/Rchg(23), SprWiloft-EndRdx/Rchg(23), SprWiloft-Acc/Conf/Hold/Immob/Sleep/Stun/Fear/EndRdx(25), SprWiloft-Acc/Conf/Hold/Immob/Sleep/Stun/Fear/EndRdx/Rchg(25), SprWiloft-Rchg/Dmg%(31) Level 20: [Empty] Level 22: [Empty] Level 24: [Empty] Level 26: Carrion Creepers -- PstBls-Dam%(A), TraoftheH-Dam%(27), ImpSwf-Dam%(27), ExpStr-Dam%(29), RechRdx-I(29), Rgn-Dmg/Rchg(31) Level 28: [Empty] Level 30: [Empty] Level 32: Fly Trap -- ExpRnf-Acc/Dmg(A), ExpRnf-Acc/Rchg(33), ExpRnf-EndRdx/Dmg/Rchg(33), ExpRnf-Dmg/EndRdx(33), SlbAll-Build%(34), OvrFrc-Dam/KB(34) Level 35: [Empty] Level 38: [Empty] Level 41: [Empty] Level 44: [Empty] Level 47: [Empty] Level 49: [Empty] Level 1: Brawl -- Empty(A) Level 1: Containment Level 1: Prestige Power Dash -- Empty(A) Level 1: Prestige Power Slide -- Empty(A) Level 1: Prestige Power Quick -- Empty(A) Level 1: Prestige Power Rush -- Empty(A) Level 1: Prestige Power Surge -- Empty(A) Level 1: Sprint -- Empty(A) Level 2: Rest -- Empty(A) Level 4: Ninja Run Level 2: Swift -- Empty(A) Level 2: Health -- Empty(A) Level 2: Hurdle -- Empty(A) Level 2: Stamina -- Empty(A) ------------ ------------ Set Bonus Totals: 11% DamageBuff(Smashing) 11% DamageBuff(Lethal) 11% DamageBuff(Fire) 11% DamageBuff(Cold) 11% DamageBuff(Energy) 11% DamageBuff(Negative) 11% DamageBuff(Toxic) 11% DamageBuff(Psionic) 7.5% Defense(Energy) 7.5% Defense(Negative) 11.25% Defense(Ranged) 4% Enhancement(Stunned) 15% Enhancement(Accuracy) 4% Enhancement(Held) 4.4% Enhancement(Terrorized) 8% Enhancement(Confused) 33.75% Enhancement(RechargeTime) 8% Enhancement(Immobilized) 8% Enhancement(Sleep) MezResist(Confused) 2.5% MezResist(Held) 2.5% MezResist(Immobilized) 2.5% MezResist(Sleep) 2.5% MezResist(Stunned) 2.5% MezResist(Terrorized) 2.5% 6% (0.1 End/sec) Recovery 1.5% Resistance(Energy) 1.5% Resistance(Negative) | Copy & Paste this data into Mids' Reborn : Hero Designer to view the build | |-------------------------------------------------------------------| |MxDz;944;436;872;HEX;| |78DA6D92DB4AC3401086376D4AD1AAB455C4B315F546413C5D0A82319542ABA508D| |EA831D6B42E2C8DA451ECA5CFE1BD47F442F1F41E2ADEFA009EF001E2B83BB525EB| |90E4CBFC33FB673649667FBEE972E1609628518D99E5B2A1D925D7B119B39C50C62| |CD23C81185CD017F55C4A4B684B8BCBB9A5745ACF25F4B4AE2DD76961E84BD41657| |7DC6B2CC2CB9D5ACBBAE616EB750184BDA4EDE3292D4625B2496B5A13F55DAA365B| |A4919752BCD5C49D2E2B64B4BC588C8D86F1A17F77CB55D30562863317D87E6A1D9| |B18C8C59762DA7D201230DC379A5100C2F441E0384F4AA24F0847C11549F05DB52C| |009A0A9F07CA6B6160E08720D8A103D55B927BC5B3D5438A3B0E297F149E112BF10| |75AF1A24C4AF37D01EC689C2ABA2B77143B0C944AE09B6AC238D40CDEB160C22385| |664C8F710EF0EAA31B48F1D0579B5FD187922D8718A3C13EC3B0FFA5C78DC835527| |5A75E26EBB70B75D47E21DF55460B256E0A8A8F74D057C560FD0D88F2EFD9FA29AF| |8407E23BF040734E4EBBF03F9A247F57F9FDE9AE28D48D571499990942949999694| |B4A464D5BFFF82285C69881212C449DE1AA1AAD4573F24E55D523E25E5073DB112A| |C| |-------------------------------------------------------------------|
-
FYI Arctic Air is currently bugged (probably? I don't see any dev notes about it) and proccing Confusion 100% of the time instead of the normal 30%, so if you're gonna play it, keep that in mind. I assume they'll eventually fix it, if it is in fact broken. I do hope they bump the proc chance up from 30 to 60 or so tho. I'm personally not a fan at all of Electric Asssault. Ice/Psi on the other hand could work. Full disclosure, on live I used to main a Ice/Fire Dom (fairly strong at the time, before Blasters had crashless nukes a viable top damager, not so much now) and Ice/Energy (before the energy buffs, not terrible but not great).
-
Synaptic Overload is a somewhat slower, non-notify but otherwise identical power to Seeds of Confusion. I guess it speaks to the effectiveness of Electric Control that some people are skipping it, but I never would. By the way if you put a Coercive Persuasion: Chance for Contagious Confusion here, it will proc about 4.5 times per minute, or in other words, has a 90% chance to proc as long as you keep the Recharge of the power above about 14 seconds. That will put Confusion on enemies immediately and speed up the chain mechanic.
-
I like this idea. You could also combine two of the armors in Super Reflex and turn one of them into this and I'd be very happy.
-
Synaptic Overload is a non-notify power. You cast it before you leap in and enemies will never know. The Confused enemies turn on each other and deliver damage, plus the attacks they use drain their endurance bars. In the end the power significantly speeds up kill speed and the ability to drain endurance.
-
Radiation Infection is arguably skippable. I still wouldn't, but there's an argument to be had there. Enervating Field and Lingering Radiation,at least in my book are definitely not skippable. -Resist is too useful , especially paired with Phantom Army. And -Regen is critical for AV fights. Looking at the second build posted, it seems like the player would be happier with Time Manipulation than Radiation. Even tho you'd still want some of the Time debuffs, the -Regen in Time Stop is lower and therefor skippable, and the Radiation Infection power is a PBAoE toggle which also makes it skippable. Time takes longer to get to Chrono Shift than Radiation does to AM, but it provides +50% Recharge instead of +30%.
-
If it's hard coded then that's too bad and what it is. I'm not worried about Stalkers and Hide though. Masterminds can skip their pets. That's far worse IMO. If some Stalkers want to gimp themselves (or, more likely, wait to take Hide until a higher level, which actually makes sense) then no worries.
-
Synaptic Overload is one of the best powers in the game. Are you sure you can't work it into your build?
-
You may notice that Arctic Air has been affected by the bug introduced in the latest issue. The chance to Confuse has increased from 30% per tick to 100%.... To be honest, playing with it this way makes me think the power really does need an increase in the Confuse chance. Still, 100% chance is probably a bit much for an auto hit power. 🙂 I assume this is a mistake. But, in the meantime, we should all have fun with crazy powerful Arctic Air. 😄
-
- 2
-

-
honoroitisfantastic Project illu, or I just want to see more of myself
oedipus_tex replied to honoroit's topic in Controller
Dark. -
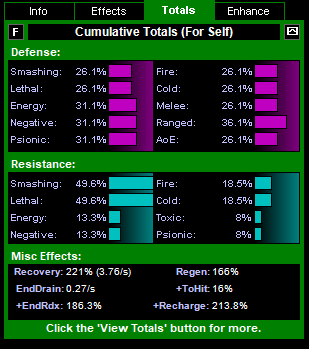
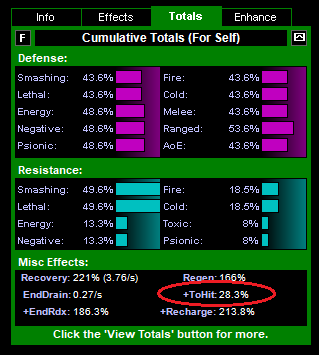
So I've been playing with this build some more and decided that the Boxing/Tough/Weave tree was overkill. So, I've dropped Defense so that with Power Boosted Farsight, Ranged is soft capped, while other defenses are at about 37%, 8 points from soft cap. With all the -ToHit I have flying around it just makes sense to spend less endurance on 2 armor toggles. It does mean my S/L resist drops to around 49%. However, I get to take Haunt, Distortion Field, and Combat Jumping in the place of the 3 powers I dropped. If I've done my math on Farsight right, despite my lack of overall Accuracy slotting in this build, all powers should have no issues hitting +4 enemies. Even if there is a little bit of a gap, Slowed Response should lower defense enough to cover it. The Alpha slot is Intuition Radial Paragon for +Damage, +Range (to expand the cones), +Hold, -Run Speed, -ToHit, and -Defense. The Destiny slot will be Clarion with +Special +Range to make the cones crazy huge and continue to build on Power Boost craziness. Note there's a bug in Mids that doesn't apply the extra Range from the alpha slot to Wall of Force. I've tested it in game and it does work. I currently have both Wall of Force and Energy Torrent with 53ft range. I'm still working toward the Destiny slot to make the size of them epic (at least when Destiny is first activated). Hero Plan by Mids' Reborn : Hero Designer 2.6.0.7 https://github.com/ImaginaryDevelopment/imaginary-hero-designer Click this DataLink to open the build! Late Fee: Level 50 Magic Controller Primary Power Set: Darkness Control Secondary Power Set: Time Manipulation Power Pool: Speed Power Pool: Force of Will Power Pool: Leadership Power Pool: Leaping Ancillary Pool: Primal Forces Mastery Hero Profile: Level 1: Dark Grasp -- Dmg-I(A), CldSns-%Dam(3), GhsWdwEmb-Dam%(3), GldNet-Dam%(5), UnbCns-Dam%(5), NrnSht-Dam%(7) Level 1: Time Crawl -- ImpSwf-Dam%(A) Level 2: Living Shadows -- PstBls-Dam%(A), TraoftheH-Dam%(7), CldSns-%Dam(9), PstBls-Dmg/Rng(9) Level 4: Temporal Mending -- Heal-I(A) Level 6: Possess -- CrcPrs-Conf%(A), CrcPrs-Conf/EndRdx(13), CrcPrs-Conf(13), CrcPrs-Conf/Rchg(15), CrcPrs-Acc/Conf/Rchg(15), CrcPrs-Acc/Rchg(17) Level 8: Fearsome Stare -- CldSns-ToHitDeb(A), CldSns-Acc/ToHitDeb(17), CldSns-ToHitDeb/EndRdx/Rchg(19), GlmoftheA-Dam%(19), CldSns-%Dam(21), SprOvrPrs-Rchg/Energy Font(21) Level 10: Hasten -- RechRdx-I(A) Level 12: Heart of Darkness -- SprWiloft-Acc/Conf/Hold/Immob/Sleep/Stun/Fear(A), SprWiloft-Rchg/Dmg%(23), SprWiloft-Conf/Hold/Immob/Sleep/Stun/Fear/Rchg(23), SprWiloft-EndRdx/Rchg(25), SprWiloft-Acc/Conf/Hold/Immob/Sleep/Stun/Fear/EndRdx(25), SprWiloft-Acc/Conf/Hold/Immob/Sleep/Stun/Fear/EndRdx/Rchg(27) Level 14: Weaken Resolve -- ShlBrk-%Dam(A), AchHee-ResDeb%(27), CldSns-%Dam(29), TchofLadG-%Dam(29) Level 16: Project Will -- Apc-Dmg(A), Apc-Dmg/Rchg(31), Apc-Acc/Dmg/Rchg(31), Apc-Acc/Rchg(31), Apc-Dmg/EndRdx(33), Apc-Dam%(33) Level 18: Maneuvers -- LucoftheG-Def/Rchg+(A), ShlWal-ResDam/Re TP(33), Rct-ResDam%(34), Ksm-ToHit+(34) Level 20: Haunt -- ExpRnf-Acc/Rchg(A), ExpRnf-EndRdx/Dmg/Rchg(40), ExpRnf-Acc/Dmg/Rchg(40), CldSns-%Dam(40), ExpRnf-Acc/Dmg(43) Level 22: Distortion Field -- Range-I(A) Level 24: Wall of Force -- FrcFdb-Rechg%(A), PstBls-Dam%(34), PstBls-Dmg/EndRdx(36), PstBls-Acc/Dmg/EndRdx(36), PstBls-Dmg/Rng(36), PstBls-Dmg/Rchg(43) Level 26: Shadow Field -- UnbCns-EndRdx/Hold(A), UnbCns-Acc/Rchg(37), UnbCns-Acc/Hold/Rchg(37), UnbCns-Hold/Rchg(37), UnbCns-Hold(39) Level 28: Farsight -- LucoftheG-Def/Rchg+(A), LucoftheG-Def/Rchg(39), LucoftheG-Def(39) Level 30: Combat Jumping -- LucoftheG-Def/Rchg+(A), BlsoftheZ-ResKB(45) Level 32: Umbra Beast -- ExpRnf-Acc/Dmg(A), ExpRnf-Acc/Rchg(42), ExpRnf-+Res(Pets)(42), ExpRnf-Acc/Dmg/Rchg(42), OvrFrc-Dam/KB(43) Level 35: Slowed Response -- AchHee-ResDeb%(A) Level 38: Conserve Power -- RechRdx-I(A), RechRdx-I(45) Level 41: Chrono Shift -- PrfShf-EndMod/Rchg(A), EffAdp-EndMod/Rchg(45), EffAdp-EndMod/Acc/Rchg(50) Level 44: Energy Torrent -- FrcFdb-Rechg%(A), PstBls-Acc/Dmg(46), PstBls-Dmg/EndRdx(46), PstBls-Acc/Dmg/EndRdx(46), PstBls-Dmg/Rng(48), PstBls-Dam%(48) Level 47: Temp Invulnerability -- UnbGrd-Max HP%(A), GldArm-3defTpProc(48), StdPrt-ResDam/Def+(50), GldArm-ResDam(50) Level 49: Power Boost -- RechRdx-I(A) Level 1: Brawl -- Empty(A) Level 1: Containment Level 1: Prestige Power Dash -- Empty(A) Level 1: Prestige Power Slide -- Empty(A) Level 1: Prestige Power Quick -- Empty(A) Level 1: Prestige Power Rush -- Empty(A) Level 1: Prestige Power Surge -- Empty(A) Level 1: Sprint -- Empty(A) Level 2: Rest -- Empty(A) Level 4: Ninja Run Level 2: Swift -- Empty(A) Level 2: Health -- Mrc-Rcvry+(A), Pnc-Heal/+End(11) Level 2: Hurdle -- Empty(A) Level 2: Stamina -- EndMod-I(A), PrfShf-End%(11) Level 50: Intuition Radial Paragon ------------ ------------ Set Bonus Totals: 18% DamageBuff(Smashing) 18% DamageBuff(Lethal) 18% DamageBuff(Fire) 18% DamageBuff(Cold) 18% DamageBuff(Energy) 18% DamageBuff(Negative) 18% DamageBuff(Toxic) 18% DamageBuff(Psionic) 6% Defense(Melee) 6% Defense(Smashing) 6% Defense(Lethal) 6% Defense(Fire) 6% Defense(Cold) 11% Defense(Energy) 11% Defense(Negative) 11% Defense(Psionic) 16% Defense(Ranged) 6% Defense(AoE) 2.25% Max End 48% Enhancement(Accuracy) 4% Enhancement(Stunned) 4% Enhancement(Held) 93.75% Enhancement(RechargeTime) 4.4% Enhancement(Terrorized) 8% Enhancement(Confused) 8% Enhancement(Sleep) 8% Enhancement(Immobilized) 129.7 HP (12.75%) HitPoints Knockback (Mag -4) Knockup (Mag -4) MezResist(Confused) 26.25% MezResist(Held) 26.25% MezResist(Immobilized) 26.25% MezResist(Sleep) 26.25% MezResist(Stunned) 26.25% MezResist(Terrorized) 26.25% MezResist(Teleport) 100% (20% chance) 18% (0.3 End/sec) Recovery 26% (1.1 HP/sec) Regeneration 18% Resistance(Smashing) 28.5% Resistance(Fire) 28.5% Resistance(Cold) 23.25% Resistance(Energy) 23.25% Resistance(Negative) 18% Resistance(Toxic) 18% Resistance(Psionic) 18% Resistance(Lethal) | Copy & Paste this data into Mids' Reborn : Hero Designer to view the build | |-------------------------------------------------------------------| |MxDz;1487;706;1412;HEX;| |78DA6594C94F136118C6BF69A72CA5480B85B2555A764A57F56E229B0B24249A785| |1EB04069C58DAA62D518F1E3CEAC58307134D8CE2967871BD7A57FF020F1A8D312A| |8BE0C583A92FF33C40934E32F9CDF77EEFF2BCEF37333397C73DCFA6AE1E569A772| |C63148BE9B15CB654C8653266C135632C5A734AAEBA69A36486264DB356167D7B1E| |3BCEF171A370316BEE45872B7C8E2C2F2CC44F594B667AC6C85AF9E58C51B27259E| |59ECD49E0C9BC69CE37DB8F93B9C29C99CE2DA44F5B994C936D9A368D79B350BC60| |E53D3BEBBC955DEC9CC85B73F1D982B56464D276585172174B66E14ABB081C94FB4| |740F12ABB545090D295E3BB43A9A07049B3D7FA84133CE6B0596368F6FE1DFF6EAC| |522BB0FD947C1A6C4EED0DF2D5DC469E3AE6AD7B05FB5D897732DED90FDB2F89775| |18FCB403DCF79F20CB8EF2C790EF4A6C15589AD656CED17D4F27E059BBF919FA0C5| |4F2D7EB9B7D7BD1258AF414BFD28B4AC49BE06E66B58C10CDA9E920FC1F647E463B| |0F309581C56AA917368AC71DAB53ADF4ACD165D75B376F77BE85E16DF26D6698AC2| |B63F46C6C904184A9229D027BA7DD0EDF4B5A2B7D00968086F91FF945D6F5DFA694| |11DBD651DF1435BE426496D910DACEFC919B5F28C5A2398CB25D11BA0DEC035F885| |79D67D2FC8D724CF3AF212DC90C00E6AE8388AD8FE2972929C0007C7C1FBA2A10B3| |D3ABAD8E3A08FF4836D3287207CB4207DA21F11FF5B6AF6B0660FFB1A61FF237F48| |F61FF98C993D909ABDECBB97E7F64EB606586380EF48945C11FF616A1CBE895CD1E| |B60EA06B8E9516A94731BE5DC62CF111FE3DC629C5B82734B70AEEFA5769CE71CFF| |0B8D8903602A806F2F95C0FA832049ED49EAEBD62BBED5B25CDB013B9672A46A375| |9654955590E56590E5559A6AB2CB3FAEE1F4269B6A5DEBBFB1F28AFBA6557ABDC5D| |DFB368DA717918D2953B8C4ED7AABC372ABD43E8DD7D0BB3D6E53D4861AFFC1FD25| |701FF| |-------------------------------------------------------------------| Here are the non-Power Boosted values. Power Boost will add 11.53 Defense to each of these. 26.1+ 11.53 = 37.63 31.1 +11.53 = 42.63 36.1 + 11.53 = 47.63 Here's the Power Boosted ToHit. With 28.3 +ToHit and the Global Accuracy I have (+48) I should be able to hit up to +4 with no actual Accuracy slotting.
-
Also Thermal, Time, Radiation.
-
Kinetics is a weird one. You're probably want to have different slotting leveling up than when you get situated. Basically as a Kin you will find yourself in many situations where you hit the Damage Cap. Since the Damage Cap is a cap per power, any Damage slotting in your powers doesn't help you out when at the Global cap. You will mostly be hitting this cap after level 40 or so once Fulcrum Shift is slotted. From that point you want to decide how many of your powers to add damage procs to. At 50 take a close look at your Alpha slot. You want to pick one with as much overlap with your build as possible. As a Kin, one that adds Accuracy is often useful, so you can get away with slotting less Accuracy in your actual powers. This may open slots in other powers. Vigor Core Paragon is good one because it will also add Healing and Endurance Reduction.
-
Looking for Some Advice RE: Elec/Energy/Primal Dominator Builds
oedipus_tex replied to Safehouse's topic in Dominator
Have you tried it with damage procs? You should be able to fit the following procs in it: Apocalypse chance for Neg damage Explosive Strike chance for Smash damage Gladiator's Javelin chance for Toxic damage Force Feedback chance for +100% Recharge Entropic Chaos chance for self heal (optional) Decimation chance for Build Up (optional) Because of Jolting Chain's unique activation mechanism, procs have a high chance to activate in this power. It's more critical to proc it out on Controllers, but my Dominators enjoy it as well. If you can get some of these procs prior to level 50, it can significantly help with the level up process. -
Repulsion Field can be worth it. It will drain your endurance very quickly though. A better use for Repulsion Field is to take it on a Controller who has an immobilize with knockback resistance. Then you can decide situation to situation whether Repulsion Field should knock back or down. Repulsion Bomb, despite the name, already does knockdown. On top of being a generally bad power. If you look at the stats for it, you'll notice it has one of the longest animation times for an attack, the Stun is only Mag 2 (ie Minions) and only has a 40% chance to activate. You can put a chance for +100% Recharge IO in this power, but its probably still not worth casting.
-
I see a lot of recommendations for Mind Control. I don't want to open up a battle, but as someone who used to main a Mind Controller for a long time, I'd like to add my contrary take. Mind Control is a set that was designed for soloing back when the game was under a different meta. The game has changed radically since then, and in my opinion Mind Control has not kept up. This isn't to say I don't think its still playable. It just isn't a set I'd recommend to a player exploring the Controller archetype and wanting to play solo. Some frustrating things about Mind Control are: Difficulty obtaining AoE Containment due to lack of an AoE Immobilize No pet General lack of hard mezz Punitively long Recharge in key powers, particularly Mass Confusion (240 seconds) Powers with unclear purpose in the current meta (Telekinesis) When Mind Control originated,, you could bring Mass Confusion and Total Domination to every fight. The game had no target cap, so Telekinesis could hit an infinite number of enemies for an infinite time, allowing you to herd maps and then Mass Confuse the whole lot. That made the lack of a pet more tolerable. I'm not saying that we need all that back. I am saying that relative to the other Control sets, barring Gravity (which has since been fixed) and Ice (could still use some attention) that also are in the lack-of-always-up-controls-boats, Mind Control is somewhat behind. It doesn't help that Mind Control has no appreciable debuffs at all to fall back on when control powers fail. Pets don't add a ton of damage, but what they do add is the leverage not to be forced to click a button for every enemy kill. This turns out to be quite liberating on a low damage AT like a Controller, and has significant implications for endurance management, since pet attacks cost nothing. Mind meanwhile pays a direct endurance price for every enemy death. The end takeaway from all of this is every time I play Mind Control, as I creep up the levels I have the slowing growing feeling I'd be happier playing something else. Dark Control, in particular, is very similar to Mind Control, but has no issues with Containment, a very effective debuff effect, and a strong pet. Electric Control has an AoE confuse that recharges in 60 seconds, and a very good Sleep. Either of those sets set the bar for me on where Mind Control should be. My hope is the developers do a review of the Control sets and lower the recharge of Mass Confuse from 240 seconds to around 90-120 seconds, and somehow make Mass Hypnosis more effective. Reordering the powers so that Terrify comes much earlier would also be ideal. As well as figuring out how to deal with the Controller version's lack of Immobilize.
-
Remind me, do Shield players usually take Aid Self to self patch? If so maybe I should be thinking of a different set. I could easily see Savage Melee as the primary, mainly for the teleport attack. The character frequently wielded claw weapons in D&D. What do folks think of a Savage/Energy Armor Scrapper? Also, even though it's a Resist set, I can totally see how Electric Armor might work as well. Thoughts on it?
-
Looking for Some Advice RE: Elec/Energy/Primal Dominator Builds
oedipus_tex replied to Safehouse's topic in Dominator
First advice, if you are open to it, is to skip Primal Mastery in favor of the Mu Mastery Villain APP. Mu Mastery gives you Power Sink (empty enemy blue bars and refill your own), an AoE that does -Endurance and -Recovery, and a pet with its own lighting attacks that puts further pressure on enemy endurance bars, You are an Electric Control character, so your safest option in any fight where you are brave enough to get close is to Power Sink the center of action to make sure any enemies Synaptic Overload missed don't make problems. Once that's done, your aura and the rest of your attacks will keep them drained. Proc Jolting Chain out with damage procs. Use it combined with cages (also procced), Whirling Hands and Ball Lightning as AoE. Punch stuff with Total Focus to get the double damage bonus in play. I highly recommend taking an Alpha slot with Endurance Modification to further increase the efficacy of your endurance drain. Combined with Power Up from your Assault set, the effects are sickening. One thing Energy Assault lacks is a heal. You'd be well served to grab Aid Self somewhere in the build to patch up. -
It's the non-aggro kind.