The Beta Account Center is temporarily unavailable
×


Spaghetti Betty
-
Posts
1523 -
Joined
-
Last visited
-
Days Won
16
Content Type
Profiles
Forums
Events
Store
Articles
Patch Notes
Everything posted by Spaghetti Betty
-
I've been musing a bit on this topic since I posted. I might work Darkest Night in on my SR/DM Tank simply for pulling Requiem and Romulus off the platform in a 4*. Surprisingly enough the Tank was sturdy for the entire run (there were a couple of moments I was the last one standing when it got too hot), but for the life of me I cannot get those 2 to cooperate when pulling, and standing up there and ensuring they follow is a suicide mission. Could be worth looking into.
-
It's a great power. I have a couple of personal arguments against taking it but that by no means should stop anyone else from considering it. For me, it's a ton of end sacrificed for the benefit. Most of the Tanks I would want DN on simply would not be able to shoulder the added end. It's an entire Epic pick, so unless I was already dipping into Soul to get Gloom, probably not worth the tradeoff of, say, choosing FA to become immune to -Tohit. These are just my own personal building philosophies coming into play though. It's just part of the give and take nature of building. No one should scoff at such a huge mitigation option especially on an AT designed around safety.
-
 I came here looking for info, as I'm sure most people do. There's still generally a lot of good information to be had here. I stick around because I like sharing my costumes and dropping the tidbit of build help from time to time. Plus, I can't resist the opportunity to make a funny. I've ran into a few other forumgoers online. Not often, and I'm not necessarily one to call people out, either. It is a fun game of hide and seek, though. I don't particularly care about my forum rep, but it is nice to look at the number. Even though I totally farmed 80% of it from the costume thread. I lurk a lot. I offer advice and knowledge when I can. But all opinions stink, so you won't find me sharing many.
 -
I cleared my alts! I hope these names find a good home Air Fryer Butterfly Samurai Carry The Blessed Cool Ant Fateless Martyr Firestorm of Venus Golden Palm Heavy Loader Intercooler Jungle Spectre Molten Idol of Hate Online Warrior Pop Roxie Roc and Roll Scream of Silence Secondhand Sam Tundra Fox XXIV
-
-
-
Post your best costume designs here!
Spaghetti Betty replied to ChanelNo2's topic in Art & Multimedia
The Scorned Guardian, Fiery Armor/Psi Melee Tanker- 8155 replies
-
- 11
-

-

-
Post your best costume designs here!
Spaghetti Betty replied to ChanelNo2's topic in Art & Multimedia
The Plague Reaper, Radiation Armor/Battle Axe Tanker- 8155 replies
-
- 12
-
-

-
-
Yes and WP also falls pretty hard to -DEF and -Regen, but this thread is not about what mobs make WP look bad.
-
Base Building is easily one of the coolest and most unique features CoH has. And we have some absolute wizards when it comes to making cool bases. It requires an absurd amount of knowledge, time, and spatial awareness to make stuff. Or maybe drugs. It could take drugs. I have a friend whose base looks like an expedition team digging for ruins in oceanic caves. It really surprised me. My base is more or less a utility base with some rooms I made that I thought were neat. My base code is BETTY-17192. Anyone on Excelsior can stop by. If it works like PvP but with custom maps, that sounds really cool. That can even open up things like people making their own "game modes". I just hope it never becomes anything like Base Raiding.
-
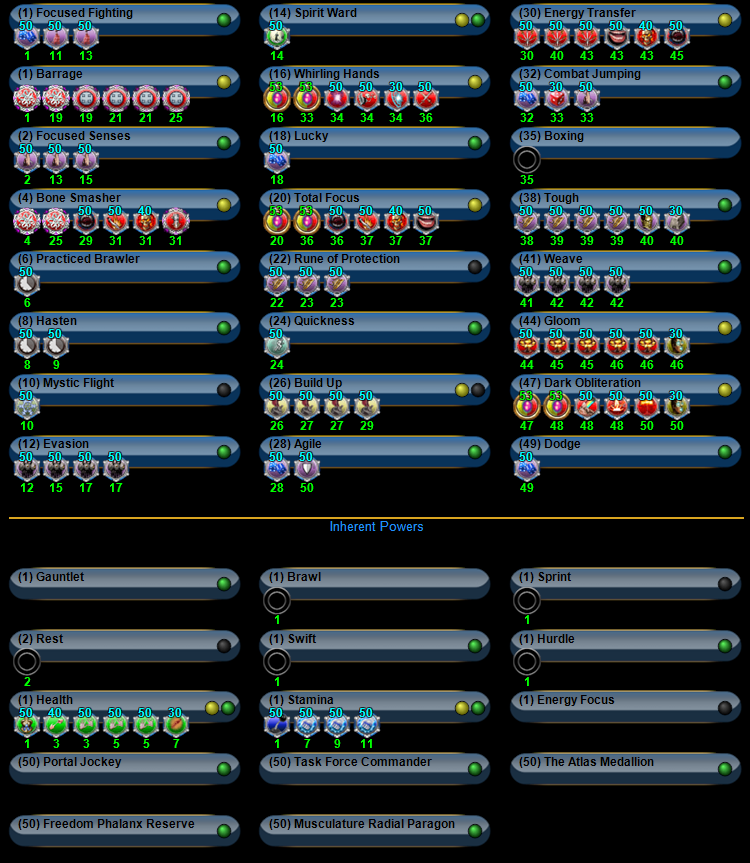
This is what I roll. This Hero build was built using Mids Reborn 3.4.7 https://github.com/LoadedCamel/MidsReborn Click this DataLink to open the build! lion: Level 50 Magic Tanker Primary Power Set: Shield Defense Secondary Power Set: Fiery Melee Power Pool: Leaping Power Pool: Fighting Power Pool: Sorcery Ancillary Pool: Energy Mastery Hero Profile: Level 1: Deflection (A) Unbreakable Guard - Resistance (3) Unbreakable Guard - Resistance/Endurance (3) Unbreakable Guard - RechargeTime/Resistance (5) Unbreakable Guard - Resistance/Endurance/RechargeTime (5) Reactive Defenses - Defense (7) Reactive Defenses - Defense/Endurance Level 1: Fire Sword (A) Superior Might of the Tanker - Accuracy/Damage (7) Superior Might of the Tanker - Accuracy/Damage/Recharge (9) Superior Might of the Tanker - Damage/Recharge (9) Superior Might of the Tanker - Damage/Endurance/Recharge (11) Superior Might of the Tanker - Accuracy/Damage/Endurance/Recharge (11) Superior Might of the Tanker - Recharge/Chance for +Res(All) Level 2: Battle Agility (A) Shield Wall - Defense (19) Shield Wall - Defense/Endurance (21) Shield Wall - Defense/Recharge (21) Shield Wall - Defense/Endurance/Recharge Level 4: Combat Jumping (A) Luck of the Gambler - Defense/Increased Global Recharge Speed (23) Kismet - Accuracy +6% Level 6: Active Defense (A) Recharge Reduction IO (23) Recharge Reduction IO Level 8: Combustion (A) Superior Gauntleted Fist - RechargeTime/+Absorb (25) Superior Gauntleted Fist - Accuracy/Damage/RechargeTime (25) Superior Gauntleted Fist - Damage/Endurance/RechargeTime (27) Superior Avalanche - Recharge/Chance for Knockdown (27) Superior Avalanche - Accuracy/Damage (29) Fury of the Gladiator - Chance for Res Debuff Level 10: Taunt (A) Empty Level 12: Against All Odds (A) Endurance Reduction IO Level 14: Super Jump (A) Winter's Gift - Slow Resistance (20%) Level 16: Phalanx Fighting (A) Luck of the Gambler - Defense/Increased Global Recharge Speed (29) Luck of the Gambler - Defense Level 18: Boxing (A) Empty Level 20: Build Up (A) Gaussian's Synchronized Fire-Control - Chance for Build Up (31) Gaussian's Synchronized Fire-Control - To Hit Buff (31) Gaussian's Synchronized Fire-Control - To Hit Buff/Recharge (31) Gaussian's Synchronized Fire-Control - To Hit Buff/Recharge/Endurance Level 22: Shield Charge (A) Armageddon - Chance for Fire Damage (33) Armageddon - Damage/Endurance (33) Armageddon - Recharge/Accuracy (33) Armageddon - Damage/Recharge/Accuracy (34) Armageddon - Damage/Recharge (34) Eradication - Chance for Energy Damage Level 24: Fire Sword Circle (A) Superior Gauntleted Fist - Accuracy/Damage (34) Superior Gauntleted Fist - Damage/RechargeTime (36) Superior Gauntleted Fist - Accuracy/Damage/Endurance/RechargeTime (36) Superior Avalanche - Accuracy/Damage/Endurance (36) Superior Avalanche - Accuracy/Damage/Recharge (37) Empty Level 26: True Grit (A) Gladiator's Armor - TP Protection +3% Def (All) (37) Steadfast Protection - Resistance/+Def 3% (37) Preventive Medicine - Chance for +Absorb (39) Preventive Medicine - Heal (39) Preventive Medicine - Heal/Endurance (39) Preventive Medicine - Heal/RechargeTime Level 28: Incinerate (A) Superior Blistering Cold - Accuracy/Damage (40) Superior Blistering Cold - Accuracy/Damage/Endurance (40) Superior Blistering Cold - Accuracy/Damage/Recharge (40) Touch of Death - Chance of Damage(Negative) (42) Mako's Bite - Chance of Damage(Lethal) (42) Gladiator's Strike - Chance for Smashing Damage Level 30: Greater Fire Sword (A) Hecatomb - Chance of Damage(Negative) (42) Hecatomb - Damage/Endurance (43) Hecatomb - Recharge/Accuracy (43) Hecatomb - Damage/Recharge/Accuracy (43) Hecatomb - Damage/Recharge (45) Touch of Death - Chance of Damage(Negative) Level 32: Tough (A) Unbreakable Guard - +Max HP (45) Unbreakable Guard - Resistance (45) Unbreakable Guard - Resistance/Endurance (46) Unbreakable Guard - RechargeTime/Resistance Level 35: Weave (A) Luck of the Gambler - Defense/Increased Global Recharge Speed (46) Shield Wall - +Res (Teleportation), +5% Res (All) (46) Shield Wall - Defense (48) Shield Wall - Defense/Endurance (48) Shield Wall - Defense/Recharge Level 38: Grant Cover (A) Luck of the Gambler - Defense/Increased Global Recharge Speed Level 41: Spirit Ward (A) Empty Level 44: Arcane Bolt (A) Empty Level 47: Rune of Protection (A) Unbreakable Guard - Resistance (48) Unbreakable Guard - Resistance/Endurance (50) Unbreakable Guard - RechargeTime/Resistance Level 49: Focused Accuracy (A) Adjusted Targeting - To Hit Buff (50) Adjusted Targeting - To Hit Buff/Recharge (50) Adjusted Targeting - To Hit Buff/Endurance Level 1: Gauntlet Level 1: Brawl The empty slot in Fire Sword Circle is for an Achilles Heel: Chance for -RES I went for a "Jack of All Content" build for this. I can attest to it being fine at all levels. I solo'd it all the way, being able to take on +2x8 content by the mid 20s and jumping to +4 by lvl 40. Going for Rune of Protection is equal parts theme and utility (my toon is a magical lion man). You could easily pick up One with the Shield and save yourself some power picks, but I am personally not a fan of it. While it does have a longer duration, the RES it gives you is lopsided towards S/L (something a well built SD should already have tons of), and the +Max HP is just kinda whatever IMO. I pair RoP with Melee Core to maintain a strong amount of RES in high end content. Ageless Core gives the whole thing a nice kick in the pants, but I also carry Barrier Core for high end teaming.
- 2 replies
-
- 1
-
-
- shield defense
- fire melee
- (and 1 more)
-
-
...I posted a /WP Brute somewhere? Oh man, my attention span is smaller than I thought. I only have an StJ/WP Brute, and it's been due for a respec for awhile now. Either way, pretty much any clicky set is gonna feel better paired WP due to how non-interactive it is. As @Gobbledegook said, my top 3 would be Axe, TW, or Stone, but I also wanna give an honorable mention to Claws. While Claws isn't nearly as strong of a contender on Brutes as it is Scrappers, that doesn't mean it's strengths still don't exist. Lightning fast buzzsaw attacks, 2 great soft CC moves in Focus and Shockwave, and low endurance cost. And with WP you can just activate your toggles and swing all day.
-
To clarify, redraw does not effect overall performance, as the draw is accounted for by allowing you to act before the animation is over. This is easy to test. Engage a target with your staff out ( ͡° ͜ʖ ͡°) and attempt to queue an attack while already executing one. You'll observe that the next attack won't activate until the previous animation is completely finished. However, if you do allow the drawing animation to occur during the activation of the power and queue your next attack, the attack animation will be canceled partway and the next attack will activate.
-
Having just 1 in the build? Probably not worth the slot IMO. It's a pretty minimal heal and not extremely consistent. If it were possible to have multiple I'd say go for it. Slightly unrelated, I was messing around with an Elec/SR Sentinel at one point that had multiple Entropic and Power Transfer self heal procs and that ended up being good enough I didn't have to chase regen that hard. Edit: If you're worried about HP management on an SR Tank, don't be. Remember that you'll be creeping up to capped RES the lower your HP gets, so the small amount of Regen you have will go a long way.
-
Whenever I normally make a proc-heavy build, I will 3 slot attacks with a Winter set (Acc/Dam, Acc/Dam/End, Acc/Dam/Rech) to nab the Slow RES and F/C RES. That will usually end up being "just enough" ACC that I'm not missing all the time against +4s. Any heavy hitters (KO Blow, ET, Freezing Touch) won't get ACC bonus for the simple fact that Build Up is usually used before these powers are fired. This will result in the build being a lot safer but pumping out a bit less damage than a Hami O build.
-
Good morning! It's 1 pm I double checked the build again to make sure I didn't have any extra slots. and I did in fact make sure they were all placed beforehand. Here's a visual if it helps. It does seem to be @Troo that popping the +Regen IO in Health garners slightly more Regen than the 4th Numina, about 2 HP/sec based on what Mids is telling me.

-
Uh, there was 1 nagging slot that i had no idea where to put but I thought i placed it before posting the build. I'm no longer at my PC so I'll have to check again for you later. I didn't actually test to see for sure. That's just how I normally slot Health on my SR toons.
-
It's a Global proc, so it will still work as long as you have it slotted. No need to activate the power it's in.
-
So, Hami O builds are a little bit out of my area of expertise, but I will offer a take for you anyway in the hopes that aids you with your project. Your build puts out a pretty absurd amount of damage, even before adding Musculature. I can see how it would end up being a little end-starved. I would go Musc Radial instead of Core. You gain a tiny amount of end mod in exchange for a small amount of damage that is easily made up by boosting every HO and VR. And you get a little more zoom to your step. Always nice. I personally also prefer to cap Slow Resistance if possible for the quality of life it gives you. Team buffs will rule over all but knowing you can always rely on your own maneuverability and consistent recharge goes a long way.
-
I never said my logic was sane. 🤷♂️ I just don't see the point of flooding the market and driving the price down even more. I did however have a friend that really wanted the Tiny costume for a toon so I gave him like 200 PAPs. That making his day felt a lot better than the profit I would've gotten.
-
The Tarantula Mistresses and Queens have an autohit -Def and -Perception. Have fun!
-
Uh, so I'm starting to collect a pretty nice surplus of these from running Advanced Difficulty content. I personally don't have any use for them. And today I saw they dipped to 3.5m on the market. To me, that isn't worth the effort of selling them. I will probably just donate them to friends that want the NPC outfits. I know quite a few people could potentially be sitting on way more than me, and I just gotta say... This would be opening up a big can of worms IMO. They are fine the way they are. Purely for an expenditure that has no impact on gameplay whatsoever. Thanks again to all the whales that lined my pockets when they were first introduced. Enjoy your badges!
-
Lately it's been Longbow. Sure, they are a curbstomp in teams, but if you are fighting big groups solo then you're forced to think about your positioning constantly. Pretty fun. It's a tie between Cabal, Praetorian Clockwork, and Incarnate Banished Pantheon all for the same reason. It is impossible to make them come to you without breaking LoS, and most of the time you'll be fighting them in huge maps with very little cover. BP make this especially painful since they rain every debuff under sun down on you. On teams, I usually end up stubbornly running ahead to bunch up mobs so the fights are over 10x quicker. I'm giving this award to DE. Even pre-Going Rogue they had the most terrifying lore. Even moreso when you consider how many zones you can actually find them in (spoiler: way more than I'm comfortable with). GR just made it more visual. Warriors! I wish we could see more. I think redside does this better mission-wise, but infighting is the name of the game over there. Seeing enemy factions scuffle outdoors is cool. Variations of the same factions between sides aren't different enough for me to notice, if there are any. Are there? I really don't know.
-
What is your favorite zone event?
Spaghetti Betty replied to KaizenSoze's topic in General Discussion
Hard to say. I like Rikti Invasion for the spectacle, but participating in the actual event is usually a lag fest. Since I'm primarily a melee AT player, I usually spend my time tab targetting through invisible targets that die upon spawning in. I liked the zombie event way more when the EBs were twenty feet tall.