Frozen Burn
-
Posts
1243 -
Joined
-
Last visited
-
Days Won
6
Content Type
Profiles
Forums
Events
Store
Articles
Patch Notes
Everything posted by Frozen Burn
-
Extra Candy Canes?? Suck on them into a point and use them against your enemies! 😄
-
Hi and welcome to the forum and game! This is a thread all about costumes - so, your question is best asked in the "Archetypes" section: https://forums.homecomingservers.com/forum/43-archetypes/. You will get various answers to your question and you will probably need to elaborate on what you mean by "strong" (most damage, most survivable, etc). I have my preference, but do not want to share here as there will probably be debates over which is AT is best, and this thread is all about sharing how awesome we look. 😄
-
Never said anything about your choice - I make no judgment. Don't blame you for bailing. Someone else stated there was "never" a valid reason to increase level, and as you agree with me - there CAN be a valid reason to ...for some others. 🙂
-
Yes, Synapse is the worst TF out there, but if people want the extra XP from increasing the level and have the time to run it at increased level, THAT IS a valid reason - even if you do not agree. 😛
-
/bind [key] say "Raise the shields!" [key] = whatever key or combo of keys you want. So, if you want to bind to your "H" key: /bind h say "Raise the shields!" ...then replicate with other keys and other phrases. Have fun!!
-
guide A Comprehensive Guide to the Incarnate System
Frozen Burn replied to Robotech_Master's topic in Guides
Yes, Ms. Liberty TF is the same as the Statesman's TF - contact switched from Statesman to Ms. Lib, but the TF is the same and you will get offered an Essence of the Incarnate shard piece.- 57 replies
-
- 1
-

-
- incarnate
- incarnate trial
- (and 3 more)
-
Unfortunately, it sounds like you are missing someone from the Graveyard Shift, since you have Posi 1&2 and you can't complete them without defeating Doc Buzzsaw and Dr. Vahz. The remaining 7 can be found in the Graveyard Shift (no need to run DFB). You can... 1. Run Graveyard Shift over again and be sure you get all 7. Or... 2. Hunt the 6 of them in the Abandoned Sewer Network (Dr. Meinst being the 7th one appearing in DFB). If you still don't get the badge, and you defeated all 6, then you know it's Meinst (DFB) or Doc Buzzsaw (Posi 1) or Dr. Vahz (Posi 2). The latest Vidiot Map pack has their locations noted on the map (a few posts down is a spoiler with the map - look for the circles with the "U"). Refer to this thread for hunting location, tips, and links to Vidiotmaps. A post up on this link, there are the coordinate locations of the 6. If they are not there at the location, kill the mobs in the room... go away for a minute to let them respawn, and then they will appear. Good luck!!
-
I like the original too. But if you ARE going to try to match the double helix, then both the white boots and the gloves would need to swap to the left side (as we face it or character's right side). That would leave the mask and shoulders white for the top half of the helix. Maybe that would look better? I dunno.
-
Double check your OCD 🙂 .... the white foot matches the hand, shoulder, and face of that side. If you switch you it, then it would look unbalanced and ruin the aesthetic. ...and then my OCD would would scream. 😄
-
Revenant Hero Project Mission wont reset
Frozen Burn replied to KC4800's topic in General Discussion
This is odd and it should reset to your new difficulty settings - even Ouro missions reset. This may need to be moved to the "Bug Reporting" section. -
What are the story arc missions for villains ???
Frozen Burn replied to smnolimits43's topic in Guides
Yep! Just like villain-side with paper/Mayhems - heroes can run 5 radios and a safeguard to get a new contact. It's very handy for Praetorians who go to Paragon City who do not have many contacts available to them. -
What are the story arc missions for villains ???
Frozen Burn replied to smnolimits43's topic in Guides
To be clear, even if you have the book icon, you CAN still "out level" the arc - it will still be available to you to run, but things may still con-grey to you depending on how "out of date" the arc is. For example, if you still have Eagle Eye's arc (King's Row contact) and you never finished it and now you're lvl 50 - all the spawns will con grey (including bosses and the EB at the end) and mobs will not award anything - but you can still finish the arc, clearing it from your contact list, and get your Reward Merits. If you're 1-4 levels higher than the arc, then you can at least increase the difficulty to +1-4 accordingly so things do not con grey. 🙂 -
Katana/SR would like to get some criticism and advices.
Frozen Burn replied to greenstalker's topic in Scrapper
Welcome back! 1. Your SR toggles are over-slotted and your SR Passives (Agile, Dodge, and Lucky) are under-slotted. 2. You do not have enough endurance to run all those toggles - especially early on. Even though you didn't show what you slotted in Health and Stamina - knowing how end heavy SR is and how fast Katana is - you're going to burn through all your endurance quickly. Then to pile on Fighting and Leadership (which you have no end reduction in), you're going to get 2 attacks in and then drop toggles. I suggest dropping Leadership altogether - it's not needed at all. 3. Drop Elude - it's a crap power. The end crash at the end is not worth having to stop and take a blue just to re-toggle up. I realize you may have it for a LotG carrier, but you can work 5 of those into your build with proper slotting and without using elude as a carrier. 4. Use the Winter Event set IOs - they provide a LOT of defense and End Recovery (similar to Purples). Here is a sample of a quick build I threw together for you as an example. Lvl 49 power is a throw away - pick whatever you want there.... (Personally, I'd pick up Infiltration from Concealment Pool as my "travel power" and stealth component, work it into the build earlier, and also slot a Celerity Stealth IO into Sprint for total invis.) This Hero build was built using Mids Reborn 3.4.6 https://github.com/LoadedCamel/MidsReborn Click this DataLink to open the build! Kat-SR: Level 50 Natural Scrapper Primary Power Set: Katana Secondary Power Set: Super Reflexes Power Pool: Speed Power Pool: Fighting Power Pool: Leaping Ancillary Pool: Weapon Mastery Hero Profile: Level 1: Sting of the Wasp (A) Superior Blistering Cold - Accuracy/Damage (3) Superior Blistering Cold - Damage/Endurance (3) Superior Blistering Cold - Accuracy/Damage/Endurance (15) Superior Blistering Cold - Accuracy/Damage/Recharge (45) Superior Blistering Cold - Damage/Endurance/Accuracy/RechargeTime (46) Superior Blistering Cold - Recharge/Chance for Hold Level 1: Focused Fighting (A) Shield Wall - Defense/Endurance (9) Shield Wall - Defense/Endurance/Recharge (11) Shield Wall - Defense (13) Shield Wall - +Res (Teleportation), +5% Res (All) (43) Luck of the Gambler - Defense/Increased Global Recharge Speed Level 2: Flashing Steel (A) Eradication - Damage (5) Eradication - Accuracy/Damage/Recharge (5) Eradication - Accuracy/Recharge (15) Eradication - Accuracy/Damage/Endurance/Recharge (17) Cleaving Blow - Accuracy/Damage (48) Cleaving Blow - Damage/Endurance Level 4: Gambler's Cut (A) Mako's Bite - Accuracy/Damage (7) Mako's Bite - Damage/Endurance (7) Mako's Bite - Damage/Recharge (17) Mako's Bite - Accuracy/Endurance/Recharge (46) Mako's Bite - Accuracy/Damage/Endurance/Recharge (48) Mako's Bite - Chance of Damage(Lethal) Level 6: Focused Senses (A) Reactive Defenses - Defense/Endurance (9) Reactive Defenses - Defense/Endurance/RechargeTime (11) Reactive Defenses - Defense (13) Reactive Defenses - Scaling Resist Damage (43) Luck of the Gambler - Defense/Increased Global Recharge Speed Level 8: Divine Avalanche (A) Accuracy IO Level 10: Practiced Brawler (A) Recharge Reduction IO Level 12: Build Up (A) Gaussian's Synchronized Fire-Control - Chance for Build Up Level 14: Agile (A) Shield Wall - Defense/Endurance (25) Shield Wall - Defense (40) Shield Wall - Defense/Recharge (42) Luck of the Gambler - Defense/Increased Global Recharge Speed Level 16: Dodge (A) Shield Wall - Defense/Endurance (25) Shield Wall - Defense (40) Shield Wall - Defense/Recharge (42) Luck of the Gambler - Defense/Increased Global Recharge Speed Level 18: The Lotus Drops (A) Superior Avalanche - Accuracy/Damage (19) Superior Avalanche - Damage/Endurance (19) Superior Avalanche - Accuracy/Damage/Endurance (29) Superior Avalanche - Accuracy/Damage/Recharge (37) Superior Avalanche - Accuracy/Damage/Endurance/Recharge (46) Superior Avalanche - Recharge/Chance for Knockdown Level 20: Quickness (A) Run Speed IO Level 22: Hasten (A) Recharge Reduction IO (23) Recharge Reduction IO Level 24: Kick Hamidon Origin:Nucleolus Exposure Level 26: Soaring Dragon (A) Superior Scrapper's Strike - Accuracy/Damage (27) Superior Scrapper's Strike - Damage/Recharge (27) Superior Scrapper's Strike - Accuracy/Damage/Recharge (29) Superior Scrapper's Strike - Damage/Endurance/Recharge (37) Superior Scrapper's Strike - Accuracy/Damage/Endurance/Recharge (45) Superior Scrapper's Strike - Recharge/Critical Hit Bonus Level 28: Lucky (A) Shield Wall - Defense/Endurance (37) Shield Wall - Defense (40) Shield Wall - Defense/Recharge (42) Luck of the Gambler - Defense/Increased Global Recharge Speed Level 30: Tough (A) Unbreakable Guard - Resistance (31) Unbreakable Guard - Resistance/Endurance/RechargeTime (31) Unbreakable Guard - Resistance/Endurance (31) Unbreakable Guard - +Max HP (34) Steadfast Protection - Resistance/+Def 3% (43) Gladiator's Armor - TP Protection +3% Def (All) Level 32: Golden Dragonfly (A) Superior Critical Strikes - Accuracy/Damage (33) Superior Critical Strikes - Damage/RechargeTime (33) Superior Critical Strikes - Accuracy/Damage/RechargeTime (33) Superior Critical Strikes - Damage/Endurance/RechargeTime (34) Superior Critical Strikes - Accuracy/Damage/Endurance/RechargeTime (34) Superior Critical Strikes - RechargeTime/+50% Crit Proc Level 35: Evasion (A) Reactive Defenses - Defense/Endurance (36) Reactive Defenses - Defense/Endurance/RechargeTime (36) Reactive Defenses - Defense (36) Reactive Defenses - Defense/RechargeTime Level 38: Weave (A) Reactive Defenses - Defense/Endurance (39) Reactive Defenses - Defense/Endurance/RechargeTime (39) Reactive Defenses - Defense (39) Reactive Defenses - Defense/RechargeTime Level 41: Caltrops (A) Bombardment - Chance for Fire Damage Level 44: Shuriken (A) Superior Winter's Bite - Accuracy/Damage (48) Superior Winter's Bite - Damage/RechargeTime (50) Superior Winter's Bite - Accuracy/Damage/Endurance (50) Superior Winter's Bite - Accuracy/Damage/Recharge (50) Superior Winter's Bite - Damage/Endurance/Accuracy/RechargeTime Level 47: Combat Jumping (A) Gift of the Ancients - Defense/Increased Run Speed Level 49: Exploding Shuriken Hamidon Origin:Nucleolus Exposure Level 1: Critical Hit Level 1: Brawl
-
All new content is no longer solo friendly?
Frozen Burn replied to arthurh35353's topic in General Discussion
Not sure what your specific issue is, but I've solo'd all new arcs successfully on several different ATs - so they ARE completely soloable - including Agent Watkins and new Cimerora arcs. If you're talking about Hard-mode TFs (ITF and Aeon), they are designed / meant for teamplay and not to be solo'd. But all the new story arc content can be solo'd. -
What are the story arc missions for villains ???
Frozen Burn replied to smnolimits43's topic in Guides
There is SO much more Hero content than three zones when leveling up. I generally never run my characters through any of these 3 when leveling up. As @UltraAlt mentioned, try using your origin contacts, or Matthew Haberdashy, and go to Kings Row contacts instead of Hollows. And yeah, Faultline has great story arcs and will get you through the teens and into your 20s. In the 20s there are SO many more contacts outside of Striga and Croatoa. If you can't find any, use your "Find a contact" button. And 5 radios mish's and a Safeguard mish will get you a new contact as well no matter what level you are. As for redside - same thing... just create your character and pick / follow the contacts you get. Unfortunately, with Villain-side, the contacts don't string together as much as or as easily as Hero-side and you'll have to do more paper missions / Mayhem Missions to get more contacts. But they will take you through all the zones. There are no "extra" hazard zones like there are Hero-side. Good luck and have fun! -
1. Yes, 1-star setting counts as "advanced difficulty" / Hard-mode. 2. As you defeat the Computer, the giant robots come to life and rocket to the front of the map landing by the first bridge where the first General is - so be sure to clear that whole ENTIRE area of mobs before you go up the hill. 3. The only way to prevent their "unstoppable" power activation is to stack enough holds on them - which is nearly (if not outright) impossible. Generally, in the ITF or mission arcs, they do not run all over the place like they do when hunting them out in the open. Run a couple "kill most" ITFs and you'll have the badge - many people like joining "kill most" ITFs for money, xp, and these badges.
-
Uh, gee, i don't know... what can a Tank do with a power that pulls mobs to him/her when moving... hmmm.... HERD THEM! 😄 This is cool. I have played my BA tank yet since the patch - now I'm REALLY looking forward to it!
-
Sorcery and Force of Will were on live, but I don't remember if Experimentation ever made it - I think it was on the cusp to be released right before the game shut down, which is why it was easy for HC to add it in when the game came back. I could be misremembering, though. Gadgetry and Utility Belt have never been out on Live or HC. The original Devs never had them far enough to be released and the HC team hasn't developed them enough yet either. I hope they do! I've been wanting these pools to be out since the announcement of them during Live. So, if you've played them, then it's been on another server. So the only discourse you'll get here is "release them!" unless someone has been on those other servers too to experience them. And as for playing all the utilities together, that's on another server too. As it was on Live, you couldn't have more than one, but they decided to unlock them. HC has so far stayed true to Live, in that regard, keeping that as 1 only per character. They may decide to unlock them in the future, though. That's the thing with all the different servers/versions out there - if you run the game, you can do whatever you want with it.
-
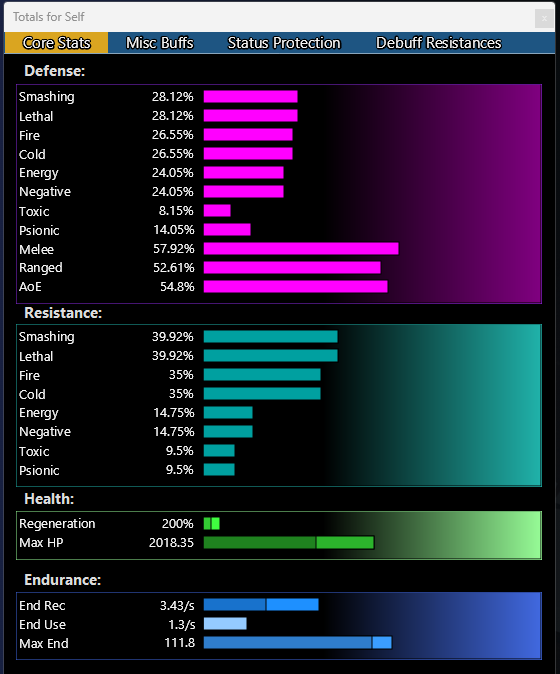
As mentioned above, Scourge appears at the bottom by your Health, Stamina, Rest, and etc. It should be the first one. Click the little Green Button to turn it off. 🙂
-
Yes, your Scourge is turned on and is calculating that. If you turn off Scourge, your Corrupter values will normalize: Dark Blast will show as 41.69 and Blackstar as 166.8.
-
Blaster consume DOT? DOES NOT SHOW DAM
Frozen Burn replied to Drionawk's topic in General Discussion
Yeah, Combustion is horrible for the animation time. However, they did just reduce it by 0.6 secs with the recent update. As mentioned above, Cauterizing Aura should be slotted for endurance (and regen, if you want) - NOT for damage. 3 slot endmod in it and you do not need to slot Stamina (just put a Performance Shifter proc in it). Consume - as mentioned above, not entirely needed anymore. However, I DO take it and slot it for Damage - I'll take any AOE i can get (except Combustion). 😄 Even though the recharge on Consume is long, it can be used every other mob, at least. It is also useful for when Sappers, Super Stunners, or other mobs that instantly drain your end bar and reduce your Recovery to 0. Fire off the Consume (even slotted for damage) and you're back in the action until the recovery debuff wears off. -
HELP! I Screwed up my Game Account Registration for Beta
Frozen Burn replied to Frozen Burn's topic in Open Beta Testing
Apparently, you did not read my posts - I did contact Support and I also posted the resolution from my interaction with them. -
Here are the AE badges. You can get all of them yourself, except for 1 where you need to test an arc with a team of 8 - unless you have 8 accounts yourself. As for missions in AE already specifically for this - they are not really needed since you get badges for creating an arc - so, you might as well make your own with all the requirements. (Thanks to @KeyboardKitsune for the list and her badge tracker here: https://n15g.github.io/badger/) Play Mission Badges Gamer Complete one player-created story arc (Required for Mission Engineer Badge) Admiring Complete one Developer's Choice story arc Critic Complete one Hall of Fame story arc Heroic Complete one arc of heroic alignment (Hero or Vigilante only) Villainous Complete one arc of villainous alignment (Villain or Rogue only) Cunning Complete one arc of Rogue alignment Walks the Line Complete one arc of Vigilante alignment Early Bird Play a newly-published arc (Required for Mission Engineer Badge) (Account-wide) Test Mode Badges Virtual Victor Defeat one enemy in test mode Virtual Extractor Rescue or kidnap one hostage in test mode Virtual Destruction Destroy one object in test mode Virtually Impulsive Interact with one mission objectives in test mode Among Friends Test an arc with a team of eight Bug Fixer Test one of your own arcs (Required for Mission Engineer Badge) Virtual Victim Be defeated one time in Test Mode Player's Published Arc Badges Author One player has completed your published arc (Required for Mission Engineer Badge) (Account-wide) Recognized One player has rated your published arc (Required for Mission Engineer Badge) (Account-wide) Mission Objective Badges Poor Impulse Control Interact with one mission objective during an Architect mission Workaholic Complete one non-required objective during an Architect mission Extractor Rescue or kidnap one hostage during an Architect mission Destructive Destroy one object during an Architect mission Ticket Badges Ticket Taker Defeat enemies to earn one Architect ticket (Required for Mission Engineer Badge) Payoff Purchase for 1,000 tickets from Ticket Vendor Miscellaneous Badges Energized Earn one inspiration while playing a published Architect mission Architect X Earn 10 Architect Entertainment Badges Architect XXV Earn 25 Architect Entertainment Badges Assassin Defeat one Custom Critter in a published Architect mission Customizer Save and load a mission with a custom Boss (Required for Mission Engineer Badge) (Account-wide)
-
Agreed. I am fine with something being put in the game for being able to turn off earning patrol XP. There seems to be plenty of people who are fine with having this feature - and why wouldn't anyone? It's a feature that wouldn't hurt anyone or the game play. And for me personally, it would be less times that I have to "Turn OFF XP" when I have characters running through Praetoria. I was in a similar situation with SWTOR - early on I struggled with out leveling content and I was always fighting low level mobs because there was no way to turn of earning XP to slow my progression. I asked for a "Disable earning XP" option on the forums and I got blasted HARD by people. (They eventually implemented a completely different system that made it better when running through content and eliminated the need for turning XP off.) But nevertheless, there has been enough discourse and debate about this. Going forward, and until a system IS put in place (and it may never be)... @Rudra, so that you don't stress yourself out and have an aneurism (we need all the players we can get) 😄 .... Patrol XP changes the rate in which you earn XP... it makes it slightly faster. So maybe try to think of it in those terms instead of getting "extra" or "bonus" XP. (I know this doesn't solve it, but it is a small nuance that may help you get through current conditions). DO NOT spend your 1 hour trying to get rid of Patrol XP - that is certainly a recipe for causing stress and negative energy. Instead spend your time in a positive way by playing the content that you want. Much like we ALL have to do when running through Praetorian content, you'll have to watch your XP bars and "Turn OFF XP" when you get to the point you want to SLOW DOWN (reference to pt #1 above as earning XP as a rate and not a bonus lump sum), so you can continue enjoying the content you want. I know this isn't ideal for you. But it is better for you and a more positive game experience with how things are now. Maybe this can get you through until a system is put in place to turn off earning patrol XP. Wasting your limited time to get rid of Patrol XP by dying and earning debt is pointless when you can just play the content you want and then SLOW DOWN to where you want to be by "Turning OFF XP." Good luck.
-
Do you care about arcs or just missions?
Frozen Burn replied to DougGraves's topic in General Discussion
I like the arcs and the stories, and want more of them. 1-off missions are boring. But thankfully, the game provides both: contact story arcs and radio/paper missions - everyone can be happy.