Seigmoraig
-
Posts
701 -
Joined
-
Last visited
Content Type
Profiles
Forums
Events
Store
Articles
Patch Notes
Everything posted by Seigmoraig
-
Anyone mind looking over my Desktop build?
Seigmoraig replied to BassAckwards's topic in PC Builders's Forum
That's interesting to have on the newer boards. My Asus ROG Strix X470 only has the one M.2 Slot with full PCI-e 4x coverage. The other slot PCI-E x2, I ended up not even using the PCI-e mode on my second slot and opted for a much cheaper SATA drive that has a m.2 form factor for that drive while my main x4 SSD is a Samsung 960 Evo. Will be something to consider in the future when I eventually change my computer. -
Anyone mind looking over my Desktop build?
Seigmoraig replied to BassAckwards's topic in PC Builders's Forum
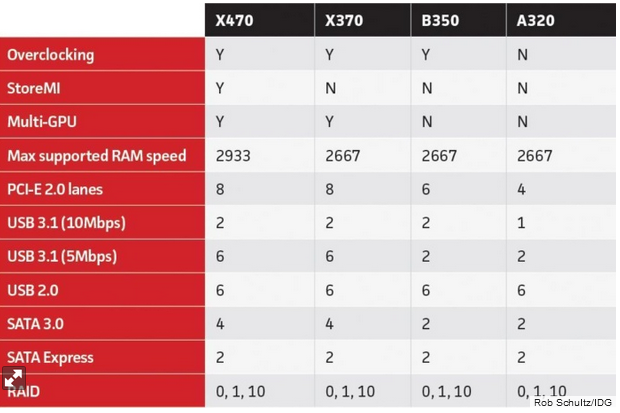
Just wanted to note here because nobody mentioned it in the thread: Every AMD Ryzen CPU is unlocked for overclocking, the XT moniker means that it had a bit more speed on it's fastest core. For your motherboard, if you want to go top of the line you need to choose one with the X(x)70 chipset, like this one X570 The B series has less PCI lanes and does not have support for multiple Video Cards. This is relevant if you want to SLI cards to get 4K resolution at higher framerates (120Hz+). The PCI Lanes are important if you want to plug in addition to your Graphics card, additional M.2 nvme drives and have them running at full speed. Here is a handy chart to help you choose the right motherboard for your needs. The image is slightly out dated as it doesn't have the fifth generation info for ram speed but you can get the general idea that X = more good than B = more good than A
-
Honestly your problem is right there. You said in your original post that you are new to the game and are learning the ropes. Playing at level 50 right away is far from the best way to learn how to play a certain AT, not to mention the suite of set IOs that you need to make it work. Just roll it at level 1 and level it organically, you will get much more comfortable with the set you choose and it's limitations. Like others said in the thread (and from personal experience) any set on a Stalker will be able to do giant backstabby crits no problem, just choose whichever you think is the coolest and roll with it. Everyone gets so OP compared to the difficulty in CoH that it doesn't really matter in the end what you choose
-
Not too sure how you figure paying for unslotters on your common IOs is getting you anywhere... Level 25 Accuracy is 70k, Level 25 Damage is 50k. Unslotters are.... 125k And before you say that you buy your unslotters with merits to use on these low level IOs, you would still make more money just selling the unslotters on the /ah and buying new IOs I will just roll with my initial batch of level 25 IOs until I respec to my final build at around level 40. When you respec they will all get unslotted for free.
-
Weekly Discussion 65: Build Your Own Powerset
Seigmoraig replied to GM Miss's topic in General Discussion
Swarm Control : Offensive primary for Dominators with some built in mitigation. You walk around with a swarm of insects on your body, they can be Bees, Locust, Ants, Flies or other such critters. -When your swarm is not engaged in combat you gain some sort of shield that slowly regenerates itself. -Every power you use takes up some of this shield and uses it to fuel your attacks. - Most of the powers would be AoE but with a ST Hold and Immob (carpeting a single target with the swarm ie: ARRGGGHHH THEY'RE IN MY MOUTH !!!). -Heavy emphasis on Fear and Confusion powers -Toggled PBAoE damage and debuff auras. Toggling these would reduce the shield by X amount for as long as each are active. -Ground target AoE slow/debuff similar to Tar Patch but with a lower duration, but reduces shields for as long as it lasts. 10-15 secs duration -
Degenerative for sure. Lowering max hp in turn turn lowers the enemy's regen since regen is based on max hp
- 1 reply
-
- 1
-

-
Since Storm should be generally built for high levels of global recharge and a bunch of Force Feedback IO all over the place, it's probably overkill to have 3 slots in it. On my Controller, I have it with 1 slot Achilles' Heel and it comes back every 23.5 seconds not counting FF procs which lowers it even further
-
In a fight between 2 heals with an accuracy check I'll take /Dark's heal that emanates from you VS Kinetic's heal that emanates from the target any day. Not that I don't think Kin is good or anything, I'm actually play a Beast/Kin right now but it certainly doesn't have the best heal
-
1) no 2) def/resist set bonuses that are in your pets only affect you. Pets will only be affected by the individual enhancements themselves (damage, accuracy etc) The only IOs that you can put in your pets that will give them extra +Def and +Res are the "Aura" enhancements from: (Pet Damage category) Edict of the Master +Def Sovereign Right +Res (Recharge Intensive Pets category) Expedient Reinforcement +Res Call to Arms +Def (Mastermind Archtype category) Command of the Mastermind +Def Mark of Supremacy +Res/Regen I highly recommend that you get these 6 individual enhancements and slot them ASAP, the most expensive ones are the 2 from the Mastermind Archtype category but the other 4 are fairly cheap. If you are playing as Demons, Thugs or Necro put them all in Hell on Earth, Gang War or Soul Extraction as they will be functional even if those skills aren't active freeing up those slots for your main pets. If you are running any other set you should put 2 in each of your pets to spread them out evenly so not to gimp any one pet. That being said, I will usually 5 slot Hell on Earth/Gang War/Soul Extraction because it's nice to have the 2pcs bonus from Mark of Supremacy in all your pets to get that sweet sweet 10% recharge bonus 3 times 3) right click on your pet in the pet window 4) not that I know of but lots of good information on this forum. The best place to start with how to MM is to set up some keybinds for the various pet commands so that you don't have to rely on quickbars. I personally enjoy playing with the numpad keybinds Here Next is choosing a Primary, you can play with any one of them, they are all perfectly serviceable but some stand out more than others. Demons and Thugs are the strongest (see slotting auras above in Hell on Earth/Gang War above for one solid reason to run these sets). Beasts, Bots and Necro are middle of the road with bots being the sturdiest set. Ninja and Merc trailing the back end. If you are looking purely for a good time and don't have a specific theme for your character, Demons and Thugs will get you places. As for choosing your secondary, most of them will be good and do their job but if you are playing your first MM, I would stay away from the sets that don't have any healing or have very little of it. Sets like Cold, Storm, Force Field, Traps, Trick Arrow, Poison and Sonic will be a lot harder to pilot if you are playing as your first MM and don't have much experience with the game. The best sets to choose for a smooth Mastermind experience are sets that have heals, buffs and debuffs Time, Nature, Dark and to a lesser extent Radiation are the best picks here. Although sets with great buffs but little debuffing ability will also do well, Electrical, Kinetics, Pain, Empathy and Thermal are all perfectly serviceable. When you set your pets in Defensive stance they enter into a "Bodyguard" stance. When in this mode all damage directed directly at you will be split between you and your pets which is why it is important to have a set that has some AoE heal capability.
-
/Ice will give them some good +Def but it doesn't have a heal which will be rough to level up and is a very late bloomer set. /Time isn't the only viable secondary and Bots isn't even in the top of the pack for primary. Demons and Thugs are the best primaries followed by beasts. Bots is nice and defensive with its shields and T2 that can heal but it's not the best offensive set at all. Demons and Thugs have a huge advantage in that they can slot the resist and defence IOs in Gang War/Hell on Earth which frees up an bunch of slots in addition to the buffs the henchmen cast on themselves really pushes them past the rest. For secondaries, Time is for sure one of the top sets because it has some of the best buffs available in Chrono Shift and Farsight but it isn't the be all and end all of secondaries. Dark, Electrical and Nature are all sets that have great gameplay and offer a lot for a MM right from the beginning. Dark has a huge heal, great debuffs including -to hit and Shadowfall buffs Def and Res so it can take a bunch of IOs. Nature has great heals and absorb, a -to hit debuff (-to hit and +Def are functionally the same thing) some +end (henchmen do run out of endurance in prolonged solo encounters) and other good buffs like Overgrowth Electrical Affinity also has great heals/absorb, a damage buff , +res and offers full status protection although it suffers a bit by having a useless T9 that doesn't affect Henchmen (Amp Up). Still very fun even without a proper T9 though While on the other hand Cold has great +Def shields but after that you get nothing really good until level 35 and 38 when you get Sleet and Heat Loss, which are nice but not having any healing what so ever is going to be really rough to play. Especially if you are pairing it with Ninja, which isn't the strongest since the pets like to jump into melee a lot isn't exactly a shining example of a "MM that works"
-
If you go to Pocket D you can access the P2W lady there when on a TF
-
ok, seems kinda working as intended then lol, might as well ban tanks all together if one of their main features can't be used. But I never pvp so I'm just spewing here. Although now that I learn it has cottage rules, it makes me even less inclined to try it some time.
-
What's wrong with taunt exactly. I never pvp but I am just curious as to what makes it so bad
-
Kinda needs that tax since you would only need to pick 3 and sometimes 4 powers from your primary without them !
-
Other than Kismet, those 2 uniques are much more valuable than 0.5% defence. If you are over resist cap on Smash, Lethal and Energy you might consider removing one of them but if not you aren't gaining anything by ditching them for some defence. I would even argue that those are some of the 2 most valuable uniques and should never be on the chopping block in any build. If you character is melee, you probably need every layer of defence you can get but if you are any sort of ranged character you can get by with much less than 45% defs since you aren't in the direct line of fire most of the time
-
This is my first higher end PC I've ever had. In the past I have always been a budget builder with a "good enough" mentality. I never really cared about playing everything a ultra settings. Now that I have a decent job though and can afford a nice 144hz monitor I decided to go a lot bigger on this build than I ever did before LG 24GM79G-B 24" 1080p 144hz Monitor AMD Ryzen 5 2600 Corsair Hydro Series H60 water cooler G Skill TridentZ 16GB DDR4 3200mhz Asus ROG Strig X470-F Mobo EVGA GeForce GTX 1080 8Gb Samsung 960 EVO M.2 500GB NVMe SSD Western Digital Blue 1TB mechanical HDD
-
The only real skippable power is the Taunt but once you are are def caps you can get rid of Defensive Sweep although on mine I kept it for a LotG mule. Because of the Momentum mechanic and long redraw animation, TW lends itself very poorly to attacks from other PP/EPP/PPP. The attacks are all pretty good though, 3ST attack chain and 3 AoE attack chain
-
Here's a thing. Defences are pretty good, not capped but at a good enough place for a defender Hasten is almost perma, 5 secs off Damagewise, has some procs here and there and if you concentrate on hitting max targets with Soul Drain you should be doing good. Endurance doesn't look to great on paper but between Lifegiving Spores and Overgrowth i really doubt you will have any issues. I have not personally played this build but I am thinking that Overgrowth and Lifegiving Spores might even let you drop a slot or 2 from Health or Stamina to add to Explosive Arrow and Blazing Arrow for extra procs, would need testing though, maybe somebody who has more experience with Nature can comment on this. Hero Plan by Mids' Reborn : Hero Designer 2.6.0.7 https://github.com/ImaginaryDevelopment/imaginary-hero-designer Click this DataLink to open the build! Level 50 Magic Defender Primary Power Set: Nature Affinity Secondary Power Set: Archery Power Pool: Flight Power Pool: Leadership Power Pool: Fighting Power Pool: Speed Ancillary Pool: Soul Mastery Hero Profile: Level 1: Regrowth -- Prv-Heal(A), Prv-Heal/EndRdx(3), Prv-EndRdx/Rchg(3), Prv-Heal/Rchg(5), Prv-Heal/Rchg/EndRdx(5), Prv-Absorb%(7) Level 1: Snap Shot -- SprDfnBst-Rchg/Heal%(A), SprDfnBst-Acc/Dmg(11), SprDfnBst-Dmg/Rchg(11), SprDfnBst-Dmg/EndRdx/Rchg(13), SprDfnBst-Acc/Dmg/EndRdx(13), SprDfnBst-Acc/Dmg/EndRdx/Rchg(15) Level 2: Wild Growth -- Ags-ResDam/EndRdx(A), Ags-ResDam/Rchg(43), Ags-EndRdx/Rchg(43), Ags-ResDam/EndRdx/Rchg(43), Ags-ResDam(46) Level 4: Fistful of Arrows -- Rgn-Dmg(A), Rgn-Dmg/EndRdx(29), Rgn-Dmg/Rchg(31), Rgn-Acc/Dmg/Rchg(31), Rgn-Acc/Rchg(31), Bmbdmt-+FireDmg(33) Level 6: Hover -- LucoftheG-Def/Rchg+(A), ShlWal-ResDam/Re TP(17), Rct-ResDam%(19) Level 8: Spore Cloud -- DarWtcDsp-ToHitDeb(A), DarWtcDsp-ToHitDeb/Rchg(25), DarWtcDsp-ToHitdeb/Rchg/EndRdx(42), DarWtcDsp-Rchg/EndRdx(48) Level 10: Blazing Arrow -- SprWntBit-Acc/Dmg(A), SprWntBit-Dmg/Rchg(19), SprWntBit-Acc/Dmg/EndRdx(25), SprWntBit-Acc/Dmg/Rchg(27), SprWntBit-Dmg/EndRdx/Acc/Rchg(27) Level 12: Lifegiving Spores -- EndMod-I(A) Level 14: Wild Bastion -- Pnc-Heal/EndRedux(A), Pnc-EndRdx/Rchg(36), Pnc-Heal/Rchg(37), Pnc-Heal/EndRedux/Rchg(37), Pnc-Heal(45) Level 16: Aim -- RechRdx-I(A) Level 18: Maneuvers -- LucoftheG-Def/Rchg+(A) Level 20: Explosive Arrow -- SprFrzBls-Acc/Dmg(A), SprFrzBls-Dmg/EndRdx(21), SprFrzBls-Acc/Dmg/EndRdx(21), SprFrzBls-Acc/Dmg/Rchg(23), SprFrzBls-Dmg/EndRdx/Acc/Rchg(23) Level 22: Boxing -- Empty(A) Level 24: Tough -- Ags-Psi/Status(A), Ags-ResDam/EndRdx(37), Ags-ResDam/Rchg(40), Ags-EndRdx/Rchg(42), Ags-ResDam/EndRdx/Rchg(42) Level 26: Weave -- LucoftheG-Def/Rchg+(A) Level 28: Ranged Shot -- ExcCnt-Acc/Dmg(A), ExcCnt-Dmg/EndRdx(33), ExcCnt-Dmg/ActRdx(33), ExcCnt-Dmg/Rng(34), ExcCnt-Dmg/Rchg(34), ExcCnt-Stun%(34) Level 30: Assault -- EndRdx-I(A) Level 32: Overgrowth -- RechRdx-I(A), RechRdx-I(50) Level 35: Stunning Shot -- SprVglAss-Rchg/+Absorb(A), SprVglAss-Acc/Dmg/EndRdx(36), SprVglAss-Acc/Dmg/EndRdx/Rchg(36) Level 38: Rain of Arrows -- SprVglAss-Dmg/EndRdx/Rchg(A), SprVglAss-Acc/Dmg(39), SprVglAss-Dmg/Rchg(39), Bmbdmt-+FireDmg(39), Ann-ResDeb%(40), JvlVll-Dam%(40) Level 41: Dark Embrace -- StdPrt-ResDam/Def+(A), GldArm-3defTpProc(48) Level 44: Soul Drain -- Arm-Dam%(A), Arm-Dmg(45), Arm-Dmg/Rchg(45), Arm-Acc/Dmg/Rchg(46), Arm-Acc/Rchg(46) Level 47: Hasten -- RechRdx-I(A), RechRdx-I(48) Level 49: Tactics -- GssSynFr--ToHit(A), GssSynFr--ToHit/Rchg(15), GssSynFr--ToHit/Rchg/EndRdx(17), GssSynFr--Rchg/EndRdx(50), GssSynFr--ToHit/EndRdx(50), GssSynFr--Build%(29) Level 1: Brawl -- Empty(A) Level 1: Quick Form Level 1: Prestige Power Dash -- Empty(A) Level 1: Prestige Power Slide -- Empty(A) Level 1: Prestige Power Quick -- Empty(A) Level 1: Prestige Power Rush -- Empty(A) Level 1: Prestige Power Surge -- Empty(A) Level 1: Sprint -- Clr-Stlth(A) Level 1: Vigilance Level 2: Rest -- Empty(A) Level 4: Ninja Run Level 2: Swift -- Flight-I(A) Level 2: Health -- Mrc-Rcvry+(A), Pnc-Heal/+End(7), NmnCnv-Regen/Rcvry+(9) Level 2: Hurdle -- Jump-I(A) Level 2: Stamina -- PrfShf-End%(A), PrfShf-EndMod(9) ------------ | Copy & Paste this data into Mids' Reborn : Hero Designer to view the build | |-------------------------------------------------------------------| |MxDz;1460;697;1394;HEX;| |78DA6594594F135114C7EF9D4E85B26FB520144A0B145A28DD302E3106414D64099| |1C4D7A6816999A4699B691BE1D1AFE08B0FC67D03353E28507C767D764BFC04AEA8| |891FA09ECEFF58483AE9E437FD9F7BFEF7DC7BEECCDCEA74C393B3974E0AD934958| |AE772B1692DA1A59735C33A174FEA4BA27CD5D0EDFCAFC74E151289C07C3C5F30B4| |D86422A1A7F5FC9AA3123D1F4F27B5E5C0A4B1B4A2196BA27E21934905CEA4F4E44| |ABED97C9ED5E2342EB7A2671B112B87F474B2CEFCB798D5B4E5EED3597D29309531| |8C42369F31628B99422A3617CFE5C9B1936A19A2FB9D47F055B28AAF162142AA50B| |E31BF83EA0FE64FF0C02E7855D9975B8456F794F90C6CD8646E814DDBE07B9A574A| |33579541696ABE1033CC8C806351F01ACD67E1F92C61C5D47A0E83BD1166943901B| |A14AB491B6DBE15F329563BFC5A66504BDB5FF083073DA231969A6DE47716C1911D| |70FC39789D60C358D5B6AEC26703EC7C081E7AC47C0C7E24FF7AE4887A9730B54FA| |435B24F630FEAF038C1815E661F38EA026FD0DCCDECD3EC874F2B15DE8AF589565E| |DF4D1AD7CEDEED9BA8A1638BB90D1E2C327740493E76F6B697E81216521CDC29C70| |49C07B8635EEED808776C843BA6524E1757D3C5D5DCA26ABAB97BDD2F50B5EB25F3| |15D8FF9AF986F9166C233F27FB39FBCB9A4D7CA69DEB839FECF3430B316FD35C6EC| |414F70456E68930A3E01D1A33C8F50C86A10D059921269F1EEF17ECBCD70DAE1286| |518F1C2E6F8E934E4618B18B04BF90E67EF94FE0B48C1E611E05C78E318F836E5A5| |F80FD02BC8671663BC5828859837731BEE91ED8721F0C3D60AEF35BB1C1542B6F28| |FDCADD9CF1559492AF2A1AAC5242554AA44A895629B36585FB256CA8657E4F2B2DA| |8FC48716966D85A2AEF7669B7AEF26D10D28313F07B4F53E4397AF0D277A81F3B5E| |7B0127ECD7FEBC61E4FDD9D3A4BC824A6A2F133B54F10FCBCDE15D| |-------------------------------------------------------------------|
-
Jacob's Ladder's cone is so short and narrow that it's basically a single target attack that sometimes hits 2 targets and 3 if the planets are in perfect alignment. Very skippable power
-
Especially with the cards running the Pascal architecture and beyond, those cards run so cool that the fans aren't even spinning most of the time
-
I've been an AMD boy my whole life (last intel cpu I had was a Pentium 4) and I have never owned a CPU with an integrated graphics processor. I have always had Nvidia graphics cards and I have never had one scrap after one year because it's being overworked because the card is rendering my web browser. If you have to replace your video card every year it is 100% not because it is rendering Firefox and you should look to other problems with your build.
-
Yes, and it also works for Necro Soul Extraction !
-
Other than the pet specific proc in Soulbound Allegiance (Build Up) and the Auras buffs from the various other pet and MM sets: Genin can fit Knockdown sets so you can get Explosive Strike Smashing damage proc Jounin can also fit KD sets in addition to Defence Debuff which includes Touch of Lady Grey and Achilles' Heel and Accurate Defence Debuff which has Shield Breaker Oni can also only fit Knockdown sets
-
Step 1 : Turn off Awaken Step 2 : Buy Renewal of Light / Return to Battle from P2W lady for a handful of change Step 3 : ??? = Profit
-
Fulcrum Shift is the one reason why Kin is as good as it is. You need to take that power as soon as it is available at level 38 ! I would also drop the Cross Punch angle, Boxing and kick should only be there as prereqs to Tough and Weave and Cross Punch slotted as it is isn't even going to do any damage if anything these powers will only get in the way of your actual nukes which will deal 5x more damage than these skills eve will. The only set I can ever see being good in Boxing and Kick is Kinetic Combat 4pcs and that's only if you need the S/L/M def bonus. I went through you build and here is what I came up with: Perma Hasten Got rid of Boxing and Cross Punch in favour of Aim and Assault. I didn't fiddle around with the leveling up process in this build other than put Fulcrum Shift at level 38, Aim should be taken earlier if you plan on exemplaring. Added more damage, too many powers had utility sets in them Defences still aren't capped but are good enough Villain Plan by Mids' Reborn : Hero Designer 2.6.0.7 https://github.com/ImaginaryDevelopment/imaginary-hero-designer Click this DataLink to open the build! id10t: Level 50 Natural Corruptor Primary Power Set: Radiation Blast Secondary Power Set: Kinetics Power Pool: Speed Power Pool: Leadership Power Pool: Concealment Power Pool: Fighting Ancillary Pool: Flame Mastery Villain Profile: Level 1: Neutrino Bolt -- SprScrBls-Dmg/Rchg(A), SprScrBls-Acc/Dmg/Rchg(15), SprScrBls-Dmg/EndRdx/Rchg(48) Level 1: Transfusion -- Prv-Heal(A), Prv-Heal/EndRdx(40), Prv-EndRdx/Rchg(40), Prv-Heal/Rchg(40), Prv-Heal/Rchg/EndRdx(43), Prv-Absorb%(48) Level 2: Irradiate -- Arm-Dmg(A), Arm-Dmg/Rchg(3), Arm-Acc/Dmg/Rchg(3), Arm-Acc/Rchg(7), Arm-Dmg/EndRdx(9), Arm-Dam%(9) Level 4: Repel -- SuddAcc--KB/+KD(A), FrcFdb-Rechg%(5), EndRdx-I(11) Level 6: Electron Haze -- SuddAcc--KB/+KD(A), FrcFdb-Rechg%(11), SprScrBls-Rchg/+End(13), SprScrBls-Acc/Dmg(13), SprScrBls-Acc/Dmg/EndRdx/Rchg(15) Level 8: Proton Volley -- SprMlcoft-Acc/Dmg(A), SprMlcoft-Dmg/Rchg(37), SprMlcoft-Acc/Dmg/Rchg(37), SprMlcoft-Dmg/EndRdx/Rchg(39), SprMlcoft-Acc/Dmg/EndRdx/Rchg(39), SprMlcoft-Rchg/Dmg%(39) Level 10: Siphon Speed -- PcnoftheT-Acc/Slow(A) Level 12: Hasten -- RechRdx-I(A), RechRdx-I(48) Level 14: Maneuvers -- LucoftheG-Def/Rchg+(A) Level 16: Tactics -- GssSynFr--Build%(A), GssSynFr--ToHit/EndRdx(17), GssSynFr--Rchg/EndRdx(17), GssSynFr--ToHit/Rchg/EndRdx(19), GssSynFr--ToHit/Rchg(19), GssSynFr--ToHit(21) Level 18: Cosmic Burst -- SprWntBit-Rchg/SlowProc(A), SprWntBit-Dmg/Rchg(23), SprWntBit-Acc/Dmg/EndRdx(23), SprWntBit-Acc/Dmg/Rchg(25), SprWntBit-Acc/Dmg(21), SprWntBit-Dmg/EndRdx/Acc/Rchg(46) Level 20: Speed Boost -- EndMod-I(A) Level 22: Stealth -- LucoftheG-Def/Rchg+(A) Level 24: Kick -- Empty(A) Level 26: Neutron Bomb -- Rgn-Dmg(A), Rgn-Acc/Rchg(27), Rgn-Dmg/Rchg(27), Rgn-Dmg/EndRdx(29), Rgn-Acc/Dmg/Rchg(50) Level 28: Tough -- StdPrt-ResDam/Def+(A), ImpSki-ResDam/EndRdx(29), ImpSki-ResDam/Rchg(31), ImpSki-EndRdx/Rchg(43), ImpSki-ResDam/EndRdx/Rchg(50), ImpSki-Status(50) Level 30: Weave -- ShlWal-ResDam/Re TP(A), Rct-ResDam%(31), LucoftheG-Def/Rchg+(31), ShlWal-Def(34), ShlWal-Def/EndRdx(36) Level 32: Atomic Blast -- SprAvl-Rchg/KDProc(A), SprAvl-Acc/Dmg/EndRdx/Rchg(33), SprAvl-Acc/Dmg/Rchg(33), SprAvl-Acc/Dmg/EndRdx(33), SprAvl-Dmg/EndRdx(34), SprAvl-Acc/Dmg(34) Level 35: Transference -- PreOptmz-Acc/Rech(A), PreOptmz-EndMod/End(36), PreOptmz-EndMod/Rech(37), PreOptmz-EndMod/Acc/End(42), PreOptmz-EndMod/Acc/Rech(43) Level 38: Fulcrum Shift -- Acc-I(A) Level 41: Char -- UnbCns-Acc/Hold/Rchg(A), UnbCns-Acc/Rchg(42), UnbCns-Dam%(42), UnbCns-Hold(7) Level 44: Fire Shield -- GldArm-3defTpProc(A), GldArm-ResDam(45), UnbGrd-Max HP%(45), UnbGrd-ResDam(45), UnbGrd-ResDam/EndRdx(46), UnbGrd-ResDam/EndRdx/Rchg(46) Level 47: Aim -- RechRdx-I(A) Level 49: Assault -- EndRdx-I(A) Level 1: Brawl -- Empty(A) Level 1: Quick Form Level 1: Prestige Power Dash -- Empty(A) Level 1: Prestige Power Slide -- Empty(A) Level 1: Prestige Power Quick -- Empty(A) Level 1: Prestige Power Rush -- Empty(A) Level 1: Prestige Power Surge -- Empty(A) Level 1: Scourge Level 1: Sprint -- Clr-Stlth(A) Level 2: Rest -- Empty(A) Level 4: Ninja Run Level 2: Swift -- Run-I(A) Level 2: Health -- NmnCnv-Regen/Rcvry+(A), Pnc-Heal/+End(5), Mrc-Rcvry+(36) Level 2: Hurdle -- Jump-I(A) Level 2: Stamina -- PrfShf-EndMod(A), PrfShf-End%(25) Level 50: Musculature Total Radial Revamp Level 50: Clarion Total Radial Invocation Level 50: Ion Total Core Judgement Level 50: Assault Total Radial Graft Level 50: Reactive Total Core Conversion ------------