The Beta Account Center is temporarily unavailable
×


Carnifax
-
Posts
1642 -
Joined
-
Last visited
-
Days Won
1
Content Type
Profiles
Forums
Events
Store
Articles
Patch Notes
Everything posted by Carnifax
-

What's the most satisfying sound/feeling you've heard/felt in CoX?
Carnifax replied to Xenorgh's topic in General Discussion
I do also love the bit in the third mission of the ITF. Past the bridge and up the hill. The swarm of romans who come running at you might be my favourite bit of the entire game (with the exception of the sound of Howling Twilight*). *Of course if I'm playing Carni then I can Howling Twilight the oncoming horde and be ultra-happy. -
Nope. Stalker or Scrapper. Cos you get a decent Tier 9, and if you miss the old one you can get that too. Ice Melee on a Stalker is excellent because poopy Greater Ice Sword turns into amazing Icy Death Move.
-
I levelled one earlier in the year and he was a lot of fun. Build is in my sig (and below). Ice/Ice/Lev scraptroller. As others say you really, really, really want Frozen Aura. Think of it as Footstomp for Scrappers. The sleep is pretty meaningless. Frost (triggering the crit IO) -> Frozen Aura -> Freezing Touch is an amazing combo. Frozen Fists and Greater Ice Sword are pretty poop. I ignored Frozen Fists and took Cross Punch when I got there. Cross Punch won't crit but it is quicker than GIS, does slightly more damage and is a wee cone. Also it'll buff you slightly. I did respec at 30ish to do it, taking Air Sup and GIS 1-30 and then respeccing to my actual build at 30. I also IOd as I went. So from 30-50 I was pretty tough, especially once I'd "settled" in a fight and got Ice Patch out. At 50 Ice Patch isn't really needed but I kept it for "uh-oh" moments. If you corner pull / retreat and drop it you'll mitigate a lot of damage. It only needs one slot ever, which is amazing. Hero Plan by Mids' Reborn : Hero Designer 2.7.2.10 https://github.com/Crytilis/mids-reborn-hero-designer Click this DataLink to open the build! iScream: Level 50 Mutation Scrapper Primary Power Set: Ice Melee Secondary Power Set: Ice Armor Power Pool: Fighting Power Pool: Leaping Power Pool: Speed Ancillary Pool: Leviathan Mastery Hero Profile: Level 1: Ice Sword -- SprScrStr-Acc/Dmg(A), SprScrStr-Dmg/Rchg(3), SprScrStr-Acc/Dmg/Rchg(3), SprScrStr-Dmg/EndRdx/Rchg(11), SprScrStr-Acc/Dmg/EndRdx/Rchg(21), SprScrStr-Rchg/+Crit(50) Level 1: Frozen Armor -- DefBuff-I(A), LucoftheG-Def(5), LucoftheG-Def/Rchg+(5) Level 2: Hoarfrost -- DctWnd-EndRdx/Rchg(A), DctWnd-Heal/EndRdx/Rchg(7), DctWnd-Heal/Rchg(7), DctWnd-Rchg(19), DctWnd-Heal(19) Level 4: Frost -- SprCrtStr-Acc/Dmg(A), SprCrtStr-Dmg/Rchg(9), SprCrtStr-Acc/Dmg/Rchg(9), SprCrtStr-Dmg/EndRdx/Rchg(11), SprCrtStr-Acc/Dmg/EndRdx/Rchg(15), SprCrtStr-Rchg/+50% Crit(37) Level 6: Chilling Embrace -- EndRdx-I(A) Level 8: Build Up -- GssSynFr--Build%(A), GssSynFr--ToHit(13), GssSynFr--ToHit/Rchg(31), GssSynFr--ToHit/Rchg/EndRdx(33), GssSynFr--Rchg/EndRdx(40), GssSynFr--ToHit/EndRdx(46) Level 10: Wet Ice -- EndRdx-I(A) Level 12: Ice Patch -- RechRdx-I(A) Level 14: Kick -- Empty(A) Level 16: Glacial Armor -- LucoftheG-Def/Rchg+(A), LucoftheG-Def(17), DefBuff-I(17) Level 18: Tough -- StdPrt-ResDam/Def+(A), Ags-ResDam/EndRdx/Rchg(23), Ags-ResDam(23), Ags-ResDam/Rchg(37), Ags-ResDam/EndRdx(43), Ags-EndRdx/Rchg(45) Level 20: Energy Absorption -- LucoftheG-Def/Rchg+(A), EndMod-I(21), PreOptmz-EndMod/End/Rech(45), PreOptmz-EndMod/Rech(48) Level 22: Cross Punch -- Erd-Acc/Dmg/Rchg(A), Erd-%Dam(25), Erd-Dmg(25), Mlt-Acc/Dmg(29), Mlt-Acc/Dmg/EndRdx(29), FrcFdb-Rechg%(40) Level 24: Combat Jumping -- LucoftheG-Def/Rchg+(A), ShlWal-ResDam/Re TP(48) Level 26: Freezing Touch -- CrsImp-Acc/Dmg/Rchg(A), KntCmb-Acc/Dmg(27), KntCmb-Dmg/EndRdx(27), KntCmb-Dmg/Rchg(46), KntCmb-Dmg/EndRdx/Rchg(34), UnbCns-Dam%(45) Level 28: Permafrost -- GldArm-3defTpProc(A) Level 30: Weave -- LucoftheG-Def/Rchg+(A), LucoftheG-Def(31), DefBuff-I(31) Level 32: Frozen Aura -- Erd-Dmg(A), Erd-Acc/Rchg(33), Erd-Acc/Dmg/Rchg(33), Obl-Acc/Dmg/Rchg(34), Arm-Dam%(34), Obl-Dmg/Rchg(50) Level 35: Water Spout -- Artl-Acc/Dam(A), Artl-Dam/Rech(36), Artl-Acc/Dam/Rech(36), Bmbdmt-Dam/Rech(36), Bmbdmt-Acc/Dam/Rech(43), OvrFrc-Dam/KB(48) Level 38: Icy Bastion -- Ags-ResDam(A), Ags-ResDam/EndRdx(39), Ags-ResDam/Rchg(39), Ags-EndRdx/Rchg(39), Ags-ResDam/EndRdx/Rchg(13), Prv-Absorb%(50) Level 41: Hibernate -- RechRdx-I(A) Level 44: Icicles -- Erd-Acc/Dmg/EndRdx/Rchg(A), Erd-Dmg(42), Erd-Acc/Dmg/Rchg(42), Mlt-Dmg/EndRdx(42), Mlt-Acc/Dmg/EndRdx(43) Level 47: Hasten -- RechRdx-I(A), RechRdx-I(46) Level 49: Boxing -- Empty(A) Level 1: Brawl -- Empty(A) Level 1: Critical Hit Level 1: Quick Form Level 1: Prestige Power Dash -- Empty(A) Level 1: Prestige Power Slide -- Empty(A) Level 1: Prestige Power Quick -- Empty(A) Level 1: Prestige Power Rush -- Empty(A) Level 1: Prestige Power Surge -- Empty(A) Level 1: Sprint -- Clr-Stlth(A) Level 2: Rest -- Empty(A) Level 4: Ninja Run Level 2: Swift -- Empty(A) Level 2: Health -- Pnc-Heal/+End(A), NmnCnv-Regen/Rcvry+(40) Level 2: Hurdle -- Empty(A) Level 2: Stamina -- PrfShf-End%(A), EndMod-I(15), PrfShf-EndMod(37) Level 50: Ion Core Final Judgement Level 50: Degenerative Radial Flawless Interface Level 50: Rebirth Radial Epiphany Level 50: Melee Core Embodiment Level 50: Agility Core Paragon ------------
-
To be honest it was more "It's 22:30 and I'm leading a PuG" more than speed running. I love love love the enemy variety in the arc though.
-
You're pure evil!! Evil I say.
-
You bought 100 of them?? Thank god I sold most of my stuff a few days ago on the market. Looks like an ingame recession is on the way.
-
Good : Lots of stuff. Enjoying most of the new arcs. Love the Trick Arrow changes Bad : Whirling Hands change for Domi. It no longer spams the screen with NRG Release so the impact feels much less now. But I've flogged that dead horse multiple times so now I'm just abusing PROCs with it instead. Fugly : Base TP changes, although I totally understand them it did end up with a lot of travel. Tying into that, the middle of the hero arc which lead me on a multi-zone dance (Skyway -> Hollows talkie-> Skyway Hunt -> Skyway "run to these 4 points". Urrgh. Destroyed the flow of the arc and half my PuG team quit as I was doing it. Not out of badness, just the interruption let them realise what time it was so they called it a night).
-
It did seem to be pretty crazy. In a good way, I had a ball doing it but I was playing a level 20-something Fire/Claws Tank and there was an Incarnate tank on the team as well (and we were both playing very aggressively, taunting additional spawns in and the like). So we were fine overall but there were a LOT of Freak Tanks attacking us and I could see a lot of teams struggling.
-
I've kept my macro, because it's for a "transport hub" SG base so I still use it. Of course I need to be beside a Base Portal for it but I've bought the base portal power for a couple of alts. Good thing I started marketeering again on Sunday to earn a couple of hundred million to pay for them and a few new alts. I was planning my Grav/Trick Arrow. Then a concept distracted me so I've been playing that instead.
-
Just seems to be how our powers person likes things. Live Devs used to do the same, to be fair (rip Machine gun Rad Blast). Personally I prefer each set to have different pros and cons including things like damage and recharge times, but I'm not the one trying to balance it all either.
-
This is how I do it too. Row 1 is the Macro, above each is the actual power. On my Ice/Fire Blaster row 1 is all "powexec_location self" for the Rains, because he's a blapper anyway. Row 2 holds the powers themselves and above again is the "powexec_location target" version (for when I'm scaredy-cat and wanna dump Blizzard on them before closing in).
-
The biggest problem is that if you're in Dwarf mode you've pretty much 0 idea if you are mezzed til you pop out of it and start twitching in place. Very annoying. Personally I'd give Dwarf mez protection a bit of linger-time (6-10 seconds) so at least you can do something (other than pop straight back into Dwarf like a snail retreating back into its shell).
-
+Assassins Stick (or whatever it's called). My Staff/NRG Brute is great and all but I'm always like "Why didn't I make you a stalker. You're even see-thru!"
-
This is so clever. I like!
-
You could squeeze two more procs into Acid Arrow if you can find the slots. On test I found it to be a bit of a proc monster. Actually you could get 3 if the damn game would let you 7 slot things.
-
Yup, I strongly dislike Combustion on my Ice/Fire. It's just too slow to cast. Once I got Burn it was respec-away for Combustion.
-
The powexec_location target is amazing too. My Plant/Stormie would be a nightmare without it.
-
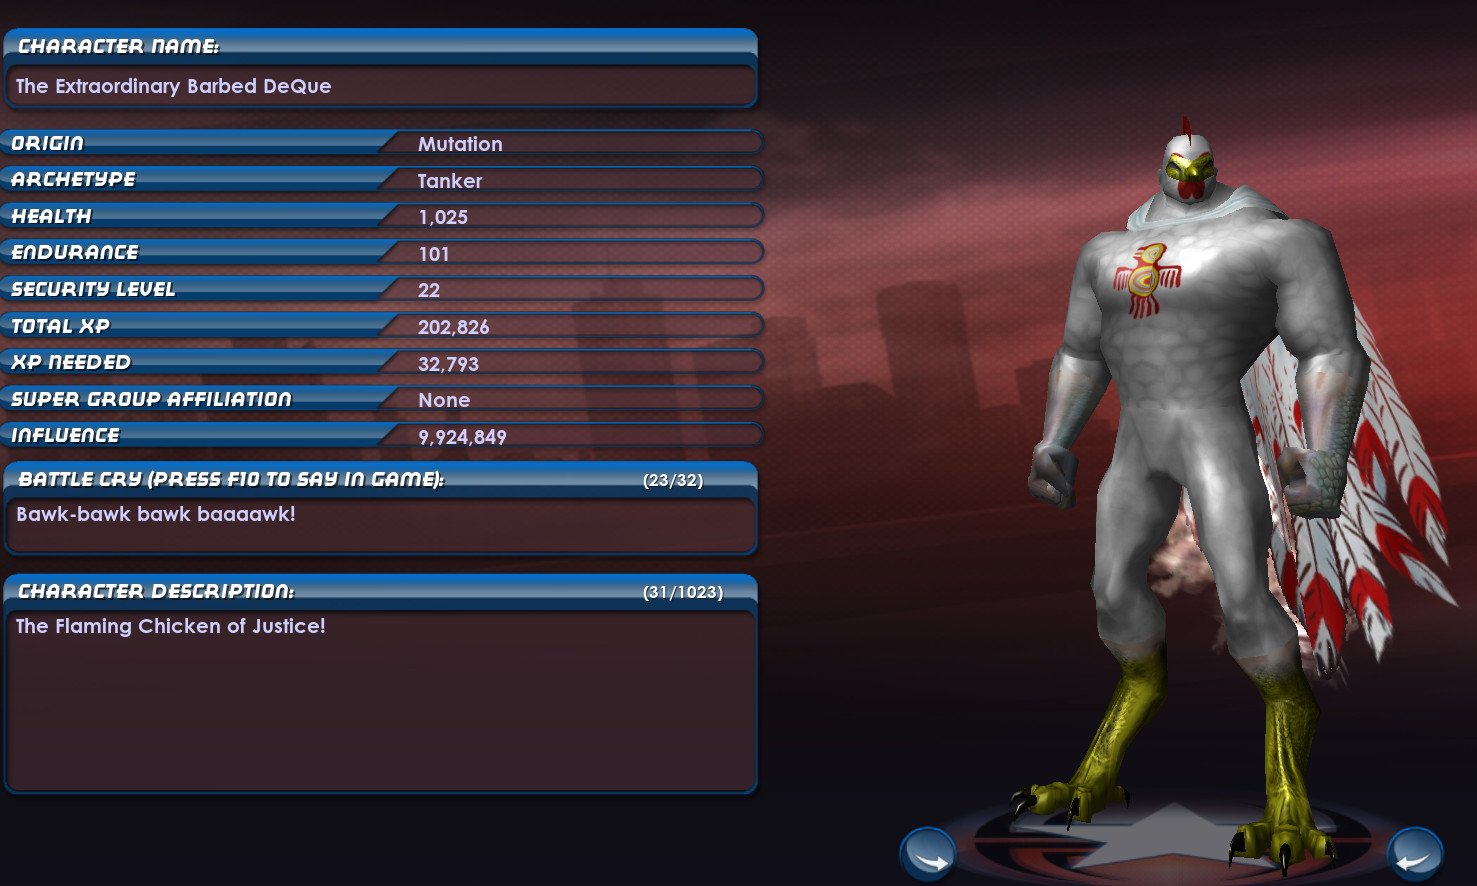
So Friday night at about 1am, after a few rums my brain forced me to make a new Fire/Claws tank. Barbed DeQue, the Flaming Chicken of Justice, was born (I was torn between this and Spatchcocked so I reserved that name too) Thank you rum.

-
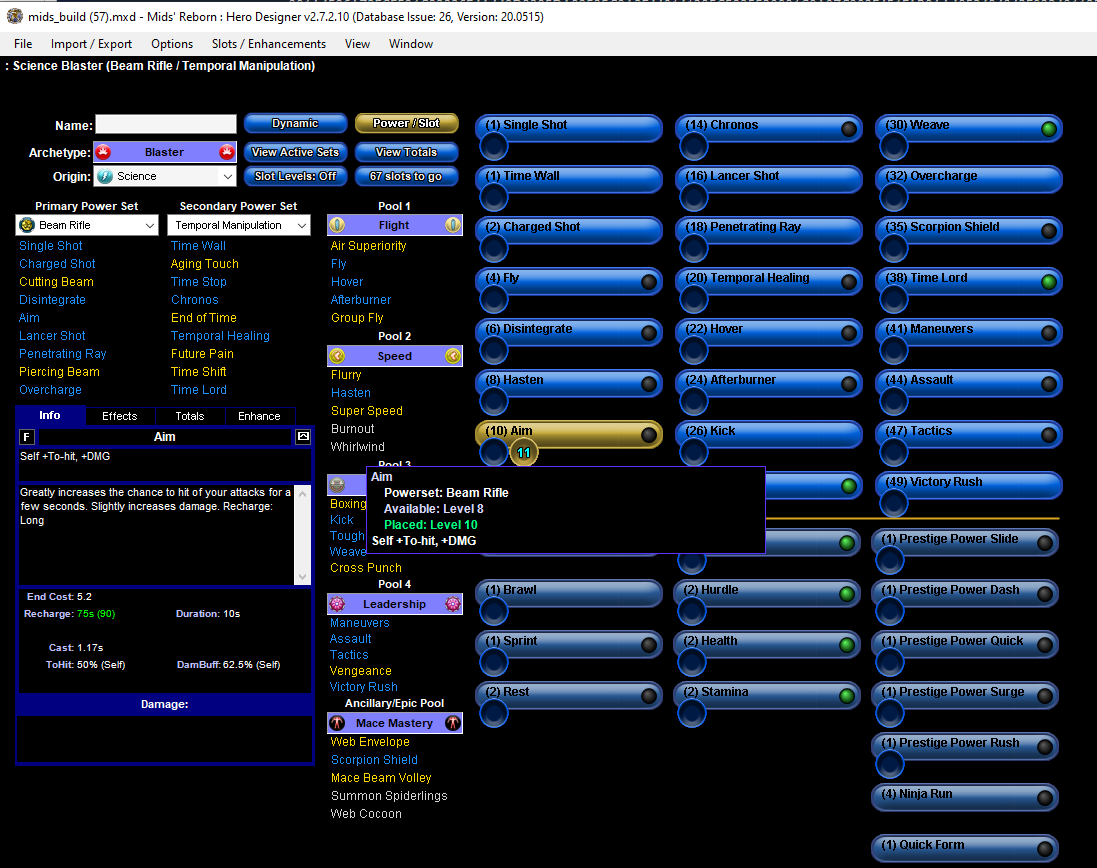
It's coming through unslotted for me. What Builder are you using? Here's what I see (my version of Mids is in the title bar)
-
About 50% is your answer. My Mids has you at 42.7% ranged in combat. In Mids Options > Configuration > Effects & Maths tab and tick HitByFoe, MissionObjectiveClick and ActivateAttackClick is how I do it.
-
Hideously unbalanced, especially Destiny and Judgement. Recharge time on them should be doubled. Half of Judgements damage should be moved to DoT over 15 seconds. Crafting system is fine, interface isn't amazing but it's tolerable.
-
First 50! Thank you for the help! Now what's next?
Carnifax replied to Aeroprism's topic in General Discussion
Specifically for Fire/Staff I guess Kinetic Combat sets (4 per power plus one random Acc/Dam in slot 5) in single target attacks and 6 Oblits in AoEs in pbaoe like CrazyDiscoSpin are a good starting point after you've slotted your ATOs. There's some really good Fire/Claws builds in the Tank forum you can download. Just switch the secondary set to staff and work from there. I used one as the basis of a planned new Fire tank, switching any Winters sets for Kinetics or Oblits because I don't slot them (too dear) -
45% with Incarnates, 39% without. Issue there is that it locks you into one Alpha when Cardiac is amazing for Stormies.
-
I like it on my Plant / Storm, but as an occasional "I'm bored. I'll push things back into the death-patch" rather than something running all the time. That said things are really tight slotwise in this build and you're skipping three cool Water powers. Tidal Forces is not only a Build Up, it also gives you 3 Tidal levels and 3 Tidal Levels = way more damaging Geyser (base damage goes up significantly). Dehydrate is a great "sustain" power with the self-heal. Steam Spray is a decent cone. So you could drop hurricane for something else (Steam Spray for example). Keeping your Teleport requirements and based on the fact that Ranged Defense is the best thing to aim for here, coupled with how goddamn End heavy Storm is I'd aim for something like this. If you decide Steam Spray over Hurricane then at least 2 Anniliation will give you an End discount bonus. Edit : another thought, why not drop Hydro, slot up Aqua instead and then take another "1 slot" power. Victory Rush for example since it grants Recovery and End Discount. No Winters or Purples here because I don't slot sets of them (too expensive for me given my altsis) Hero Plan by Mids' Reborn : Hero Designer 2.7.2.10 https://github.com/Crytilis/mids-reborn-hero-designer Click this DataLink to open the build! Level 50 Natural Defender Primary Power Set: Storm Summoning Secondary Power Set: Water Blast Power Pool: Leadership Power Pool: Teleportation Power Pool: Speed Ancillary Pool: Mu Mastery Hero Profile: Level 1: O2 Boost -- NmnCnv-Heal/EndRdx(A), NmnCnv-EndRdx/Rchg(45), NmnCnv-Heal/Rchg(45), NmnCnv-Heal/EndRdx/Rchg(46), NmnCnv-Regen/Rcvry+(46), NmnCnv-Heal(50) Level 1: Aqua Bolt -- Empty(A) Level 2: Hydro Blast -- Thn-Acc/Dmg(A), Thn-Dmg/EndRdx(3), Thn-Acc/Dmg/Rchg(3), SprVglAss-Acc/Dmg/EndRdx(23), SprVglAss-Acc/Dmg/EndRdx/Rchg(23), SprVglAss-Rchg/+Absorb(25) Level 4: Water Burst -- Artl-Acc/Dam(A), Artl-Dam/End(5), Artl-Dam/Rech(5), Artl-Acc/Dam/Rech(19), Artl-Acc/Rech/Rng(21), Artl-End/Rech/Rng(21) Level 6: Steamy Mist -- UnbGrd-ResDam/EndRdx(A), UnbGrd-ResDam(7), LucoftheG-Def(7), LucoftheG-Def/Rchg+(9), Rct-ResDam%(9), Rct-Def/EndRdx(11) Level 8: Freezing Rain -- RechRdx-I(A), TchofLadG-Rchg/EndRdx(25) Level 10: Whirlpool -- Artl-Dam/End(A), Artl-Acc/Rech/Rng(11), Artl-Acc/Dam/Rech(13), Artl-End/Rech/Rng(13), Artl-Acc/Dam(17), Artl-Dam/Rech(19) Level 12: Hurricane -- DarWtcDsp-ToHitDeb(A), DarWtcDsp-ToHitDeb/Rchg(36), DarWtcDsp-ToHitdeb/Rchg/EndRdx(36), DarWtcDsp-Rchg/EndRdx(37) Level 14: Maneuvers -- LucoftheG-Def/Rchg+(A), LucoftheG-Def/EndRdx(15), LucoftheG-Def(15), Ksm-ToHit+(17) Level 16: Assault -- EndRdx-I(A) Level 18: Tactics -- ToHit-I(A) Level 20: Recall Friend -- Empty(A) Level 22: Teleport -- Empty(A) Level 24: Teleport Foe -- Empty(A), Empty(40) Level 26: Tornado -- ExpRnf-Acc/Dmg(A), ExpRnf-Dmg/EndRdx(27), ExpRnf-Acc/Dmg/Rchg(27), ExpRnf-EndRdx/Dmg/Rchg(34), OvrFrc-Dam/KB(36), FrcFdb-Rechg%(37) Level 28: Water Jet -- SprDfnBst-Rchg/Heal%(A), SprDfnBst-Acc/Dmg(29), SprDfnBst-Dmg/Rchg(29), SprDfnBst-Dmg/EndRdx/Rchg(31), SprDfnBst-Acc/Dmg/EndRdx(31), SprDfnBst-Acc/Dmg/EndRdx/Rchg(31) Level 30: Tidal Forces -- GssSynFr--Build%(A), GssSynFr--ToHit/Rchg(37) Level 32: Lightning Storm -- SprVglAss-Acc/Dmg(A), SprVglAss-Dmg/Rchg(33), SprVglAss-Dmg/EndRdx/Rchg(33), SuddAcc--KB/+KD(33), FrcFdb-Rechg%(34), EndRdx-I(34) Level 35: Power Sink -- PreOptmz-EndMod/Acc/Rech(A), PreOptmz-EndMod/Rech(50) Level 38: Geyser -- Artl-Acc/Dam(A), Artl-Dam/End(39), Artl-Dam/Rech(39), Artl-Acc/Dam/Rech(39), Artl-Acc/Rech/Rng(40), Artl-End/Rech/Rng(40) Level 41: Dehydrate -- Thn-Acc/Dmg(A), Thn-Dmg/EndRdx(42), Thn-Dmg/Rchg(42), Thn-Acc/Dmg/Rchg(42), Thn-Acc/Dmg/EndRdx(43), Thn-Dmg/EndRdx/Rchg(43) Level 44: Hasten -- RechRdx-I(A), RechRdx-I(45) Level 47: Charged Armor -- GldArm-3defTpProc(A), StdPrt-ResDam/Def+(48), UnbGrd-ResDam(48), UnbGrd-ResDam/EndRdx(48), UnbGrd-ResDam/EndRdx/Rchg(50) Level 49: Vengeance -- LucoftheG-Def/Rchg+(A) Level 1: Brawl -- Empty(A) Level 1: Quick Form Level 1: Prestige Power Dash -- Empty(A) Level 1: Prestige Power Slide -- Empty(A) Level 1: Prestige Power Quick -- Empty(A) Level 1: Prestige Power Rush -- Empty(A) Level 1: Prestige Power Surge -- Empty(A) Level 1: Sprint -- Empty(A) Level 1: Vigilance Level 2: Rest -- Empty(A) Level 4: Ninja Run Level 2: Swift -- Empty(A) Level 2: Health -- Pnc-Heal/+End(A) Level 2: Hurdle -- Empty(A) Level 2: Stamina -- PrfShf-End%(A), PrfShf-EndMod(43), EndMod-I(46) Level 1: Combo Level 1 Level 1: Combo Level 2 Level 1: Combo Level 3 ------------
-
It'll add Domination to any mezzes in the secondary. Domination used to also grant a damage boost but that was removed and base damage increased to compensate. The OG Devs did it to try and reduce the gap between Domination and no Domination. I really wouldn't like something added to increase that gap again.