The Beta Account Center is temporarily unavailable
×


brasilgringo
-
Posts
672 -
Joined
-
Last visited
Content Type
Profiles
Forums
Events
Store
Articles
Patch Notes
Everything posted by brasilgringo
-
 don't forget powerboost!
 -
/agree... kind of a unique and fun pairing, and Nature is a nice force-multiplier especially when already a /cold or /kin on the team.
-
It's great. Just be ready for constant lightsaber sounds when you run ITFs lol
-
you must use Sandolphan's binds...'nuff said.
-
Yeh man, you have to toggle ON the following: Combat Jumping, Scorpion Shield, and Maneuvers. See the little button at the right side of the bar of each of those?
-
Got it down to 1.08-1.16 times with the rebuilt build. Still open to suggestions. I think the difference largely comes from the extra chance for Build Up in Zapp. Chain remains BF-AS-SS-AS with Zapp substituting for AS when it's up. Amazing how sensitive the times are to misses or proc chances; a couple of misses and I'm at 1.22. This Hero build was built using Mids Reborn 3.2.17 https://github.com/LoadedCamel/MidsReborn Click this DataLink to open the build! Level 50 Magic Scrapper Primary Power Set: Dual Blades Secondary Power Set: Stone Armor Power Pool: Leaping Power Pool: Speed Power Pool: Fighting Power Pool: Leadership Ancillary Pool: Mu Mastery Hero Profile: Level 1: Power Slice -- Empty(A) Level 1: Rock Armor -- LucoftheG-Def/Rchg+(A), LucoftheG-Def(3) Level 2: Ablating Strike -- Hct-Dam%(A), Hct-Dmg/EndRdx(7), Hct-Dmg/Rchg(7), Hct-Acc/Dmg/Rchg(9), Hct-Acc/Rchg(9), AchHee-ResDeb%(11) Level 4: Earth's Embrace -- Prv-EndRdx/Rchg(A), Prv-Heal/Rchg(11), Prv-Heal/EndRdx(13), Prv-Heal(13), Prv-Absorb%(15), Prv-Heal/Rchg/EndRdx(15) Level 6: Stone Skin -- UnbGrd-ResDam(A), UnbGrd-Max HP%(17), ShlWal-ResDam/Re TP(17), ShlWal-Def(19), Ksm-Def/EndRdx(19), Ksm-ToHit+(21) Level 8: Blinding Feint -- SprBlsCol-Acc/Dmg(A), SprBlsCol-Dmg/EndRdx(21), GssSynFr--Build%(23), GldStr-%Dam(23), TchofDth-Dam%(25), SprCrtStr-Rchg/+50% Crit(25) Level 10: Combat Jumping -- LucoftheG-Def/Rchg+(A) Level 12: Super Speed -- BlsoftheZ-Travel/EndRdx(A), BlsoftheZ-Travel(27) Level 14: Hasten -- RechRdx-I(A) Level 16: Rooted -- Pnc-Heal/+End(A), Pnc-Heal/EndRedux(27), Pnc-EndRdx/Rchg(29), Pnc-Heal(29), Pnc-Heal/EndRedux/Rchg(31) Level 18: Typhoon's Edge -- Arm-Dmg(A), Arm-Dmg/Rchg(31), Arm-Acc/Dmg/Rchg(31), Arm-Acc/Rchg(33), Arm-Dmg/EndRdx(33) Level 20: Crystal Armor -- LucoftheG-Def/Rchg+(A), LucoftheG-Def/EndRdx(33), LucoftheG-Def(34), PrfShf-End%(34), PrfShf-EndMod(34), EndMod-I(36) Level 22: Boxing -- Empty(A) Level 24: Tough -- StdPrt-ResDam/Def+(A) Level 26: Sweeping Strike -- SprAvl-Acc/Dmg(A), SprAvl-Dmg/EndRdx(36), Obl-%Dam(36), Erd-%Dam(37), Arm-Dam%(37), FuroftheG-ResDeb%(37) Level 28: Minerals -- LucoftheG-Def/Rchg+(A) Level 30: Weave -- Rct-Def(A), Rct-Def/Rchg(39), Rct-EndRdx/Rchg(39), Rct-Def/EndRdx(39), Rct-ResDam%(40), Rct-Def/EndRdx/Rchg(40) Level 32: Mud Pots -- SprScrStr-Dmg/Rchg(A), SprScrStr-Acc/Dmg(40), SprScrStr-Acc/Dmg/Rchg(42), SprScrStr-Dmg/EndRdx/Rchg(42), SprScrStr-Acc/Dmg/EndRdx/Rchg(42), SprScrStr-Rchg/+Crit(43) Level 35: Brimstone Armor -- GldArm-3defTpProc(A) Level 38: Zapp -- StnoftheM-Acc/Dmg(A), StnoftheM-Dmg/EndRdx(43), StnoftheM-Dam%(43), Dcm-Build%(45), Apc-Dam%(45), GldJvl-Dam%(45) Level 41: Ball Lightning -- Rgn-Dmg/Rchg(A), Rgn-Acc/Rchg(46), Rgn-Acc/Dmg/Rchg(46), Rgn-Dmg/EndRdx(46), Rgn-Knock%(50) Level 44: Geode -- Pnc-Heal/EndRedux(A), Pnc-EndRdx/Rchg(48), Pnc-Heal/Rchg(48), Pnc-Heal/EndRedux/Rchg(48), Pnc-Heal(50) Level 47: Maneuvers -- LucoftheG-Def/Rchg+(A), LucoftheG-Def/EndRdx(50) Level 49: Assault -- EndRdx-I(A) Level 1: Critical Hit Level 1: Brawl -- Empty(A) Level 1: Sprint -- Clr-Stlth(A) Level 2: Rest -- Empty(A) Level 1: Swift -- Empty(A) Level 1: Hurdle -- Empty(A) Level 1: Health -- NmnCnv-Regen/Rcvry+(A), Mrc-Rcvry+(3) Level 1: Stamina -- PrfShf-End%(A), PrfShf-EndMod(5), EndMod-I(5) Level 12: Speed Phase Level 49: Quick Form Level 50: Musculature Core Paragon Level 50: Ageless Radial Epiphany Level 50: The Atlas Medallion Level 50: Task Force Commander Level 50: Portal Jockey Level 50: Freedom Phalanx Reserve ------------
-
How is Time as a secondary for Blasters and what is a good primary?
brasilgringo replied to mrdeeds7's topic in Blaster
I found Time underwhelming on a blaster, I think I tried Sonic/Temporal. I thought there would be meaningful PBAOE synergy but in testing it didn't feel like it. I feel more powerful on Fire/Elec, Water/Atomic, and more stylish on DP/Martial. YMMV. -
What Can Be Done to Recruit Players?
brasilgringo replied to Apparition's topic in General Discussion
I still really enjoy it. I make alts, I run speedy TFs, I smash Pylons. I enjoy the teaming and the powers and the costumes. It's a fun escape and I play when I can. After live shut down I tried other games like Guild Wars / 2 and SWTOR, but COH is so much more fun. Was so happy when I rediscovered it. Sure, I alt farm to 50 in 5 hours, but that's so I can try new sets and see what my dps can be. Feels like a lot of haters in this thread. -
didn't you just post for Fire/Atomic builds like 2 days ago? your other post is still in the first 10 results. wtf bro?
-
Thx bro. Good stuff. If I move to work the Snipe in, I'll probably need to reslot for higher proc dmg in the snipe which currently is just a set mule. 1) I think Carnifax parser counts the 2 hits of AS as separate attacks, so really the number is closer to double the attack-button-presses of SS, which makes sense if you think of the chain as BF-AS-SS-AS .. but your point still stands about the damage of SS. 2) RM is rad melee? What kind of times? 3) For some reason I thought DB would be down closer to 1.15 times or better, may just have been my expectations (I thought it could perform as good or better than Katana). I didn't optimize the build for ST (still no Assault), so it's decent on teams.
-
Well, I swapped in the Gaussiaan's proc (in BF) in place of the Mako lethal proc, and honestly it doesn't seem to have made that much of a difference - i thought it would make like a 10+ second difference but i'm still getting 1.23-1.30 times (maybe avg 1.25). Unless I look at rebuilding attacks like yours, not sure what else I can do here. Was really hoping DB would be sub 1.15 on /Stone. Here's a Carnifax combat log of my last Pylon run - what's interesting is that Brimstone and Mudpots add so much dmg, more than the procs (even purple procs). The log doesn't show the Gaussian procs, but it seems to be going off a lot less than I would have expected (given BF has very low recharge slotting). I wonder if working in a proc'd snipe would be better than SS on alternate rotations of BF-AS-SS-AS, at least when Snipe is up - though perhaps any dmg increase is offset by the cast time. Obviously I'm not running Assault, so maybe that helps on times. Any DB/Stones with other suggestions? Cheers,

-
Thanks. I like the slotting of Ablating and BF, good stuff. Couple of questions. - Does this build have enough recharge (142.5%) to run BF-AS-SS-AS? - Do you use Nimble Slash in your regular chain? - Do you use Zapp in your chain? (Both Nimble & Zapp seem to have been proc'd for use vs. set bonuses). - Is the Unbreakable +7.5% IO worth it if Earth's Embrace basically is perma and caps HP? Theoretically could pull it out and use the slot for a Kismet +Accuracy in a def power or CJ?
-
Good point. Got it down to 1.25-1.28 with Assault T4 left side and the BF-AS-SS-AS chain. Open to further suggestions to reach those mythical <1.15 times. Is it possilbe on /Stone (no /Bio)?
-
This is what I run, which basically was @Nemubuild at some point. He's the Fire/Elec master. Fire_Elec_Powerflare_blaster_Live.mxd
-
Build attached. I built for 45% soft-cap S/L/R -- if i had to do it again, I might drop those down to ~32% ish and replace Positronic Fist with a proc'd-out Positron Cell (excellent ST dmg when fully proc'd). Fist is just for lols really and for the set bonuses, I use it to apply the Gamma Ray effect (search the forums - it's like the mini-game in Atomic). For me, atomic thrives in melee due to Beta Decay. Attached my Water/Atomic for comparison ideas. InhumanTarget_Fire-Rad-Blaster_LIVE.mxd Blaster_-_Water_Blast_-_Atomic_Manipulationv4.mxd
-
I got a 1.42 time on the build below. T3 Musc Total Core, T4 Degen Core Flawless, T4 Assault Radial (b/c I heard double-hit is better dps for fast-attacking DB chain), T4 Ageless Radial. Chain was BF->SweepingStrike->Ablating, repeat ...with a tiny gap before BF is back up. I was running an SG Base attack speed buff and recovery buff. I still had endurance issues (with Maneuvers turned off) and had to pop 2 blues. I thought about not running Tough, to save end, but I think 1 pylon hit could floor me w/o it. Any tips on making a better time? I thought fast-chain DB would be da bomb with Brimstone (which can crit, btw - fun things i learned in combat logs). This Hero build was built using Mids Reborn 3.2.17 https://github.com/LoadedCamel/MidsReborn Click this DataLink to open the build! Ghost Blades: Level 50 Magic Scrapper Primary Power Set: Dual Blades Secondary Power Set: Stone Armor Power Pool: Leaping Power Pool: Speed Power Pool: Fighting Power Pool: Leadership Ancillary Pool: Mu Mastery Hero Profile: Level 1: Power Slice -- Empty(A) Level 1: Rock Armor -- LucoftheG-Def/Rchg+(A), LucoftheG-Def(3) Level 2: Ablating Strike -- Hct-Dam%(A), Hct-Dmg/EndRdx(5), Hct-Dmg/Rchg(7), Hct-Acc/Dmg/Rchg(7), Hct-Acc/Rchg(9), AchHee-ResDeb%(9) Level 4: Earth's Embrace -- Prv-EndRdx/Rchg(A), Prv-Heal/Rchg(11), Prv-Heal/EndRdx(11), Prv-Heal(13), Prv-Absorb%(13), Prv-Heal/Rchg/EndRdx(15) Level 6: Stone Skin -- UnbGrd-ResDam(A), UnbGrd-ResDam/EndRdx(15), ShlWal-ResDam/Re TP(17), ShlWal-Def(17), Ksm-Def/EndRdx(19), Ksm-ToHit+(50) Level 8: Blinding Feint -- SprBlsCol-Acc/Dmg(A), SprBlsCol-Dmg/EndRdx(19), Mk'Bit-Dam%(21), GldStr-%Dam(21), TchofDth-Dam%(23), SprCrtStr-Rchg/+50% Crit(23) Level 10: Combat Jumping -- LucoftheG-Def/Rchg+(A) Level 12: Super Speed -- Clr-EndRdx(A), Clr-RunSpd(25) Level 14: Hasten -- RechRdx-I(A) Level 16: Rooted -- Pnc-Heal/+End(A), Pnc-Heal/EndRedux(25), Pnc-EndRdx/Rchg(27), Pnc-Heal(27), Pnc-Heal/EndRedux/Rchg(29) Level 18: Typhoon's Edge -- Arm-Dmg(A), Arm-Dmg/Rchg(29), Arm-Acc/Dmg/Rchg(31), Arm-Acc/Rchg(31), Arm-Dmg/EndRdx(31) Level 20: Crystal Armor -- LucoftheG-Def/Rchg+(A), LucoftheG-Def/EndRdx(33), LucoftheG-Def(33), PrfShf-End%(33), PrfShf-EndMod(34) Level 22: Boxing -- Empty(A) Level 24: Tough -- StdPrt-ResDam/Def+(A) Level 26: Sweeping Strike -- SprAvl-Acc/Dmg(A), SprAvl-Dmg/EndRdx(34), Obl-%Dam(34), Erd-%Dam(36), Arm-Dam%(36), FuroftheG-ResDeb%(36) Level 28: Minerals -- LucoftheG-Def/Rchg+(A) Level 30: Weave -- Rct-Def(A), Rct-Def/Rchg(37), Rct-EndRdx/Rchg(37), Rct-Def/EndRdx(37), Rct-ResDam%(39), Rct-Def/EndRdx/Rchg(39) Level 32: Mud Pots -- SprScrStr-Dmg/Rchg(A), SprScrStr-Acc/Dmg(39), SprScrStr-Acc/Dmg/Rchg(40), SprScrStr-Dmg/EndRdx/Rchg(40), SprScrStr-Acc/Dmg/EndRdx/Rchg(40), SprScrStr-Rchg/+Crit(42) Level 35: Brimstone Armor -- GldArm-3defTpProc(A) Level 38: Zapp -- StnoftheM-Dam%(A), StnoftheM-Acc/Dmg(42), StnoftheM-Dmg/EndRdx(42), StnoftheM-Dmg/EndRdx/Rchg(43), StnoftheM-Dmg/ActRdx/Rchg(43) Level 41: Ball Lightning -- Rgn-Knock%(A), Rgn-Dmg/EndRdx(43), Rgn-Dmg/Rchg(45), Rgn-Acc/Dmg/Rchg(45), Rgn-Acc/Rchg(45) Level 44: Geode -- Pnc-Heal/EndRedux(A), Pnc-EndRdx/Rchg(46), Pnc-Heal/Rchg(46), Pnc-Heal/EndRedux/Rchg(46), Pnc-Heal(48) Level 47: Electric Shackles -- BslGaz-Acc/Rchg(A), BslGaz-Acc/Hold(48), BslGaz-Rchg/Hold(48), BslGaz-EndRdx/Rchg/Hold(50) Level 49: Maneuvers -- LucoftheG-Def/Rchg+(A), LucoftheG-Def/EndRdx(50) Level 1: Critical Hit Level 1: Brawl -- Empty(A) Level 1: Sprint -- Clr-Stlth(A) Level 2: Rest -- Empty(A) Level 1: Swift -- Empty(A) Level 1: Hurdle -- Empty(A) Level 1: Health -- NmnCnv-Regen/Rcvry+(A), Mrc-Rcvry+(3) Level 1: Stamina -- PrfShf-End%(A), PrfShf-EndMod(5) Level 12: Speed Phase Level 49: Quick Form Level 50: Musculature Core Paragon Level 50: Ageless Radial Epiphany Level 50: The Atlas Medallion Level 50: Task Force Commander Level 50: Portal Jockey Level 50: Freedom Phalanx Reserve ------------
-
Trapdoor Test Results - the other half of Pylon testing?
brasilgringo replied to Kanil's topic in Scrapper
. -
Arguably the best is Fire/Electric when built right, for the mitigation and +rchrg that /Elec provides. I have Fire/Atomic as well and it is more offensive, potentially, but loses in mitigation. Same for Fire/Fire from what i've read. Fire/Elec feels to me like the best trade-offs for mitigation w/o losing power. Using the constant KDs (to keep things in Rain of Fire, etc.) is so much fun.
-
xxxx
-
Unleash your mighty critique-powers upon my ss/rad/mu build! ヽ( ≧ω≦)ノ
brasilgringo replied to Smites's topic in Brute
Variations on the theme -
This Hero build was built using Mids Reborn 3.2.17 https://github.com/LoadedCamel/MidsReborn Click this DataLink to open the build! Level 50 Magic Sentinel Primary Power Set: Electrical Blast Secondary Power Set: Bio Armor Power Pool: Speed Power Pool: Leaping Power Pool: Fighting Ancillary Pool: Psionic Mastery Hero Profile: Level 1: Charged Bolts -- SprOppStr-Acc/Dmg(A), SprOppStr-Dmg/Rchg(3), SprOppStr-Acc/Dmg/Rchg(3), SprOppStr-Acc/Dmg/EndRdx(5), SprOppStr-Acc/Dmg/EndRdx/Rchg(5) Level 1: Hardened Carapace -- UnbGrd-ResDam(A), UnbGrd-ResDam/EndRdx(7), UnbGrd-Rchg/ResDam(7), UnbGrd-ResDam/EndRdx/Rchg(9), GldArm-3defTpProc(9) Level 2: Inexhaustible -- PwrTrns-EndMod(A), PwrTrns-+Heal(11) Level 4: Environmental Adaptation -- LucoftheG-Def/Rchg+(A), ShlWal-Def/EndRdx(11), ShlWal-Def/EndRdx/Rchg(13), ShlWal-Def(13), ShlWal-ResDam/Re TP(15), Rct-ResDam%(15) Level 6: Ball Lightning -- Ann-Acc/Dmg(A), Ann-Acc/Dmg/Rchg(17), Ann-ResDeb%(17), PstBls-Dam%(19), JvlVll-Dam%(19), Bmbdmt-+FireDmg(21) Level 8: Zapping Bolt -- Apc-Acc/Rchg(A), Apc-Dmg(21), Apc-Acc/Dmg/Rchg(23), Apc-Dmg/EndRdx(23), Apc-Dam%(25), GldJvl-Dam%(25) Level 10: Adaptation Level 12: Charge Up -- GssSynFr--Build%(A) Level 14: Tesla Cage -- GldJvl-Acc/Dmg(A), GldJvl-Dam%(27), NrnSht-Dam%(27), GhsWdwEmb-Dam%(29), GldNet-Dam%(29), SprOppStr-Rchg/+Opportunity(31) Level 16: Ablative Carapace -- Pnc-Heal/EndRedux(A), Pnc-EndRdx/Rchg(31), Pnc-Heal/Rchg(31), Pnc-Heal/EndRedux/Rchg(33), Pnc-Heal(33) Level 18: Voltaic Sentinel -- CaltoArm-Acc/Rchg(A), CaltoArm-Acc/Dmg(33), CaltoArm-Dmg/EndRdx(34), CaltoArm-Acc/Dmg/Rchg(34), CaltoArm-EndRdx/Dmg/Rchg(34) Level 20: Rebuild DNA -- Prv-Heal(A), Prv-Heal/EndRdx(36), Prv-EndRdx/Rchg(36), Prv-Heal/Rchg(36), Prv-Heal/Rchg/EndRdx(37), Prv-Absorb%(37) Level 22: Hasten -- RechRdx-I(A), RechRdx-I(37) Level 24: Combat Jumping -- LucoftheG-Def/Rchg+(A), Ksm-ToHit+(39) Level 26: Short Circuit -- OvrFrc-Acc/Dmg(A), OvrFrc-Dam/KB(48), Arm-Dam%(48), Obl-%Dam(50), Erd-%Dam(50), FuroftheG-ResDeb%(50) Level 28: Boxing -- Empty(A) Level 30: Super Speed -- WntGif-ResSlow(A) Level 32: Thunderous Blast -- SprSntWar-Acc/Dmg(A), SprSntWar-Dmg/Rchg(39), SprSntWar-Acc/Dmg/Rchg(39), SprSntWar-Acc/Dmg/EndRdx(40), SprSntWar-Acc/Dmg/EndRdx/Rchg(40), SprSntWar-Rchg/+Absorb(40) Level 35: Genomic Evolution -- UnbGrd-ResDam(A), UnbGrd-ResDam/EndRdx(42), UnbGrd-Rchg/ResDam(42), UnbGrd-Max HP%(42) Level 38: Mind Probe -- SprBlsCol-Acc/Dmg(A), SprBlsCol-Dmg/EndRdx(43), SprBlsCol-Acc/Dmg/EndRdx(43), SprBlsCol-Acc/Dmg/Rchg(43), SprBlsCol-Dmg/EndRdx/Acc/Rchg(45), SprBlsCol-Rchg/HoldProc(45) Level 41: Dominate -- GldJvl-Acc/Dmg(A), GldJvl-Dam%(45), NrnSht-Dam%(46), GhsWdwEmb-Dam%(46), UnbCns-Dam%(46), Dcm-Build%(48) Level 44: Parasitic Leech -- NmnCnv-Heal/Rchg(A) Level 47: Tough -- StdPrt-ResDam/Def+(A) Level 49: Weave -- LucoftheG-Def/Rchg+(A) Level 1: Opportunity Level 1: Brawl -- Empty(A) Level 1: Sprint -- Empty(A) Level 2: Rest -- Empty(A) Level 2: Swift -- Flight-I(A) Level 2: Hurdle -- Jump-I(A) Level 2: Health -- NmnCnv-Regen/Rcvry+(A) Level 2: Stamina -- PrfShf-End%(A) Level 30: Speed Phase Level 1: Prestige Power Dash -- Empty(A) Level 1: Prestige Power Slide -- Empty(A) Level 1: Prestige Power Quick -- Empty(A) Level 1: Prestige Power Rush -- Empty(A) Level 1: Prestige Power Surge -- Empty(A) Level 4: Ninja Run Level 50: Musculature Core Paragon Level 10: Defensive Adaptation Level 10: Efficient Adaptation Level 10: Offensive Adaptation Level 1: Shocked ------------
-
I posted a Master of Cones Dark/NRG build recently too.
-
Carni's Online Combat Parser
brasilgringo replied to Carnifax's topic in Tools, Utilities & Downloads
Thanks for tackling this. I didn't mean to come across as demand-y. I appreciate the hard work, and the tool is already pretty cool. (There's a Critical type damage that happens in Ninja blaster secondary, I think liked to Shinobi power, if that's useful to know). -
Carni's Online Combat Parser
brasilgringo replied to Carnifax's topic in Tools, Utilities & Downloads
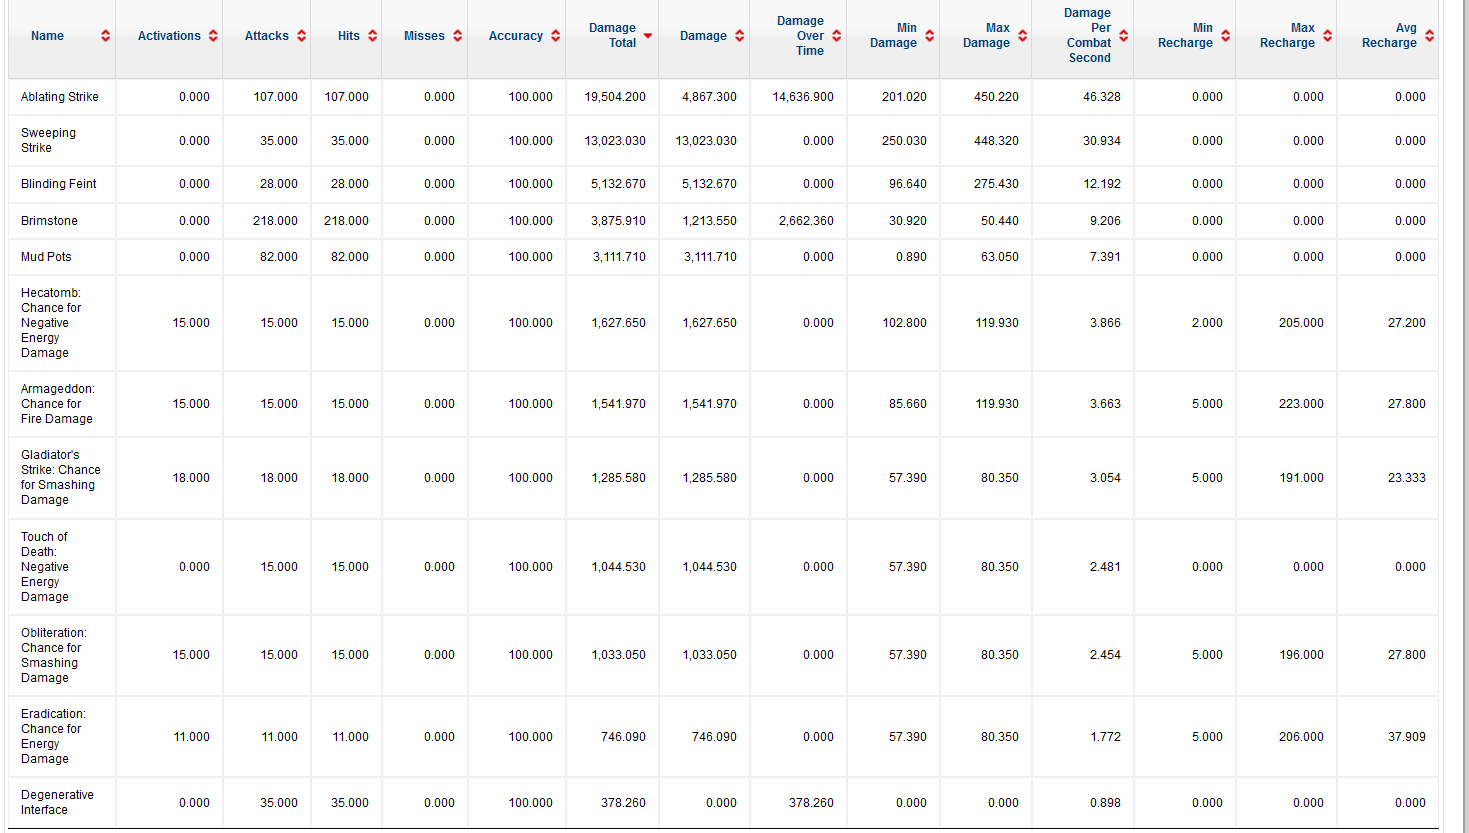
Maybe it's my lack of understanding, but the proc damage seems to show up separately and not related to the power the proc is in -- like in the table above there's "Positron's Blast - Chance for Energy" as its own item along with various powers. Is there a way to associate the proc damage to the power the proc was slotted in? I think it throws off things like 5-6 proc'd powers from the damage table/chart? -
Actually I don't think anyone has posted a better all-around build. Some people have better attack chains, etc., but afaik I've not seen a better all-around build. Maybe the resurrection of this post will lead some ppl to chip in.