The Beta Account Center is temporarily unavailable
×
We are experiencing intermittent network issues affecting Everlasting and Excelsior

Hopestar
-
Posts
223 -
Joined
-
Last visited
Content Type
Profiles
Forums
Events
Store
Articles
Patch Notes
Everything posted by Hopestar
-
@Troyusrex You're using AS the old way. The new way to play Stalker is to open from hide with your highest damaging non-AS attack then incorporate AS into your attack chain so that it doesn't get used from hide and because it's not used from hide it's fast. This is usually achieved by giving AS the Recharge/Chance to Hide Stalker ATO. It also has a mechanic where it will get increasingly higher chance to crit depending how many other Assassin's Focus-granting powers were used in a short time span, 33% -> 66% -> 100% chance. See Assassination here. For example, when using Street Justice, you would typically have an attack chain of: (From Hidden) Crushing Uppercut > Heavy Blow > Shin Breaker > Assassin's Strike > Sweeping Cross > Heavy Blow > Shin Breaker > Assassin's Strike > Crushing Uppercut > Heavy Blow > ... etc. This way your Assassin's Strike is always at 3 stacks of focus and is always fast (granted you never miss). EDIT: I just reread what @nihilii wrote and it's pretty much the same thing, sorry nihilii. Hopefully this is made up by being a bit more in-depth of a description.
-
Sadly there's no way in telling which are crits from the proc and which are not.
-
This game is way too buggy and missing tons of information so I'm unofficially going with "Yes there's a 10 second lockout time.*" *Tested against a custom character in AE and can't confirm it never procs under 10 seconds (chat logs are unreliable as it says "You enter a hidden state" every time I used AS), here's 2 instances of a crit under 10 seconds apart and it did this a total of 6 times out of 35 (Not reliable, but still possible.):
-
I don't see anything about it anywhere either, but it probably does have a lockout of 10 seconds as when I use it in my rotation (StJ as well) it only procs every other Strike. I haven't played my other stalkers in awhile, but I'll definitely test it when I get the chance. I usually just save the chat log for 100 attacks on a dummy and run a Find All in Notepad++, if someone else wants to beat me to it. 😛
-
@Nymaen I think I got the perfect build for you then. Lots of damage and mitigation all around with KD in Call Thugs, procs in Enforcer and Dual Wield, and perma Hasten and Chrono Shift. With Time's Juncture running, your Defenses should be effectively capped against any enemies in it's radius, so charging in with bodyguard mode should be fine as long as it's not Carnies, Frostfire, or the Dark Novas in ITF (others like Dwarf have Smashing with their Negative). Could fix those holes a bit with Rune of Protection, but it would still have a 30 second downtime even at 400% recharge, so I'd rather say, prioritize those targets so they're removed from the equation (for Carnies, just make sure you're lvl 50 and have Clarion incarnate running 😩). MM_Thugs_Time_Survival.mxd Villain Plan by Mids' Reborn : Hero Designer 2.7.2.10 https://github.com/Crytilis/mids-reborn-hero-designer Click this DataLink to open the build! Level 50 Technology Mastermind Primary Power Set: Thugs Secondary Power Set: Time Manipulation Power Pool: Sorcery Power Pool: Leadership Power Pool: Fighting Power Pool: Speed Ancillary Pool: Mu Mastery Villain Profile: Level 1: Call Thugs -- SprMarofS-Acc/Dmg/EndRdx:50(A), SprMarofS-Acc/EndRdx:50(3), ExpRnf-Dmg/EndRdx:50(3), ExpRnf-Acc/Dmg/Rchg:50(5), SlbAll-Build%:50(5), OvrFrc-Dam/KB:50(7) Level 1: Time Crawl -- TmpRdn-EndRdx/Rchg/Slow:50(A) Level 2: Temporal Mending -- Pnc-Heal/EndRedux:50(A), Pnc-EndRdx/Rchg:50(7), Pnc-Heal/Rchg:50(9), Pnc-Heal/EndRedux/Rchg:50(9), Pnc-Heal:50(11) Level 4: Time's Juncture -- DarWtcDsp-ToHitDeb:50(A), DarWtcDsp-ToHitdeb/Rchg/EndRdx:50(13), DarWtcDsp-Rchg/EndRdx:50(15), DarWtcDsp-ToHitDeb/EndRdx:50(15) Level 6: Equip Thugs -- EndRdx-I:50(A) Level 8: Mystic Flight -- WntGif-RunSpd/Jump/Fly/Rng/EndRdx:50(A), WntGif-ResSlow:50(17) Level 10: Temporal Selection -- Prv-Heal:50(A), Prv-Heal/EndRdx:50(13) Level 12: Call Enforcer -- SprMarofS-Acc/Dmg:50(A), SprMarofS-Dmg:50(17), AchHee-ResDeb%:20(19), TchofLadG-%Dam:50(19), GssSynFr--Build%:50(21), HO:Cyto(21) Level 14: Maneuvers -- LucoftheG-Def/Rchg+:50(A), LucoftheG-Def:50(23), LucoftheG-Def/EndRdx:50(23) Level 16: Distortion Field -- UnbCns-Hold:50(A), UnbCns-Hold/Rchg:50(25), UnbCns-Acc/Hold/Rchg:50(25), UnbCns-EndRdx/Hold:50(27), UnbCns-Dam%:50(27), Lck-%Hold:30(29) Level 18: Gang War -- SprCmmoft-Acc/Dmg/Rchg:50(A), SprCmmoft-Dmg/EndRdx/Rchg:50(29), SprCmmoft-Acc/Dmg/EndRdx/Rchg:50(31), SprCmmoft-Rchg/PetAoEDef:50(31), EdcoftheM-PetDef:40(31), CaltoArm-+Def(Pets):30(33) Level 20: Tactics -- AdjTrg-ToHit:50(A), AdjTrg-ToHit/Rchg:50(33), AdjTrg-ToHit/EndRdx/Rchg:50(33), AdjTrg-EndRdx/Rchg:50(34), AdjTrg-ToHit/EndRdx:50(34) Level 22: Boxing -- Empty(A) Level 24: Tough -- UnbGrd-ResDam:50(A), UnbGrd-ResDam/EndRdx:50(34), UnbGrd-Rchg/ResDam:50(36), UnbGrd-ResDam/EndRdx/Rchg:50(36), GldArm-3defTpProc:50(36) Level 26: Call Bruiser -- SprMarofS-Dmg/EndRdx:50(A), SprMarofS-EndRdx/+Resist/+Regen:50(37), ExpRnf-+Res(Pets):50(37), SvrRgh-PetResDam:50(37), SlbAll-Dmg:50(39), SlbAll-Acc/Dmg/Rchg:50(39) Level 28: Farsight -- LucoftheG-Def:50(A), LucoftheG-Def/EndRdx:50(39), LucoftheG-Def/Rchg:50(40), LucoftheG-Def/EndRdx/Rchg:50(40), LucoftheG-Def/Rchg+:50(40) Level 30: Hasten -- RechRdx-I:30(A), RechRdx-I:30(42) Level 32: Upgrade Equipment -- EndRdx-I:50(A) Level 35: Charged Armor -- UnbGrd-ResDam:50(A), UnbGrd-ResDam/EndRdx:50(42), UnbGrd-Rchg/ResDam:50(42), UnbGrd-Max HP%:50(43), StdPrt-ResDam/Def+:30(43) Level 38: Chrono Shift -- Prv-Heal/Rchg:50(A), Prv-Heal/Rchg/EndRdx:50(43), Prv-Heal:50(45), Prv-Heal/EndRdx:50(45), Prv-EndRdx/Rchg:50(45), Prv-Absorb%:50(46) Level 41: Electrifying Fences -- Rgn-Dmg:50(A), Rgn-Dmg/Rchg:50(46), Rgn-Acc/Dmg/Rchg:50(46), Rgn-Dmg/EndRdx:50(48), Rgn-Knock%:50(48) Level 44: Dual Wield -- Apc-Dmg:50(A), Apc-Dmg/EndRdx:50(48), Apc-Dam%:50(50), ExpStr-Dam%:20(50), GldJvl-Dam%:50(50) Level 47: Slowed Response -- AnlWkn-DefDeb/EndRdx/Rchg:50(A) Level 49: Vengeance -- LucoftheG-Def/Rchg+:50(A) Level 2: Swift -- Flight-I:50(A) Level 2: Health -- Pnc-Heal/+End:50(A), Mrc-Rcvry+:20(11) Level 2: Hurdle -- Jump-I:50(A) Level 2: Stamina -- PrfShf-End%:50(A) ------------

-
What are you trying to achieve with your build and what are the things you didn't like from the other? I see you have 30% S/L resistance over cap and only have 57.5% recharge; you also have SOs in places where you could use IOs and even Luck of the Gambler, nor using the +3 DEF or +5% RES IOs. Gang War is also not going to be up very often because of your recharge. The reason for procs on henchmen is to pull more damage and utility out of them than normal; Henchmen aren't affected by +Recharge so having tons of recharge won't make them proc any less. Procs in things like Health and Stamina are for recovery and regen, for example 1 Panacea in Health gives more +recovery than 2 endurance boosts in Stamina.
-
@qwy has a couple nice popmenus for base stuff.
-
Fearsome Stare, Heart of Darkness, and Dark Grasp are all pretty much mandatory for Dark. Fearsome provides some very welcome -tohit and fear, Heart is easily a permanent stun, and Grasp can hold bosses. Haunt is nice as an extra damage source and Fear in pets that can stay alive better than most. Umbral Beast is OK but tends to misuse it's powers like hitting 1 target with it's cone, Shadow Field is just unnecessary when you have Heart, and obviously Shadowy Binds is pointless if you have Living Shadows. Possess can be nice to have and the Very Rare Confuse set has different bonuses than most purples. So I guess the most skippable are the pets, Shadowy Binds (which you skipped), and Shadow Field. Haunt has Shadow Punch (83% of the damage of Shadow Punch as used by a /Dark Tanker and 4 second recharge) and Scare (a /Mental Blaster's version with 8 second recharge) if that helps your decision on them. As for Savage, really only Maiming and Unkindness are skippable, Unkindness can do some nice things with procs, but otherwise it's only mediocre with low damage for the cast time/recharge. I definitely wouldn't skip Vicious Slash or Rending Flurry, it's the best things to use after your Feral Charge and Call Hawk is just-under-snipe damage without the snipe issues. Unkindness and Call Hawk both scale with your stacks by a measly 1.3% so definitely spend your stacks on Rending before Hawk.
-
On the topic of dropping slots from Tough and Weave and exemplaring, those come much earlier than Frozen Armor and Hoarfrost and Barrier, thus helping you at lvl 20 and 25 taskforce content respectively, possibly even moving Spot Prey into 26 and pushing them both back 2 levels so you can have Tough AND Weave for lvl 20+. I would take slots out of Blood Craze first as it's mainly for global recharge which you can make up for in Call Hawk later. Also Frozen Armor is already hitting ED as is. As for Confuse and Mass Confusion, their slots are really interchangeable as there's good points for using those procs on either one.
-
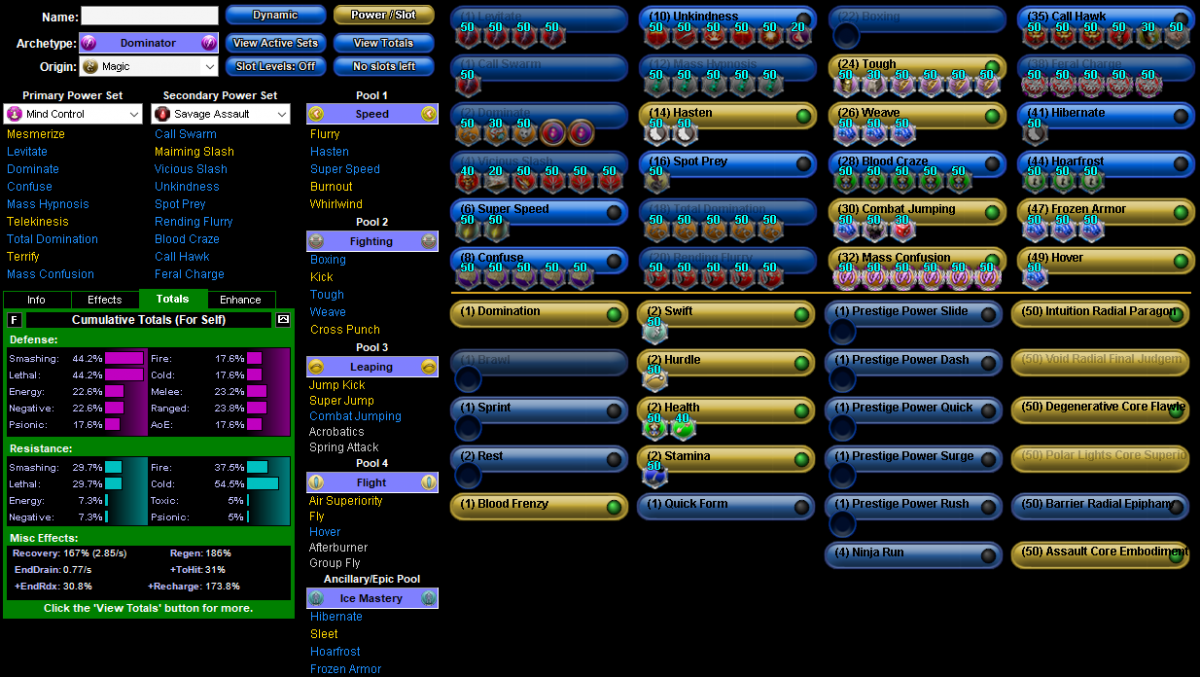
Since no one has posted one yet, if I were to build this, I'd do something like this: MindSavageIceDom.mxd The optimal ST attack chain would be Call Hawk -> Dominate -> Vicious -> Unkindness, for AoE you'd wanna do Unkindness -> Feral Charge -> Rending -> Call Hawk (Using stacks on Call Hawk really does almost nothing at all and is a waste compared to Rending) You can also do Unkindness -> Feral -> Rending -> Vicious if you want to use 5 stacks on Rending on a 2nd rotation. It's not the best defensively, but you're Mind, put things you can't handle to sleep then stun/confuse/destroy the rest and if you get in trouble you have Hibernate to fall back on. Nerve Radial is also a good Alpha choice.
-
They are and they work great at that, I just feel that control is something the primary should have and not be something you have to wait until lvl 35 for stopping enemies from running you down. Clearly some people are zealous and angry about other people adding anything that goes against their personal vision and going to add things I never implied or said, so I won't bother replying anymore in this topic as it will only spiral downhill as my words are left on deaf ears.
-
Let me make it clear and colorful. It's not just a damage problem, Offensive Opportunity does more than Defensive yet still almost nothing, it has the tiny health of a Blaster, and reduced amount of targets for seemingly no reason other than reducing the ability to contribute AoE like a Scrapper/Stalker. As you can see, it's only receiving the weaknesses of other ATs and no strength of it's own. The strength of a sentinel is being able to be mid-ranged and slightly more durable than a Blaster/Defender, so I ask you, is that really worth everything above? Also, being much better at ST than AoE, this seems to be the opposite of what Captain Powerhouse was going for. The lower damage would be acceptable if it did something unique like more AoE than ST and had some form of control somewhere to help you stay mid-range.
-
I ask myself the same question, why would I play a Sentinel when I can play Blaster which does more damage, can hit more targets with AoE, and is just as durable; Or a Stalker that can hit way harder, can be semi-ranged, and again is just as durable. Yes many classes can be compared the same way, but other than Kheldians, Sentinel is the only other AT with a barely functioning passive. To reiterate @Chronicler J, Sentinels with their current passive and target limitations have no role to perform. I daresay the HEATs do the same jack-of-all-trades job Sentinels currently do, but 10x better.
-
Yep, all the "sales" and "deals" recently have been overridden with "in stock" at MSRP because all the manufacturers are pretty behind thanks to Covid. For hot items, you have to watch them heavily or they'll be out of stock before you can even checkout. About the only things I've seen theres still sales for, because they're heavily in stock for some reason, is memory and hard drives.
-

June 27th Reverse Costume Contest + A fun announcement for CC's!
Hopestar replied to GM Miss's topic in Events & Contests
I'm pretty sure you're able to opt out of whatever you want to, no way they would force anything on you. Not to put words in anyone's mouth, but from previous experience, GM Miss is usually in charge of giving out the rewards and is very much willing to work with you. -
You're comparing a Defender to an MM... And no, I read the entire thread first before replying, thank you very much. Just because you aren't running out of end doesn't represent everyone. "If you're spamming" This is almost the entire point of Elec Affinity, spam everything it has, there's a reason everything is so low cooldown, to keep stacks, you can't build 16+ stacks without spamming your powers. I don't understand your meaning "forcing toggles" is this forcing to include toggles in the endurance cost? I would post a video but I don't have the power to do so at 30 fps. Run CoH or run something else, such is the life of a potato computer, and right now it's particularly expensive to build a new one...
-
For me, using Discharge -> Rejuvenating -> Insulating -> Empowering -> Shock -> Energizing is 6.1 EPS, and while you don't spam Empowering or Shock and only need to use Discharge twice per group, substitute those for Crack and Lash and you spend about the same amount. And this is without having to spend 10 on moving the shield (bringing it up to 6.5 EPS) when your team moves. IF you have a slow team that can already take a beating, then yes, you don't have to worry about endurance.
-
Even with a full set IO'd out build, both my Demons/Elec and Beasts/Dark use a TON of endurance that I have to be super careful about. For Demons/Elec, before even using whip attacks, the End cost for keeping everyone healed, absorbed, and moving my shield with the group is just barely not made up for by the +45-55% (depending on if Perf Shifter procs) endurance I get from a super min-maxed Energizing Circuit, so I often have to slow my buffing. If I want to use Whip? Well the team better hope they don't break through the absorbs I'm spamming because I can't afford to heal AND attack. Thus I only attack hard targets like Elite Bosses and above. For Beasts/Dark, it's the same, Call Hawk + everything in Dark is unsustainable because it not only lost it's +recovery power for MM's crappy Hold, but increased the cost of everything and just having the toggles for dark on alone (with ~ 59% end reduction!) still costs 0.9 end/s not to mention summoning my servant or using howling twilight STILL costs 22 endurance EACH with tons of end reduction in them, so goodbye chunks of endurance while I wait 21 seconds (not an exaggeration, that's literally how long it takes, with Panacea, Perf Shift, Miracle) to get that back, not counting using any other powers or any other toggles like Maneuvers or Tough. Sorry but "even with just normal IO's, your end is going nowhere depending on sets" is not my experience and I like to believe I know how to make a half decent build. You must be standing around using passive abilities or using a Time or Kinetic both of which can recover vast amounts of endurance and shouldn't really be considered for that reason alone.
-
Yeah you should probably watch out for it even though it technically should snap to you if it hits the edge of your Supremacy range, but if anything it should stay in your circle more since Tenebrous Tentacles would be at 56 range from 40 and I'm pretty sure they made it so pets don't target outside of 100 range from you (poor pointless Merc sniper range).
-
Both heals are 6 slotted with what? I'd 6 slot 1 with Preventative Medicine and 5 slot the other with Panacea (all but the proc which I would hope is in Health) 4 Cloud Senses is a good idea, same with Acc/Dam, but listen to something crazy. What about adding 2 Dam/Range HOs for 80 range cones? Level 1: Zombie Horde -- SprMarofS-Dmg/EndRdx(A), SprMarofS-Acc/EndRdx(3), SprCmmoft-Acc/Dmg(3), SprCmmoft-Acc/Dmg/EndRdx/Rchg(5), SprCmmoft-Dmg/EndRdx/Rchg(5), SprCmmoft-Rchg/PetAoEDef(7) Level 12: Grave Knight -- SprMarofS-Dmg(A), SprMarofS-Acc/Dmg(13), TchofLadG-%Dam(13), ShlBrk-%Dam(15), SlbAll-Acc/Dmg/Rchg(15), Level 18: Soul Extraction -- SprMarofS-Acc/Dmg/EndRdx(A), SprMarofS-EndRdx/+Resist/+Regen(19), EdcoftheM-PetDef(19), SvrRgh-PetResDam(21), ExpRnf-+Res(Pets)(21), CaltoArm-+Def(Pets)(23) Level 26: Lich -- CldSns-ToHitDeb(A), CldSns-Acc/ToHitDeb(27), CldSns-ToHitDeb/EndRdx/Rchg(27), CldSns-%Dam(29), HO:Centri(29), HO:Centri(31) As for incarnates: Alpha: Intuition/Musculature Radial/Cardiac Core > Resilient Core > Spiritual Radial/Vigor Core > Everything else, it comes down to what you want, more damage, higher resist shield, or healing. Judgement: Whatever you want for flavor. Pyronic Core will do the most damage, Ion will hit the most targets, and the others are just fun to use. Lore: Again, choose for flavor. Interface: Degen Core or Reactive Radial are the best 2, but they'll all work for minions since you have a lot more hits going on than any other AT. Destiny: Lacking any and all protections for yourself, Clarion is an excellent choice, or Barrier if you want to chance just not getting hit by mez in the first place. Hybrid: Assault Radial (You have to have it going before you summon) or Support Core (use it any time).
-
Can you help an MM newbie decide on a his powersets?
Hopestar replied to Damoklese's topic in Mastermind
No but you can heal, absorb, and refresh endurance for an entire League with it and the maximum it lowers is 5 targets, any more targets is still the same number as if healing/absorb/+end'ing 5. While Nature can definitely outheal and outbuff EA, EA restores way more endurance and gives 125% recharge, debuffs more, gives protections, a 20' AoE revive for your silly blappers, and can keep a similar (40% - 30% approximately depending on your spot in the chain, Nature is 45% with 5 stacks) absorb shield at all times and quickly refreshable resulting in exponentially more damage absorbable, effectively never needing to heal. The biggest downside is that the absorb is much later in levels than Nature. Nature is not "far tankier" than EA, it can just heal more, EA has higher, quickly refreshable Absorb and it's +Res is easier to keep on your team without depending on them to group up as they can see if they're shielded or not. Some issues with those listed: It also has an AoE damage debuff that also drains a chunk of endurance. The chain heal doesn't only heal your pets, btw, it chains through whatever you target first (pets or players), then goes to everything else. The absorb shield is not small, but it is dependent on the target's maximum health, like all absorbs, so tankier henchmen will benefit from it more (hello Bots). 2 casts of Discharge can sap 100% of end from a group if enhanced. Both are excellent sets that are very survivable with pretty much the same ability to keep your team alive. Nature does excel at low level exemp'ing in comparison with it's absorb being 15 levels sooner though it can buff team damage sooner. (Something I think could use swapping personally.) I'm really not sure why they gave a ST +Special to allies only, putting support in your support while you support your supports. -
The reason you increase the chance of Force Feedback procing is because AOEs can hit multiple targets, so the more potential targets the greater the chance, exponentially making the bad chance (because of {AreaMod < 1} decreasing it) better. Normally this is not so great for procs, but for FF as long as you hit at least one target, the proc succeeded in it's job.
-
For a ST chain I use Unkindness -> Vicious Slash -> Call Hawk, Vicious and Hawk do crazy damage and Unkindness with -Res only boosts that further, something like 300 DPS. Call Swarm replaces Vicious if I need to range (for stuff like Warwolves running around and flyers). Haunt does some really good damage as well so I think you're missing out not using that @Nightmarer. @FallenDice As an alternative to S/L defense cap, you can get 27% defense to everything (or 20 if you want to also depend on Heart of Darkness) and you'll be practically capped after Fearsome Stare, then focus on Resistances. This is what I did and got 70% S/L, 50% energy resists.
-
Disclaimer: I haven't played it, just adapted my Dark/Dark to Stone/Dark, but I gotta go make it now 😁 This seems insanely fun with Quicksand, Perma Earthquake, Perma Stalagmites with Gather Shadows with nearly the same recharge time, and near perma Hasten and Volcanic Gasses (not that it matters because what group is gonna take more than 60 seconds). Between Earthquake and Engulfing Darkness -tohit, your melee and ranged defense should function as if it's capped, but that shouldn't even bother you since there's so much CC here enemies will have a hard time even attacking you in the first place. Moonbeam > Midnight > Smite > Gloom > Smite :: over 200 DPS for about 4 energy per second for your single target is sustainable thanks to Power Sink + Domination (or maybe just Domination, I haven't thought of stress testing this until now) AoE damage is only Engulfing and Earthquake, so that's not great, but hey tons of crowd control. Villain Plan by Mids' Reborn : Hero Designer 2.7.2.10 https://github.com/Crytilis/mids-reborn-hero-designer Click this DataLink to open the build! Level 50 Natural Dominator Primary Power Set: Earth Control Secondary Power Set: Dark Assault Power Pool: Speed Power Pool: Fighting Power Pool: Flight Power Pool: Concealment Ancillary Pool: Mu Mastery Villain Profile: Level 1: Fossilize -- SprAscoft-Conf/Hold/Immob/Sleep/Stun/Fear/Rchg(A), SprAscoft-Acc/Conf/Hold/Immob/Sleep/Stun/Fear(3), SprAscoft-EndRdx/Rchg(3), SprAscoft-Acc/Conf/Hold/Immob/Sleep/Stun/Fear/EndRdx(5), SprAscoft-Acc/Conf/Hold/Immob/Sleep/Stun/Fear/EndRdx/Rchg(5), SprAscoft-Rchg/+Dmg%(7) Level 1: Dark Blast -- Empty(A) Level 2: Smite -- Hct-Dmg/Rchg(A), Hct-Acc/Rchg(7), Hct-Acc/Dmg/Rchg(9), Hct-Dmg/EndRdx(9), Hct-Dam%(11), TchofDth-Dam%(11) Level 4: Super Speed -- Clr-Stlth(A) Level 6: Quicksand -- PcnoftheT-Acc/Slow(A), PcnoftheT-Rng/Slow(13), PcnoftheT-Acc/EndRdx(15), PcnoftheT-EndRdx/Rchg/Slow(15), PcnoftheT--Rchg%(17) Level 8: Hasten -- RechRdx-I(A), RechRdx-I(17) Level 10: Boxing -- Empty(A) Level 12: Gloom -- Apc-Dmg(A), Apc-Acc/Dmg/Rchg(19), Apc-Acc/Rchg(19), Apc-Dmg/EndRdx(21), Apc-Dam%(21) Level 14: Tough -- UnbGrd-ResDam(A), UnbGrd-ResDam/EndRdx(23), UnbGrd-Max HP%(23), UnbGrd-ResDam/EndRdx/Rchg(25), StdPrt-ResDam/Def+(25), GldArm-3defTpProc(27) Level 16: Gather Shadows -- RechRdx-I(A) Level 18: Weave -- LucoftheG-Def/Rchg+(A), LucoftheG-Def(27), LucoftheG-Def/EndRdx(29), Ksm-ToHit+(29) Level 20: Earthquake -- AchHee-ResDeb%(A), TchofLadG-%Dam(31), ExpStr-Dam%(31), DmpSpr-Rchg/EndRdx(31), DmpSpr-ToHitDeb/Rchg(33), DmpSpr-ToHitDeb/Rchg/EndRdx(33) Level 22: Engulfing Darkness -- Arm-Dmg(A), Arm-Dmg/Rchg(33), Arm-Acc/Dmg/Rchg(34), Arm-Acc/Rchg(34), Arm-Dmg/EndRdx(34), ToHitDeb-I(36) Level 24: Stalagmites -- Stp-Acc/Rchg(A), Stp-EndRdx/Stun(36), Stp-Acc/EndRdx(36), Stp-Stun/Rng(37), Stp-Acc/Stun/Rchg(37) Level 26: Volcanic Gasses -- UnbCns-Hold/Rchg(A), UnbCns-Acc/Hold/Rchg(37), UnbCns-Acc/Rchg(39), UnbCns-EndRdx/Hold(39), UnbCns-Dam%(39) Level 28: Hover -- LucoftheG-Def/Rchg+(A) Level 30: Life Drain -- TchoftheN-Acc/EndRdx/Heal/HP/Regen(A), TchoftheN-Acc/Heal(40), TchoftheN-Heal/HP/Regen/Rchg(40), ThfofEss-+End%(40), TchoftheN-%Dam(42) Level 32: Stealth -- LucoftheG-Def/Rchg+(A), ShlWal-ResDam/Re TP(42) Level 35: Animate Stone -- ExpRnf-Acc/Rchg(A), ExpRnf-Acc/Dmg(42), ExpRnf-Dmg/EndRdx(43), ExpRnf-Acc/Dmg/Rchg(43) Level 38: Moon Beam -- StnoftheM-Acc/Dmg(A), StnoftheM-Dmg/EndRdx(43), StnoftheM-Dmg/ActRdx/Rchg(45), StnoftheM-Dmg/EndRdx/Rchg(45), StnoftheM-Dam%(45), CldSns-%Dam(46) Level 41: Midnight Grasp -- CrsImp-Acc/Dmg(A), CrsImp-Dmg/EndRdx(46), Mk'Bit-Acc/Dmg(46), Mk'Bit-Dam%(48), TchofDth-Dam%(48), CldSns-%Dam(48) Level 44: Charged Armor -- UnbGrd-ResDam(A), UnbGrd-ResDam/EndRdx(50), UnbGrd-ResDam/EndRdx/Rchg(50), UnbGrd-Rchg/ResDam(50) Level 47: Power Sink -- EffAdp-EndMod/Rchg(A) Level 49: Invisibility -- LucoftheG-Def/Rchg+(A) Level 1: Brawl -- Empty(A) Level 1: Domination Level 1: Quick Form Level 1: Prestige Power Dash -- Empty(A) Level 1: Prestige Power Slide -- Empty(A) Level 1: Prestige Power Quick -- Empty(A) Level 1: Prestige Power Rush -- Empty(A) Level 1: Prestige Power Surge -- Empty(A) Level 1: Sprint -- Empty(A) Level 2: Rest -- Empty(A) Level 4: Ninja Run Level 2: Swift -- Run-I(A) Level 2: Health -- Pnc-Heal/+End(A), Mrc-Rcvry+(13) Level 2: Hurdle -- Jump-I(A) Level 2: Stamina -- PrfShf-End%(A) Level 50: Assault Core Embodiment Level 50: Void Radial Final Judgement Level 50: Degenerative Radial Flawless Interface Level 50: Banished Pantheon Core Superior Ally Level 50: Barrier Core Epiphany Level 50: Intuition Radial Paragon ------------
-
Sacho's build is pretty good, I looked it over and did some changes myself, still capped on S/L def, but added more resist and energy defense, rearranged the ATOs and added a missing pet resist aura. Villain Plan by Mids' Reborn : Hero Designer 2.7.2.10 https://github.com/Crytilis/mids-reborn-hero-designer Click this DataLink to open the build! Level 50 Magic Mastermind Primary Power Set: Thugs Secondary Power Set: Nature Affinity Power Pool: Leadership Power Pool: Fighting Power Pool: Leaping Power Pool: Speed Ancillary Pool: Mace Mastery Villain Profile: Level 1: Call Thugs -- SprCmmoft-Acc/Dmg(A), SprMarofS-Acc/EndRdx(3), SprMarofS-EndRdx/+Resist/+Regen(3), SprCmmoft-Dmg/EndRdx(5), ExpStr-Dam%(5), OvrFrc-Dam/KB(7) Level 1: Corrosive Enzymes -- Acc-I(A) Level 2: Regrowth -- Pnc-Heal/+End(A), Prv-Heal/EndRdx(7), Prv-Heal(9) Level 4: Wild Growth -- UnbGrd-ResDam(A), UnbGrd-Rchg/ResDam(11), UnbGrd-ResDam/EndRdx/Rchg(13), UnbGrd-Max HP%(13), StdPrt-ResDam/Def+(15) Level 6: Equip Thugs -- EndRdx-I(A) Level 8: Maneuvers -- Rct-ResDam%(A), Rct-Def(15), Rct-Def/EndRdx(17), Ksm-ToHit+(17), LucoftheG-Def/Rchg+(19) Level 10: Spore Cloud -- DarWtcDsp-ToHitdeb/Rchg/EndRdx(A), DarWtcDsp-ToHitDeb/EndRdx(19) Level 12: Call Enforcer -- SprMarofS-Dmg(A), SprMarofS-Acc/Dmg(21), HO:Cyto(21), TchofLadG-%Dam(23), AchHee-ResDeb%(23), ShlBrk-%Dam(25) Level 14: Tactics -- GssSynFr--ToHit/EndRdx(A), GssSynFr--ToHit/Rchg/EndRdx(25), GssSynFr--Build%(27) Level 16: Boxing -- Empty(A) Level 18: Gang War -- SprCmmoft-Dmg/EndRdx/Rchg(A), SprCmmoft-Rchg/PetAoEDef(27), SprCmmoft-Acc/Dmg/Rchg(29), SprCmmoft-Acc/Dmg/EndRdx/Rchg(29), EdcoftheM-PetDef(31), SvrRgh-PetResDam(31) Level 20: Wild Bastion -- Pnc-Heal/EndRedux(A), Pnc-Heal/Rchg(31), Pnc-Heal(33), Pnc-EndRdx/Rchg(33), Pnc-Heal/EndRedux/Rchg(33) Level 22: Tough -- GldArm-3defTpProc(A), GldArm-End/Res(34), GldArm-ResDam(34), TtnCtn-ResDam/EndRdx(34), TtnCtn-ResDam/EndRdx/Rchg(36) Level 24: Cross Punch -- FuroftheG-ResDeb%(A), FuroftheG-Acc/Dmg(36), Arm-Dam%(36), Obl-%Dam(37), ExpStr-Dam%(37), FrcFdb-Rechg%(37) Level 26: Combat Jumping -- BlsoftheZ-ResKB(A), LucoftheG-Def/Rchg+(39), LucoftheG-Def(39) Level 28: Call Bruiser -- CaltoArm-+Def(Pets)(A), SprMarofS-Acc/Dmg/EndRdx(39), SprMarofS-Dmg/EndRdx(40), SlbAll-Acc/Dmg/Rchg(40), SlbAll-Build%(40), ExpRnf-+Res(Pets)(42) Level 30: Weave -- LucoftheG-Def/Rchg+(A), LucoftheG-Def(42), LucoftheG-Def/EndRdx(42) Level 32: Upgrade Equipment -- EndRdx-I(A) Level 35: Dual Wield -- Apc-Dam%(A), GldJvl-Dam%(43), Apc-Dmg(43), ExpStr-Dam%(43), FrcFdb-Rechg%(45) Level 38: Overgrowth -- AdjTrg-Rchg(A), AdjTrg-ToHit(45), AdjTrg-ToHit/EndRdx/Rchg(45), AdjTrg-ToHit/Rchg(46), AdjTrg-EndRdx/Rchg(46), AdjTrg-ToHit/EndRdx(46) Level 41: Rebirth -- Prv-Absorb%(A), Prv-Heal/Rchg/EndRdx(48), Prv-Heal/Rchg(50) Level 44: Scorpion Shield -- LucoftheG-Def/Rchg+(A), LucoftheG-Def/EndRdx(48), LucoftheG-Def(48), ShlWal-ResDam/Re TP(50) Level 47: Hasten -- RechRdx-I(A), RechRdx-I(50) Level 49: Kick -- Empty(A) Level 1: Brawl -- Empty(A) Level 1: Prestige Power Dash -- Empty(A) Level 1: Prestige Power Slide -- Empty(A) Level 1: Prestige Power Quick -- Empty(A) Level 1: Prestige Power Rush -- Empty(A) Level 1: Prestige Power Surge -- Empty(A) Level 1: Sprint -- Empty(A) Level 1: Supremacy Level 2: Rest -- Empty(A) Level 4: Ninja Run Level 2: Swift -- Run-I(A) Level 2: Health -- NmnCnv-Regen/Rcvry+(A), Mrc-Rcvry+(9) Level 2: Hurdle -- Jump-I(A) Level 2: Stamina -- PrfShf-End%(A), PrfShf-EndMod(11) Level 50: Clarion Radial Epiphany Level 1: Punk Level 1: Arsonist Level 28: Bruiser Level 12: Enforcer Level 50: Musculature Core Paragon Level 0: Maneuvers ------------